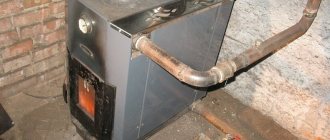
In kitchen fires or stoves, only a small portion of the thermal energy released by the fuel is used for cooking. The rest of the heat is spent on heating the brickwork of the slab. In the short chimneys of kitchen stoves, little heat is absorbed; most of it is lost in the pipe with exhaust flue gases and enters the atmosphere. Therefore, to avoid heat loss, stoves are connected to the heating panels.
The heating panel is a small attached wall with smoke vents inside. Most often, heating panels are heated by gases escaping from the kitchen stove and do not have an independent firebox. In this case, the shields cannot generate a large amount of heat. Designs of shields with their own small fireboxes were developed. They are convenient because they can be heated independently of the stove.
Shields are most often laid out thick-walled, half-brick, which require good heating and are justified when the stove operates for a long time. In addition, they are less dangerous in terms of fire. There are (much less often) thin-walled shields with walls a quarter of a brick thick. They work satisfactorily. For fire safety purposes, such shields are best made in metal casings.
The surfaces of the shields are covered with tiles (only during the process of laying the shield), plastered or simply left brick.
Shields can work in summer and winter versions. In the first case, only one part of the shield is heated, in the second - the entire shield. The panels must be laid on a solid foundation, with mandatory installation of waterproofing and strict adherence to fire safety.
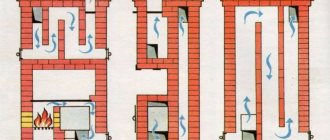
There are a lot of shield designs. They come with low and high heat transfer. Figure 56 shows a kitchen stove 5 with a heating panel 4, a smoke valve 3 placed in the chimney pipe, partitions (walls) 2, a brick cut 1 placed between the panel and the partitions, the thickness of which must be at least 25 cm. This panel is always heated hot gases escaping from the stove.
Rice. 56. Kitchen stove with a constantly heated heating panel: 1 - brick cutting; 2 - partitions (walls); 3 - smoke valve; 4 — shield; 5 - plate
In a shield of a different design (Fig. 57), all smoke valves are located at the top. Valve 3 shows the winter flow of gases, valve 2 shows the summer flow. Flue gases can be directed directly into the chimney (open valve 2 and close valve 3). If you close valve 2 and open valve 3, the gases will flow into the smoke circuits of the shield. Passing through the channels, they give off some of the heat to the walls and, cooled, go into the pipe.
Rice. 57. Heating panel with two strokes: winter and summer
A stove with a heating panel with summer and winter operation is shown in Figure 58.
Rice. 58. Section of the panel with valves located at the top and bottom: 1 - cast iron flooring (stove) with two burners; 2 — shield; 3 - smoke valve in the pipe; 4, 5 - valves for regulating the movement of gases in summer and winter
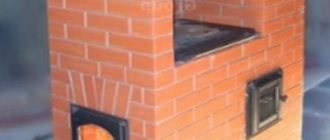
Thick-walled shield
The heating panel (Fig. 59) has dimensions: length - 890 mm, width - 380 and height - 2240 mm. Heat transfer with one firebox per day is 430 kcal/h, with two fireboxes per day - 600 kcal/h. Weight - 1210 kg. The front surfaces are plastered.
Rice. 59. Thick-walled heating panel: 1 - connection points for the kitchen stove; 2 - cleaning; 3 - waterproofing; 4 - samovar; 5 - ventilation grille with valve
The movement of hot gases in the shield is controlled by three smoke valves. In the warm season, valves No. 1 and No. 3 are open and gases are directly directed into the pipe. In the cold season, valve No. 3 is closed, and valves No. 1 and No. 2 are left open. In this case, hot gases, passing the entire chimney of the shield, heat it. In the mounted pipe for ventilation of the room, a ventilation duct is installed, closed by a grille with valves (blinds), which makes it possible to either keep the grille open, or partially cover it, or completely close it.
Materials: ordinary brick - 309 pieces; ordinary clay - 6 buckets; sand - 3-4 buckets; three smoke valves - 130×130 mm; three cleaning doors 130×140, one of them for a samovar; ventilation grille with valve - 150-200 mm; roofing felt for waterproofing - 1.5 m.
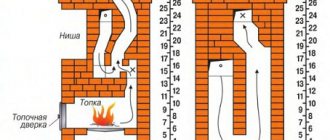
The foundation for the shield is erected two rows of brickwork below the floor level. A row of brickwork is placed on it, along which waterproofing is laid, the figure of the stove is marked and a second row of brickwork is laid, which reaches the level of the finished floor. Then lay out the shield.
The first row is made of whole brick.
The fourth row is placed as shown in the order, with two cleanings installed, leaving a space or window for connection to the stove panel.
The fifth row is placed like the fourth, but only with ligation of the seams.
The sixth row is placed so as to leave two channels with overlapping cleaning and space for the kitchen stove.
The seventh row, as well as other odd rows up to the twenty-fifth, are placed as shown in the order, forming three channels.
The eighth row and other even rows up to the twenty-sixth are placed according to the order.
The tenth, eleventh, seventeenth, twenty-third and twenty-fourth rows are similar to the previous ones, but for reliable dressing of the seams, the laying is done differently.
The eighteenth row is placed like the tenth and twenty-fourth, and valve No. 2 is placed on the channel on the right side.
Rows twenty-one and twenty-two are placed with the installation of a samovar.
The twenty-seventh row is placed so that the two channels on the left side are combined into one. The samovar is covered in the same row.
In the twenty-eighth row, valve No. 3 is installed. The twenty-ninth row is placed according to the order. It is similar to the previous row only with careful bandaging of the seams.
In the thirtieth row, the channel is blocked on the left side, and valve No. 1 is installed on the right.
The thirty-first and thirty-second rows are performed in compliance with the dressing of the seams. From the order it is clear that the top of the shield (roof) is laid in three rows, which meets fire safety requirements.
The thirty-third to thirty-sixth rows are laid as shown. In the thirty-sixth row, ventilation and smoke ducts remain.
Lightweight shield
The heating panel is in a metal frame, lined with asbestos plywood or metal sheets (Fig. 60). The facing sheets are cut out in advance strictly according to templates in accordance with the dimensions of the oven walls and with all the required openings for doors and cleaning.
Rice. 60. Heating panel of lightweight construction in a metal frame, lined with asbestos plywood: 1 - pipe; 2 — place of connection of the plate to the shield; 3 - cleaning; 4 - valve; 5 — samovar
According to the outer frame, the shield has dimensions: length - 730 mm, width - 340 and height - 1930 mm.
Heat transfer depends on how the shield is connected to the stove. Weight - 650 kg. The shield is installed on a solid floor. The frame is designed in such a way that there are 65 mm high legs at the bottom, providing good ventilation of the lower part of the shield. The masonry is made of ordinary brick on an edge or in a quarter of a brick.
Materials: ordinary brick - 141 pieces; clay - 2.5 buckets; sand - 2.5 buckets; three smoke valves - 130x130 mm; three doors - 130x130 mm; roofing steel pipe with a diameter of 150 mm and a length of 150 mm, needed to connect the shield to a pipe or stove. After installing the pipe, it is lined with brick. A roofing steel sleeve is put on the pipe to remove smoke into the chimney. Frame - set 730x340x1930 mm, lined with asbestos plywood or metal sheets. It is made of angle steel 30×30×4 mm - 12 linear. m, from asbestos plywood 5 mm thick - 4 sq. m.
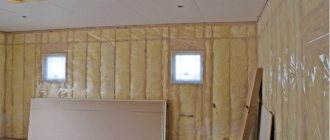
The laying is carried out in the following sequence. First, install the frame of the furnace or shield, which has a welded frame at the bottom made of steel angle 30 × 30 × 5 mm. If a stove or panel is erected on a wooden floor, then the latter is pre-prepared by laying two layers of felt soaked in a clay solution, or on asbestos, covered with sheet steel on top.
The frame must rest firmly on the prepared base with all four legs and be strictly vertical. Having installed and verified the frame, lay the bottom row of facing sheets (asbestos plywood or steel) and begin laying. Previously, corners are welded or riveted to the lower part of the frame to the four corner metal posts, on which a sheet of roofing steel or an asbestos-cement slab is then placed to serve as the base. A layer of felt is laid on this base, and the first row of bricks is placed flat on it. We remind you that if the floor is fireproof, then you can install the stove or panel directly on the floor. Having laid out the floor, the masonry is brought up to the level of the first row of cladding, that is, to a height of 625 mm.
Disclaimer
It’s worth mentioning right away: the author is not an experienced stove maker.
The purpose of writing this article is to introduce the owners of country houses to a new concept, a way to dramatically increase the efficiency of a conventional Shvedka-type heating and cooking stove and make their home warmer at minimal cost. Judging by the information dug up during the writing of the article, these are very friendly and helpful people, which is not typical for the RuNet. You can receive an accurate and comprehensive answer to a specific question asked in the forum.
They will be happy to tell you the details of how heating panels are installed - the order, the size of the panel specifically for your home, the recommended type of panel and the thickness of its walls. The reason that discussion of any topic does not turn into throwing banana peels at each other is simple: stove makers are mature, experienced people. Finding out which of them is wiser and more experienced is simply not interesting to them.
Participants in furnace forums are, as a rule, middle-aged and sensible people who willingly share their knowledge.
Conclusion
The role played by the brick shield is very important. This device allows you to increase the efficiency of stove heating when operating stoves of various types:
- iron stove-fireplace;
- stone oven;
- a simple potbelly stove, the efficiency of which usually does not exceed 30-40%.
When using a brick wall with air ducts inside, you have the opportunity to reduce wood consumption several times, ensuring proper heating in the room.
If for various reasons you were interested in the nuances of the stove business, then you probably came across such a concept as a brick heating panel. It is not always possible to understand from the name what kind of building it is and what purpose it is intended for. You can find answers to these and other questions in this article; the varieties of such brick structures will also be described here. For those who want to lay them out with their own hands, we will present some diagrams of heating panels and give a number of useful recommendations for their construction.
What devices is the shield used for?
The two most common situations are:
- Purchase of a metal stove, which is also a fireplace.
- Using a brick cooker.
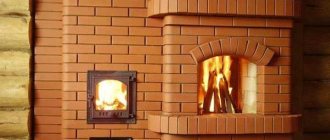
Also, a brick panel is in demand among residents of country houses in which Swedish Zhirnov stoves are installed. Outwardly, they resemble a fireplace, but structurally they consist of a firebox and a hob: most of the heat is spent on heating, a small part - on cooking.
Fehringer ovens are also in most cases equipped with a brick wall, which increases their productivity.
If the heating panel for a metal stove or brick stove is not used, then the heat obtained from the combustion of fuel literally flies out into the chimney. And if it is present, the heat is retained, which allows you to warm the room.
Stove with panel for space heating
The heat shield, which looks like a thick brick wall, can be compared to a gas-air heat exchanger, which is attached to any furnace in order to increase its operating efficiency. Gas flows, under the influence of chimney draft, move through vertical and horizontal channels inside the wall.
The operating principle of this device is based on heat extraction from flue gases. As a result, the brick structure heats itself and then heats the air in the room. Due to the heat capacity of the material, the wall cools down for a long time and continues to give off heat after the fuel burns out.
As a rule, the shield is not equipped with its own combustion chamber, playing the role of only an additional element. But sometimes the design provides for the presence of a firebox.
Disadvantages of metal cooking stoves and how to fix them
- The compact dimensions of metal stoves also have a drawback - the air heat exchange surface is too small.
- In addition, gaseous combustion products have a very high temperature - from +300° degrees or more. Therefore, you have to think about fire safety and thermally insulate the chimney.
- As is known, the efficiency of stoves is inversely proportional to the temperature of the exhaust combustion waste. To prepare food, cooking units do not use all the generated thermal energy.
- In addition, such stoves usually have short chimney ducts. Therefore, they also absorb some heat.
- Such heat losses are irrational from any point of view. There is a need to minimize them. One of the most common ways to reduce the energy losses of a furnace is to equip the unit with a heating panel yourself.
What is the device
- The shield is a small brick wall attached to the stove, inside of which there is a developed chimney system.
- Such devices are almost never made with a firebox. The shield heats up thanks to the gases removed from the stove. Structurally, the wall is not capable of releasing much heat into the environment.
- There are more complex and convenient designs, the price of which is higher. They are equipped with their own small fireboxes. You can make them independent of the hob and attach them, for example, to stoves with a fireplace.
- Brick has good thermal conductivity, and most importantly, high heat capacity. Warming up when lighting the stove or cooking, it gives off heat to the room for several hours. This way you can get an analogue of a brick stove. Only simpler in design and for less money.
Requirements for the arrangement of shields
It is important to remember the strength of the foundation and its high-quality waterproofing (for example, with a layer of roofing felt). This will prevent moisture from getting on the shield. It is also necessary to strictly take into account all fire safety requirements
It is also necessary to strictly take into account all fire safety requirements.
To prevent the formation of excessive condensed moisture and reduce draft, it is necessary to control the maximum temperature of the exhaust smoke, which should be no more than 120 degrees.
Features of materials
It is better to build the chimney wall from smooth and chip-free brick. All joints between rows, all seams must be properly and evenly sealed with mortar. The solution that has fallen down the unit should be removed from there through special openings to clean the oven.
The ideal size for laying the shield is considered to be half a brick in size, which prevents it from cooling quickly.
To build the shield, it is permissible to use ordinary brick. The only condition is that it should not be hollow. It is better to seal the seams between layers of brick not with cement mortar, which is not adapted to the influence of high temperatures, but with a clay mass.
A correctly folded heating shield increases the efficiency of the stove from 30% to approximately 65%.
General provisions
In any case, the laying of the heating shield is carried out taking into account certain boundary conditions common to all structures.
- Half-brick masonry is optimal . The thin-walled heating shield warms up faster, but also cools down faster. In addition, quarter-brick masonry makes you seriously concerned about fire safety: it is recommended to enclose such structures with a metal casing.
- The temperature of the furnace gases at the outlet should not be lower than 100-120 degrees . A further decrease in temperature is dangerous due to a drop in draft and abundant condensation.
- As with any chimney, control valves are used in the heating panel . Without them, the temperature in the room will drop too quickly in winter.
- Do-it-yourself heating panels are made from ordinary red brick . Of course, full-bodied: the voids serve as thermal insulation, which in this case we do not need.
- For masonry, clay mortar is used, as in stoves . Cement is not resistant to high temperatures.
- The base of the shield is separated from the foundation by a waterproofing layer . Most often, ordinary roofing felt is used.
Laying a heating shield with your own hands
Tools
In order to fold a brick stove panel yourself, you need to use the following tools:
- Trowel - it is used to apply and level the mortar;
- Roulette - used for marking;
- Cord;
- Level - to control the horizontal and vertical when laying;
- Plumb;
- Hammer drill;
- Screwdriver;
- Angle grinder;
- Diamond blade for cutting;
- Containers for water and mixtures;
- Seam cutting tool.
Materials
To fold a brick stove panel, you will need the following materials:
- Fireproof brick - the quantity is calculated based on the size of the structure;
- Sand, clay for preparing masonry mixture.
- You can buy dry mixture:
- Chimney damper;
- Cleanout doors;
- Roofing felt for waterproofing; Grates for ventilation
Order
Laying recommendations:
- Do not use cement mortar, it should only be clay-based;
- Immediately remove any remaining masonry mixture from the inside;
- The construction of the shield begins with laying the foundation. It should not be connected to the foundation of the building. It is necessary to waterproof it using roofing felt. There are many schemes for independently constructing panels for iron stoves; we present one of the options for constructing a heating panel made of bricks for an iron stove.
- Laying out should be done especially carefully, because the evenness of the entire riser depends on it. First, lay out the brick dry. It is necessary to measure all dimensions (check the horizontality, verticality of the masonry, diagonal).
- After checking all the parameters, install it on the solution. It is necessary to make fireproof cutting. If there is a wooden wall adjacent to the shield, it will be brick. With a non-combustible partition - half a brick. The optimal thickness of the seam in the masonry is 7 mm. With such a seam, the riser will look more aesthetically pleasing and will be easier to maintain in the future.
- To limit the draft of smoke and close the smoke hole, install a gate valve (or view) in the upper part of the shield.
- In accordance with the requirements of fire safety rules, the first 2 rows are blind, that is, without smoke ducts. Placed in compliance with dressing.
Installation safety rules
A wooden wall needs an additional layer of brick to prevent ignition.
The laying of panels for a metal stove is subject to increased fire safety requirements. The shield must be laid out on a separate foundation. It is pre-waterproofed.
To eliminate the risk of fire, the first two rows are made blind - they do not have holes for smoke ducts.
Before installing the structure, you need to make a fireproof finish. If the shield is adjacent to a wall made of flammable material, you need to lay the partition separately in brick. If the material is non-flammable, the masonry is made of half a brick. Particular attention is paid to the corner stove; here you need to make cuts between the wall and the structure on both sides. If the shield is thin-walled, it is recommended to upholster it with sheets of metal, since the wall warms up completely.
Brick heating panel.
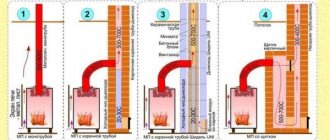
The scheme is as follows. As you can see in the figure, smoke valves are made in the upper part of the shield. The second valve is responsible for the summer flow of gases. The third is the winter mode (it is open, and the gases go into the smoke circuits of the shield, the second valve is closed). While the gases pass through the channels, they cool, giving up part of their heat to the shield, and in a cooled state they go into the pipe. .
The dimensions of our thick-walled heating panel are 89 x 38 x 224 cm. Weight - 1.2 tons. Heat transfer: one good firebox - 430 kcal/h; two fireboxes respectively - 600 kcal/h. As a rule, the panels are plastered or laid directly from beautiful refractory bricks. Three smoke dampers make it possible to regulate the movement of gases. The operating modes are as follows.
Shield operating modes.
- In winter, the winter valve is closed, the first and second valves are open. Going along all the passages of the shield, the gases lose their heat, giving off their heat to the shield.
- In summer, valves 1 and 3 are open, the second is closed. Gases, bypassing the chimney of the shield, go directly through the pipe. For better ventilation of the room, a special channel is installed in the mounted pipe. It opens with a grille having louvers (valves). Their presence allows the ventilation system to be operated in 3 modes: open, half open and closed. Next we will see the laying of the heating shield.
Material for laying the heating shield:
- refractory brick - 400 pcs.;
- river sand - three to four bags;
- clay mixture - three bags;
- roofing felt for waterproofing - 1-2 m.
- cast iron valves 13 x 13 cm -3 pcs.;
- ventilation draught with valve (15-20 cm);
- cast iron doors 14 x 13 cm - 3 pcs.
When laying the foundation under the shield, it is not brought up to the level of the finished floor by two rows in height. One row of brick is placed on top of the foundation, waterproofing is laid over it, after which the shape of the stove is marked out. Next, the second row is laid, with its upper surface reaching the level of the finished floor. After this, you can start laying out the shield.
- 1st row - made of solid brick.
- 2nd and 3rd rows - according to the picture.
- 4th row - during the laying process, a window is left for entry to the furnace panel and 2 cleanings are installed.
- The 5th row is similar to the fourth, the ligation of the seams is exactly as in Fig.
- 7th row and next. odd, up to the 25th - according to the figure with the formation of three channels.
- 8th row and next. even numbers up to and including the 26th - according to the order in the picture.
- Rows 10, 11, 17, 23 and 24 are similar to the previous ones. However, for the purpose of better reliability, ligation of sutures occurs differently.
The 18th row is placed similarly to the 10th and 24th. A valve is installed in the channel on the right wall. The 21st and 22nd rows are placed with the installation of a samovar. 27th row - during the laying process, the two left channels converge into one and overlap. samovar. 28th row - a cast iron valve is installed during the laying process. 29th row - according to the order
Pay attention to the dressing. 30th row - during masonry, a valve is placed on the right side of the shield, an overlap on the left. channel. In the 31st and 32nd rows we bandage the seams differently. Top of the shield - overlap in three rows
This can be seen in the figure. This scheme is completely made according to fire safety requirements. 33, 34 and 35th rows - according to Fig. 36th row - during masonry we make a ventilation and smoke passage
The top of the shield will be covered in three rows. This can be seen in the figure. This scheme is completely made according to fire safety requirements. 33, 34 and 35th rows - according to Fig. 36th row - during masonry we make a ventilation and smoke passage
In kitchen wood stoves, most of the heat energy literally goes up the chimney, and only a small amount of heat is used to heat the stove. To trap hot gases and use them to heat your home, you need a heating panel - a brick wall with smoke circulation channels inside. A heating and cooking stove with a shield is ideal for a summer house and summer kitchen - it does not take up much space, effectively heats the room and can operate in winter and summer modes.
Stages of work
Before starting work, you must purchase a pick, plumb lines, a ruler, a level, a tape measure and a square, a cord, a hammer and a combination trowel, which is used to remove excess mortar.
The material for constructing a standard heating panel and fittings will require fire bricks (about 310 pieces), about 6 buckets of clay and about 4 buckets of sand, 1.5 meters of waterproofing roofing felt, 3 special cleaning doors, a 20-centimeter grille for ventilation and 3 pieces of valves (smoke) measuring 13x13 cm.
As mentioned above, the shields are erected on the foundation. Therefore, the process begins with the arrangement and waterproofing of the base.
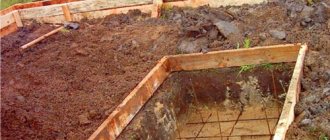
Construction of the foundation
The solution in the foundation is leveled using a level, without reaching approximately 10 cm from the floor. A brick is placed on the dried layer, the base of the structure is treated with waterproofing material, and the outline of the unit is outlined. Then a second layer of brick is laid, finally comparing it with the floor level.
Don't miss: How to choose a thermal curtain - detailed instructions on how to choose the best option
The basic algorithm for laying the foundation is the same for arranging a heating panel of any configuration.
Laying a shield without an autonomous firebox
- Row 1 – completely lined with bricks.
- The 2nd and 3rd rows are laid following the order.
- At the level of the 4th row, 2 clearings are installed and a window is left among the bricks for further connection with the shield.
- On the 5th row, the same work is done, but attention is also paid to bandaging the seams of the stove. The 6th row is placed, not forgetting to leave 2 channels.
- Starting from the 7th, including all remaining odd rows (up to the 25th), lay out the bricks in order, leaving 3 channels.
- Starting from the 8th and including all even rows, they act strictly according to the order scheme.
- At the level of the 10th, 11th, 17th, 23rd and 24th rows, a different masonry is used, which ensures a stronger connection of seams.
- In the 10th, 18th and 24th rows, do not forget to put the valve on the right.
- At the level of the 21st and 22nd layers, a samovar is installed, which will be blocked on the 27th row, which combines the 2 left channels into one common one.
- A reliable latch is placed on the 28th layer, and the 29th is laid out in accordance with the order, not forgetting about the dressing.
- On the 30th row, the channel on the left is blocked, and the valve is reinstalled.
- The 31st and 32nd rows should provide ligation of seams and overlap with a thickness of 3 rows.
- The levels of the 33rd, 34th and 35th layers are laid based on the order, and on the final - 36th row, care must be taken to leave channels (ventilation with smoke).
Arrangement of the shield with an autonomous firebox
This scheme is more complex and provides for the possibility of separate combustion of the shield and the stove. Here you will also need much more material than with a simplified version of the shield.
After the foundation is securely installed, the first two layers are laid, following the ordering pattern. 3rd row - similar, but with an ash pan, which is needed for the firebox.
- The 4th layer is quite important: 2 valves are installed here (for winter and summer), as well as doors (blowing and cleaning) in the amount of 4 pieces. Similarly on the 5th row, but here they additionally bandage the seams.
- On the 6th level they install an oven with a water-heating box, and also reduce the size of the channels and block the doors.
- On the 8th layer, doors are installed: a large one for the stove and a small one for the shield.
- The 9th and 10th rows are laid according to the diagram, but on the 10th row a steel seal is laid over the oven structure.
- On the 11th row, the upper edge of the oven is smeared with clay, and the doors are also blocked.
- The final row is the 12th, serves to strengthen the frame and install cast iron flooring.
The need to heat rooms around the clock prompted the creation, instead of a standard potbelly stove, of a highly efficient heating panel that has excellent heat capacity and guarantees comfort both when preparing food and when staying in the room.
Types of heating panels
The design is classified according to various criteria.
By wall thickness:
- half a brick (thick walls, the best option if you plan to regularly operate the stove for a long time, and also as protection against potential fire);
- a quarter of a brick (thin walls that heat up faster, but at the same time cool down faster, while masonry in this option requires more careful compliance with fire safety rules, as well as laying the shield on a waterproofed foundation and indispensably equipping the furnace with a metal casing).
According to design features and installation features:
bell type - one or two brick surfaces connected by channels. In each cap, the inlet and outlet of the chimney are placed below its upper plane. The reason is that hot air tends upward, so that, having heated up and entered the hood, it will remain there until it cools down, and then, being displaced by hotter gas, it will go higher up the smoke exhaust pipe.
In this sense, a two-hood heating shield is more profitable - it will take more heat from the furnace gases than a design with one hood.
channel type - involves the installation of a spiral chimney channel, which has the same diameter in all sections of the pipe. Such a chimney can be vertical or horizontal, but, in any case, partitions are installed in it. This type also involves the installation of jumpers - in summer they prevent unnecessary heating of the entire surface, focusing heat exclusively on the stove.
Important! There is no need to install jumpers if a duct-type heating panel is “attached” to the fireplace, since the main task of the fireplace is to heat the room.
By configuration:
- straight – the most common form of the shield;
- corner - less common, but it saves space in the room and provides more heat due to its larger area.
Important! In order to separate kitchen worries and heating issues, experts recommend equipping the panel with a combustion chamber.
Classification
Thermal shields are divided according to several features:
- Wall thickness;
- Design or installation features;
- Configurations
Each of the above features divides the design into several more types. For example, the thickness of the walls can be either half a brick or a quarter. The first method is perfect for those who want to work with the stove for a long time and not be afraid of fire during prolonged use. In structures with thin quarter-brick walls, the main feature is that they cool much faster.
It is important! Creating this type of heating panel requires caution, compliance with fire prevention rules, and, most importantly, additional costs for a metal casing and a waterproofing system for the foundation.
Design and installation features also have their own divisions. There are two main types of structures: bell and channel types. In the first case, one or two surfaces are combined according to the cap principle using channels. The operating principle of this design is simple. The hot air will remain in the upper part of the structure until it begins to cool. After the air in the hood cools, other hot air will take its place.
Don't miss: Preparing a heating station for the heating season in Moscow inexpensively 2022
Bell-type structures are characterized by low flammability
The channel type is simpler than the bell type. This case implies the same diameter in the pipe and the presence of jumpers in certain places of the structure, which allow you to regulate the heating or cooling of the surface.
The configuration of the shield is divided into straight and angular. Each configuration has its own advantages and disadvantages that affect the functionality of the shield. However, it has been noted that the corner design is used much less frequently than the straight type. This may be due to the fact that the corner structure is more difficult to construct. At the same time, it can save space, which will be an excellent solution if the room in which the shield is located is small.
Types and designs of shields
According to the internal structure, these structures are of 2 types:
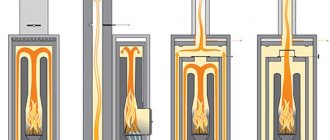
- channel: in the body of the shield there is a developed network of gas ducts, which consists of several vertical channels connected to each other. Before exiting, the gases make a tortuous path along these passages, intensely giving off heat;
- bell-shaped: such a shield for a cast-iron stove or stove has one or two chambers with horizontal arches, where hot gases are retained until they cool down. Only after this can they enter the vertical channel and go down the chimney.
Duct-type heaters are structurally simpler, and therefore easier to fold. Bell shields are more efficient in terms of heat removal, but their design is much more complicated. It is not recommended for beginners to undertake their construction; the hand of a master is needed here. For independent construction, we present you with drawings and sections of a simple duct-type heating panel with three vertical gas ducts:
In order for our heating and cooking stove to be used in the summer for cooking, the design provides for switching the smoke circulation to the summer mode. The transition is carried out using three valves built into the gas ducts. In addition, in the upper part of the structure there is an exhaust ventilation shaft to organize air exchange in the room. To avoid the draft tipping over in strong winds, a grate with a check valve is installed at the shaft exit.
The following diagram shown below shows a metal cooktop with a bell-type heating hood. As you can see, here the gases, after leaving the furnace firebox, enter a chamber with a vault, from which 2 channels lead.
Since the only way to move from the chamber is downward, high-temperature combustion products are retained under the roof until they cool down. Then they become heavier and, according to the law of convection, leave the chamber space. In this case, to increase efficiency, the furnace with a heating shield is equipped with tubular heaters located inside the flues.
Since it is assumed that most interested people have little experience in the stove business, a simple channel design is proposed for self-construction, presented in the first drawing of the previous section. Unlike a master, an ignorant person will need the order of the heating panel for construction, which we will show in the diagram:
To build a channel panel according to this procedure, you will need the following materials and fittings:
- solid red ceramic brick – 309 pcs.;
- valve 130 x 130 mm – 3 pcs.;
- cleaning door 130 x 140 mm – 3 pcs.;
- exhaust grille with valve 150 x 200 mm;
- clay - 6 buckets;
- sand - 4 buckets;
- roofing felt – 2 m2.
It should be noted that the heating panel is laid according to all the rules of stove art. First, it is necessary to build a concrete foundation that is not connected to the base of the building. Its top should be 150 mm below floor level. Having laid a waterproofing layer of roofing felt on the foundation, they begin laying in accordance with the order. The masonry mortar must be thoroughly mixed from pre-soaked and filtered clay and sifted sand.
To correctly fold a brick shield with your own hands, you need to maintain a seam thickness of 3 mm, the maximum permissible layer is 5 mm. After laying the stones, each row must be checked for compliance with the horizontal and vertical using a building level and plumb line. Excess mortar protruding from the seams must be removed, and the inner surface of the flues must also be wiped with a damp cloth after laying 3-4 rows.
A do-it-yourself shield for a potbelly stove or any other heating and cooking stove must dry thoroughly. Small cracks that form should be carefully sealed with clay. After this, you can heat the stove, starting with a small pile of firewood and gradually increasing the temperature.
Types of shields
All types of shields for brick kilns are divided into 2 types of structures:
- channel;
- bell-shaped
Heating panel diagram.
Duct shields have a developed network of gas ducts in their design. It consists of separate vertical channels that are connected to each other. Gases can come to the surface when they overcome a complex maze of pipes. In the process of moving, they actively transfer their heat to the shield.
The construction of bell-type structures is more complex. The design includes 1-2 chambers with horizontal arches. Heated gases are kept in these chambers until their temperature reaches the minimum possible. Only at this moment will the gases be able to flow through the vertical channel into the chimney.
Despite the complexity of the design, bell shields remove heat much more efficiently. This completely compensates for the difficulties encountered during the installation process. Experts recommend assembling bell shields only to those who have minimal experience in such work. Beginners are unlikely to be able to cope with the task.
In the conditions of a country house, the easiest way to equip it with your own hands is a simple heating panel of a duct structure, which has 3 vertically located flues. Modern man highly values the functionality of buildings
It is important to arrange the structure in such a way that in the summer it can be used for cooking
This means that combustion products can leave the chamber only after cooling. As soon as their temperature begins to drop, the gases become heavier and gradually sink to the bottom of the chamber. To give the furnace maximum efficiency, additional tubular heaters are placed in the flue ducts.
Most often, heating panels for a brick kiln act as simple heat exchangers and are not equipped with their own combustion chamber. In more complex designs you can see a small firebox.
Working principle
Very often in Russian country houses they use potbelly stoves and Zhirnov stoves, which are small heating devices of the “Swedish” type. Such a stove is easy to set up, heats up quickly and does not require special care during operation. It is perfect for small country houses. Its disadvantage is the inability to switch to summer mode.
The most famous are several types of arrangement of such a furnace, but, without paying attention to the characteristic small details, they are united by the following characteristics: the power of the furnace can reach 3.5 kW; there are 4 hoods in the cooking chamber and the chimney pipe will not be larger than 270×140 mm.
The working principle of the furnace is based on direct-flow operation of the heating panel. After all, only a small part of the heat is used to cook food, and the rest is used to heat the room.
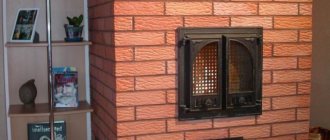
For beauty, the shield can be finished with plaster, tiles or left brick.
Bell shield
The bell-type heating shield consists of one or two flat surfaces that are connected by channels (three-channel). Warm air rises upward. Getting into the bell part, the air remains in it until it cools completely and is displaced by warmer gas, going higher. Therefore, the chimney is mounted below the upper plane.
It is important to note that the presence of two bell elements in order does not affect financial costs and the purchase of more material. The bell shield has some features that distinguish the brick structure from each other:
The bell shield has some features that distinguish the brick structure from each other:
- The ordering is possible straight and angular. The efficiency of its operation is the same, it only allows you to save territory.
- creating a combustion chamber allows you to separate the structure from the furnace, making it independent.
Operating principle
Most often, in Russian country houses, potbelly stoves and Zhirnov stoves are used, which are compact heating units of the “Swedish” type. This stove is easy to set up, heats up quickly and does not require special care during operation. It is ideal for small country houses. Its disadvantage is the inability to switch to summer mode.
Several types of arrangement of such a furnace are best known, but despite the distinctive nuances, they are united by the following characteristics: the furnace power reaches 3.5 kW; there are 4 hoods in the cooking chamber and the chimney pipe does not exceed the dimensions of 270x140 mm.
For beauty, the shield can be decorated with plaster, tiles or left brick.
How to make a heating shield with your own hands
Making a heating shield is a very real task even for a person who does not have much experience in construction before. At first glance, some may think that the design is too complex, while others will consider this type of heating element simple. However, do not forget that each process has its own nuances that must be taken into account and must be known in advance, before the laying out of the material begins.
First masonry option
The first step is to pour concrete; it is important that the foundation is not connected to the base of the house structure. After the concrete has dried, it is necessary to lay roofing felt
It will serve as excellent waterproofing. For clarity, see the figure below.
Let's look at two simple basic methods of ordering.
In the first case, the parameters of the future shield will be 89x38x224 cm. To lay out such a structure, you will need the following tools:
- Trowel;
- Hammer with a small pickaxe;
- Plumb;
- Tape measure, ruler, square, level.
You will also need piping and lace. These simple tools, in most cases, almost every person has them, otherwise acquiring them will not be difficult.
The materials that will be needed to lay out the shield are also familiar to many and are sold in hardware stores. You will need 309 bricks, about four buckets of clean sand, at least 6 buckets of clay cleared of debris. You will also need 1.5 m of roofing material, 3 smoke valves, 3 small doors for clearing soot and a grate up to 20 cm in size.
Preparatory work
The foundation should be below floor level, the first layer of brick should be laid on it, and then roofing material should be laid. Another brick layer is placed on the roofing felt, and it should be at the level of the floor surface. This is the best and safest option to start laying the future shield.
Process
All actions must be performed according to the instructions:
- After laying the foundation, the first layer of bricks is laid. From rows 2 to 3, bricks should be laid depending on the order that is preferable.
- The fourth and fifth rows will require cleaning as well as the window in order for the connection to the shield to be successful.
- In the sixth row you will need to leave 2 channels.
- From the seventh to twenty-fifth rows, it is enough to follow the chosen order and leave three channels. In this case, the masonry will be in odd numbers of rows.
- From the eighth to 26th rows, it is enough to follow the order.
- On the eighteenth row you will need to install a valve. The twenty-first and twenty-second rows are laid together with the samovar. On the 27th row, after the samovar is blocked, it is necessary to combine both channels on the left side.
- On the 30th row on the right, a valve is installed. For row 36 you need to follow the order. Row 36 is the last, but requires no less attention, since it is necessary to leave ventilation and smoke ducts in it.
Second masonry option
Materials:
- Bricks will be needed here in the amount of 680 pieces;
- Purified sand and clay - at least 22 buckets of each;
- Steel corners 4 m;
- Door;
- Steel strip about 55 cm;
- Steel sheet no less than 0.5×0.7 m;
- Cast iron stove, preferably with 2 burners;
- Door for firebox, vent, cleaning;
- Valves;
- Box for water heating.
Preparation
Preparation in this case will not differ from the first option. A high-quality foundation that complies with all rules is required. The parameters of the future shield are as follows: 1.40x1.02x2.17 m. This design will be larger than the previous one, will require more effort and materials, but it will be durable and more heat-intensive than the previous version.
Types of brick wood stoves
- Heating;
- For cooking (predecessors of modern stoves);
- Cooking and heating (combination of the two previous models);
- Special (the design is intended for special needs - drying clothes, etc.).
Heating stove with oven - step by step
It is advisable to carry out construction in the summer, at a constant air temperature.
For construction you will need: 220 bricks, three doors for the firebox (13x13 centimeters), a cleaning door (14x14 cm), a cast iron stove (38x35 cm), an oven (32x28x42 cm), a valve (27x13 cm), a sheet of asbestos cement, a grate - grate (20x30 cm), steel strip 4 mm thick (35x25 cm).
Laying instructions:
Before laying, we must build a foundation. We select the type of foundation after studying the type of soil and groundwater level. We wait for the foundation to completely harden and begin construction.
We print out the drawing, prepare a tape measure and a building level. Before construction, it is recommended to lay out the stove without mortar as a practice to avoid mistakes in the future. We will number the rows along the course of the laying for convenience. Be sure to use plumb lines and check the quality of the brick (no chips or cracks). Soak the bricks in water.
- We lay out the first two rows according to the drawing, continuous. To do this you will need 10 bricks for each row.
- In the third row, we lay the ash pan and install the blower door (we attach it to wire and special metal fasteners).
- 4: we build this row, checking the order, building up the walls.
- 5: we build a brick ceiling over the blower door, lay the grate (don’t forget to leave a small gap from the metal grate to the brickwork, pour sand into the gap).
- Next, we take an asbestos cord and wrap it around the frame of the combustion door. We build the sixth row, clamping the door fastening with bricks.
- The seventh and eighth row - we build up the walls, observing the order, again checking the drawing.
- In the ninth row, we lay bricks on top of the firebox door, creating a ceiling above it. In this row we begin to build a smoke collector and finish it by the eleventh row.
- To separate the cooking area and the smoke exhaust channel, we lay a strip of steel, which will additionally support the bricks laid on edge. We fix the cast iron hob (row number 12).
- From the thirteenth to the fifteenth row we lay out the bricks “on edge”. We cover the cooking chamber with a layer of asbestos cement.
- Sixteenth row - we build the bottom of the first channel, which will be located horizontally.
- In the seventeenth and eighteenth rows we install a cleaning door and build up the walls of the oven.
- Nineteenth row - we block the door from above with bricks. We form a jumper in the center of the smoke circulation.
- The twentieth row according to the drawing (we build the walls of the furnace by tying the previous row).
- The next two rows (21-22) are the construction of a cleaning hole and the completion of the smoke circulation masonry.
- After this, we install the oven, and up to the 27th row we carry out the masonry according to the drawing. In rows 27 and 28 we leave space between the bricks to clean the oven.
- Then we completely cover the furnace and install the valves (29-31).
- From the thirty-second row we build a chimney and take the chimney to the street.
How to light a brick stove with wood?
We inspect the furnace and pipes for cracks. If there are any, cover them with a clay solution. We clean the stove from combustion products. We prepare the firewood. We warm up the chimney. We put firewood in the firebox, leaving the ash door ajar for air access. To ensure even burning of the firewood, stir it with a poker as it burns. It is optimal to add additional firewood after the formation of the first coals.
How to lay out a panel with an autonomous firebox
What does it look like
The shield can work in both summer and winter smoke circulation systems, allowing you to heat either the stove or the shield separately.
Important! Before starting the main masonry, you should build a strong, high-quality foundation with waterproofing (you can use roofing felt).
Features of masonry
The arrangement of the heating panel in this design has its own characteristics (the diagram can be found on the Internet by asking the appropriate request). In general terms the process looks like this:
- The 1st and 2nd rows are laid out in accordance with the order.
- In the 3rd row it is necessary to leave an ash pan under the firebox.
- 4th row: two valves are installed (one for summer operation, the other for winter) and four doors (two blower doors + two cleanout doors with brick linings inside).
- Row 5 is similar to the fourth (bandaging the seams is observed).
- Row 6: all channels are reduced, all doors overlap. An oven and a hot water box are installed.
- In the 7th row, two grates are laid (one for the firebox of the stove, the other for the firebox of the panel). The bricks on both sides of the gratings are crowded together. The long channel on the left overlaps to create two short channels.
- In the 8th row (placed in order) firebox doors are installed (one smaller for the firebox of the shield, the other larger for the firebox of the stove).
- The 9th row is placed according to the scheme, as well as the 10th, but in it a steel strip is placed above the oven.
- Row 11: the doors overlap, the top of the oven is greased with clay solution. To the right of the water-heating box, the channel is closed with a brick, to the left it remains unblocked.
- In the 12th row, cast iron flooring is laid, and a frame of steel corners is strengthened around the slab. This row is the final one in laying the slab.
Other orders are the laying of the shield (see diagram).
- In the 16th row it is necessary to cut off the brick on the right at the second channel.
- At 19, a valve is installed that closes the pipe (from this to row 25 inclusive, five are formed from the three existing channels).
- In the 22nd row a samovar is placed, then in subsequent rows there remains one channel - a pipe, and the shield is covered with masonry in three rows.
- In the 31st row, the pipe channel is widened by cutting off the brick.
- A ventilation grille is installed in rows 32 and 33 (a separate channel is created for this).
Important! Watch the thickness of the seams - it should not exceed 3-5 mm.
Dimensions to consider:
- Length – 1400 mm.
- Width – 1020 mm.
- Height - 2170 mm.
- Weight - 2800 kg.
- The length of the steel strip above the oven is 550 mm.
Parameter calculations
The size of the chimney for a brick stove should remain the same along its entire length; its optimal value is selected depending on the dimensions of the heating device.
Sectional size
Suitable device parameters depend on the combustion chamber and furnace power. The inner walls need to be made smooth without sagging mortar or protrusions, then they will remain clean longer.
Most often, brick chimneys of square and rectangular cross-section are used; their masonry is made of 4, 5 or 6 bricks; when calculating the cross-section, one side of the structure is multiplied by the second. The standard dimensions are considered to be: 12.5 × 25 cm. The calculation is carried out according to the internal chimney channel. The indicated parameters refer to a masonry of 4 bricks, the cross-sectional area is 156.25 cm2.
When calculating a cross-section of five bricks, the result is a value equal to 312.5 cm2, and with six - 625 cm2.
When installing a brick chimney on a metal stove, you need to connect its square section to the round outlet hole of the stove. So, for a chimney cross-section with an area of 156.25 cm2, a round pipe with a diameter of 130 mm is suitable, its area is 133 cm2, the next parameter of 150 mm has a greater value than the declared one.
When calculating a circular cross-section, the required radius is taken into account, the area is calculated using the school formula:
S = π×R2, where the number π=3.14
Knowing the diameter of the pipe, you can easily determine the desired parameter.
Calculation depending on power
The internal channel depends on the optimal ratio of pipe sizes and the power of the heating device. Among the guidelines for choosing a suitable section, the size of the opening provided for the blower door is highlighted. The pipe size should be smaller than the hole for the door.
If, when calculating, we take into account the productivity of the furnace, then we can select the cross-section from the tabular data, but they do not take into account the thickness of the seams; they range from 6 to 10 mm.
| Power, kW | Pipe cross-section, in millimeters |
| 3,5 | 130×130 |
| 3,5÷5,2 | 130×190 |
| 5,2÷7,0 | 130×260 |
| 7,0 | 190×260 |
Chimney height
When calculating this parameter, you need to pay attention to the following features:
- if a highly flammable type is used as a roofing material, the chimney must rise above the roof by at least 1.5 meters;
- the height difference between the top point of the head and the grate should not be less than 5 meters;
- if there is a high building near the house, then the pipe should be 0.5 meters higher than its extreme point;
- on roofs with non-combustible coating, the minimum distance to the top of the pipe should be 0.5 meters.
When calculating the height of the pipe, the size of the firebox and the cross-section of the chimney are taken into account. So, if the total area of the combustion window is 0.35 m2, and the cross-sectional area of the channel is 0.04 m2, then a height of 7 meters is suitable for these parameters. To make calculations with other parameters, you need to establish this dependence and select the height.
The height of the chimney pipe affects the draft, so this size of a brick chimney pipe should not be less than 5 meters, otherwise turbulence may begin and all the soot will go inside the house.
How to correctly position the pipe from the roof ridge is shown in the photo below:
Device designs
The designs of heating panels are divided into two large categories: they can be thick or thin-walled.
About wall thickness
- Thick-walled panels are laid in half a brick. They must be warmed up well beforehand. When a hob with a heating shield is used constantly, such a device is advisable. Among other things, thick-walled structures are preferable from a fire safety point of view.
- A thin-walled heating shield is placed in a quarter of a brick. To meet fire safety requirements, such structures are often covered with metal casings.
- The surface of the walls can be plastered, tiled with tiles, or, after opening the joints, left unfinished. The fireplace stove with heating panel should be covered during its installation.
- The devices can operate in two operating modes – winter and summer. In the first of them the structure is heated completely, in the second it is partially heated.
Basic operating diagrams
Based on the principle of operation, there are two types of devices.
Duct shields
- Inside such a device there is a kind of labyrinth of chimneys, which have the same cross-section.
- When such heating panels are installed, they can be arranged in both horizontal and vertical partitions.
- The combustion products release thermal energy to the walls during their uniform movement along the entire length of the channels.
- In duct type devices, jumpers are often installed that bypass the chimney. They are fenced off with partitions. This is necessary so that in the summer the cooking stove does not heat the room.
In fireplace stoves, jumpers are not needed, because they are equipped with shields for greater heat transfer. A device for a powerful metal unit, for example, for Bavaria (thermal power 14 kW), should not be made without such a jumper. (See also the article Biofuel for fireplaces: features.)
Bell devices
A bell-type heating shield consists of one or more cavities that are connected by chimneys. The exit and entrance of the channel in all caps is made much lower than the top of its plane.
Why is this necessary? Heated air and furnace gases always flow upward. Having penetrated the bell, the gases will be located there until they cool. When they give up their heat, they will be displaced by a new portion of heated combustion products, and they will flow down the chimney into the street.
Features of the implementation of the shield scheme
- In addition to rectangular devices, when there is little space in the room, a corner shield is often installed. In addition to the fact that this design saves useful volume, due to the larger heat exchange area, it releases more energy.
- If you equip the shield with a separate firebox, it will be transformed from an additional element of the stove into a full-fledged heating equipment.
- You need your own fuel chamber so that you don’t need to heat up the cooking stove. (See also the article Heating a private house with wood: features.)
https://youtube.com/watch?v=YiJRfgw9s90
Arrangement of the shield
The order of the heating panel.
For self-construction, craftsmen recommend choosing a simple channel-type structure. A person who does not have experience in carrying out such work will additionally need order. Experts usually do without it. In addition to the arrangement for arranging the stove panel, you will need to prepare:
- brick;
- 3 valves;
- 3 cleaning doors;
- exhaust grille with valve;
- clay;
- sand;
- roofing felt
The laying of heating panels is carried out in accordance with all standards of stove craftsmanship. The first step is to build a concrete foundation that will not be connected to the base of the building itself. Check that its upper part is located 15 cm below floor level. A waterproofing layer is placed on the foundation, which is created from roofing felt. The laying is carried out according to the order.
To achieve high quality work, the thickness of the seams is left at 3-5 mm. Each laid row of stones is checked for horizontalness and verticality.
A brick stove will not be able to effectively heat the air in the room if it is not equipped with a shield. The heat transfer of the furnace depends on how well it is installed.
//www.youtube.com/watch?v=LcV5QrGrVkM
When arranging a shield yourself, you should realistically assess your own strengths and choose the design that you can recreate without outside help.