Despite the development of new technologies in the field of heating, a conventional wood-burning brick stove remains the main source of heat in many private and country houses, garages and various outbuildings. But building even a simple heating stove costs money - the homeowner needs to buy materials and pay for the services of a stove master. To save on construction costs, we suggest building a brick oven with your own hands. Below we will tell you how to build it correctly, provide drawings and masonry order diagrams.
Choosing a location and type of foundation for the stove
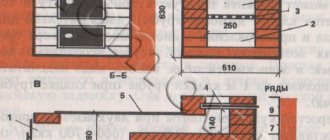
Scheme of laying the foundation for the stove
Before starting to lay the stove, pay due attention to finding a place to place it. For example, if the unit is placed in the middle of the room, it will be able to give off much more heat, warming up from all sides and evenly heating the air around
If you place the stove against the wall (and this option is used most often), cold air will constantly “walk” near the floor. Therefore, you need to make your own decision in this regard.
Preliminarily determine the installation location of the combustion door. This element must be installed so that in the future you can load fuel into the stove as conveniently and quickly as possible, without spreading debris from firewood or coal throughout the house. Usually the fire door is located on the side of the kitchen or some little-trafficked room.
The finished brick stove will have quite an impressive weight. In order for the device to stand as reliably and as long as possible, you need to prepare an individual concrete foundation for it.
Furnace design features
Traditional brick ovens have a fairly simple design. However, the apparent simplicity at first glance allows one to achieve very high levels of productivity and efficiency.
The main elements of the brick stove body are the firebox and chimney. Cooking stoves are additionally equipped with stoves and/or ovens; it is also possible to install a tank for heating water.
Scheme of a Russian stove
The firebox is the main part of the stove unit. It is into the firebox that firewood or other fuel used for heating is loaded. The firebox can have a wide variety of sizes. When determining suitable dimensions, several important factors need to be taken into account, such as:
- type of fuel used. If you will heat the stove with wood, make a firebox 50-100 cm high;
- required performance;
- required volume.
To arrange the firebox, use refractory bricks. The thickness of the walls of the structure in question cannot be less than half a brick.
The chimney is also one of the main elements of any heating stove. The chimney is designed to remove flue gases with various harmful inclusions formed during the operation of the stove.
Rules for constructing a brick chimney
At the chimney design stage, try to think through everything so that its design has a minimum number of bends and turns. Ideally, the chimney should be completely vertical. Any kind of bends will lead to deterioration of traction and a decrease in the efficiency of heating the room.
An important element in the design of a brick kiln is the ash chamber. Ash will collect in this compartment. Also, through the ash pan, air is supplied inside the unit to the fuel. The ash chamber is located under the grate and is equipped with its own door. Traditionally, the height of the ash pit is 3 bricks.
Preparatory work
Before you start building a Russian stove, you should make sure that everything you need is available.
Selecting a location
A lot depends on the choice of place to build a furnace. It is necessary to maintain a gap of 30-40 cm to walls made of flammable material or provide them with protective cladding with asbestos. Gaps will also be required for access to the outer walls of the stove for the purpose of inspection and repair.
A heavy unit weighing several tons requires a solid foundation (foundation) protected from ground moisture. A place is provided in advance where the chimney will pass through the ceiling and roof. There should be no ridge or rafters here.
Masonry tools
Basic working tools for a stove maker:
- a narrow trowel (trowel) for laying mortar and cleaning excess from seams;
- a hammer-pick to give a solid brick the required shape;
- building level and plumb line.
To mix the solution you need a shovel and a container.
Stove maker's tool
Now cutting bricks into wedges, removing corners and grinding the cladding is done with a hand-held power tool (grinder) with diamond wheels. This greatly simplifies the work of the master.
Necessary materials
Basic materials for constructing a reliable fireplace: brick and refractory mortar
Their quality is given close attention. You will also need: cast iron for doors, dampers, latches, grates and a hob
Brick selection
The correct selection of bricks for the job is a key factor in the efficiency of thermal output and the long service life of the future fireplace. Therefore, it makes sense to purchase red clay bricks of the M150-M200 brand only of the first grade. Hollow material is unsuitable for stove masonry.
Bricks with obvious signs of defects are also not suitable for such work:
- non-compliance with the standard (230x125x65 mm), to which all standard orders are oriented;
- with traces of burns, warping, shape and surface defects;
- with shells after the release of gases;
- having cracks and burrs from cutting.
Special grades of premium quality bricks, called hearth bricks, are sold individually and are ideal for laying stoves.
Foundation
The base of a heavy furnace is placed on a concrete foundation, which is cast over a compacted crushed stone bed in a hole up to half a meter deep. Horizontal waterproofing from groundwater is made of 2 layers of roofing felt on bitumen mastic.
Masonry mortar
The requirements for a solution suitable for furnace work are seriously different from the usual ones.
The material is required:
- resistance to high temperatures;
- coefficient of thermal expansion as close as possible to that of masonry bricks.
Refractory mixture for laying stoves
Since the quality of the clay plays a leading role here, it is better to buy a ready-made dry mixture at a hardware store.
Checking the quality of clay
The suitability of clay for stove masonry can be checked using a folk method. From the solution, make a spherical lump the size of a child's fist and slowly squeeze it between two planks. If the clay is of high quality, the lump will crack only after being compressed to half its size. Skinny, unusable clay does not deform at all, and material of average condition will burst after being compressed by about a third.
Purpose of the stove in the house
They come in several types.
Previously, when open fires were used for cooking, there could be two stoves in the house - one for cooking, the other for heating. In small houses, universal structures were laid out, simultaneously suitable for domestic needs and heating. Such stoves were built together with the house and were located between the adjacent wall, providing heating for two rooms. The scheme is quite complex and the process of its implementation is labor-intensive, but the conveniences are obvious. It was possible (especially for the summer season) for only the stove to be heated. This made life much easier, because such an attribute in the house needed constant care. It consists of a set of activities performed daily or once or twice a year. With intensive use, the coarse needs to be cleaned from accumulated ash. A large amount of it will interfere with normal air circulation, causing the firewood to not burn completely.
Another nuance in using a brick oven is the cracking of its finish. Experienced users advise not to overheat the surface. The normal temperature is 17-18 degrees, and the features of the brick allow you to retain moisture indoors. Such a microclimate can only be achieved by using a stove; other heating devices often dry out the air, and lower temperatures make the room feel damp and cool.
Consider air circulation.
To effectively heat a room, consider air circulation: warm air rises and cold air descends.
Therefore, when choosing a stove or fireplace, think about their placement. You may need to purchase a ceiling fan or other appliances. If the fireplace is located on the first floor, and the second floor is also planned to be heated, you need to look at how warm air will be supplied there. The first option is free circulation. But then the heating will be uneven: distant rooms are colder and take longer to warm up. And if the rooms are isolated (the door is closed), they will not warm up at all, or the heating will take a very long time. The second option is to separate the hoses with warm air, when warm air from the heating device goes through the air duct and enters the room through the ventilation grille. Here you need to take into account how long the sleeves need to be pulled - if the length is long, you may need a special fan.
Main types of furnaces
Before you start laying a stove yourself, familiarize yourself with the features of existing varieties of such units. The stoves are:
- heating. Designed exclusively for heating. Such ovens have an extremely simple design and can be installed in the shortest possible time and with the least effort compared to other types of structures;
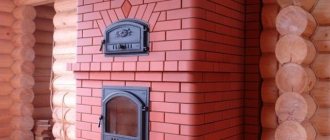
- heating and cooking systems. The most popular and sought after option. At the same time they heat the house and allow you to cook food;
There are also improved varieties of heating and cooking stoves with a built-in stove or even a full-fledged oven.
Do-it-yourself Dutch masonry
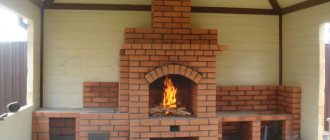
Fireplace stoves belong to a separate category. This is an excellent option for a modern private home. Such designs do an excellent job of heating rooms and have an attractive appearance. A properly laid out and finished fireplace stove will be a worthy addition to the interior of both a small country house and an expensive private villa.
This is what heaters are like
The diagrams of modern stoves distinguish them not only by their purpose, but also by their shape. Most often, rectangular and square-shaped units are installed in private homes. But if you wish, you can lay out a round oven. Select a specific option taking into account the characteristics of the room and your own preferences.
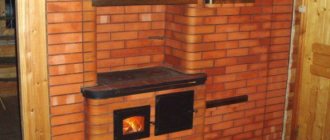
The picture shows a simple brick oven for heating and cooking
Of course, you can lay out the oven yourself, and numerous diagrams will help you do this in the shortest possible time. However, when performing such work, remember that any stove, regardless of its purpose, shape and other characteristics, must fully comply with current fire safety standards.
Types of coarse stoves
Hruba (or rude) is one of the variants of the Russian-Dutch oven. Appearing in Russia more than 200 years ago, “Dutch” units have established themselves as an economical and reliable heating unit that takes up little space in the house. However, domestic stove makers, having decided to expand the functionality of the existing design, also added a stove bench to it. The original model underwent significant changes: the height and location of the beds were constantly changing, the materials were improved, the rough began to perform not only heating and cooking functions, but also to decorate the house, playing the role of a kind of fireplace.
Deciding whether the house needs a rough one, or whether it’s worth taking a closer look at another option, can only be done after carefully weighing all the pros and cons of the design in question.
- Roughly easier to build than most known duct power furnaces. This can be done both during the process of building a house, and in an already landscaped room. No large-scale construction work or alterations are required;
- the costs of materials are “affordable” for almost anyone;
- the stove is easy to use, compact and takes up little space;
- its appearance depends on the taste of the owner, who, at his own discretion, selects the shape and size of the bricks, the colors of the plaster and the design of the component elements;
- Thanks to the installed hob, it is easy to cook on the griddle.
The thermal efficiency of such a stove is extremely low: it can warm up a room with only an area. If the owner certainly wants to use a rough stove to heat a larger room, he will be unpleasantly surprised by the amount of kindling material consumed.
The addition of a heated bed is another plus of the rough bed. But this option is only possible when heating with wood. The coal heats the surface of the bed too much.
Types of acceptable structures:
Attaching a shield to the outside allows you to give the stove a more decorative look, making it look like a fireplace. If the work is done carefully, using tiles or decorative ceramic tiles, such a stove will give the room a special charm. But this will be a very expensive job: both in terms of the efforts involved and in terms of the volume of materials. Such a stove is more difficult and difficult to build; a foundation is required. Both wood (up to and coal) are suitable as heating materials. However, the thermal power of such a unit is much greater than that of a stove with a built-in shield.
With built-in shield
Outwardly, it looks like a regular hob. Such a unit is easier to build, and materials are spent several times less compared to the first option. This is a compact stove of small size, the amount of thermal energy of which is limited. Therefore, this option is only suitable for rooms in which they live from spring to autumn, and are visited occasionally in winter. The log can be built without a foundation, but the load-bearing capacity of the floor must be from 500 kgf/sq.m.
Types of cast iron slabs
@pptk-energostroy.ru
For the production of hobs, gray cast iron of the SCh 15–20 grade is used. The alloy has ideal tensile strength values of 150–180; 200–220 MPa. The strength is characterized by the hardness index HB of gray cast iron: 210–224; 230–240 MPa. To obtain a heat-resistant metal, additives are included (%): 3.3-3.7 carbon, 1.4-2.4 silicon, 0.5-1.0 manganese, 0.15-0.2 phosphorus and sulfur. Low alloying of cast iron SCh15-SCh20 is adjusted with chromium, nickel, and copper.
Refractory characteristics for a cast iron stove reach: tensile elasticity modulus E=700–1100 10-2. The specific heat capacity of the metal is 460x10-6 J (kg*K). Thermal conductivity of the panel: 54–59 W (m*K). Otherwise, cast iron will not withstand the high temperature of the fire flame and hot flue gases.
The most popular two modifications in Russia
Plates, dimensions (mm):
- 1-burner stoves P1–5: 512x512x10, D-440: 640x640x10.
- 1-burner panel P1–6: 600x600x16.5.
- 1-burner products PS2–3/2: 362.5x410x8.
- 2-burner solid medium thickness: P2–3, prefabricated PS2–3: 710x410x8/12.
- For stove P1–7: 410x245x15.
Balezinsky LMZ produces panels 8–17 mm.
- One burner P 1–2 (710x410).
- Without burners, blank panel PS (710*410).
- Domestic manufacturers, Finnish-made square slabs Pisla, HTT (mm): 340x410; 710x410; 660x410; 510x340.
What mortar to use for masonry
The reliability and durability of the finished stove directly depends on the quality of the masonry mortar. The masonry will be carried out using a sand-clay based mortar.
There is nothing complicated in preparing the solution. Take clay, fill it with water and soak it. Sift the mixture through a sieve and then stir into “clay milk.” Finally, add some water to obtain a sufficiently viscous and plastic solution.
Remember, the reliability and strength of the stove directly depends on the correct preparation of the masonry mortar. If you do everything right, the stove will effectively heat your home for many years. Violate the technology or decide to save a lot on materials - the thermal unit is unlikely to be able to fully reveal its potential and stand for any length of time.
Mortar used for laying the stove
How to make a rough oven with your own hands
The oven consists of the following parts:
- A firebox is a working chamber into which fuel is loaded. Equipped with a door.
- Blower is a chamber attached below the firebox. Serves to improve traction. A door is also attached here to regulate the air supply. A grate is installed between the firebox and the blower.
- A chimney is a pipe for removing carbon dioxide from a home. Equipped with a soot cleaning door and a damper.
- Smoke circulation (convector) - vertical (sometimes horizontal) channels through which hot gases from the firebox pass. They connect the firebox to the chimney and accumulate thermal energy.
Firebox, shield and chimney
The main differences from a solid fuel stove are a more powerful firebox and the absence of a pass (smoke tooth) in the firebox. The tooth traps hot gases under the hob, which in a summer stove allows you to reduce fuel consumption for cooking. In the rough it is not needed, because excess heat will be used for heating.
A rough stove should have a more powerful firebox because the shield provides additional resistance to the flow of flue gases. A chimney with increased draft will not help here: the gases in the shield will immediately expand and cool. Their thermal energy will turn into mechanical energy, which will successfully fly out into the chimney. Figuratively speaking, a firebox with a chimney in a stove with a shield operates on the push-pull principle, and “push” here is a firebox of greater power. This explains the special requirements for the firebox and stove fittings, see below.
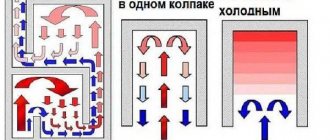
Depending on the purpose of rough heating shields, they are made of different types. Diagrams of heating panels for furnaces are shown in Fig. below; The fuel part is shown conditionally everywhere.
Schemes of heating panels for stoves
- Sequential stroke with short vertical channels. The least material-intensive and easiest to build. The resistance to gas flow is greatest. The compactness and thermal efficiency of the stove are average. The most commonly used scheme;
- Sequential stroke with horizontal channels. The dimensions and weight of the oven are the same as before. case, but building a shield with horizontal channels is much more difficult. Gas flow resistance approx. 1.5 times less. As a result, the thermal efficiency of the furnace is higher. It is possible to install a bed, i.e. the upper channel does not heat up much;
- Sequential stroke with long vertical channels. Thermal efficiency is the same as that of a shield with horizontal channels, the technological complexity is the same as that of a shield with short vertical channels. It occupies the smallest area, but requires a lot of materials and a good foundation (see below) due to the high specific pressure on the support. The best option for a home heating stove for 2-3 rooms, see below;
- Parallel move. Highest thermal efficiency, lowest weight per unit of thermal power. The occupied area and technological complexity are the greatest. Can be used with a reduced power firebox. Optimal for adding to an existing slab without altering it.
Note: there are also series-parallel or chessboard shields. The most complex, but also the lightest, have the least resistance to the flow of gases. The only possible option for roughing in a house with a heated attic, see below.
Furnace materials
To make roughing with your own hands, you will need to prepare materials. Try to take all the components for making a stove with a stove bench of good quality, because the design will serve you for many years.
- Ceramic brick. This will be the lining of the product. Take it without chips and one color. It comes in various configurations, so first you should draw up a drawing of the product and decide what appearance it will have. Instead of lining a stove with a stove bench, decorative or ordinary plaster can be used. If plaster is used, the surface can then be painted.
- The brick is fireproof. It is able to withstand high temperatures. Calculate how much you will need to make the combustion chamber yourself.
- Clay and sand will be required when making mortar for laying the structure.
- Fireclay powder will be used as an additive to the solution.
- Grate bars. It is advisable to take ones made of cast iron. Metal ones, when using coal, will burn out very quickly.
- Fire door.
- Blower door.
- Smoke valve.
- For waterproofing, you should take roofing felt.
Preparation for work
For laying a stove with a stove, different types of brick are used. Usually they take red solid one for external masonry and fireclay - to make the internal lining of the firebox, as well as the smoke well.
The foundation is poured with concrete mortar. To prepare it you will need cement of at least M400, preferably M500. The sand can be river or from a quarry, but it must first be sifted to prevent the ingress of impurities. Clean water should also be used. For the solution, you should also take granite crushed stone about 30 mm.
The foundation is backfilled using rubble granite, a suitable fraction is approximately 300 mm. In addition, you will need to prepare a solution of red clay and sand.
Instead of clay, you can purchase clay powder; the instructions for using it are indicated on the package. All components must be of good quality; the integrity and service life of the future stove depends on this. To seal the joints, you need to prepare a high-temperature sealant.
The work is carried out using ordinary construction tools.
You may need:
- containers for mixing the solution;
- Master OK;
- Bulgarian;
- plumb line;
- level;
- roulette;
- rule;
- mallet;
- furnace hammer;
- other devices for processing and laying bricks.
To make a high-quality solution, it is better to use a hammer drill or drill with the appropriate characteristics, as well as an attachment designed for these purposes. A shovel and a sieve will come in handy.
An even simpler version of the stove
If the previous option seemed complicated to someone (although it is not), we can offer an extremely simplified heating design. You can lay out this oven with your own hands in literally an hour, even if your hands are far from being called golden.
Figure 4. The simplest version of a brick oven
The operating principle of the structure is simple. Solid fuel burns below, and settles here under the influence of its own mass. Temperature changes create a draft that carries hot air currents upward. In this case, the firewood burns almost without a residue - the smoke is minimal.
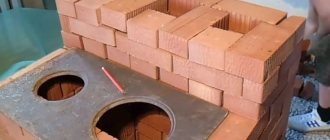
For masonry you will need only two dozen whole bricks and two halves. The stove consists of five rows. The design is so simple that there is no point in describing the order. The procedure is clearly shown in the illustration.
Figure 5. Order of the simplest brick structure
Figure 6. Masonry process
Figure 7. Finished mobile brick oven
For those who want an intermediate option, we can recommend a slightly more complicated option.
Figure 8. Diagram of a simple stove
Figure 9. L-shaped stove
To create this structure you will also need 20-30 bricks. This option can be completed by yourself in a couple of hours, if the skills of a mason are completely absent. A specialist will complete the construction in a matter of minutes.
Advantages of the simplest furnace designs
- very high installation speed – from a day to several minutes;
- does not require a foundation; the stove can be folded anywhere; and if you do not use a binder mixture, the stove comes out collapsible and can be easily moved;
- as fuel - everything that burns: logs, branches, cones, corn stalks, leaves, chipboard, furniture remains, etc.;
- fuel consumption is several times less than, for example, in the case of a potbelly stove;
- the simplest option - without using clay - allows you to get greater heat transfer than from a fire; therefore, such structures are a godsend for those who do not want to constantly maintain a fire while camping;
- almost complete absence of smoke - fuel burns with a minimum of waste;
- the temperature of the bricks reaches 1000 degrees – good heating and fast cooking are guaranteed.
Calculation of the number of bricks
Regardless of the type of brick block, they all have the same standard dimensions.
This makes it possible to use several varieties at once in one masonry, without having to rack your brains trying to align the rows. Bricks have the following dimensions:
- single (standard) - 250x120x65 millimeters;
- one and a half - 250x120x88 millimeters;
- double - 250x120x138 millimeters.
There are also other options, but these are, as a rule, European standards that are not applied in our country.
For kiln construction, as a rule, single bricks are used, sometimes one-and-a-half bricks. Double is not suitable in this case. The fact is that it is usually hollow, that is, it has a large number of holes in the structure. This is done in order to reduce its weight.
We only need solid blocks. Hollow ones accumulate heat much worse and are destroyed more quickly under the influence of various aggressive factors.
Let's move on directly to the calculations. For them, we need only two indicators: the number of bricks from which the lowest continuous row is laid, that is, the base, and also the number of rows. All this is easy to calculate if you know the dimensions of the blocks you are going to use.
Having calculated the amount of material in the base, multiply it by the number of rows of which the oven will consist. In this case, only those departments that go up to the chimney are taken into account. Subtract a third from the resulting product, and you will have the required number of bricks.
We carry out calculations for the chimney separately. There you take the number of bricks in one row, multiply by the number of rows and do not subtract anything.
That's all. All that remains is to add up the results. Now you know how many bricks you will need to build a fireplace. Don't forget to add about 5% in case of replacing blocks broken during construction. Good luck and warmth in your home!
Special requirements
We repeat: the advantages are simple - compactness and the ability to build in an existing house without major construction work. But it is not so easy to place a more powerful firebox in a furnace structure of generally the same dimensions; from excessive heat load it will quickly become unusable. If special requirements are not met:
- Furnace foundation.
- Masonry mortars.
- Methods of laying the structure of the furnace.
- The choice and methods of installing stove fittings.
The design of the foundation for the rough is shown in Fig. The crushed stone cushion without sand bedding is leveled to the horizon before pouring. Pouring mortar M150 – cement M300 and sand 1:2. The gap between the rubble foundation and the flooring is 30-40 mm. Don't forget to support the cut joists! Leaving their ends hanging is a common but serious mistake. The dimensions of the foundation in plan should protrude onto the contour of the furnace by at least 100-150 mm.
Construction of the furnace foundation - rough
Note: the brick bed on the foundation under the furnace is laid out with bandaging in the rows and between the rows in the same way as the first 2 rows of masonry for the furnace structure, see below.
To fold the rough, 3 types of solutions are used, see fig. below. The bed on the foundation and the chimney are laid out on lime mortar as it combines sufficient heat and moisture resistance, but the rubble must be laid only on a completely moisture-resistant cement-sand mortar. It is highly advisable to use mountain or ravine sand with rough grains for clay mortar. Ordinary clay - purchased from the oven, guaranteed fat content and, most importantly, purity. Self-excavated clay, brought to the required fat content with sand, is of little use for coarse masonry.
Compositions of masonry mortars for coarse stoves
For rough masonry, stove bricks and, if the order (see below) is provided for, fireclay bricks are used; red worker is of the highest quality - light red in color (fully annealed), without burn marks, distortion and swelling. Dry molded brick is absolutely unsuitable. The masonry of the structure is roughly carried out following the trail. rules:
- If you are an inexperienced stove maker, each row of masonry is first laid out dry; detected defects in cutting/chipping bricks are eliminated.
- Before laying on the mortar, each brick is soaked until the release of air bubbles stops. You can’t dump all the bricks into a barrel indiscriminately!
- A 5 mm layer of mortar is applied to the bed and the base of the brick being laid.
- The brick being laid is laid with a smooth movement, slightly tilted, and moved towards the previous one so that there are no air bubbles left in the seam.
- The brick is pressed until the seam comes together to 3 mm; You can't knock!
- Between fireclay and ordinary masonry, the initial seam is 8-10 mm; after pressing – 6 mm.
- The seam between bricks and metal embedded parts (see below) is 10 mm.
- Excess mortar squeezed out of the seam is removed with a trowel (trowel).
- The recesses in the seams found after removing excess mortar are filled with mortar by pressing without transverse movements, but not by rubbing!
Those who prefer to learn visually can watch a video tutorial on laying heating and cooking stoves below:
Video: laying a heating and cooking stove
Incorrect oven door installation
Fittings and grates for roughing require cast iron; doors and latches - with an installation skirt and holes in it for diagonal wire whiskers. Welded steel or cast iron fittings with eyes for straight lugs (laid along the corresponding furnace wall) are unsuitable in this case. However, install the doors/latches as in Fig. on the right, in the rough it is impossible; This is not according to stove rules at all. For a Dutch country house with 2.5 bricks in plan, which is heated once or twice a season, it may be fine, but not for a rough one.
It is necessary, firstly, to crimp the mustache (galvanized wire 2-3 mm) with a twist so that it does not move. Press not too tightly at first, place it at the desired angle (at least 12 mm should remain from the far end of the mustache to the inside of the masonry). Then tighten carefully and shake the door/latch slightly. Didn't leave? Good. Then, secondly, you need to tightly wrap the skirt with asbestos cord (or basalt fiber), and only now put it in place. You can also watch the following videos about installing accessories into the oven.
Construction stages
Foundation for a two-story oven
The first thing the work begins with is marking to lay the foundation
It is important to remember that the dimensions of the foundations in any case must be larger than the foundation itself. To set up the structure you will need the following:
- plywood for formwork construction;
- sand and cement;
- fittings;
- crushed stone;
- waterproofing sheet (preferably made of roofing felt).
Stages of work:
- Prepare a place for the foundation, cut out part of the floor boards if necessary.
- Make sure that the future structure will not rest against the load-bearing beams of the ceiling, otherwise you will have to change the layout of the top.
- A pit is dug taking into account the work plan.
- Crushed stone and sand are poured into the bottom and the composition is compacted.
- The formwork frame is constructed so that the concrete does not leak out of the walls.
- Reinforcing mesh is installed. The fittings for a two-story stove are made stronger than for a conventional one.
- A concrete solution is poured and left to dry for several days.
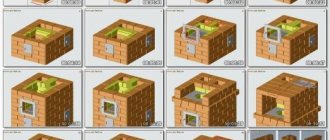
Masonry scheme
Once the foundation is ready, you can begin laying the foundation. The ordering is carried out strictly according to the scheme and includes the following steps:
- The order of laying the first row on the waterproofing sheet is noted.
- The solution for work is mixed.
Next, the rows are built:
| Row No. | Execution of work |
| 1 | Laying out without using a clay mixture to understand the further course of action |
| 2 | Mounting a blower using wire |
| 3 | Formation of the combustion chamber |
| 4 | Laying asbestos strips along the side openings of the fire chamber for further installation of the grate |
| 5 | Installation of a combustion door, similar to the blower door |
| 7—10 | Standard installation scheme |
| 11 | Mounting the hob, installing metal corners |
| 12—16 | Formation of the cooking chamber |
| 17—19 | Laying out continuous brick rows of lines, forming a place for the chimney |
| 20—22 | Installing corners, fixing doors for the cleaning chamber |
| 23—24 | Raising the sides of the drying chamber |
| 25—30 | The filling proceeds without changes, the valves are formed |
| 31—38 | Forming channels for smoke exhaust, expanding the masonry and leading to the ceiling |
The following stages concern construction on the second floor:
- From the 1st to the 26th row, the standard work scheme is used.
- The 27th stage ends with the formation of the valve. And up to 31 everything goes according to plan.
- Rows 31 and 32 are considered to be the beginning of the chimney pipe.