A detailed description of the manufacture of an autonomous heater made of a radiator, heating element and thermostats.
Good day to all! When the question of heating your home arises, you have to choose the best option. Of course, you can buy a heater in a store, but if you want, you can do it yourself.
The homemade heater is made of a cast iron radiator. The battery is packed in the usual way using four bags. At the lower point of the radiator's beginning, instead of a shut-off fitting, an electric heating element is mounted. At the opposite upper point there is a Mayevsky valve for releasing excess air pressure.
According to the author's plan, the radiator is filled with distilled water by gravity. The system is controlled by two thermostats - water and air.
Assembly of the structure
Assembling the radiators together is not difficult, but you should first purchase new intersection gaskets or use instead an asbestos cord impregnated with graphite powder, previously diluted in drying oil.
Since the temperature inside the boiler can exceed +600 degrees, it is worth taking care of the gaskets in advance. The tightness of the entire structure depends on their quality and strength.
The radiator assembly sequence is as follows:
Nipples equipped with right and left threads are screwed into each section. Asbestos cords are wound around them.
Sections are connected in pairs by alternately tightening the nipples
It is important to make the same number of turns with the key so as not to cause distortion. All sections of the cast iron radiator are connected in the same way. The return and supply pipes should be connected diagonally, closing unused holes with plugs. There should be a right-hand thread on one side of the riser and a left-hand thread on the other
If this does not work out, then you need to screw on the nipple, and on it a coupling with a drive
On one side of the riser there should be a right-hand thread, and on the other, a left-hand thread. If this does not work out, then you need to screw on the nipple and the coupling with the drive on it.
Heater made of battery and heating element
When it comes to deciding how to heat a room: electricity or solid/liquid fuel, consumers are confused by both options because of their high cost. Therefore, many are interested in the question of how to make a heater from a cast iron battery so that it is cheap and does not require special care.
Craftsmen have long been using the advantages provided by installing a heating element. Its main merit is that, with proper connection, it can easily heat small rooms, for example, a greenhouse, garage, workshop or chicken coop, without additional heat sources.
A cast iron battery with a heating element is, in fact, an effective way to autonomously heat a small room or use it as an additional heat source in an apartment in a city heating network.
A heating element is a metal cylinder with a spiral installed inside. The walls of the tube do not come into contact with the spiral due to insulation with a special filler. Installed in a heating device, such a homemade heater made of a cast iron battery has the following advantages:
- This is a reliable design, completely safe for human life.
- This device has high efficiency.
- They are simple and durable to use.
- Heating elements are almost invisible, as they are installed directly into the heating system.
- Since they are equipped with a thermostat, they help save energy resources.
- The amount of electricity it consumes is significantly lower than that of conventional electric heaters, boilers or underfloor heating systems.
- To make such a heater from a cast iron battery with your own hands, you do not need any permits. The heating element is simply mounted into the heating network pipe.
Even a person far from electrical work can install and connect the heating element. As a rule, they are sold complete with parts for installation and protection, control devices and elements for connecting to the electrical network. The heating element is simply screwed into the radiator socket and plugged into the outlet.
It should be remembered that the heating element must be installed in a horizontal position. You can turn on the device for heating the room when there is coolant in the system.
To control safety, the heating elements are equipped with double overheating protection. Control sensors are located both inside the device and outside.
Modern heating elements for connecting to cast iron radiators are equipped with two operating modes, which allows them to be used as the main source of heating, and then they are turned on at full power, or as an emergency or periodic one. In the latter case, it is beneficial to use such technology, for example, in dachas where people do not live permanently, but care must be taken to ensure that pipes and radiators do not freeze.
To make efficient heating from cast iron radiators with your own hands, you need to choose a heating element of suitable power. To do this, a calculation is made taking into account the required heating of the coolant and its quantity in the battery.
Advantages of homemade devices
Homemade appliances for heating a city apartment, country house or cottage have significant advantages over factory-made products. They are as follows:
- Possibility of manufacturing from accessible and cheap materials, which leads to a reduction in the cost of the finished device.
- Simple and compact design that can be used in various rooms.
- Ease of use and transportation.
- High efficiency with silent operation of structural elements.
- Self-assembled quality.
Today, infrared heaters are available for self-production, which are the safest and most efficient to use. If more powerful equipment is required, then you can assemble an oil radiator, an alcohol heater, a heat gun, a battery-powered and gas-powered device.
Types of heaters
A home craftsman who wants to acquire a homemade “hot water bottle” can choose from several options:
Oil
It is a container equipped with a tubular electric heater (TEH) and filled with oil.
The main element of the heating element is a spiral made of nichrome or other material with high electrical resistance, which begins to heat up when an electric current is passed through it. The spiral is placed in a copper tube filled with sand.
The oil removes heat from the heating element, distributes it over the surface of the body and, in addition, serves as a heat accumulator (after a power outage, the device continues to heat the surrounding air for some time).
Steam-drip
In its design, a vapor-drip heater is very similar to an oil heater, only water vapor is used as a medium that distributes heat. It is formed from a small amount of water, which is poured into the body.
This solution provides two significant advantages:
- When freezing, the vapor-drip heater will not burst, since water occupies only a small part of its volume.
- Steam is an extremely capacious heat accumulator. More precisely, not so much steam as the evaporation process: it is during the transition from liquid to gaseous state that water accumulates a large amount of thermal energy, which is returned when steam condenses on the walls of the heater.
Having transferred heat to the body of the device, the condensed steam in the form of water flows to the lower part, where the heating element is installed. The power of the heating element and the volume of water are selected in such a way that rupture of the heater by steam pressure is excluded.
Due to the fact that the device body is hermetically sealed, its internal walls do not rust due to high humidity.
Candlestick
A candle flame is known to emit not only light, but also some heat.
Only it usually evaporates to the ceiling in the form of convective air currents and is “smeared” over the entire area of the room.
Why not place a heat trap above the candle? We will tell you what it is in the next section.
Infrared (IR)
Any substance with a temperature different from absolute zero emits “thermal” electromagnetic waves, which are called infrared.
The intensity of this radiation is directly dependent on the temperature of the substance. Water and oil radiators also emit IR waves, but in very small quantities because their surface is relatively cold.
To turn a metal object into an IR emitter, it is enough to heat it to a red glow temperature. If you use special materials, for example, graphite, then quite noticeable “heat” waves can be achieved at relatively low temperatures.
Knowledge of these subtleties will help us make our own IR heater, which will give us heat directly, that is, without the participation of air as an intermediary.
Other types
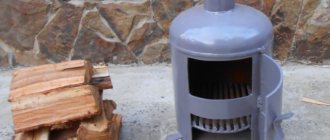
Since electricity is not available everywhere, structures running on gas or solid fuel have the right to life. The latter include potbelly stoves.
Installation of heating elements
The electrical part of a homemade heater is quite simple in design. A heater, a connecting wire with a plug - that’s all you need to install it. To begin with, a grinder is used to cut out a metal plate to which the heating element will be attached. A hole is drilled or cut out by electric welding in it according to the seat and fasteners of the heater. When this part of the work is completed, the plate is welded to the end of the lower pipe left for these purposes. After processing the welding seams, the heating element is installed in its place.
DIY assembly
So, all the starting materials have been prepared. In addition to them, you will need some plumbing tools and equipment, which will not be difficult to find. For example, if you don’t have your own, you can borrow a welding machine from your neighbor in the garage (you still don’t plan to assemble and test the product in your apartment, do you?).
Homemade heater diagram
Do-it-yourself assembly will be carried out mainly locally; you just need to pay attention to the following individual points:
- for better oil circulation, heating elements are placed in the lower part and on the sides; they should not come into contact with each other or with the body;
- if the shape and volume of the body do not sufficiently provide natural convection of liquid, you should resort to equipping the structure with a pump and electric drive;
- for emergency drainage of oil and pressure relief, it is recommended to provide appropriate openings with valves;
- the housing must be grounded;
- Before use, it is recommended to thoroughly test the device for functionality.
As you can see, constructing an oil heater yourself is not so difficult. If you take the utmost care in designing and manufacturing, it will respond to you with all its warmth in inclement weather. If assembling the device seems too complicated, you can always choose an oil radiator in the store.
Recommendations for use
The most important thing when installing and operating a homemade heater is safety. For this reason, it is necessary to periodically monitor the heating device during startup. It is especially important to do this during the first time after launch.
A homemade heater can be successfully used in places with reduced design requirements. A garage or a summer house are the most suitable premises for this. Let's look at how to make an oil heater with your own hands.
Size calculation
Making your own pipe heating device is not very difficult. But there is one important point here - to correctly calculate the dimensions of the device. After all, such an indicator as heat transfer will depend on them.
Required indicators
The calculation is not easy, because it requires some criteria for the premises itself. For example: glazing area, number of entrance doors, what windows are installed, whether the floor, walls and ceiling are thermally insulated.
It’s difficult to take all this into account, so there is a simpler option that takes into account only two indicators:
- area of the room.
- ceiling height.
How can this help when assembling a homemade heating device? To do this, you will have to make a comparison with the usual MS-140-500 brand. The heat output of one section is 160 W, volume is 1.45 liters. What does this give us?
You can determine exactly how many sections will be needed if you use a cast iron device. The total volume of coolant that will fit in one battery is determined from the number of sections. And knowing this number, you can approximately determine the volume of the pipe radiator.
The thing is that the thermal conductivity of steel is 54 W/m*K, and that of cast iron is 46 W/m*K. That is, a small downward error will not have any effect on the quality of heat transfer.
Calculation example
Conventionally, we will assume that an eight-section cast-iron heating device corresponds to the above-described ratio. Its volume is 8x1.45=11.6 liters.
Now we can calculate the length of a pipe with a diameter of 100 mm, which we will use to assemble a homemade battery. The standard cross-sectional area of the pipes is 708.5 mm². We divide the volume by the cross-section, we get the length (we convert liters to mm³): 116000:708.5= 1640 mm. Or 1.64 m.
A slight deviation in both directions will not greatly affect the heat transfer. Therefore, you can choose either 1.6 or 1.7 m.
Using radiators
Selection by heat transfer
So that the radiators cope with their task, i.e. provided a comfortable microclimate, we need to purchase a sufficient number of such devices for one room.
And here you can’t do without calculations, instructions for which are given below:
The number of heating points must correspond to the volume of the room
- Power consumption depends on how much volume needs to be heated. Therefore, we need to multiply the area of the room by its height (in meters). So, for a room with an area of 25 m2 with 3 m ceilings, the required value will be 75 m3.
- Next, we multiply the volume by the standard value of 41 W/m3. This value determines the heat consumption per cubic meter of living space for central Russia. In our case, the total volume of heat will be equal to 75 * 41 = 3075 W.
For cast iron models, heat transfer is calculated per section
System installation
Installing heating radiators with your own hands is a rather complicated process, but this task is still feasible for most craftsmen.
We begin the description of the algorithms with instructions for installing electrical models:
Electric radiator under the window sill
As a rule, stationary electric heaters are mounted on the wall. In this case, for connection, either a socket located in the immediate vicinity of the device or hidden wiring for a permanent connection is used.
- In order for heat flows to be distributed evenly in the room, the battery must be positioned according to certain rules. It is extremely important to maintain the size of the gaps: from the floor - about 100 mm, from the window sill - 80 - 100 mm, from the wall to the back surface of the battery - 30 - 60 mm.
- If the radiator is completely covered by a window sill board, then it is advisable to make holes in it for the release of warm air, covered with plastic grilles. Otherwise, the bottom of the window glass will constantly accumulate condensation as the coldest area in the room.
- The installation of an electric radiator itself is not difficult. All we need to do is install the mounting brackets on the wall and hang the battery on them.
Water heating systems
With water heating it is much more difficult:
First you need to select a connection scheme. This determines how efficiently heat redistribution will take place. Possible schemes are presented in the images in our article, so during installation you must keep this information in mind.
Connection diagrams and heat losses during their implementation
- Secondly, we need to lay heating pipes. As a rule, steel or polymer products with good heat resistance are used for this purpose.
- After this, we install the radiator itself on wall or floor brackets. The heaviest batteries are made of cast iron, so the most powerful fasteners are used to secure them.
- Finally, you need to connect the radiator to the pipes. Most often, threaded connections are used here, which must be as reliable and tight as possible.
Connection fittings
After completing the installation work, it is worth testing the system
If you have not done this, then it is important to follow the announcements about the beginning of the heating season: only the first launch of a test portion of the coolant will finally demonstrate how high-quality the installation was
Electric heater made of cast iron radiator
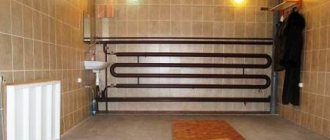
Sectional prefabricated batteries made of cast iron, traditionally used in water or steam heating systems, can also be used as a housing in the manufacture of an electric heater based on a heating element with your own hands.
Electric heaters made of cast iron radiators: on the left - with an expansion tank, on the right - with a sealed core
Preparing the heat generator housing
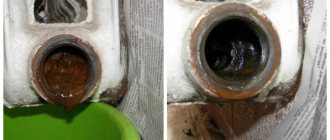
Depending on the location and area of the room, a cast iron radiator with the required number of sections is selected and its condition is visually assessed. If the device has not been used for a long time, you will have to disassemble it, clean the threaded connections, free the sections from scale and reassemble the device using new seals at the threaded connections. This must be done, since oil or antifreeze solution (high permeability liquid) will be poured into the container, and there is a high probability of the unit leaking through old dried out thread seals.
Inspection of a used cast iron radiator
*
If you have no skills in this work, it is better to seek help from a professional - this will also eliminate the need to look for special keys.
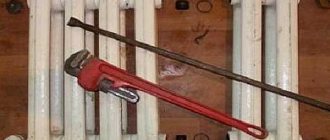
Important! After disassembling and cleaning the threaded connections, while the radiator is not assembled, it is easier to remove old paint from its sections - this is done using an angle grinder or a drill with a steel brush attachment. But this operation can be performed later - after assembling the battery.
After completing the assembly of the radiator, first of all, determine its capacity - temporarily screw plugs into three of the four holes, completely fill the unit with water, and then drain it into a measuring vessel. This is necessary to determine the need for oil or antifreeze, and at the same time for preliminary testing of the device for leaks.
Removing old paint from a cast iron battery after disassembling and reassembling it
After cleaning with a grinder, the product is treated with coarse sandpaper, cleaned of dust and degreased with a nitro solvent. The radiator is then coated with a primer and, after it dries, with one coat of topcoat paint. Painting is done with a spray gun or a narrow brush with a long handle.
Preliminary painting of the body of an electric heater made of a cast iron battery
Selecting a heating element and its installation
For a future electric heater, it is necessary to select a tubular electric heater with the required power and the safest design for this device.
Important! A simplified basis for calculating the required power consumed by a heater is the rule: to heat 1 m2 of a room in central Russia, the main heating unit requires 100 W of energy, and an additional heating device requires 2-4 times less.
*
That is, on average, for the main heating of a room with an area of 20 m2, the battery must be equipped with a heating element of 2 kW of power consumed.
The tube heater's power must be within 0.75% of the battery's heat output to prevent the heater from heating up and turning off too quickly, which reduces the heater's efficiency. The average heat transfer value of one section of a cast iron battery is 140 W. This means that the heat transfer of a radiator of 10 sections will be equal to 1.4 kW, and the power of the heating element should not exceed ¾ of this value - 1.05 kW. Thus, in a room with an area of 20 m2, 2 cast iron electric radiators of 10 sections each, each equipped with a heating element with a power of 1 kW, must be installed as the main heating devices.
When choosing a tubular electric heater, you need to keep in mind that ideally its length should be 10 cm less than the width of the battery - this ensures uniform heating and convection of antifreeze in all sections. You should definitely purchase a heating element with a thermostat - such a unit will increase the relative safety of the heater and ensure operation in a relatively economical mode.
Tubular electric heater with temperature controller
If the heater is planned to be used for heating non-residential premises, then after installation at the design site it can be equipped with an expansion tank - through the fitting on one side in the upper part of the battery, a plug is installed on the opposite side of the radiator. This will not benefit the aesthetics of the device, but will eliminate the factor of pressure from the inside on the radiator from the filler expanding when heated.
Cast iron battery with expansion tank
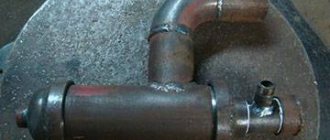
If the tank is not used, then a Mayevsky tap is installed in the lining instead of its supply pipe - to allow emergency pressure relief.
A heating element is screwed into the lower part of the radiator on one side, and a plug on the opposite side.
Before installing the heating element, transformer oil or antifreeze is poured into the battery in an amount of 80-85% of its volume. The external thread of the heating elements (an inch and a quarter) is identical to the internal thread on the battery, so installation of the unit is not difficult.
Identical threads of the heater and radiator
Filling the battery
*
The type of filler is determined (antifreeze, transformer oil or water), and the required quantity is calculated - 80-85% of the volume of water that was previously drained into a measuring container from a completely filled radiator.
Important! If the room temperature drops below zero when the heater is turned off, then using water as a filler for the battery is dangerous - if not drained in time, it will freeze and destroy the unit.
A cast iron radiator destroyed by frozen water in a garage.
The sequence of actions when pouring liquid into the battery is as follows:
- a heating element is screwed into the lower part of the battery on one side and a plug on the other;
- a plug is installed in the upper part of the radiator on one side;
- the heater is positioned vertically with the remaining open hole up, and filler is poured into the unit through it;
- the section of the wall behind the installed electric heater is equipped with thermal insulation from a layer of foil foam foam with an excess in size of 10-15 cm in each direction - this will reduce heat loss due to heating of the enclosing structure;
- the heater is placed at the design location, after which a fitting is installed in its upper free slot, to which the Mayevsky tap or expansion tank pipe is connected.
Important! A homemade electric heater made from a cast iron battery must be equipped with a separate supply line with an individual automatic shutdown device.
To get a more visual understanding of the technology described above, watch this video: https://www.youtube.com/watch?time_continue=674&v=HOmXkuFKBUc
Advantages and disadvantages of oil heaters
Among electric heating devices, oil ones are the only ones that are called electric radiators. Oil heating has many advantages:
- does not dry out the air;
- radiators transfer heat mainly through thermal radiation;
- has a safe design;
- the surface almost never heats up above 50-60 oC;
- easy installation and management.
All this is true, but there are also disadvantages. The main thing is a fairly large inertia. Oil, which serves to transfer heat, has a high heat capacity. And until it warms up, the air will not begin to warm up. But this same property allows you to smooth out temperature differences when turning on/off.
The biggest problem is high inertia and low efficiency: too many heat transfer stages
The second disadvantage is that the safety and durability of the work depends on the quality of workmanship. An incorrectly designed structure can simply burst when heated, the seams are poorly sealed, and oil will leak. Therefore, buying cheap but unknown brands is a risky business.
Criteria for selecting the required materials
Since a homemade device is assembled from units that have already been used, first of all it is necessary to assess the condition of the pipes
Particular attention will need to be paid to their walls. Their thickness should be several millimeters
If corrosion occurs, it is undesirable to use such pipes or be sure to eliminate all defects before use. All rust will need to be thoroughly removed from the metal with a brush, and then covered with an anti-corrosion compound so that the problem does not arise in the future during operation.
For production, pipes with a diameter of approximately 12 cm are usually used. Sheet metal of the appropriate size is used to plug the ends.
To make bypass channels and fittings, you will need to use pipes of a smaller diameter, which can eventually be connected to the heating system. The threads on the fittings are pre-cut, for this reason the appropriate equipment is required - a “drill” (for creating external threads) and a tap (for cutting internal threads).
A DIY oil radiator can be made portable. In this case, small pipes will be used, and oil will be used as the coolant. Heating elements are used instead of heating elements. The choice of this component depends on the area of the room that needs to be heated. Home craftsmen often install an additional thermostat on such a device, which periodically turns the heating element on and off.
For good fastening to the wall, you will also need strong hooks that can support the weight of the resulting unit. To create a more aesthetic appearance, they can be purchased in the store. But if you don’t want to spend additional money, then strong reinforcement bars that need to be fixed in the wall are also suitable. It is advisable to first paint the hooks in the same color that was used to paint the heating device - this way the fittings will become invisible.
Homemade heat gun
Another option for equipment that you can assemble yourself is an electric heater similar to a heat gun.
To make a home heat gun you will need:
- metal cylindrical container (bucket, cut cylinder),
- heating element - a spiral from an electric stove,
- metal grate,
- fan,
- conductive wires,
- switch.
The heat gun is assembled as follows:
- Using a grinder, the bottom part of the structure of the prepared cylindrical container is cut off. This results in a through workpiece.
- The grid is cut to the diameter of the container. The spiral is fixed on the grid so that the diameter of the installation is smaller than the diameter of the container.
- Horizontal rectangular holes are made on the sides of the container to insert a grid with a fixed spiral. Thus, the spiral is positioned 3 cm from the edge of the container.
- From the spiral, conductive wires are led out of the walls of the container through special insulators. A circuit breaker with additional insulation is fixed on the outside of the container wall.
- A fan is installed on the opposite side of the grille, which is securely fixed to the walls with self-tapping screws. The device is connected to the machine.
- Holes are made along the edges of the body for mounting supports secured with nuts. The finished structure should be as stable as possible.
- Test run of the finished heater. First, the fan turns on, then power is supplied to the coil.
Constructing a home electric heater with your own hands from improvised materials, the cost of which is low, is not particularly difficult, so even a novice master can cope with such a task.
Often, apartment owners do not want to throw away old batteries when the time comes to replace them with new units, since there is an option to make an additional heating device from them with your own hands. This is quite feasible if you familiarize yourself with the necessary information and know about the materials suitable for assembly. A heater made from an old battery is a good option, suitable for an additional heat source.
Making your own infrared heater
Modern IR emitters for heating homes are reliable, practical and have good efficiency. Such devices emit infrared radiation, which, without interacting with air, contributes to the rapid heating of various surfaces in the room. Thus, they effectively convert electricity into thermal energy.
The most affordable option for home assembly is an economical film heater, the basis of which is a heating film.
To work, you will need to prepare the following materials and tools:
- two identical pieces of glass,
- aluminum foil,
- sealant,
- paraffin candle,
- epoxy resin glue,
- electrical cord with plug,
- candle holder,
- soot cleaning sticks,
- sponge for cleaning glass surfaces.
The infrared heater is assembled with your own hands according to the following scheme:
- The glass is thoroughly cleaned of dirt and degreased.
- A conductive base for the heater is assembled. Using a candle, soot is applied to the back side of the glass blanks, acting as a kind of current conductor. Before starting the procedure, the workpieces are slightly cooled.
- Along the perimeter of the workpieces, the surface is cleared of soot using chopsticks to obtain an even edge 0.5 cm wide.
- Strips of width equal to the area of the conductive glass base are cut out of foil. They will be used as conductive electrodes.
- One workpiece is placed on a flat surface with the smoked side up, and a thin layer of glue is applied around the perimeter. Foil strips are applied to the glued surface with a slight shift beyond the edges of the workpiece.
- It is covered with a second piece on top and, accordingly, the smoked side down is pressed to set the glue. All joints are carefully treated with sealant.
- Checking the power of the finished structure. If the power indicator does not exceed 100 W per 1 sq. m of room, then the heater is connected to the network using a conductive wire and plug.
A multimeter measures the resistance of the heater's conductive base. To calculate power, use a simple formula: N = U×U/R, where
N – power, U – mains voltage (220 volts), R – resistance.
For example, R – 20 Ohm, then N = 220×220/20. The result is 2420 W. This power is enough to heat a room of 25 square meters. m.
Electric spiral heater
A small homemade garage heater can be made in almost a couple of hours.
To do this you will need the following materials and tools:
- fireproof (fireclay) brick – 2 pcs.;
- nichrome spiral – 1.2-1.5 m;
- steel or aluminum corner 35x35 or 40x40 mm - 1.5 m;
- small grinder with discs: for stone and cutting for metal;
- drill with drills: for metal – Ø 3 mm, pobedit – Ø 6-8 mm;
- narrow chisel with hammer;
- rivets with a key.
The device to be manufactured will be an insulating base made of two bricks with a spiral recessed into them, located on a frame made of angle steel.
Homemade electric heater based on a nichrome spiral
A square of 250x250 mm (the length of a brick) is drawn on a sheet of paper, in which a spiral layout is arranged - a labyrinth of strips 1 cm wide, directed from the edges of the square to the center.
Bricks that are selected with good geometry and without chips are cleaned, washed, dried and placed on a flat surface next to each other to form a square. The outline of the labyrinth drawn on the sheet is transferred to this square.
An example of marking a furrow for a spiral
Using a grinder with a stone disc (a dry cutter), a furrow is formed on the bricks. Along the boundaries of the groove, even cuts are made to a depth of 1 cm, and then the core between them is selected using the side edge of the same disk - this way the bottom of the groove is smooth.
Using a grinder to make straight sections of a groove for a spiral
If you cut out the middle between the cuts with a chisel, then there is a risk of splitting the brick; moreover, if the outcome is successful, you will still have to level the bottom of the furrow with a grinder.
By forming straight sections of the groove on the bricks with a disk, at turns there is no need to go beyond the boundaries of the contour in order to create the required depth of the groove - this is carefully done with a small chisel, which can be made from an M10 tap or a Ø10 mm drill.
Finishing the corner sections of the furrow with a chisel
After the groove is formed, a spiral is placed into it.
Important! In order to be able to place containers on the heater to heat the contents, the spiral placed in the furrow must be 3-5 mm below the plane of the bricks.
In the grooves at the beginning of the “labyrinth,” two through holes with a diameter of 6-8 mm are made using a drill with a Pobedit tip for subsequent connection of the ends of the spiral to the power cable.
Places for making holes in the brick for bringing the spiral down
Then they begin to make a tripod from angle steel for installing bricks into it.
Using a grinder with a cutting disc for metal, cut a corner to size - 4 elements for the frame and 4 support legs. Corner pieces can be connected in two ways:
- electric welding, having previously cut the ends of the fragments for the frame at an angle of 45 o;
- using blind rivets, drilling holes in elements placed on top of each other.
Assembled metal stand for brick insulator
The thickness of the brick is 5.5-6.5 cm, so at both ends of the spiral we straighten several turns to even sections approximately 10 cm long. The straightened ends of the spiral are passed down through the holes in the brick and connected to the ends of the power cable.
Connecting the spiral to the electrical cable after exiting down through the holes in the brick
The heater is installed in the working position, the spiral is distributed in the groove until it is evenly tensioned along its entire length.
Perform a test connection of the device to the network. Electrical wiring and automatic line shutdown must be designed for a power of at least 3 kW.
After the device enters operating mode, its spiral should not be bright red, but brown-crimson in color.
If the coil is overheated, it is necessary to reduce the current, which is done by adding a 20-40 A diode to the circuit.
Diagram of parallel connection of two heat-reducing diodes and normal color of the spiral in operating mode
The electricity consumption of such a homemade heater cannot be called economical, but it is quite acceptable for short-term activations - minor car repairs in the garage, for a small greenhouse as an emergency means of heating, heating food, etc.
Homemade heaters: pros and cons
As a rule, heat generators made by hand are copies of devices produced industrially. These copies, with rare exceptions, are inferior to the originals in many respects, but due to certain circumstances, the consumer often chooses a home-made unit.
“Pros” of using homemade devices:
- relatively low cost (when made with your own hands and using improvised means);
- the ability to assemble a unit of the required dimensions and manufacture a housing with the desired strength characteristics, up to vandal-proof design.
The main argument against it is the uncertain degree of safety of homemade heating devices during operation, which is fraught with unpredictable negative consequences not only for the owner of the unit, but also for others.
This argument is due to many factors, and its validity is confirmed annually by numerous fires caused by homemade air heaters used in violation of the Decree of the Government of the Russian Federation. “On the fire safety regime” No. 390 of April 25, 2012 (as amended on November 18, 2017)
Excerpt from the Resolution on the fire safety regime in R.F. banning the use of homemade heaters
As for the secondary arguments “against”, they are as follows:
- lack of legitimate manufacturer guarantees;
- uncertainty of some characteristics of homemade devices;
- low aesthetics and degree of automation of handicraft units.
If familiarization with these arguments still does not prompt you to purchase a factory-made heater in a store, let’s consider how to make a heater yourself so that the likelihood of an accident when using it is as small as possible.
Selection of materials
As is clear from the above, to obtain a homemade heater you will need to get the following components somewhere:
- frame;
- oil;
- heating element;
- mobile stand;
- control and automation devices.
As a housing, you can borrow an old radiator from a central heating system, sheet or sectional. A car, or any similar product, the design of which will allow fluid to circulate inside naturally or artificially (using an electric motor), is also quite suitable. You can also make a closed loop from steel pipes with your own hands.
The main thing is not to forget that an indispensable condition for the normal functioning of the system will be to ensure the tightness of the housing. If the liquid begins to leak, then it is unlikely that such a homemade device will bring more benefit than it will cause trouble.
As for the oil, firstly, its quantity should be based on the calculation
85% of the body volume. The rest of the cavity is filled with air. This 15% area is maintained so that during operation the oil does not crush the housing due to thermal expansion.
Secondly, the quality characteristics of the liquid must satisfy at least two criteria: purity and heat resistance. Dirt and impurities will shorten the life of the heating element by causing scale to settle on it. A decent temperature of the heating element indicates that you should select technical oil of the appropriate brand. A suitable option would be, for example, a transformer.
The number and characteristics of heating elements are selected depending on the required power of the heater (and taking into account the overall dimensions of the housing). Conventionally, we can assume that to create a comfortable atmosphere in a room with normal ceiling heights, you need
1 kW per 10 sq. m. For rooms with high ceilings, poorly insulated, located in cold areas, etc., several times more powerful products are needed.
Of course, the capabilities of the power supply network in the place where you plan to use the hand-made device must also be taken into account.
In terms of durability, it is also important to consider possible combinations of metals of the heating element and the body. For example, it is not recommended to use heaters with a magnesium anode
combine aluminum and regular steel (not stainless steel) with copper.
Installing a heating element into the heater body
Since the structure, in all likelihood, will have an impressive mass, a mobile platform on wheels, if one is planned to be included in a home-made device, must withstand the load placed on it. It can be made, for example, from rolled steel - angles, channels, etc. materials.
Switches or a rheostat are selected in accordance with the total power load of the device.
A bimetal plate (taken, for example, from an old iron) should be used as a thermostat. When choosing a setting for it with optimal temperature characteristics, you need to proceed not only from considerations of energy savings, but also from the fact that excessive heating can cause the pressure inside the case to increase to too high a level.
To better guarantee safety, an additional thermal fuse can be provided. Or a similar switch that triggers at a certain pressure.
Working with pipes
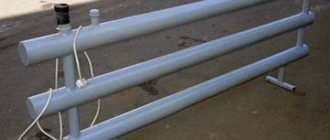
After the oil heater circuit has been selected, it is necessary to manufacture its body. We make a drawing, determine the dimensions and start working with an angle grinder. The pipes are cut to length in the required quantity. After cleaning the ends, they are carefully and thoroughly welded. The performance of the heater as a whole will depend on the quality of welding. A leaking seam is not only a nuisance, but also a possible cause of fire. When welding the ends of the pipes, leave one (on the lowest pipe) free. Subsequently, a heating element will be inserted into it. This means that the stub will be of a different configuration.
The finished pipes are tied together. The piping is done with pipes, only of a smaller diameter. On the topmost pipe it is necessary to provide a place where the filler plug will be located. Structurally, it can be made in the form of a welded short pipe with a coupling, one side of which will be welded. Using your plumbing and mechanical experience, the heater configuration can be made more aesthetically pleasing, unlike the one in the photo. By the way, the body can be not only tubular. Radiators from cars, old cast-iron radiators and other closed containers are well suited for this purpose.
To increase operational safety, it is advisable to install a pressure-sensitive safety valve on the upper pipe.