The compact brick structure of a recognizable shape has remained a popular heating option in country houses, dachas and city apartments for centuries. The Dutch oven is valued for its neat size, efficiency and variety of uses. Let's figure out what distinctive features it has and what rules it is built by.
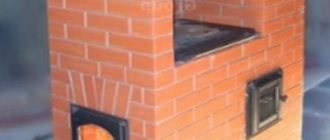
Dutch oven in a country interior Source shko.ca
Historical roots and features
It is believed that compact stoves with a high chimney, the prototype of modern Dutch women, began to appear in the cities of Holland from the 15th-16th centuries. The tall chimney carried the smoke from several stoves, which was a practical solution, since at that time property taxes depended on the number of chimneys and the size of the dwelling.
Initially, the firebox was solid and fired with coal, but in the process of evolution, a vent and grate appeared. Then changes were made to the appearance of the stove. After the disappearance of the arched vault, the facade was simplified so much that special qualifications were no longer required for its construction.
This became the reason for the rapid spread of the Dutch oven to other countries. They appeared in Russia at the beginning of the 18th century, after a special decree of Peter I. Since the decree on the construction of Dutch-type stoves did not require adherence to strict canons of masonry, the design began to be modified. The classic stove of the past had the following features:
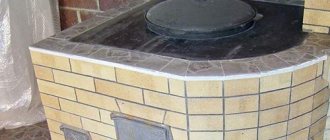
- Simple masonry, feasible even for a beginner with little experience and a diligent approach to work. Minor flaws have virtually no effect on functionality.
The design takes up minimal space Source glartent.com
- The traditional Dutch oven was used solely for heating and did not have a stove or stove.
- The design lacked a grate and a blower.
- For cladding they preferred tiles or tiles imported from Holland.
By the middle of the 19th century, the Dutch oven became common in the European part of Russia, from the northern regions to the southern regions and Belarus (where it was called “rude”).
Modern Dutch women have acquired new qualities and are complemented by a stove, a stove bench, a water heating tank, and an oven for baking bread. However, they are still easily recognizable in appearance and retain the main design features.
Finish stage
Finishing work is the creative stage in the construction of the Dutchman.
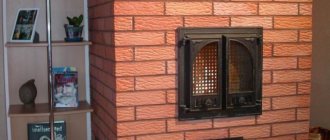
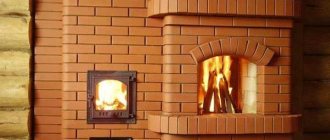
If the stove is laid using new red ceramic bricks, then cladding is not required. For Dutch cladding, clinker or tile tiles and decorative plaster are used. The Dutch woman looks great in the interior. In color it can either merge with the interior or contrast. A stove lined with mosaics or decorative stone looks very good.
In past centuries, the outer parts of the first Dutch ovens were decorated with tiles. The ordinary stove looked like a work of art.
The classic rectangular stove, lined with ceramic bricks, is widely used. Round-shaped Dutch women have a number of disadvantages during operation, so they are less common.
After veneering, take a break for two weeks. The structure must dry. The firebox door is left open during this time.
After the Dutch oven has dried, you can light the stove for the first time. There is no need to rush things. If the first firebox is made with a damp stove, the structure will crack and all the work will be lost.
For the first burning, take a fifth of the full portion of fuel. It is good to use wood chips or shavings for firing in test mode. You need to take the smallest logs.
Open all valves and dampers. In gentle mode, the oven is operated for approximately 7 days. The oven temperature should not exceed 600 degrees.
When burning low-quality, high-ash fuel, a large amount of soot quickly appears in the chimney of a Dutch oven. Therefore, it will have to be cleaned often, but it is better to select good fuel. The most suitable logs for heating a stove are made from wood from not very old oak, alder, linden, and fruit trees.
Design features and operating principle
In the classic old versions, the grate and the blower door were absent, but in modern replicas they are often added. The remaining features are preserved and have the following form:
- Compact, tall design with a spacious rectangular firebox.
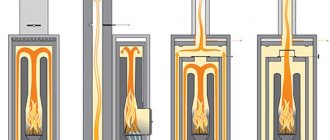
- Multi-channel chimney system, the chimney channels are located vertically and connected in series. The number of channels can vary from 3 to 6-8 pieces.
Scheme of operation of a three-channel Dutch machine Source terman-s.ru
- The grate and ash pan are missing. In such conditions, intense combustion is impossible, the fuel smolderes, and, as a result, heat is released gradually.
- Oxygen enters through the firebox door.
- Features of the masonry. The walls were made of half a brick. Thanks to this technique, the weight of the building is relatively small, which reduces the requirements for the foundation and speeds up heating.
The multi-channel chimney is a feature of the design, and it determines the features of its functioning: The path of heated fuel gases is lengthened as follows:
- Hot smoke coming out of the combustion chamber rises through the first (lifting) channel; During the rise, it gives off heat to the walls of the furnace and has time to cool.
- The cooled smoke enters the second (descent) channel, through which it descends to the firebox, where it is heated again.
- The cycle is repeated two or three times. After circulating through the channels, the smoke gives off the maximum amount of heat to the brick walls and exits out through the last channel.
Design of a 5-channel stove with a stove Source ytimg.com
The Dutch successfully stretched such a structure over two or three floors. This made it possible to efficiently use the energy of burned fuel, which ultimately led to more careful consumption. At the same time, the stove turned out to be economical in terms of materials.
Pros, cons and care features
The positive qualities of a brick Dutch oven include the following features:
- Simplicity and light weight of the design.
- Relatively low material consumption. A large model will require 650-700 bricks, while laying a small Russian stove requires 1200-1300 bricks.
- Compactness. The design does not require much space
- Large heating area. A Dutch stove heats 50-60 square meters, a Russian stove heats 40-45 square meters of housing.
- The room heats up quickly, and the efficiency of the structure does not decrease with height.
- Multifunctionality. Classic models do not have a stove, but if you wish, you can add a hob, oven or other functions that improve your life, or equip the stove with a water heating tank.
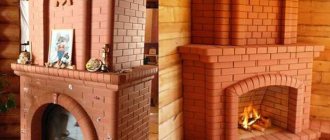
- Design possibilities. The tiled structure decorates any interior and can act as a fireplace.
Dutch models with a hob Source strojdvor.ru
The following qualities are considered weaknesses:
- Passing through a long chimney, the gases cool and heat up several times. Due to uneven heating of the walls, cracks may form in the masonry.
- If you accidentally leave the damper (view) open after the wood has burned, the heat will go outside and the Dutch oven will quickly cool down.
- The system has weak draft, which is associated with fluctuations in the temperature of combustion products and the resistance of the winding chimney.
Also, the Dutch heating stove has a low efficiency, not exceeding 40-55%. This is due to the fact that the optimal combustion mode for it is smoldering. Therefore, quickly burning dry brushwood is not suitable for the firebox. But, even with the right fuel, to maintain a comfortable temperature, you need to heat it twice a day.
It is also important to monitor the correct operating mode and fuel selection. An overheated furnace begins to release carbon monoxide in dangerous concentrations. To prevent this from happening, check the temperature; no higher than 60°C is considered optimal. Control can be exercised by hand: in the middle part of the structure, the palm can withstand touch, but the back does not.
The Dutch woman needs systematic care Source shko.ca
Over time, soot accumulates in the chimney (this happens especially quickly if you use inexpensive fuel that leaves a lot of ash). To prevent soot from catching fire, it must be cleaned out on time.
See also: Catalog of companies that specialize in the design and installation of fireplaces and stoves
When is a Dutchwoman suitable for the home?
The following considerations may serve as criteria for choosing a design for a country house or cottage:
- The area of the premises is limited, and a Russian stove (or other large structures) will not fit.
- The house has two or more floors, and you want to heat them all.
- The cost-effectiveness of the project is important to you; you don’t have enough budget to use expensive materials. You can use any type of brick (even used one), and it will be required in half as much as for a Russian stove. The only exception is the firebox, which requires good quality refractory bricks.
- If the stove is needed for a summer residence, when the kindling will be rare and irregular.
- As a summer cottage option, a model with a hob is usually chosen. In a house with year-round living, a stove-oven model will be convenient.
You should refuse the Dutch in the following cases:
- The main fuel is planned to be branches, reeds, straw; everything that does not smolder, but burns quickly.
Modeling a small stove for a private home Source teploclass.ru
- High efficiency (heat capacity) is important. In cold weather, the oven must be heated every 4-5 hours.
The history of its appearance
As the name suggests, the country where this type of stove was invented is Holland.
The design of these stoves, which appeared about 600 years ago, was influenced by two main factors:
- Dutch houses of that time were very modest in size
- taxes that the state took were calculated based on the number of pipes in the house.
Therefore, stoves were small enough to save space, and pipes were often shared with neighbors to pay less taxes.
Round variety
In the model range, among the rectangular options with and without a stove, the round Dutch oven stands out. Its feature is double walls: the inner cylinder of small diameter is closed on top with a metal casing. Modern designs have the following structure:
- The chimney consists of three or five vertical channels, sometimes it is made helical.
- They try to make a solid firebox as voluminous as possible so that fuel has to be added less often.
- The brick frame is wrapped in a case made of smooth or corrugated steel sheets.
A Dutch oven in a metal casing has the following advantages:
- The model is popular due to its simplicity and low cost; it is easy to assemble with your own hands, and relatively few materials are required (the wall is laid out in a quarter of a brick).
- The stove is efficient and at the same time fireproof. Even if the brick wall begins to collapse, the sparks will remain within the steel case.
Round model in tiled cladding Source shko.ca
- Minimum dimensions. Thanks to its round shape and small (1 m) diameter, the model fits organically into the space of even a small room. It will not interfere in any location: in a corner or in the center of the room. The most usable space can be saved by placing the device between rooms.
- Design possibilities. If you don’t like the metal casing, you can refine it: tiling it with ceramic tiles, painting it or covering it with plaster.
The following features are listed as disadvantages:
- Increased fuel consumption. A round stove needs 25-30% more wood than a Russian one. Therefore, its installation is justified in case of irregular use, for example, in a country house or in a summer country house. In dacha conditions, a Dutch oven with a hob will be especially useful.
- High heat dissipation. A round stove heats up the room quickly, but also cools down just as quickly. Lining with heat-resistant materials will help slow down the process.
- The steel casing makes cleaning the chimney inconvenient.
- Due to problems with traction, a dull firebox and improper care, the round Dutch woman often smokes.
An old drawing of round stoves Source stroyfora.ru
Decorating a Dutch oven
It has long been customary to decorate a Dutch oven with tiles.
Examples of decorating a stove with tiles
If this method of decoration is not available, a more familiar one will do - the stove can be plastered and whitewashed.
One way or another, if the interior of the room is at all important to the owner of the stove, the Dutch oven definitely needs to be refined.
Round Dutchman's finishing
In a purely brick design, it looks stingy and uninteresting.
Preparation for construction: materials, tools
To build a Dutch house with a rectangular (or square) base, the following building materials are used:
- Ceramic and fireproof (fireclay, for combustion chamber) bricks. The quantity depends on the size of the building.
- Mortar for foundation laying and brick laying. You will need cement, sand, clay, gravel, water.
- Roofing felt for foundation waterproofing.
- Chimney pipe.
- Consumables. Formwork boards, metal reinforcement, wire (for masonry reinforcement), asbestos cord.
- If you plan to build a Dutch oven with a stove, you need a hob.
- Metal parts of the structure: grate, doors, valve.
- Facing. Metal sheet (for a round structure) or other suitable cladding.
The tools you need to prepare are:
- To control proportions and angles. Tape measure and marker, as well as a building level, plumb line, protractor.
- For laying bricks. Trowel, rubber hammer.
- For turning bricks. Grinder with a diamond wheel.
Modern interpretation of the form Source pinimg.com
- A bucket for mortar, a shovel and a bayonet shovel, a construction mixer (can be replaced with a drill with a spiral attachment).
- Sieve for sifting sand and cement.
- Ladder for laying out the last rows and arranging the chimney.
Fire safety measures
Dutch is considered a fire-resistant structure.
However, as with the construction of any furnace, certain rules must be followed:
- An asbestos sheet is placed in front of the stove to protect against accidental ignition of fallen coals or sparks from the firebox.
- Systematic cleaning of the chimney to remove soot accumulation is required.
- There should be no furniture or household items within half a meter from the stove.
- The fewer metal elements used in the construction of the Dutch house, the safer it will be. However, when constructing an arch, the opening above the cooking zone must be blocked with a steel corner.
- At the junctions of metal elements with brick, a 0.5 cm layer of building mixture and an asbestos cord are laid.
- When laying a hob on a brick, you need to apply a clay layer to protect it from overheating.
Video description
About the construction of the Dutch from A to Z in the following video:
Foundation
Even for a lightweight stove that places a small load on the base, a solid foundation is needed. Ideally, a place for a Dutch oven, with or without a stove, is allocated and arranged at the design stage of the house. If you think about a heating device later, you will have to carry out the following work:
- Remove existing floor covering.
- Dig a pit with a depth of at least 0.5 m. The size of the side of the pit is 20-25 cm larger than the side of the stove.
- The bottom of the pit is cleared, leveled and compacted.
- The bottom is covered with a layer of sand 15-20 cm thick. The resulting sand cushion must be strictly horizontal (checked by level), otherwise the walls will turn out crooked.
- Half a solution of cement (1 part) and sand (3 parts) of medium consistency is poured onto the pillow. A reinforcing mesh is placed on top and filled with the remaining solution.
Design complemented by a resting place Source shko.ca
- Dry cement is sifted through a sieve onto a damp base, roofing material is laid, and covered with sand (5-7 cm).
- The foundation is left to gain strength for a month, after which laying begins.
Pipe arrangement
If you think about the chimney design in advance when building a house, then laying the pipe will not be a problem. But it often happens that a stove is built in an already built house.
When the place for the chimney is not prepared in advance, additional preparatory work must be carried out. Remove the roofing and install lintels at a short distance from the ventilation ducts. If it is impossible to partially dismantle the roof, use a grinder or jigsaw. Asbestos sheets are laid between the pipe and the wooden roof elements. They are attached to the rafters using self-tapping screws or construction staples. Carrying out fire prevention measures at this stage is a very important point in the construction of the furnace.
When erecting a pipe on the roof, the craftsman should be careful. This is especially true for installing a chimney in old houses.
To enhance traction, the corners of the bricks are rounded. If this is not done, the draft will be weakened by turbulence, and the efficiency of the furnace will significantly decrease.
The pipe should rise 0.6 m above the roof. The penultimate 2 or 3 rows slightly expand the pipe. This is necessary to protect the roof from water. In the last row, the chimney is narrowed to its original size. Be sure to install a protective metal cap against rain and snow.
To correctly calculate the height of the pipes, they are guided by the height of the ridge. When the pipe passes through the hole in a well-insulated attic, you can do without additional thermal insulation.
The opening between the pipe and the roof should be carefully closed. All cracks are clogged with heat insulation. The best material for this is stone wool or foam glass.
Solution and order
For masonry you will need a clay mortar. You can purchase a ready-made mixture at a hardware store, but it’s easy to make it yourself. The masonry mortar is prepared two to three days before the start of work. This is necessary so that the solution acquires the necessary qualities for a strong setting of the brick rows. The mixture is prepared in the following order:
- The clay is poured with water in a separate container and allowed to swell for several days.
- Wet clay is thoroughly mixed with sifted sand. The proportion differs among different masters: 1 to 1, or 2 parts sand for 1 part clay.
- Add water: 1 part water to 8 parts mixture.
An example of an order for a large Dutch woman Source gidroguru.com
Video description
About a small round Dutch woman for a summer residence in the following video:
The quality of the mixture must be checked. A trowel is passed over its surface, moving the top layer to the side. If the shape of the recess is smooth, the side retains its shape, and the proportion of the mixture is correct. If a torn mark remains, then the solution is too thick, you need to add water. If the mixture spreads (the side floats) behind the trowel, add a little clay to the solution.
Regardless of the chosen size, shape and design of the Dutch oven, the ordering is carried out in compliance with the following order:
- The 1st row is laid out on the foundation using a dry method, the horizontalness is checked with a level. Each brick (in this and other rows) is dipped in water for 2-3 seconds, then it will not absorb water from the masonry mortar.
- The solution is applied to the surface of the 1st row, and the 2nd and 3rd rows are placed on top. They, like all subsequent rows, are placed on the solution. From approximately rows 3 to 8, refractory material is used to form the combustion chamber.
- The grate is mounted in the 4th row, then the combustion door is installed and wrapped with asbestos cord. The winding will allow the cast iron to expand when heated without deforming the structure.
Completed structure with brick cladding Source ytimg.com
- On the back wall, bricks from rows 4 to 7 are laid out dry. The bricks can be removed for easy cleaning of the stove.
- On the 10th row, install a hob (if provided). It is also laid with asbestos cord to compensate for the expansion of the metal.
- From the 9th-10th row, the molding of the chimney begins, the masonry is carried out according to the order, cleaning holes are laid, and the doors are mounted.
- Approximately from rows 17-18 to 23-24, return channels are installed. It is important that their internal walls do not have brick protrusions.
- In the final rows, channel overlaps are formed, and a hole for the chimney is left on top.
- The chimney is laid out, a steel sheet is laid on the floor in front of the firebox (fire safety rules).
The finished oven is left to dry for two weeks with the doors open. Before the first kindling, check the draft: burn a sheet of paper and monitor whether the smoke comes out correctly.
Dutch oven with hob and bed Source shko.ca
Calculation of parameters
The main parameters of the stove are the heat transfer power and the dimensions of the chimney.
To calculate power, you need to know the specific calorific value of the fuel.
Table: wood calorific value indicators
| Wood | Value (kW*h/m3) | ||
| At 12% humidity | At 25% humidity | At 50% humidity | |
| Poplar | 1856 | 1448 | 636 |
| Fir | 1902 | 1484 | 652 |
| Spruce | 2088 | 1629 | 715 |
| Birch | 3016 | 2352 | 1033 |
| Oak | 3758 | 2932 | 1287 |
| Aspen | 2181 | 1701 | 747 |
During flaming combustion, a portion of fuel burns in about 1 hour, so the power of a stove operating in this mode will be:
W = Vt x Eu x 0.63 x 0.4 x 0.8, where:
- W is the heat transfer power of the furnace, kW;
- Vt—furnace volume, m3;
- 0.63 — combustion chamber load factor;
- 0.4 - furnace efficiency;
- 0.8 is a coefficient showing what part of the fuel is burned in full.
Let's assume that the furnace firebox has dimensions of 400x300x400 mm. Then, in the case of using birch logs of average humidity (25%) as fuel, we obtain the following power:
W = 0.4 x 0.3 x 0.4 x 2352 x 0.63 x 0.4 x 0.8 = 22.76 kW.
In accordance with the calculated power, the chimney cross-section is selected:
- with thermal power less than 3.5 kW: 140x140 mm;
- between 3.5 and 5.2 kW: 140x200 mm;
- between 5.2 and 7.2 kW: 140x270 mm;
- between 7.2 and 10.5 kW: 200x200 mm;
- between 10.5 and 14 kW: 200x270 mm;
- more than 14 kW: 270x270 mm.
If the chimney used has a circular cross-section (it can be made from sections of steel pipe or concrete blocks with round holes), then it must have the same area as the specified rectangular sections.
It should be noted that when operating the furnace in smoldering mode, its power ranges from 10 to 30% of that calculated for flame combustion. But the cross-section of the chimney should be selected according to maximum power.
Briefly about the main thing
A laconic Dutch oven is a heating device with a historical past. It has proven its effectiveness in many countries, and remains a popular option for country houses and cottages.
Its distinctive design feature is a multi-channel chimney system and a reduced amount of material for construction. Dutch women are quite diverse. There are rectangular, square and round models; many have an addition in the form of a hob. The undoubted advantage is that it can be assembled with your own hands, and this can be done by a person with minimal construction skills.
Large Dutch oven - how to build
All elements - valve, doors, grate - are mounted in the same way as in the version just described. But the design, of course, will be somewhat different: there is already a smoke circulation (channel labyrinth) in which the flue gases give off their heat. The order of a large Dutch oven, as well as its diagram, are shown in the figure.
Arranging a large Dutch oven