Users of forumhouse.ru know well that the comfort and safety of living in the house depends on the correct choice of heating equipment.
Due to the steady rise in energy prices and the high cost of gas connections, many developers are looking for an alternative to blue fuel. There are different ways to heat a private home, but stove heating is not going to lose its position. In this article we look at how effective stove heating is in a private home in modern conditions. From this article you will learn:
- What are the advantages and disadvantages of a stone stove?
- Where is the best place to install a stove in the house?
- Stove heating in the house: problems and features;
- What kind of brick should the structure be made of?
- What are the requirements for the foundation for a stone stove?
- Can it become an alternative to a solid fuel boiler?
- What you need to know about fire safety standards for stove heating in a private home.
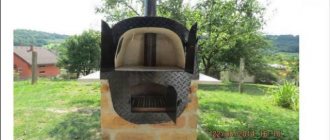
Making a bath unit
One of the best options for a heating device for a bath is a metal stove made of sheet steel, lined with brick.
Such a homemade sauna stove is not mobile, but it is fireproof, which means it can be installed in a residential building and even in a wooden sauna building. To build it, you will need the following tools:
- welding equipment;
- Bulgarian;
- diodes 3-4 millimeters.
You also need to have sheets of iron 2–3 millimeters thick, and reinforcement 8–10 millimeters.
An important point is that when arranging such a stove, it is necessary to choose the correct cross-section for the chimney, since the draft force depends on this, which is also influenced by weather conditions: the warmer and more humid the air, the weaker it is.
If the chimney is not wide enough, gases and air will begin to mix before they have time to escape. This creates a smoke plug. If the diameter of the pipe is too large, then the gases in it will move too slowly, and the surface of the inner walls will quickly become clogged.
Do-it-yourself iron sauna stoves are built like this:
- First of all, the foundation is laid out. For it, a wooden formwork 20 centimeters high is built so that a square measuring 1x1 meter is formed.
- The reinforcement is mounted in one layer, making a mesh of rods with cells measuring 20x20 centimeters. It is necessary that the reinforcement does not touch the ground, so it is supported on pre-installed pegs and tied in weight.
- Prepare a cement-sand mortar in a ratio of 1:3. For it, take 1 part of cement no lower than grade M400 and 3 parts of fine river sand. To add strength, some crushed stone is added to the mixture.
- The solution is poured into the formwork, covered with polyethylene film and left to dry for 4 weeks. Once a day, the concrete must be sprayed with cold water and covered again, otherwise it will begin to crack.
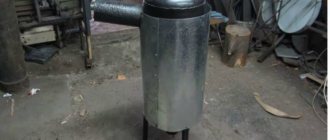
- Next, you need to take the rear wheel rim and weld all the holes on it, leaving only the central one.
- The convex top is cut off from the second rim, the first one is inserted into it and welded. The main thing is to create a tight connection, because there will be hot liquid inside.
- On the inside of the second rim, at an equal distance from one another, reinforcement is welded on three sides. It needs to rest against the pipe to give the structure rigidity.
- A round 25 mm hole is created at the bottom of the first rim and a pipe of the appropriate cross-section is welded to it. A faucet is screwed into it to drain water.
- Next, exact copies of the two rims are made. A copy of the second of them is placed on the pipe, the copy of the first rim is turned over and welded to the end of the pipe. A second copy of the second rim is attached to the top and reinforced with reinforcement for rigidity.
- When the foundation mortar has hardened, the formwork is removed and bricks are laid using a clay-based mixture.
- The location of the furnace is completely covered with bricks to protect against fire.
- The base is made of brick, and from the second row they begin to lay out an ash pit with a blower. By means of it, ash is removed and thereby ensures the flow of air inside, which helps the appearance of good draft. The length of the ash chamber should be less than that of the firebox.
- Install the blower door, line it with bricks and lay another row. A grate is placed on the ash pit shaft.
- After the grate, two rows of bricks are laid out, leaving space for the firebox door. Two more rows are created on top.
- The masonry is allowed to dry for 2 weeks, ensuring air circulation. Then the stove needs to be heated with wood chips for 1.5 - 2 hours.
- The finished pipe is installed on the brick structure. There is a heater and a container for hot water on it.
- The weight and dimensions of the stove are quite large, so it is better to divide it into its component parts and assemble it inside the bathhouse on site.
- The top of the chimney is reinforced with reinforcement rods, welding one end to the pipe and resting the other against the wall. To attach it to the wall, use a metal plate or a steel angle.
Stove heating at home: device features
When choosing stove heating, one of the most common mistakes is the idea that you first need to build a house, and only then start laying the heating device. The house and the stove should be perceived as two objects closely interconnected with each other, requiring an integrated approach and careful calculation.
“Dance from the stove!” – this is exactly what the stove-makers’ motto sounds like. This means that before starting construction, you must:
1. Understand what kind of oven you need;
2. Calculate its dimensions and mass;
3. Determine the location of its installation in the house.
4. Calculate the load from it on the foundation or floors.
5. Consider the chimney system.
Figuratively speaking, it is not the stove that is built inside the house, but the house that is built around the stove!
Alexey Telegin:
– It happens like this: the developer first builds a house, puts on the roof, does the finishing, and then suddenly remembers about heating and wants to install a stove. Here it turns out that she simply does not “fit” into the room. We have to solve this problem, redo or strengthen the foundation, break and rebuild the floors and rafter system.
“Implanting” a heating device into an already built house leads to unjustified costs.
MasterOk:
– Only if you have a project or sketch of the stove, you can link it to the house plan.
Therefore, the construction of the stove should be divided into a number of successive stages. Namely:
1. Design. At this stage:
- choose the type and design of the furnace;
- we first determine the place for it;
- we calculate safe distances at the intersections and junctions of its surface with the floor, ceiling, ceilings, roofing, walls, partitions;
- We think over its appearance, finishing materials, surface texture.
2. Control. At this stage, you need to make sure that all work is carried out in accordance with the project.
This approach guarantees a high-quality result.
It is also necessary to select in advance the correct material for the manufacture of the stove and chimney. It is better to use solid plastic-molded bricks, since dry-pressed bricks cannot withstand high temperatures.
Alexey Telegin:
– The masonry must be made of red solid ceramic bricks, normally fired, without cracks and foreign impurities, of a grade not lower than M100.
It is prohibited to use burnt or unburnt, hollow, silicate, porous or lightweight bricks for laying chimneys and stoves!
Vadim Kornev:
– For laying solid wood, it is best to use good red brick, and make the firebox from fireclay brick.
Models and manufacturers
Selecting a quality product is a troublesome and difficult task. You can buy an inexpensive long-burning wood stove for heating and use it with pleasure for decades
It is important to clearly understand what you need and why, accurately calculate the power of the installation, find out its autonomy and other technical features. Then the purchase will 100% please you and bring maximum benefit
Below are the most popular types of units from leading industry manufacturers.
Buleryan
Heaters with a colorful name originate from distant Canada. They are distinguished by reliability and high heat dissipation. They are a cylindrical steel firebox with a wall thickness of 6 mm. The loading chamber door is located on the end side, which simplifies the loading of firewood. There are pipes along the body for convection of warm air masses.
Structurally, the device is divided into two parts; fuel briquettes are loaded into the first half, and the released pyrolysis gas mixture is burned in the second. The hole for connecting the smoker is on the side opposite the loading flap.
Butakov furnaces
Such heat generators are intended not only for heating residential buildings in severe frosts, but also for heating baths.
There are several varieties of this equipment that differ in performance characteristics. The model with the loud name “Student” has a power reserve of 9 kW with a weight of 70 kg and provides excellent heating of up to 150 cubic meters of space. The most powerful device is named “Akademik” - with a mass of 300 kg, it perfectly heats rooms up to 1200 m3. Intermediate lines have also been developed - “Associate Professor”, “Engineer” and “Professor”, which are capable of heating buildings with a volume of 250 to 1 thousand m3.
Breneran
A long-burning wood-burning stove from a domestic manufacturer is an improved analogue of Canadian equipment with a similar name. It is manufactured on modern high-tech production lines, in accordance with all existing international quality and safety standards. The model range is referred to by the abbreviation AOT with a numerical serial number. The lower the index, the lower the weight of the unit and its functionality. The spatial volume that it can heat directly depends on the power of the device. Thus, a 6 kW installation copes with heating an area of 56 m2, and a 35 kW installation can warm up to 260 m2.
Some models are equipped with outlets with a water circuit connection and beautiful doors made of fireproof glass. The disadvantage of "Breneran" is the high probability of moisture getting into the room where the stove is located. This is due to insufficient tightness of the chimney connecting unit.
Teplodar
An excellent quality stove from a Russian manufacturer is designed for heating a home in our harsh winters. Devices from this brand are distinguished by their compact size, excellent efficiency and relatively low weight.
The line includes many different format variations:
- “Vertical” is a heater equipped with a surface for cooking food.
- “Matrix-200” is capable of heating rooms up to 200 m2.
- "Siberia" - warms up a much smaller space, but much faster than its analogues.
Vesuvius
A good, compact, Russian-made installation is intended for a summer house, garage, bathhouse, and other outbuildings and residential buildings. The heat exchanger is selected based on the technical parameters of the heated premises.
Termofor
The design development of the domestic company includes several products with very colorful names. Compactness and high performance with economical fuel consumption make the device popular among the population. Depending on the type, the unit is capable of heating a space with a volume of 55 to 255 m3.
Ermak
The reliable installation features miniature dimensions, light weight, and excellent heat output. The boilers have proven themselves well and can be installed in both commercial and residential buildings.
Bakhta
This is a heating and cooking stove-fireplace made of durable and heat-resistant cast iron of the ChH-1 brand. The high quality of the heating device, versatility, wear resistance and visual appeal are its main advantages.
How to cover the walls and ceiling when installing an iron stove
Stone panel
How to protect wooden walls from a stove in a house is determined by the style of the room, purpose and budget. Finishing does not exclude the construction of a protective screen. But if the stove is located far enough - 100 cm, it is allowed not to install thermal insulation, but to select a finishing material.
- The most obvious solution is to treat this part of the wall with fire retardants. This does not provide a 100% guarantee, but it reduces the potential for fire.
- A panel made of natural or artificial stone looks beautiful.
- In a room in a loft, techno or rustic style, facing with brick - textured or facing - is quite suitable.
- A sheet of plasterboard provides sufficient protection.
It is prohibited to use flammable coatings for finishing, such as oil impregnation, varnishes, or oil wax.
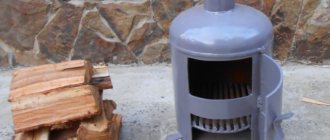
Long-burning potbelly stove
The potbelly stove has become a real symbol of Russia since the times of the Revolution and Civil War.
This is the name given to the simplest iron stove of a cylindrical or cubic shape. Its advantage was that the smoke channel - an ordinary iron pipe - could be taken out anywhere - through a wall or roof, into a window.
Taking the simplicity and practicality of a potbelly stove, you can make a small stove that will embody some simple ideas that significantly increase its efficiency, safety and environmental friendliness.
Basic scheme
The classic potbelly stove has a cylindrical design. However, it is difficult to do this when making it yourself, so you need to take a cube or parallelepiped as a basis.
Contains the following structural elements:
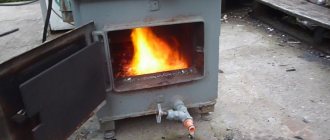
- Firebox. This is the chamber in which fuel combustion occurs, most often wood. The walls and bottom of the firebox must be thick, since they bear the main temperature load. There is a door in the front for storing firewood in the firebox; if desired, it can even be equipped with heat-resistant glass.
- Ash pit (ash pan). The compartment under the firebox is separated from it by a grate. The ash pan is also equipped with a door, only of a smaller size. It is used to remove ash and ash. which fall through the grate from burnt firewood. But this is not the only point of the ash pan - air is sucked in through the ash door and passes through the fuel layer from below, ensuring the best combustion.
- Smoke channel. To arrange it, a round hole is cut out in the upper part of the stove, a piece of steel pipe is inserted into it and scalded. In the future, you can attach other sections of the pipe here or use a factory sandwich chimney with special locks.
Expert opinion Dmitry Konstantinovich Levin
Some manufacturers of homemade stoves believe that the design with a blower and grate is not suitable for a sauna stove - it creates too much draft, which prevents complete combustion of the wood. Instead, it is proposed to lay the firewood directly on the bottom of the stove, and ensure air flow by drilling several round holes in the lower part of the combustion door and equipping them with a sliding damper.
How to make a door
The door is made of a thick sheet of metal. For fastening, you can use store-bought factory hinges or make your own. To seal the fit, an asbestos thread is used - it is wedged in a groove cut by a grinder.
If there is a suitable sheet of heat-resistant glass, it is inserted as follows: cut a window in the door and grind the cut area. Then they lay the glass, lay asbestos fiber around the perimeter, invisibly from the outside of the part, after which, using small steel tongues, I make tacks on each side.
The turning handle of the latch is easiest to make from the outside.
Homemade secondary gas afterburning system
The main disadvantage of a potbelly stove is its low efficiency. A stream of air passes quickly and strongly through the entire oven, carrying with it not only unburned food, but also heat. As a result, the case does not warm up sufficiently and gives off less heat. To solve this problem, a simple but ingenious modification was invented.
By placing two steel sheets above the firebox, the smoke passage channel can be significantly increased the length of the path that burnt gases travel before exiting through the chimney opening:
- The first horizontal sheet is welded directly above the firebox so that a channel remains for the passage of gases in the rear part of the stove.
- The next sheet is cooked higher, offset so that the passage is now at the front of the oven. It turns out that smoke, gases and heat, once in this labyrinth, snake through it all the way to the chimney. Along the way, they give off all the accumulated heat to the sheets, side walls and top plate of the oven.
If you drill several holes from the bottom from the back and cover them with a screen made of steel sheet, then at the top point, when fresh air, but already heated by the screen wall, meets unburned gases, the process of afterburning secondary gases will take place in the channel, which will lead to a significant increase in efficiency ovens.
Types of structures
They differ in structure and operating principles. Let's look at each type in more detail.
Open
The stones are laid on top of the stove structure and are not covered with anything. Due to this, the steam room warms up faster, reaching temperatures of up to 100 degrees. But the humidity in the room is low, so the heat turns out dry.
The product consists of three parts:
- fireboxes;
- compartments for stones;
- containers with water.
There should be few stones, otherwise the top layer will not warm up well and the steam room will not be warm enough.
To increase the level of humidity and the release of water vapor, the hot stones are simply watered. One or two ladles will be enough - this will give up to 15% humidity.
To increase the level of fire safety and reduce the risk of burns, it is recommended to lay fire-resistant bricks around the walls of the furnace or make a partition made of wood.
To heat a sauna, it is important that as much of the stove area as possible is in contact with the air space. This contributes to faster heating of the air in the steam room
Closed (lined with brick or stone)
If wood fuel is chosen for heating, you will have to prepare large reserves in advance. Such a stove takes a long time to reach the desired temperature, but, having reached the desired level, gives good heat transfer and retains heat for a long time.
Closed structures are great for large baths, where there is not only a steam room, a wash room, a dressing room, but also a relaxation room.
One of the advantages is closed stones. Therefore, there is no risk of getting burned.
In factory economical models, the stove has a double casing with a gap for air exchange between the walls.
Combined
For most manufacturers, the design consists of a high box with gratings and double valves (performs the function of a firebox). A chimney pipe emerges from the neck of the box. Stones are placed in the neck here.
There are devices available for sale with combined fuel types:
- gas-wood;
- electric wood-burning.
They do not need to be constantly monitored. Simply adjust to the desired temperature.
By design they are divided into 3 types:
- Monoblock. With heat exchanger, combustion chamber. Gas burner of a fixed type, covered with a steel sheet.
- Paired. They have two separate combustion chambers for wood and gas.
- Reconfigurable. Universal device. Can be modified for each fuel.
The first two types do not need to be reconfigured, since you can switch from one type of fuel to another.
Gas is used as main gas or liquefied in cylinders.
The electric-wood-burning design allows you to successfully heat the bathhouse using electricity or wood (optional). Moreover, firewood is considered the main raw material. When they burn out and the temperature drops, the electric heater automatically starts working. There are two heating elements on the sides of the product. Such stoves operate on a 220 W network, with a three-phase voltage of 380 V.
The owners can choose which fuel to heat the bathhouse with. But such designs are many times more expensive than simple wood-burning stoves.
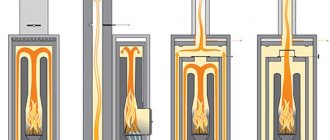
How wood stoves work
One of the features of heating devices is a secondary combustion chamber, which is characterized by slow combustion of fuel. Simply put, the logs in the firebox do not burn, but smolder. This effect is achieved by adjusting the amount of air entering the fuel chamber.
The combustion chamber is divided into two compartments. When wood is smoldering, unburnt combustible gas enters the second compartment of the chamber, where additional air is supplied from the injection pipes, after which the gas burns out completely, and the wood remains to smolder further.
Unburned gas from the main combustion chamber enters the additional combustion chamber, where, after mixing with an additional portion of air, it ignites, releasing additional thermal energy
Among the advantages of the system, it is worth noting: an increase in the operating life of the devices, greater efficiency - the stove operates for 8-9 hours on one load of firewood.
There are a few more disadvantages: the system only works on dry wood, the combustion mode will have to be constantly adjusted, which is somewhat inconvenient. It is also necessary to constantly monitor the cleanliness of the chimney and periodically clean it.
Means for manufacturing and the process itself
If you want to make a thematic unit, you will have to look at a lot of photos of metal stoves made by yourself, then draw up a drawing and arm yourself with:
- Welding equipment with electrodes;
- Sheet metal or “donor” structures;
- Steel corners;
- Grinder with cutting wheel;
- Large and medium hammers;
- Reinforcement with a diameter of 8 mm;
- Measuring tools - tape measure, corner;
- Use a pencil or sharp nail to draw lines.
When all the tools are collected, you can proceed directly to the event:
- Cutting a pipe and 5 rectangles using a grinder;
- Butt welding of steel or cast iron sheets with a welding machine;
- Welding the bottom to the walls, followed by checking the evenness of the finished structure;
- Marking on the walls of the barrel the places where the firebox, ash pan, and chimney will be located;
- Welding the corners to the “barrel” at a level of 10 cm from its bottom (this is necessary for installing the grate);
- Making grate bars from scraps that can be taken from a 2-centimeter diameter pipe or corresponding metal rods;
- Fixing the tubes and welding them;
- Welding two reinforcement sections at the top of the structure to organize the reflector;
- Welding the lid to the “barrel” (the first one should already have a hole for the chimney);
- Making door handles from pipes or plates;
- Making legs from corners or fittings;
- Organizing a chimney using a 135-180 mm pipe;
- Creating a rotary damper at the bottom of the chimney;
- Furnace installation.
Manufacturing a metal furnace is a completely feasible task. You just need to approach the corresponding project slowly and gradually. Then the finished result will not disappoint.
Concrete base
Before installing a metal stove in a wooden house, they most often prefer to pour a concrete foundation with reinforcement.
Among its undoubted advantages are high load-bearing capacity, ease of independent implementation and low cost.
The disadvantages of a concrete foundation include the long time it takes to arrange it.
The base for a concrete stove can be made in two ways:
- Strip foundation
. According to the size of the future furnace, a trench is dug along its perimeter, deepening it below the freezing point. After installing the reinforcing mesh, concrete is poured.
Please note that such a strip base should not be connected to the general foundation of the building, since in winter it can be squeezed out of the ground. Sometimes the height of the walls raised from the ground can reach 20-30 cm, so if there is one solid foundation, the facing masonry on the stove may crack. In some cases, the metal furnace itself is subject to deformation. Be that as it may, SNiP prohibits pouring a common foundation under the stove and, in fact, the building.
- Monolithic concrete slab
. To install a fireplace stove in a country house, this method is used quite often. The thickness of the slab reaches 15-20 cm, which is enough to obtain a strong base designed for high loads.
A cushion of a mixture of sand and gravel is first poured onto the pre-cleaned area. It is watered with water and compacted thoroughly. Then a waterproofing layer is laid and beacons are placed for further pouring of the screed. At the end of the work, the concrete is covered with film and watered with water for the next two weeks. This is necessary so that the screed does not crack.
Any of the described types of concrete foundation dries and hardens very slowly. Installation of the furnace with subsequent cladding on such a base can begin no earlier than 28-30 days after pouring.