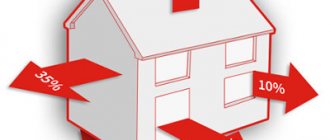
When a country house has two floors, the issue of heating it, as a rule, turns out to be more complicated than for one-story buildings. Of course, they are trying to solve these problems, for example, they install a fireplace stove on the first floor, and for the second floor they use electric ones. Choosing a stove for a two-story house, the optimal heating option in this case is a stove for a two-story house with one firebox. This approach to solving the problem will ensure heating of the house, and you will have to pay less for fuel (you will not need to use electrical heating appliances).
Air heating
In this category we include all methods of heating without the mediation of a coolant - water, oil, antifreeze and any others. The air in the room is heated through direct contact with the heating element.
Buleryan
The stove is a firebox surrounded by thick pipes with open ends up and down. The pipes heat up and provide convective mixing of the air in the room.
Directing them in different directions speeds up the process. If it is necessary to heat several isolated rooms from the buleryan, air ducts with natural or forced circulation are installed.
Advantages:
- Existing furnaces ensure almost complete combustion of fuel due to the fact that they provide long-term smoldering with a limited supply of oxygen. This ensures efficiency that is unattainable for traditional stoves.
- Buleryan does not take up much space and does not require its own premises. A stove for heating two floors can easily fit in the living room or dining room. There will be no soot or odors.
- Installing air ducts will cost less than installing a water heating system. Although, taking into account the necessary thermal insulation, not by much.
Flaws:
- It is almost impossible to lay air ducts after finishing the final renovation without spoiling the aesthetics of the room. The heating plan for a two-story house - both the heat source and the wiring - will have to be thought out in advance.
- Any stove heating of a two-story house is associated with the need to store reserves of firewood, coal, pellets or peat briquettes.
In the photo there is a buleryan stove in the living room.
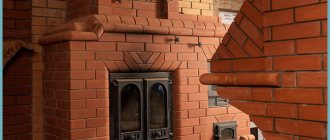
Brick oven
An ordinary Russian stove usually has very impressive dimensions.
It occupies up to a third of the house’s area and is quite capable of heating several rooms. It is clear, however, that two-story heating stoves are somewhat more complex structures.
In general, there are almost no standards in the field of designing brick kilns. The specific implementation depends on the size of the room, the location of the stove, the imagination of the stove maker, or, alternatively, the order of a ready-made solution found on the Internet that was invented by someone else.
A typical two-story heating stove has a firebox located below and a cap or duct chimney that makes several turns on the second floor.
Execution options can be varied. For example, it is enough to place a cast-iron stove on the firebox, laying an asbestos cord under it to isolate the room from combustion products - and you will get a heating and cooking stove on two floors.
The stove can be placed in the middle of the room or in the corner; finally, if desired, you can even organize water heating of a two-story house with natural circulation by simply placing a coil in the firebox.
Dignity:
In the absence of gas, stove heating is the cheapest heating method. A brick stove pleases its owners with its great thermal inertia: it is usually heated once a day for 2-3 hours, and the rest of the time it releases the accumulated heat.
Flaws:
- Again, you will need a supply of fuel, which will take up a fair amount of space in the yard.
- Folding a stove so that condensation does not seep through the masonry, so that the stove does not crack and smoke into the room is an art that is gradually being lost.
If you are not afraid of experiments, you can try to do this work yourself; but in the absence of any experience, it is better to be prepared for various surprises.
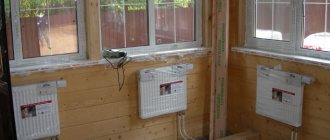
Gas convectors
Another way in which you can do air heating of a private two-story house with minimal time and money is by installing gas convectors.
Each device is a closed burner with air intake from the street and combustion products discharged there through a coaxial pipe. The heat exchanger heats the air in the room. The devices can operate from both main gas and bottled gas.
Advantages:
- Full autonomy of heating for each room in the house.
- Low project cost. The price of each convector is 4-8 thousand rubles. Considering that you do not need a boiler and wiring from it, this will mean significant savings.
Flaws:
- Unfortunately, mains gas is not available everywhere.
- Installation of convectors is possible only on the external wall of the house.
- Drilling wide holes for a coaxial pipe in, for example, reinforced concrete is still a pleasure.
- look here.
Flaws
Along with many positive aspects, of course, there are also negative aspects of using stove heating.
The initial launch requires a significant amount of time. It will take some more time to warm up the furnace array until it begins to give off heat inside the building.
Stove heating requires human intervention to operate. It is almost impossible to automate the process. The stove heating system has low efficiency. Its increase is facilitated by an increase in the length of the smoke channels - revolutions, an increase in the outer surface, as well as the correct position of the chimney valve during the combustion process. Firewood must be prepared in advance to ensure drying.
A good stove should be massive and have a fairly large volume. Moreover, this entire volume should be located inside the building, reducing the usable area of the rooms. The decision to install stove heating should be made at the building design stage, since stoves very often require a foundation.
How to install a two-story hydronic heating system
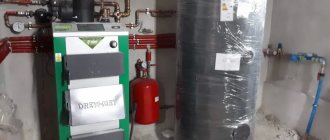
A furnace with a water circuit does not differ in operating principle from a conventional solid fuel boiler: wood or coal is burned in the fuel compartment, and the released heat warms up the coolant in the exchanger. This can be ordinary water, but it is more profitable to purchase antifreeze: it will not freeze in case of temporary problems in the system, and in addition, it will not have to be changed for a long time.
A register is used as a heat exchanger - this is a type of coil through which a temperature-changing coolant passes. The register can be made of metal pipes or sheet metal, and the higher its area, the more heat it can collect and transmit.
The thickness of the walls of the register must be at least 3 mm: otherwise it will simply burn out, since the temperature in the firebox compartment will be very high. A sheet register is easier to manufacture and install; you don’t have to buy it, but make it yourself. But at the same time, the pipe design is more efficient.
Heating radiators are connected to the installed register using metal pipes, which must be placed at an angle. Water will move through them by gravity, and a circulation pump can be installed to supply it to the second floor.
The assembly diagram will be the simplest: you can use single-pipe wiring with a simple connection. After installation, you can proceed to a test run: the owner must evaluate how quickly and efficiently the stove warms up, and whether it will provide heat in the house.
The water circuit must have an expansion tank: it is located at the highest point of the system. This tank will make it possible to compensate for the expansion of water as the temperature rises. The system will work optimally, and the owner will not have to put any effort into setting it up.
Selection of coolant and method of transporting thermal energy
The most rational solution in two-story houses, in which there are a large number of rooms and there is an overlap between floors, is the implementation of water heating. With a complex building configuration, in the vast majority of cases, there is no alternative to such heating. The system is a looped structure of pipes through which coolant flows, and heat is transferred through radiators or air heaters.
Also, heating using a heated floor can be installed as an additional or sole source of heat. Its operating principle is similar to heating using radiators.
The choice of coolant is extremely important
The use of heated floors powered by electricity throughout the entire house is a theoretically feasible option. However, a number of problems arise in its implementation. Firstly, from an economic point of view, heating organized in this way is not always profitable. Secondly, there is a possibility that it is technically impossible to carry out the task of air heating.
Warm floor
Air can be used as a coolant in multi-level houses. In this case, it is necessary to solve the problem of its transportation. To implement such a project, it becomes necessary to create a system of channels in the space of the building, as well as equip them with fans to force air flow. Only in this way can organized heating ensure the delivery of heat to remote rooms and rooms located on the second floor.
Types and features of two-story stoves
Two-level hearths come in two types: with one and with two fireboxes. For a country home, the most interesting are two-story “Swedes”, complemented by a hob. There are modifications with beds, but heavy extensions are always on the ground floor. On the second level, a false or functional fireplace is sometimes built; the first increases heat transfer, and a full-fledged fireplace insert helps to quickly warm up the room.
In models with one firebox, the combustion chamber is located on the ground floor, while vertical channels must be provided on the upper level. For separate heating of floors, dampers are used to block the movement of flue gases.
Stove for a two-story building with one firebox, stove and fireplace
Some stove makers do not recommend choosing models with one firebox for your home, since cooling flue gases form condensation in the second-level heating panel, which destroys the masonry. Designs with two fireboxes heat the room faster and are more convenient if there is often a need to heat one floor. Schemes of stoves with two fireboxes necessarily include two-channel chimneys.
Modern brick two-story fireplace with two fireboxes
Brick stoves for a two-story house weigh almost twice as much as standard modifications, so a reliable foundation is necessary. The interfloor ceiling must be no less durable - a reinforced concrete slab capable of supporting the weight of a brick building. The installation location is chosen along the main internal walls.
How does a heating stove work on two floors?
To fully understand how a stove works in a two-story house, you can pay attention to the photo. If the house is made of brickwork, then the stove can be installed on steel beams, which were initially built into the walls of the building
When installing beams, you need to use spacers that will soften the effect of weight on the walls and thereby prevent their deformation. The space between the beams is filled with ordinary mortar, but clay mortar is used to reliably cement the furnaces.
When installing stoves for heating a cottage, it is necessary to maintain the independence of the systems: each stove in a two-story cottage must be able to operate separately from the other. If desired, a fireplace can be installed into the erected structure, which will add an additional dose of comfort. If you choose a heating and cooking option as the main stove, located on the lower floor, then this design will provide the house with everything necessary.
A Swedish perspective on heating appliances
Iron production.
Photo from the website keddy.se At the time of construction of the fireplace for this country house, more than 10 years ago, Keddy products were one of the most efficient in terms of heating. Today in our country many other offers have appeared on the market. But Keddy cassettes, in my opinion, continue to be leaders among heating devices. For the described country house, we chose the Keddy SK 203 model.
Fireplace cassettes produced by this company have a solid cast body made of high-quality cast iron. Cast iron is the best material for making a firebox, as it has high thermal conductivity. A cast iron fireplace insert will heat the room one-third more efficiently than its steel counterparts.
Firebox SK 203 (Keddy). Photo from keddy.se
Cast iron is most suitable for working with high temperatures - the cassette body made of this alloy is not subject to deformation due to heating. And among other similar products, Keddy fireplace cassettes stand out especially for their quality and manufacturability.
The Keddy cast iron firebox has a very correct geometry: even in the doors there is no sealing asbestos cord, which deteriorates over time and requires replacement. The doors are so precisely made and have a well-thought-out design that they close tightly even without additional sealing.
Swedish-made fireboxes have one of the highest efficiency rates: manufacturers say almost 70%. Such high efficiency of the device is due to the engineering solutions used:
monolithic design
The one-piece cast iron body is one of the main advantages of Keddy cassettes. At high temperature loads, the body of the fireplace cassette does not warp, and its tightness makes it possible to achieve higher burning temperatures during combustion, which increases the size of the fireplace. The SK 203 cassette data sheet indicates a power of 14 kW.
optimal shape
airflow adjustment
preheating of air for blowing
Keddy cassette design diagram
In addition, heated air, entering the firebox, washes the glass, preventing soot deposition - this is called
“clean glass”
system (see element “3” in the diagram).
high heat exchanger fins
second afterburner chamber
"tooth" "tooth"
simple door closing mechanism
What is a gas burner
The gas burner is one of the most important components of any boiler. She is responsible for creating a stable flame. This is where the supplied fuel is burned. The resulting heat rises upward to the heat exchanger, where it is almost completely transferred into the coolant. Combustion products, along with residual heat, are removed into the atmosphere in one way or another.
The design of a gas burner for a boiler is extremely simple - it includes several main components:
The low emission of nitrogen oxides and carbon monoxide during combustion makes the boiler almost flawless in environmental terms.
- Nozzle - gas is released from here;
- Ignition system – provides gas ignition;
- Automation system – controls the temperature;
- Flame sensor – monitors the presence of fire.
To put it simply, this is exactly what it looks like. You will find out a little later how these or other types of gas burners differ from each other in different boiler models.
A modern gas burner for a heating boiler is a device that has certain requirements. First of all, quiet operation is important. I immediately remember some models of Soviet instantaneous water heaters, where the flame roared with the force of a hurricane
Modern samples burn relatively quietly (attention is also paid to quiet ignition, without pops or explosions). The design of the combustion chambers has an additional influence on the noise level. Long service life - if you remember the old gas units, they served for quite a long time (in those days everything was made to last)
Today, such technologies no longer exist, so burners in boilers often break down. There is only one way out - to buy units from trusted brands that use components of normal quality. As for any Chinese junk from unknown manufacturers, everything is obvious here - you shouldn’t take it
Long service life - if you remember the old gas units, they served for quite a long time (in those days everything was made to last). Today, such technologies no longer exist, so burners in boilers often break down. There is only one way out - to buy units from trusted brands that use components of normal quality. As for any Chinese junk from unknown manufacturers, everything is obvious here - it’s not worth taking.
The same applies to cheap Russian-made boilers - they often have short-lived burners installed.
Complete combustion of gas is another important requirement. A burner for a gas boiler must burn fuel completely, with minimal release of carbon monoxide and other related components. However, everything here depends not only on it - the quality of combustion is also influenced by other components
We must not forget about proper gas removal, for which you need to have a clean chimney with good draft at your disposal. As for the operating principle of the gas burner, it is simple:
However, everything here depends not only on it - the quality of combustion is also influenced by other components. We must not forget about proper gas removal, for which you need to have a clean chimney with good draft at your disposal. As for the operating principle of the gas burner, it is simple:
In the burner, the burned gas is combined with air. At high temperatures, a chemical reaction occurs to form carbon dioxide and water.
- The boiler detects a discrepancy between the temperature in the heating circuit and the parameters specified by the users;
- The gas valve opens and gas begins to flow into the burner;
- At the same time, the ignition system is activated;
- The gas is ignited and a flame is formed.
At the same time, the flame presence control begins to work - if the fire suddenly goes out, the automation will shut off the supply of blue fuel. As soon as the temperature in the heating system reaches the specified limit, the gas supply will be shut off.
The implementation of flame presence control is implemented in gas burners in different ways. Somewhere there is a simple thermoelement, and advanced boilers with electronic-based automation are equipped with ionization control systems.
Method of decorating a stove in a kitchen interior
The method of designing the stove structure depends on the chosen design trend. Finishing materials will determine its appearance.
Tile
If you want to create a luxurious atmosphere in a rustic kitchen, the stove can be refined using tiles - special ceramic or clay heat-resistant tiles created specifically for finishing stoves. The unique shape of the tiles makes them easy to install, and the unique pattern will allow you to create a delightful design, unlike others. In the 19th century in Rus', tiled stoves were in fashion among the upper strata of society and were considered an indicator of prosperity and luxury.
Ceramic tiles heat up quickly and retain heat for a long time
A more affordable option for designing a stove structure is to use tiles. It can be of any shape, rectangular, square or imitate various natural fibers.
Tiles will help create a unique stove design
There are tiles that resemble tiles. With its help you can get an exquisite design option, as the following photos demonstrate.
Design of a stove in a private house, decorated with tiles
When choosing tiles, you need to choose fire-resistant samples that can easily withstand high temperatures and have a dense structure. Thanks to these properties, they will last a long time and will not require cosmetic repairs.
Very often, tiling is carried out only in the part where the fire is ignited and maintained.
Stone
Upgrading the surface of a Russian stove with stone allows you to get a unique rustic interior with an antique accent. This option is quite labor-intensive and requires significant financial investments. But by spending time and money, you will get a unique design that will delight more than one generation of your family.
A stone stove will become the main highlight in the house
Plaster
When designing the kitchen of a private house in rustic, Provence, country or Russian styles, plastering with clay mortar is an excellent way to finish the stove. After it hardens, heat-resistant paint is applied to the surface. With its help, the stove can be decorated with an original ornament, ideas for which are suggested in the following photos.
In addition, heat-resistant paint easily withstands any sanitary and hygienic procedures, it is easy to wash it from any dirt, and the appearance of the stove will remain unchanged.
Decorative plaster gives a Russian stove a special charm. It will help you recreate any pattern you like on its surface. The following selection of photos will convince you of this and inspire you to create an extraordinary design.
Interior of a village house with a stove
The rustic style almost never completely went out of style. Even having their own huge dacha, stuffed with ultra-modern equipment and perfect, economical heating devices, people strive to build something on their site in the old style - a small gazebo or sauna. But many, having acquired a country house, want to completely transform it, turning it into something like an old Russian hut with a real stove. There are almost no specialists left who are engaged in planning a village house with a stove, because people even in distant villages have switched en masse to coal or gas. We will try to delve a little into this problem to help our readers.
Country house design with stove
Traditional Russian stoves come in several types - simple and with a stove, with a heating shield. Later they began to make metal structures, but the classic design of a stove in a private house implies a brick structure. It can be whitewashed and painted with folk ornaments or covered with tiles. Now there are excellent clinker tiles that are resistant to high temperatures, but you can also use high-quality majolica with painted glaze.
It is quite natural that in ancient Russian huts a large stove was the center of the entire interior. But you need to understand that in a house with a Russian stove, where everything is kept strictly according to ancient standards, there is no water heating, and the heat in the room is distributed unevenly. Furniture should be arranged so that in winter it is not very cold away from the stove. Being too close to a hot heat source will also not be very comfortable. It is advisable to choose the right middle in each case. Also, do not forget that the stove itself is quite large and bulky; it takes much longer to cool down and heat up than modern heating devices.
It is not at all necessary to use exclusively expensive natural materials for a house made of timber with a stove. Try to keep the decor itself in a classic rustic style - the type and size of the windows, the height of the ceilings, the design of the furniture. But various small things or interior details that will not be conspicuous can be purchased from plastic or artificial stone. They are visually almost indistinguishable from things made of natural brick. granite or wood. There is a third option for the interior of a village house with a stove - from the outside the building looks like an old log house, but inside the whole furnishings are designed in a modern style. You see that you can, if you wish, choose the most successful option for yourself in order to simultaneously feel like you are in an ancient setting and not be deprived of the benefits of civilization.
Thermally efficient stove with one firebox
This two-story model has a high heat capacity - one firebox per day for 2-2.5 hours is enough to heat a house. Fuel consumption is about 60 kg of dry firewood. Average heat transfer is 5500 kcal/hour.
Description of design and materials
The channel single-turn furnace has one firebox on the ground floor. Dimensions of the building: 89*115 cm. Height – 715 cm. Dimensions of the heating panel on the lower floor are 77*102 cm, on the second floor – 77*95 cm. Heat exchange outlets are provided in the lowering channels of the smoke circulation panels, increasing the heating rate and heat transfer.
For masonry you will need the following materials and stove equipment:
- 1900 pieces of red ceramic bricks;
- 170 pieces of fireclay bricks;
- 2.1 m3 of red oven clay;
- 0.2 m3 of refractory clay;
- 2.3 m3 of mountain sand;
- grate (40*40 cm);
- steel sheet (50*70 cm);
- firebox door (35*35 cm);
- blower door (13*12 cm);
- 5 cleaning doors (13.5*12 cm);
- 2 valves (13*26 cm).
Sections of the building and masonry diagram
A detailed arrangement of the stove on 2 floors clearly shows the structure of the smoke circulation channels and the principle of gas movement. Red and fireclay bricks in the scheme are easy to distinguish by color.
Important! Ceramic and refractory bricks cannot be bound in one dressing. The scheme is completed by a shell-type pipe, erected directly above the furnace. The scheme is completed by a shell-type pipe erected directly above the furnace
The scheme is completed by a shell-type pipe, erected directly above the furnace.
Sections of a two-tier oven
Masonry from 1 to 64 rows
Top rows diagram
The presented model is designed for a ceiling height of 3.4 m, but if necessary, the structure can be easily reduced or enlarged by making amendments to rows 26 to 46 and 60 to 82.
Note! Modernization will entail changes in the heat transfer characteristics specified in the description
Dimensions
The dimensions of the firebox are designed for a single loading of approximately 50 kg of dry logs 50 cm long and up to 10 cm thick. Moreover, the logs are placed vertically in the firebox. From the firebox, gases rise upward through the first ascending chimney. At a height of about 3.2 m from the floor level, part of the gases is separated into the smoke circulation of the heating panel of the first floor, and the other rises to the top of the stove and enters the smoke circulation of the second floor. In the lowering channels of the smoke circulation of the heating flaps of both floors and in the last lifting channel of the first floor, special heat-exchange nozzles (outlets) are made - bricks protruding from the masonry into the channel. They increase the heat-absorbing surface in the smoke circulation and the rate of heating of the furnace masonry. The last lifting smoke channels of both floors (see rows 60 to 88 in Fig. 1 and 2) have a cross-section of 120x190 mm and end in the upper part of the furnace with a common chamber (rows 89 and 90 in Fig. 2). In this chamber, control bricks are installed, with the help of which the corresponding quantities of flue gases are distributed into the smoke circulation of each floor. These adjustment bricks rest on special protrusions 1.5-2 cm wide, made when laying out the channels in the 88th row. Adjustment of the distribution of flue gases is done once during the first test fires, moving the bricks and achieving uniform heating of the furnace masonry on the lower and upper floors. After the final installation of the adjustment bricks, the side windows of the chamber are tightly closed and covered with clay. The chimney is a mounted one, built directly above the stove. The pipe channel is closed and the draft is controlled by two valves installed in series. In places where soot may accumulate and ash settles in the chimneys, cleaning holes are made, closed with cleaning doors.
Advantages
When the layout is well thought out taking into account a specific heating system, the installation of the stove practically does not depend on the building material from which the home is built. It is suitable for both wooden and brick houses. Its advantage is that there is always a wide choice of fuel for heating premises: coal, peat, firewood, even cardboard and dry tree branches. The user himself decides what to heat with, what is more accessible and costs less.
The next advantage is that heating the house does not depend on the heating season of the heating plant, on emergency repairs and long-term interruptions in fuel supplies. The stove is autonomous, its operating mode is determined by the user himself, who does not need a plan for seasonal system shutdowns.
Layout of a house with a stove 6×9 meters
The ability of a stove to create a cozy and comfortable atmosphere is well known. Thanks to this quality, no other heating system can compare with it. It’s nice to sit with a book by the stove, inhale the smell of resinous wood and listen to its quiet crackling. This is reminiscent of distant times, shrouded in romance. In addition to these advantages, the stove can be equipped so that it becomes an original addition to the interior.
The Russian stove gives the room a special charm. In terms of heat capacity, nothing can compare with it. It is able to accumulate heat and then gradually release it, maintaining constant coziness and comfort in the hut. In the past, it performed a cooking and heating function. Today it is quite rare.
Only those who like the rustic design style of the house will decide to decorate their apartments with it. True, there are no more stove makers who don’t need a drawing to build one.
The century of technological progress has made its own adjustments. Today, it is common to have a house with a stove that runs not only on solid fuel, but also on electricity, gas, and fuel oil. But the most affordable heating material is still firewood.
Requirements for stove heating
Traditional oven design
A traditional stove is a brick structure that has a firebox, an ash pan and a smoke exhaust system. The latter played an important role, since the heating of the house occurred due to the heat of carbon monoxide, which passed through a complex system of channels.
However, for houses with a large area this scheme is not effective. Therefore, they prefer to do water heating from a stove with their own hands. To do this, a heat exchanger is installed in the firebox to heat the coolant - water, air or to generate steam. This scheme will increase the heating efficiency and significantly increase the heating area in the house.
- It is recommended that the stove is not located against a load-bearing wall so that a system of chimney ducts can be arranged;
- The material used to make the floor and walls in the area of the stove must be non-flammable;
- Mandatory installation of a protective door in the ash pit and firebox;
- Drawing up a schedule for cleaning the chimney from soot and soot. This procedure should be carried out at least once every 2 months and before each heating season.
How to build a water heating stove with your own hands? First you need to choose the optimal design that will meet the requirements of a particular home. There are many construction schemes - from the simplest designs to complex ones with sun loungers and ovens.
Types of fireplace
Connecting even a small fireplace to a stove chimney is not a very successful idea. It is difficult to correctly calculate the draft so that smoke from the stove does not go into the open hearth, and the control system will require manually closing the views on the first and second floors in turn.
- A fireplace insert is a lightweight option in which you only build a brick box around a finished steel chamber with your own hands. The weight of the product is much lower - from 150 kg. It does without a foundation, but a brick elevation will have to be built for the firebox.
- A ready-made hearth with a closed combustion chamber is a steel or cast iron autonomous device with a glazed firebox door. The weight is minimal, it can be installed in any convenient place and connected to the chimney.
The simplest model of this kind serves as a very good heater: in a closed chamber, a convection method of heat transfer is implemented, and not just radiation. More versatile versions can heat water, connect to central heating and act as a stove - even baking bread. The photo shows a sample.
Installation of stove heating in the house
As the main source of heat, you can use ready-made stoves or build a brick structure yourself. At the same time, for the project of houses made of timber with stove heating, you can use both the first and second options. The most labor-intensive option is to build a stove yourself. But at the same time, already at the stage of the stove heating project, it is necessary to adapt the design for a specific house. The optimal layout scheme, its location in the room and the material of manufacture are selected.
The main features of heat supply with a brick stove are:
- Possibility to install a heat exchanger for organizing water heating;
- Installation of a system of air channels through which combustion products will pass before being removed through the chimney;
- Installation of a hob, oven, storage tank for hot water supply. These components will allow you to effectively use all the thermal energy from the furnace.
However, unlike gas heating projects for a private home, it is necessary to think in advance about where the fuel will be stored. It should not be in the same room as the stove.
Preparatory work for organizing heating
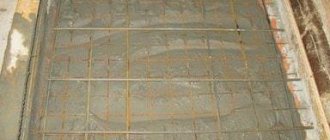
For the practical implementation of the heat supply system project for a two-story house, a number of preliminary measures should be carried out. If you plan to make your own stove, build a separate foundation for it.
This is due to the large mass of the structure. A concrete floor, much less a plank floor, will not support the weight of the stove and it will warp and settle. Even a small project of a rural house with stove heating must take this fact into account. It is best to arrange the foundation during the construction stage of the building.
The base layout for the furnace is in many ways similar to a standard slab foundation. But experts note a number of features that should be taken into account when drawing up a project for houses made of timber with stove heating:
- The upper plane of the finished foundation should be 70 cm below the floor;
- The dimensions of the base are 30-40 cm larger than the dimensions of the oven;
- The foundation of the stove should not be connected to the common building.
After this stage, you can begin construction of the furnace. In advance, a detailed order is indicated in the design of a house with stove heating.
Laying a heating stove in a house
After the foundation has completely dried, a heat-reflecting material – aluminum foil – is installed on its surface. Additionally, you can install a layer of insulation. The only limitation when choosing a material is that it should not be flammable.
In a typical heat supply project for a two-story house, special attention is paid to the materials used for the construction of the stove. In places of greatest thermal impact, only refractory fireclay bricks are used. All other components of the structure can be laid out from ordinary bricks
All other components of the structure can be laid out of ordinary brick.
If you have no experience in implementing a furnace heat supply project, it is best to entrust the construction of the structure to professionals. But if you wish, you can do this yourself. It is recommended to make several test layings first. For construction you will need the minimum set of a mason - a trowel, a trowel, a level, a plumb line. Additional materials should be included in the design of houses with individual heating:
- Scaffolding. May be needed at the final stage of construction, when the height of the structure is more than 2 meters;
- Nichrome wire is used to install the door and grate.
Upon completion of work, the draft level should be checked. To do this, you can take A4 paper and attach it to the hood. It should “stick” to the hole.
Construction rules
A homemade stove must meet fire safety requirements
Therefore, you need to pay special attention to preparation for construction
- Decide on the location of the oven.
- Prepare the correct drawing.
- Buy quality materials for construction.
- Purchase of tools.
- Create a cost estimate.
Correctly drawn up drawings will become your main assistants, since it is the drawings of a homemade brick oven that help you avoid many mistakes. Ready-made plans can be found on the Internet.
When choosing an installation location, you need to take into account the area of the room and the type of oven. It’s difficult to calculate everything yourself, so it’s easier to use a reduced model of a brick oven, a photo of which is available on the Internet.
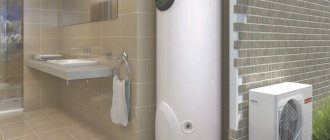
Water heating
The principle is clear: the boiler heats the coolant (most often water); It distributes thermal energy through heating devices, which heat the air due to convection.
Types of boilers with their advantages and disadvantages have been discussed several times
We will allow ourselves to pay attention, first of all, to how to carry out heating in a two-story house from the boiler to heating devices, and what type of the latter should be chosen
Two-pipe wiring
It makes sense to do this if the area of each floor is large. Moreover, in this case, according to the author, the most interesting option is a two-pipe distribution in the basement with transportation of the coolant to the rooms by risers.
The heating devices are ordinary radiators or convectors. Each of them fits between the supply and return pipelines.
Dignity:
The scheme allows you to make the temperature of the radiators the same throughout the house.
Flaws:
- The pipe flow will be quite large.
- The system needs balancing. The radiators closest to the boiler must be pressed with throttles, limiting the flow of water through them. Otherwise, only they will heat. The consequences are up to the defrosting of the heating system when circulation in distant heating devices completely stops.
Each radiator or convector is a jumper between the supply and return.
Single-pipe wiring
From the author’s point of view, single-pipe heating distribution in a two-story house is optimal. A relatively large diameter pipe runs along the perimeter of each floor; Heating devices are embedded parallel to it.
Each is equipped with an air vent, a throttle and a shut-off valve on the second side of the supply, which allows, if necessary, to remove the radiator without resetting the heating system.
Advantages:
- Significantly lower wiring costs.
- Extreme fault tolerance. Without any balancing, the heating system will function in any frost. Setting the radiator temperature is not necessary - it is an option to ensure your comfort.
Flaw:
With a VERY large floor area, the temperature difference between the first and last radiators will be very noticeable. The problem, however, is again solved by balancing using chokes.
Warm floor
Heating a two-story house with heated floors is interesting, first of all, due to the rational distribution of heat throughout the room. The temperature will be maximum where it is useful - at floor level. Hot air will not uselessly transfer heat to the roof, accumulating under the ceiling.
Water-heated floors are usually laid in a cement-sand screed at the construction stage
; however, it can also be installed later in a dry screed. In this case, heat-distributing aluminum plates are used, making the heating of the floor uniform.
Most often, for heated floors in several rooms on the same floor, a manifold connection is used: pipes laid in the floor cling to a common comb with chokes. It is optimal to use your own collector for each floor.
Advantages:
- Rational heat distribution.
- Comfort. Walking on a heated floor in winter is very pleasant.
- Low coolant temperature required for heating operation.
Flaw:
The installation of water heated floors is tied willy-nilly to a major renovation of the premises.
Diagram of the heating system in a country house
Considering that this fireplace was planned to be the only heating device, we chose a model with a power reserve. To calculate it, the following formula is usually used: 1 kW per 10 m² of area with a ceiling height of no more than 3 m. That is, with a passport value of 14 kW, there was almost a 50% reserve of thermal power.
Heating of the first floor
In order for a heating device to work efficiently, in addition to a heat source, you need a heat accumulator - something that has a fairly large mass and is made of a material with a high heat capacity. One of these materials is clay, and therefore products made from it, for example, bricks. Stove heating is based on a large mass of bricks heated by hot gases of combustion products, which gradually release heat into the room when the main firebox is finished.
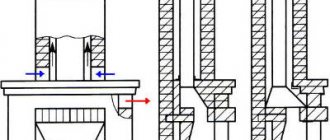
In this project, the heat accumulator was a brick partition between the living room and kitchen, containing the fireplace chimney. The cassette lining is also brick, which additionally accumulates heat. The heating shield-partition was made according to the principle of a two-bell furnace, approximately according to this scheme.
Scheme of gas movement.
Source - book by P. Smukhnin, Leningrad, 1925. Principles and techniques for designing furnaces with high heat capacity. The bell-type design, in my opinion, has an advantage over channel furnaces: due to their simpler internal structure, they are easier to clean, that is, they are easier to operate and durability increases. Ductless ovens have better heating in the lower part.