When installing or reconstructing a heating system, replacement or installation of batteries is often required. Installation of heating radiators can be done on your own, without resorting to the help of specialists, but only by strictly observing the requirements of SNiP. When performing work, both theoretical knowledge and practical experience will be required, because even the slightest mistake can lead to problems during operation of the heating system.
Radiator battery installation
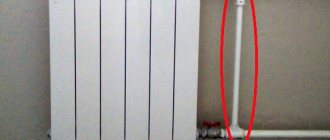
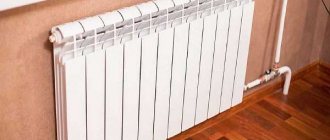
Distance from the window sill to the heating device
In fact, all modern heating devices and sectional heating batteries surprise with their high efficiency, an indicator of efficiency, providing similar characteristics due to the circulation of air, its natural flow through the heat exchange system. Actually, due to these design properties, it is not enough just to purchase highly efficient heating devices and power them with a coolant; it is necessary to provide conditions for convection - the natural transfer of heat by air. Let us indicate the distance required from the window sill to the heating device, as well as the main installation tips, as conditions for maintaining high efficiency.
Window sill board.
When installing marble window sills in a living space or a privatized house, many focus exclusively on the upper clearance of 100 mm, completely forgetting that by choosing an immensely protruding, wide window sill, you can disrupt not only the thermal cutoff of cold air, but also adjust the overall air circulation along the windows. The window sill board should not cover the heating device, creating a kind of niche for the battery, suggesting an enveloping movement of heat along it. Unfortunately, a specific size cannot be recommended, and the protrusion of the board should minimally interfere with the air circulation around the heating device and move it away from the glass.
Heating device mounting.
Before drawing the first attachment point on the wall, carefully study the existing instructions for the heat exchanger, because Many manufacturers inform about recommended installation gaps, which ensure high heat transfer from the battery itself. In the absence of such advice, they use general ones, according to SNiP 3.05.01-85. "Internal sanitary systems":
From the bottom of the window sill to the heating device, the minimum distance is 100 mm, since reducing it reduces the thermal air flow. From the floor to the bottom of the heating device, the clearance is in the range of 100-150mm, and increasing the distance increases the temperature difference in all rooms, and decreasing it again reduces the intensity of heat transfer. It is very important to provide for the distance from the wall surface to the heating device; it is made 25-30mm, because the rear surface is also actively involved in heat transfer. If factory councils are separated from SNiP, they are guided by the manufacturer who developed the battery.
installation of radiators
Popular manufacturers. What to look for when buying a radiator
On the Russian market in this category of goods there are representatives of Italy, Hungary, Russia and China. The highest quality and most popular are “Italians”. Hungarian products are slightly inferior to their Western European counterparts, but their price-quality ratio is ideal.
Domestic goods are produced using modern equipment, so their quality is also worthy of attention. If you decide to opt for Chinese products, then you should not chase low prices.
Below is a table giving a general description of the products of some of the most popular manufacturers.
When purchasing radiators, especially those made in China, carefully check the quality (wall and fin thickness), and also pay attention to the warranty period. Several years ago I bought radiators for a cottage under construction, I was looking for ones that weren’t too expensive and only aluminum ones; I didn’t consider bimetallic ones
As a result, he acquired Italian companies Radena
Several years ago I bought radiators for a cottage under construction, I was looking for ones that weren’t too expensive and only aluminum ones; I didn’t consider bimetallic ones. As a result, he acquired the Italian company Radena.
In severe frost, there was a power outage and the house was “frozen”; some batteries on the top floor burst, so they had to be scrapped. I bought the same ones, the system works perfectly, the pressure is stable, although some of them had ice at the time. I thought that over time, the “thawed” ones would begin to leak, but no.
I'm happy with the choice and recommend it to everyone.
In order not to make a mistake with the purchase and installation, you also need to correctly calculate how many sections you will need to heat the room. After all, you don’t want to freeze or spend extra money.
Installing a heating radiator
Before starting work, consider some nuances:
Before replacing the battery, the water should be turned off only in the customer’s apartment, and not in the entire house.
Only housing office employees who have the appropriate qualifications for this should shut off the water. Even if you replace the battery yourself, entrust this task to specialists. Otherwise, you risk leaving all residents whose apartments are located along the riser without water supply.
Battery replacement, ideally, should also be carried out by housing office employees or workers specially hired for this. If the customer carried out the removal and installation independently, then all responsibility for the serviceability of the system falls on him.
Installation and replacement of the battery when using the pipe bending method and gas welding, instead of the usual installation system, must also be carried out by workers who have certain qualifications to carry out work at an increased level of safety.
How to install heating batteries correctly according to norms and regulations (SNiP)
When installing or reconstructing a heating system, replacement or installation of batteries is often required.
Installation of heating radiators can be done on your own, without resorting to the help of specialists, but only by strictly observing the requirements of SNiP. When performing work, both theoretical knowledge and practical experience will be required, because even the slightest mistake can lead to problems during operation of the heating system. Radiator battery installation
Proper installation of heating radiators, expert recommendations
Rules for successful installation of batteries in the house. Having correctly selected the power of heating radiators, we often do not obtain the desired heat in the house. What determines their productivity?
In order for the heating system to work correctly and effectively, it is necessary to correctly install and assemble the heating devices
It doesn’t matter what heating system you use (independent or centralized), the rules for installing heating devices remain the same
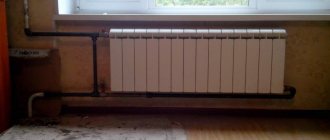
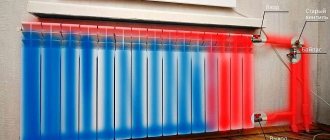
Location of heating radiators
The heating device must be installed in such a way that it operates at 100% efficiency. The ideal installation option is under the window. The greatest heat loss in a home occurs through windows. The placement of heating radiators under the window prevents heat loss and condensation on the glass. For large windows, heaters with a height of 30 cm are used, or they are installed directly next to the window.
The suggested distance from the floor to the heating device is 5-10 cm, from the heating device to the window sill - 3-5 cm. From the wall surface to the back surface of the radiator is 3-5 cm. If you plan to glue some heat-reflecting material behind the heating device, then you can reduce the distance between the wall surface and the battery to very small (3 cm).
The heating device must be placed strictly at right angles, both in a horizontal position and in a vertical position - any deviation leads to the accumulation of air, which leads to corrosion of the heating device.
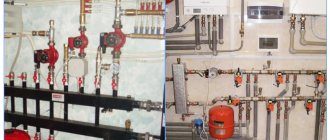
Pipes in the heating system
Advice for those who have central heating in their home. Naturally, metal pipes are used for heating systems in high-rise buildings.
If the apartment has an iron riser pipe, you cannot switch to polypropylene heating pipes!
In main heating systems, temperature changes in the coolant and its pressure often occur - apartment wiring and heating devices will break down throughout the year.
Also, just do not use unreinforced polypropylene pipes - they are designed for use for water supply and become unusable at a coolant temperature of +90°C.
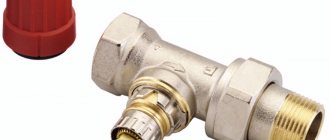
Fittings for heating radiators
In order for you to be comfortable during the heating season, you should install external water thermostats on each heating device. This way you can save money by shutting off radiators in unused rooms and control the temperature in the house. You can choose programmable external water thermostats - they will turn the heating device off/on, maintaining the desired temperature.
Installation of thermostats on each heating device is possible in a heating system with two pipes. In a single-pipe system (in apartment buildings and high-rise buildings) for thermoregulation, a jumper is installed in front of the battery - a circular pump. A circular pump is a pipe placed perpendicularly between the supply and return. The pipe for the circular pump must be of a smaller diameter than the pipes used in the wiring of the heating system.
A Mayevsky valve is also installed on the battery - a valve for removing air from the system. Such elements make it easier to control the heating device and simplify their repair.
Obstacles to room heating
The effective transfer of heat is also affected by the barriers that we ourselves create. This includes long curtains (70% of heat loss), protruding window sills (10%) and decorative grilles. Thick floor-length curtains interfere with air circulation in the room - you simply heat the window and the flowers on the windowsill. The same effect, but with less results, is achieved by a window sill that completely covers the top of the battery. A dense decorative screen (especially with a top panel) and the location of the battery in a niche reduce the efficiency of the heating device by 20%.
Proper installation of heating radiators is one of the main components of the good functioning of the heating system in general. You should not be led by savings at the expense of comfortable heat supply.
Rules for installing aluminum radiators
- Correctly assemble the radiator by screwing in the radiator plugs, plugs and gaskets, install thermostatic valves, shut-off valves, and Mayevsky valve.
- Following the general rules for positioning the radiator relative to the window, mark the mounting locations.
- If necessary, cover the wall surface with heat-reflecting material and attach the brackets to the wall.
- Secure the radiator to the brackets, placing hooks between the sections, and connect to the centralized or room.
Aluminum radiators can be installed in both single-pipe and two-pipe heating systems with vertical and horizontal piping. Today's market can offer two types of aluminum radiators: reinforced radiators with a pressure of up to 16 atm, which are used for heating high-rise buildings, and European aluminum radiators of no more than 6 atm, used for heating in autonomous heating systems.
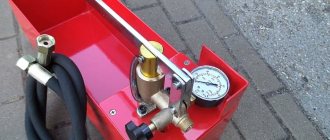
Crimping pressure
Pressure testing of the heating system
Before the start of the heating season, the central system is checked for leaks - that is, it is pressurized. This operation consists of supplying coolant under pressure exceeding the working pressure by 1.5 - 2 times.
Standard values for crimping pressure are from 20 to 30 atm.
If the radiator is not designed for such pressure, it may fail during testing of the heating system.
If you have central heating in your home
Be sure to pay attention to this parameter when purchasing a battery: according to the data sheets of many models, it is only 18 atm. Such models are only suitable for autonomous heating systems
How to determine the required distance
Many construction works carried out inside residential premises are regulated by building codes and regulations (SNiPs). There is also a SNiP for the installation of heating batteries.
From it you can not only find out what distance between the wall and the radiator must be maintained, but also other parameters for its installation:
- the device should be placed directly under the windows so that the centers of the opening and the battery coincide;
- the width of the heating device should not exceed 70% of the width of the window sill niche, if any;
- the distance to the floor should not exceed 12 cm, to the window sill - 5 cm;
- the distance to the wall is within 2-5 cm.
There are several parameters that influence the selection of the optimal gap. Most often it is influenced by the material of the walls of the house and the size of the window sills. In some rooms you can observe an unsightly picture when the batteries protrude significantly beyond its limits.
Heating radiator installation
The main way to adjust the required distance to the walls is high-quality and competent installation of heating devices with your own hands or with the help of specialists. Let's look at this aspect in more detail.
Installation of floor views
This fastening option is optimal for products that have a high mass and are most often made of cast iron. Such batteries are equipped with removable or stationary legs, which are fixed to the floor. Depending on the base material, fastening can be done with wood screws, self-tapping screws and plastic dowels, dowel-nails.
A necessary element for installing a floor heating device is a wall bracket. It is installed at the required height, which is defined as the desired distance from the floor to the upper longitudinal pipe of the radiator, taking into account the gap. Using fasteners and marking their installation locations, the optimal distance to the floor, wall and window sill is achieved.
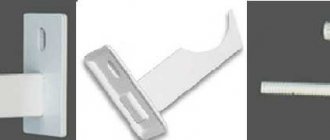
Hanging a wall radiator
Each heating device is equipped with one or another type of hangers used for installation on walls. The material and strength characteristics of the brackets must correspond to the mass of the heating system, taking into account its filling with coolant. Otherwise, the system may leak.
Before direct installation, it is necessary to determine the installation location and the required distances to the main surfaces.
To do this, follow these steps:
- Let's determine the center of the window and apply markings on the wall to align it with the center of the radiator.
- Let's measure the distance from the bottom edge of the batteries to the top pipe and add 12 cm. Set this measurement aside from the floor where the brackets are installed, checking that the mounting points are horizontal and level.
- In the places where the hangers are installed, we drill holes with a Pobedit drill, install dowels in them and fix the brackets with self-tapping screws.
Cost of installing heating radiators
The cost of installing a radiator will directly depend on the material of the product, the number of sections installed for one heating point, as well as the total number of heating points installed in the apartment. The total amount of installation costs will be influenced by both the connection diagram and the cost of components necessary for the work. Of course, you can do such work yourself. However, this will place full responsibility on you for the performance of the system, as well as for all possible negative consequences associated with its failure. So, how much does it cost to install a radiator? On average, all work on arranging one heating point in an apartment can cost $40-50.
Radiator installation:
- Kyiv − 250-350 UAH. per point;
- Moscow − 2,650-3,000 rubles. per point.
- The cost of work on supplying or replacing heating pipes is calculated separately.
Connection diagrams
Several schemes for connecting radiators into a single thermal system have been developed and are used. They are presented in the following types:
- maximum thermal output occurs with a lateral connection, which involves installing the input in the upper sector of the battery, the output is at the bottom on the same side;
- if the heat sink is of significant size, the best option is considered to be a diagonal connection, where water enters through the upper pipe and is discharged through the lower one, on the opposite side;
- When installing hot water supply pipes hidden under the floor surface, a bottom connection scheme is used, popularly called “Leningradka”.
Bottom wiring
If the heat supply pipes are placed in a rough screed, then significant heat losses should be expected due to contact with the concrete and the ceiling of the lower floor.
Height calculation
The distance between the radiator and the window sill must be at least 10 cm, regardless of what type of heating device is used. You also need to take into account the height of the battery itself. It is necessary to retreat 8 cm from the rear. The battery itself should rise above the floor by 10 cm, that is, when installing a window sill from the floor according to SNIP, you will need to retreat 70-80 cm.
The projection of the window sill also plays an important role.
: It may extend significantly from the wall or be invisible. If there is no radiator under the window, it is not necessary to meet any requirements, but if heating is present, the projection must be strictly regulated. The task of the window sill is to redirect heat flows. Without it, they will rise upward, and proper heating of the room will not occur, since some of the heat will evaporate and be distributed on the ceiling.
Poor convection can also be caused by a window sill that is too wide. It will not allow warm air to escape, as a result, condensation will begin to accumulate on the window, since the main air flows will go up, and some of them will get stuck under the window, heating the atmosphere
In this case, it is very important to calculate the distance from the window sill to the heating radiator, both in height and how much of a protrusion can be made. You can avoid the problem described above by using a slab that does not extend beyond the wall by more than 8 cm
Tip: when calculating the dimensions, you need to take into account the level of the wall with decoration.
The best option is a solution in which no more than 10% of warm air will be retained in the window niche. To do this, the window sill should not protrude more than 6 cm beyond the radiator, but it should not be shorter than the heating device. If the design solution of the room requires the installation of non-standard wide structures, it is necessary to provide ventilation holes in them. Their size must be sufficient for proper air circulation.
Is clearance necessary?
Some window owners believe that the window sill extends deep under the window frame, but this is not the case. The distance between the window and the window sill is approximately 10 mm. Otherwise, the structure may become deformed. The fact is that under the influence of warm air, the material from which the slab is made expands. The gap is left so that the structure can take the desired shape without being damaged. Visually, this technique is invisible.
How to position the curtain?
The distance of the window sill curtain also plays a role. In order for the curtains to move without clinging, without leaving marks on them, and for warm air to circulate freely, the distance must be at least 5 cm.
Conclusion: it is not always possible to apply the standard distance from the floor, radiator, curtains to the window sill, but you can find a way out by observing certain requirements.
Video: Installation of heating radiators (batteries)
Primary requirements
The distance from the floor to the window sill may vary depending on the type of window. However, GOST provides for the permissible coefficient at which heat is best retained in the room, and the figure is 0.55 W/°C×m². This means that in order to achieve the desired effect, you need to use a plate that will have low thermal conductivity.
The distance of the radiator to the window sill plays an important role: in this case, there is SNiP, the main provisions of which require:
- The window sill should have a slight slope into the room - at least 1˚.
- There must be thermal insulation between the wall and the structure.
- During installation, the height from the floor is taken into account. All window sills must be at the same level.
- The length of the window sill should not be more than 3 meters.
- The length is set relative to the window opening, with a difference of 4 mm.
- The distance required to retreat from the battery to the windowsill should not be less than 8 cm.
- It is recommended to saw off excess parts at room temperature.
Radiator selection
There is a wide range of radiators on the market today, designed for different buyers. The principle “the more expensive the better” does not always work here. You need to make your choice based on the following reasons:
- place of residence;
- heating system wiring;
- on how the heating radiators will need to be installed;
- temperature conditions in the heating system;
- accounting for what material was used in the production of pipes;
- the need for control elements and fittings;
- location of the premises in the building.
Having completed this analysis, you can proceed to choosing a battery.
Today, cast iron radiators can look quite presentable; they can be decorated. Thus, they can easily fit into the overall design of the room.
Cast iron radiators of the modern type are no longer the huge accordions that were in the Soviet apartment, but flat panels with smoothed corners and a presentable appearance. Having good physical heating properties, cast iron retains heat for a long time and gradually releases it into the room. Such radiators have a long service life, 20-50 years. The main disadvantage is their large weight (one section weighs about 8 kg), so it is impossible to install them correctly in rooms where the walls are made of wood or plasterboard. Having a rough surface, they are not very easy to clean.
Aluminum radiators differ little in design from cast iron ones; the only difference is the weight of the sections (1 kg). Also, such devices have good heat transfer properties, a smooth surface, ventilation windows evenly distribute air in the room, and they can be attached to any surface. The main disadvantage is the easy perception of the chemical composition of water and pressure surges in the pipeline.
Bimetallic radiators are a compromise solution between cast iron and aluminum. Externally they are almost no different from aluminum ones, but are not sensitive to the composition of water and pressure surges. They have good heat transfer performance, are easy to install and are inexpensive.
Steel radiators have a panel appearance and a relief surface. They have various connection options and good thermal properties. No major deficiencies were identified.