A garage is a special room for parking and, in some cases, repairing vehicles. It serves as protection against adverse environmental factors and is built according to standard or individual designs from foam blocks, cinder blocks, metal structures, bricks and other materials. In Russian conditions, it is advisable to insulate the garage, otherwise, due to temperature fluctuations, condensation occurs, leading to corrosion.
- How to install insulation on the ceiling inside a garage
What is better – heating or insulation?
At subzero temperatures, condensate freezes and melts when the engine is turned on. During the winter, such cycles are repeated several times, which negatively affects the metal and the condition of the car components.
Heating does not fundamentally solve the problem, since when leaving a warm garage there is a large temperature difference, just as when moving inside from the cold. As a result, condensation forms even in places where moisture does not directly enter. Spending the night in a well-heated garage in winter, the car is in a warm-humid fog, which has a detrimental effect on the condition of body parts.
Practice shows that the optimal temperature for garage storage of a car is +5°C. In such conditions, the risk of corrosion is small, and due to the slight difference from the street, components and mechanisms are not subject to destruction.
This allows us to conclude that do-it-yourself insulation is better than heating. In addition, this method brings savings due to the absence of the need to pay for electricity.
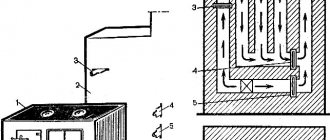
Air exchange rates
According to SNiP 21-02-99 “Car Parking”, a warm garage must be equipped with supply and exhaust ventilation, and in such a room the air temperature must be maintained no higher than 5°C.
Ventilation in the garage is needed to:
- dry the room intensively;
- dilute and remove exhaust gases;
- dry the car.
ABOK standard “Residential and public buildings. Air exchange standards" requires at least 180 cubic meters of fresh air per hour per passenger car.
Foreign manufacturers of ventilation equipment (XPELAIR, UK) believe that a garage should provide 6-10-fold air exchange: for a garage with a volume of 60 m3 - from 360 to 600 m3/h.
MatildaFORUMHOUSE Consultant
No one in their home adheres to these standards, but it is necessary to ventilate at least 0.5 - 1 volume per hour, otherwise the machine will begin to rust.
What you need to know before you start insulating your garage
When insulating a parking space, you need to consider the following factors:
- thermal insulation materials are applied both to walls and to gates, floors, and ceilings;
- ventilation openings must not be blocked;
- In order to insulate garage doors, internal thermal protection is installed.
Detailed rules for arranging thermal protection for a garage are prescribed in SNiP 2.07.01-89. It contains requirements for premises in which vehicles are stored. For owners of personal garages, the requirements are optional, but if you want to do everything right, it is better to refer to this document.
Protecting the ceiling from the cold - some subtleties of the procedure
Thermal insulation of the ceiling in the garage is similar in technology to the insulation of walls along the frame. But there are some nuances:
- if there is an attic above the garage, then you can cheaply insulate the ceiling with a layer of expanded clay or sawdust;
- be sure to install reliable waterproofing; sheets of roofing felt are suitable, not plastic film;
- in a garage, it is safer to use mineral wool rather than polystyrene foam to insulate the ceiling;
- if insulation is carried out over the sheathing, be sure to make several ventilation holes to prevent fungus and moisture under the sheathing.
As a finishing touch to a foam-insulated ceiling, it is advantageous to use a foam backing under a foil-coated laminate. Safe, reliable and inexpensive. The dragon is mounted with regular glue directly to the foam sheets.
How to insulate a garage: choosing the best materials
When choosing a thermal insulation material, it is necessary to start from the type of insulation used. Mineral wool, which absorbs water and then radically changes its properties, is not suitable for external thermal protection. It is better not to use materials inside the garage that can emit hazardous substances in the summer heat or when otherwise heated.
Next, we will analyze the characteristics of the most popular thermal insulation materials on the market.
Styrofoam
It is in demand among Russians due to its low cost and ease of installation. The material is durable and holds heat well. Installation does not require special skills and is carried out by most garage owners themselves. Despite these advantages, polystyrene foam has disadvantages:
- ability to absorb moisture (although less than that of mineral wool);
- quickly loses its shape from mechanical shocks and crumbles easily;
- granules have low adhesive strength and fly out over time due to accidental impact.
Significant demand is generated by the presence on the market of low-quality counterfeit material that is not safe. If the production technology is not followed and if exposed to the sun, it emits components hazardous to health. The problem is exacerbated by the small enclosed space of the garage.
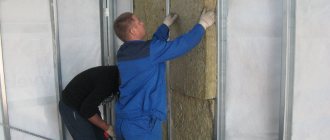
Mineral wool
Available in roll and slab formats. The material retains heat well due to its low thermal conductivity and absorbs noise well. Moreover, it is affordable.
However, mineral wool quickly absorbs moisture, which can be critical for a garage. Wet cotton wool no longer insulates heat. To eliminate this drawback, it is necessary to install vapor and waterproofing. When you try to dry the material, it becomes brittle and is easily damaged. Mineral wool fibers contain tiny glass fractions that enter the lungs and are not excreted. They cause irritation on the skin.
Installation of mineral wool must be carried out with respiratory protection (preferably a respirator) and in a protective suit. Upon completion of installation, cleaning must be carried out. You need to wait another day or two for the glass particles invisible to the eye to settle.
Taking into account the probable damage or depressurization of the external insulation pie, the risk of losing the insulation of the garage increases. Vertical installation is not the best solution for mineral wool, as it is quite heavy. Because of this, the material begins to sag over time, which leads to the formation of cold bridges (voids).
In case of even slight damage to the foil or film protective layer, the previously performed installation operations should be repeated (use of a protective suit, respirator, cleaning).
Another disadvantage of mineral wool is shrinkage and limited service life. It loses to its competitors in most respects, and we do not recommend using it for both external and internal insulation.
Extruded polystyrene foam
One of the best options for thermal insulation of a garage. It combines several positive properties: affordable cost, ease of installation, ease of cutting, and glues directly to the wall. During installation, the material does not require sealing of joints due to the presence of L-shaped puzzles.
However, the main advantage of penoplex is its excellent thermal insulation properties, which are maintained during long-term use in any conditions. Due to the low water absorption coefficient (0.4% in 28 days), the material does not accumulate moisture, lasts for more than half a century and can withstand many freezing/thawing cycles.
Expanded polystyrene exhibits good compression resistance, does not shrink, and has excellent sound absorption. Structurally, it is a homogeneous composition without granules, which guarantees excellent strength. An added bonus is that it does not attract rodents or insects.
Penoplex is supplied, like polystyrene foam, in sheets, but they are denser and thinner, which saves internal space.
Thanks to the listed properties, penoplex is the best choice for external and internal thermal insulation.
Reflective insulation
The foil material is thin in thickness with rather low thermal insulation properties. However, it is able to perfectly reflect infrared radiation, so it can be used in heated garages. In the absence of a heat source, reflective insulation will not help. Most often it is used as an additional material when installing extruded polystyrene foam, etc.
Thermal insulation of a flat roof, which materials to choose
Recommendations for choosing material are the same as for any other design. For these purposes, basalt wool or extruded polystyrene foam is used. Let's look at their features
Insulation of a flat roof with mineral wool:
- Environmentally friendly product
- Permits steam and allows the roof to breathe
- Good thermal insulation
- High density, can be laid to suit the surface being used
- Fire safety, does not burn, does not melt, does not emit harmful substances
- Heavy weight, you must initially calculate the load
- Hygroscopicity, if the waterproofing is damaged, it will absorb moisture and lose its properties
- High price
Insulation of a flat roof with polystyrene foam
- Light weight, easy to install, transport, does not increase the load on the foundation
- Low price
- Not susceptible to moisture
- Good thermal insulation
- This is artificial material
- Burns or melts, in most cases does not meet fire safety requirements
- Does not allow steam to pass through
More often, basalt wool slabs are still used to insulate a flat roof. Since this is a more reliable and durable method. Also, this allows you not only to insulate rooms from the cold, but also saves you from heat in the summer, which cannot be said about other materials. And thanks to vapor permeability and the fact that the slabs are made from natural raw materials, a favorable microclimate is created indoors.
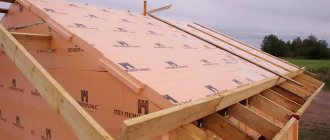
Algorithm for external insulation of a garage: step-by-step instructions
External thermal insulation is best equipped with a rigid material. The most affordable is polystyrene foam. Penoplex is more expensive, but it withstands moisture better, provides better thermal protection and lasts longer. Since we previously recommended this option, below we present the algorithm for its installation (foam is mounted in a similar way).
When carrying out the work, you need a jigsaw or a paint knife for cutting panels, glue (preferably PENOPLEX brand, adapted for installing this material), a spatula/gun for applying the composition and disc elements for fastening (4 units per slab).
The following steps are followed:
- Preparing the walls. Dust, old paint, plaster and other contaminants are removed from vertical surfaces. For better adhesion of the adhesive composition, it is better to prime the surface.
- Fastening the bottom bar. The slabs are installed starting from the floor. To do this, the starting profile is fixed with dowels, after which the penoplex is placed in a checkerboard pattern.
- Installation of thermal insulation material. Glue is applied to the edge of each slab, after which it is firmly applied to the vertical surface. Connecting L-shaped puzzles to each other allows you to achieve a tight fit of the insulation without gaps. After the glue has dried, additional fastening with disc elements is performed to ensure reliable fixation.
- Finishing work. In order to protect the material from exposure to UV rays and add aesthetics to the exterior of the garage, DSP, siding, etc. are mounted on the wall.
Outdoor installation
With this approach, all layers of insulation and waterproofing are located on the outside of the ceiling. Accordingly, it is necessary to create a heat-saving “pie” that can withstand all temperature and climate changes. There are two main types of flat roofs, insulated differently:
A classic roof is insulated according to a standard scheme and the layers are laid in the following order, counting from bottom to top:
- Floor slab
- Vapor barrier film
- Insulation
- Waterproofing
This scheme has a significant drawback - external waterproofing requires periodic maintenance and repair. It is produced every two to three years and this entails additional costs, although such a roofing device is slightly cheaper than the other option - the inversion one.
This type of roofing is considered more expensive to install, but it withstands temperature changes better and does not require such frequent repairs. Its fundamental difference from the classic version will be a different scheme for laying layers and arrangement:
- The first will be, as in the previous case, the floor slab
- Then - screed
- Next comes waterproofing
- Next is insulation
- A special film is placed on top - a filter.
- Cover the pie with expanded clay or gravel, at least 50 millimeters thick
This solution allows you to protect the waterproofing gasket and significantly increase its service life.
How to insulate a garage floor yourself
There are several options for floor insulation. One of the most affordable and effective is Penoplex thermal insulation under the screed. The surface will need to be raised slightly to reduce the height. In this case, there is no need to build a foundation pit - the insulation is placed on the finished floor. The work involves the following stages:
- Removing dirt from the surface. Preparing a cement-sand screed or using a building mixture to level the floor. It is necessary to ensure that the differences are not more than 5 mm.
- Next, the PENOPLEX FOUNDATION is laid directly on the floor without the use of additional means of fixation (glue, dowels). If necessary, one or several layers are formed.
- To evenly distribute possible point impacts, the surface is filled with a concrete solution or a self-leveling composition. The recommended layer thickness is 4 cm. The heat-insulating material is first covered with a film, the seams of which are securely fixed with adhesive tape. To prevent the effect of thermal expansion from negatively affecting the structure, 10–20 mm of empty space is created between the wall and the screed. It is then filled with polyethylene foam to reduce noise pollution.
- At the final stage of the work, the finished floor is laid.
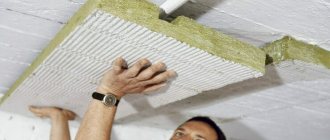
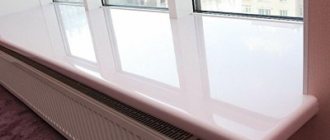
How to install insulation on the ceiling inside a garage
The technology for insulating a garage ceiling is also within the capabilities of even an untrained person. The sheets are fixed with glue to a previously prepared top, from which dirt has been removed. The adhesive composition is applied with a notched trowel and evenly distributed over the surface of the sheet.
After drying, the material is additionally fixed with dowels using fungi. To do this, 5 holes are made - four on the edge and the last one in the center. When laying two layers, the dowel heads are recessed at the same level as the first layer. When the glue dries, the remaining cracks are filled with polyurethane foam, and excess mass is removed with a knife.
The choice of adhesive depends on the type of ceiling. On dry surfaces it is better to use gypsum and mineral mixtures. If your garage has high humidity, waterproofing adhesive is recommended. It is important that its composition does not contain aromatic components (toluene, benzene), as well as certain types of resins. Also, when arranging a penoplex ceiling, you should not use metal elements that can create “cold bridges.”
To give the ceiling an aesthetic appearance, a finishing material is placed on top of the insulation - plasterboard, metal profiles or plastic panels. The work is facilitated by the light weight of the thermal insulation being laid.
Insulating a concrete or reinforced concrete ceiling requires a hammer drill to drill the surface. Before installation, it is recommended to level the ceiling using a composition based on rotgypsum, and then prime it with an antifungal composition.
Internal location of insulation
When figuring out how to insulate a flat roof from the outside, do not forget that insulation can also be done from the inside. This solution is especially relevant if there is an unused or technical attic space. In this option, all the necessary materials are attached to the ceiling from the inside. However, this does not relieve the need for external waterproofing.
This method of insulation is less effective than external insulation, but in some cases it may be the only possible one. Here, all the components of the structure and their arrangement will correspond to classic external insulation, with the only difference being that they will be located not from bottom to top, but from top to bottom, in the reverse order.
The only difference is the creation of a heat-insulating structure in residential premises, when the outer side of the assembled pie will act as a ceiling. In this case, the external component of the assembled “pie” will be a decorative coating. This can be either a suspended ceiling or any other solution that is more suitable in appearance or suits the taste of the owner of the house.
How to prevent cold bridges from appearing in garage doors
Many garage owners are well aware of the signs of spring “walking” at the base of the gate, which prevents them from closing normally. This structural element is in direct contact with the environment.
Protecting the poles from freezing will help eliminate the problem. If the garage already has standard iron gates, they require internal insulation.
Before starting work, you need to prepare the surface of the gate. Inspection for corrosion is carried out. If there is damage, it is removed with a wire brush. To eliminate cold bridges, the existing grooves are sealed with polyurethane foam. After the surface has dried, waterproofing treatment is carried out with 2 mm thick isolon or bitumen mastic.
One option is to fix heat-insulating sheets with dowels to metal sheets. If it is impossible to use this method, adhesive compositions are used. After installing the material, a vapor barrier film is placed on top, and then the outer cladding is used. To increase the thermal insulation effect, foil-coated polyethylene is recommended.
Proper selection of insulation and strict adherence to installation technology allows you to solve the issue of thermal insulation of the garage on your own, without resorting to outside help.
We insulate the gate - the car should not freeze
Metal garage doors without insulation are the main source of cold and dampness in the garage. It is necessary to insulate the gate. You can choose several options for thermal insulation of garage doors:
- laying insulation over metal sheathing, similar to wall insulation;
- installation of foam plastic directly to the door leaf using liquid nails;
- you can use quick and reliable insulation with polyurethane foam;
- reliable thermal insulation with sprayed polyurethane foam.
Any technology for insulating metal gates requires compliance with basic rules:
- you need to clean the surface from dirt, rust and remnants of the old coating;
- it is important to degrease the metal surface;
- be sure to treat the metal with a rust-preventing primer, and the wood with an antiseptic against mold and drying oil;
- all cracks around the perimeter of the box are sealed with polyurethane foam and cemented;
- no voids should be left when laying the insulation layer;
- foil heat-reflecting coating reduces heat loss by 15 percent.
It is necessary to install seals on the gate leaves, since there is considerable heat loss through the cracks.
Conclusion
Of course, looking at various photos of a high-quality insulated garage, everyone wants to reproduce such a decent finish in their own home. And this is quite real, there is nothing complicated about it.
Any “straight-handed” person is able to do everything himself without much expense or effort. It won’t take too much time, but there will be a huge amount of benefits. The car will be protected from the influence of an aggressive external environment, and its owner will be able to comfortably carry out car repairs during the cold season.
Sources
- https://garazhov.ru/inside/uteplenie-garazha-penoplastom.html
- https://pechiexpert.ru/uteplenie-garazha-penoplastom-01/
- https://www.tproekt.com/kak-uteplit-garazh-iznutri/
- https://www.plast.by/novosti/utepleniye-garazha.html
- https://garazhmechti.ru/kommunikacii/kak-uteplit-garazh-iznutri-deshevo.html
- https://mirstrojka.ru/uteplenie-garazha/
- https://uteplenieplus.ru/kak-uteplit/garazh/kirpichniy-garazh-iznutri/
- https://bibiauto.club/sovets/poleznoe/uteplenie-garazha-iznutri.html
- https://garazhmechty.ru/kak-pravilno-uteplit-garazh.html
- https://www.ivd.ru/dizajn-i-dekor/zagorodnyj-dom/vse-o-samostoyatelnom-uteplenii-garazha-iznutri-56901
[collapse]
Dense buildings
How to insulate a garage with your own hands? Often garages are installed close together. The side walls seem to be inaccessible for insulation. But there is a way out.
Offer your neighbors on the right and left a non-standard solution: limit the space between the walls and fill it with expanded clay along the entire height to the roof. It is best to weld the openings with steel sheets; a wooden shield is short-lived.
Expanded clay is an excellent insulation material. There is no need to cover the backfill from rain and snow. Expanded clay breathes, moisture trapped in the backfill will quickly evaporate. All you have to do is insulate the back wall, gate and roof.
Finally:
Looking at the miracle built with your own hands, you will not believe your eyes. But there are a couple more bonuses.
Remember how many times you've cleaned off the rust and painted the outside walls of your metal garage? How many times has the battery died in a frozen garage and the oil in the transmission has frozen? Do you remember? Now forget about it forever.
Required Tools
Each stage of garage insulation work requires its own set of tools. The list also depends on the selected material, but mainly the changes will affect cutting devices. For example, mineral wool can be cut well with a construction knife, but polystyrene foam is easier to handle with a homemade “hacksaw” made of steel wire on wooden handles. You can, of course, use a jigsaw, but in this case the sheets will crumble a lot, so you will have to work slowly. The rest of the set of tools is standard.