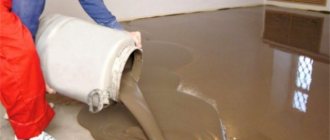
The screed for a warm water floor is a simple cement pour. It is called roughing and is done to level the surface, prevent heat loss, and pipe deflections. In addition, it affects the durability of the finishing layer, which is poured on top of the heating system. It can be laid in three ways. Let's talk about them first.
Tasks of screeding heated floors
To figure out how to make a screed for a heated floor, let’s define its tasks more precisely. First of all, remember that ties are fundamentally divided into tied and floating. The floating screed is not connected either to the base of the floor or to the walls of the room. If, relatively speaking, you look at a floating screed, then it is a separate, often concrete slab in the room that performs its tasks.
It is worth noting that a floating screed is the priority type of screed in the construction of a concrete heated floor.
The tasks of a floating heated floor screed include:
- Holding pipes or underfloor heating cables;
- Be a heat exchanger between the floor heating system and the room, ensuring uniform heating of the floor surface;
- Take on the power load of operating the premises.
It is to solve these problems that specific requirements for installing heated floor screed are aimed.
Composition of the solution
The mixture for screeding a heated floor can contain not only standard, but also additional ingredients. However, there is no hard and clear indication of their total number. Special components can be plasticizers, catalysts, and composition strengtheners. It is worth noting that the overall composition will depend on which particular screed option is chosen for implementation.
Liquid pouring mixtures are characterized by a classic mixing option, which includes, in addition to cement, sand. The proportions of content in the solution are 1 to 3. As soon as a certain amount of water is added to the mixture, a homogeneous liquid mass should be obtained. Plasticizers can be added to the final solution. Gypsum is not used in such mixtures for the reason that the system is highly hygroscopic.
If you are preparing a large amount of mixture for pouring screed over a heated floor, it is better to use a concrete mixer, which allows you to obtain homogeneity of the components. In this case, the cooking process itself will be less time-consuming.
For semi-dry mixtures for screeding a warm water floor, the composition is slightly different. In addition, the preparation of the solution is carried out in two stages. Initially, two components are mixed - sand and cement in a ratio of 2 to 3. That is, 10 kg of cement will require 1 kg of sand. Fiber fiber is added to this after thorough mixing. A similar size of mixture will require about 15 grams of additive. Add 4 liters of water to the resulting volume of mixture for filling the heated floor. Water should be stirred gradually in portions to ultimately obtain a homogeneous mass. What happens should stand for 20-30 minutes, after which a second portion is added for the final solution - sand, water and fiberglass, in a ratio of 20 kg, 4 l, 15 g. That is, cement is no longer used a second time . The resulting mass is used to install a screed over a warm water floor.
An online mortar calculator will help you calculate the required amount of screed materials.
Requirements for a heated floor screed
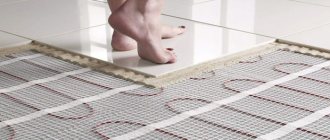
This is the time to remember about the types of heated floors. Fundamentally, there are two types of underfloor heating: water and electric. In a water heated floor, heat is transferred to the screed from the water circulating through the system. In an electric heated floor, heat is obtained from heating special heating cables laid in the floor.
Note: When we talk about heated floor screed, we mean only water heated floors and cable electric heated floors. Covering electric heated mats with screed is not required. Also, a screed is not required for TP (warm floor) flooring systems used in wooden houses and in houses with floors on joists.
Installation
The screed on a warm floor is characterized by the presence of some features.
The process of pouring screed onto a heated floor takes the following steps:
- Along the entire perimeter of the room, at the joints of the floor and walls, edge tape is glued. It is designed to compensate for the thermal expansion of concrete.
- The minimum height of the screed is calculated with the corresponding marks. The overall height of the heated floor will depend on the nature of the solution used.
- The appropriate beacons are installed according to the height of the heated floor.
Measures are taken to prevent cracks from occurring.
Total screed thickness
So, two tasks of the TP screed, distribution of operating load and uniform distribution of heat, are a priority. It is to accomplish these tasks that all further discussions about the thickness of the screed will be directed.
Two parameters are important in screed thickness. The first is the overall thickness of the screed, which is usually left out of brackets. The second parameter is the thickness of the screed layer above the pipes. First things first.
The total thickness of the heated floor screed, namely the screed, and not the entire heated floor structure, should be as follows:
- If the heated floor is installed above an unheated room, basement, or ground, the minimum thickness of the screed is 85 mm. This standard value is very controversial (more on this below);
- If the TP is done on a concrete slab, the total minimum thickness is the sum of 10 mm of screed under the pipe (cable), the diameter of the pipe (cable) and the permissible technological thickness of the screed above the pipe.
- It is recommended NOT to make the maximum thickness of the screed more than 100 mm, due to the large inertia of the system. Thick screeds will take a long time to heat up and spend heat not on warming up the room, but on heating the screed itself.
Note: if you need to raise the overall floor level, you do not need to do this with a heated floor screed. You need to first make a leveling screed, and then install a warm floor, and not try to solve all the problems in one screed.
Total thickness of finished subfloor
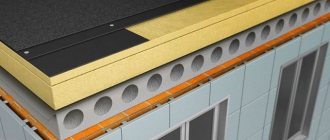
Recommended thickness of each of the layers that make up the warm water floor cake. The order of arrangement of each of the layers is shown in the diagram below:
The subfloor must be smooth and durable. The thickness of each layer placed on top of the subfloor, in order from bottom to top, will be as follows.
A layer of insulation 30-90 mm thick made of fibrous polystyrene rigid boards. They must be strong enough to withstand the high load of subsequent layers, and therefore the material density is chosen to be at least 35 kg/m³. The thickness varies depending on how cold the crawl space is. If there is a heated room below the floor, then a layer of 30 mm will be sufficient, and if the floor is laid on the basement floor of a private house, then it is better to place a layer of insulation with a thickness of at least 90 mm.
Multifoil 3 mm thick is laid on top of the thermal insulation. Its main function is to waterproof the next layers of the floor. If the waterproofing layer has already been laid on the rough concrete floor, laying multifoil is not required.
Reinforcing mesh 100x100x4 mm or 150x150x4 mm serves to increase the strength of the screed, which, when reinforced, becomes more resistant to tensile loads. For the convenience of laying pipes according to the diagram, they can be fixed at the desired points on this grid.
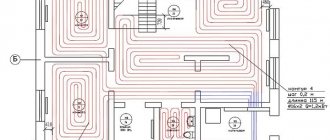
The pipe is laid according to one of the diagrams shown below. These circuits are called "coil" and "helix". The first is classic and suitable for any room, while the second is not recommended for use on wooden floors and is most effective for rooms that require particularly intense heating. The permissible distance between pipes is from 10 to 30 cm. The presence of joints inside the floor is unacceptable; the pipe is laid in one piece, the ends of which go into the collector. The average layer thickness is 20 mm.
Before moving on to the screed, we need to talk about the damper tape. It is pre-laid around the perimeter of the walls in order to avoid creating unnecessary stress on the walls. The fact is that the concrete screed, when heated from the heat of the pipe, will expand and create pressure on the walls, and to prevent this, it must be fenced around the perimeter with a special “spring” material. The minimum thickness of such a tape is 5 mm, the optimal is 10 mm.
As a result, taking into account all the described requirements for the arrangement of a water-heated floor screed, the thickness of all layers and a separate concrete screed will be as follows:
- The entire floor is 80-135 mm, taking into account the thermal insulation layer and the thickness of the concrete layer
- The thickness of the screed is 50-65 mm, depending on the selected layer height above the surface of the pipes.
Screed thickness over pipes
This is an important parameter on which, first of all, the uniform heating of the floor depends, and secondly, the load perception (strength).
I’ll tell you right away about durability. The following rule works here: the thicker the underlying insulation in the TP structure, the greater the thickness of the screed above the pipes should be. For a central climate, a sufficient insulation thickness is 2, maximum 3 cm.
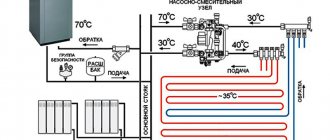
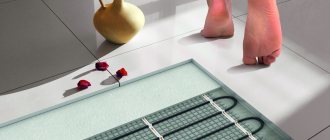
To answer the question about the relationship between the thickness of the screed over the pipes and uniform heating, let’s look at the thermal diagram of the heated floor.
As you can see, the heat from the pipes rises along the screed along peculiar cones. Optimal heating of the floor will occur if these cones “end” on the surface of the screed. If the screed is made thinner, then not so much the screed will heat up as the finishing coating, which is bad. If the screed above the pipes (cable) is made thicker, then the heat will not reach the surface of the screed. On the surface we get the so-called strip, uncomfortable heating of the floor, otherwise “zebra”. Walking along the floor you will feel the change of warm and cold stripes. This is also bad.
As you can see, it is the thickness of the screed above the pipes that is the most important technological parameter of the TP screed. The load on the floor in residential premises is moderate and the thickness parameter is not affected by the load on the floor.
So, the thickness of the screed over the pipes. Without further ado, let’s look at the recommendations on this parameter from the main manufacturers of water heated floor elements, namely Oventop, Uponor, Valtac, Thermotech, KAN. Summarizing their recommendations, I can draw the following conclusion:
When installing a heated floor on a concrete base, with a layer of insulation no more than 20 mm, the thickness of the screed above the pipes should be:
- At least 30 mm for a wet solution with the addition of plasticizer and fiber;
- At least 50 mm for wet mortar (concrete or cementitious mixture);
- At least 45 mm for machine-made semi-dry mortar.
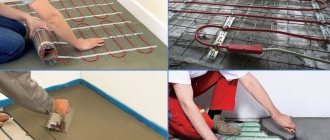
Finish filling on TP
If the rough screed has dried, it’s time to move on to the next steps:
- installation of heat insulator . Thermal insulating material is mounted only on a clean base (it is best to vacuum it). The heat insulator can be cork, foam, polypropylene, aluminum foil or metallized Mylar film. To secure it, tape, dowels and glue are used.
- Laying damper tape . The damper tape protects concrete from cracking associated with temperature fluctuations. Mounting area: along the perimeter of the room and between the contours of heated floors.
- Laying heated floor elements . Pipes need to be checked for breaks (especially at bends), and when running cables, grounding must be ensured.
- Reinforcement . Reinforcing mesh can be placed under the pipes, above them, or in both places at once. Pipes are easily attached to the lower metal mesh during installation, however, unlike the upper one, it does not provide reinforcement for the screed. If the concrete is of high quality, then this part of the work can be abandoned.
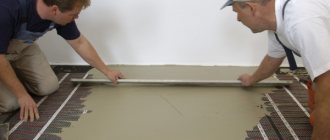
- Pouring finishing screed . Before proceeding to the last stage, you must check how well the heating system is functioning. The screeding solution is poured at above-zero temperatures and in one go. Partial filling is allowed only in rooms with a multi-level floor. The concreting process begins from the far side of the room and ends next to the door.
Pie TP
After finishing the pouring, it is recommended to make several punctures in the coating with a metal knitting needle or similar object. This will prevent the formation of voids.
In the next week, the concrete surface should be moistened with water 2-3 times a day. This will prevent it from drying out while it hardens.
The thickness of the finishing layer can be from 3 to 7 cm in a private house, and in an industrial area - 10 cm.
If a water heated floor is installed, the height of the screed above the pipes should be 3.2-7 cm.
Attention! If it is impossible to make a fill thicker than 3 cm, then it is better to use a self-leveling mixture, or mix cement mortar with a plasticizer.
Read more about the thickness of the screed and the design of heated floors in the article.
Option 1. Concrete screed for heated floors
Wet concrete screed for heated floors is made using floating floor technology, based on a solution of cement, sand, crushed stone and water. To make your own solution, you need to make a B22.5 (M300) solution with the obligatory (!) addition of crushed stone or gravel of 5-15 mm fractions to the solution.
The classic concrete mortar M300 (concrete B22.5) is made on the basis of M400 cement. Concrete proportions (Cement: Sand: Crushed stone) - 1: 1.9: 3.7.
It is important to note that this brand of concrete is heavy concrete and is difficult to install. The load of such a screed per 1 m² of flooring will be 125 kg, with a screed thickness of 50 mm. And this does not take into account the weight of the heated floor “pie”.
All this reveals the disadvantages of the “concrete” option:
- When laying concrete, damage to the pipes (cables) of the heated floor is possible;
- Not possible to compact, may lead to the formation of air bubbles;
- The difficulty of leveling concrete will require an additional layer of leveling screed.
The floating concrete screed (6) is necessarily reinforced with a mesh (2), welded in knots, with cells of 10 by 10 cm. The reinforcing mesh not only holds the screed together, preventing it from cracking when the floor dries and is in use, but also serves as a base for fastening ( 4) pipes (5) water floor and electric floor cable. It is important (!) to ensure that the mesh (3) rises 10 mm from the insulation (film) (1).
The concrete screed must be insulated from the walls with a damper. This is a special tape or any dense insulation no thicker than 1 cm.
Thermal insulation of the base
Before installing the heating system, it is necessary to insulate the base. The thermal insulation layer will protect the water circuit from heat loss going into the basement or foundation of the house. The following is used as insulation:
- Styrofoam;
- extruded polystyrene foam;
- foil-coated backing.
The listed materials are characterized by high strength to mechanical load, resistance to moisture and temperature changes. The thickness of the insulation is 30-50 mm, it is laid on a layer of waterproofing polyethylene film. The canvas is laid overlapping on a clean, dry base; it will protect the insulation from getting wet. Thermal insulation boards are laid end to end, the joints are coated with glue or blown in with foam, the excess of which is cut off.
Penofol or a similar sheet of reflective insulation is placed on top. A layer of aluminum foil is directed upward, this will reflect the bulk of the heat back towards the room. The joints of the foil insulation are taped with special tape. Penofol will protect the insulation from the aggressive effects of concrete. A metal reinforcing mesh is laid over the thermal insulation. This element evenly distributes the high load from the water circuit system and the concrete structure.
Option 2. DSP
Cement-sand screed for heated floors is made using floating floor technology, based on a solution of cement, sand and water with the addition of plasticizer and fiber, or based on ready-made dry mixtures.
Important! Plasticizer and/or fiber are mandatory in underfloor heating screed.
- If you are doing TP at home, M200 grade cement is sufficient to prepare the DSP solution. The sand needs to be clean. Sand/cement proportions, 3/1 (three sand - one cement).
- If the heated floor is made in a garage, then the grade of cement is taken higher from M300 to M500, optimally M400.
An obligatory element in the DSP TP solution is reinforcing fiber and plasticizer fibers. Fiber fiber is added in a volume of 900 g. per cube of solution. Fiber plays a reinforcing role.
Important! A plasticizer (this is not fiber) is added to any type of DSP underfloor heating. It (plasticizer) compensates for the thermal expansion of the heated floor, protecting the central fiber board from cracking.
The TsPS TP screed is separated from the base of the floor. For this purpose, a layer of polyethylene with a thickness of 200 microns is laid on the base. For better heat transfer, a layer of heat insulation with a thickness of 20 mm or more is placed under the screed. Important! The foil backing is not insulation.
Important! For trouble-free operation of the heated floor, the heated floor screed must be laid only on a flat, solid base. Unevenness of the base can lead to the formation of air cavities, which can shrink under load. If the base of the floor is uneven, under the heated floor screed, you need to make an additional leveling bonded screed.
The DSP screed will be separated from the walls of the room, for which a damper tape or strips of any solid insulating material 5-10 mm thick are fixed around the perimeter of the room.
A floating DSP screed must be reinforced with a mesh with 10 by 10 cm cells. The reinforcing mesh not only holds the screed together, preventing it from cracking when the floor dries and the heated floor is in use, but also serves as a base for fastening water floor pipes and electric floor cables. It is important to ensure that the mesh rises 10 mm from the film.
The thickness of the screed layer, in the version of a cement-sand screed without fiber with a reinforcing mesh, cannot be less than 10 cm. It is this layer that will ensure the creation of a durable floating slab. In this case, the thickness of the screed must ensure that the pipes (cables) are covered with a layer of at least 30 mm, otherwise there will be strip heating of the floor.
Ready-made mixtures will simplify the work
There are a lot of manufacturers producing ready-made mixtures (levelers), including those suitable for installing heated floor screeds. A solution from this mixture is made by adding water in the proportion indicated on the package. The leveler is laid with or without beacons, depending on the brand and manufacturer.
The use of ready-made mixtures is the best option for installing screeds for heated floors yourself.
Types of finishing screeds
Dry
It consists of expanded clay, foamed vermiculite, expanded polystyrene or perlite. The granules are covered with sheets of moisture-resistant plasterboard or chipboard. All this is quite easy to install - anyone can do the job.
pros
- High laying speed. Even in a large room you can do it in a day.
- You can install the finished floor covering the very next day.
- The load on the floors is three times less than in the case of wet pouring.
- Easy installation.
- Excellent sound and thermal insulation.
Minuses
- If water gets inside the floor, mold will appear and the entire structure will have to be dismantled. Requires a waterproof finish.
- GKL and chipboard boards may not withstand additional heavy partitions.
- For some time after the repair is completed, rustling sounds will be heard when walking.
Instagram @alexpracapl
Wet
Usually this is a cement-sand mortar or concrete mixture. Doing everything yourself will be a little more difficult than in the case of dry backfill, but it is quite possible. Ideal for floors with ceramic and stone finishes.
pros
- Strength. Will withstand new, heavy partitions.
- The dried layer can be left as a final finish by simply painting it.
- Excellent sound and thermal insulation.
Minuses
- Labor-intensive process. The solutions are liquid, but pouring and leveling them without skills can be difficult.
- Heavy weight. If the floors are weak, this filling will not work.
- Long hardening time. It will take a few weeks before final finishing.
- You will need equipment for mixing - a construction mixer or a drill with an attachment.
Instagram @mastersanuzlov
Semi-dry
It is difficult to make such a coating with your own hands - it requires a pneumatic blower, a mixing machine, and a grinding machine. In a small area, you can try to do everything without equipment, but it will be more difficult. The material is not easy to level on your own, since it is a hard sand-cement mixture. Plasticizers and a small amount of water are added to it.
pros
- Tiling can begin after two to three days. For other coatings, the time frame is longer, since moisture will be released within a month.
- Light weight.
- Good sound and thermal insulation.
- Relatively clean working conditions.
- There is virtually no shrinkage.
- Moisture resistance.
Minus
- Need for equipment. It can be rented from a construction company, but this is an additional expense.
Instagram @stiazhkapola39
What is better to choose
It is difficult to answer unequivocally which screed is better for a water heated floor. Based on weight, the best option is dry mixtures. They are much lighter, the load on the floors is not so strong. In addition, they can be cheaper if renovations are being done in a small apartment. In terms of installation speed, they outperform the other two options. You can do everything in a couple of days. But such a floor is not recommended for use in the bathroom.
For large-scale work, when there is time before moving into a home and a large batch of material is needed, it makes sense to purchase wet concrete or cement-sand screed. This option is also suitable for those who need a durable coating that is not afraid of moisture.
A semi-dry mixture could be a compromise - it is durable and dries faster than wet. But it requires equipment or the workflow will be labor-intensive.
Option 3. Semi-dry screed on heat-reflecting boards
To simplify the installation of heated floors, companies began to produce special slabs of remarkable designs. These slabs, on the one hand, are ready-made channels for laying cables or underfloor heating pipes, on the other hand, they take on part of the operational load and create a layer of heat insulation.
In this version of underfloor heating, a semi-dry screed is usually made, based on cement-binding mixtures with the addition of plasticizers. The best quality of such a screed can be achieved by using ready-made mixtures of levelers for heated floors or by purchasing ready-made semi-dry factory-made mixtures.
Pros and features of semi-dry screed
- A semi-dry screed does not require reinforcement and dries much faster than wet screeds.
- The semi-dry screed is laid with a damper tape.
- The thickness of the screed should ensure that the pipes (cables) of the heated floor are covered with a layer of 40-60 mm.
Minuses
- However, a semi-dry screed, porous and in the construction of a heated floor, will significantly increase its inertia;
- In addition, semi-dry screed requires serious professional skills, which makes it difficult to recommend it for independent use.
Types of plasticizers, features of their use
Plasticizers (surfactants) are surfactants. Surfactants are produced in liquid or powder form, with antifreeze additives and reinforcing polyamide fibers.
During the development process, the composition is endowed with properties that modify and improve the quality of floor screeds:
- Ensuring the plasticity of the solution;
- Increasing the degree of mechanical strength and moisture resistance;
- Improving surface smoothness;
- Elimination of possible damage to electrical devices by corrosion.
Laying a heated floor with your own hands, using strengthening active substances in the screed, makes its use comfortable and safe.
Sometimes modern plasticizers for screed are classified as environmentally friendly products.
But still, do not forget that they contain chemicals that have the property of changing the structure of the concrete mixture.
Therefore, in the process of preparing screeds for electric or water floors with your own hands, it is recommended to include in their composition the amount of additives corresponding to the information indicated on the packaging.
Some manufacturers of surfactant additives for cement-sand screeds, in order to get ahead of competitors, keep their composition and recipe for their preparation secret.
In addition to unknown individual components, plasticizers include the following ingredients:
- Concentrated sulfuric acid (strong oxidizing element);
- Phenolic production waste (phenolic resin, water);
- Concentrated sodium hydroxide solution;
- Defoamer, formaldehyde and water;
- Plastic reinforcing fibers (present in some surfactants).
Liquid plasticizers are added to the dry mixture: at the rate of 1-1.5 liters per 100 kg; Before use, shake the substance thoroughly and pour in simultaneously with water as mixing progresses.
Powdered - take at a ratio of 1:2 (surfactant/water); mix thoroughly, let stand for a couple of hours (the further mixing procedure is the same as with liquid).
conclusions
The article discusses several options for screeding heated floors:
- TP screed in a high-load room. It is made with B22.5 concrete, possibly on soil with a thickness of 85 mm or more, with obligatory mesh reinforcement. Concrete underfloor heating system.
- TP screed in a house (apartment) is made with a cement-sand mixture reinforced with mesh or plastic fiber on a 2-3 cm insulating substrate with the obligatory addition of a plasticizer.
- The semi-dry screed technology is NOT recommended for independent use , excluding small rooms (bathroom, toilet) due to the complexity of the technological processes in the production of the solution and its installation.
Rough preparation
A warm floor is formed in several layers:
- Rough screed;
- Sound and heat insulator;
- Heating elements;
- Finishing screed (upper part of the structure).
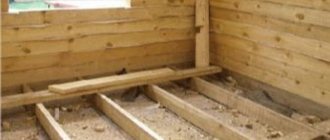
The rough layer is leveling. It is not required if the base is a flat floor slab, like in an apartment. In a private house, floor heating is often installed on the ground; in this case, a self-leveling solid foundation is necessary.
To properly fill, you need the following materials:
- dry mix or cement mortar;
- reinforcing composition (can be replaced with a reinforcement mesh with medium-sized cells);
- waterproofing and insulating materials;
- fasteners;
- container where the solution will be mixed;
- construction mixer (can be replaced with a drill if you have a suitable attachment);
- putty knife.
Subfloor
Installation technology
Before pouring the solution:
- Make sure that the temperature at the work site is between + 5°C and + 25°C.
- Clean the working surface (the presence of debris will impair the adhesion between the solution and the base);
- Repair all cracks in the base;
- Line the perimeter of the wall with damper tape to the depth of the screed;
- Install level beacons.
After this, you can move on to the main part of the work:
- Prepare the mixture;
- Fill it, strengthening it with reinforcing mesh if necessary;
- Wait 24 hours, cover the dried concrete with polyethylene;
- After a week, remove the film (further hardening will occur without it).
Expert opinion
Sergey Permyakov
Heating systems engineer
The minimum thickness of the rough screed must be at least 3 cm ; a thinner layer will crack and collapse. There is no point in pouring more than 5 cm under a warm floor; exceeding this limit will lead to a noticeable reduction in the volume of the room.
You can start the next stage of work in a week . The strength of the screed will be about 70%, this is enough to withstand the load. It will take 28 days for the base concrete coating to dry completely. During this time, concrete gains 100% strength.
Regulations
- SNiP 2.03.13-88 paragraphs 2.144-1/88 (nodes 63, 69, 75, 81, 87), 2-244-1 (nodes 140,147,149, 160, 161).
- Design of heated floors: DIN 18560 and SNiP 41-01-2003.
©Opolax.ru
Articles on the topic
- Polystyrene underfloor heating system
- Heating electric cable
- Which underfloor heating is better, electric or water
- Infrared heated floor, heating film
- Water heated floor system: principle of operation, device, description
How to install a finished screed
If the need to lay a heated floor arose after pouring, then you will need to do the following:
- Mill the channels for the pipes (using a grinder, milling cutter or wall chaser);
- Install thermal design elements - electrical cable or water pipes;
- Cover them with solution.
Scoring
The canals prepared at the first stage should have the shape of a snail or snake.
Unfortunately, this technology is very labor-intensive. In addition, there is no possibility of providing heat and sound insulation, and the drying solution may be squeezed out of the channels, which will damage the appearance of the floor.
Tools and materials
In order for the work to start and proceed without distractions, you should consider preparing in advance not only the tools, but also the appropriate materials. As for the latter, the proportions of the semi-dry floor screed must be fully observed. The main quality of the finished base for the flooring will depend on the proportions.
Among the tools are a construction level or a water level. Laser levels are no less popular. But its cost puts some off. There is not always a desire to spend large amounts of money on a single task. A tape measure and various containers for mixing the solution and stirring using a drill with an appropriate attachment will also be useful. In addition, spatulas and trowels will be useful in the work.
Depending on the installation process of the semi-dry screed, any additional tools will depend. If the beacons are positioned and attached to the base using self-tapping screws with wire, then you do not need a screwdriver or wire cutters.
The semi-dry screed has proportions that are best looked at in the instructions for the purchased material. The cement mortar should be homogeneous and without unnecessary lumps. To avoid possible difficulties with mixing, there are enough dry mixes in the store chain, to which you only need to add a certain amount of water. True, here the proportions of liquid in relation to the mixture must be appropriate.
When making your own mortar for a semi-dry screed, buy the following in the store:
- 50 kg of cement. Its brand must be at least M-400.
- For this amount of cement you will need 200 kg of sand, with a fraction of no more than 0.8 mm.
- 30-40 liters of water. There is no need to rush about water. It is better to pour slightly less than the required amount, and only then add as much as needed. The main thing is that the solution does not turn out liquid.
- Plasticizer. It can be found in finished form in stores. Its amount will be insignificant, about 200 grams. Some experts advise adding regular liquid soap instead of an expensive additive. The elasticity of the screed will remain at a decent level.
- The thermal insulation layer is made of polystyrene foam boards.
- A special metal profile, called “beacon”, is used as beacons. Beacons, by the way, can be made in other ways, of which there are a huge number.
Choosing a floor covering
When screeding a warm water floor with your own hands, you should glean information about what kind of floor covering you can choose in the future. The main thing is that it has excellent thermal conductivity characteristics. The most ideal option in this case is ceramic tiles or porcelain stoneware. This material can last for a long time and maintain all its performance characteristics. Heat transfer is good, and, therefore, all the energy from below will flow out very well. True, such a choice will be comfortable for the feet only during the heating season. A semi-dry screed for a warm water floor will be cold in the summer.
Many people make the mistake of laying plastic tiles. At elevated temperatures and heating, it will crack and become unusable over time. So it’s better to avoid it when choosing.
Another best option is laminate. Moreover, you can buy special material in the store designed for heated floors. Tarkett, Parador and others are popular among manufacturers. A semi-dry cement screed can also withstand linoleum. There is one feature here, which is that the raw materials must be natural. Otherwise, various chemicals and carcinogens will be released into the room when heated. This applies to non-woven linoleum.
For warm water floors, natural materials such as parquet and cork are also used as flooring. The main thing is that the product is certified and can be laid on a heated floor. It is very important to read the manufacturer's recommendations.
Nuances of control check
When installing a wet screed made of concrete or a cement-sand mixture, a hired team should not rush and immediately pay for their services. You have to wait until the artificial stone hardens completely. Moreover, for the first 2 weeks the surface is covered with a film and periodically moistened with water in order to saturate it with moisture as much as possible.
Then you need to wait time, which is about a month, for the composition covering the underfloor heating pipes to crystallize. The period depends on the thickness of the layer - this is an individual indicator for each case.
As soon as the allotted time for hardening has expired, you can inspect the surface, which was developed by the hired team. There are some nuances that should be checked when accepting their work.
The first step is to carefully examine the surface - the presence of cracks clearly indicates mistakes have been made. This kind of work cannot be accepted
When inspecting, you need to pay attention to each section of the screed in all rooms - the presence of shine is undesirable, the top layer should be smooth, uniformly gray, without chips or cracks.
Then the evenness of the surface is checked with a two-meter strip - the rule. It is applied in several places to the screed. The norm is if the gap does not exceed 4 mm. This is SNIP 3.04.01-87, table 25.
You should check the horizontal slope - with a length of 4 meters, a deviation from the horizontal of no more than 0.2 percent is permissible. It turns out that in this case the permissible slope level is 8 mm
To tap, it is better to take not a hammer, but a wooden block and tap the end. The entire surface is checked - the sound is the same, ringing. If it is deaf, then there are detachments of the screed from the base.
If the surface has passed the test with honor, the work can be accepted and the crew can be paid their honestly earned money. If this is the result of independent work, then you can be proud of it.
Now all that remains is to carry out thermal tests. It is important to remember that they are launched in a month, not earlier. Start at 25 with a daily increase in temperature by 5 degrees until it reaches the design value, not forgetting to monitor the pressure loss.
Rules and examples of calculations for a water floor heating system are given here. We recommend that you familiarize yourself with useful, systematic information.
Features of installing a rod infrared floor
This type of heated floor consists of rods that are connected to each other by flexible wires. When current is passed through the rods, they generate heat. This type of heating can self-regulate the temperature, so it can be used without a thermostat.
Installation sequence of the rod infrared floor:
- creating a laying scheme;
- preparation of the base;
- laying thermal insulation;
- preparing the location for the sensor;
- laying out the strips and connecting the cable according to the drawn up diagram;
- fixing the strips to the base using mounting tape;
- installation of a thermostat;
- connecting the sensor and cable to the thermostat;
- connecting the thermostat to the network;
- system testing;
- pouring screed;
- laying tiles.
For such a floor, the best finishing coating is ceramic tiles; it is laid in a screed, the thickness of which should be more than 2-3 centimeters.