- Pros and cons of heated floors in a cottage
- Design and Build Rules
- Wise choice of materials
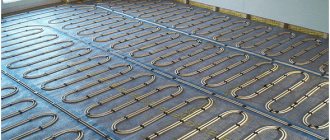
- Installation guide for heated floors
- Finishing
- Operation of heated floors - rules and recommendations
- conclusions
It is more profitable and convenient to heat a full-fledged cottage for year-round use with heated water floors. But only professionals know that there are two concepts of such floors:
- Water heated floor.
- The heating system of the house is water heated floor.
In both cases, the floors will be warm, or you can even make them hot. But the first concept assumes that additional radiators on the walls or other heat sources are needed, because the room will be cool. This is a solution for creating comfort for your feet: you can walk barefoot at home, but you will have to sleep under a warm blanket.
What floor temperature is acceptable and what is considered comfortable? For a room with permanent occupancy, according to Russian SNiP, the temperature should be +26˚C, the European standard DYN - +29˚C. According to surveys, 98% of owners consider a temperature of +28-29˚C comfortable for their feet.
The reason for such a divergence in the concepts of heated floors is most easily illustrated by the example of a swimming pool with two pipes: water flows in through one, and flows out through the other. Here is a cottage - this is a kind of swimming pool, but instead of water it is filled with heat, and it constantly dissipates.
Thus, during the design process, a thermal engineering calculation of the object is carried out. It is necessary to find out how much heat the cottage loses, and then the water heated floor system is calculated and completed. For this, a lot of factors are taken into account:
- temperature of the radiating surface;
- load on the foundation and supporting structures;
- thermal characteristics of house materials;
- repair budget, etc.
IMPORTANT: there are no objective factors that prevent the organization of heating a cottage with water-heated floors.
But to solve some nuances, additional funding for the project will be required.
For example, if the house is replete with glazed surfaces, then it may be necessary to install low-emissivity double-glazed windows. These are non-target costs, but in some situations they can significantly reduce heat loss, which consistently reduces first the costs of equipment for heated floors, and then energy consumption.
Pros and cons of heated floors in a cottage
Evaluation characteristics are used only when comparing alternative solutions. Warm floors have only one real competitor - radiator heating:
| Radiators | Water heated floor | |
| Project cost | Cheaper by 20-40% both in equipment and in labor. | The price increase starts from the design stage. But this is a one-time expense! |
| Heat distribution and room heating | Heating of rooms is local, and convection currents are responsible for a comfortable temperature throughout the room. | An absolute advantage. The very principle of the underfloor heating system declares that the room is heated over the entire area at once. |
| Life time | Manufacturers provide a 50-year guarantee on high-quality radiators. But even cast iron radiators from the 60s continue to work. | The equipment warranty is 50 years. But water-based heated floors entered the Russian market about 25 years ago, so experimental testing is yet to come. |
| Availability of repairs | No difficulties even with a minimal set of tools. | An extremely time-consuming and difficult task even for professionals. |
| Inertia - adjustment | The radiators themselves react almost instantly to changes in coolant temperature, but this does not affect the heating of the entire room. When the heat supply is turned off, the radiators will cool down first. | The system responds much more slowly; noticeable changes may take up to 1.5-2 hours. But the heating will be felt immediately throughout the entire area of the room. |
| Economical | The situation is quite nasty. If two absolutely identical houses lose the same amount of heat, then to compensate they need to receive the same amount of heat from the heating system. With a typical solution, energy bills will be approximately the same. But water heated floors have the opportunity to realize the inherent potential of the system! | |
| The coolant temperature reaches 95-97˚C. The efficiency of the hot water boiler is ≈85%. | The maximum coolant temperature does not exceed 60˚C. This allows the system to be equipped with a condensing low-temperature boiler. Its efficiency can exceed 100%. | |
| Aesthetics | Even the most modern radiators will be in plain sight, which limits the designer's creative ideas. | Ideal, because the water heated floor system is not visible at all. |
| Comfort | Only next to the heating radiator. | Comfort of stay is noted by 100% of users. |
The tabular data is reliable provided that the heating systems of the cottage were installed by professional builders and on identical sites.
Why is a thermal insulation substrate required?
If the heated floor is installed according to all the rules, then its efficiency allows the system to be used as the main heating, although not for all rooms and not in all climatic zones. A poor-quality substrate for a warm water floor reduces the heating efficiency so much that it can only be used as an additional one.
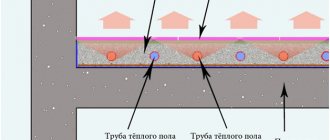
Diagram - layers of heated floors
The diagram shows the substrate under the pipes
The presence of a high-quality substrate can reduce unproductive heat losses by 20% or more. This element is especially important on the first floors - thermal energy goes into the ground. On the second and higher floors, the lost heat at least warms the lower rooms, but this is little consolation.
The substrate is necessary for heat conservation
Energy is more evenly distributed across the floor area. There are no areas too cold or too hot. The negative impact of high temperatures on finishing flooring and furniture is minimized.
Without a backing, heat is distributed unevenly
Financial losses are significantly reduced not only for floor heating in winter, but also for its installation and maintenance. A substrate with bosses allows you to try several options for laying pipes, while temporarily fixing their position may not be necessary. Installers have the opportunity to choose the most convenient places to connect the system and install sensors for monitoring operating modes in optimal places. Due to this, control of the water heating system becomes more reliable and accurate.
The support with bosses makes the pipe laying process easier
The thermal insulation substrate, in addition to its main tasks, serves as an effective sound insulator. This is a very important factor for old-built apartment buildings; they have very low heat saving rates, losses can be 40–50%. Another additional function of some types of substrates is vapor and waterproofing.
The substrate is a good insulator
Design and Build Rules
The basic rule says: a cottage heating system with water-heated floors is always designed for a specific object!
Absolutely all objects are unique, and the same appearance of cottages does not guarantee the same preferences of residents. There are a number of design rules, between which there is no strict gradation; they are all important, and without taking them into account, the system will not work in the desired mode. But the calculations begin by calculating the safety margin of the floor and the heat loss of the house. This allows you to decide on the type of construction: “screed” or “dry”. And also decide on additional thermal insulation of the building (this action is never superfluous for a private house in Russia).
It is important to remember that in almost all calculations of underfloor heating, the principle of sequence “from simple to complex” or “from large to small” does not work. It is impossible to first select pipes, a collector for them, a boiler for them, etc., and designing water floors in the reverse order does not work.
Professional designers complete the system in such a way that if some parameter changes, then other points are simultaneously adjusted.
The nuances of installing heated floors for a private home and its difference from installation in an apartment
Equipment for a water heated floor system using a “wet scheme” requires filling the coolant circuit with a screed. The minimum thickness of the screed is 4 cm (above the pipe) + 2 cm the height of the pipe. 1 m2 of screed is 1 cm thick, weighs about 17 kg. 6 cm of screed will give ≈100 kg/m2. The load on the floor in a room with an area of 20 m2 will exceed 2 tons.
For an apartment in a multi-story building, these are excess loads, so water-heated floors in such facilities are installed only using “dry” technology.
It is prohibited by law to connect a water underfloor heating system in an apartment to a regular riser.
In some houses built according to modern designs, engineers specifically included the possibility of parallel connection of a separate apartment through a special riser. In other cases, approximately the following scheme is allowed for an apartment: “dry installation” + electric boiler + UNIBOX.
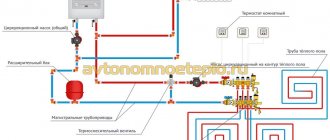
Schematic diagram of a water heated floor in a private house
The heating scheme for a private house based on water-heated floors can be presented in the following sequence:
- Boiler.
- Security group. Needed to relieve high pressure in the system.
- Expansion tank.
Further the route will bifurcate. Because high-temperature coolant is supplied to the radiators, and for the floor circuit it must be diluted.
- Radiator.
- Control and adjustment unit, including: Pumping and mixing unit.
- Collector.
Comments: the entire circuit can be roughly divided into three nodes: boiler (1, 2, 7) + wall heating (3, 4) + floor heating (5, 6). All types of heating are controlled and operate independently of each other.
The system operates according to the following protocol:
- Hot water (HW) from the boiler enters the main riser.
- From the riser, part of the hot water passes into the radiators. The expansion tank is part of this branch. The cooled water returns to the boiler through the return line.
- The main part of the hot water enters the pumping and mixing unit (PMU), where in a three-way valve it is mixed with the return from the floor circuit to regulate the temperature.
- Then the hot water is pumped through the collector along the underfloor heating circuits. Cold water (CW) is returned through the same collector. In the NSU, part of the cold water is used to regulate the temperature. Most of it enters the boiler through the return line.
The room temperature sensor transmits a signal to the collector thermostat. The temperature of the coolant in the underfloor heating system is adjusted up to the collector.
The reason is explained with a simple example. Let's say there are 3 rooms in a cottage, each of them has its own floor covering: carpet, tile and laminate. Each room must have an air temperature of +24˚C. But each floor covering has its own thermal conductivity. And if a coolant with a temperature of 40˚C is sufficient for a room with tiles, then in a room with carpet it will need to be raised by several degrees.
Experienced designers in such cases operate with several parameters at once: pipe diameter, pitch and type of installation.
The inconvenience of thermal engineering calculations lies precisely in the difficulty of combining different parameters in one project to obtain the optimal result for the agreed amount.
Calculation of the water floor. General views
The thermal power of the floor is calculated to heat the cottage during the 5 coldest days of the year. These are different constants for each region. Therefore, the norm of one region is not at all applicable in another.
Deviations are allowed here. For example, in Moscow the average temperature of the coldest month, February, is -9.8˚C. Every year for 3-5 days it drops to -18˚C. And in the cottage the air temperature must be maintained at +24˚C. When designing a heating system, the power of the floor circuit may not be enough on these frosty days, and there are two options. You can either lower the temperature in the room to +21-22 degrees, or add another circuit with wall-mounted radiators.
The other part of the calculations concerns each room. For example, there is a corner room in a cottage with an area of 4x5 m and a height of 2.5 m. Two walls with an area of 22.5 m2 face the street. There are two windows with a total area of 5 m2. Ventilation is also taken into account, and what is located under and above the room, and the purpose of the room (bedroom, kitchen or living room). It is necessary to calculate with what minimum configuration it is possible to ensure a comfortable air temperature in the room.
In the project, the power of thermal radiation can be adjusted by changing the diameter of the pipes, the type of installation of the circuit, the speed and temperature of the coolant.
The calculations even take into account the material of the enclosing structures, which is considered layer by layer, and the thermal characteristics of each layer are entered into the project as a separate line.
The power and productivity of the pump and boiler are also calculated separately.
IMPORTANT: amateur calculations of a heated floor should be compared with the diagnosis that a psychic gave to a sick person. Data obtained in this way can be studied, but used in practice is dangerous. It is necessary that the project calculations are carried out only by specialists.
Methods for installing water circuits
In total, there are only 5 ways of laying pipes in an underfloor heating circuit, of which the first 2 are basic, and the rest are derivatives:
- Snail.
- Snake.
- Double snail.
- Double snake.
- Combined.
You only need to compare the basic types of installation, and the difference between them is very noticeable:
| Snake | Snail | |
| Complexity | It is very simple to design, but difficult to implement, since the circuit is built on pipe bends at an angle of 180˚. | Noticeably more difficult to design, but easy to install. Due to the absence of 180˚ bends, the hydraulic resistance of the circuit is reduced by 5-10%. |
| Uniformity of heating | In the standard version and with poor design, the “zebra effect” is clearly visible. | Warming up is uniform. |
| Material consumption | Higher than that of a snail, by 7-10%. | Optimal. |
The “snail” has an objective advantage, but the shortcomings of the “snake” are leveled out by an experienced engineer at the design stage. For example, you can reduce the temperature difference or the laying step. And on sloping floors, “snake” installation is preferable.
IMPORTANT: a combination of different types of styling, even within the same contour, is a common practice. For example, immediately after the collector, the pipe is laid in a “snake” along the outer walls in order to concentrate heat in the “boundary zone”. Then you can use the snail style.
There are two immutable rules:
- The length of pipes in each circuit should not exceed 100 m.
- They try to keep the length of the pipes the same for all circuits.
Design for concrete and wood floors: differences
The limiting factor is the bearing capacity of the foundation. Only a floor underfloor water heating system is allowed on a wooden base. It works partly as a system in a screed. But to lighten the load, the cement-sand mortar was replaced with a structure made of polymers, composites and wood.
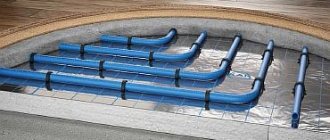
Scheme of deck structure
A mat with bosses and pipes are sequentially laid on a wooden base. They are covered from above with a special sheet material with high thermal conductivity, and then there is a floor covering.
The weight of 1 m2 of water-heated floor, assembled using “dry technology” from proprietary materials, is about 10-12 kg, and the height of the room will decrease by no more than 7-8 cm, of which 3.5 cm is the heat insulator included in the structural mat . This property allows you to install a floor heating structure in a residential building without major repairs.
Disadvantages of “dry technology” water floor
Lack of inertia is the main flaw of this scheme. After all, the entire volume of the cement-sand screed was responsible for the inertia of the water-heated floor. But this same disadvantage can be interpreted as an advantage, because the room should be heated faster.
But here the rate of heat transfer from the pipe to the flooring interferes. In a screed, this process occurs due to direct heat transfer - the pipe is completely enveloped and in contact with the screed material. In the flooring system, special aluminum radiators are installed to increase the efficiency of heat transfer between the mat and the pipe.
This metal fits more tightly to the pipe, and heat transfer through it is much more efficient than through a screed. But still, even in the best systems, it is not possible to remove more than 50-55 W/m2 from a water-heated floor.
This option can work well in the south of Russia, and in the Moscow region it is suitable as an additional source of heat to create comfort.
There is experience in the successful use of water-heated floors in cottages using “dry technology” in the Moscow region and the North-Western Federal District. These houses were originally designed as low energy buildings. The thermal insulation technique was taken from “passive houses”.
Some numbers
Now let's look at some very average cost of heating a room with water heated floors using a gas boiler. Of course, this value can be easily disputed, since it is calculated based on a variety of initial data.
Remember, we tried to calculate the cost of heating a 12 square meter room using infrared film. If you forgot, I remind you that electricity costs amounted to about 1000 rubles. Of course, this is also a very approximate value.
Now we take the same room, but use a water-heated floor for heating. On average, based on the cost of gas, the amount is approximately 3-4 times less, that is, about 200-300 rubles. For heating the entire apartment it will cost 1000-2000 rubles, which is much cheaper than the option with electric heating.
It would be long and boring to talk about how this figure came about. Some may doubt it and they will be right. A lot depends on the characteristics of the premises itself, the cost of equipment, and communications.
One thing is absolutely clear - a water heated floor with a gas boiler “heats cheaper” than the same option with an electric one or all kinds of film-cable electric options.
Wise choice of materials
For ease of classification, all materials for water heated floors should be divided into “accessible” and “closed”. The second one is a pipe. It will be immured in a screed, which increases the requirements for its reliability.
#1. Pipe selection
Basic requirements for a pipe for water underfloor heating:
- One circuit - one pipe.
- Joints and seams are unacceptable.
- The maximum pipe length in the circuit is 100 m.
Almost all water floors are assembled from pipes with a diameter of 16 to 25 mm. Based on material, they are divided into metal and polymer-composite.
Metal pipes
There are only two options in this category: copper and corrugated stainless steel.
Copper pipes for water heated floors are an ideal option in almost all respects. Only their cost and the complexity of installation work cover the advantage of using them.
Corrugated stainless steel is a relatively new material, but with powerful potential and good recommendations. These pipes are also more expensive than their polymer counterparts, but the rupture is not catastrophic.
Properties common to metal pipes:
- high thermal conductivity;
- immunity to overheating;
- resistance to high pressure;
- electrical conductivity.
Polymer composite pipes
Purely polymer pipes are polypropylene and cross-linked polyethylene (can be reinforced), and composite pipes are metal-plastic.
They work well in standard operating mode, but are afraid of prolonged overheating at elevated pressure. In an underfloor heating circuit, the operating mode for polymer pipes is optimal - the coolant temperature is much lower than the limit values.
#2. Choice of insulation
Rigid polymer foams are almost always preferred. Mineral wool thermal insulators have comparatively low thermal conductivity, but they are susceptible to dampness and tend to caking.
There is also a choice among polystyrene foams, but in practice, specialized heat insulators made from extruded polystyrene foam are almost always used. They can be produced in the form of smooth slabs or mats with bosses. In the first case, the pipe is fixed with mounting anchors or brackets, and in the second it is pressed between the protruding stumps of the bosses.
The pipe is held very firmly. The heat insulation sheets must be fixed to the base and the joints taped.
A damper tape is laid around the perimeter of the room. In addition to compensating for the thermal expansion of the screed, it also acts as a heat insulator.
#3. Other components and manifold
The manifold regulates the flow of coolant into the circuit. This is a whole conglomerate of parts and devices designed to connect several circuits.
Each circuit is controlled independently: the thermostat receives data from temperature sensors or an external control unit, and then changes the clearance in the pipe through a servo drive.
In general, the collector can have different designs: brass, stainless steel or polymer. But plastic ones are not in demand.
The flow meter included in the collector serves to equalize the coolant flow in circuits of different lengths. The setup is complicated, but one-time.
A three- or two-way valve is connected to the system before the manifold to mix hot and cooled water.
The pump can only be a circulation pump. The defining parameters are flow and pressure.
Circular pump
The flow rate is calculated using the formula: V = 0.86 * W/TΔ, where W is the installed thermal power, and TΔ is the difference in supply and return temperatures. For example, a cottage requires 20 kW of thermal power, set TΔ to 5˚C, we get (0.86 × 20)/5 = 3.44 m3/h. If we increase TΔ to 10˚C, then (0.86 × 20)/10 = 1.72 m3/h.
The pressure is calculated using a more complex formula, because on the equipment this parameter is indicated in “vertical column meters”, and the system operates with a pipeline located in a horizontal projection.
#4. Boiler selection
Basic parameters of the boiler: power and type of fuel. For individual houses there is an average rule when choosing a boiler - 0.1 kW/m2. Those. for a cottage of 200 m2 you will need a boiler with a capacity of 20 kW.
But as the quality of the house’s thermal insulation improves, the boiler power may be reduced.
Professional design of a water heated floor is more profitable because it allows you to more accurately select a boiler based on performance, avoiding cost overruns. After all, the heat loss of an object with the specific characteristics of the enclosing structures will be calculated.
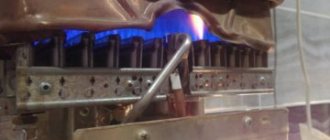
The type of fuel affects automation and efficiency. Absolute controllability is only achievable in electric boilers. But electricity is the most expensive energy carrier. It is most profitable to heat with gas.
Even solid fuel boilers (pellet boilers) are subject to automation.
The most profitable boilers for underfloor water heating are low-temperature or condensing. They have two advantages:
- They remove heat from combustion gases through a second heat exchanger.
- The maximum outlet water temperature is 60.
The efficiency of condensing boilers exceeds 100%.
#5. Poor quality materials and possible consequences
Nobody wants to buy low-quality goods, but everyone wants to save money. This is what can lead to tragedy. Failure of the safety group in the water heated floor system in a certain combination with other factors can result in a boiler explosion and fire.
Cheap metal-plastic pipes purchased from an unknown supplier can be successfully laid into a circuit, then checked by crimping. But after they are filled with screed and put into operation, they may leak or even burst. This is not a fire, but major repairs are guaranteed.
The collector can be assembled with your own hands from components from different manufacturers. It can work very well for a year, two or three. But the guarantee that it will function at all is given not by the manufacturer, but by the assembler of the device.
Branded equipment can also break down and fail. But this happens in exceptional cases, and, depending on the type of warranty, the company compensates for the costs of repairing and restoring the system.
Installation guide for heated floors
Assembling a water heated floor system is a creative process. Although a professionally prepared project contains a detailed flow chart for each stage, in practice there are always deviations from the imaginary standard. Therefore, installers are required not only to quickly respond to changes in the situation, but also to prevent such deviations.
Between some stages there are technological breaks of several days and even weeks. It is unacceptable to accelerate natural processes in any way.
It is best to begin installation after the system has been fully assembled, so that the parts and devices only need to be put in place and secured.
Step No. 1 - installation of subfloor, base, waterproofing
If the project does not provide for a sloping floor, then the rough foundation must be leveled with the horizon. And the floors in the new cottage are formed according to the “layer cake” principle.
The thickness of this structure reaches 90 cm, and in cross-section it looks like this:
- Clay.
- Sand.
- Crushed stone.
The thickness of each layer is at least 10 cm. After distribution, each layer is carefully compacted, and only then proceed to the next one. These three layers eliminate groundwater.
- Polyethylene film.
- "Skinny concrete."
Thick film is used, overlapped, and the joints are taped. It's better to do two layers.
“Skinny” concrete is used to form a strong base and as part of the waterproofing. The thickness of the concreting is 10 cm. By adding modifying additives to the solution, they accelerate the process of cement maturation.
- Fused roofing felt.
- Thermal insulator.
- Rough screed.
They begin to work with roofing felt after a technological break and the concrete has gained sufficient strength. Ruberoid is fused in two layers. The overlap between the strips is 5 cm, with a mandatory rise along the wall to the same height.
Extruded polystyrene foam (EPS) boards are used for thermal insulation. The joints are taped. The thickness is calculated individually, but not less than 10 cm.
The last layer is formed from cement-sand mortar of standard composition with mandatory reinforcement with masonry mesh. It is acceptable (desirable) to add steel fiber. The thickness of the screed is at least 7 cm.
The maturation of the screed can be accelerated with special additives.
If the surface is not leveled immediately, then in some cases a quick-setting self-leveling mixture is used.
Step No. 2 - laying a heat-insulating layer
Forming thermal insulation with a scientific basis for the process is a high skill. By slightly changing the sequence of actions and modernizing the stage, you can achieve almost complete elimination of heat leaks into the ground. This will manifest itself in lower energy bills.
Instead of using thick EPS mats, you can divide them into several layers. For example, the planned thickness of thermal insulation is 150 mm. If instead of sheets 15 cm thick, three layers of 5 cm each are laid “spaced apart”, then in total they will give the same 150 mm, but the overall thermal conductivity coefficient of the “layered structure” will be 6-8% lower. By laying construction foil between each layer of EPS, this indicator is improved by another 3-4%.
On the top layer it is more convenient to use specialized mats for laying water circuit pipes. They cost a little more, but they won’t require mounting dowels and anchors to secure the pipe, and the fixation will be more reliable.
The EPS boards are fixed to the base, and the joints between them are taped.
Step No. 3 - marking and placing pipes
The advantage of a high-quality project is most clearly manifested right now. A professionally drawn pipe laying diagram is simply transferred to the floor surface with scaling. In some combinations, experienced installers do not even make markings.
For example, if a flexible PEX pipe is being laid on a thermal insulator with bosses, then two people can fix a 100 m long circuit within 4-5 minutes. Moreover, there is no need to invent anything - the entire sequence of actions has already been deciphered in detail in the project documentation.
IMPORTANT: you must be very careful to ensure that the laid pipe is perfectly level. Even small tubercles or bulges, under certain operating conditions, can become a refuge for the smallest air bubbles. Having accumulated in one place, these microbubbles will certainly merge and reduce the lumen of the pipe. This will lead to an increase in pressure and depressurization of the circuit.
Laying pipes under furniture does not lead to any negative consequences for the underfloor heating system.
Step No. 4 - installation of reinforcing mesh
Reinforcement of the screed above the contour is necessary, but in some situations it is more effective to use steel fiber instead of masonry mesh. The introduction of fiber into the solution leads to dispersed reinforcement of the screed, i.e. throughout the entire volume.
In a standard situation, the reinforcing mesh is laid with an allowance of 7-10 cm and all elements must be tied.
IMPORTANT: at the end of the stage, the mesh should be tied into a single web and located approximately in the middle, between the pipe and the planned surface.
To do this, the reinforcing mesh is placed on small stands; homemade ones are also acceptable.
Be sure to lay a damper tape around the perimeter of the room. It cuts off heat leakage and prevents cracking of the frozen monolith due to thermal expansion.
Using beacons
The installation of beacons at this stage is practiced if:
- The pipe was purchased at a company center, and there is a guarantee.
- The installation was carried out carefully, without accidental kinks.
It has been empirically established that if these two points are observed, in 99.9% of cases, crimp testing reveals a violation of the tightness outside the laid contour. And beacons will not interfere with troubleshooting.
Additionally, the beacons stabilize the position of the reinforcement “web”.
Step #5 - System Testing
Pressure testing of the system allows you to identify a leak in the seal. There are three testing options:
- Air under pressure.
- Cold coolant under pressure.
- Working mode for a couple of days.
Options with coolant are considered more reliable. The coolant can be a chemical that has a low surface tension and is therefore extremely fluid, such as antifreeze.
TIP: before each filling of coolant, it is recommended to flush the circuit with water. The first time this is done, it is necessary to remove residual grease and dust.
For each type of pipeline fittings, the manufacturer recommends its own crimping technology, which specifies the duration, temperature conditions and test pressure.
Therefore, in order to ensure warranty obligations, representatives of specialized centers draw up an individual crimping flow chart for each project.
IMPORTANT: a pipe fixed in mats with bosses can be squeezed out of the mounting sockets during “air” testing if it was not secured to the reinforcing “web.”
After pressure testing, the coolant is not drained.
Step No. 6 - laying cement screed
For floor heating, the screed is poured at a time so that it forms a single monolithic sheet.
Laying in two layers, for example, for leveling, disrupts the process of heat transfer from the coolant to the surface, which distorts thermal calculations. Based on the exposed beacons, the finishing surface of the “concrete radiator” is formed.
IMPORTANT: the coolant must be in the pipe under increased pressure. When heated, the pipe will expand. The coefficient of thermal expansion is specified in the technical data sheet of the product. While in a filled state, the pipe slightly increases in linear dimensions. After 2-4 days, the pressure can be relieved.
If additives that accelerate the maturation of concrete have not been added to the cement-sand mixture, then laying the floor covering should begin no earlier than after 5-7 weeks. The following constant is used for calculation: at a temperature of 15-20˚C, the screed ripens at a rate of 1 cm per week. This means that for a screed 6 cm thick, the technological break will last 6 weeks.
Step No. 7 - commissioning
A particularly important event. If the regulations are violated, the screed may crack, so it is better to carry out this stage under the supervision of a specialist.
The collector has two outlets: for filling and draining the coolant. Fill the system with all valves and taps open to facilitate the passage of liquid as much as possible.
As soon as air stops coming out of the exhaust valves, turn on the circulation pump. In several modes, the coolant is circulated throughout the entire system, then, turning off the manifold taps, the liquid is pumped separately through each circuit. All this is done to remove air.
Projects of different configurations are filled out individually. The task is not just to fill in the coolant, but to remove all the air from the system.
The water heated floor in the screed is brought into operating mode within 4-7 days. Start heating at a temperature of 20˚C, leaving it for a day. Then it is raised by 2˚C every day until it reaches operating mode.
Finishing
The work at this stage is no different from conventional flooring installation. Restrictions are imposed on the surface temperature, and not on the type of decorative finish.
IMPORTANT: absolutely any floor covering can be laid on water-heated floors. But some of them can reduce the energy efficiency of underfloor heating. The type of substrate is also taken into account when laying laminate flooring. For such a base, a thin, noise-absorbing, rather than heat-insulating, substrate is needed.
Making the final screed
The most correct way to cover underfloor heating pipelines is a concrete screed 45–50 mm thick above the pipes. It cannot be made thinner due to the risk of destruction when heated. And if concrete is poured into a thicker layer when installing floor heating yourself, it will absorb too much heat.
And here it is important to figure out in advance how to set the floor screed beacons correctly to the required height. If you make mistakes during their installation, the concrete surface will turn out uneven and will poorly distribute loads. And this is a sure way to damage water pipes.
Final floor screed
Operation of heated floors - rules and recommendations
A professionally designed and assembled water underfloor heating system is good because the term operation does not apply to it. The elements of this system are neither visible nor heard, but its effect is felt by the whole body - it’s just warm in the house.
Not somewhere near the radiator or in front of the fireplace. A house with water-heated floors is simply warm.
A comfortable state is ensured by the control system. The more complex and expensive it is, the more accurately you can adjust the heating modes and the speed of reaction to changing environmental conditions.
The only rule is scheduled replacement of the coolant and regular maintenance by specialists.
Variety of heating systems
Almost every home uses autonomous equipment for heating. All heated floors can be classified according to various criteria :
- operating principle;
- type of boiler;
- coolant.
In individual houses a boiler can be installed , which uses for its operation :
- solid fuel;
- diesel fuel;
- gas;
- electricity.
In a heating system, the coolant can be :
- air;
- water;
- electricity.
According to the principle of operation, all heated floors can be of infrared or convective type.
Source stroyfora.ru
To make a film heated floor, a special film with heating elements glued to it is laid under the floor covering.
Each of the above types has its own advantages and disadvantages. All of them must be taken into account at the design stage. In doing so, experts take into account many different factors.
The most common, accessible and cost-effective in our country is gas heating.
When installing a heated floor, take into account the characteristics of the material from which the structure is made. For example, wood is characterized by a low thermal conductivity.