During construction or renovation, specialists are increasingly abandoning the classic heating scheme in favor of an innovative floor heating system. Heated floors are a modern, convenient, effective way to make your home warm and comfortable at any time of the year, without disturbing the style of the interior. This technology is widely used in residential, office and industrial settings.
Heated floors
About floor heating in an apartment
Increasingly, heated floors cover all the floors in an apartment and house, and from an additional heating system, floor heating goes into the main, and sometimes the only heating system.
In this article we will talk in detail about floor heating in an apartment and house. Warm floors in the bathroom, toilet, and kitchen are no longer some kind of luxury. This is rather the minimum necessary for comfort. Increasingly, heated floors cover all the floors in an apartment and house, and from an additional heating system, floor heating goes into the main, and sometimes the only heating system.
Indoor floor heating
The classic home heating system is radiators or convectors installed under the windows of the room. Windows serve as natural ventilation of the room and cold air, penetrating into the room from the street through the windows, is heated by heating radiators and, as a result of natural convection, moves from a warm place in the room to a cold one. We don’t see these air flows, but they are there and pass upward from the heating devices near the window, then, gradually cooling, along the ceiling to the opposite wall and return along the floor to the heating device.
Note: No heating system for a house or apartment will be ineffective if standard methods of retaining heat in a house or apartment are not followed: install plastic windows, insulate the walls of the house, use external insulation technologies, that is, take all measures to retain heat in the room.
With such a heating system, the heating of the room occurs unevenly. The warmest place is near the radiator, the coldest is in the opposite corner. To heat the room evenly, we use a variety of portable heating devices, dragging them from place to place. But still, the warmest place in the room remains at the ceiling, and the coldest at the floor.
Selection of pipes and their installation
The following types of pipes are suitable for water heated floors:
- Copper;
- Polypropylene;
- Polyethylene PERT and PEX;
- Metal-plastic;
- Corrugated stainless steel.
They have their own strengths and weaknesses.
| Characteristic Material | Bend radius | Heat transfer | Elasticity | Electrical conductivity | Life time* | Price for 1 m.** | Comments |
| Polypropylene | Ø 8 | Low | High | No | 20 years | 22 RUR | They bend only with heat. Frost-resistant. |
| Polyethylene PERT/PEX | Ø 5 | Low | High | No | 20/25 years | 36/55 RUR | Can't withstand overheating. |
| Metal-plastic | Ø 8 | Below the average | No | No | 25 years | 60 RUR | Bending only with special equipment. Not frost-resistant. |
| Copper | Ø3 | High | No | Yes, requires grounding | 50 years | 240 RUR | Good electrical conductivity may cause corrosion. Grounding required. |
| Corrugated stainless steel | Ø 2.5-3 | High | No | Yes, requires grounding | 30 years | 92 RUR |
Note:
* pipe characteristics are considered when operating in water-heated floors.
** Prices are taken from Yandex.market.
The choice is very difficult if you try to save on yourself. Of course, you don’t have to consider copper ones - they’re very expensive. But corrugated stainless steel, at a higher price, has exceptionally good heat transfer. The difference in temperature in the return and supply is the largest. This means that they give off heat better than their competitors. Considering the small bending radius, ease of operation and high performance characteristics, this is the most worthy choice.
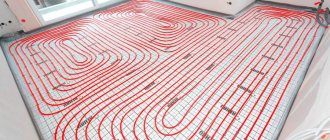
Pipe laying is possible in a spiral and snake. Each option has pros and cons:
- Snake - simple installation, almost always a “zebra effect” is observed.
- Snail – uniform heating, material consumption increases by 20%, installation is more labor-intensive and painstaking.
But these methods can be combined within one circuit. For example, along the walls “facing” the street, the pipe is laid in a snake pattern, and in the rest of the area in a snail pattern. You can also change the frequency of turns.
There are generally accepted standards that professionals are guided by:
- Step – 20 cm;
- The length of the pipe in one circuit is no more than 120 m;
- If there are several contours, then their length should be the same.
It is better not to install pipes under stationary and large-sized interior items. For example, under a gas stove.
IMPORTANT: be sure to draw the installation diagram to scale.
Laying begins from the collector. Unwinding the coil, fix the pipe according to the diagram. It is convenient to use plastic clamps for fastening.
Corrugated stainless steel is produced in coils of 50 m. To connect it, proprietary couplings are used.
The last element laid between the turns of pipes is a temperature sensor. It is pushed into a corrugated pipe, the end of which is capped and tied to a mesh. The distance from the wall is at least 0.5 m. Don’t forget: 1 circuit – 1 temperature sensor. The other end of the corrugated pipe is led out to the wall and then along the shortest path is brought to the thermostat.
About floor heating
The room heating pattern changes when using floor heating. Floor heating occurs evenly over the entire area of the room. Warm air rises evenly, creating an almost ideal air temperature difference from floor to ceiling.
When the temperature of the floor heating system is correctly set, a temperature of 24° C is created at foot level, and 20° C at head level. This is the most comfortable indoor temperature climate for a person.
How can you heat the floor?
Temperature
Using a temperature sensor and programmer makes it possible to independently enter the desired mode.
However, each type of heater has its own limit:
- Heating cables can withstand +100 degrees, with a maximum operating temperature of +65 degrees.
- The mats have a maximum temperature range of +80-104 degrees. The operating temperature depends on the material of manufacture: +60 degrees for cable mats and +55 degrees for rod mats.
- The operating temperature of film infrared systems is about +55 degrees.
Since the thermostat can change the temperature over a wide range, it is impossible to indicate the exact energy consumption. However, in any case, these systems will be more economical. Rod heaters are famous for the lowest level of energy consumption; In second place in terms of efficiency are film ones.
Floor heating in an apartment and house: general principle
Any floor heating system consists of a heating element evenly distributed around the perimeter of the room and neatly hidden under the floor finish. But it's not that simple.
The heating electric cable of a warm floor must be insulated from direct contact with the base of the floor and the walls of the room. This insulation should prevent heat loss from the heating element and direct all of its heat to heat the floor rather than neighboring rooms. This insulation is called thermal insulation and is an integral element of the floor heating system.
To increase the heat transfer of the heating element of a floor heating system, it must be enclosed in a layer with good heat transfer (screed) or placed in a kind of “sandwich”, where the bottom layer is a heat reflector and the top layer is a good heat conductor.
- The first floor heating system is called concrete.
- The second floor heating system is called floor heating.
Screed
IMPORTANT: the top layer of screed is poured only when the contour is filled. But before this, the metal pipes are grounded and covered with thick plastic film. This is an important condition to prevent corrosion due to electrochemical interactions of materials.
The issue of reinforcement can be solved in two ways. The first is to place a masonry mesh on top of the pipe. But with this option, cracks may appear due to shrinkage.
Another method is dispersed fiber reinforcement. When pouring water-heated floors, steel fiber is best suited. Added in an amount of 1 kg/m3 of solution, it will be evenly distributed throughout the entire volume and will qualitatively increase the strength of hardened concrete. Polypropylene fiber is much less suitable for the top layer of screed, because the strength characteristics of steel and polypropylene do not even compete with each other.
Install the beacons and mix the solution according to the above recipe. The thickness of the screed must be at least 4 cm above the surface of the pipe. Considering that the pipe ø is 16 mm, the total thickness will reach 6 cm. The maturation time of such a layer of cement screed is 1.5 months. IMPORTANT: It is unacceptable to speed up the process including floor heating! This is a complex chemical reaction of the formation of “cement stone”, which occurs in the presence of water. And heating will cause it to evaporate.
You can speed up the maturation of the screed by including special additives in the recipe. Some of them cause complete hydration of cement within 7 days. And besides this, they significantly reduce shrinkage.
You can determine the readiness of the screed by placing a roll of toilet paper on the surface and covering it with a pan. If the ripening process is over, then in the morning the paper will be dry.
About floor heating elements
The heating element of a floor heating system can be water or electric.
Water heating element for floor heating
The water element heats the floor by circulating hot water through it. This floor heating system is called a water heated floor. The water heated floor circulation system must be independent of central heating. Also, it should not have plumbing cuts into the internal water supply system of the apartment or house. In other words, you cannot connect to a hot water pipe running indoors.
You can only connect to a separate water supply system.
Electric floor heating element
The electrical element of a floor heating system is a variety of electrical cables that convert the energy of electric current into thermal energy. In other words, the electric current flowing through the heating element heats it, and it heats the floor of the room.
Depending on the type of electric heating element, electric floor heating is called cable or film. Cable floor heating is divided into resistive cable heating and thermal mats. Film heating is otherwise called Infrared heated floor.
But let's return to floor heating systems.
What is a heating cable?
Resistive and self-regulating cables are used to install heated floors. Resistive products are characterized by the presence of constant resistance and a stable level of heat transfer. This wiring can be single-core or double-core: the number of cores affects its switching circuit. The connection of a single-core cable is carried out by inserting both ends of the bay onto the thermostat. If a two-core cable is used, then only one end is connected.
The mechanism of the self-regulating cable includes the ability to adapt to the temperature of the surrounding space, adjusting the volume of outgoing heat. Each section can be adjusted, which is not affected by the condition of the nearby cable. It often happens that an object is placed on the floor surface: this leads to an increase in the temperature underneath it. The self-regulating cable reacts to this by reducing the heat generated in this area by increasing its resistance (the current strength and heating temperature are reduced). At the same time, neighboring areas are operating as normal. After the object is removed, the surface temperature equalizes.
The difference in characteristics explains the fact that the cables are laid differently. In the case of self-regulating products, there is no need to make a discount on the location of furniture items. Resistive models are installed with greater care: when developing a laying scheme, they preliminarily designate the areas where furniture will be located or objects suspended at a low height. Heating cables of this type may only be installed in free areas. Therefore, the main disadvantage of resistive cable floors is their fear of overheating, which can cause them to burn out.
Floor heating system
The floor heating system resembles a “sandwich”. The bottom of the flooring system is heat-reflecting surfaces, the top is special heat-conducting materials that separate the heating element from the floor finish.
In conclusion, I would like to note that all floor heating systems are called a “warm floor” system or, more simply, “warm floor”. Read more about each type of “warm floor”, the principles and features of their design in the following articles on the site.
©opolax.ru
Other articles in the section: Floor heating
- Wooden floor heating system
- Three applications of heating cable: heating of roof, floor and pipes
- Types of cables for heated floors
- Infrared floor heating
- Safe operation of biofireplaces in an apartment
Project development
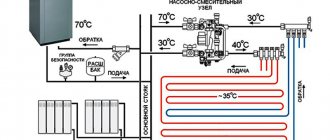
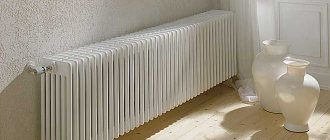
The HTP design stage begins with deciding whether the system will be the only source of heat or whether radiators will be additionally installed in the premises. If installation of batteries is not intended, all circuits are connected directly to the boiler, without installing a distribution unit. With this scheme, the temperature on the boiler is set to 45 degrees, and the coolant flows directly into the pipes.
When combining floor pipes and radiators, installation of a mixing unit is mandatory. For the batteries to work, the coolant must be heated to 70 degrees, and for a heated floor this is too high a temperature. In the mixing unit, the coolant will cool before being supplied to the pipes.
Before installation begins, a detailed design for the placement of collector units and mixers is drawn up. Craftsmen recommend placing them in the center of the entire system so that the length of the pipes in all rooms is the same. This will help you make precise adjustments.
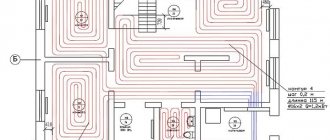
The next design stage is sketching a pipe laying diagram. There are 2 options:
- For small rooms (less than 10 sq/m) - parallel laying in a “snake” pattern in increments of 20 – 30 cm.
- In large areas (from 15 sq/m) - in a spiral. This method is more labor-intensive, but ensures uniform heating of the pipes over the entire area. Snake installation in large rooms can lead to broken pipes due to excessive bending and uneven heating in different corners of the room.
Spiral laying option
For rooms from 10 to 15 square meters, both installation schemes are suitable. The pitch between the pipes can be increased to 35 cm if additional radiators are to be installed.
If the room is large, divide it into several circuits. They must be the same size, the difference is allowed within 15 meters. If there is good thermal insulation, the standard step is 15 cm.
Standard formula for determining contour size:
- The heated area in squares is divided by the laying step in meters.
- The size of the curls and the distance to the collector are added to the result.
Expert opinion
Grebnev Vadim Savelievich
Heating system installer
When preparing the calculation and pipe laying diagram, hydraulic resistance is taken into account. It depends on the number of turns: the more there are, the higher the resistance. Please note that each circuit connected to the collector must have the same resistance.
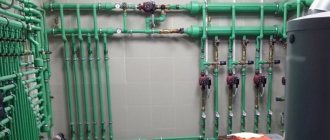
How to choose a manifold and pipes
More often, users choose inexpensive collector models. But if there is no need to save money, then it is better to buy a model with servos and mixing units. Such devices allow you to automatically regulate the degree of heating of the water entering the pipes
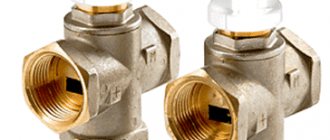
A mandatory attribute of the manifold is an air vent valve and a drain valve for emergency situations. For the device to work normally, you can configure all valves once according to the required parameters.
To install the collector you will also need a cabinet. The best option is to use ready-made cabinets that are assembled and tested in the factory.
In this case, you only need to select the required number of collector groups, the power of the circulation pump and the mixing unit, if necessary. The cabinet is mounted in the wall and the heating circuit from the common riser and the circulation circuits of the heated floor are connected to it.
The standard option is to install the cabinet in the wall
The only drawback of using a ready-made manifold cabinet is its relatively high price, but when it comes to increased reliability and safety, it makes no sense to save.
For a rough estimate of the required number of pipes, you can proceed from the calculation of 5 linear meters of pipe per 1 square meter of floor. Polymer pipes made of cross-linked polyethylene are optimal in terms of price and quality ratio. They are lightweight, easy to install and have a service life of at least 50 years. Metal ones last longer, but they are more expensive and more difficult to install.
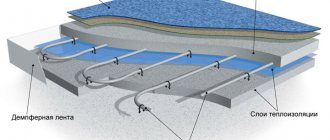
Preparing the base
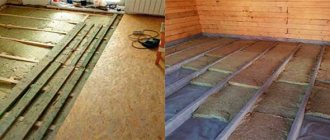
The area for laying pipes must be perfectly level, with a height difference at the location of one circuit of no more than 6 mm. A concrete screed is used as the base. A layer of insulation is laid on it.
Extruded polystyrene foam is often used for the base.
Experts advise using extruded polystyrene foam - the degree of thermal conductivity is low and mechanical strength is high. This material is not exposed to moisture and does not absorb it. This type of gasket is produced in slabs measuring 50 by 1000 mm or 600 by 1250 mm, and with a thickness of 20, 30, 50, 80 and 100 mm. The product is equipped with snap grooves, this will allow for a strong connection.
Expert opinion
Grebnev Vadim Savelievich
Heating system installer
Expanded polystyrene sheets with a foil layer should not be used. There is no significant benefit from it, since the reflective property does not work in an opaque environment. In addition, the cement mixture is alkaline, it will very quickly corrode the foil.
Profile polystyrene mats are highly plastic, equipped with special bosses, and pipes are laid between them. Also, the bosses serve as a retainer for the heating elements. In them, the contour is attached in increments of 50 mm. The use of mats greatly simplifies the installation process, but they are more expensive than polystyrene foam insulation. The thickness of the slabs is from 1 to 3 mm, and the sizes are 500 by 1000 or 600 by 1200 mm.
If there is a heated room under the floor, a layer 3-5 mm thick is sufficient. If the room below is cold, the layer is increased to at least 20 mm. If this is the first floor and there is soil below the floor, the insulation layer should be 70-80 mm.
Along the perimeter of the room, the walls are taped with damper tape. It serves to compensate for the thermal expansion of the screed. If expansion is not taken into account, the screed may crack or swell. The height of the tape usually does not exceed 10 cm. It must be glued to the wall. After filling the screed, the excess is cut off.
After laying the thermal insulation, draw the contours of the pipes on the surface. This will facilitate the installation process and help identify design errors in advance.
Pipe installation
The most suitable base for laying pipes is a special mounting mesh made of metal or plastic with 100 mm cells. It is spread on thermal insulation, pipes are pulled from above, along pre-designated contours, and secured with wire or plastic clamps.
The advantage of using mesh is additional reinforcement of the base for laying pipes. The disadvantages include the complication of the installation process. But the end result eliminates this drawback.
Pipes can also be laid on polystyrene mats. They are specially designed for water heated floors. The mats are a kind of mats with protrusions on the front side in which pipes are fixed. Economically, this is a more expensive method, but installation on mats is much easier and faster. In addition, polystyrene serves as additional insulation.
During installation, try not to step on the pipes or drop heavy objects on them. Even microscopic damage can cause leakage when pressure is applied. Cut the pipe only after it is completely on the floor and back to the manifold. Don't skimp on stretching the material. Savings will lead to leaks in the future.
Expert opinion
Grebnev Vadim Savelievich
Heating system installer
If you choose snake installation, place the beginning of the pipe at the coldest wall or at a window. This will help avoid uneven heating. When laying in a spiral, this condition does not need to be observed. In any case, heating will be uniform.
Connection
The most common way to connect a water heated floor is a distribution unit. Its goal is to increase pressure, implement temperature regulation and uniformly supply coolant to several circuits. There are different devices - with manual or automatic adjustment.
Connecting the system involves connecting both ends of the pipe to the manifold distribution with clamp fittings. Using a collector, the heated floor is connected to the main heating system or to a specially equipped boiler.
When choosing a heating boiler, it is important to take into account its power; it should equal the power of all areas of the floor with a small margin. The boilers have an inlet and outlet for water, which are equipped with shut-off valves.
Also, to circulate the coolant, it is necessary to install a pump. Most often it is included with the boiler. But if you plan to heat a large area, you will need to install an additional pump.
After connecting the pipes, you can fill the system with coolant. The manifold responsible for supplying the coolant is equipped with a ball valve; water is connected to it. And a pressure testing pump is connected to one of the outputs connected to the heated floor circuit.
The system filling process is as follows:
- Close all channels except one. Open all air vents at the same time.
- Supply water. Using the drain hose, monitor the degree of cleanliness and air exit from the system.
- When all the air is out and the water comes out completely clean, close the drain valve.
- After this, shut off the filled system. If there are several circuits, perform the actions for each one.
- After flushing and filling all circuits, close the tap.
Expert opinion
Grebnev Vadim Savelievich
Heating system installer
Upon completion of the procedure, there should be no air in the pipes, and the water should flow perfectly clean.
Hydraulic tests
Concrete can be poured only after a test run of the system. Fill the pipes with coolant at high pressure and maximum temperature. Make sure all pipes are filled and heated evenly.
The next stage is crimping. To carry this out you will need a special pump.
Procedure:
- Bring the pressure to 5 bar and wait until it drops to 3 bar.
- Then bring it up to 5 bar again. Repeat the cycle 4 – 5 times. At the same time, inspect the circuits for leaks.
- At a pressure of 2 bar, leave the system running for 12 hours. If the pressure does not drop, proceed with the finishing tests:
- Set the maximum temperature and turn on the circulation pumps to achieve maximum pressure. If the system has radiators, set the mixing unit regulators to the operating marks.
- Wait for the entire system to warm up completely, including batteries (if any).
- Make sure that all circuits and radiators are heated evenly.
- Leave the heating running for a day. If the condition does not change, you can turn off the boiler and begin concreting the pipes.
When pressure rises in the pipes, they try to straighten out. If their fixation is not secure, then unpleasant surprises will arise during testing. After filling the pipes with concrete, there is no need to worry about this.
Bay screed
Pipes that have cooled to 25 degrees can be concreted. Use a special mixture to prepare the solution. It has the best thermal conductivity coefficient and will ensure uniform heating. The thickness of the concrete layer for living rooms is 20 mm, in utility rooms - 40 mm.
There are special requirements for screed mortar. The surface will be subject to mechanical and temperature stress, which can lead to deformation. Therefore, plasticizers and fiber are added to the cement-sand mixture.
Plasticizers will give the solution elasticity and increase mobility. This is important for free penetration of concrete between the pipes. Fiber will increase the strength of the base and, in addition, will prevent the formation of cracks in the screed. Polypropylene and basalt fibers are intended for warm water floors. The standard fiber rate per square meter is 500 grams.
The solution is mixed mechanically. Before pouring pipes, the surface is cleaned of dust. The concrete screed must be poured in one step, without interruptions in work. 4 hours after concreting, cover the floor with film to ensure that the solution strengthens evenly and prevents premature evaporation of moisture.
Expert opinion
Grebnev Vadim Savelievich
Heating system installer
Do not turn on the heating and do not lay the finishing coating until the concrete has completely hardened. This will take at least 28 days.
Finish coating
It is recommended to use porcelain stoneware or tiles as a finishing material for a water heated floor. Laminate, linoleum or carpet are acceptable only if there is a corresponding marking on the packaging.