When the question arises about installing heated floors in an apartment, you should take care in advance of purchasing the necessary tools and components for water heated floors, because nothing slows down work more than not having the right tool at hand.
The tools for laying heated floors will be discussed in the article.
Roulette
A tape measure is a universal measuring tool that allows you to mark out the installation diagram for warm water floors.
It is a flexible metal tape rolled into a compact skein in a plastic or metal case. This design allows you to take measurements of fairly long objects, as well as areas with bends.
Pipes
There are several options for pipes that are used for underfloor heating systems. Each of them has its own installation and operation features. Pipes with a diameter of 1/2 and 3/4 inches are mainly used. But it all depends on your needs. Let's look at them separately.
Types of pipes for warm water floors: 1- cross-linked polypropylene; 2 - polypropylene; 3 - metal-plastic; 4 - copper; 5 - aluminum; 6 - stainless steel.
Cross-linked polyethylene ( PE- X) – is a flexible polyethylene pipe reinforced with polymer threads and an adhesive base. The most common material for laying heated water floors. Suitable for both dry and wet installation.
Metal-plastic - pipes made of two layers of plastic. Between them there is a reinforcing layer of aluminum, treated on both sides with glue. It gives strength and prevents cracks from thermal deformation. Due to this, the pipe bends poorly; when installing complex shapes, it is necessary to use fittings. High temperature glue is used for connection.
Polypropylene is a solid pipe made entirely of polymer. This is the cheapest option, inferior to others in terms of deformation indicators. They are practically not used for installation in screeds. In terms of service life they are inferior to other options.
Copper - such pipes are resistant to low-quality water and have a service life of up to 50 years. For installation you will need a special tool - a pipe bender. Soldering and special fittings are used for connections. Copper pipes are often used where coolant rather than water circulates in a warm floor.
Aluminum - rarely used for warm water floors. In terms of performance, aluminum pipes are inferior to copper ones. They have lower tensile strength.
Stainless steel - pipes made from this alloy are the most expensive. But the price is compensated by the service life - more than 50 years. They can be supplied in the form of corrugation, which can be bent by hand. Stainless steel pipes can be used for heated floors with aggressive coolant or low-quality water.
You can read more about the characteristics of different types of pipes in the article “Which pipe to choose for a heated floor - expert advice.”
Pliers (pliers)
Pliers are a metal clamp that allows you to grab any object, such as the end of a wire, the head of a nail, a bolt or a nut. The pliers are equipped with wire cutters for wires or wires of various diameters.
The handle of the pliers should be made of dielectric material, as they are often used when working with electrical wires.
The main feature of high-quality pliers is the absence of a gap between their jaws and minimal play between the two moving components.
Level
A level is a device for determining horizontal and vertical planes. It can be of two types: bubble and hydraulic.
The bubble level is a bar of a certain length, equipped with small reservoirs with liquid and a bubble. The simplest devices have 2 reservoirs with a bubble. One for the horizontal plane, the other for the vertical.
The principle of operation is as follows: the bar is applied to the leveled surface, for example, the floor, and the location of the bubble in the tank is determined. The plane is considered level if the bubble on the bar is exactly in the middle of the tank.
The hydraulic level is a long transparent hose with reservoirs at the ends. In other words, these are two communicating vessels. The principle of operation is as follows: the tanks are set to the same level and filled with water until the level reaches half of the scale drawn on both tanks.
A mark is made on the wall indicating the level of a plane, for example a concrete floor screed. In order for its surface to lie in one horizontal plane, it is necessary to mark it on the wall in the form of a solid horizontal line.
One tank is installed so that the point is within the scale. The second tank is applied to the same wall at some distance at approximately the same level and the cap on both vessels is opened to allow air to enter. The second reservoir is then moved up or down so that the level of the liquid in the first container matches the level of a point on the wall.
The physical law states that fluids of communicating vessels are in the same horizontal plane. That is, a mark is made opposite the liquid level of the second vessel - it will be at the same level as the first point.
A level for installing heated floors is used at the surface preparation stage before installing heating elements, since the floor must be level and have a deviation of no more than 3 mm.
Adjustable wrenches
Adjustable wrenches are universal for working with nuts, bolts and other fasteners. A pair of adjustable wrenches can replace an entire set of regular wrenches.
When choosing a tool, you should pay attention to the following features:
- A good quality wrench will have jaws that move well and will not have any play
- A key with a rubberized handle will hold your hands much better and will not slip out.
- Presence of markings on the key. Helps quickly set the wrench to the required nut size.
Regular wrenches
Wrenches are a type of locksmith tool that will help you tighten or unscrew any bolt, nut, coupling or tap head.
There are several types of wrenches:
- Cap. It is a popular key in the form of a polyhedron.
- Rozhkovy. The most popular is the U-shaped open-end wrench. The nut is clamped on both sides. However, such wrenches have their drawback - with their help it is difficult to get the nuts in the recesses.
- Tortsevoy. The advantage of such a wrench is that it can be used to reach hard-to-reach nuts.
- Combined. Combines several types of keys.
For home use, you can purchase budget wrenches made in Russia, China, Taiwan, and India. For professional use, you should buy expensive keys from well-known manufacturers.
Screwdrivers
Screwdrivers are the most necessary tool that is used in various situations. If you are installing a heated floor, you will need to tighten several screws or screws to which the regulator will be attached to control the water heated floor. Nowadays, professionals prefer to use a screwdriver - a power tool that performs the same functions as screwdrivers.
Stages of laying heated floors
Types of electric heated floors:
- based on cable laying;
- rod with infrared radiation;
- matte type;
- infrared in film.
Matte
Film
Rod
Cable
An alternative type of heated floor is water, based on connecting the system to a hot water supply. Installing a heated floor under tiles, regardless of the type that is planned to be installed, involves following a mandatory algorithm of actions that requires strict adherence before laying decorative floor tiles.
Surface preparation
At this stage of repair work for heated floors, it is necessary that window and door packages be installed, the walls be completely plastered, and the height of the final decorative coating is marked. Sewage systems, water supply and electrical connection points must be installed before underfloor heating is installed.
You need to prepare the base for laying heated floors under the tiles with your own hands:
- carry out thorough cleaning of the surface;
- lay a layer of heat-insulating material and waterproofing.
Using a level, you can check how level the surface is for a heated floor; if there is a strong slope of several centimeters, the subfloor is leveled using a new screed. If this is not done, then the installed heating element will end up under a screed of different thicknesses, and the room will warm up unevenly. Completely get rid of the old floor covering, remove the old screed completely.
If necessary, a screed is made
Surface cleaning
The second step of the preparatory work will be to lay the waterproofing material. The film is laid directly on the subfloor, creating an overlap of 12-15 cm. The waterproofing is tucked under the wall, and the excess is carefully cut off after installation. The joints are carefully taped with construction tape. These manipulations are required to protect the heated electric floor from the penetration of moisture from the underlying building floors or rooms, from the basement if the house is located directly on the ground.
Laying insulating material
Tools and materials
Before laying the heated floor, the sub-base is leveled and waterproofed. To install a heated floor you will need:
- waterproofing film;
- thermal insulation material at your discretion;
- damper tape;
- material for concrete screed, if you need to level the surface.
Now let's move on to materials and tools, depending on the option chosen for the heated floor under the tiles.
| Heated floor type | Necessary materials | Tools |
| Water heated floor | ||
| Water floor |
|
|
| Electric heated floor | ||
| Infrared in film |
|
|
| Matte |
| |
| Based on laid cable |
| |
| Rod with infrared radiation |
| |
With the exception of the tools used when working with pipes, the remaining items make up a universal set for those who plan to install heated floors. You also need to take care of the tools for laying the tile covering - spatulas.
Tools
Laying insulation
How to make a warm floor in the house, eliminating unnecessary consumption of the energy source? To do this, before installing the heating elements, a heat-insulating layer is laid on the prepared base.
Technology allows you to bypass this stage. By refusing insulation for a heated floor, you will reduce the number of operations, material and financial investments, and time resources. This approach is justified if the room is internal in a building with good thermal insulation, and heating through the floor is carried out exclusively periodically. The heat-insulating layer will create the effect of a thermos. The heat will remain within the boundaries of the heated room. Heat consumption due to heat transfer to building structures and ceilings is blocked by the screen.
To reduce energy costs, it is necessary to install insulation even in a house that has been occupied for a long time. If the building is just being built, find out about the heat saving methods used.
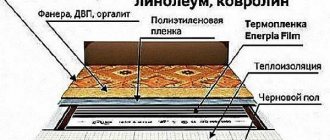
The thermal insulation coating is laid on a clean base. The insulation can combine reflective and insulating characteristics, or the layers can be produced separately by the manufacturer. Penofol is a fairly popular material on the market, which combines both functions that interest us. The material is sold in wide rolls and is easy to cut. The foil side is placed on top. The edges and base of the insulation are fastened with mounting tape - the fragments are qualitatively combined into a single layer.
Penofol
The material is laid with the foil side up
Mounting tape is used to fasten the sheets
Laying heating elements
In the absence of thermal insulation, when the base is only a concrete slab, its surface, after cleaning and screeding, is treated with a primer so that all working surfaces interact with the adhesive composition as efficiently as possible.
Next, a heating element - cable, mats, pipes - is laid out on the primed surface. Each option requires maintaining a certain distance between the heating elements. Remember not to lay the cable too close or to cross it - this can lead to overheating of the area or a short circuit. The layout is carried out evenly over the entire area of the room, with the exception of places occupied by bulky furniture or other heating equipment.
Electrofluidic modules or when installing a heated floor based on infrared film, use adhesive tape to fix the heat reflector screen to the coating. This is enough to ensure the static layout, and after the fixing screed has hardened, the building mixture becomes the fixative.
When laying the cable, it is important that it does not intersect
Installation of a thermostat
The temperature sensor is mounted between the temperature control device and the heating element. The sensor housing is retracted inside the corrugated pipe. The wire is laid from the sensor to the thermostat housing. When fixing the wires to the thermostat, carefully ensure that the connection is correct. Follow the connection diagram carefully.
How to install a heated floor under tiles without a thermostat? It's like turning on a tap and allowing water to flow uncontrollably. When choosing a regulator, read the specifics of the device in the model instructions. Learn how to remove the front control panel. If the procedure is carried out incorrectly, the device can be irreparably damaged.
The thermostat kit includes a temperature sensor, mounting box, terminals, installation and operating instructions
The mounting box can be attached directly to the wall or placed in a pre-prepared recess in the thickness of the wall. The optimal height from the floor ranges from 60-100 cm. The thermostat is located as close as possible to the location of the power outlet. To ensure that the thermostat is level, use a level.
Next, let's look at the power cables. Determine using the indicator:
- phase wire (dark brown);
- wire with working zero (blue color);
- ground wire.
Take a measurement between phase and zero using a tester - the voltage should be 220 V.
General thermostat connection diagram
At this stage, an interference situation may arise. No forced force, otherwise you risk damaging the fragile device. The device fits neatly inside the mounting box. The problem may be poor placement of the wires or excessive length of the corrugated pipe used. Eliminate the shortcomings and install the thermostat inside the mounting box. The “sensor” markings are terminals for attaching the wire from the temperature sensor. The contact of the phase wire is marked with the letter “L”, and for zero – “N”.
Install the front control panel and secure it with screws. After installing the thermostat, turn it on. Set the required temperature and check the floor in test mode. For programmable thermostats, check the quality of operation in daily mode.
Two light green wires are connected to the ground loop through the PE terminal
When connecting the thermostat, follow the connection diagram shown on the device body
Connection diagram of a two-core cable to a thermostat
Connection diagram of a single-core cable to a thermostat
System health check
Testing is carried out to verify the effectiveness of the system. Optimal conditions are created by adjusting automated resources, in parallel, consumption currents are measured with special devices, and electric meter readings are taken. All readings must comply with the technical standards stated by the manufacturer in the accompanying documentation.
The overall design of a heated floor is a multi-layer system, which includes laying tiles on the heated floor. The joint functioning of each layer ensures comfortable conditions inside the room and a long service life. If the installation is made with defects, the overall efficiency of the system will be seriously reduced.
Before applying electricity after the fixing screed has dried, check the operation of the protective devices - the residual current device (RCD) and the automated circuit breaker. If during the installation of floor tiles the electrical insulation was damaged or the installation was carried out incorrectly, these means will prevent the unpleasant consequences of leaks and short circuits.
Laying the covering
Laying tiles on a heated floor is carried out after applying a fixing screed. Experienced craftsmen can try to combine fixing and laying out the flooring. This solution may encounter an obstacle in terms of differences in screed thickness for different coolants:
- cables and electric heating modules with liquid media - requirements of 5 cm or more. This layer requires more time to warm up, but at the same time retains heat better and cools more slowly;
- thermomats with a cable are less demanding on the thickness of the screed. The level required can vary significantly. It all depends on the manufacturer;
- infrared (IR) film - the thinnest layer, starting from 2 cm. In the case of IR, they prefer to lay the tiles directly on a fresh screed in one go.
In the process, you need to use specialized compounds designed for laying tiles on heated floors. The solution is distributed directly over the gasket of the heating elements. For convenience, use a wide spatula with a wavy edge.
When laying out, use inlays with crosses for equal gaps, and control the level to ensure a horizontal surface. The laying is carried out in the direction from the far wall to the exit, so as not to disturb the already laid covering. We remind you: the screed finally hardens after 28 days. Until the process is completely completed, it is necessary to isolate the coating from mechanical loads, drafts and moisture.
Laying tiles on a heated floor
Sander
A grinder or “grinder” is an electric tool with a rotating attachment (disc). Depending on the attachment, it can be used for:
- Polishing.
- Grinding.
- Cutting metal, concrete and stone.
- Cutting a tree.
Depending on the model of the grinder, it has different power and disc diameter.
Welding machine for propylene pipes (soldering iron)
The heated floor project includes piping made of polypropylene pipes. Their connection into a single system is carried out using a special soldering iron. Its operation is quite simple:
- Plug in the soldering iron.
- Wait a while for it to heat up completely.
- Insert the pipe to be connected into the soldering iron, wait 3-5 seconds, remove it from the soldering iron and immediately connect it to the outlet or any other element.
- Wait until the elements cool completely and are firmly connected.
Among the countries producing soldering irons for pipes, the most popular are:
- Czech Republic.
- Türkiye.
- China.
When choosing, you should also take into account the power of the soldering iron:
- For pipes with a diameter of 90-100 mm, a soldering iron with a power of 1.5-2 kW is used.
- For pipes with a diameter of 16-63 mm, use a soldering iron with a power of 680 W.
- For pipes with a diameter of 16-75 mm, use a soldering iron with a power of 850 W.
- For pipes with a diameter of 125 mm and above, soldering irons with a power of 1200 W are used.
How to select and calculate pipes
Before you begin independent work on the construction of a hydrofloor, you should choose the right type of pipes and calculate the optimal diameter size.
Pipes for heated floors. Recommendations from experts // FORUMHOUSE
Types of pipes
Today, a large number of types of pipes are produced for installation in water-heated floors; they are made of various materials.
Professionals advise that when installing yourself, give preference to cross-linked polyethylene pipes such as PEX or PERT. The ideal option is PE-Xa, which has the highest cross-link density (85%).
This makes it possible to use axial fittings that have a sliding end; they can be safely mounted in a concrete structure. In addition, if such pipes are broken, it is not difficult to return them to their original shape using a hair dryer by heating the broken area.
Read the article: there are situations when it is necessary to connect pipes together in a screed, a pipeline has been pierced or you need to extend it - find out how to do this.
PERT circuits do not have a memory property, so it can only be used with push-in fittings, which are not recommended to be hidden in a screed. But if the system is assembled from solid pipes, then the connecting nodes will only be on the manifold, and this type of pipe is quite suitable.
When installing water systems, experts recommend using the PE-Xa or PERT model with a polyvinylethylene layer, which can be on the outside or inside. It is better to install pipes with an inner layer of EVOH.
For your information! By choosing a PE-Xa circuit, you can test it yourself. A section of pipe needs to be folded, and then this section must be heated using a hair dryer. If the product is of high quality, it will return to its original form.
In addition, metal-plastic pipes are often installed - the price is not expensive and they are not difficult to install. There are copper pipe products that are more expensive and require protection from alkaline exposure when pouring concrete mortar.
Another type of pipe recommended for heated floors is composite. They consist of two layers of cross-linked polyethylene with foil between them. The presence of inhomogeneous material that has a different expansion coefficient when heated can cause delamination of the circuit.
When choosing a model, you must consider:
- brand (Rehau, Tece, KAN, Uponor) is a guarantee of quality;
- labeling;
- certificate of conformity for products;
- take into account the coefficient of thermal expansion of pipes;
- cost of components required for installation.
Pipe size calculation
For water floors, three main pipe sizes are available: 16*2, 17*2 and 20*2 mm. The most popular sizes for installation are 16*2 and 20*2.
Before purchasing a heating circuit, you should calculate the size. If you are not sure that you can do it correctly yourself, it is better to entrust it to professionals. To do this, you need to decide:
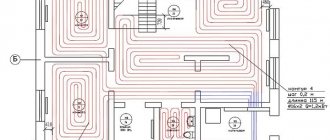
- with a diagram of the location of the water heated floor;
- with areas of the floor where furniture will be placed and plumbing installed (pipes are not installed under furniture).
A product with a diameter of 16 mm should have a contour no more than 100 meters long, with 20 mm - 120 m. That is, each should occupy a maximum of 15 square meters. m, otherwise the pressure in the system will be insufficient.
If the room is large, it is divided into several circuits. They must be the same size, the difference is allowed within 15 meters. If there is good thermal insulation, the standard laying step is 15 cm, it is permissible to reduce it to 10 cm.
During the laying step:
- 15 cm - you will need 6.7 meters of heating element per 1 sq. m;
- 10 cm - 10 m.
In addition, when calculating the size of a water floor, heat loss, system power, material of pipes, ceilings and flooring are taken into account.
The standard formula for determining the size of the circuit is the heated area in sq. m. need to be divided by the laying step in meters. To this indicator add the size of the curls and the distance to the collector.
Hammer
A rotary hammer is an electric drill that can operate in the following modes: drilling, drilling, and also combine these two modes in one. As a rule, such a tool is required for attaching a heated floor temperature controller to the wall, as well as thermostats for water heated floors.
The choice of manufacturers is varied and depends on the purpose and price-quality ratio.
It is best to choose a tool that has all the necessary elements of various sizes in the set.
Gas-burner
A gas burner is used in various cases: for heating and joining certain elements, for drying the surface, for cutting and soldering metal elements, etc.
When choosing this tool, you should pay attention to:
- Design: it should include a unit for attaching a cylinder, a burner head, nozzles, a gearbox with a regulator, and a holder for installing utensils.
- The presence of piezo ignition, wind protection, adapters for various cylinder mounts, and a transport case.
Water heated floor installation
The heated water floor has a multi-layer complex structure, each layer has its own function. Consists of: base, hydro and thermal layer, reinforcing product, heating element and concrete screed.
A substrate is placed on the screed on which the floor covering is mounted; it must have a special symbol indicating the possibility of laying it on warm systems.
The junction of the walls and the screed, as well as the boundaries of the water circuit, should be laid with damper tape, this will help compensate for the expansion of concrete with temperature changes.
More often, independent installation of this heating structure is carried out using the “wet” method, that is, by pouring a cement-concrete screed. But “dry” installation is possible; it is used in houses with wooden floors.
Pipe cutter
A pipe cutter is used when it is necessary to dismantle the heating system or shorten pipes during installation, as well as when replacing any section of pipes. It can be used to cut pipes made of steel, copper or metal-plastic.
Pipe cutters can be of two types:
- Telescopic.
- With ratchet mechanism. They resemble scissors and are quite easy to use.
Fastening the pipe to mounting rails
This method is no more complicated than the previous one. The pipes are fixed using special clamps that tightly hold and protect the system from mechanical damage. Also, such systems are easy to install on the wall; the only problem is that it is quite difficult to find such a heating system in specialized stores. In addition, difficulty arises in the preliminary marking. But in general, this method is very convenient and practical.
Cutter (scissors) for metal-plastic pipe
These scissors are similar to a pipe cutter and are used to reduce the length of a pipe when installing a heated floor. For one-time work, you can purchase a cheap tool. But if it will be used frequently, it is better to choose a well-known manufacturer.
If you have all these tools, installation work will be carried out quickly and efficiently. When choosing tools, do not skimp if you want to get a truly high-quality product.
Author: Sergey Vladimirovich, electrical engineer. More about the author.
Installation nuances depending on the type of heated floor
Since there are several types of heated floors, each option has its own subtleties, despite the seemingly identical installation algorithm. These nuances can seriously affect the overall efficiency of the finished system:
- During installation, it should be taken into account that the thickness of the top layer of the screed depends on the type of heating element. The larger it is, the longer the system warms up the floor area, but also retains heat and cools down longer;
- the film infrared version is laid on a dry base;
- When cutting thermomats with already laid cable, the wire must not be damaged (cut). Only the base is cut, and the cable remains intact;
- when installing a water floor, the pipes are attached to the reinforcing mesh using clips or other fasteners;
- if you plan to make a heated floor in the attic or loggia, then a separate pipe branch is made, since such rooms require more heat consumption and, when combined, will leave the main room cold;
- installation of pipes is carried out from the periphery (walls) to the center of the room for uniform heating of the room as water passes through the pipes.
When choosing a specific heated floor option, you must carefully study the technical characteristics and installation requirements so that the heated floor fully meets your expectations.
Infrared heated floor installed on a dry surface
The screed depends on the type of floor
We lay the pipes on the reinforcing mesh
We start installation from the periphery