The number of layers that are laid on top of the base floor on the attic side is called the attic floor pie.
Correct installation of all layers of the cake, consisting of vapor barrier, insulation lathing, finishing materials and finished floor, extends the life of the ceiling on the side of the house.
Helps to equip an additional room as an attic, protects the main building from drafts and temperature changes, and further reduces the cost of alternative types of heating (by 20%).
How the layers of the attic covering cake are formed, what regulatory requirements are imposed on it, whether there are errors, how to eliminate them, as well as other important nuances, we suggest you learn from the presented article.
Description
The installation of a cold attic is the simplest solution from a technological point of view, especially when compared with the alternative warm option or the construction of an attic. The air temperature of such a room, as a rule, is slightly higher (no more than 4 degrees) than the air temperature outside.
The composition of the structure under consideration includes the following elements (from top to bottom):
- roofing;
- external attic walls;
- insulated ceiling between the attic and the living space underneath.
It should be noted that insulation of the ceiling of a cold attic with mineral wool or other heat-insulating material can be done both from above and below from the side of the living room, regardless of whether it is wooden or concrete.
The option under consideration has a number of advantages:
- reliability of waterproofing of the coating. It is achieved by reducing the number of superstructures protruding above the roof, which, as a rule, are its weakest points;
- ease of operation. The existing internal under-roof space makes it easy to inspect and maintain all floor and roof structures;
- the overlap area is smaller than the area of the pitched roof, which reduces the area of possible heat loss;
- availability of additional operational premises.
In order for the benefits of a cold attic design to be fully realized, it is necessary to correctly and competently resolve several issues related to the insulation of the attic floor, as well as proper ventilation of the cold attic.
Possible mistakes
Before you build a roof on a house, you should consider the following nuances:
it is important to correctly determine the dimensions of the floor spans; if the building has a sufficiently large width, then it is necessary to choose a rafter leg of the maximum cross-section; in order to prevent deflection of construction legs when using rafters of small cross-section, the truss must be equipped with additional support posts and other elements; when calculating the roof, wind loads should be taken into account; for this, the rafter legs must be secured with brackets; The density of the sheathing (sparse, solid) depends on the type of roofing.
Organization of ventilation
The main purpose of ventilation in this case is as follows:
- removal of excess water vapor penetrating through the ceiling from below from the residential part of the building, in order to prevent the appearance of condensation and moistening of the insulation and roof truss system;
- creating an optimal microclimate.
- Ventilation occurs through two types of vents:
- cornices (the air passing through them is called supply air);
- ridge (exhaust air passes through them).
Their total area should be 0.2-0.33% of the roof covering area, in other words for a covering area of 1000 sq.m. The area of the vents should vary from 2 to 3.33 sq.m. This calculation is carried out in accordance with SNiP standards, and it is quite simple to do. It applies equally to various options for roofing pie covered with metal tiles, corrugated sheets or soft tiles.
The basic rule for the location of vents is as follows: the ventilation system operates most efficiently when the inlet and outlet openings are as far apart as possible.
In most cases, a scheme is used with an approximately uniform arrangement of vents around the perimeter of the building under the overhangs and along the entire length of the roof ridge.
Additional ventilation is often performed through dormer windows installed on the gables or roof slopes, which help with enhanced ventilation. When installing them, they are guided by the rule of symmetry: in order to prevent the presence of unventilated areas, dormer windows should be located on opposite slopes.
Typically, dormer windows are made of three types:
They are installed in such a way that the lower part of the window is no more than 1 meter from the floor level, and the upper part is at least 1.75 meters higher from the floor level. Often, dormer windows are used as an exit to the roof for the purpose of inspecting the roof and the elements of the ventilation system and chimneys installed on it. Sometimes a special hatch is installed for this purpose.
In order to prevent birds from entering, the vents are equipped with protective nets or gratings, and blinds are installed on the dormer windows.
Lighting
In order for natural light to freely enter the rooms under the roof, translucent structures are needed. In this case, the only correct solution would be to install skylights. An important point in the process of preparing to install a window into the roof slopes is the manufacture of a strong wooden frame on the inside, which will help hold the window frames and prevent possible deformation. The frame is installed between the rafter legs, so the width is ordered taking into account this distance and the thickness of the beams. Windows can be installed on gables or directly in the roof of the house. What are the advantages of roof windows?
- Saving on energy costs. Such windows allow you to increase the transmission of natural light by 40%.
- Exquisite design. Windows help create a unique atmosphere in the room under the roof; they organically complement the design, creating spaciousness in the room.
- Functionality. Manufacturers offer various configurations and functional loads of windows for attic spaces.
Dormer windows are an excellent source of daylight
As for wiring into the attic to create high-quality artificial lighting, there are several proven methods:
- laying wires over the walls, hiding them in special plastic boxes;
- arrangement of hidden electrical wiring by laying the wires under the inner lining.
The first method is the simplest; you can do it quickly and easily with your own hands. The second method is more technically complex, since the fire safety standards and requirements for a private home must be taken into account. Hidden electrical wiring is installed during the installation of the frame, wall and ceiling cladding.
When the electrical wiring is installed in the attic, all sockets and switches are placed in their places, you can begin the most exciting stage - interior planning. Flights of imagination are welcome here! You can choose classic style solutions, cozy Country or gentle Provence. For young people you can create an urban room under a roof in the Loft style, and for children - a fabulous dream island.
The easiest way to highlight the beauty of your attic interior is through thoughtful lighting.
Transforming a dusty and dark attic into a cozy and spacious room under the roof itself is a labor-intensive process and requires financial costs. Knowing the secrets and tricks, following the rules and advice of experts, you can quickly transform an uninhabited cold attic under the roof into additional living space.
Transforming an Abandoned Attic
Thermal insulation from the attic
This option is considered the most effective. A wide variety of ceiling insulation for a cold attic can be used: mineral wool (the most commonly used option), polystyrene foam, expanded clay, etc.
Sequence of work stages:
- vapor barrier device (ordinary PVC film or modern materials with much higher performance characteristics can act as a vapor barrier material);
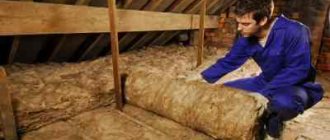
- laying mineral wool thermal insulation in two layers;
- creation of a protective coating from cement bonded particle boards.
This unit is one of many possible ones that fulfill the basic requirements for insulating the ceiling of a cold attic and allow you to obtain the following advantages:
- due to the presence of a vapor barrier, moisture does not enter the insulation;
- the DSP coating allows you to move freely without damaging the insulation;
- the design is quite reliable and durable (to further increase the service life, it is recommended to treat the surface of the DSP with antiseptics, which significantly reduce the likelihood of fungi or mold appearing).
It is imperative to additionally insulate the perimeter of the attic. It is carried out by laying a layer of mineral wool 0.75-1 meter wide and a layer thickness of 10 cm. This will reduce or completely avoid the risk of freezing in the upper floor rooms in the corners.
Sequence of work
First of all, a thermal engineering calculation is carried out. Regardless of its result, it will be necessary to create an insulating layer 0.3 m thick. In cases where for some reason it is smaller, you will have to put up with insufficient thermal protection. Some of the insulating material is placed in the spaces between the beams, and about 1/3 of it is placed on top - this approach helps to avoid the occurrence of cold bridges, which even appear on the beams themselves.
Let's assume that some type of technical wool has been chosen. The advantages of such a product do not cancel out its disadvantages: a fine suspension upon contact with the skin and mucous membranes, including inhalation, provokes irritation. It is better to place slabs on top of the wooden floor, which are placed in two layers in a checkerboard pattern.
Mineral wool must be cut with scissors or a knife, the joining of the edges must be tight to avoid heat leakage. You need to put on special clothing in advance: a respirator, gloves and safety glasses. Waterproofing a cold attic is mandatory when the rafter system is not protected from moisture. But even if it is protected, such a measure is unlikely to be superfluous.
Installation of ceiling insulation
The installation of an insulating layer on wooden beams based on mineral wool begins with laying a vapor barrier. The film is placed in accordance with the technology, achieving an overlap of 10 cm. Each part protruding beyond the edge of the main block should be bent around. The points at which the film is connected to the wall require lifting the material by at least 5 cm, and the thickness of the mineral wool is also taken into account.
At the second stage, it is the turn of the insulating material itself. It is cut with construction knives, carefully ensuring that the wool is not pressed through and does not have cracks, since both of these factors will significantly deteriorate its quality. The wool should not be raised higher than the beams. If you have to create a very thick layer, then the main structures are built up with additional slats or timber. Another layer of vapor barrier is placed on top of the insulation, and only then the rough finishing is carried out.
Floor insulation
Many people, in order to increase living space in their home, make the attic a second floor. Insulation of its floor in this case has its own characteristics.
The sequence of layers in a wooden house is as follows:
- first floor ceiling;
- construction paper;
- load-bearing beams made of good timber;
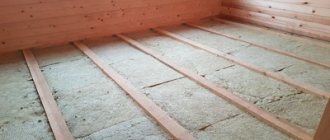
- mineral wool, it is placed in cells formed by the beams themselves;
- another layer of paper;
- floor covering.
It is strictly unacceptable to deviate from this list or violate the order of items on it, as this will greatly worsen the protection against heat leakage and water penetration. A couple of layers of plywood are added to the insulation in the “pie” - it helps to increase protection from loud sounds. And if expanded clay is used instead of mineral wool, then a concrete screed is placed over it using a dry method.
The floor should be insulated by placing the material in the cells formed by the rafter system. Manufacturers have taken care of turning simple technical wool into slabs that are much lighter and more convenient to install. To be able to press the slab directly into the cells, its thickness must be at least 20 cm. Professionals love this method, but amateurs should abandon it due to the excessive consumption of material. The best option is to place the slabs under the rafters and in the spaces between them; if necessary, auxiliary frame parts are made.
Laying slab materials only under the rafters themselves will require the creation of additional sheathing, absorbing part of the attic volume. Therefore, such a solution is allowed only in cases where no other measures help at all. If the ceiling of the second floor is located under the attic, and not under the roof itself, it is necessary to increase the thermal protection of the ceiling both from below and from above.
In order for the insulation of the second floor floor to give an optimal result, you need to work not only on it. Even the walls need to be prepared: close the cracks with tow, soak them with antiseptics. Only under this condition can it be guaranteed that with any changes in the external environment, all parts of the house will be warm.
Then you will need:
- secure horizontal slats for the ventilation system;
- install a membrane that increases steam protection;
- install vertical posts, which will then allow you to secure the slabs;
- place insulation in the gaps of the racks made of timber or aluminum profiles;
- fix the second vapor barrier layer;
- finish the surface with clapboard, plasterboard sheets, chipboard or other covering.
Thermal insulation from inside the living room
Installing a ceiling in a private house with a cold attic and insulation from the inside is done much less frequently, since the work is accompanied by a number of disadvantages:
- the ceiling level decreases;
- Carrying out thermal insulation work disrupts the finishing, if it has already been completed, and requires subsequent repairs;
- not all thermal insulation materials are useful and environmentally friendly, which leads either to an increase in the cost of work or to a decrease in living comfort. For this reason, the use of mineral wool is not recommended. In addition, it is always recommended to leave a ventilation gap between the thermal insulation material and the finishing material.
Variety of roofs
A non-specialist can easily confuse a hip roof with a hip roof. Source bazaznaniyst.ru
A complicated version of a gable roofSource yandex.ru
Sloping roof for a house with an atticSource biznes-stroi.ru
Conical roof on the rounded part of the houseSource stroi-remontirui.ru
A combination of old and new - a gable roof on a house in modern style. Source fasad-master.com.ua
A complex multi-tiered roof looks very impressiveSource mirstrojka.ru
A few more beautiful and practical types of roofs in the following video:
Attic design with ceiling
Construction of an attic, which, of course, expands the living space, is much more expensive and requires certain knowledge, time and labor costs. The installation of a cold attic floor is many times cheaper and simpler.
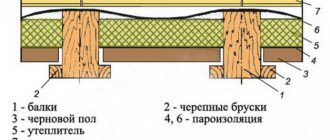
The installation of an attic floor on wooden beams is a layer cake:
- plank board or roll;
- vapor barrier;
- ventilation gap;
- insulation;
- ventilation gap;
- vapor barrier;
- floor.
Ventilation is carried out through gables or roof slopes. They also make dormer windows, placing them on opposite slopes so that air penetrates into all corners of the room.
Dormer windows are a difficult element to install, but useful. They can have different shapes: triangular, oval, they are located at a height of 1 meter from the floor, equipped with grilles and blinds. Through them it is convenient to go onto the roof for inspection, maintenance, checking the chimney, antenna and other things.
Membranes
These are special materials with limited breathability. They allow air to pass through, but retain moisture. The most common and popular vapor barrier of the Izospan brand has a characteristic feature - a fleecy surface on which tiny drops of condensate accumulate and evaporate quite quickly.
The cost of such materials will be higher than that of polyethylene with glassine, but the efficiency of moisture removal is much higher, and air exchange remains within the normal range. At the same time, there are certain features of the installation of such membranes - to remove moist air vapors, a ventilation gap is necessary. Therefore, the installation of a decorative ceiling covering on the side of the room is carried out on a sheathing or frame, which will create the necessary space for ventilation.
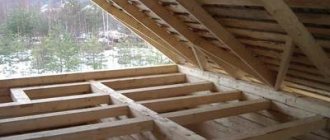
Beams for the attic
The attic floor is made using wooden beams after the installation of load-bearing elements is completed. This is the simplest and best way to properly arrange the technical area.
The attic floor structure is usually made of wooden beams. These load-bearing elements have a number of advantages:
- maximum coverage 4.5 m between supports;
- light weight, load on the building, savings on the foundation;
- ease of installation, without the use of lifting equipment or a crane;
- availability of wood as an inexpensive material;
- speed of work, the ability to install an attic floor in a day or two;
- possibility of using any soundproofing materials.
To make beams, coniferous wood is used that is resistant to moisture, rot, and fungus. The cross-section of the beams for the attic floor must correspond to the load; climatic conditions and the thickness of the heat-insulating material should be taken into account. Beam dimensions of 150x200 mm are used if a serious load is expected on the attic floor. For example, it is planned to install a water tank and a transformer. For minimal load, beams of 100x150 mm are used.
The desire to save money and install 50x100 mm beams is not approved. An extremely important element of the house is the attic floor, which provides thermal insulation, sound insulation and reliability of the ceiling. The quality of the overlap guarantees savings in heat and heating costs.
You can calculate the number of wooden beams for the attic floor as follows. Divide the length of the room by 60-100cm (the distance between the beams), add 2 pieces to the resulting value, which will be laid on the walls. Beams should be laid on load-bearing and external walls.
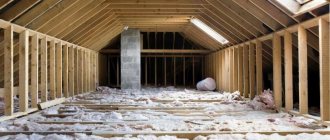
What does it consist of?
At the heart of any interfloor ceiling, be it a basement or an attic, are large-caliber beams, on which a so-called pie of flooring, insulation and external finishing is placed. The difference between the structure of the attic and the basement is only in the cross-section of the beams . The attic requires stronger beams, especially if we are talking about a warm room where furniture will stand and people will walk around.
For cold floors, the standard is timber or other versions of beams with a section of 100x150. It is impractical and unsafe to use a smaller thickness. For a stronger floor, you can use 100x200 beams. They are heavier, but you will need less of them, since the step can be increased from the standard 60 cm to 1.5 m.
Next, a vapor barrier is laid on the side of the lower room, filling it with a rough ceiling, for example from OSB boards. On the attic side, insulation and waterproofing are laid and a rough attic floor is created .
In another option, you can use metal beams, for example, I-beams. They are more durable, but when used, the thermal conductivity of the entire cake suffers. Metal has high thermal conductivity, which increases the cost of insulation.
Another option for attic flooring is concrete slabs, which are laid ready-made on the load-bearing walls of the house. The advantage of a reinforced concrete floor is its high strength and the absence of the need to install a vapor barrier. The downside is that it is cold and heavy, as well as expensive and labor-intensive from an installation point of view.
Installation of wooden attic beams
The installation of an attic floor is carried out in several stages, each of which determines the quality and reliability of the structure. The work algorithm looks like this:
1. Preparation. The required length is cut, the wood is treated with a special compound that protects it from rotting, swelling and other troubles, the edges of the beam are wrapped with roofing felt, then the finished element is lifted up.
2. Laying in two ways:
- without protrusion beyond the external walls;
- with outlet beyond the outer walls.
It is necessary to lay it along the length at the required distance in relation to other structural elements; for any installation method, the following is taken into account:
- the maximum span width should not exceed 4.5 meters;
- the timber is laid on the ends of the walls; in some cases, a mauerlat is used - this is a thick beam secured with thick nails or steel studs into the walls around the perimeter;
- roofing material is laid under each beam layer to ensure waterproofing;
- the pitch of wooden beams is selected based on the size of the thermal insulation material.
3. The attic floor on wooden beams is carried out taking into account the construction of the ramp, which is a covering made of boards and slabs.
Waterproofing, vapor barrier, and insulation are laid between the upper and lower eaves. The lower flooring is made on supports to which boards are attached, but it is better to use slabs or sheets of plywood 15-20mm thick. Fastenings are carried out with self-tapping screws in increments of 10-15mm so that the heat-insulating materials are securely held. In order to mount the most durable structure, you need to fill the bottom of each beam with 50x50mm wooden blocks; they form a ledge on which boards or sheets are placed. You also need to secure the roll to the bars with self-tapping screws. The advantages of this design are exceptional reliability; the disadvantages will appear in the finishing of the ceilings, on which these bars will have to be sealed and hidden. Such a structure should be installed if you plan to actively use the attic.
Video on the topic:
4. The final stage of installing an attic floor on wooden beams is the installation of the floor, for which boards are sewn on top to act as a subfloor. For the finished floor, a tightly laid tongue and groove board is used.
The importance of vapor barrier and methods of its installation
Vapor barrier of the attic floor ensures the safety of the wooden floor. It extends the life of the roof, helps create an optimal microclimate in residential premises, removing excess moisture, and prevents heat loss. You should choose the material for vapor barrier carefully, without any intention of saving money.
Vapor barrier material has different side structures. On one side, the rough surface absorbs moisture, the other side with a film prevents moisture from penetrating into the heat-insulating layer.
The vapor barrier is installed, as is already clear, between the ceiling and the insulation in the attic floors. Materials used:
Fabrics reinforced with a special mesh may have perforations. You can also use non-perforated film, leaving gaps during installation. The reinforced film has a metallized surface. The film is spread downwards with the metallized surface to reflect heat loss.
A layer consisting of fibers absorbs moisture, then evaporates it naturally. The materials are durable and resistant to ultraviolet rays.
There are also other vapor barrier materials that can be used when equipping the attic floor with wooden beams as a vapor barrier. These are varnishes and mastics, asphalt, bitumen, bitumen-kukersol. Today, such materials are rarely used, preferring non-woven fabrics of synthetic origin. These are so-called “breathable membranes”, capable of transmitting moisture and air, multi-layer, single-layer, equipped with aluminum foil.
The material is placed with a 20 cm overlap on the wall, secured with a stapler, the rough side down.
Video on the topic:
Liquid coatings
A fairly new solution, created thanks to the achievements of chemists. Looks like regular varnish or mastic. It is applied to the surface in the same way as conventional paints. After drying, a special coating is formed that can allow air to pass through, but prevent the passage of water vapor. Such materials are often used to vaporize the ceiling on the cold attic side.
In addition, this will be a very effective solution if flat roofs are treated in buildings that do not have an attic. In this case, a suitable insulation is laid on top of the applied insulation and the entire structure is waterproofed. In some cases, such materials may be harmful to health and can only be used in non-residential premises. Be sure to familiarize yourself with the characteristics of the selected paintwork material.
Insulation of the attic floor
Insulation of the attic floor, taking into account wooden beams, is an important stage, both from the point of view of the choice of material and from the point of view of installation. The correct choice of material for thermal insulation should take into account the following factors:
- price;
- availability;
- ease of installation;
- climatic conditions;
- environmental friendliness;
- fire safety.
Do not forget about the weight of the insulation, so as not to create unnecessary stress on the entire structure of the building.
There are many offers on the modern building materials market. Here are some types of insulation that are most in demand:
- Expanded clay, bulk material, light weight, with high heat-saving characteristics, low cost;
- Vermiculite, a natural bulk insulation with similar properties;
- Perlite, a bulk insulation material of natural origin, which has approximately the same thermal conductivity;
- Mineral wool, available in rolls and slabs, insulation with low thermal conductivity and high environmental performance. Read more in the article technology of attic insulation with mineral wool;
- Glass wool, an analogue of mineral wool, which is of artificial origin, has greater chemical resistance compared to mineral wool;
- Expanded polystyrene, produced in the form of slabs, is afraid of rodents, has rather low thermal insulation properties and low cost;
- Extruded polystyrene foam, non-flammable, has a higher heat-saving ability than regular polystyrene foam;
- Polyurethane foam, produced in slabs, has excellent heat resistance; when sprayed, it creates a continuous protective film for heat and waterproofing.
- Peat slabs made from moss, which are of natural origin, are moisture resistant, light in weight and have excellent thermal protection;
- Reed, the most practical and cheapest material, with excellent characteristics, which you can make with your own hands.
If the thickness of the insulation is higher than the beams, you need to make additional laying of the slats to create an air gap. Bulk insulation is distributed evenly between the beams, the slabs are laid end-to-end, without gaps.
Attic waterproofing
After the interfloor pie is ready and the floor is installed, you should think about waterproofing the cold attic space. Some advise abandoning it altogether, but still, it won’t hurt to lay a layer of waterproofing material under the roof. To avoid leaks of condensate, diffusion membranes should be installed. There will be no snow or rain, which significantly reduce the thermal insulation properties of the attic. Waterproofing is especially necessary if corrugated sheeting is used as a roofing material.
The attic floor separates the heated part of the building from the cold part. Choosing the right material and insulator thickness means reducing heat loss and saving material costs during the heating season. Let's talk about insulating the attic floor using wooden beams with your own hands.
Construction of a wooden attic floor
The load-bearing elements in the attic wooden floor are beams. They are made from coniferous wood. The cross-sectional size of the beams is taken based on the load that the element absorbs. We told you about the correct calculation of wooden floor beams in the article “How to calculate wooden floor beams.”
For each specific climatic conditions and depending on the ability of the material to resist heat transfer, according to the thermal engineering calculation, its own value for the thickness of the heat insulator is obtained.
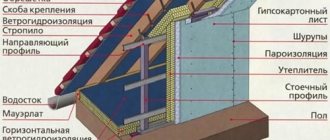
Scheme of attic floor insulation: 1 - joists; 2 — cranial bars; 3 - plank board or boards; 4 - vapor barrier; 5 - counter-lattice for ventilation gap; 6 - insulation; 7 - clean floor; 8 - ventilation gap
A subfloor made of wooden panels or boards is mounted on skull blocks. Next, a membrane-type vapor barrier is laid, insulation is laid on it, which is covered with another layer of membrane.
If the attic is in use, a clean floor is laid on top. If not, then running boards (min. 40 mm thick) are laid along the beams. All wooden elements are antiseptic. To ventilate wooden structures, when laying a clean floor, a gap is left between it and the insulation.
Selection of material for insulation
Bulk materials
Expanded clay
You can insulate attic floors using bulk materials, which include expanded clay. It has a relatively low weight (250–600 kg/m3) and high resistance to heat transfer. Ease of installation and relative low cost determine the choice of this material.
Vermiculite
Expanded vermiculite is obtained by heating vermiculite rock to a temperature of 700 ° C, which at the same time increases in volume by 25 times. Its thermal conductivity ranges from 0.13 W/m·K, and its volumetric weight is up to 200 kg/m3.
Perlite
Expanded perlite also belongs to bulk thermal insulation materials. Perlite rock is crushed and fired to produce a porous structure. Expanded perlite is environmentally friendly, does not burn and is bioresistant, and has high thermal insulation properties (0.052 W/m K). Its volumetric weight is 160–250 kg/m3.