Electric boilers
It must be said that electric heating is the most efficient of all existing ones.
Not only are the efficiency of boilers about 99%, but in addition they do not require chimneys or ventilation. There is practically no maintenance of the units as such, except for cleaning once every 2-3 years. And most importantly: equipment and installation are very cheap, and the degree of automation can be any. The boiler simply does not need your attention. No matter how pleasant the advantages of an electric boiler are, the main disadvantage is just as significant - the price of electricity. Even if you use a multi-tariff electricity meter, you will not be able to beat a wood-burning heat generator in terms of this indicator. This is the price to pay for comfort, reliability and high efficiency. Well, the second disadvantage is the lack of the necessary electrical power on the supply networks. Such an annoying nuisance can immediately cancel out all thoughts about electric heating.
Calculation of the heating system and selection of boiler power
It is impossible to select equipment without knowing the amount of thermal energy required to heat the building. It can be determined in two ways: simple approximate and calculated. All sellers of heating equipment like to use the first method, since it is quite simple and gives a more or less correct result. This is a calculation of thermal power based on the area of heated premises.
They take a separate room, measure its area and multiply the resulting value by 100 W. The energy required for the entire country house is determined by summing up the indicators for all rooms. We suggest a more accurate method:
- by 100 W, multiply the area of those premises where only 1 wall, on which there is 1 window, is in contact with the street;
- if the room is a corner one with one window, then its area must be multiplied by 120 W;
- when a room has 2 external walls with 2 or more windows, its area is multiplied by 130 W.
If we consider power as an approximate method, then residents of the northern regions of the Russian Federation may not receive enough heat, and residents of the south of Ukraine may overpay for equipment that is too powerful. Using the second, calculation method, heating design is carried out by specialists. It is more accurate, as it gives a clear understanding of how much heat is lost through the building structures of any building.
Before you begin the calculations, you need to measure the house, finding out the area of the walls, windows and doors. Then you need to determine the thickness of the layer of each building material from which the walls, floors and roofs are built. For all materials in the reference literature or on the Internet, you should find the value of thermal conductivity λ, expressed in units of W/(m ºС). We substitute it into the formula for calculating the thermal resistance R (m2 ºС / W):
R = δ / λ, here δ is the thickness of the wall material in meters.
Now you can find out the amount of heat lost through the external building structure using the formula:
- QTP = 1/R x (tв – tн) x S, where:
- QТП – lost amount of heat, W;
- S is the previously measured area of the building structure, m2;
- tв – here you need to substitute the value of the desired internal temperature, ºС;
- tн – street temperature in the coldest period, ºС.
Design specifics of heating devices
Structurally, batteries are divided into groups: radiators, convectors and registers.
Review of popular heating devices
Radiator is the most common type. This is a heating device consisting of vertical separate compartments. In classic collapsible products, sections are independent working elements. They are joined in the required quantity using threaded internal connections. This assembly scheme gives the batteries versatility.
Before installing or possibly completing a heating radiator, it is necessary to perform a calculation in accordance with the required thermal power. According to calculations, the number of sections of prefabricated batteries is selected. The horizontal cavities of radiators obtained by connecting sections are called collectors. Top and bottom.
Modern technologies have mastered the production of less versatile, but more reliable non-separable radiators using welding and solid casting methods. They do not have joints and seals characteristic of collapsible radiators. Design - for every taste.
A convector is a one-piece heating device made of a tubular or cavity heat exchanger with rows of heat-removing fins. Convectors are available in the following versions:
- Wall-mounted.
- Floor (duct)
- Skirting.
A register is a non-separable heating device made of straight, smooth horizontal pipes, arranged and combined in a certain way.
Details about the types of radiators
Radiators differ in the material used for their manufacture.
Within one variety there may be different design solutions, sometimes unexpectedly original.
The heating appliance market can offer:
- Radiators are cast iron. The ancestors of the batteries of this group. Relatively inexpensive. Can withstand each operating mode. They serve up to 50 years. The main disadvantage is that they are heavy, which, however, helps retain heat for a long time when the heating is turned off.
- Steel radiators. Such batteries are structures made of steel pipes. They work in any conditions, but are less durable than their cast iron counterparts. They have low heat transfer.
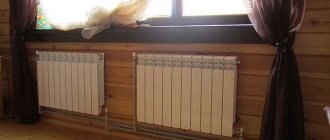
- Aluminum radiators. Made from lightweight, aesthetic material, these batteries dissipate heat better than anyone else. They are resistant to all operating temperatures, but are afraid of water hammer. Aluminum is very demanding on the quality of the coolant.
- Bimetallic radiators. Steel insides clad in aluminum – that says it all. The main characteristics are the same as those of steel, heat transfer is almost like that of aluminum. The price is steep.
- Copper radiators. These are “eternal” heat emitters for any room. Their only and most significant disadvantage is their extremely high cost.
- Radiators are plastic. Innovation in the radiator family. So far they are suitable only for autonomous heating systems of private houses with a coolant heated to no more than 80⁰C.
Aluminum devices are the most sensitive to operating conditions. These radiators reliably serve only 15 years. Their use is only possible in autonomous heating systems.
Externally, popular models of radiators made of different materials are similar:
Image gallery
Photo from
Heating radiator made of cast iron
Heating device made of steel
Lightweight aluminum battery
Heating radiator made of copper
Characteristics of the convector variety
Convectors are significantly inferior in heat transfer to radiators, but in some cases they successfully complement or replace them:
1. Wall convectors. Batteries in this design are usually made of steel, so they are cheap. They are not resistant to water hammer, and their use in centralized heating systems is undesirable.
Convectors designed as panels look like closed radiators, are very attractive, and fit perfectly into any interior design.
But made in the form of pipes bristling with plates, such batteries are only suitable for installation in utility rooms.
2. Floor convectors (duct). An excellent solution for creating a thermal curtain at the door of a balcony or loggia. Made from durable, corrosion-resistant materials, they are unpretentious to operating requirements.
3. Skirting convectors. Capable of operating in all conditions and modes, these batteries are ideal for creating a microclimate where all other heaters would look cumbersome.
The baseboard type is appropriate in bathrooms and storage rooms adjacent to cold street walls and unheated entrances.
Brief description of heating registers
Once upon a time, batteries of this group were made handicraft using conventional welding. Registers can be used in any heating systems, but due to their unsightly appearance they are used mainly in auxiliary rooms: garages, storerooms, basements. Sometimes they can be seen in the entrances of old high-rise buildings.
Modern heating devices for this group.
Shiny chromed metal registers can decorate the design renovation of any living space
Calculation of thermal power of batteries
The stage of preliminary selection of batteries is completed, you can proceed to calculating the thermal power required from them. The calculations are based on a relative power of 100 W for heating 1 m² of standard room.
The full formula includes many correction factors and looks like this:
Q = ( 100 x S ) x R x K x U x T x H x W x G x X x Y x Z,
Where:
S = area of the heated room, where:
R – additional parameter for rooms oriented to the east or north = 1.1;
K – correction for the presence of external walls in the room:
one = 1.0; two = 1.2; three = 1.3; four = 1.4;
U – insulation coefficient of street walls:
low = 1.27 (without insulation); average = 1.0 (plaster, surface thermal insulation); high = 0.85 (insulation performed according to special calculations);
T – weather indicator of the period of lowest temperatures in ⁰С:
up to -10 = 0.7; up to -15 = 0.9; up to -20 = 1.0; up to -25 = 1.1; up to -35 = 1.3; below -35 = 1.5;
H – ceiling height index in meters:
up to 2.7 = 1.0; up to 3 = 1.05; up to 3.5 = 1.1; up to 4 = 1.15;
W – characteristic of the room located on the floor above:
unheated and uninsulated = 1.0 (cold attic); unheated but insulated = 0.9 (attic with insulated roof); heated = 0.8.
G – degree of window quality:
serial wooden frames = 1.27; frames with single glazing = 1.0; frames with double glazing = 0.85;
X – ratio of the area of window openings to the area of the room:
up to 0.1 = 0.8; up to 0.2 = 0.9; up to 0.3 = 1.0; up to 0.4 = 1.1; up to 0.5 = 1.2;
Y – battery surface openness value:
fully open = 0.9; covered with window sill = 1.0; obscured by a horizontal projection of the wall = 1.07; covered with a window sill and front casing = 1.12; blocked on all sides = 1.2;
Z – battery connection efficiency (1.0 ÷ 1.13; for more details, see the section below).
The calculated value must be multiplied by a conditional coefficient of 1.15. It will provide some heat reserve to enable more precise adjustment of devices to operate in low-temperature mode.
What is needed for installation
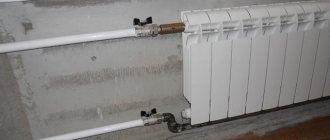
Installation of heating radiators of any type requires devices and consumables. The set of necessary materials is almost the same, but for cast iron batteries, for example, the plugs are large, and they do not install a Mayevsky valve, but instead, somewhere at the highest point of the system, they install an automatic air vent. But the installation of aluminum and bimetallic heating radiators is absolutely the same.
Steel panel ones also have some differences, but only in terms of hanging - they come with brackets, and on the back panel there are special arms cast from metal, with which the heater clings to the hooks of the brackets.
These are the arms that hook the hooks
Mayevsky crane or automatic air vent
This is a small device for releasing air that may accumulate in the radiator. Placed on the free upper outlet (collector). It must be on every heating device when installing aluminum and bimetallic radiators. The size of this device is significantly smaller than the diameter of the manifold, so you will also need an adapter, but Mayevsky taps usually come complete with adapters, you just need to know the diameter of the manifold (connection dimensions).
Mayevsky crane and method of its installation
In addition to the Mayevsky crane, there are also automatic air vents. They can also be installed on radiators, but they are slightly larger in size and for some reason are only available in a brass or nickel-plated case. Not in white enamel. In general, the picture is unattractive and, although they deflate automatically, they are rarely installed.
This is what a compact automatic air vent looks like (there are more bulky models)
The side-connected radiator has four outputs. Two of them are occupied by the supply and return pipelines, on the third they install a Mayevsky valve. The fourth entrance is closed with a plug. It, like most modern batteries, is most often painted with white enamel and does not spoil the appearance at all.
Where to install the Mayevsky plug and tap for different connection methods
Shut-off valves
You will need two more ball valves or shut-off valves that can be adjusted. They are placed on each battery at the input and output. If these are ordinary ball valves, they are needed so that, if necessary, you can turn off the radiator and remove it (emergency repairs, replacement during the heating season). In this case, even if something happens to the radiator, you will cut it off, and the rest of the system will work. The advantage of this solution is the low price of ball valves, the disadvantage is the impossibility of adjusting heat transfer.
Radiator taps
Almost the same tasks, but with the ability to change the intensity of the coolant flow, are performed by shut-off control valves. They are more expensive, but they also allow you to adjust the heat transfer (make it less), and they look better externally; they are available in straight and angular versions, so the piping itself is more accurate.
If desired, you can install a thermostat on the coolant supply after the ball valve. This is a relatively small device that allows you to change the heat output of a heating device. If the radiator does not heat well, you cannot install them - it will be even worse, since they can only reduce the flow. There are different thermostats for batteries - automatic electronic ones, but more often they use the simplest one - mechanical.
Related materials and tools
You will also need hooks or brackets for hanging on walls. Their number depends on the size of the batteries:
- if there are no more than 8 sections or the length of the radiator is no more than 1.2 m, two mounting points on top and one on the bottom are sufficient;
- For every next 50 cm or 5-6 sections, add one fastener at the top and bottom.
You also need fum tape or linen winding and plumbing paste to seal the joints. You will also need a drill with drills, a level (preferably a level, but a regular bubble one will do), and a number of dowels. You will also need equipment for connecting pipes and fittings, but it depends on the type of pipes. That's all.
Other types of connection
There are more profitable options than the bottom connection, which reduce heat loss:
Diagonal view
- Diagonal. All experts have long come to the conclusion that this type of connection is ideal regardless of the piping scheme in which it is used. The only system where this type cannot be used is a horizontal bottom single-pipe system. That is, the same Leningrad woman. What is the essence of a diagonal connection? The coolant moves diagonally inside the radiator - from the upper pipe to the lower. It turns out that hot water is evenly distributed throughout the entire internal volume of the device, falling from top to bottom, that is, naturally. And since the speed of water movement is not very high during natural circulation, the heat transfer will be high. Heat loss in this case is only 2%.
- Lateral, or one-sided. This type is very often used in apartment buildings. The connection is made to the side pipes on one side. Experts believe that this type is one of the most effective, but only if the system has coolant circulation under pressure. There are no problems with this in city apartments. And to provide it in a private house, you will have to install a circulation pump.
What is the advantage of one type over others? In fact, correct connection is the key to effective heat transfer and reduced heat loss. But in order to connect the battery correctly, you need to prioritize.
Take, for example, a two-story private house. What to prefer in this case? Here are several options:
Two and one pipe systems
- Install a one-pipe system with side connection.
- Install a two-pipe system with a diagonal connection.
- Use a single-pipe scheme with lower wiring on the first floor and upper wiring on the second.
So you can always find options for connection diagrams. Of course, you will have to take into account some nuances, for example, the location of the premises, the presence of a basement or attic
But in any case, it is important to correctly distribute the radiators among the rooms, taking into account the number of their sections. That is, the power of the heating system will have to be taken into account even with such an issue as the correct connection of radiators
In a one-story private house, connecting the battery correctly will not be very difficult, given the length of the heating circuit. If this is a single-pipe Leningrad circuit, then only a lower connection is possible. If it is a two-pipe scheme, then you can use a collector system or a solar one. Both options are based on the principle of connecting one radiator to two circuits - coolant supply and return. In this case, top pipe distribution is most often used, where distribution along the circuits is carried out in the attic.
By the way, this option is considered optimal both in terms of operation and during the repair process. Each circuit can be disconnected from the system without turning off the latter. To do this, a shut-off valve is installed at the point where the pipes are separated. Exactly the same one is mounted after the radiator on the return pipe. You just have to close both valves to cut off the circuit. After draining the coolant, you can safely carry out repairs. In this case, all other circuits will operate normally.
Installation diagrams and their specifics
There are fundamental differences in heating equipment installation projects. This depends on how the pipes will be routed. The wiring can be single-pipe or double-pipe. In each type, a horizontal and vertical riser system is distinguished.
Each type has its own variation of connecting radiators. Single-pipe and two-pipe systems have the ability to use side, bottom and diagonal methods for installing heating elements. Let's look at each of the methods in more detail.
Single-pipe horizontal
The simplest version of a single-pipe horizontal heating system with a bottom connection.
When creating a heating system for a private house with your own hands, a single-pipe wiring diagram may turn out to be the most profitable and cheapest. It is equally suitable for both one-story and two-story houses. In the case of a one-story house, it looks very simple - the radiators are connected in series to ensure consistent flow of coolant. After the last radiator, the coolant is sent through a solid return pipe to the boiler.
Advantages and disadvantages of the scheme
First, we will look at the main advantages of the scheme:
- ease of implementation;
- excellent option for small houses;
- saving of materials.
A single-pipe horizontal heating circuit is an excellent option for small spaces with a minimum number of rooms.
The scheme is really very simple and understandable, so even a beginner can handle its implementation. It provides for a serial connection of all installed radiators. This is an ideal heating layout for a small private house. For example, if this is a one-room or two-room house, then “fencing” a more complex two-pipe system does not make much sense.
Looking at the photo of such a circuit, we can note that the return pipe here is solid, it does not pass through the radiators. Therefore, this scheme is more economical in terms of material consumption. If you don’t have extra money, this type of wiring will be the most optimal for you - it will save money and allow you to provide heat to your home.
As for the shortcomings, there are few of them. The main disadvantage is that the last radiator in the house will be colder than the very first one. This is due to the sequential passage of the coolant through the batteries, where it releases the accumulated heat into the atmosphere. Another disadvantage of a single-pipe horizontal circuit is that if one battery fails, the entire system will have to be turned off at once.
Despite certain disadvantages, this heating scheme continues to be used in many small private houses.
Features of installation of a single-pipe horizontal system
When creating water heating for a private house with your own hands, the scheme with single-pipe horizontal wiring will be the easiest to implement. During the installation process, it is necessary to mount the heating radiators, and then connect them with pipe sections. After connecting the very last radiator, it is necessary to turn the system in the opposite direction - it is advisable that the outlet pipe runs along the opposite wall.
A single-pipe horizontal heating circuit can also be used in two-story houses; each floor here is connected in parallel.
The larger your home, the more windows it has and the more radiators it has. Accordingly, heat losses also increase, as a result of which the last rooms become noticeably cooler. You can compensate for the temperature drop by increasing the number of sections on the latest radiators. But it is best to install a system with bypasses or with forced circulation of the coolant - we will talk about this a little later.
A similar heating scheme can be used to heat two-story houses. To do this, two chains of radiators are created (on the first and second floors), which are connected in parallel to each other. There is only one return pipe in this battery connection diagram; it starts from the last radiator on the first floor. The return pipe coming down from the second floor is also connected there.
Gravity heating system and its implementation scheme
Until a certain time, a gravity heating system in private houses was the only possible one. It was probably its widespread use that created the myth about the simplicity and cheapness of gravity heating. In fact, it is the heating scheme based on the natural movement of the coolant that is the most difficult to implement and resource-intensive.
Moreover, gravity heating only works effectively in one-story houses. In two-story buildings, overheating of the second floor inevitably occurs, to eliminate which it is necessary to install additional bypasses, which will also lead to an increase in the cost of the heating system.
In higher-rise buildings, a gravity heating system is not used.
Another important condition for the successful implementation of a gravity heating system is the presence of an attic, where a heating expansion tank must be installed and supply manifolds (arms) must be laid.
If there is no attic, but the house has an attic, the expansion tank must be installed in the living room, connecting it to the sewer system to discharge excess coolant if necessary. It should be remembered that in a gravity system the expansion tank is open and its location inside the house is possible only when water is used as a coolant. If the heating system is filled with antifreeze, the vapors of which are dangerous to humans, an open expansion tank cannot be installed in the room.
Another condition for normal operation of gravity heating is the installation of the boiler below the return level, for which the boiler is placed in a special recess or in the basement. And finally, the installation of pipes of such a system must be carried out with a slope, ensuring free directed movement of the coolant towards the boiler.
As you can see, the scheme of a gravity heating system cannot be called simple. It has too many disadvantages, but only one advantage - uninterrupted operation of the heating system in the absence of electricity.
Side method
This method is used for one-pipe and two-pipe systems. It has a distinctive feature: the pipe for processing and supply is mounted from a certain edge of the radiator.
The scope of application is considered to be multi-storey buildings in which a vertical coolant supply is installed.
Video on heating battery connection diagrams
Video about the difference between natural and forced circulation of coolant in a heating system:
Video clearly demonstrating the differences between different heating system schemes:
Scheme for effectively connecting heating batteries with a two-pipe system:
The heating efficiency directly depends on the choice of battery connection diagram for your home. With the right option, heat loss is minimized. This allows you to get maximum effect with the least amount of fuel used. You can install the batteries yourself
It is important to take into account the features of your home so that cold radiators do not interfere with a comfortable life in a cozy home
Please tell me what to do if my radiator pipes directly “stick” to the wall of the house, is this not a minus? For example, when I was already doing putty at home myself, I noticed that it was not convenient, since I could not properly straighten the walls. And is it worth replacing old Soviet cast-iron radiators with new, but more beautiful steel or cast-iron appliances?
Free consultations with an engineer on the arrangement of technological networks Ask your question
Join on social media networks
Add a company
Popular from this category
- What is the best way to cover a heating radiator: options for masking radiators
- How to paint a heating radiator: technology for painting radiators
- Calculation of heating radiators: how to calculate the number and power of batteries
- How to choose an infrared carbon heater: an overview of various designs
Visitors are currently discussing
Ventilation in the cellar: technology for constructing a proper ventilation system Design and calculations
Rainwater collection system: how to arrange storage tanks for water use in the house Other
SMS socket: how a socket controlled by gsm works and is installed Sockets and switches
Ejector for a pumping station: operating principle and installation rules Pumping equipment
What is required for efficient heating operation
Let us immediately note that you should not just spy on your neighbor’s method of connecting heating radiators and decide to carry out the installation yourself. Proper execution of the work may depend on several factors, so the owner of a country house often needs specialist advice.
Only after deciding on the method of connecting the devices can you decide to do the work yourself.
The efficiency of heating batteries depends on several factors:
- power of thermal heating devices, their dimensions;
- places for installation in premises;
- connection methods.
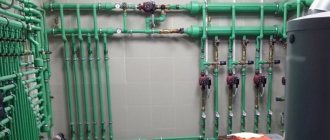
Boiler connection
It should be noted that the wiring of gas, diesel and electric heat generators is almost the same. Here we must take into account that the vast majority of wall-mounted boilers are equipped with a built-in circulation pump, and many models are equipped with an expansion tank. First, let's look at the connection diagram for a simple gas or diesel unit:
The figure shows a diagram of a closed system with a membrane expansion tank and forced circulation. This tying method is the most common. The pump with a bypass line and a sump tank is located on the return line, and there is also an expansion tank there. The pressure is controlled using pressure gauges, and air is removed from the boiler circuit through an automatic air vent.
When the heat generator is equipped with its own pump, as well as a circuit for heating water for domestic hot water needs, the pipe layout and installation of elements is as follows:
Shown here is a wall-mounted boiler with forced air injection into a closed combustion chamber. To remove flue gases, a double-walled coaxial flue is used, which is led out horizontally through the wall. If the firebox of the unit is open, then you need a traditional chimney with good natural draft. How to properly install a chimney pipe made of sandwich modules is shown in the figure:
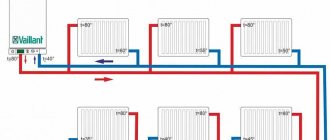
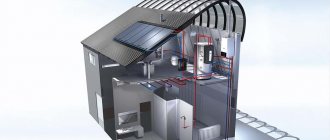
In country houses with a large area, it is often necessary to connect a boiler with several heating circuits - a radiator, heated floors and an indirect heating boiler for DHW needs. In such a situation, the optimal solution would be to use a hydraulic separator. It will allow you to organize independent circulation of coolant in the boiler circuit and at the same time serve as a distribution comb for the remaining branches. Then the basic heating diagram for a two-story house will look like this:
According to this scheme, each heating circuit has its own pump, thanks to which it operates independently of the others. Since coolant with a temperature of no more than 45 ° C should be supplied to heated floors, three-way valves are used on these branches. They add hot water from the main line when the temperature of the coolant in the heated floor circuits drops.
With solid fuel heat generators the situation is more complicated. Their strapping should take into account 2 points:
- possible overheating due to the inertia of the unit; the firewood cannot be extinguished quickly;
- formation of condensation when cold water enters the boiler tank from the network.
To avoid overheating and possible boiling, the circulation pump is always placed on the return side, and on the supply side there should be a safety group located immediately behind the heat generator. It consists of three elements: a pressure gauge, an automatic air vent and a safety valve. The presence of the latter is crucial; it is the valve that will relieve excess pressure when the coolant overheats. If you decide to heat your house with wood, then the following wiring diagram is required:
Here, a bypass and a three-way valve protect the furnace of the unit from condensation. The valve will not allow water from the system into the small circuit until the temperature in it reaches 55 °C. Detailed information on this issue can be obtained by watching the video:
Many homeowners install two different heat sources in the furnace room. They must be properly tied and connected to the system. For this case, we offer 2 schemes, one of them is for a solid fuel and an electric boiler working together with radiator heating.
The second scheme combines a gas and wood heat generator, supplying heat to heat the house and prepare water for hot water supply:
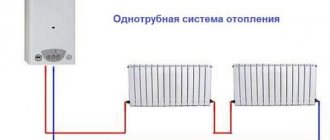
Single pipe heating system
With a single-pipe heating system, the coolant enters the radiator, passes through it and returns again to the same pipe. In this case, the temperature of the coolant gradually decreases as it moves from one heating device to another. As a result, the first radiator is the hottest and operates with full heat transfer. To ensure the calculated heating power, the second radiator must be of greater power, and the third heating device must be even more powerful.
In private homes, it is difficult to accurately calculate the required power of heating devices when connecting them to a single-pipe system. As a rule, the selection of radiators occurs “by eye”, which leads to uneven heating of the room: in one room close to the boiler it will be hot, and in the other, on the contrary, it will be cold.
It remains to add that it is also impossible to achieve real savings on pipes when installing a single-pipe heating system.
Heating parameters for selecting appliances
An initial knowledge of the modes and operating conditions of heating devices will help you understand what battery designs are needed.
Below is a summary of information about the parameters of heating systems that are important when choosing batteries:
1. Internal pressure. The value required for the correct selection of a device that can withstand the pressure in the heating circuit:
- Private house (autonomous) = 1.5-2 atm.
- Private house (centralized) = 2-4 atm.
- 5-storey building (centralized and autonomous) = 2-4 atm.
- 9-storey building (centralized and autonomous) = 5-7 atm.
- House over 9 floors (autonomous) = 5-7 atm.
- House over 9 floors (centralized) = 7-10 atm.
If the technical capabilities of the battery are lower than the pressure in the heating circuit, there is a possibility of depressurization of the device with other negative consequences.
2. Permissible heating temperature . A characteristic indicating the upper temperature limit, above which the battery may fail:
- Autonomous = up to 90⁰С.
- Centralized with plastic wiring = up to 90⁰С.
- Centralized with steel wiring = up to 95⁰С.
Operation in violation of the temperature regime leads to melting of the seals, deformation and loss of tightness of the device.
3. Degree of coolant contamination. A parameter that is mainly of interest to owners of autonomous heating and water supply systems:
- Autonomous private house = high, medium, low when installing filters.
- Autonomous multi-storey building = high, medium, low when installing a filter system.
- Centralized = low, in rare cases medium.
Water supplied by centralized networks to municipal heating systems undergoes comprehensive purification. The content of sand and clay suspension in water extracted from private wells, wells, and open sources may exceed the permissible limit.
The choice of heating devices must be oriented towards the upcoming operating conditions. It is necessary to find out the characteristics of the heating circuit
Recommendations for choosing and connecting radiators
An ordinary homeowner, going to a heating equipment store and seeing a wide selection of different radiators there, can conclude that choosing batteries for his home is not so easy. But this is the first impression; in fact, there are not so many varieties of them:
- aluminum;
- bimetallic;
- steel panel and tubular;
- cast iron
Sectional batteries made of aluminum alloy have the best heat transfer rates; bimetallic heaters are not far behind them. The difference between the two is that the former are made entirely of alloy, while the latter have a tubular steel frame inside. This was done for the purpose of using the devices in centralized heat supply systems of high-rise buildings, where the pressure can be quite high. Therefore, installing bimetallic radiators in a private cottage makes no sense at all.
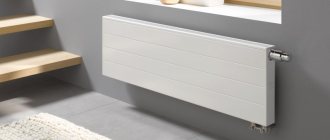
It should be noted that heating installation in a private home will be cheaper if you purchase steel panel radiators. Yes, their heat transfer rates are lower than those of aluminum ones, but in practice you are unlikely to feel the difference. As for reliability and durability, the devices will successfully serve you for at least 20 years, or even more. In turn, tubular batteries are much more expensive, in this respect they are closer to designer ones.
Steel and aluminum heating devices have one useful quality in common: they lend themselves well to automatic control using thermostatic valves. The same cannot be said about massive cast iron batteries, on which it is pointless to install such valves. This is due to the ability of cast iron to heat up for a long time and then retain heat for some time. Also because of this, the rate of heating of the premises is reduced.
If we touch on the issue of appearance aesthetics, then the cast-iron retro radiators currently offered are much more beautiful than any other batteries. But they also cost incredible amounts of money, and inexpensive Soviet-style accordions MS-140 are only suitable for a one-story country house. From the above, the conclusion suggests itself:
General characteristics of the radiator installation process
First of all, it is worth understanding that different types of heating radiators have different requirements for their installation. Aluminum radiators will probably be the easiest to install, but classic cast iron radiators will require the use of specialized equipment - you will have to resort to welding, and this is a very specific area that requires the presence of professionals.
However, modern heating radiators, made from lightweight but at the same time durable materials, are a little more difficult to assemble and install than a children’s construction set, do not require any specific skills and can be placed on almost any surface. They can even be applied to a plasterboard wall.
Radiator location in the room
Even the most expensive radiator will not give the desired effect if it is connected incorrectly or installed incorrectly on the wall. Standard options for mounting heating radiators are under window openings, next to entrance doorways, in places where there are unremovable drafts. But there are also standard requirements for mounting heating batteries on walls and other surfaces:
- Under the windowsill. There is always room for a battery under it, since other interior items are simply not needed there. All drafts from the window are minimized by the heat flow from the radiator. With this arrangement of the device, its total length should not be more than ¾ of the width of the entire window. If this rule is observed, the thermal output will be maximum. The radiator should be mounted in the center of the window, the tolerance to the left or right should not be more than 2 cm.
- Between the window sill and the radiator there must be a height distance of at least 10 cm (or at least ¾ of the thickness of the heating radiator), but no more than 15 cm, otherwise the plane of the window sill will retain the entire heat flow or not reflect it when mounted high.
- The distance between the battery and the wall on which it is mounted should not be less than 2 cm. A smaller distance provokes the accumulation of debris and dust, which, in turn, reduces the heat transfer of the device.
These requirements are not enshrined in GOST, therefore they are advisory. If there are no other recommendations from the manufacturer, then it is best to take these tips into account when attaching any radiator. But most often, the manufacturer in the radiator’s passport indicates the optimal scheme for installing it on the wall, which should be used.
Conclusion
After considering the main options for connecting heating devices to the heating system, their main disadvantages, as well as the advantages of each connection option, clearly emerge. In addition, the considered options for optimizing heat transfer can be applied to any scheme, and recommendations for mounting radiators are always needed when installing a heating system in an apartment or in a private house.
Main options
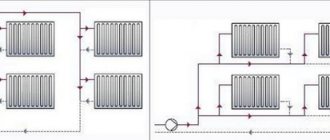
There are several different heating systems and several options for connecting them. In particular, heating can be single-pipe or double-pipe, forced or natural circulation.
Single-pipe heating network options imply a connection in which the coolant moves from radiator to radiator in one line, passing them sequentially. As a rule, this is the scheme that is used everywhere in apartment buildings of old buildings, while at the same time, in new city apartments, a two-pipe connection option is already being made.
The second pipe serves to remove coolant from the radiator after it has been supplied there through the first. This allows the coolant to have the same temperature in all parts of the heating circuit and regulate its movement, therefore, the temperature in each specific heating device. The connection diagram for heating batteries in an apartment depends on the underwater piping. It is impossible to convert a one-pipe scheme to a two-pipe one if the rest of the apartments use a one-pipe system.
Now let's look at the question of how to connect a heating radiator, depending on the needs and capabilities of each of these systems.
Enter exit
Strictly speaking, each of the presented options for how to properly connect heating batteries has its own advantages and disadvantages. For example, the simplest method is a single-pipe connection, from one side of the radiator the coolant is introduced into the upper part, and from the lower part it is discharged further.
The most common connection option, it is also called standard. There is virtually no loss of thermal energy. It is best to supplement this connection with a bypass to allow adjustment and repair of the radiator.
As a rule, serial connection of heating batteries is carried out according to the described or the following schemes.
The simplest method is a single-pipe connection, from one side of the radiator the coolant is introduced into the upper part, and from the lower part it is discharged further.
Diagonal
Despite its high efficiency, it is quite rare, apparently due to the complexity of strapping and the consumption of additional materials. This is done as follows: the coolant is introduced into the upper part of the radiator and its outlet is made from the lower part on the opposite side.
Leningradka
The most correct connection of the heating battery when it comes to horizontal installation of the riser. The input is made from the side closest to the coolant current, the output is from the opposite side, and both connections are located at the bottom of the battery.
Leningradka is often supplemented with a bypass in order to be able to control the flow of coolant and regulate the temperature in the radiators. It is named so because it was developed and first used in Leningrad.
However, despite all the originality and controllability of the considered system, it has a significant drawback, namely heat loss, which will amount to up to 15% of the total figure. Which, you see, is not very good when you heat your house with gas at your own expense.
We discussed above the main methods of connecting heating batteries used for single-pipe networks. It is impossible to connect heating batteries in parallel in a one-pipe system, since it is not possible to supply coolant separately to each heating element.
For a two-pipe system, there is no need to build tricky series connection schemes; usually in such networks radiators are connected in a standard way, less often diagonally.
If the coolant circulates without a pump, naturally, the connection is always made in a diagonal way, since it provides the least resistance in the path of the coolant.
Radiator selection
You should start by choosing a radiator, and the main criterion for choosing will be the operating pressure for which the radiator is designed. For a private house with its own heating system, a radiator with a working pressure of 6-7 atmospheres will be sufficient, but if you need to connect a radiator to the central heating system of an apartment building, it must withstand a pressure of at least 10 atmospheres.
Currently, the consumer is offered two options for aluminum radiators - standard or European and reinforced. The latter can operate under pressure reaching 12 atmospheres. When connecting to a central heating system, you must choose among reinforced radiators.
The number of sections plays a big role
Next you need to decide on the required number of sections. To do this, we determine the amount of heat. Necessary for heating the room and divide by the heat transfer of one section of the selected radiator.
The amount of heat required for a standard room can be taken equal to 1 kW per 10 m 2 of room area. For non-standard premises and more accurate calculations, we will use a ready-made table:
Radiator power table
It should be remembered that the connection diagram for a battery of more than 12 sections must be double-sided, diagonal or saddle. With a one-sided battery connection scheme consisting of a large number of sections, a “pocket” of cold water will form on the side of the radiator opposite the pipes. “Extra” sections simply won’t work; we end up with harmful ballast.
Using forced injection, the battery can be expanded to 24 sections, even with one-way supply, but the radiator in this case must be reinforced.
It should be remembered that coolant must be supplied to reinforced radiators under high pressure only through metal pipes. Metal-plastic may not withstand such pressure, and the consequences will be the most dire.
It should also be taken into account that the heat transfer of the radiator indicated in the documentation is relevant only for one-sided or diagonal supply of coolant to the radiator. When using bottom feed, feel free to subtract 10-15 percent.
If the heating system is installed in a private house, then it is possible to choose the general heating arrangement yourself - one- or two-pipe.
How can you improve the efficiency of radiators?
First option: there are batteries designed for the lower connection circuit. They plug the lower hole between the first and second sections.
And the water is forced to rise into the upper collector and is distributed among all sections. Batteries for the top connection are made in the same way. Special valves are produced for the plug device.