Every owner of a wooden house knows: in order for the building to withstand the harsh Russian winters, winds and cold, it must be properly insulated. Thermal insulating materials must be used on the walls of the house, on the ceiling and, of course, on the floor. A lot of precious heat can escape through a cold wooden floor. To avoid significant heating costs and make the floor warm, you can use different materials. But now modern high-tech insulation materials that allow the coating to breathe and at the same time have high thermal insulation properties are especially popular. This type of material is penoplex or extruded polystyrene foam. In the article we will look at the features of this insulation, find out its advantages and disadvantages, and learn how to properly install it when insulating the floor in a wooden house.
Description and features of floor insulation in a wooden house with penoplex
Penoplex is the collective name for thermal insulation material. In general, strictly speaking, “Penoplex” is the name of a company that produces construction and finishing materials - by the way, ours, Russian. Thanks to the popularity of their extruded polystyrene foam, this material, even from other manufacturers, is now called penoplex.
Penoplex is made from the same raw materials as the familiar white foam. By the way, the latter can also be used for insulation. However, if polystyrene foam is always white, then polystyrene foam can be gray, red, or even colored. Penoplex took all its advantages from polystyrene foam, leaving its disadvantages.
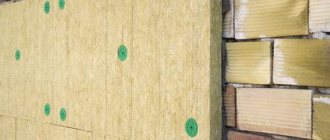
Extruded polystyrene foam is produced by foaming raw materials. As a result of this processing, the output is a light but hard material, permeated with many tiny air bubbles. Thanks to this air gap, the material has really high thermal insulation properties.
In addition to insulating the floor in a wooden house, penoplex can be successfully used for thermal insulation of ceilings, attics, interfloor ceilings, and walls.
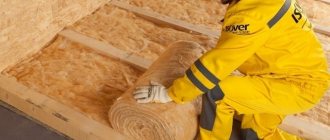
You will learn about the technology of insulating a wooden house from the outside with mineral wool under siding here.
Advantages of polystyrene foam material, comparison with polystyrene foam
Let's find out what advantages there are to insulating the floor in a wooden house with penoplex.
This insulation provides reliable protection of the room from the cold. The material has really high and reliable thermal insulation properties. In addition to the fact that the material retains heat well in the house, it also has high sound insulation properties.
Compared to polystyrene foam, penoplex is more durable. Many people know how easy it is to break a fragile sheet of foam. This will not happen with modern penoplex.
Due to the fact that this is a solid material, it will not sag over time, exposing areas of the floor. By the way, a similar incident often happens when insulating with soft materials, for example, mineral wool. Penoplex is resistant to deformation and easily resists compression.
In addition, you may be interested in material about the features of insulating a log house from the outside.
Penoplex is resistant to moisture. This is a really important nuance, since the house may be located in a swampy area or in a flooded area. Mineral wool, for example, will not withstand exposure to moisture.
Penoplex is convenient and easy to install. There is no need to wear respirators or protective clothing. The slabs of this material are lightweight; if necessary, you can achieve the desired size by simply cutting the slab with a knife. Penoplex easily “stands up” on the glue, while being securely fixed.
Penoplex is not chewed by mice, bugs and other insects do not grow in it. For an environmentally friendly wooden house, such a problem sometimes becomes a direct threat to the preservation of heat and the integrity of surfaces. For example, mice love to live in soft mineral wool. But fortunately, this will not happen with penoplex.
We also advise you to familiarize yourself with the features of insulating the outside of a house from 150x150 timber using this link.
Due to its artificial origin and immunity to moisture, penoplex does not rot, deteriorate or decompose at all. The material is environmentally friendly and completely safe for those living in the house.
The safety of this insulation is also evident in the fact that penoplex does not emit any toxic substances. During operation, unlike mineral wool, it does not generate dust and does not cause allergic reactions. In addition, extruded polystyrene foam is odorless.
It will also be interesting to read about insulating the outside of a house using foam blocks.
Penoplex comes in different types. You can choose a non-flammable variety, which is important for a wooden house.
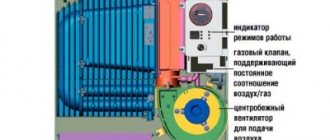
Characteristics of penoplex insulation.
The material is laid in a rather thin layer, but due to its high thermal insulation characteristics and density, this is quite enough. Therefore, penoplex can also be considered a rather economical type of insulation.
If installation is carried out correctly and you choose high-quality penoplex from a trusted manufacturer, the material can serve for a very long time without any loss of its technical characteristics. With careful use, manufacturers guarantee uninterrupted service of penoplex for at least 55 years.
This article will tell you how and how to insulate a brick house from the outside.
Minuses
For balance, you need to know the disadvantages of insulating floors using penoplex.
The material has a fairly high price. This stops some home owners. However, we must not forget that laying penoplex does not require a thick layer.
The material is completely artificial. But thanks to this, mice and bugs do not grow in penoplex. So it is quite possible to consider this disadvantage as an advantage.
Penoplex cannot withstand too high temperatures, causing deformation. But these temperatures range from plus 80 degrees on one side and minus 90 degrees on the other. Such changes in life are rare, so we can say that this drawback does not greatly affect the quality characteristics of the material.
The material does not withstand strong mechanical stress. Do not forget that, in essence, these are balloons inflated with air or gas, so penoplex is quite fragile. You should not jump or run on a laid surface that is not yet protected by the floor covering.
Summary: compared to the list of advantages, the shortcomings of the material look completely invisible, so you can safely go buy this high-quality and durable insulation.
General characteristics
Since the production technology of all types of Penoplex is similar, they have many of the same characteristics:
- water absorption is very low;
- when immersed in water for a day, no more than 0.4% of the volume;
- when immersed for 28 days, 0.5% of the volume.
- fire resistance - G4. The material is flammable and should not be used in areas where there is a risk of heating above 80°C
- thermal conductivity coefficient 0.032 W/(m×°K). This is 9 times lower than that of Rockwool mineral wool mats (0.30 (m×°K)), which is considered one of the best in its group.
- specific heat capacity 1.45 kJ/(kg.°C). Low heat capacity - it takes little time to heat up after, for example, freezing.
- sound insulation of the partition (GKL-PENOPLEX® 50 mm-GKL) - 41 dB. EPPU is not a very good sound insulator. Most of this bundle is made up of gypsum boards.
- when used in a floor structure, structural noise insulation is 23 dB. When laying XPS of sufficient thickness on the floor, sounds (including percussion) will become less clear.
- vapor permeability - 0.005 mg/(m.h.Pa). Vapor permeability is very low. That is, moisture almost does not pass through it in a vapor state.
- temperature range -70°C to +70°C.
As you can see, according to temperature indicators, any type of Penoplex can be used in any part of the country - from the south to the north. Moreover, if you leave it to “winter” unprotected, nothing will happen to the material. This is not the merit of Penoplex, but a general property of extruded polystyrene foam.
How to style
In a wooden house, the floor is mainly blown due to the fact that the boards dry out over time, and gaps form between them, sometimes quite large. But if the floor is insulated with high-quality material, then even as the floor covering dries out, the heat in the house will not become noticeably less. Our recommendations for proper installation of penoplex when insulating the floor in a wooden house.
What you will need
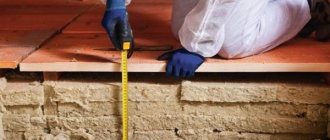
What tools and materials may be needed when insulating a floor with penoplex.
- Roulette, large ruler;
- Construction flat pencil;
- Level. Possibly laser.
- Stationery knife;
- Chisel;
- A construction gun for sealant and, in fact, the sealant itself. This material will be needed to thoroughly fill all the joints and voids and cracks formed during the installation process.
- A film with vapor and waterproofing properties is required.
- Well, and, in fact, extruded polystyrene foam itself.
You can read all the information about foam adhesive for outdoor use here.
It should be noted that wooden floors can be insulated using penoplex in different ways. The most common and simplest of them is insulation along logs.
The result is a truly warm floor. But in this case, high-quality waterproofing is necessary.
Required tools and materials
To install under the screed, it is necessary to lay a reinforcing mesh.
To insulate the floor in a dacha with penoplex and then pour the screed, you will need the following set of tools:
- level, tape measure, square;
- perforator;
- hacksaw;
- rule;
- spatulas;
- stationery knife;
- needle roller;
- hammer, mallet;
- construction mixer or drill with an attachment;
- container for mixing the solution.
Penoplex can be attached to mounting foam or tile adhesive
Materials:
- synthetic glue to attach penoplex to the floor in front of the screed;
- aluminum tape;
- dowels and screws;
- steel mesh or grate;
- mixture for screed based on gypsum or cement;
- beacons for leveling the screed.
You should think about the convenience and safety of work. It is recommended to prepare rubber boots, safety glasses and gloves.
Stages of work
The horizontal surface under the floor must be thoroughly cleaned and leveled. If you decide to insulate the floors in an already inhabited house, then before carrying out the work it is necessary to dismantle the floor covering. If it is still in good condition, then remove it carefully so that after work you can put it back in place. Well, if you plan to replace the coating, then you don’t have to stand on ceremony and remove it quickly. Check the condition of the subfloor. If it is deformed or there are defects, carry out work to strengthen it.
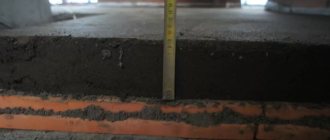
Prepared wooden logs must be positioned and secured in such a way that there is a space of no more than 70 cm between them.
The boards on which the penoplex will be laid must be hemmed to the joists or secured to bars specially designed for this.
Before laying the insulation, it is necessary to treat the logs and all wooden elements with antiseptic solutions. This precautionary measure will protect the tree from rotting and damage by bugs. After antiseptic treatment, it would also be useful to treat with a moisture-repellent agent.
First you need to lay out a layer of thick waterproofing film on the boards or plywood , so carry out the work of installing the waterproofing. Keep in mind that this material is overlapped (about 15 cm) to ensure complete tightness and high-quality protection from moisture.
It is possible that it will be useful for you to study the material about insulation for the walls of a house outside under siding.
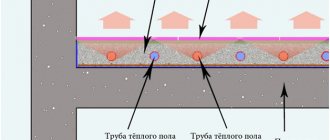
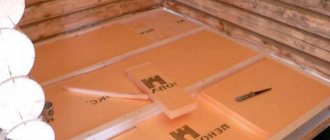
Floor insulation scheme.
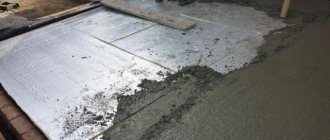
The next step is the direct installation of insulation on wooden boards. When laying out the penoplex, carefully ensure that no gaps or cracks form during the work. Careful placement of the material will provide reliable protection from the cold.
For additional protection from moisture, you can stretch polyethylene film over the surface of the insulation. This technique is of particular importance if the house is located in a swampy area and the climate is rainy.
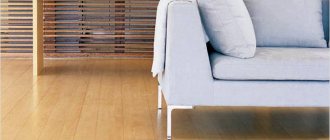
The floor covering is laid on top: laminate, parquet, solid wood, etc.
By the way, similar work can be done in an ordinary apartment. Such insulation is of particular relevance if you live in an apartment building on the ground floor.
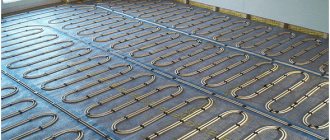
Penoplex can also be used as an insulator under a “warm floor” system. In this case, it will provide additional protection of the room from blowing and heat loss. In order to lay the material in this case, a concrete screed with floor pipes built into it is used.
You will probably want to find out more information about whether it is possible to insulate the ceiling and floor with sawdust.
Self-installation
The insulation is mounted on foundations made of reinforced concrete, soil and wood. When working, the following rules should be observed:
- strictly follow the installation instructions;
- Carefully adjust the slabs to each other so that there is no free space between them.
- Distortions and rolls are unacceptable.
If the material is laid in two layers, then you need to ensure that the joints of the upper plates do not coincide with the joints of the lower ones. Otherwise, pockets filled with air will appear in the insulating layer. Condensation will accumulate in them. Such defects impair thermal insulation and subsequently lead to delamination of the insulation.
A special compound is used to glue the boards together. It improves the thermal insulation properties of insulation. A “finish floor” is laid on top of the penoplex, for which the following materials are used:
- laminate;
- linoleum;
- parquet;
- polymer coating;
- ceramic tiles;
- boards.
Decorative coating is mounted on foam boards
Video
In the video, how to insulate the floor in a wooden house with penoplex:
We looked at the features of penoplex as insulation for floors in a wooden house. The important thing is that it is quite possible to carry out the installation yourself and that penoplex has truly outstanding performance characteristics. Thanks to our recommendations, as well as your own hard work and accuracy, you will be able to provide your country house or cottage with high-quality heated floors.
Maybe
Ground mounting
Penoplex is widely used to insulate earthen floors. Floors on the ground are installed as follows:
- Carefully level the installation site.
- Cover it with expanded clay and sand to a height of 40 cm. The layers should be positioned strictly horizontally.
- Insulation boards with a thickness of 5 cm or more are laid. The sheets are carefully joined together, leaving no gaps. The joints are sealed with tape.
Penoplex can be used to effectively insulate an earthen floor - The entire base along the edges is covered with roofing felt or polyethylene. They are also mounted on penoplex.
- Cement is poured on top, on which a metal mesh is laid to strengthen it. Its layer must have a thickness of at least 5 cm.
- The screed must be strictly leveled horizontally, otherwise difficulties will arise when laying the floors.
Installing a floor in a bathhouse has its own characteristics. Here the screed is installed at an angle to ensure water drainage. To cover the floor, it is better to use sanded boards mounted on joists.
What is penoplex?
Penoplex is an extruded polystyrene foam (EPS), produced by the Russian company of the same name, which became a pioneer in the mass production of insulation materials. Unlike its predecessor, polystyrene foam, EPS is made using a completely different technology, so the quality of the extruded “newbie” and its characteristics are very different for the better.
Extruded polystyrene foam is made by foaming raw materials. This processing allows you to obtain a lightweight but incredibly durable material, inside of which there are tiny air bubbles. Thanks to these numerous cells, penoplex has the highest thermal insulation properties.
It is easy to distinguish real “penoplex” from other brands of extruded polystyrene foam: it has a “Dutch” orange color. These are slabs 600 mm wide, their length is 1200 or 2400 mm (only 45 and 45C). The thickness of the material varies: a maximum of 100 mm, a minimum of 20. It is this that determines the number of sheets in the package - there are only 4 thick slabs, the thinnest ones can be 20.
Balcony insulation
The floor of the loggia also needs high-quality insulation, this is especially important if the balcony and the main room form a single whole. To insulate the floor, you will need penoplex with a thickness of 40-60 mm for a combined loggia and 20-40 mm for a non-combined loggia.
Penoplex is attached to the floor surface using dowels. The joints between the plates must be blown out with foam. As soon as it hardens, glue all joints with regular tape, which will provide a smooth, uniform surface.
Then a layer of vapor barrier is attached, which is provided by foil-coated polyethylene film or foil-coated polyethylene foam. The vapor barrier is secured with polyurethane glue. The vapor barrier is installed end-to-end and after that all joints are taped with metal tape, which will provide a “thermos” effect on the loggia floor.
If you have a wooden floor on the loggia, then first logs are installed on the floor, insulation is placed between them, and then flooring is attached to the logs.