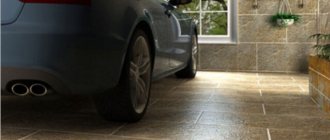
Traditional technology involves laying floor heating elements in a concrete screed. However, due to the specifics of the material, it is not possible to implement it using a wood base as an example. However, today there is an alternative way to install heated floors on a wooden floor. Let's look at what such a heating system is, what its features are, the principle of operation and what a number of mandatory requirements are imposed on it, as well as how to properly prepare the foundation, what types of systems there are and what are the features of their installation technology.
Installation of a heated floor system on a wooden base Source ytimg.com
Warm floors - what is it, how does it work, features
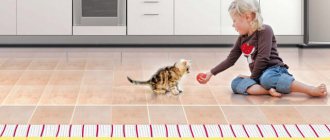
The underfloor heating system is a structure of heating elements mounted in the surface layer of the ceiling. Heat from the circuits heated to the optimal temperature is transferred to special metal elements, which in turn release it to the floor surface. The latter evenly heats the air throughout the room.
Main features of the system:
- Uniform heating of the floor surface.
- Formation of microclimatic areas that are optimal for health – when warm air accumulates at the bottom and cold air at the top.
- The absence of vortex circulation flows characteristic of heating radiators, leading to the accumulation of dust.
- Minimum maintenance procedures for the entire operational period.
Construction of a heated floor system on a wooden base Source otoplenieblog.ru
There is another important feature of a heated water floor on a wooden floor. If in the traditional case the installation of the system is carried out in a concrete screed, since the reinforced concrete floor is quite capable of withstanding the resulting load, then on a wooden base this approach is prohibited. The reasons are excessive weight and inconsistency in the properties of the contacting materials. Therefore, installation is most often carried out using an alternative method - flooring.
Among the main advantages of the flooring system are the following:
- The minimum acceptable weight that can withstand even the ceiling of a frame structure.
- Simple installation technology.
- Short installation time - there is no need to wait for the coating to harden, as in the case of pouring a concrete screed, in addition, you can immediately begin finishing.
- Possibility to carry out repairs and replacement of elements if necessary.
- Large variability of schemes and equipment models.
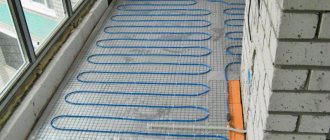
Installation of heated floors using the flooring method Source strojdvor.ru
Floor heating coatings are not without a drawback - this is low inertia. Although this allows the floor to heat up quickly, it also cools down just as quickly. Analogues poured into concrete screeds do not have this. In them, the concrete mass itself serves as a heat accumulator, and after switching off it warms the room for a long time.
Note! Due to the fact that wood conducts heat rather poorly and is also subject to significant deformation when heated, when installing heated floors using new technologies, heating elements are placed in special heat-conducting circuits. From them, heat is transferred upward to the floor covering.
A properly organized heated floor creates maximum comfort in the room Source onduline.ru
Ground floor floor
If you do not have a warm base, then install the floor on the first floor on the ground using stands made of posts.
Wooden floor on posts
- To make such a floor, you first need to remove the plant and soft layers of soil. This can be done locally at the installation site of the columns, or throughout the entire area inside the strip foundation.
- Then a dry layer of soil of at least 15-20 cm is poured and thoroughly compacted.
- The resulting base needs to be moistened and crushed stone or gravel pressed into it a few centimeters on top.
- Then the sand-crushed stone mixture is backfilled and, after compaction, red brick columns are laid on it to support the floor beams. They are laid in increments of 70-100 cm, several bricks high. The top and bottom of the posts must be protected with a layer of roofing felt waterproofing.
- It is advisable to lay a layer of waterproofing between the columns so that moisture from below does not affect the beams.
- Beams are laid in the center of the columns. Their height should be at least 2 cm greater than the height of the subfloor boards and insulation, so that an air gap remains.
- The subfloor boards are laid on posts along the edges.
- Then comes a layer of vapor barrier.
- Insulation (mineral wool or extruded polystyrene foam, polystyrene foam) is placed between the beams.
- A finished flooring board is attached to the beams on top.
Requirements for heated floors on a wooden base
In order for the operation of a heated floor laid without a screed on a wooden floor in a wooden house to be safe and durable, the following series of requirements are imposed on the system installation procedure:
- Wood floors, both as part of a structure and as an independent structure, exhibit natural shrinkage, which is most pronounced during the 1st year after construction. Therefore, the installation of all elements of the heating system must be carried out in compliance with the required technological clearances.
- Wood is most quickly exposed to microclimatic changes indoors. If it is too dry, it shrinks, cracks, warps, and if it is too wet, it rots and is subject to the development of mold and fungi. In both cases, the service life of structures is rapidly reduced.
Structure of a heated floor in a wooden structure Source pinimg.com
- The susceptibility of wood to fire requires choosing a method of laying heating elements so that neither the heating parts themselves, nor the conductors, nor their connections are in direct contact with the wooden floor elements. For this purpose, boxes and other protective devices made of non-combustible materials are used, as well as pre-treatment of surfaces with fire retardants.
On a note! To avoid the development of an emergency situation, it is necessary, first of all, to comply with building codes and regulations regarding the permissible level of heating of the system as part of wooden structures. According to SNiP, the temperature of the heated floor should not be higher than 27-30 °C. It is best to install a temperature sensor for the most accurate control.
Thermal calculations
The higher the screed, the smaller the distance between the turns of the heating pipes in the floor needs to be. It is also worth considering such a factor as heat loss. Their magnitude depends on
- the location of the house relative to the light,
- number of windows and their size,
- insulation of load-bearing walls and roofs.
Naturally, the calculation of a warm floor should take into account the intensity of use of a wooden house (dacha option or full-fledged life) and, of course, the climatic conditions in which this house is located.
If the building is old, then before starting heating, it is better to test the house for strength, as well as cracks/drafts, and then carry out maximum insulation. If the house is being built from scratch, then energy saving issues must be addressed immediately during construction.
It depends on whether the house is old or new and you need to choose options for water floor heating.
Varieties
Based on the type of energy resource used, heated floors that can be installed on wooden joists are divided into two types:
- Electrical.
The system is based on wired heating elements - cables and coatings. Their main advantages:
- Small dimensions and weight.
- Possibility of installation on any base, including old ones.
- Fast heating.
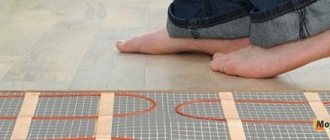
Film-type electric heated floor Source teplopol74.ru
See also: Catalog of companies that specialize in engineering systems (heating, water supply, sewerage and others) and related work
- Convenient selection of heating level - depending on the microclimatic requirements for a particular room.
- Microzoning - setting your own mode in each room.
- Service life with proper operation is at least 50 years.
However, the installation of electrical systems is associated with the risk of fire - with low-quality components, overheating, violation of operating conditions and other reasons, there is a high risk of a short circuit. In addition, with high power, such heating will consume quite a lot of electricity. You also need to make sure that the wiring can withstand the load created by the heating system.
- Mermen.
It is based on a pipeline network through which heated coolant circulates. The system is powered either from an individual heating boiler or from a centralized mains.
Water heated floors are more preferable from a fire safety point of view. However, they also have specific disadvantages. The first of these is the risk of leakage. Sooner or later, all connections leak, and the system piping is no exception. The second disadvantage is lower power than electric analogues.
Pipeline for water heated floor Source stroyvms.ru
Types of electric heated floors
If a water heated floor can be installed directly under a wooden floor, that is, under a plank floor, then an electric floor can only be installed under a coating made of relatively non-combustible materials. There are 3 main types of electric heating coatings of the type in question, each of which has its own power and type of finish:
- Heating cable. The operating power range varies between 120-180 W/m2. It is recommended to choose porcelain stoneware or ceramic slabs as the finishing coating.
- Mats. They are an analogue of the above modification, however, with the difference that the heating conductor is fixed on the substrate. Therefore, in addition to the power of the heater itself, products are characterized by the pitch of its location on the substrate. The best option for the final coating is ceramic or granite-based tiles.
- IR emitting film. The working surface of the material emits thermal energy on the principle of sunlight and heats surrounding objects. Its power varies widely - from 150 to 220 W per m2. Fits under parquet boards, linoleum and laminate.
Electric film heated floors are easy to install Source saucyintruder.org
Reference! Installation of a classic heated floor - with concreting in the screed - is also possible on a wooden floor. However, for this, wood structures need to be provided with reliable waterproofing with a ventilation gap and antiseptic protection, provided also that they are designed for the final weight of the poured concrete pad, equipment and finishing. It is recommended that the screed itself be made on the basis of ready-made mixtures with minimal setting time.
Materials and tools
Installing a heated water floor in a private house using the dry method requires the purchase of the following materials:
- solid or liquid fuel boiler, gas (an electric boiler is inferior in economics to cable heated floors and infrared film);
- circulation electric pumps - due to the internal resistance of the pipes, the movement of the coolant due to the pressure difference in the system is impossible;
- expansion tank;
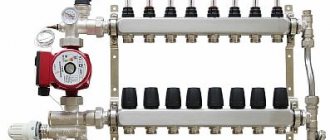
- Mayevsky tap for removing air when airing the heating system;
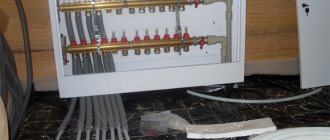
- distribution unit (collector);
- safety valve;
- pipes with special fasteners;
- fittings for polypropylene pipes or coupling-press for metal-plastic;
- antifreeze if no one lives in the house on a permanent basis during the winter;
- roll waterproofing in case of pipe leaks;
- foil vapor-permeable heat-insulating material. When purchasing simple insulation, you need food foil;
- metal diffuser made of galvanized steel or aluminum;
Diffuser.
- polystyrene plate with bosses for laying pipes;
- set of wooden slats.
If you want to save money, a slightly different list of materials is possible. But we will talk about this in the process of reviewing the material.
You can't do installation work with your bare hands. You need tools and equipment (you can buy them, borrow them from friends and acquaintances, or rent them). According to the technology, the set includes:
- level - allows you to carry out work in one plane;
- roulette - nothing without it. You will have to measure a lot;
- wood hacksaw - useful when laying pipes on beams or on a slatted system;
- grinder - will help in cutting pipes. Here she is unrivaled;
- set of wrenches;
- adjustable wrench. Sometimes they indicate that one adjustable wrench is enough. But that's not true. Anyone who installed such a system with their own hands knows about this;
- soldering machine - required for cross-linked polyethylene pipes;
- Screwdriver Set.
Some specialists take a portable gas burner with them, which in some cases significantly speeds up the progress of work.
Calculation of the number of pipes
The number of pipes depends, first of all, on their diameter. And not because a larger amount of coolant liquid is pumped through a larger pipe, which means less is needed. The point is the size of the circuit, which is limited by the internal resistance of the pipe walls. In plain language, this means that a pump of any power cannot pump water through a pipe of infinite length.
There is always a “locked loop” effect. Thus, through a ⌀16 mm pipe, an electric pump can pump liquid over a distance of only 80-100 m (depending on the pipe material). In turn, the size of the pipe affects the laying step: a thinner pipe can be bent 360° with a smaller radius. Here the laying step will be smaller. Naturally, for a thicker pipe this step is greater.
Taking these nuances into account, heating engineers proposed the following formula for calculating the number of pipes:
N = S/L x 1.05 + (M x 2) where:
- N—number of pipes, m;
- S—heated area, m2;
- L — pipe laying pitch, m (optimal distance between pipes is 20 cm);
- M—distance from the circuit to the collector, m;
- 1.05 - safety factor for radii and connections.
The calculation can be carried out using a simplified formula: multiply the heated area by 5 - SNiP requires laying 5 m of pipes per 1 m2 of room area.
The second point taken into account when purchasing pipes is the material from which they are made.
Preparatory work - assessment of the condition of the ceiling, renovation, insulation
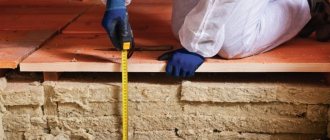
Before deciding which modification of heated floors is best suited for a particular wooden floor, it is necessary to make a correct assessment of its current condition, as well as the need for its renewal, replacement, repair and insulation. To do this, the following series of procedures are performed in relation to the main parts of the structure (boards, joists and other load-bearing elements):
- Visual inspection of the surface for defects.
- Feeling, scraping, drilling into the material to assess the condition of its structure.
- Replacement of elements with obvious damage - cracks, sagging, rot.
Laying heated floors requires careful preparation of the wooden base. Source sovet-ingenera.com
Methods for installing underfloor heating
In wooden buildings, heated floors with coolant can be installed in 2 ways:
- Traditional, under a screed made of cement-sand mortar.
- “Dry” method, on wooden logs or beams
Since in houses made of wooden beams the floors of the first floor or the ceiling above the basement are often concrete, the traditional method of installing floor water systems cannot be completely discarded. Moreover, you should not try to build a heated floor over wooden joists on such bases; this will lead to unnecessary costs, and the result may not meet your expectations. It is better to install a heating system under the screed on rough concrete floors, and only then lay the wood flooring.
The situation is completely different when the house has wooden floors. You should not use a screed with a heating circuit on them, and here’s why:
- The cement-sand screed exerts an additional load for which the ceiling is not always designed.
- A good wooden house constantly “breathes”, as a result of which the mortar layer can crack, since the amplitude of its expansion does not coincide with the processes in wooden structures. It will be necessary to compensate for the expansion of the heating circuit, which is quite difficult and expensive.
For reference. Sometimes wooden houses are often built from insufficiently dried profiled timber, which is why at first changes occur in the thickness of the structure, leading to cracks in the material. In such conditions, the screed will certainly suffer.
The use of various electric floor heating systems cannot be ruled out, of which the most acceptable option is the use of infrared heated floors for heating a wooden house. A thin polymer film with heating elements applied to it is laid directly under the floor covering; no screed is required, which greatly simplifies installation work. However, in this case, the choice of energy resources for heating a home is limited to electricity, while the coolant of water heated floors can be heated from a gas, solid fuel or diesel boiler.
Some homeowners, paying tribute to tradition, build brick stoves in wooden houses, integrating a heating circuit for water into them. In this situation, there is simply no alternative to underfloor heating circuits with coolant.
Installation of water heated floors using the “dry” method
Joists and wooden floor beams are used as load-bearing structural elements of the floor in houses. The joists are installed on a solid base or on many point supports, while the beams have 2 support points at the edges and, in some cases, are additionally supported by partitions. Since the beam is a load-bearing structure of the floor, it is not allowed to make any grooves or cuts in it, this is the main difficulty when installing a heated floor in a wooden house. The only way out is to lay a subfloor from boards or sheets of chipboard, and from there you can begin constructing a “pie” of underfloor heating.
The situation with lags is somewhat different. When the timber is laid on a solid solid base, it is possible to cut grooves for the water circuit pipes and there is no need to make a subfloor. If the logs are supported at several points, then it is extremely undesirable to make cuts in them, as in load-bearing beams. But in any case, before installing a subfloor on top of the beams or joists, a layer of heat-insulating material is laid between them. To lay a heated floor on wooden joists on the first floor, the thickness of the insulation must be at least 80 mm, and for overlapping, 20-30 mm is sufficient. In this case, a waterproofing layer of polyethylene film should be laid under the thermal insulation material on the first floor.
Under the pretext that all floors of a private house constitute a single space, many installation manuals for heated floors indicate that the floors do not need to be insulated. Like, there’s nothing wrong with some of the heat from the heating circuit going down. In fact, this violates the very principle of operation of underfloor heating, since the heat coming from the ceilings of the room will remain in the upper zone, and in the room where the underfloor heating system is located, it may not be enough. To ensure that heat is distributed evenly throughout the rooms for which it is intended, lay a small layer of insulating material, arranging a warm, dry floor in the ceiling.
After the thermal insulation material has been laid and a rough base made of boards or chipboard has been installed, it is necessary to ensure that all the heat from the heating circuit is reflected upward. This is done in 2 ways:
- You need to start installing warm wooden floors by laying a foil reflective layer over the entire surface. In the case where the circuit pipes are planned to be laid directly on the insulation and through cuts in the joists, then the foil is laid only between them.
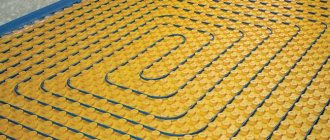
- A more expensive method is using slab wood materials and profiled sheets of galvanized metal. Having drawn a diagram of the layout of the contours of heated floors on a wooden base, in the intervals between the pipe routes, parts made of chipboard are attached to it with self-tapping screws. Sheets of galvanized steel are inserted into the resulting grooves.
The installation of water heated floors continues with the layout of the heating circuit pipes. For this purpose, metal-plastic pipes with a diameter of 16 mm (DN10) are most often used. The laying step here must be kept smaller than in heated floors under screed, since heat transfer in our case will not be as effective. The coolant pipe transfers heat to the coating not directly, but through an air gap, hence the reduction in heat transfer. Accordingly, the average pipe laying pitch should be 150 mm, maximum 200 mm. After this, the circuit is connected to the manifold, checked for leaks, and the finishing coating for the wooden floor can be laid.
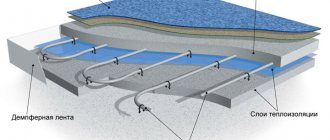
Underfloor heating "under the screed"
The technology for installing underfloor heating, which involves embedding the contours into a screed made of cement-sand mortar, is widespread and quite well known; the floor cake is shown in the figure:
First, you need to ensure waterproofing of the future slab by laying a plastic film over the concrete preparation. Then, in order to compensate for the thermal expansion of the screed, a damper tape is attached along the entire perimeter of the room along the walls, after which insulation is laid over the entire surface of the base.
In order for water-heated floors to have good heat transfer, a foil film with markings along which the pipes are laid out is laid on top of the thermal insulation. The laying pitch here varies from 150 mm (for parquet with carpet) to 350 mm (for tiles). It is necessary to ensure that the length of each circuit does not exceed 100 m. The pipes are fastened using special strips or plates. At the end, the circuit is connected to the distributor and checked for leaks.
The last stage is pouring the screed. The optimal thickness of the solution layer is 3-5 cm above the top of the pipe, the time for complete hardening is 3 weeks. After this, you can finally make a warm floor in a wooden house by laying a finishing coating over the screed.
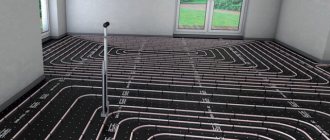
Installation of a water heated floor system
The most common way to install a domestic floor heating system on a wooden floor is to lay a pipeline circuit with a circulating coolant liquid. In this case, there are several options for how the latter will be heated - these are:
- Individual heating unit.
- Centralized heating system.
- Thermal accumulator.
The technology for installing equipment and materials consists of the following main stages:
- Drawing up a project - diagram of pipe laying, connection points, calculation of parameters, quantity and type of finishing and base materials used.
- Formation of the base - creation of a subfloor, insulation, steam and waterproofing.
- Laying the pipeline, depending on the chosen method - pouring into a screed, fixing it on special mats or in grooves on a wooden flooring.
- Connecting the system to the heating circuit and checking its functionality.
- Preparing the base for finishing.
- Installation of finishing floor covering.
Scheme for uniform laying of a heated floor on a wooden base Source roomester.ru
The final layer of finishing for a water heated floor can be created from four main materials - ceramic tiles, parquet boards, laminate and wooden boards. In this case, there are 3 popular options for laying heated floors on a wooden floor:
- Application of a ready-made solution. This is a set specially manufactured by a specific manufacturer, similar to a construction set, which includes pipes, a substrate, and fasteners. Plus - quick and easy assembly. Disadvantages - high cost, the need for careful preparation of the base, elimination of the slightest differences, priming, etc.
- Performing flooring on joists. The method is used when pipes need to be laid with large pitches.
- Installation along guides. Guides are laid on the subfloor in accordance with the diagram, between which pipes are then placed.
The structure of a thermal water floor under laminate Source 1c-bitrix-cdn.ru
Important! The main mistake in organizing a warm water floor system is the lack of waterproofing protection. Sooner or later this will lead to the formation of condensation and the accumulation of dampness in the wood. As a result, the service life of structures will be significantly reduced.
System design
- A boiler used for heating. If the choice fell on water floors, then it is possible to use a solid fuel, electric or gas equipped boiler. They are practical and quite comfortable. Their use implies the absence of a constant supply of fuel, which is used in wood and solid fuel boilers.
- If you plan to create a truly warm house, then it is recommended to use combined systems that will allow you to heat both the radiators and the floor layer. Its temperature regime may differ, since the temperature in radiators can reach 60°C, but for wooden coverings the maximum is 30°C. If this condition is not met, the tree will crack quite quickly.
AdminAuthor of the article
Did you like the article?
Share with your friends:
Video description
Video example of installing a heated floor on a wooden floor:
- Installation of support bars is in progress.
- Next, material is placed on the free surface between them to reflect thermal radiation.
- A special substrate for the heating cable – galvanized mesh – is laid on top of this coating.
- Then a heating conductor is lined on it.
- All loose elements are fixed.
The choice of base and finishing materials, as well as basic devices, should be made taking into account the following features:
- To avoid overheating of wooden structures, the maximum temperature of heating elements should not exceed 400C.
- The thermal conductor is distributed over the surface as evenly as possible - with the exception of places where furniture and interior items are installed - there should be no heating elements under them.
- The thickness of the finishing coating directly depends on the type of material and thermal conductivity characteristics. For wood, the value of this indicator is 2-2.5 cm.
Floor frame
Basic elements of a wooden floor
First, let's study the main constituent elements and main rules:
- The underground space from the pads to the floorboard must be at least 1 cm (and no more than 25 cm for floors on the ground). This is necessary for good ventilation inside the frame.
- Logs are transverse bars that serve as the basis for further cladding with boards. They can rest on beams, a concrete slab, posts, and even on the ground (when using pads).
Note! According to GOST 8486-86, unplaned boards treated with an antiseptic from coniferous or deciduous wood, except linden or poplar, are used for joists. Wood moisture content should not exceed 18%.
- The width of the logs when laid on a slab should be in the range of 80-100 mm and 100-120 mm when laid on posts or beams. The thickness when laid on a slab should be 25-40 mm, and when laid on posts - 40-50 mm.
- Beams are horizontally laid structural elements that perform load-bearing functions. They are supported at least at two points on load-bearing walls.
- Columns (linings) are used to level the base. For logs with a thickness of 40-50 mm, linings are installed every 80-110 cm.
- The pitch of laying the logs depends on the thickness of the sheathing. For example, if you use the thinnest floorboard 21 mm, then the step of laying the logs should not exceed 30 cm.
- It is best to use a thicker floorboard 35 mm, and make a standard laying step of 60 cm, especially if you are going to insulate the base. This way you won't have to cut the insulation to width.
Video description
Video on how to make a warm floor on a wooden floor under tiles:
Recommendation! When using parquet boards as a finishing coating, the base must be strong enough. This is especially true when the distance between the joists is large and they will sag on a soft floor, but thick wooden boards will make the warm floor ineffective. Therefore, it is better to lay parquet on plywood on top of screed or frequently located supports.
About the pros and cons of “dry” floor systems
In conclusion, I would like to note the advantages of a heated floor without screed, which can attract owners of private wooden houses:
- The design is lightweight, reliable and efficient at the same time.
- Unlike heating circuits embedded in screeds, in such a system it is easy to detect a leak and eliminate it.
- The thickness of the “pie” protruding above the upper cut of the log is from 20 to 50 mm.
- Water floors with dissipative plates made of steel or aluminum are not able to accumulate heat and are practically devoid of inertia. Accordingly, they quickly warm up rooms and quickly respond to automation commands and changes in coolant flow in the loops.
- Speed of installation due to the absence of “wet” processes and hardening of the solution. How lightweight heated floors are installed in a short time is shown in the next video:
For reference. On various Internet resources there is conflicting information about the reduced heat transfer of a flooring system compared to a monolithic one. Theoretically this is true, but in practice the difference is small, and it is quite difficult to compare.
The only drawback that forces home inventors to play tricks with aluminum foil is the price of steel products, especially when combined with shaped polystyrene foam. You can get around this nuance like this: install warm floors in all rooms one by one, depending on the availability of financial opportunities. First you need to insulate the ceiling and install a comb, and then gradually install the pipework, starting with the rooms where residents live permanently.
Video description
Video review on laying film heated floors:
- After this, the thermal film is fragmented along the cutting lines and laid in accordance with the plan.
- Installation of thermal film is carried out so that the fragments are located 20-30 cm from the edge of the wall and do not overlap each other. In this case, the copper-plated elements should be facing down.
- The heating material must be laid strictly according to the plan - so that it does not fall under the place where furniture and other heavy objects will stand.
- Upon completion of laying the thermal film, the finishing coating is installed.
Advice! As a finishing material for a film electric heated floor laid on a wooden floor, you can use both tiles and linoleum with laminate. In this case, the substrate for the finishing coating is a mounting mesh and sheets of plywood.
Installation technology
If the base is uneven, then it can be leveled using a backfill of sand with a moisture content of less than 4%.
Installation of logs
Laying joists on a flat surface
- Most often, logs are installed perpendicular to the light from the window, so that the boards then lie along it. This will make the gaps between the boards less visible.
- First of all, install the outer joists with a gap of 2-3 cm from the wall. Then intermediate logs are installed.
- The logs are laid on the base without rigid fastening. Their evenness is checked using a level and a 2-meter rod. They all must be in the same plane. In this case, leveling with wooden pads or wedges is not recommended, but adding sand under the waterproofing is acceptable.
- To increase the rigidity of the structure, the logs are connected to each other by wooden jumpers, which are attached to galvanized 4*4 corners.
Note! It is imperative to install an additional joist in the doorway so that it protrudes into each room by at least 5 cm. This is necessary so that the boards from adjacent rooms rest on one base.
Insulation layers
Correct placement of insulation
- If laying takes place on a concrete slab, it is imperative to use a waterproofing layer, especially if the screed is new. For this purpose, roofing felt, polyethylene film, and backfill types of waterproofing are used. They are laid in a continuous sealed layer, with an overlap of 15 cm on the walls.
- To increase sound insulation and reduce the transmission of vibration noise through floors, it is recommended to install logs on soundproofing pads. You can make them yourself from polyurethane, cork backing, soft fiberboard.
- To insulate the floor, a layer of mineral wool or expanded polystyrene can be laid between the joists. Mineral wool also provides a soundproofing effect. Unlike concrete screed, it is not necessary to use high-density insulation materials, since there will be no load on them.
- For additional protection against noise transmission through the structure, before installing the sheathing, a cork backing can be laid on the joists.
- If you use mineral wool, then it must be covered on top with a vapor barrier membrane, such as glassine. This is necessary to protect against moisture ingress and condensation removal. It is secured as the boards are laid on the joists using a stapler.
- After installing the vapor barrier, there is no ventilation gap left under the boards, so it is recommended to screw a counter-lattice made of boards at least 1 cm thick onto the logs on top of it. The floorboard will be attached to them.
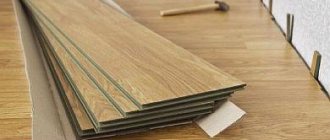
Finished flooring
Installation of finished floor
- A tongue-and-groove floorboard is most often used as the last layer; its price is approximately 13,500 rubles per cubic meter.
- To save money, you can use an unplaned board, but you will have to trim and process it yourself.
- Thick plywood or OSB sheets are also a good alternative. For floor coverings, their thickness should be 15-21 mm.
Briefly about the main thing
A warm floor is a system of heating elements mounted directly under the floor covering. The heating parts of the system transfer heat to the surface, which in turn heats the room. Among the main features of this heating are:
- Uniform heating of the room.
- Creation of an optimal microclimate.
- No dust accumulation.
- Minimal maintenance.
When deciding whether it is possible to make a warm floor on a wooden base, the main obstacles are the features characteristic of the traditional method - the large weight of the concrete structure. Therefore, the plank flooring method is used. Its advantages are minimal load, simple installation, low labor and time costs, maintainability and variability.
Heated floors can be classic water or electric. Each type has its own characteristics, materials, equipment and installation technology. At the same time, the installation procedure, methods and components used must comply with special fire safety requirements and long-term operating conditions.
Is it possible to save on materials?
Since components for underfloor heating without a screed cost a lot of money, many craftsmen have found ways to do without them:
- Place the heating branches inside the ceiling, directly on the insulation. Then Ω-shaped products are not used.
- Make the cutouts in the boards yourself, and instead of the plates, roll out aluminum foil used for baking along the length of the grooves.
- Make steel heat spreaders yourself using metalworking equipment.
- You can also make a wooden system for laying pipes in grooves yourself, for example, from chipboard sheets.
Of the listed options, only the last 2 will allow you to save money and at the same time organize efficient heating. Indeed, on a sheet bending machine you can make plates from any metal, only the profile of the groove will be rectangular and not “omega-shaped”.
Piping inside ceilings is still practiced today.
When pipes are laid inside a wooden structure, they have poor contact with the finishing coating and heat the air around them more than the room. For such heating to have an effect, the tubes must be laid at a distance of 10 cm from each other, and the coolant temperature must be raised to the maximum. Then the idea loses its meaning; it’s easier to install radiators.
Thin aluminum foil serves as a poor distributor of heat flow due to its thickness of hundredths of a millimeter. In addition, it crumbles over time due to gradual oxidation, so there is no point in using foil.
Master craftsmen independently make grooves for pipelines and roll out rolls of aluminum foil into them
There is another way to save money - to organize heating of a wooden house with electric heated floors using infrared film heaters. But such a system will lose its versatility, that is, you will be able to use only electricity for heating, and you will have to forget about gas or wood.
Automatic temperature control in the house
In the homes of thrifty Europeans, heating systems are necessarily initially designed, and then immediately built with an automatic temperature control system in the house. A German or a Pole knows and understands that without automation it is impossible to ensure economical gas consumption and an acceptable level of thermal comfort in the house.
In Russia, owners often begin to realize the need for automatic temperature control after the house is built, the heating system is already installed and working, and gas bills begin to arrive.
It turns out that outside the house the air temperature, direction and strength of the wind are constantly changing. Day and night, the outside air temperature, even during the day, often changes by ten degrees. The house sometimes blows through, sometimes not, the wind is changeable. The sun is inconsistent, sometimes it heats the house, sometimes it doesn’t. Heat loss at home constantly fluctuates by different amounts. In order not to bother with all this leapfrog several times a day, the owner of the house manually sets the temperature on the boiler to a higher temperature, so that the temperature in the house is warmer, with a margin. And at the end of the month he looks longingly at the gas bill and scratches his turnips.
The owner learns that in order to equip the house with automatic temperature control, it is necessary to throw out some things, replace and redo the heating system, and install additional equipment. And for this you will have to drill, chisel, and lay again. That all this automation would have been much cheaper if it had been installed immediately during the construction of the house.
In a house with a dry heated floor, it is necessary to have
three automatic temperature control systems: a heated floor based on the air temperature in the room with a limitation of the floor temperature;
radiators based on room temperature; boiler based on outside air temperature. As you know, a warm floor can be either “comfortable” or “heating”.
"Comfortable" heated floor
slightly warms the surface and provides a pleasant feeling when a person is on the floor. The main heat supply to the room is provided by radiators. For a comfortable heated floor, it is necessary to maintain a constant temperature of the coolant.
"Heating" heated floor,
In addition to comfort, it provides complete heating of the room.
The relatively small thermal power of a dry heated floor makes it most often suitable only for comfortable heating.
The room temperature sensor is located in the thermostat housing.
In a house with a comfortable dry heated floor, it is necessary to have three automatic control systems to control the temperature .
One system that regulates the operation of a warm floor must be controlled by the air temperature in the room until the temperature of the floor surface reaches a comfortable level. That is, in the off-season the house will be heated with the heat of the heated floor.
the automatic radiator control system comes into effect . Radiators will heat the air in the room, adding their heat to the heat that will constantly come from the heated floor.
The heating mode of the coolant by the boiler must be regulated by another automatic system that responds to the outside air temperature .
Considering that the underfloor heating system has a high inertia (it heats up slowly and cools down slowly), it is recommended to use weather automation to control its operation. Then the temperature of the coolant supplied to the system will be adapted to the outside temperature. Due to this, along with changes in outside temperature, the temperature of the coolant circulating in the floor changes.
When adjusted using a room thermostat, the temperature of the coolant in the system will not change until it begins to rise in the room (due to warming outside). Only after this the temperature of the coolant will begin to decrease, but due to the inertia of the system, the room will already become hot (i.e., waste of energy).
Therefore, in order for home heating to be economical, a weather controller must be used in the underfloor heating system to control it.
To regulate the temperature of the heated floor, it is necessary to select and install a manifold equipped with servo drives on the control valves.
A servo drive is a device that, when electrical current is supplied to it from the thermostat, acts on the valve, opening or closing it. The servo acts as a switch, completely opening or closing the valve. The surface temperature of the heated floor will be maintained with an accuracy of +/- 0.5 - 1 °C.