High-quality ceiling insulation in a house with a cold roof reduces thermal costs, reduces heating costs and increases living comfort. Thermal insulation is carried out in different ways, using materials of various compositions and forms. How to choose the best option?
We will talk about which methods are most effective in constructing a system that prevents heat loss through the ceiling. We'll tell you what to look for when choosing insulation. In our article you will find valuable recommendations for improving the thermal insulation characteristics of your home.
What you need to know before starting work
Where to start?.. The topic is quite extensive, and work related to insulation requires, if not professional, then at least basic knowledge about the materials available on the market, their properties and methods of their use.
If you do the work without having this knowledge, you can, at best, waste time, effort and money, so to speak, in the wind, which is what makes it cold, and at worst, provoke a fire due to neglect of fire safety rules and improper installation of insulation material. Yes, insulation is needed to keep warm, but a fire is clearly too much in every sense.
Now we will look at the most popular materials, and also learn how to insulate a ceiling with a cold attic using common types of insulation. We'll find out what the advantages and possibly disadvantages of each are.
Why is ceiling vapor barrier necessary?
Rockwool ceiling vapor barrier is an excellent way to protect and extend the life of a wooden floor, which:
- significantly extends its service life, eliminating rotting from the inside and deformation of building materials;
- increases the percentage of heat retained by the ceiling in the room;
- makes the attic an inaccessible place for mold and mildew to form.
In addition, it is worth paying attention to the absolute absence of the need for further additional maintenance of vapor barrier materials, given their composition and the design of the entire floor. Therefore, by installing a vapor barrier on the steam room ceiling during the initial construction or during repairs, you don’t have to worry about possible problems in the future
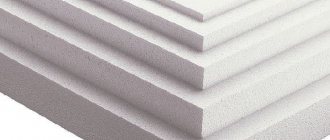
Insulation using foam plastic
Polystyrene foam is one of the most popular materials for insulation. It is lightweight and easy to cut even with a regular cardboard cutter. In a word, working with polystyrene foam is convenient, fast, pleasant and, in principle, not difficult. The main thing is to take the correct measurements and not cut off too much from a whole sheet. But even if you overdo it, there is nothing fundamentally terrible about it: this place can be easily filled with polyurethane foam. Let's present the advantages of polystyrene foam in the form of a short list:
- it is easy to cut,
- easy to transport to the top,
- it is not afraid of moisture and is not sensitive to temperature,
- it is not suitable for consumption by insects and rodents,
- if the foam is laid correctly - on a dry base treated with an antiseptic, the likelihood of fungal formations (mold) appearing is minimized,
- the material has a relatively low cost.
The list can be continued, but I think this is quite enough. We have listed the main positive aspects of the material.
But foam plastic can also be different. Yes, there are different manufacturing companies, but that’s not about that now. The fact is that the sheets are produced in different parameters. In this case, we are interested in thickness.
For insulation of residential premises, sheets with a thickness of 5–7 cm are usually used, and their density, as a rule, is 15 kg/m³. Of course, the higher the density, the higher the material’s thermal insulation ability. You can, of course, choose 25 kg/m³, you can lay the sheets in two layers - this is not forbidden.
But, nevertheless, there is a recommendation: if you are going to install an attic floor made of hard material (for example, fiberboard/OSB boards), then it is enough to choose polystyrene foam with a density of 15 kg/m³. If you do not plan to install a hard surface, for better thermal insulation you should choose sheets with a density of 25 kg/m³.
In general, if there is such a possibility, then a hard floor should be installed in any case. This will allow you to store various things in the attic or even turn it into additional living space, if, of course, it is properly equipped.
But if there is no hard surface above the sheets, then it is not advisable to walk on them often, much less move objects. Simply, they are not designed for this, no matter what density indicator they have.
Insulation from a wooden or brick attic is not fundamentally different: in both cases, the process consists of simply laying polystyrene foam on the floor of the attic. More specifically, the following work needs to be done:
- check the entire wooden structure for rot. If you find a rotten area, it must be cut out and replaced with a new piece of wood, pre-treated with an antiseptic. In general, it would be a good idea to treat all elements of the wooden structure with an antiseptic. Even if these measures were taken during the construction of the house, prevention will never be superfluous. Moreover, in matters related to construction,
- clear the attic floor of debris (including small ones) - the base must be clean,
- make the necessary measurements, make calculations,
- cut the foam sheets according to the calculations,
- lay polystyrene on the surface. Be prepared for the fact that this material will cost more than the foam itself, but it is quite justified. In essence, there are alternative options, and in some cases they can do without it at all,
- lay prepared foam sheets on the attic floor,
- fill the gaps between the sheets with polyurethane foam. The distance between the sheets and the supporting structures also needs to be foamed.
Here's a simple way to insulate your home from the attic with polystyrene foam. Now we move on to another, no less popular and effective insulation - mineral wool.
Peculiarities
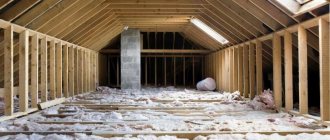
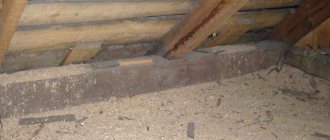
Most of the warm air masses escape through the roof. Therefore, when building a house with an uninsulated attic, you need to carefully approach the topic of insulating the attic floor with wooden beams. After all, it creates a certain barrier between warm rooms and a cold attic.
Let's consider the special criteria for attic insulation that affect the maintenance of temperature in the house:
- Purpose of the room.
The attic is a kind of buffer between the environment and the living rooms. Its task is to regulate the temperature difference between the external environment and the house. - Temperature regime.
In any season and on any day, the temperature of the air masses in the attic will always be higher than outside the window. This is why the attic is very cold in winter, and unbearably hot and stuffy in summer. - Heat loss in winter.
The more a substance heats up, the less dense it becomes. This is a physical phenomenon. This is why in residential premises with a heating system, warm air from household appliances is concentrated in the ceiling area. That is, if you do not insulate the ceiling, then in winter all the warm air will warm the attic.
- Excessive heat in summer.
In summer, the reverse process can be observed. The roof, heated by the rays of the sun, will warm up the attic air, which, in turn, will penetrate into the room through the attic floors. - Reverse circulation of air masses.
In contact with the ceiling without thermal insulation, warm air becomes cold, more dense and, as a result, sinks to the floor. This is reflected in the living space in the form of circulating drafts that cause harm to human health.
- The appearance of excess moisture.
When it comes into contact with an uninsulated attic, hot, humid air turns into condensation. The overall level of humidity in the house increases, which leads to mold growth in the corners. - Saving
. The heat lost through the roof without insulation is about 30%. This means that with proper insulation of the attic floor, you can save 30% of the fuel used. Using air conditioning in the summer will also cost less.
The entry of warm air masses into a technical attic (non-residential) leads to negative consequences:
- Due to the mixing of warm and cold masses, condensation may appear in the attic. Water falling on the surface can lead to rotting of wood on load-bearing beams.
- If the attic is warm, the snow collected on the roof will begin to melt. The water dripping at the same time will begin to turn into icicles. Ice forms on the drainage system.
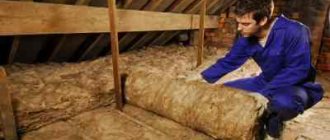
Insulation with mineral wool
Insulation with mineral wool is another, no less popular method. Mineral wool is widely used for insulation of apartments, houses, balconies, loggias. Moreover, both ceilings and facades. The range of its applications is no less wide than that of polystyrene foam.
Just like polystyrene foam, mineral wool has its own advantages:
- relatively low cost,
- it is unsuitable for consumption by rodents and insects,
- it's quite easy to work with,
- the material is considered to be highly flammable.
But, among other things, mineral wool also has its own characteristic disadvantages, associated, for the most part, with its structure, with the nature of the material itself:
- when wet, it loses its valuable qualities. Of course, if a few drops of water get on it, nothing bad will happen, but if your roof leaks with enviable regularity, dampness will accumulate in the wool - then it will not only cease to perform its functions, the main of which is heat preservation, but also with Over time it will become a place of residence for fungal formations. But growing such “mushrooms” in the attic is unlikely to be part of your plans,
- cotton wool cannot be pressed for the same reasons. No, this won’t cause mold to grow in it, but its effectiveness will decrease by about 30–40%, depending on how hard you try.
- People with diseases of the respiratory system (for example, asthma) should not look at mineral wool at all. But if you happen to work with it, then you need to use personal protective equipment - of course, not a gas mask, but at least a gauze bandage.
I would not say that the disadvantages of mineral wool are significant so as not to consider it as a possible option. I repeat, mineral wool is an affordable, reliable and widespread insulation material. The main thing is to take precautions and not violate the operating rules.
In general, when purchasing, check with the sales consultant to see if special conditions need to be created when using a particular type. You can purchase mineral wool in the form of rolls or slabs. If you need to insulate from the inside, buy slabs; if from the outside, it doesn’t matter, but still, it’s more convenient to roll out rolls between the beams than to lay sheets. By the way, read more about insulation from the inside in a separate article “Ceiling insulation in an apartment and a private house.”
As for the thickness, then, again, the thicker the layer, the warmer the room will be. Taking into account natural conditions, a layer of mineral wool from 15 cm to 30 cm or more is usually laid in attics.
Another important point: if you use several types of insulation (yes, this is also possible), then the bottom layer should be the least vapor-permeable. In other words, it is possible to lay mineral wool on polystyrene foam, but it is impossible to lay polystyrene foam on mineral wool. If there is a need for sound insulation, it is recommended to use mineral wool with a density of 40 kg/m³.
Here we come to the essence of this section. Let's get started:
- Be sure (!) to check the boards for rot. Outwardly, they may look intact, but if you hear a dull sound when you hit it with a hammer, it is most likely rotten inside. It should be replaced with a new fragment treated with an antiseptic. In general, the preparation is the same as when using polystyrene foam,
- checking the roof. If it leaks even a little, the mineral wool will not forgive you for it. Therefore, be sure to fix the leak,
- checking communications. Although mineral wool is a highly flammable material, it’s still worth being safe,
- clear the surface of debris,
- we build a wooden frame,
- We lay vapor barrier material. Just in case, I will say that vapor barrier cannot be laid on both sides. If you suddenly want to spread it on top, resist this destructive desire. The condensate will have nowhere to evaporate, and then the mineral wool will begin to slowly but surely flow,
- roll out the rolls between the beams (or lay the tiles),
- we install a wooden base,
- We enjoy the work done.
You can do without installing a hard floor. This is not necessary, but, again, you will not be able to walk on the surface or place anything on it (remember that the cotton wool cannot be pressed).
We have already looked at two popular methods of insulating a house with a cold attic. Now let's look at other options. I’ll say right away that they are more labor-intensive, but at the same time, more economical from a financial point of view. One of these methods is the use of expanded clay.
Methods of thermal insulation of floors
When thinking about how to properly insulate the ceiling of a house under a cold roof, first of all, you need to decide on the method of thermal insulation.
There are two radically different approaches:
- insulation from the attic side;
- installation of thermal insulation material from inside the room.
The first method is more preferable for a number of reasons. Thus, the installation technology itself is significantly simplified - there is no need to build a suspended frame or fix the insulation with glue to the ceiling.
External insulation eliminates expensive repairs inside the room, and also does not reduce the height of the ceilings. The latter is especially true if the distance to the ceiling in the premises does not exceed 2.5 m
Also, with this approach, the risks of condensation are minimized. The same cannot be said about thermal insulation from inside the room.
If you choose the wrong insulation and do not exclude contact of warm air with a cold slab, then water vapor from the room will accumulate - this is fraught with the appearance of dampness, fungus and gradual destruction of the ceiling.
However, in some situations, internal ceiling insulation is a necessary measure, for example:
- lack of access to the attic;
- carrying out reconstruction of an old building with a ready-made attic floor;
- thermal insulation of a garage located in the basement.
If internal insulation is necessary, installation technology should be followed to prevent condensation from occurring inside the building. It is important to comply with two requirements: block the flow of water vapor and use insulation of sufficient thickness.
Insulation using expanded clay
Expanded clay is a material that is obtained by firing low-melting clays. The resulting gravel has the shape of oval pellets, and the color is somewhere between brown and orange. The bulk density of expanded clay also varies - from 350 to 600 kg/m³ or more. Now this is not so important for us.
Let's consider the characteristic advantages and disadvantages of expanded clay. So, the advantages:
- low price (as a rule, it costs several times cheaper than mineral wool or polystyrene foam),
- fire resistance - expanded clay does not burn at all,
- high sound insulation ability - if this is, of course, relevant,
- Expanded clay is an environmentally friendly material: it does not emit any fumes into the air.
It would seem ideal. Yes, indeed, this is an excellent option for insulating a private home. There is only one specific detail: it is a porous material - and by absorbing moisture, its weight increases, and its thermal insulation qualities decrease. If the roof of your house is leaking (even just a little), the first thing you should do before starting work is to repair the roof. Moisture, as we have already found out, is harmful not only for expanded clay, but also for mineral wool and other alternatives.
Keep in mind that expanded clay is quite heavy - it is not foam or cotton wool. Therefore, before pouring it out, make sure that the attic floor/ceiling of the room below is secure. If the boards are hemmed from below to the beams, there is a possibility that the former will not withstand the pressure and will come off the beams. Then the expanded clay will be right in the room.
In order for the insulation with expanded clay to produce results, it must be spread in a layer of at least 20 cm, but this depends primarily on natural conditions. In some cases it is necessary to pour the entire 40 cm.
To adjust the height of the backfill, you can use a simple tool - a piece of reinforcement approximately 1 m long. At the required height - 20-40 cm, glue electrical tape or make a mark in another way. I think you've already guessed how to use it. It is necessary to vertically immerse the reinforcement in a layer of poured expanded clay. The mark will give a clear idea of the layer thickness.
Now let's move on to action:
- We spread hydro-/porous insulation, in other words, polyethylene film. By the way, if the base is a concrete floor, then there is no need to install a hydro/vapor barrier. In a wooden house, you need to cover not only the space between the beams with polyethylene, but also the beams themselves with an overlap of 5–7 cm. In order to fasten the spread pieces of film together, ordinary wide tape will do.
- pour expanded clay,
- evenly distribute and level the layer. Its level should be several centimeters lower than the level of the future flooring. If the floorboards and gravel come into contact, an unpleasant sound will occur under the floor due to the friction of the pellets against each other,
- We cover the top layer of hydro-/vapor barrier. For this you can use the same film, roofing felt, and glassine - there are quite a lot of options,
- glue the joints of the laid steam/waterproofing,
- we install boards/OSB/fibreboard or other material as a rigid base.
As we can see, there is nothing complicated in working with gravel. Again, the main thing is that the floor boards are not wet, and that the roof does not leak. In short, check the structure as if you were using mineral wool.
It is possible (even necessary) to build a strong, hard floor over a layer of expanded clay, on which you can walk freely and move/place various heavy objects. There is another popular method of insulation. It is even cheaper and simpler than expanded clay. This is thermal insulation using sawdust.
The better the roll materials
Rolled materials: mineral wool, glass wool and others retain heat in the house. It is difficult to work with such materials because the fibers fall off. Protective clothing and goggles should be worn during operation.
- When insulating the inside of a room, the ceiling is cleaned of old whitewash, the joints are sealed, unevenness is removed, and markings are made using a laser level.
- Drive the nails in so that the heads stick out.
- The threads are pulled between them in a zigzag manner.
- Then insulation is placed under the threads. Two people work: one pulls the threads, the other inserts rolled materials.
- Attach the film.
- The nails are driven in.
- Plasterboard is laid on top or a false ceiling is made.
“Lathing” of nylon threads on the ceiling
Insulation with sawdust
Sawdust is a waste product from the wood processing industry. They are ideal for ceiling insulation in a private home. But when working with the material there are also some nuances that you need to know.
Like the alternatives, sawdust has its own advantages, disadvantages and varieties. For example, there are both standard sawdust, which in their structure is more reminiscent of wood dust, and shavings.
Chips are formed when wood is planed or drilled, sawdust is formed during the sawing process. The shavings are several times larger - the average length is ±4 cm. But sawdust also varies in size: their size ranges from a few millimeters to several centimeters in length.
The type of wood also matters. It is best to use waste from hard wood: pine, ash, oak. In the large woodworking industry and in carpentry, these types of trees are widely used, so getting the necessary sawdust is not difficult.
When comparing small and large wood waste, it is best to choose the small ones. But there is one caveat: in this case, the density of the insulation in its mass will be higher than when using larger chips. Therefore, the total mass will be higher.
It is preferable to use carpentry waste, since in this case the wood is subjected to forced drying at high temperatures. This reduces the likelihood of mold; in addition, such sawdust will not be palatable to rodents and insects. The main thing is not to manage to wet the insulation before installation.
If you cannot get waste from the carpentry industry, sawdust from cutting logs will also work. The logs are not dried before cutting, therefore the sawdust will be more moist. They must be thoroughly dried before use. If they lie in the sun during the summer, it will be great (if, of course, climatic conditions allow). But, again, they need to be protected from rain.
The advantages of wood waste are obvious:
- they can be purchased for a nominal fee. And if you’re lucky, then even “thank you”
- environmental friendliness. Sawdust and shavings are an environmentally friendly material that does not emit any harmful substances into the environment,
- ease of use. To use this material as insulation, no special knowledge/skills/abilities are required.
But wood waste also has its own characteristic disadvantages:
- intolerance to moisture. As in the case of mineral wool and expanded clay, sawdust must be protected from exposure to moisture, since due to dampness mold will form and the insulation will begin to rot and deteriorate. In addition, mold is harmful to health,
- dry sawdust is susceptible to burning. Of course, the likelihood of an open fire in the attic is minimized, but, in any case, communications are usually laid there, so the likelihood of a short circuit still exists. Where the wires pass, it is better to pour some non-flammable material, for example, expanded clay.
Yes, there are disadvantages, but if used correctly, troubles can be avoided. These disadvantages are not so significant that because of them we should completely abandon the use of sawdust and wood shavings.
To work we need the following:
- sawdust/shavings,
- sand/slag/clay,
- lime,
- boric acid/copper sulfate,
- sealant,
- antiseptic,
- corrugated cardboard or other substrate. Suitable boxes for appliances: refrigerators, TVs, washing machines. The main thing is that the cardboard is completely dry, without a hint of dampness,
- polyurethane foam, gun,
- an awl with a long point - for checking wooden structures,
- fire retardant,
- scotch,
- construction stapler with staples,
- water repellent.
If we have everything we need, we can safely get to work. You should start, naturally, by checking the wooden structure for rot. In a word, everything is the same as when working with other materials. But there are some specific points here. It will be more convenient to present the preparatory stages in the form of a list:
- antiseptic treatment,
- treatment with means of protection against open fire and exposure to high temperatures,
- treatment with a water repellent. This is necessary to protect the wood from the harmful effects of moisture.
The wooden structure should be checked using a long-pointed awl. If a rotten area is identified, it must be replaced with another piece treated with an antiseptic. You may even need to replace the beam. Of course, if the roof leaks, it must be fixed.
Now we move on to laying the substrate. You should first clear the surface of debris and then lay down sheets of cardboard. If it is thin, installation should be done in several layers. If you are laying thin cardboard in one layer, then the flooring should be overlapped by about 15–30 cm. If you are using thick cardboard in one layer, the joints must be taped with wide tape or masking tape. These measures are necessary to ensure that sawdust does not spill through the ceiling.
Now you need to fix the sheets of cardboard backing with a construction stapler. Make sure that the staple penetrates all layers of the substrate - this is important. Along the edges where the substrate meets the supporting structures must also be secured with staples. Now you need to go around the perimeter with foam.
Now we have the right to start filling up the sawdust. But even here there are two ways, namely, with and without cement. To make the article as universal as possible, we will consider both methods.
Method #1. Dry filling.
If you have both large (shavings) and small (sawdust) wood waste, that’s great. You can add larger shavings first, and then smaller sawdust on top.
The filling process does not require any special skills: you need to fill the shavings with a layer of about 15 cm, then compact them and pour the same layer of sawdust on top. Then you need to compact it too.
For a living space, approximately 20–30 cm of insulation is sufficient. If you do not have large and small wood waste, you can use one type. Ash/slag must be poured on top. Of course, the ash must be completely burnt and, accordingly, cooled down.
You can also use sand/clay. This top layer will not only help retain heat, but will also provide additional protection against rodents, insects and fungal growths. In addition, this will reduce the likelihood of a fire.
Method #2. Insulation using cement.
The “recipe for preparing” the mixture is quite simple. Here are the ingredients: sawdust/cement/lime/water, which must be mixed in the appropriate proportions: 10/1/1/0.5. To prepare the solution, simply mix sawdust, cement with lime/copper sulfate, then gradually add water. Mix to the desired, uniform consistency, feed the solution into the attic and dump it between the beams onto the substrate, then level and compact it as much as possible.
When using this method, the insulation layer may be smaller than with dry backfilling - not 20–30 cm, but about 5–10 cm. But it all depends on climatic conditions.
After the solution has completely hardened, you can move on it without the risk of compromising the integrity of the insulation. Now you can install a rigid attic floor to be able to fully use the attic of your home.
Vapor barrier membranes
Diffuse (breathable) membranes are classified as the most effective and expensive vapor barriers. This group of products contains both single-sided and double-sided materials
The former allow steam to pass through only in one direction, so during installation it is extremely important not to confuse which side to lay the fabric towards the insulation and which to the load-bearing surface. Double-sided ones work in both directions, so there are no problems with them
Vapor barrier membranes can be single-layer or multi-layer. The first ones have an affordable price. Multilayer ones have the function of accumulating moisture inside the canvas and gradually releasing it.
A special group of products in this category are “smart” membranes. They are able not only to absorb vapors, but also to regulate the level of humidity of surrounding materials, while simultaneously acting as a water barrier. These membranes are the best choice. But their cost is beyond the means of most private home owners.
Vapor barrier membranes "TechnoNIKOL"
The undoubted leader in this category of materials is TechnoNikol membranes. For vapor barrier of wooden ceilings, the “Optima” brand is recommended for use. This hydrophobic polypropylene membrane consists of three layers:
- upper and lower polypropylene;
- medium – high-tech functional vapor-permeable film.
- weight 80 g/m2;
- thickness 0.3 mm;
- vapor permeability 5 g/m2x24 hours.
The TechnoNIKOL Optima membrane is produced in rolls. The width of the canvas (roll height) is 1.5 m. The length is 50 m. This material is optimal for vapor barrier of any type of ceiling, intended for installation indoors and on external surfaces of buildings.
Superdiffuse reinforced membrane
Diffusion membrane films "TechnoNikol"
Rules for installing a vapor barrier for a wooden ceiling
Step 1. The membrane is laid directly on the insulation so that the smooth side is directed inside the room.
Step 2. It is possible to lay the strips in different directions: parallel or perpendicular to each other.
Step 3. During installation, an overlap of at least 10 cm must be observed.
Step 4. To attach the membrane to a wooden floor without insulation, use galvanized screws with wide heads or staples with an anti-corrosion coating.
Step 5. The joints of the canvases are sealed using self-adhesive mounting tape.
Use foil tape, width 50 mm, length 30 lm.
Step 6. When laying on a floor with insulation, it is necessary to bring the edges of the panels onto the wall by 15-20 cm and secure them with suitable materials (slats or metal profiles).
Step 7. Mounting tape is glued along the perimeter of the vapor barrier layer.
Step 8. Between the membrane and the material with which the wooden floor will be lined, leave a ventilation gap 3-4 cm wide.
Step 9. Particular attention is required to the places where the vapor barrier comes into contact with the structural elements of the floor and the building: beams, chimneys, ventilation ducts.
Ceiling vapor barrier in wooden floors
During installation of the vapor barrier, it is necessary to ensure that the film is laid evenly, without folds or sagging. A guideline for correct installation can be a colored stripe, which is the center line along the entire length of the canvas.
Video - Ceiling vapor barrier
An equally good choice are multilayer vapor barrier membranes of other brands: Dorken Delta REFLEX/REFLEX PLUS and Dorken Delta LUXX. The first is a four-layer material, is particularly durable and can provide 100% waterproofing of a wooden floor. The second has limited vapor permeability, ensuring gradual and uniform removal of moisture from the living space.
Why can't you insulate your apartment from the outside?
All the methods described above are suitable for owners of private houses, but in multi-apartment buildings they are usually not applicable. Why, after all, it would seem possible to carry out work on the technical floor above the apartment? It's simple.
Communications are laid on the technical floor of the house, to which repair teams from housing maintenance offices must have unhindered access. There are also fire safety rules that must be followed to avoid putting yourself and your neighbors at risk.
That's all, dear reader. I hope the information was useful to you. And don't forget to tell your friends about us on social networks. Good luck with the renovation work and see you next time!
Required Tools
To carry out thermal insulation work, you will need tools such as: fasteners (screws, screws, dowels, anchors, liquid nails), construction staples, tape measure, hammer drill for working with concrete, screwdriver, hammer, construction knife for cutting sheet products.
The material used is insulation, vapor barrier film or membrane, metal profiles to create a frame, wooden blocks 3x3 cm or 5x5 cm.
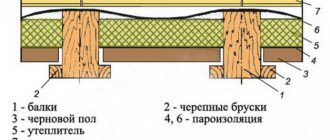
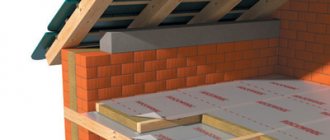
Roofing pie
In order to correctly understand how to insulate a cold attic, you should understand what the roof itself, the so-called roofing pie, consists of.
Scheme for laying the “pie”:
- solid board, 30x100 or 25x100mm;
- double-layer membrane that protects from wind;
- timber 5x5 cm mounted perpendicular to the overlapping beams (59 cm distance between blocks);
- beams based on double timber 5x20 cm;
- vapor barrier (preferably with aluminum foil);
- boards over the overlaps of the vapor barrier.
Density must be taken into account when the total load on the ceiling is important. And the thickness is important, depending on the flooring material, for example concrete, which has high thermal conductivity (wadding thickness from 10 cm). The wooden floor is warmer and allows for a smaller layer of insulation; 8 cm will be enough.
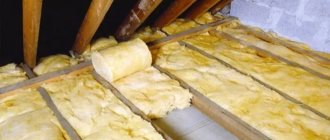
Bath insulation
When choosing which insulation is best for the ceiling of a bathhouse, you should consider such points as:
- flammability;
- environmental friendliness. When heated, the insulation for the bathhouse ceiling should not release toxic substances;
- resistance to moisture and temperature changes.
Materials that meet the listed characteristics include sawdust with clay, mineral wool, and fiberglass wool. It is better to choose insulation for the bathhouse ceiling from foil materials. This is a basalt fiber that allows steam to pass through and does not allow moisture to pass through.
Basalt wool will not rot during use, is resistant to microorganisms, and does not deform. Which insulation for the bathhouse ceiling to choose depends on what effect is expected from the heat-insulating layer. Thus, foil materials can create the effect of a thermos in a bathhouse. And if you combine foil insulation with polyethylene foam, you can get maximum heat savings.
Communications Contact
What to do if a ventilation pipeline or chimney passes through a ceiling made of wooden beams? If a beam is located on the path of a vertically oriented highway, it is cut, and the load is transferred by transverse elements to adjacent beams. In this case, the distance from the outer surface to the strapping of jumpers must be at least 100 mm.
Connection of pipes with insulated ceiling
The chimney is lined with expanded polystyrene slabs 40 - 50 mm thick, not only in the intersection area, but also along the entire length of the structure exiting the roof. The membranes are folded up (the vapor barrier is down, the water barrier is up) and covered with bitumen tape for a tight fit to the polystyrene foam sleeve of the pipe. The gate areas are then crimped with a frame made of wooden blocks using dowels passing into the walls of the chimney.
The same should be done with ventilation ducts, with one exception: in most cases they are not sleeved. Electric cables are attracted by clamps to the beams, and in places where they pass through the membranes, the places where the films are folded are sealed with foil tape and fixed with plastic clamps.