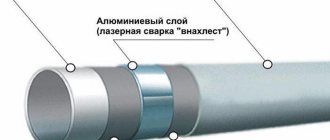
In order to calmly walk barefoot even in winter, sit by the fireplace or play with a child on a laminate floor, it is worth installing an additional heating system. But many owners of wooden houses are concerned about the compatibility of such a device with the fire and environmental safety of their home.
We propose to find out whether it is possible to make a heated floor under a laminate on a wooden floor, what are the pros and cons of such a solution. We will tell you how to choose the optimal installation method, and also describe in detail the technology for arranging a floor-type heating system.
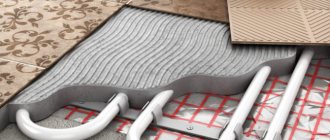
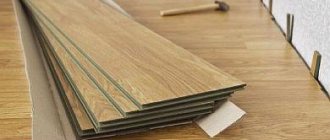
Laying on a thin screed
Some wooden floors allow the possibility of screeding. At the same time, their design load limits the thickness of its layer to 5 cm, and more often to 3 cm. Heated water floors are laid on a wooden floor if there is a high-quality heat removal from the pipe. Following the standard principle of installing a water floor, the missing thickness is compensated with foil. The foil is laid in a dense layer directly under the screed. An additional material that helps to evenly distribute heat in the structure is reinforcing mesh, which simultaneously increases the strength of the screed. Filling the screed can only be done after laying the pipes and filling them with water. All further work can be done only a month after this.
Thermocable 8 m.
| Manufacturer: | Thermo |
| View: | heating cable |
| Power: | 165 W |
| Length of cable: | 8 m |
| Installation type: | in a screed 3-5 cm |
for comparison
old price 5,002 rub.
RUB 4,502
Product added to cart
| Photo | Name | Price per piece | Quantity | Price |
| Thermocable 8 m. | 4,502 rub. | < 1 > | 4,502 4,502 rub. |
There are 0 items in the cart worth 0 rub.
Go to cart
Buy
Availability
Connection to collector
Regardless of the chosen method of laying pipes for heated floors, they must be connected to the manifold. The first pipe is connected to the manifold that supplies hot water. The opposite end goes to the cooled water return collector. The pipes are secured using special nuts. Connecting the pipes to the collector is the final stage of installation; after this, the structure should not be subject to shifts, impacts, or other mechanical influences from the outside. At this stage, the entire system is checked. The boiler turns on at full power, the water entering the pipes will move under pressure. The pressure during testing exceeds the working pressure by 1.5 times. Under such conditions, the system must operate for at least 2 hours to ensure that there are no installation defects (pinched pipes, unreliable connections).
Caleo Platinum 230 1 sq.m., 0.5
| Manufacturer: | Caleo |
| Model: | PLATINUM 230 |
| View: | heating film |
| Type of heating: | infrared |
| Self-regulation effect: | Yes |
| Power: | 230 W |
| Heating area: | 1 m2 |
| Installation type: | dry installation |
for comparison
To order
Installation of a heated structure on a lightweight slatted base
If you are laying the system on an old wooden floor, you need to carefully inspect the floor before starting work. It is better to lift the floorboards, check the condition of the joists, and, if necessary, restore or replace worn and damaged structural elements. Sometimes it is necessary to nail wooden beams to the beams on the floor and additionally lay insulation.
The next stage is laying insulation.
The process of laying thermal insulation
Polyethylene, which is laid out overlapping, is suitable for this. A damper tape with a width of 5 centimeters is attached to the wall along the perimeter of the floor covering. To install a heated floor with a water circuit, it is convenient to use the “snake” method of laying pipes.
On a pre-drawn floor plan of the room, we mark the area where pipes are supplied and where equipment is attached to adjust the system; we also need to draw the position of the guides with the necessary clearances. Usually it is 150 - 300 millimeters. It is better to use corrugated pipes with a diameter of 16 millimeters. The slats are made according to the dimensions.
Next, the heated floor is laid along the joists. Lay out the guides. Between them you need to leave channels for the pipeline.
Snake pipe laying method
Then we fix the guides to the subfloor using self-tapping screws. The corners of the strips in pipe bending areas should be rounded. Foil with a thickness of at least 50 microns is placed in the prepared grooves. Lightly pressing and smoothly bending around the recess, we fix it. At several points you can attach the material to the slats with a stapler.
If the pipes in the system are also wrapped with foil, then the heat transfer of the structure can be slightly increased.
We lay the pipes in the formed channels. Metal plates are also used for fastening to the subfloor. Afterwards, a connection is made to the heating circuit and the heating system is pressurized. After checking the normal functioning of the water floor, you can immediately proceed to finishing with tiles or laying a backing, if necessary. As for the substrate materials, it is recommended to use DSP boards that do not contain formaldehyde.
A wooden heated floor on a water circuit can be easily installed with your own hands. At the same time, it is not necessary to spend a lot of money. Today you can successfully cope with this task using a special step-by-step technology of slatted or modular installation.
Scheme of slatted installation The installation of a heated floor in the diagram The process of laying thermal insulation Laying a water heated floor on a wooden base Method of laying pipes “snake” Pipeline system for a wooden heated floor Modular installation of a water heated floor Heated floor system without screed Installation of a water heated floor system Floor covering of a water heated floor Laminate coating for a water heated floor system. Appearance of a water heated floor.
Infrared floor under linoleum - the optimal solution
The operation of infrared floors is based on the principle of secondary convection - initially physical bodies (interior and household items, humans, animals) are heated, and then the surrounding air.
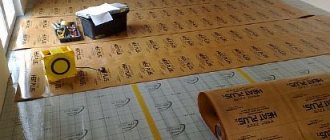
IR film flooring consists of two layers of film, between which heating elements are located. Power source is electricity supplied through electrical conductors. Thermal energy is emitted by carbon paste applied to the film. Heating is carried out due to the IR rays of carbon semiconductors.
Rod IR floor is a thin mat made of carbon rods. This system is based on a composite material. Thermocouples with electrically conductive bars have built-in bendable rods. When heated, IR radiation is produced by a thermal film made of polymer into which the heating element is sealed. The advantage of this system is self-regulation of temperature. The heating plates themselves serve as a thermostat.
This heating system has a number of both positive and negative qualities.
Pros of IR heating system
The advantages of this heating include:
- The warmth of infrared rays is similar to the warmth of the sun and creates the greatest comfort for humans. Their healing effect has been proven by scientists;
- Unlike alternative heating systems, this one does not dry out the air. This feature allows you to achieve the most favorable indoor climate conditions;
- IR flooring technology is compatible with the largest possible number of modern floor coverings: ceramic tiles, laminate, carpet, parquet and linoleum;
- Possibility of installation in buildings of any geometry. The film can be laid in rooms with a non-standard layout, on balconies, loggias;
- small film thickness. Makes it possible to use in buildings with low ceilings, as it will not significantly raise the floor level;
- ease of installation. Provided that the floor on which the film is planned to be laid is smooth and free of defects, there is no need to fill the screed. Laying is carried out using the “dry installation” method;
- long service life. Most manufacturers provide a warranty for uninterrupted operation for 15-20 years;
- possibility of self-assembly, without the involvement of specialists;
- minimum screed height when installing a rod system. The height of tile adhesive or concrete does not exceed 2-3 cm;
- energy saving. Provided that thermostats are installed, it is possible to program temperature conditions or their automatic or manual correction.
Cons of IR floors
There are relatively few of them:
- After installing infrared film heating, you cannot rearrange the room. Bulky furniture and household appliances should not be installed at the film locations - this can lead to overheating of the floors;
- the need to install thermostats in each room;
- If you don’t have basic skills, it will be difficult to install and connect the system yourself. It is not always possible for a non-professional to connect the contact to the film. It has to be cut off and connected to another contact;
- laying a heated floor under linoleum on a concrete floor with defects leads to its deformation. Therefore, sometimes a new screed is still necessary;
- if infrared heating is used as an auxiliary to stationary heating, then the air may be overdried;
- high price of rod systems.
Variations on a theme
In our country, based on Finnish technology, which facilitates the design and allows one to abandon monolithic casting, its variations have appeared - the principle remains, but the materials have been increased:
Gypsum fiber sheets (GVL) - compared to plasterboard, they are denser, more resistant to bending and deformation, and contain cellulose fibers and other additives that increase their technical characteristics. For wet rooms, a moisture-resistant variety (GVLV) is used;
ТishinFORUMHOUSE user
In such a floor, instead of plasterboard, it is better to use gypsum fiber sheets (GVL). I myself am now considering a dry screed for implementation in my home, I will only replace the bottom layer with OSB. I will assemble the middle part from two layers of gypsum fiber board.
Chipboard, OSB, plywood - in terms of heat transfer, this design is worse, since wood and its derivatives act as an insulator. Ready-made sets of heated floors on a dry screed made of chipboard sheets, with grooves selected for hinges, are sold, but not everyone can handle their cost.
boatmasterFORUMHOUSE user
Logs, with a pitch of 60 cm, plus insulation - 35 cm, OSB base, then a 20 mm pipe, plus a 5 mm clip, it turns out 25 mm, three layers of GVLV between the pipes 12 x 3 = 26 mm.
- Cement particle board (CSP);
- EPPS - pipes are laid directly into the insulation, and the voids are covered with glue. To increase the heat transfer of the elements, foil or similar material is used;
The thickness of the sheets for the middle layer with the main is selected based on the diameter of the pipe, so that after filling with glue, a flat surface is obtained, and the final layer does not put pressure on the pipe. As an option, two sheets are glued together if the thickness of one is not enough.
Forum users are actively organizing their underfloor heating systems on wooden floors.
Serg177 FORUMHOUSE user, Moscow.
If something happens to the pipe (today, tomorrow or in 25 years), you won’t have to break the screed. I will buy 50 sheets of plywood, 18 mm thick, for 200 m², cut it into strips, 16 mm pipe in between, and cover 200 sheets of ten sheets with laminate on top.
One of the options for making a dry screed with your own hands is laying pipes in special aluminum plates with grooves. They fit the pipes tightly and increase heat transfer. The disadvantage of this configuration is the high cost of these metal gaskets; their use increases the cost of the entire system.
Vladimir TallinFORUMHOUSE user
There are not enough special aluminum sheets that are placed under the pipe and remove heat to the top. I have them, they “hug” the pipe, the size is about 30 cm per meter, there is a groove for the pipe with rare spikes to hold the pipe.
Sheets on a gypsum base are one of the most popular, as an optimal material in all respects.
- Reasonably priced;
- Easily cut into segments;
- Eco-friendly (does not contain synthetic binders like wood-filled boards) and suitable for home use;
- Non-flammable;
Types of materials for floor waterproofing
Paint insulation
Such compositions can be used for waterproofing when insulating wooden and concrete floors. Silicone, acrylic, rubber, polymer based mastics are applied to the surface using a brush or roller. The layer of such insulation is 3-6 millimeters.
Coating insulation
It is very common and is used to protect internal and external surfaces from moisture. When applied, it forms a monolithic layer of high density. It is a bitumen-polymer base with the addition of solvents and additives that increase plasticity. Very reliably protects the treated subfloor. Coating insulation used for floor insulation will significantly increase the efficiency of insulation.
Pasted waterproofing
It is produced in the form of rolls and is a durable fiberglass base coated with a bitumen-binding composition with the addition of polymers. Very easy to install. On one side there is a self-adhesive base. The installation of such waterproofing for insulation can be done with your own hands without the use of professional equipment and tools. Affordability complements the advantages of adhesive insulation.
Wooden floor with electric heating
Warm floors in the house can be made using an electric heating system. There are several models of such products:
- electrical cables in coils, differing in the degree of heating and the amount of heat produced;
- heating mats are a system of cables attached to a special mesh. A convenient modification in which the heat-producing elements are located at the same distance from each other and fixed on a factory base. This allows you to quickly and without much physical effort create warm wooden floors;
- infrared film floor, which is a tape with metallized contacts built into it. In the middle of the strip there is a black mesh that generates the required heat;
- carbon rods that operate on the same principle as an infrared floor.
In a wooden house, it is preferable to use infrared film heaters. This is an ideal option for installing heated floors on boards. It can be placed in small rooms, up to 30 sq.m. This warm floor has temperature limits of up to 27 degrees.
An electric heated floor is a conductive system consisting of a group of heating elements. They are powered by a cable connected to an electrical source. During installation, it should be taken into account that the wire must lie freely, not be pinched by anything, and not come into contact with the heat-insulating material and wooden floor parts.
If you want to create comfortable and reliable heating using an electric floor, you should take into account that it should occupy at least 70% of the total area of this surface.
Does it make sense to heat laminate flooring?
When you watch advertisements from manufacturers of laminate flooring, you hear that these products are made from natural wood, are environmentally friendly and safe. Yes, the materials contain wood flour, but their properties differ due to the presence of chemical additives and the structure of the lamellas themselves.
Layer-by-layer structure of laminated boards
The picture above shows the classic structure of a laminate, consisting of:
- paper impregnated with resins;
- pressed fiberboard;
- protective films.
The laminate is quite resistant to abrasion, various mechanical and thermal damage, and exposure to ultraviolet radiation.
Most models contain formaldehyde. They are harmful to human health. Most of these substances are found in inexpensive products from China. Additional heating increases the release of toluene, phthalate, phenol and other toxins into the surrounding space. For this reason, special models of laminated boards with appropriate markings are purchased for underfloor heating.
Types of chamfer
The following conditions are also met.
- The active release of the listed substances begins after overcoming the heating threshold of 40 degrees.
- Additional devices - a temperature sensor and a thermostat - will help you control this moment.
- When the surface of the laminate is intact, it is difficult for volatile substances to escape from the body of the board.
- It is also worth looking at the tightness of the fit of the seams - the fewer gaps, the better.
- Special laminate models for heated floors have an emission index of E0, and no more than E1. The concentration of harmful substances in such products is significantly lower than normal.
Calculation of the amount of laminate
What else you need to know about heated laminate flooring
The average thickness of the laminate is 8-10 mm
The main body of the laminate is a pressed board of wood fibers bound with adhesives. The density of the material is quite high, but it still does not conduct heat well enough. In addition, an insulating substrate is laid under the laminate, which will also actively prevent the passage of thermal energy.
Those coating models that are intended for installation on underfloor heating systems will be marked with this or a similar sign.
Product marking for heating systems
What distinguishes them from ordinary lamellas is the following:
- reduced thermal expansion during heating;
- smaller thickness;
- a denser structure that conducts heat well, compensating for the loss of strength due to reduced thickness.
Such a laminate will cost more due to the more complex production process and the marketing moves of manufacturers.
Recommendations for laying laminate flooring
Taking all these points into account will not be difficult - which means you can comfortably use the heated floor.
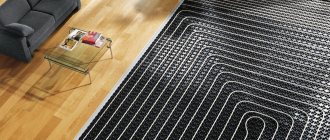
Warm water floor
In a wooden house you can make warm water floors. They require a good foundation. Floorboards may not withstand the load on them from heating elements and concrete screed, on which a water floor is usually installed.
To make the structure lighter, the heating cable (pipes) is placed in an “air cushion”. A warm water floor consists of hollow tubes through which hot water subsequently flows. It gives off heat to the floor and makes it pleasant to walk on.
In this case, seamless plastic, metal-plastic and metal pipes with a diameter of 16 mm are used. They are installed in increments that average 20-30 cm and are connected to a central heating system or an autonomously operating boiler with a pump.
The technology for installing a warm water floor consists of the following operations.
Thoroughly clean the boards of dust and debris, seal the cracks and cracks with wood mortar, knock together and strengthen the wooden floorboards. The floors are impregnated with an antiseptic, primed, and covered with a waterproofing compound. A heat-insulating fabric, for example, Penoferol, is laid on the subfloor, which is stapled onto wooden boards
It is important that the top layer is metallized. If this is not the case, then you should use foil. Then the pipes are laid and secured, connecting them together into a single system. Next, in the lower part of the room, a special damper tape is glued along the entire perimeter
During operation, the heated floor will heat up and expand. This may cause the concrete to crack. This tape will protect you from this. Next, pour the concrete screed, trying to hide the pipes, but not allow too much thickness (3-5 cm). This will make the wooden floor structure lighter.
In the house, such a floor can be made in any room. Concrete is an excellent conductor of heat. The water in the tubing system does not need to be heated to a high temperature. 40 degrees is enough. Even with such heating, it will be comfortable on a warm floor. Thanks to this device, the heat from the pipes will be reflected in the foil and transferred to the floor covering.
The length of one closed circuit recommended by experts should be no more than 80-100 meters. In rooms with an area of more than 30-40 m2, 2-3 circuits should be made. Otherwise, the liquid will cool quickly. For example, in a room measuring 6x6 m, pipes are laid in increments of 20 cm. The length of the circuit, taking into account the length to connect to the boiler, will be almost 100 m.
Laminate, linoleum, carpet and even tiles can be used as finishing material. If in the case of electric heating it is impossible to create a heavy load on the surface, then with an installed water system there is no need for this. Here you don’t have to specifically design the arrangement of furniture and furnishings.
A warm water floor can be made without a concrete screed, using a dry method. However, this method can lead to heat loss, since wood does not conduct it well. To avoid this, take the following steps:
- reduce the pitch between water pipes;
- create reflective surfaces (deflectors).
IQ Floor Cable 10 m.
| Manufacturer: | IQ WATT |
| View: | heating cable |
| Power: | 200 W |
| Length of cable: | 10 m |
| Installation type: | in a screed 3-5 cm |
for comparison
RUB 4,590
Product added to cart
| Photo | Name | Price per piece | Quantity | Price |
| IQ Floor Cable 10 m. | 4,590 rub. | < 1 > | 4,590 4,590 rub. |
There are 0 items in the cart worth 0 rub.
Go to cart
Buy
Availability
Preparing the base
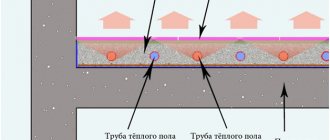
This diagram allows you to clearly understand the principle of arranging a wooden floor using joists for a warm floor using the example of a water heating system. A
heated floor using wooden joists has a great and main advantage - the absence of “wet” work, in particular, the installation of screeds. In this case, the base is boards. At the same time, certain requirements are imposed on them:
- The thickness of beech and oak flooring should not exceed 24 mm, pine or larch – 22 mm;
- If new flooring is being made, the boards should first be laid out on a heated floor for several days. This is necessary so that they do not subsequently become deformed.
Before you begin laying cables or pipes, you need to prepare the base. There are two options here:
- Over existing subfloors. In the old surface, cracks and gaps between the boards are sealed, thermal insulation (foam plastic, mineral wool) is laid;
- From scratch. The logs treated with antiseptics and fire bioprotection are located 60 cm from each other. Cracks, mold, and rot on boards are unacceptable.
As you can see, laying heated floors in any case requires a rough foundation. The next step is to do thermal insulation. Thermal insulating material is placed tightly between the joists, which eliminates the appearance of cold bridges.
Once the rough base is prepared, you can begin laying heated floors.
Some tips for safe operation
When planning the installation of heated floors, do not forget that neither electrical cables nor water pipes should be laid under heavy pieces of furniture. Also, you should not install heated floors in close proximity to a wood-burning, gas fireplace, stove or other heating devices.
For rooms for various purposes, you can program different temperature conditions, for example, in the bathroom and living rooms it will be comfortable at 22-24°C, and in the kitchen and corridor 20°C is enough
Practical nuances:
- After completing the repair, you should leave the heating system on and maintain the same temperature for 3-5 days. This precaution will allow the entire floor “pie” to be heated evenly and thoroughly and ensure reliable operation of the system.
- At the beginning of the heating season, you need to properly prepare the floor heating system for operation. To do this, you should increase the heating degree by 5-7 units every day until the temperature reaches the required value. This approach will avoid sudden temperature changes that can damage laminate and other materials. Similarly, the heating is turned off during the warm period.
- Do not forget that film infrared floors do not tolerate moisture well. Therefore, it is not recommended to install it in rooms with a humidity level above 70%, and after wet cleaning, wipe the laminate dry.
- The optimal temperature for heated floors is considered to be within 20-30 degrees.
And lastly, do not cover the heated laminate flooring with carpets or other furnishings that interfere with the effective distribution of heat.
Disadvantages and advantages of heated floors
Warm floors “work” throughout the entire area of the house, which allows not only to obtain a surface that is pleasant to the touch, but also to contribute to the overall heating of the home. When learning how to make a heated floor in a wooden house with your own hands, the owner will first assess the complexity of installation and compare the efficiency of water and electrical systems. The efficiency of full-fledged heating boilers significantly exceeds that of electric underfloor heating, which tips the scales not in favor of the latter.
Despite the huge number of positive reviews and recommendations, warm water floors also have disadvantages. They are related to the features of operation. Once you cover the floor with carpet or linoleum, the floor will immediately stop warming up properly. When laying tiles on a screed with pipes, it is worth considering that due to temperature changes, the glue may not withstand it and may crack. Another drawback is the high cost of flooring, amounting to about 1,500 rubles only for materials per 1 sq.m. The price, together with the work, can reach 3,000 rubles per 1 sq.m.
Choice of linoleum
This aspect must be treated with full attention precisely because linoleum, when heated, can release toxic substances into the environment. And then you can use the floors only at your own peril and risk to your health.
How to choose the right linoleum
Table. Types of linoleum.
| View | Description |
| Polyvinyl chloride | This is the cheapest, and therefore the most common option. It is based on ordinary PVC, which is heat sensitive. This material is distinguished by a wide variety of color variations, can have different thicknesses, and also have a base in the form of insulating material. Unfortunately, when laid on heated floors, this particular material not only begins to release toxic substances into the air, but also shrinks and begins to smell unpleasant. |
| Marmoleum | This is a natural type of coating that is of high quality and high price. It is not afraid of fire, does not become electrified, and when heated, almost does not release toxic substances into the air. It contains natural dyes, wood and cork flour, pine resin, and linseed oil. It is also usually based on jute fabric. This linoleum is easy to clean, does not fade in the sun and does not lose its appearance for many years. The only thing he doesn't like is washing with alkali-containing substances. Under the influence of alkali it will begin to collapse. |
| Relin | This linoleum contains bitumen, rubber, rubber. It does not tolerate heat and therefore, in general, is extremely rarely installed in houses and apartments; more often it can be seen in a number of industrial premises. When heated, it releases substances that are quite dangerous to humans. It is strictly prohibited to use it with a floor heating system. |
| Nitrocellulose | This material is also called colloxylin. It is not afraid of water, elastic, thin, but does not like heat. So it cannot be used with a heating system. |
| Alkyd | Also called glyphthalic. A synthetic material that is also fabric based. It’s worth saying right away that, like the previous options, it does not like heating. But it can be used in combination with heated floors, since it does not emit excessive amounts of hazardous substances. |
The process of laying linoleum
According to the information in the table, marmoleum or PVC material can be installed on wooden floors with heating systems. However, experts note that both options can be laid on water floors, but it’s better to put marmoleum on film floors.
Important! When choosing linoleum, you should take into account its thermal conductivity. If this indicator is very low, then there is no point in laying it on top of a warm floor - the material simply will not heat up and heating will be pointless. The thermal conductivity of a material depends on what it is made of.
Table with a list of linoleum characteristics
Warm floor on wooden logs, sixth option
Another option: you can lay the heated floor pipes directly on the insulation (only if the insulation is not cotton wool, but polystyrene) between the joists. So that the pipes are located below the top of the joists. And fill the space between the joists with gypsum mortar:
However, if you really want to do without wet processes, instead of the gypsum mixture, you can simply fill it with dry, clean sand. Gypsum or sand will smooth out one of the disadvantages of a wooden heated floor: the absence of a heat accumulator, which is the concrete screed in a concrete system.
(I have given six options for installing a heated wooden floor, but this does not mean that you are limited to them; perhaps you can come up with your own or make additions/improvements to those shown; the main thing is that the operating principles of a heated water floor are not violated)
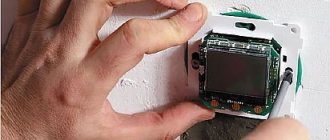
Heating system testing
To do this, set the heating indicator on the thermostat at 20 - 25 degrees and wait a few minutes. Check with your hand whether the mounted film heaters have warmed up. Then the power is turned off completely to see how the electrical connections heat up.
We recommend: How to insulate the front door?
Their temperature should be the same as that of the film. In the case when it is much higher, this means that the contacts are unreliable. They must be checked, and the cause of excessive heating must be identified and eliminated.
Installation
The construction of a water floor using logs based on Finnish technology requires a standard installation algorithm, regardless of the materials used in the work, be it gypsum plasterboard, gypsum fiber board (V) or other slabs.
evrazUser FORUMHOUZE
Similar technologies, where pipes or heating cables are sealed with a solution in the grooves of gypsum plasterboard and covered with a top layer of gypsum plasterboard, are painted by many manufacturers of underfloor heating systems.
Water-heated floor on joists in a wooden house.
On FORUMHOUSE you can read detailed instructions for installing a subfloor yourself.
Insulation
The system should transfer heat upward, and not pass it into the ceiling, which will lead to increased heating of the medium and a decrease in efficiency. A vapor barrier is laid between the joists, a layer of insulation (mineral wool, EPS) is placed on top, covered with a layer of vapor barrier. Insulation will protect both the wood and the insulation from condensation, provided that it is not just plastic film. Under a regular film, condensation will form in even larger quantities.
Base
When installing the system, the optimal distance between the logs should be observed - 60 cm; in this case, there is no need to create additional sheathing to distribute the load, and the sheets form a monolithic structure. The sheets are attached to the joists with self-tapping screws.
Highway
The size and diameter of the pipe depends on the area of the room, heat loss, and the power of the equipment used to heat the coolant. The most popular range is 16-20 mm in diameter. The pipe pitch is also individual in each specific case, but on average it is 100 mm, more often at the edges. The pipe is secured with special metal or plastic brackets or self-made clamps.
Warm water floors, wooden floors.
Laying
The space between the contours of the pipes is filled with segments cut from sheets; there should be grooves around the pipes for filling with glue. The optimal groove size is 3 pipe diameters, this is enough for maximum heat removal. The segments are screwed with self-tapping screws, in increments of 10–15 cm; the length of the fasteners should be sufficient for fixation in the joists.
Filling
To fill the grooves, tile adhesive is most often used; a cement-sand mixture can be used, but when mixing, it is necessary to use plasticizers. To increase adhesion and ensure that the finishing layer of the “pie” is more firmly connected to the intermediate layer, it is recommended that after filling the seams with pipes, go over the entire surface with the adhesive mixture “to tear off”. This is advice from a user under the nickname Vitaon, he professionally installs such systems and shared his trick with the forum members.
VitaonFORUMHOUSE user
Before the finishing layer, the surface consists of alternating strips of dry plasterboard and ditches filled with adhesive. Immediately before gluing, it is necessary to cover the entire surface with putty, a wide spatula and a thin layer of glue - you will get a homogeneous base. Apply glue on top under the final layer. With this method, adhesion increases many times over.
Finish floor
A water floor over wooden joists allows you to use almost any decorative covering in a private home; only cheap linoleum is a contraindication - it will have a noticeable “smell” when constantly heated. The best option is ceramic tiles or laminate flooring. In the case of laminate, there is no backing underneath it due to its thermal insulation properties.
Warm floors with dry screed using Finnish technology are a basic option that can be tailored to specific conditions and needs. All the subtleties and nuances are in the topic of heated plasterboard floors. In the article about heating a private home, the most economical heating method is selected. And in the video about engineered heating equipment - expert advice on choosing.
VIOLET FLOOR 130
| Manufacturer: | VIOLET FLOOR |
| View: | heating film |
| Type of heating: | infrared |
| Power per 1 m2: | 130 W |
| Equipment: | per cut |
| Length: | 1m |
| Width: | 0.5 m |
| Heating area: | 0.5 m2 |
| Installation type: | dry installation |
for comparison
430 rub. per linear meter
Product added to cart
| Photo | Name | Price per piece | Quantity | Price |
| VIOLET FLOOR 130 | 430 rub. per linear meter | < 1 > | RUB 430,430 |
There are 0 items in the cart worth 0 rub.
Go to cart
Buy
Availability
Go to the full catalog of infrared film for laminate CALEO
Mixed method of installing wooden heated floors
Some craftsmen prefer to use another installation method, which is something between a rack and modular option. In this way, you can install heated floors easily, quickly and without spending a significant amount of money.
They begin work by selecting a quarter with the dimensions of the channel in the edged board. Having measured at least seven centimeters from the wall, use a cutter to make a strip or recess so that the pipe is connected to the next row. The thickness of the board must exceed the sampling parameters, and the width must be equal to the pitch during installation. There is no need to lay a rough base, and the planks are attached to the joists using self-tapping screws.
Recommendations and possible errors
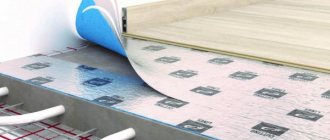
The cake made from infrared flooring and linoleum should have five layers from the rough base:
- Izolon (heat-reflecting substrate).
- Infrared thermal film.
- Polyethylene film (waterproofing).
- Flooring made of wood or gypsum fiber boards 3–5 mm thick.
- Finish linoleum covering.
Without a heat-reflecting substrate, the high energy efficiency of an infrared underfloor heating system will be seriously compromised. And without polyethylene and protective flooring, it will sooner or later fail. The plywood layer absorbs some of the thermal radiation, but it is impossible without it.
Connection diagrams
Linoleum on top of an infrared heated floor should be laid in the form of natural marmoleum or vinyl PVC. At the same time, its marking must have a special icon. And it should go without an insulating sublayer from below. Choosing an air conditioner will require a lot of thought. With the finish, everything is simpler here. The main thing is not to take the colloxylin or rubber version, which will begin to release harmful substances when heated.