The creation of residential building projects, from the general design to the calculation of the placement of heating radiators, is regulated by state building codes and regulations. It is SNiP that is the main document on the basis of the provisions of which the building design is developed. But this is for new buildings, but what about houses built back in the 40-50s of the last century? Or with the projects of multi-storey panel high-rises that were so popular in the 70-80s? Especially when apartment owners replace old wooden windows with plastic ones with new window sills. In this case, you need to carefully study the regulatory documents and, in accordance with them, plan work on how to install a heating radiator under the window.
What is needed for installation
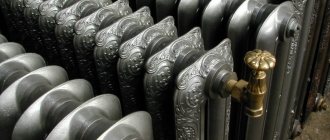
Installation of heating radiators of any type requires devices and consumables. The set of necessary materials is almost the same, but for cast iron batteries, for example, the plugs are large, and they do not install a Mayevsky valve, but instead, somewhere at the highest point of the system, they install an automatic air vent. But the installation of aluminum and bimetallic heating radiators is absolutely the same.
Steel panel ones also have some differences, but only in terms of hanging - they come with brackets, and on the back panel there are special arms cast from metal, with which the heater clings to the hooks of the brackets.
These are the arms that hook the hooks
Mayevsky crane or automatic air vent
This is a small device for releasing air that may accumulate in the radiator. Placed on the free upper outlet (collector). It must be on every heating device when installing aluminum and bimetallic radiators. The size of this device is significantly smaller than the diameter of the manifold, so you will also need an adapter, but Mayevsky taps usually come complete with adapters, you just need to know the diameter of the manifold (connection dimensions).
Mayevsky crane and method of its installation
In addition to the Mayevsky crane, there are also automatic air vents. They can also be installed on radiators, but they are slightly larger in size and for some reason are only available in a brass or nickel-plated case. Not in white enamel. In general, the picture is unattractive and, although they deflate automatically, they are rarely installed.
This is what a compact automatic air vent looks like (there are more bulky models)
Stub
The side-connected radiator has four outputs. Two of them are occupied by the supply and return pipelines, on the third they install a Mayevsky valve. The fourth entrance is closed with a plug. It, like most modern batteries, is most often painted with white enamel and does not spoil the appearance at all.
Where to install the Mayevsky plug and tap for different connection methods
Shut-off valves
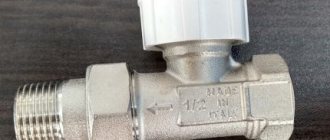
You will need two more ball valves or shut-off valves that can be adjusted. They are placed on each battery at the input and output. If these are ordinary ball valves, they are needed so that, if necessary, you can turn off the radiator and remove it (emergency repairs, replacement during the heating season). In this case, even if something happens to the radiator, you will cut it off, and the rest of the system will work. The advantage of this solution is the low price of ball valves, the disadvantage is the impossibility of adjusting heat transfer.
Radiator taps
Almost the same tasks, but with the ability to change the intensity of the coolant flow, are performed by shut-off control valves. They are more expensive, but they also allow you to adjust the heat transfer (make it less), and they look better externally; they are available in straight and angular versions, so the piping itself is more accurate.
If desired, you can install a thermostat on the coolant supply after the ball valve. This is a relatively small device that allows you to change the heat output of a heating device. If the radiator does not heat well, you cannot install them - it will be even worse, since they can only reduce the flow. There are different thermostats for batteries - automatic electronic ones, but more often they use the simplest one - mechanical.
Related materials and tools
You will also need hooks or brackets for hanging on walls. Their number depends on the size of the batteries:
- if there are no more than 8 sections or the length of the radiator is no more than 1.2 m, two mounting points on top and one on the bottom are sufficient;
- For every next 50 cm or 5-6 sections, add one fastener at the top and bottom.
You also need fum tape or linen winding and plumbing paste to seal the joints. You will also need a drill with drills, a level (preferably a level, but a regular bubble one will do), and a number of dowels. You will also need equipment for connecting pipes and fittings, but it depends on the type of pipes. That's all.
Why is it important to maintain the dimensions of the gap between the radiator and the wall?
When installing a heating system, you need to adhere to the following scheme: the more powerful the radiator in terms of its thermal characteristics, the wider the gap to the wall will be. As a rule, its size ranges from 2.5 cm to 6 cm.
Specific dimensions consist of two parameters:
- real possibility of installation (window sill width, niche dimensions);
- power of the heating device.
If foil heat-reflecting material is glued to the wall, the distance can be minimal (2.5 cm - 3 cm).
It is not recommended to install a heating device close to the wall for many reasons:
- to ensure free heat transfer from the entire surface of the radiator, conditions must be created for free air circulation around the device; if you place the radiator close to the wall, this process will be disrupted and the heat will be partially lost;
- when the radiator is “pressed” to the wall, a high temperature level will constantly remain on its back surface, as a result, the device will fail faster due to overheating;
- in the narrow gap between the radiator and the wall, debris and dust will accumulate, which will also impede heat exchange;
- if the heat-reflecting plate is not glued, the radiator will “waste” heat the external walls, and in apartment buildings they are usually concrete and have low thermal insulation properties.
Important. Due to an incorrectly set distance to the wall, both the water radiator and the electric one will overheat. Moreover, electric ones run the risk of shorting, while water ones will be susceptible to corrosion. Naturally, the dimensions of heating radiators in height and length must be taken into account in advance, at the design stage.
The distance from the floor to the heating radiator is also kept optimal for each heating device. Thus, proper installation of the radiator is important for efficient heating of the room.
Connection diagrams
The radiator has holes at the ends for connecting pipes supplying coolant to the radiator and discharging it (return). exist :
Lateral
The coolant supply pipe is connected to the upper hole at the end of the radiator . The coolant passes through all sections from top to bottom and is discharged through a return line connected to the lower hole at the same end.
is installed in the upper hole at the other end to bleed off excess air . A plug is placed in the remaining lower hole.
- It is used in apartments with a single-pipe coolant supply system.
- The length of the radiator is no more than 1 m (heat loss increases with the number of sections).
Diagonal
The coolant supply is through the upper hole on one side, the return outlet is through the lower hole on the other side of the radiator. The coolant flows diagonally from top to bottom.
- Effective heat transfer with any number of sections.
- Allows you to connect several radiators in series.
Lower and saddle
The supply pipe enters the lower hole on one side, the return pipe exits through the lower hole on the other side of the heating device.
Photo 1. Bottom heating radiator connection diagram: pipes pass between the floor and the radiator.
- Used for hidden pipes in the floor.
- Thermal efficiency is 30% lower than diagonal (coolant stagnation in the upper part of the radiator).
Reference! Most often in private homes, heating pipes are laid along the wall between the radiator and the floor. Near the radiator, upward bends are made with a diagonal connection.
Construction portal No. 1
Heating installation is a serious stage in preparing a house for operation. Attaching heating radiators to the wall is not the only, but quite big difficulty in this process. To do everything correctly and get a good result of your work, you need to understand what mounting options exist, types of batteries, and the intricacies of work.
The first question is still worth considering the types of batteries that can be used by you both in a country house and in an apartment.
Installation process
The installation process is nothing overly complicated if it is carried out according to plan step by step and without errors.
- First, you need to turn off the heating system and drain the water from it. In a private house, this can be done using a pump; in an apartment building, you will have to contact the housing office. Then you need to dismantle the used radiators.
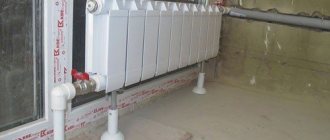
- Mark the wall for mounting new heating devices. In this case, it is advisable to use a level to install the battery as level as possible, eliminating distortions. It is important that the battery is installed strictly horizontally or with minimal deviation towards the pipe. This will allow the water to drain completely by the end of the heating season.
- Install the brackets, check their strength by pressing on them with all your weight. If they can stand it, hang up the battery. For cast iron and aluminum batteries, two fasteners are usually sufficient; for plastic pipes, a larger number is required. Before installing the fasteners, the walls should first be cleaned, leveled and plastered.
- Install shut-off valves, paying special attention to the reliability and water tightness of threaded connections. Connect the pipeline.
Important! To prevent the battery from leaking, it is advisable to use appropriate torque wrenches. Especially if you are installing an aluminum radiator, you will inevitably need to install an air valve with it, through which air will be released
The force of the torque wrench used during installation should not exceed 12 kg.
Sequence of work
Installation of batteries begins with complete shutdown of the circuit. When replacing old radiators with new ones, the water is drained and the heating elements are dismantled. It would be correct to use a pump to eliminate the presence of coolant residues in the system.
After all the water has been removed, the mounting location of the batteries is aligned in both planes. Brackets are installed.
Package
The next step is to pack the radiators using sealing flax, packaging paste or special shut-off valves. Using a torque wrench, tighten the connection, creating the force specified in the documentation.
Installation work
Installation of radiators on the wall is carried out by welding or polypropylene pipes. In the first case, it is enough to use two fasteners; in the second, at least three are required. Two should be at the top, one at the bottom.
With ten or more sections, the number of fastenings should be increased to five. There should be three at the top, two at the bottom.
Spatial location control
The position of the batteries is monitored in both planes. It is advisable to provide a slight slope towards the wall. This will avoid airing the system during its operation.
The final stage
Threads are cut on the risers and all elements of the heating system are connected. The tightness of all connections is carefully monitored.
Test tests can then be carried out to detect possible leaks.
How to organize a connection
The next step in the process is choosing the connection type. The following methods are most effective:
- Lateral one-sided - the inlet is connected to the upper branch pipe, and the outlet is on the same side of the battery, but to the lower branch pipe. The option provides excellent heat dissipation, but is suitable for batteries consisting of 12 sections.
- Bottom - both directions are connected to the lower pipes of the heating device from different sides. The method is ideal for hidden pipe laying.
- Diagonal - the inlet is carried out through the upper pipe, and the outlet is carried out on the other side through the lower pipe. The method is used to connect devices with more than 12 sections.
Connection to polypropylene pipes
To properly install radiators with propylene heating pipes, you will need to acquire a special soldering iron. The connection is implemented using two technologies:
- In the case where the radiator valve is propylene, the connection is made by soldering directly to the liner. Next, you should unscrew the American metal end cap from the tap and screw it into the radiator sleeve. For tightness, FUM tape or linen winding is used. As a result, reassemble the “American” and tighten the union nut with a wrench.
- If the radiator valve is made of metal, then a split-type combined coupling with internal thread is used to connect to the plastic liner. It is similar in principle to the “American” one, but the union nut is adapted for soldering. Through the connecting fitting, the plastic part of the coupling is soldered to the underwater pipe. After this, the coupling must be disassembled, and the metal part with the winding must be screwed onto the valve. Assemble the coupling and tighten the union nut.
Connecting the battery to the metal connection
Many homeowners who want to know how to properly install a heating radiator are worried that when working with metal pipes, they may need a welding machine and related skills in its use. We hasten to reassure you - nothing like that is needed here, everything is done using threaded connections. To do this, a thread is cut on the newly cut section of the eyeliner using a die. The process technology looks like this:
- Cut the supply pipes using a grinder so that the cut line is clearly perpendicular to the center line of the pipe.
- Clean the end of the pipe from corrosion or paint and make a chamfer with a file.
- Apply lubricant to the clamp cutters and pipe section.
- Place the head on the chamfer and center it.
- Using a gas wrench, turn the head clockwise.
- For a high-quality connection, you should get a threaded section equal to the long part of the drive.
As a result, you need to screw a locknut and a coupling onto the finished thread, and aligning the axes of the ball valve and the connection, move the coupling from the connection to the valve body. The process uses rewinding or FUM tape. Next, you should screw the winder onto the thread near the coupling and move the locknut. After final fixation of the stopcock or temperature regulator, it is connected to the radiator liner through the “American” connection.
Features of installing heating radiators for different types of window structures
Correct installation of the heating radiator depends on the type and design of the windows. For window units of different designs, batteries are used, the dimensions of which correspond to the dimensions of the space underneath them.
Based on this, we can distinguish several main options for how to place a convector under a window:
- Standard placement relative to the battery window.
- Installation of convectors near the walls in balcony blocks with a doorway.
- Flat plate convectors for panoramic windows.
- Convector in the floor under the stained glass window.
- Hidden installation of a radiator under the window sill.
- Floor batteries under the panoramic block.
Most of these methods are not clearly regulated in SNiP, so in order to hang a heating radiator correctly, it is necessary to take into account the recommendations of manufacturers and builders.
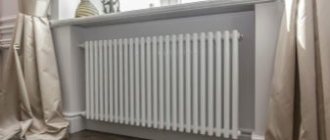
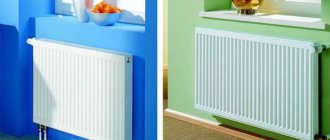
Standard battery placement
The correct location relative to the battery window is determined by building codes. However, professionals recommend hanging the radiator so that it protrudes beyond the window sill by ¼ of its width. This will create the most effective thermal shield around the window.
In addition, it is recommended to choose a convector for a large window opening with internal fins so that the convection process is maximized.
In balcony blocks
It is recommended to install the convector under the double-glazed window of the balcony block across the entire width of the window sill. It is recommended to place the edge of the battery facing the unit door at a distance of 3-4 cm from it. It is not recommended to install shut-off valves or temperature controllers in this location. For installation, a device is selected whose power is 10-15% greater than the calculated one for this room.
Special convectors for panoramic windows
Heating radiators for panoramic windows are selected based on the size of the space under the window. It often happens that a panoramic window starts at floor level, without a window sill. In this case, it is recommended to install the battery near the window in a floor-standing version. If the floor arrangement of the radiator does not fit into the interior concept, you can install a convector under the floor, covering it with a decorative grille.
Requirements for the location of the radiator in a private house
Radiators should be installed in places of greatest heat loss in the house (window openings and entrance doors).
As a rule, heating devices are installed under each window of the home and in the hallway on the wall, next to the front door of the house, as a thermal curtain and dryer for wet things.
For maximum heat transfer from the heating device, there are the following optimal distances from the radiator:
- To the floor 8-12 cm;
- to the window sill 9-11 cm;
- to the wall 5-6 cm;
- protrusion of the radiator beyond the window sill is 3-5 cm (so that the heat from the radiator warms the window unit).
Requirements for wall and floor construction:
- The wall on which the heating device will be mounted must be plastered.
- When attaching to a plasterboard wall, a reinforcing frame made of timber is first installed in it.
- Floor mounts for the radiator are installed on the finished floor.
Installation Tool:
- Drill or hammer drill,
- Drill 10 mm,
- Hammer,
- Screwdriver for screwing self-tapping screws when using corner brackets,
- Construction level with spirit level or laser level,
- Pencil,
- Roulette,
- Plastic radiator spanner,
- Key for American.
Types of heating systems
There are three options for radiator connection systems - serial, single-pipe, two-pipe and collector (parallel). They differ in the wiring diagram. Depending on what system is installed, it is necessary to select the type of batteries. It is important to remember that incorrect connection of heating radiators leads to a decrease in the actual thermal power of the batteries.
Serial connection
This is the simplest option for connecting radiators. From the heating device the pipe passes to the first radiator, from it to the second, etc. This connection option has become obsolete, since the water cools quickly and the heating level drops sharply with distance. There is no option to turn off an individual battery - you have to shut off the entire system.
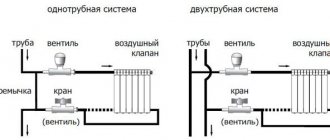
Single pipe system
A single-pipe system uses one main pipe through which heated water or other coolant flows from a heating device (heat pump, boiler, boiler, etc.). Each battery is connected in such a way that the liquid passing through it returns to the main line.
The radiator can be turned off using a valve or shut-off valve without shutting off the main pipe. The water temperature in each subsequent radiator drops, but not as significantly as with a series connection.
Two-pipe system
The supply of heated water and the discharge of cooled water in the system occurs through different mains. Each radiator is connected to both pipes. In such a system, the temperature of the liquid at the inlet of each radiator is almost the same; it decreases slightly due to heat loss in the pipes.
Collector (parallel) system
In this system, all batteries are connected in parallel. One line comes out of the heating device, which is connected to the collector (popularly called a comb). In the collector, water is distributed through several pipes, each of which leads to a separate radiator. The shut-off valves are located on the manifold.
The collector system can work in conjunction with any other. For example, several radiators connected to each other in parallel using a single-pipe or two-pipe system can be connected to the main line with warm water leaving the collector. The number of heating radiator sections depends on the selected system and type of connection. You can calculate them using an online calculator.
Coolant supply methods
Heating systems are also divided according to the method of supplying coolant to heating devices. There are two varieties:
- with natural circulation (gravity);
- with forced circulation.
Natural circulation is ensured by the ability of hot liquids to rise upward and, as they cool in the heat exchangers, to tend downward. With this supply method, the hot coolant rises through pipes of a sufficiently large diameter and then through the same pipes at a slight slope is supplied to the installation site of the batteries. Upon exiting them through pipes mounted at a slope directed towards the boiler, the coolant returns to the boiler to carry out a new cycle.
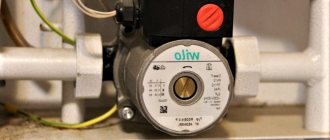
Forced circulation is carried out by installing a circulation pump in the return line, which ensures the movement of the coolant throughout the entire heating circuit. This scheme is more effective, although more expensive.
Installation instructions
To hang and connect the battery to the heating pipes, prepare the following components and materials:
- hooks with plastic dowels for attaching the radiator to the wall - at least 3 pcs.;
- 2 fittings (side plugs) with right-hand pipe threads, marked with the Latin letter D;
- 2 fittings with left-hand thread, marking – S;
- 1 manual air vent (Maevsky valve) with a key;
- 1 plug;
- sealing silicone thread or flax;
- faucet, balancing valve, thermostatic valve, fittings - according to the diagram;
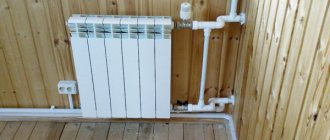
- polypropylene, metal-plastic or polyethylene pipes with an internal diameter of 10-15 mm for connections.
The number of fasteners depends on the size of the heating device. An aluminum battery of up to 10 sections must be mounted on 3 hooks or special brackets - 2 on top, 1 on bottom. In other cases, 4 fastenings are used.
Steel panels are sold assembled, hanging brackets are included. Heavy cast iron radiators for floor mounting are equipped with legs.
Types of wall and floor brackets used for mounting batteries
Tools you will need:
- electric drill and drill corresponding to the hardness of the wall;
- screwdriver or screwdriver;
- construction level;
- gas key;
- tape measure, pencil.
Pre-assembly
The radiator sections are pulled together by nipples - metal clamps on which left and right threads are cut (half the length). To connect, you need a long wrench with a nipple attachment; this is not available in the household. Hence the advice: ask to twist the sections right in the store.
Assemble the sectional battery in this order:
- Clean the areas around the side holes.
- Screw in 4 fittings from the ends and carefully tighten them with a gas wrench. Please note: plugs with regular threads must be screwed into the right ends of the radiator, with left-hand threads - into the left ones (if you look at the front side of the product).
- Close the unused lower outlet with the plug included in the kit.
- Using sealing material, pack and screw the Mayevsky tap into the upper channel.
- In the remaining 2 holes, install the mating part of the American females, disconnected from the taps.
Important point. The American element with a union nut does not need to be screwed into the fitting until it stops. Otherwise, the nut will not move away from the edge and will not allow you to attach the valve itself. To screw it in, you will need a special internal key, but if you wish, you can get by with powerful pliers.
After installing the American ones, screw on the valves and tighten (by hand for now). Panel heaters do not require assembly, except that you will have to install an air vent. Do not remove the film from the case - it will protect the coating from accidental damage.
Common types of low batteries
Radiators differ in the type of housing and the size of the fins.
The design of low batteries is determined by the materials:
The batteries are sections obtained by casting. For heat exchange, each section contains a number of ribs determined by the design.
Cast iron is fragile, so the water pressure inside such a radiator should be less than 9-11 atmospheres. Since the surface of cast iron after casting is rough and uneven, debris settles on it inside the radiator over time and creates a layer that weakens the transfer of heat from the water to the cast iron of the radiator. A cast iron radiator retains heat well and is not subject to destruction from prolonged contact with water.
Calculation of required power
The rated power of one section is based on the standard values of coolant temperatures at the inlet and outlet of the heating device, and the air temperature in the room.
In a private home, these values differ from the standard ones. Therefore, when calculating, the passport value is reduced by 15%.
An exact calculation is carried out in any online calculator, taking into account all heat losses through the elements of the house structure.
Roughly we can assume that:
- for a room with one external wall and a window, 100 V / m² is required;
- for a room with two external walls and one window, 120 V / m² is required;
- for a room with two external walls and two windows, 130 V/m² is required.
An expert answers your questions
What is the best way to install batteries in a niche or on a wall?
If you want to hide the radiator, it is better to install it in a niche. But keep in mind that it must be made according to the rules; it is best to install a heat-reflecting screen in it.
When you make a niche in an exterior wall, you will reduce its thickness. If a house or apartment is poorly insulated from the outside, this will lead to heat loss. In addition, a thin wall will not support a heavy battery.
Do you need a niche for heating radiators? Do you need a niche for the battery?
There is no need for a niche as such. With its help you can hide the radiator and put a decorative grille on top.
Where to put the batteries if the house has large windows?
If you mean windows that start from the floor, then you need to place it directly in front of the window (see photo). If the windows are of normal height, but wide, panoramic, you need to install radiators under them. There will simply be more of them. Calculate so that there is one radiator for every 2 linear meters of window.
How to properly position heating radiators in a private house?
The installation rules are the same for both a private house and an apartment. The only difference is the large number of external walls. Try to make the wiring so that all the batteries stand along them.
Most heat loss occurs in the corners where two exterior walls meet. You should definitely install a radiator there. It may be small, 3-4 sections, but it is necessary.
Why do they put batteries in the corner?
This is done only in those corners where two outer walls meet. It turns out that in a small area there is a large area of walls through which heat escapes. And these losses need to be compensated somehow.
How to properly install batteries under plastic windows?
It makes no difference whether you place them under plastic or wooden windows. You just need to correctly calculate the number of sections. The smaller the window area and the greater the number of chambers, the less heat escapes through it.
Do heating radiators need to be placed flush with the edge of the window sill?
If your window sill does not extend beyond the edge of the wall, this can be done. But imagine how ugly such an arrangement will look? In addition, the lower the radiator is located, the more evenly the room warms up.
If you want to ask your question, do so in the comments.