The thermal conductivity coefficient of brick is almost two times lower than that of concrete, however, it is higher than that of cellular concrete and wood. This means that the structure itself is cold. Heat loss is enormous, so instead of heating the street, it is better to insulate a brick house from the outside. Having done thermal insulation once, you can provide yourself with warmth and comfort inside for many years. But why should you choose external insulation?
Why is external thermal insulation better?
There are three ways to insulate a brick house. The first is insulation from the outside, the second is from the inside, the third is in-wall thermal insulation (well method). And if the latter is implemented only at the stage of wall construction, then the first two can be used after completion of construction. Which insulation option should I choose? The internal method has its advantages:
- Work is carried out at any time of the year.
- The insulation will not be negatively influenced by the external environment.
However, this method of insulation also has a lot of disadvantages, for example, a reduction in usable space by exactly the thickness of the insulation and finishing. The dew point begins to shift into the wall, and the insulation becomes less effective. In addition, the surface will constantly be covered with condensation. The result is dampness and mold. But insulating the brick wall of the structure from the outside will allow you to avoid these disadvantages. Advantages of this method:
- The walls on the outside are protected from weathering and will last longer. It is better to replace the insulation after tens of years than to replace the main walls.
- After insulation, the building can be transformed using any finishing facing material: block house, siding, facing brick, decorative panels, lining.
- The wall will not freeze, the dew point will shift, so there will be no dampness or condensation in the room
- Thermal insulation is more effective.
- The insulation (if it emits harmful substances) is located outside and will not affect the health of the residents in any way.
Practice shows that this is the best choice for private homes. But so that the work is not in vain, it is important to find out how to properly insulate a private brick house from the outside.
Why is it worth insulating walls outside?
Placing a heat insulator inside a building leads to the following negative consequences:
- Reducing the usable area of the house.
- Reducing the service life of capital structures. They do not receive heat from the room, so during the winter the water in the pores freezes and thaws repeatedly. This leads to the gradual destruction of the brick.
- Freezing of walls in the area adjacent to enclosing structures. Moisture condenses in cold corners, which affects the appearance of the interior and causes mold spots to appear.
Thus, insulating a stone house from the outside is the most correct solution.
You can do the opposite in regions with a warm climate and in some exceptional cases. For example, an apartment wall is insulated from the inside, separating it from the elevator shaft.
Features of heat insulators for insulating brick houses
The first thing that needs to be taken into account for high-quality insulation of a structure is the characteristics of heat insulators. There are dozens of insulation materials in stores that differ from each other and may be suitable in one case or another. Since the task is to keep the heat inside, protect the brick walls and make the house presentable, you need to choose a suitable material that will not be afraid of wind, precipitation, freezing and heating. List of criteria:
- Heat conductivity indicators. This is the first thing you should pay attention to. The lower this indicator, the better the insulation for brick walls on the outside of a house will retain heat inside. The number indicates how much warm air will be lost in 1 hour per m2, with a thickness of 1 m.
- Moisture absorption - it indicates how much moisture the insulation material can absorb. The more moisture in the structure, the worse the thermal insulation characteristics. Many insulation materials are afraid of moisture and require ideal protection from precipitation. It is better to insulate the facade of a brick house with materials that have low moisture absorption.
- Flammability indicates whether the insulation is protected from fire, whether it supports combustion or not. All materials are divided into 4 groups based on flammability: G1, G2, G3, G4. When choosing insulation for brick walls, group G1 is most often used. Such insulation can go out without an open flame.
- Density. The higher it is, the stronger and heavier the material, but its thermal insulation characteristics weaken. The lower the density, the lower the load on the foundation and the better the insulation, however, the strength of the product decreases.
- Soundproofing. An important parameter that will make the room more comfortable and quieter. Penetrating noise will be dampened, which is important for those who live in busy areas, near train stations, airports, playgrounds, factories and similar noisy enterprises. Typically, all wall insulation materials have this indicator at a high level.
- Ecological cleanliness. Since the heat insulator will be located outside, this is not the main criterion. This is more of a requirement for those who carry out internal insulation of brick walls.
Among other things, pay attention to weight. A brick house is heavy and puts a lot of stress on the foundation. Heavy insulation should not be used, especially if during the construction of the building no reserve was made for the strength of the foundation.
So that the work can be done with your own hands, pay attention to the complexity of installation. For beginners, a material that has a clear and simple installation technology that does not require additional equipment is suitable. Taking into account all these recommendations, you can choose a suitable thermal insulator for insulating your home.
What characteristics should a thermal insulation material have?
The choice of insulation is made based on its properties and physical parameters. Based on their design, they can be divided into sprayed, crumbly, sheet, roll and slab materials. For insulating a brick house from the outside, all options are suitable to one degree or another.
To determine the best way to insulate a brick house, you need to consider several criteria:
- Thermal conductivity . You need to make a choice in favor of the minimum indicator.
- Water absorption . The wetter the material, the faster heat passes through it. Therefore, the indicator should be close to zero. Alternatively, the insulation can be insulated with a water barrier or vapor barrier.
- Density _ The parameter is expressed in kg/cub.m. That is, the higher the value, the heavier the cubic meter of insulation will weigh. High strength is often welcome, but the load on the foundation must be calculated.
- Soundproofing . Relatively thin brickwork transmits noise from the street quite well. In areas with busy transport and industrial infrastructure, the acoustic properties of materials are especially important.
- Environmental friendliness . This characteristic is especially important when working indoors. For external insulation of a brick house, the criterion is considered if there are small children growing up in the family.
- Flammability . Brick does not support fire, but this point is being considered in relation to building materials for wall decoration. In the case of masonry, craftsmen often make the right choice in favor of the G1 identifier (self-extinguishing occurs in the absence of an open flame).
Another point that is taken into account when choosing thermal insulation is ease of installation. The timing and who will do the insulation with their own hands directly depend on the technology of the work.
Wall insulation is a key stage in the construction of a brick house
List of the best materials for working with brick walls
The analysis of the criteria given above will help determine which of the available insulation materials is best for thermal insulation of the walls of a brick house. There is no single thermal insulator that meets all requirements; each has its own advantages and disadvantages. The insulation of the outer wall of a private brick house is carried out using several materials that best meet the criteria. They are:
- Expanded polystyrene (foam plastic).
- Mineral wool (mineral wool).
- Extruded polystyrene foam (EPS).
Each is made from different components, has its own cost and is installed using a certain technology, taking into account the nuances. Insulating the brickwork with each of them will reduce heat loss to a minimum.
Styrofoam
A simple, cheap, proven method of insulating structures. It is a rigid slab of foamed polystyrene with air inside. This determined the thermal insulation characteristics of the material. Has the following features:
- Thermal conductivity coefficient – from 0.032 to 0.039 W/(m*K).
- Density – from 35 to 50 kg/m3.
- Water absorption is low, no more than 1% after 28 days of complete immersion in water.
- Flammability - G3 or G4.
Foam plastic is one of the popular materials for insulation; the price-quality ratio allows it to be used for any structure.
Advantages of polystyrene foam:
- High level of thermal insulation and sound insulation.
- Light weight, so the structure is not loaded.
- Not afraid of the influence of chemicals.
- Has increased density.
- It is not afraid of moisture, does not deteriorate when wet and does not lose its properties.
- The recommended insulation thickness for brick walls is 10 cm.
- It has a low cost, which allows for budget insulation of a brick house.
- Not afraid of temperature changes.
The material is universal, suitable for insulating walls, roofs, foundations, and plinths. Brickwork with such insulation will last a long time. But as for the disadvantages, we note the flammability of polystyrene foam, its fragility and vulnerability to rodents (they love to chew it). In addition, it is impermeable to vapor and is not affected by ultraviolet rays.
Important ! The insulation can be glued to the wall or laid between the brickwork. It is not recommended to use foam inside.
Mineral wool
The product is no less popular than polystyrene foam. Mineral wool is produced from rocks and metallurgical waste. During the production process, raw materials are melted into fibers and formed into slabs or rolls. There is air between these fibers.
Technical characteristics of mineral wool:
- Thermal conductivity coefficient is from 0.05 to 0.05 W/m*K. The material practically does not allow heat to pass through if there are no cold bridges in the brickwork and in the house itself.
- The average density is from 60 to 80 kg/m3. This indicator indicates how much load the insulation can withstand.
- Moisture absorption is higher than that of polystyrene foam, and when wet, the material loses its properties. Therefore, during work it is important to provide an air layer (ventilated façade technique). It will help dry out moisture and restore the properties of mineral wool.
- Flammability coefficient G1. The material is not afraid of fire and does not support combustion.
- Service life more than 50 years.
Mineral wool has many advantages. For example, this is an environmentally friendly material that will not harm health. It has good sound insulation properties and will not deteriorate with temperature fluctuations. Not afraid of chemicals and biological microorganisms. In addition, mineral wool is vapor permeable, so condensation will not form in the house and the microclimate will not be disturbed.
Cotton wool is convenient to work with, however, it has some disadvantages. The price is higher than that of polystyrene foam. Although it is easy to carry out external insulation using cotton wool, you need to protect yourself, since in the process small particles and fibers are formed that come off the material.
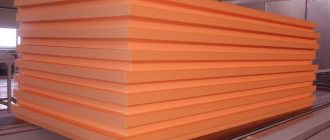
Extruded polystyrene foam
This is an improved version of polystyrene foam. Raw materials (expanded polystyrene) are passed through an extruder, resulting in the formation of the finished material. This production method is called extrusion. As a result, the insulation is somewhat reminiscent of polystyrene foam, but with improved characteristics. It is denser, does not absorb moisture, is easy to process and has a thermal conductivity coefficient from 0.028 to 0.032 W/m*K. The price for EPPS is higher.
Insulating a brick house from the outside with polystyrene foam is popular, as the material has many advantages:
- High strength and ability to withstand heavy loads.
- Resistant to temperature fluctuations and chemicals.
- Not afraid of moisture.
- Safe for health.
- Easy.
- Long service life.
Insulating the walls of a brick house using EPS is something between using mineral wool and polystyrene foam.
Thermal panels
This material has several advantages, as it combines both insulation and decorative material. Suitable only for exterior decoration of brick houses. The heat insulator is made from several layers of polystyrene foam and polyurethane foam. The decorative material is artificial stone.
Advantages:
- Ecological cleanliness.
- Installation is carried out at any time of year and weather.
- The speed of the process of thermal insulation of a brick house.
As for the minuses, it is a high price. Thermal conductivity coefficient is 0.025 W/m*K.
Video description
In this video we will take a closer look at insulating a house with polystyrene foam.
How safe is polystyrene foam: See also: Catalog of companies that specialize in insulating country houses.
Expanded polystyrene
Essentially, this is a more modern type of foam. Its full name is extruded polystyrene foam . It is more durable than conventional foam and does not absorb moisture. The disadvantage of using it is its cost, which is higher than that of other thermal insulation materials.
Insulation of a house can be carried out both at the construction stage and already in a residential building Source foveotech.pl
Warm plaster
Warm plaster consists of the following components:
- cement;
- lime;
- plasticizers
- expanded polystyrene and expanded clay granules.
Slightly inferior to other materials in terms of thermal conductivity. But it is resistant to bacteria and moisture, does not burn and allows steam to pass through well.
The material has significant density, which creates additional pressure on the foundation. The applied layer should not exceed 5 cm.
Micropores formed in warm plaster protect the house from the cold Source pilorama-chita.ru
Which insulation to choose for a brick house is determined by the personal preferences of the home owner, the timing of the work and financial capabilities.
What does a brick wall insulation pie consist of?
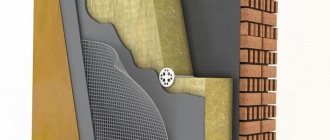
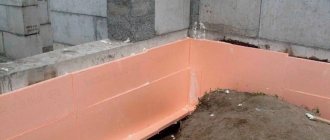
Before you insulate a brick wall at home yourself, you need to understand how to make an insulating pie. There are two options: wet facade and ventilated facade. The first is most often used for foam plastic, the second for mineral wool. The wet facade is done like this:
- Brick wall.
- Glue mixture.
- Thermal insulation layer (foam).
- Additionally, the insulation is fixed on dowels with umbrellas.
- Adhesive solution with reinforced mesh. The mesh is embedded in the adhesive layer so that it does not come into contact with the insulation.
- Primer, layer of plaster.
- Finishing decorative finishing: facing brick, decorative plaster.
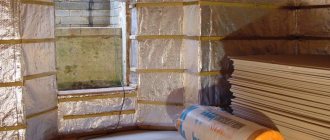
As for the ventilated facade, the pie is like this:
- Brick wall.
- Lathing made of wood or metal.
- Vapor barrier.
- Insulation layer (mineral wool).
- Hydro-windproof film.
- Counter grille, thanks to which a ventilation gap is created.
- Finishing decorative layer (installation of siding, lining, decorative panels).
What will you need for your job?
First you need to decide what kind of material will be used to insulate the walls. The choice here is huge:
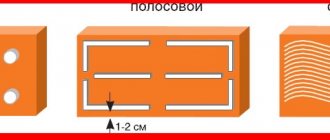
- Polystyrene foam is a material that is obtained by foaming plastic so that the resulting foam consists of 90% air and 10% plastic. This is the cheapest material that is easy to install and cut. 5 cm thick foam can replace 65 cm of additional brickwork, 1 m of concrete wall or 25 cm of wood.
- Glass wool is an elastic and durable material. It is obtained by processing glass waste. You cannot touch glass wool with your bare hands, much less work with it. Glass wool particles in contact with the human body or organs (eyes, mouth) cause severe irritation and redness of the skin, continuous coughing and can cause serious (sometimes even irreparable) harm to health.
Penoizol. It is poured through specially made holes in the brick between the outer and inner walls into the voids (from bottom to top).
The material is fireproof, retains heat well and does not harbor insect pests, mold or mildew. The service life of penoizol is about 50 years.- Polyurethane foam is easy to install even for those who are inexperienced in construction. It has low thermal conductivity, good sound insulation, water resistance and durability.
- Vapor barrier material - prevents the formation of condensation or steam on the walls, and, accordingly, their destruction.
- Ecowool. The material is sprayed wet onto the wall through a compressor.
- Expanded polystyrene or Pumpan is a dense and durable material that is not affected by solvents and alkalis.
- Mineral wool is fireproof, retains heat well and allows steam to pass through, and does not deform due to temperature changes.
- Basalt (stone) wool is strong, soundproof, fireproof, durable, and resistant to deformation.
Other consumables include:
- polyurethane foam,
- dowels and “umbrellas” (for foam plastic),
- reinforcing mesh,
- perforated metal corners,
- adhesive mixture for insulation,
- primer,
- lathing boards or metal profiles,
- plaster mixture,
- decorative plaster.
The use of these consumables depends on the selected material. For example, when using foam plastic, sheathing boards are not useful, but a starting metal profile is needed.
The amount of material depends on the area of the walls. The packaging usually indicates what area the material is designed for. You should always buy 5% more consumables, with the expectation that the material will be damaged or trimmed.
Electric and hand tools you will need:
- perforator;
- mixer or drill with a whisk for mixing the solution;
level;- rule;
- plumb line and fishing line for pulling a straight line;
- buckets;
- hacksaw for cutting material;
- a hammer or pick for knocking off uneven areas from the wall surface;
- spatula for applying and leveling the solution;
- knife (construction);
- grinding disc;
- brush or roller for priming and painting.
Seal the cracks and prepare the sheathing
If the wall is severely damaged, it is repaired. Before insulating a brick house from the outside, it is important to inspect the walls. If cracks are found, it is important to seal them so that cold bridges do not form. This is done with stone sealant, cement or other natural materials.
When the option with a ventilated facade has been chosen for insulation, the sheathing should be prepared. It is attached to the wall at a distance of the width of the insulation so that the slabs can be laid evenly in the created space. Using a building level and a plumb line, the sheathing is aligned around the perimeter.
The process of insulating a brick house from the outside with polystyrene foam
Step 1. Prepare the necessary tools:
- impact drill (hammer);
- hammer;
- sharp knife;
- spatulas for puttying foam;
- assembly adhesive (ordinary tile adhesive will also work);
- fastening material;
- reinforced mesh;
- putty;
- materials for priming wall surfaces;
- polyurethane foam.
Step 2. Clean the walls, carefully level them, and prime them.
Step 3. We dilute the glue and lubricate the foam sheets with it using a spatula.
Step 4. Apply the insulation to the wall, then press it well. We fix the sheets at 5-6 points using dowel nails.
Step 5. After 3-4 days, when the sheets are completely dry, you should fill the cracks with foam.
Step 6. We putty the seams and irregularities with adhesive solution.
Step 7. We reinforce the foam sheets with a special mesh, which is also mounted with glue. The mesh is glued with a slight overlap.
Step 8. After the insulation material has dried, decorative finishing of the facade is carried out. This can be vinyl siding, block house, plaster and other materials.
We also recommend that you watch the video instructions for a complete understanding:
How to insulate a brick wall using mineral wool
Knowing how to insulate a brick wall, you can get to work. Let's look at the features of the work using mineral wool as an example.
How to insulate the facade of a brick house yourself:
- Since the sheathing is already ready, all that remains is to lay the insulation in the created cells. The mineral wool should fit tightly so that no voids form. You need to work in a protective suit, respirator and goggles.
- How to properly attach insulation to a brick wall? The plates are fixed with dowels. The voids are filled with polyurethane foam.
- For protection, waterproofing is fixed on top of the laid mineral wool.
- Counter battens are placed on the lathing, after which decorative finishing is performed.
This completes the insulation of the external walls.
Performing thermal insulation work
Technologies for carrying out installation work are selected based on the selected type of insulation and method of decorative finishing. In particular, with mortars or lathing. Let's look at the methods using examples of three groups of materials.
Using mineral wool
Fiber insulation is characterized by softness, so lathing is required here. The material is immersed in the cells and further strengthened by “fungi”. To protect the insulator, a water barrier is formed or a vapor-permeable membrane is laid. After filling the counter-lattice, decorative finishing is carried out using modern cladding materials.
Insulation of external walls with mineral wool
Foam insulation
If you plan to sheathe the walls, then the insulation technique is similar to when working with mineral wool. The only difference is the additional foaming of the installation gaps between the slabs and the sheathing. They are needed to compensate for the thermal expansion of dissimilar materials.
The second method is gluing the slabs with glue. Before this, the walls are leveled and primed with an adhesive compound. The solution is applied to the insulation or base in an even layer. The canvases are pressed using a rule in order to subsequently waste less leveling plaster. After the adhesive mass has dried, the insulator is additionally secured with dowels with a wide head (red “fungi” are considered the best).
Applying warm plaster
Preparation of the base is carried out by analogy with the method of insulating brick walls using the “wet” facade system. The difference is that warm plaster is applied to a previously wetted surface. The base is covered with reinforcing mesh. A homogeneous mixture is suitable for work within 1.5-2 hours.
Insulation of external walls with warm plaster
The distribution of the mass is carried out with a painting tool. Drying between layers takes approximately 4 hours. Complete drying of the finished coating occurs within 28 days.
Thermal insulation of brick walls with foam plastic
This technique is called a wet facade. The sequence of layers was described above. There are some peculiarities: it is important to wait for the glue to dry before proceeding with subsequent work. You need to fix the foam slabs from the bottom, moving up, one row at a time. The next row is done with a bandage so that the joints do not coincide.
After the brick walls are completely covered, it is important to immediately begin reinforcing the mesh by embedding the mesh in the adhesive solution. After all, if you leave polystyrene foam unprotected in the sun, it will begin to turn yellow and lose its properties. It’s also better not to delay with decorative finishing.
Important ! The gaps between the plates are filled with polyurethane foam, after which it is cut off.
Laying bricks with insulation will make the house warm, quiet and cozy. Heating costs are reduced several times. Having done everything correctly, there is no doubt that repairs will be required in a few years.
How to make thermal insulation
Any homeowner with minimal technical skills can insulate a brick wall with their own hands. But you need to know about the intricacies of the process, otherwise the efficiency and durability of the insulator will be less than expected.
Using mineral wool
Installation of the curtain facade is carried out in the following order:
- Glue is applied in the corners and in the center of the mineral wool board in spots with a diameter of 5 cm.
- The product is inserted between the lathing slats and glued to the surface of the enclosing structure.
- Other slabs are glued in the same way. At the corners of the building, the seams are bandaged: on one wall, every even row protrudes beyond the corner, on the adjacent wall, every odd row.
- Around windows and doors, the slabs are laid so that the seams between them are not in line with the boundaries of the opening.
- The glued heat insulator is screwed to the brickwork with special disc-shaped dowels. They are made of plastic and have a wide cap. Thanks to this, the product does not conduct cold and does not press through the material. At the first stage, each plate is screwed with 2 dowels.
- In corners and around openings, special profiles are glued to mineral wool.
- Cover the coating with a superdiffusion membrane. The panels are laid horizontally, from bottom to top, with an overlap of 100 mm. The edges of the strips previously fixed at the top and bottom cover the ends of the slabs. The film is temporarily fixed with a construction stapler.
- Screw another 3 dowels into each slab. As a result, it should be fixed at 5 points: in the corners and in the center. At the same time, the dowels will fix the membrane.
- Window slopes and ebbs are installed from painted galvanized steel. The facing material can be fixed on top.
- Siding is attached to the sheathing. Self-tapping screws are screwed into the middle of the oval hole and not tightened tightly so that thermal expansion is not accompanied by the appearance of internal stresses.
Thermal insulation is carried out using mineral wool.
The canopy, antenna, outdoor unit of the air conditioner, etc. are returned to the insulated facade. The brackets for them must be lengthened, taking into account the thickness of the insulation and the air gap.
Foam insulation
Most often, this material is laid without lathing, followed by finishing with plaster. They operate in this order:
- Above the base, a leveled starting strip is screwed to the wall. Use dowels 6x80 mm with a pitch of 450 (mm).
- The profile offset is equal to the thickness of the insulation and plaster. If necessary, a steel strip on paronite washers is placed under it.
- Attachment strips are screwed along the edge of the openings.
- Horizontal strips of alkali-resistant reinforcing mesh are glued to the top and bottom. One edge is left free to later cover the end of the insulation.
- Apply glue to the wall above the starting strip with a roller and secure the first slab. Its edge protrudes beyond the corner of the building by the thickness of the insulation. The front edge is set vertically using a bubble level.
- According to the described scheme, the bottom row of slabs is glued sequentially. Their edges must be in the same vertical plane (check with the rule and ironing the seams with the palm of your hand). The last slab is cut so that it protrudes beyond the corner of the building by the thickness of the insulation.
- Glue the second row offset onto half of the slab and then to the top. Around windows and doors, modules are laid so that the seams between them do not lie on the same line as the boundaries of the openings. Bandaging is performed at the corners of the building: on one wall even rows go beyond the edge, on the adjacent wall - odd rows.
- After the glue has dried, the foam plastic is screwed with wide plastic dowels-“umbrellas”, 5 pieces each. on the sheet (in the corners and in the center). The material is cut so that the caps do not protrude. The sleeves are immersed into the brick by at least 60 mm.
- A perforated corner with strips of reinforcing mesh is glued to the corners of the building. To prevent it from protruding, the top layer of foam is first removed with a grater.
- With the onset of darkness, the surface is checked using oblique rays from a flashlight. Irregularities are revealed by shadows. The mounds are cut off with a grater, the depressions are marked with a marker so that more glue can be placed here later. Minor defects are left as they will be hidden by decorative plaster.
- Cover the facade with glue and embed the reinforcing mesh in it. The edges of the previously glued strips are wrapped onto the foam at the top and bottom. The overlap is 100 mm
- In narrow places, near the porch and in other areas where there is a high probability of damage, the mesh is laid in 2 layers.
- Cover the facade with glue again. Using oblique rays, defects are identified and corrected.
- The insulation is covered with decorative plaster.
Finally, the visor, air conditioner and other dismantled elements are returned to their place.
How to apply warm plaster
The mixture is prepared according to the recipe on the package. To check the consistency, pick it up with a trowel and turn the tool over. A good solution will not fall off. Then proceed in this order:
- Window frames, glass and other parts are sealed with masking tape so as not to get dirty.
- Using a paint brush, cover the wall with a silicone or acrylic primer with quartz sand.
- Corners and cracks are sealed with reinforcing mesh.
- After wetting the surface of the facade, apply warm plaster. Use a wide spatula, moving from bottom to top. Layer thickness - no more than 20 mm. Otherwise, it will slide under its own weight.
- After the solution has set (at least 4 hours are required), a second layer is applied. If the air is humid or cold, for example in autumn, a longer pause is maintained.
- If necessary, after the second layer has set, apply a third 10 mm thick. The total thickness of warm plaster should not exceed 50 mm. The surface is checked according to the rule for gaps and bumps, and any defects found are eliminated. Deviation from the plane is allowed no more than 3 mm per 1 m.
- Decorative plaster is applied to the insulation. The wall is covered in 1 step, otherwise the areas will be different.
- By making circular movements with a plastic grater, a structure is formed.
Decorative plaster can be painted.
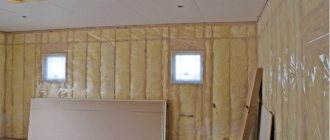
Features of internal insulation
Insulation from the inside is carried out in cases where it cannot be done from the outside. If there is a need to insulate walls from the inside, then you need to take this work responsibly and choose the right materials.
The disadvantage of insulating walls from the inside is that the wall not only does not become warmer, but also begins to freeze more, so the dew point moves closer to the inner surface of the wall. The presence of condensation leads to dampness and mold development.
It is brick walls that are most afraid of increased dampness, as a result of which they begin to collapse. To correct this drawback, you need to choose materials that have minimal vapor permeability and moisture absorption.
When laying insulation, it is necessary to properly seal the seams so that moisture does not penetrate into the room.
When insulating walls from the inside, in order to do the job efficiently, adhere to the following rules:
- the wall must be completely dry;
- It is imperative to use steam and waterproofing materials;
- the material used must be moisture resistant and have minimal vapor permeability;
- There should be a minimum of seams on the heat insulator, and if there are any, they must be sealed hermetically.
When does insulation become pointless?
Even before purchasing thermal insulation materials you will need:
- Check ventilation.
- Carry out a thorough treatment of the masonry with antiseptics, wherever the “pie” will be applied.
- Order a full thermal imaging inspection of your home.
The cost of these activities will cost you a lot, but if the ventilation system is not done properly, the house will be stuffy after insulation. The windows will begin to “sweat” and mold and mildew will multiply.
It is important to know! Owners of brick houses that have preserved stoves or installed fireplaces do not have to worry about ventilation. Stove heating copes well with mold and dampness.
With a “thin” roof, there is no point in spending money on insulation. Thermal imaging will show all the places through which heat loss occurs. And, in the end, it will turn out that it is cheaper to patch holes in the roof than to start total insulation of the facade.
What is used for insulation
To ensure optimal temperature conditions indoors, the brickwork should have a thickness of about 1.5-2 meters. Naturally, such technological solutions are difficult to implement and very irrational. At the same time, insulation, the thickness of which will be approximately 10-15 cm, if the building is lined with mineral wool or polystyrene foam, will cope well with this task. The most common materials for insulation should be named:
- Mineral wool - available in hardware stores in the form of slabs of various thicknesses, which are easily installed on a pre-prepared brick wall surface. When a building is insulated with mineral wool, heat is remarkably retained inside, steam and air circulate freely and are not retained. When using fiberglass as insulation, it is recommended to seek help from qualified specialists so that the installation technology is correctly followed and the materials perform the required function for a long time.
- Foam plastic - Foam plastic and penoplex, as a type of insulating materials made on the same basis, make it possible to reproduce insulation technology in the most effective way with the best conservation of thermal energy.
- All kinds of insulating paint and plaster can be used. Thermal insulating facade materials can only be used as additional means for insulating brick buildings.
- Insulation of bricks with mineral wool
- finishing a brick house with foam plastic
- thermal insulation paints
Complex theses in clear language: disadvantages of external insulation
Insulating a brick wall from the outside is a relatively simple, effective process. But it is wrong to talk only about its advantages, especially for low-rise construction, an inexpensive, small house built “for oneself.”
“Three pillars” of inconvenient answers:
- A person who builds a brick house “for himself” does not always lose out on costs. According to building standards, such a house will stand without repair for a maximum of 10-20 years, and then will require significant investments. But with mass construction “in a hurry”, the period of maintenance-free operation of the building is even shorter.
- The multilayer insulation systems that the construction market offers are designed just for a home “for yourself.” Manufacturers of insulating materials and hired construction crews are not interested in building a house “for centuries”; the faster the structures deteriorate, the (ultimately) higher their profits. The technology of layer-by-layer wall insulation is designed to use materials with different shelf life. For example, polystyrene foam and mineral wool will last a maximum of 5 years. Then the entire outer “cupcake” will have to be broken and a new one installed.
- The durability of multilayer structures is low. Strong connections and cheap insulation will be required; this is the best balance between strength and cost. Previously, such insulation was clay mixed with sawdust soaked in lime, ash, and slag. This option not only fulfilled its intended purpose, but also stood for centuries.
That is, any technology, any material that modern construction markets offer cannot be considered the best. You have to choose the best from the worst, and this does not fit in with the desire of the owner of a brick house to build “for centuries.”
Main types of insulation and their brief description
Organic heat insulators on the market are represented by a wide range
They are based on materials of natural origin:
- Arbolite insulation is considered the newest material, which is based on sawdust, shavings, uncut straw and reeds. Also, the insulation is made of cement and organic additives. These are CaCl2, H2SO4, as well as the product obtained after processing ordinary clay, kaolin or nepheline, and Na2O.
- Foam-polyvinyl chloride insulation. It consists of polyvinyl chloride resin, which, after exposure to light or electromagnetic vibrations, acquires a characteristic foam structure. At the same time, it is considered a universal heat insulator.
- Chipboard insulation. Components - shavings, resin obtained as a result of controlled chemical processes, antiseptics, fire retardant.
- Insulation with a fiberboard base. It resembles chipboard in its own way. The base is wood waste, or trimmed corn and straw stalks. The material may well also consist of compressed old paper.
- Polyurethane foam is based on polyester, it includes H2O, an emulsifier and isocyanates. When catalysts begin to act, all elements interact as a result of a chemical reaction, in which a new type of insulation appears.
Inorganic heat insulators
Mineral wool comes in two types: slag and stone. To produce the first, companies use slag. Stone wool is distinguished by: CaCO3, rocks that are used for paving streets, minerals containing calcium and magnesia, volcanic rocks and others.
Do-it-yourself insulation of external walls: modern technologies
Modern materials, available in a wide range on the market, make it possible to choose a technology for insulating the walls of a wooden house that best suits your ideas about style and comfort, as well as your financial capabilities. Today experts talk about the two most popular modern insulation technologies:
- sandwich technology: insulation of brick buildings is laid at the stage of their construction. After the walls are built, a frame is installed on them - wooden or metal. It is in the frame that the insulation material will subsequently be laid, and then the material for decorative finishing (siding, etc.) will be attached. This procedure can only be carried out if the foundation of the building is sufficiently strong and durable. Siding, block house and other fashionable materials for facade design can be attached to a frame with insulation embedded in it;
- “wet facade”: another modern technology, when the insulation is installed using special adhesive compounds, and the top is covered with a special reinforced mesh and, finally, material for decorative finishing. In this case, to insulate a brick building with your own hands, you can use stone wool, polystyrene foam, or expanded polystyrene, and use decorative plaster, siding and other popular materials as finishing materials.
How to insulate - mineral wool or polystyrene foam?
Both for thermal insulation of a building from the outside and to insulate it from the inside, two types of materials are most often used: polystyrene foam and stone (mineral) wool.
Among the most important advantages of mineral wool:
- incombustibility;
- excellent sound insulation;
- high vapor permeability;
- long period of operation;
- It is used with equal success both for thermal insulation from the outside (under siding, etc.) and for insulation from the inside (considered the best option for interior work).
The main advantages of insulating brick houses with foam plastic:
- excellent thermal insulation properties;
- resistance to fungi and bacterial development;
- low water absorption;
- low cost compared to other materials;
- Easy to install with your own hands.