In order for an autonomous type heating system to work as efficiently and efficiently as possible, it is important not only to correctly select the heating devices included in its design, but also to connect them appropriately, using optimal connection diagrams for heating radiators in a private home.
The comfort of living in the house directly depends on how competently and professionally this is done, so it is best to entrust the calculations and installation of the system to specialists. But, if necessary, you can perform the installation work yourself, paying attention to the following points:
- Correct wiring installation.
- The sequence of connecting all elements of the system, including pipelines, shut-off and control valves, boiler and pumping equipment.
- Selection of optimal heating equipment and components.
Selecting the connection location and installation norm
Before connecting a heating radiator in a private home, you must familiarize yourself with the following standards for the installation and placement of these devices:
- The distance from the bottom of the battery to the floor is 10-12 cm.
- The gap from the top of the radiator to the window sill is at least 8-10 cm.
- The distance from the back panel of the device to the wall is at least 2 cm.
Important: Failure to comply with the above standards can lead to a decrease in the level of heat transfer from heating devices and incorrect operation of the entire heating system.
Another important point that is worth considering before installing heating radiators in a private house: their location in the premises. It is considered optimal when they are installed under windows . In this case, they create additional protection from the cold entering the house through window openings.
Please note that in rooms with several windows, it is better to install radiators under each of them, connecting them in sequential order. In corner rooms it is also necessary to install several heating sources.
Radiators connected to the system must have an automatic or manual heating control function. For this purpose, they are equipped with special thermostats designed to select the optimal temperature regime depending on the operating conditions of these devices.
Responsibility of the owner to the residents of neighboring apartments
Installation of new batteries must be carried out competently and professionally. Otherwise, there is a high risk of flooding your neighbors, which can lead to significant costs. This happened repeatedly. Either the owner of the apartment in which the radiators were replaced, or the organization that installed them, is responsible for the material damage caused. It should be noted that companies have more opportunities to relieve themselves of responsibility, so the owner of the property often has to compensate for losses. This usually happens in the cases described below.
New batteries are not public property
The management organization is responsible only for equipment that is considered common household property. If the radiators were installed by the owner of the apartment without her participation, he will be responsible for the flood. The court recognizes batteries as public property in the following cases:
- they heat several apartments, are located in the entrance, on the landing;
- The radiators are not equipped with separate shut-off devices and can only be removed after the common heating riser has been turned off.
Unauthorized replacement
In old houses, heating systems were installed during their construction and are considered common property. The management company is responsible for their repairs and the consequences of the flood. But she can prove that the radiators were replaced by the owner without permission when he did not have the appropriate permission. In such situations, the court sides with the company and forces the apartment owner to compensate the damage caused to neighbors in full.
To prevent this from happening, before replacing the batteries, it is necessary to send an application to the management organization requesting permission for such a replacement. It must indicate the type of new radiators and the date of their installation. The landlord should keep a copy of the application. In this case, the management company must drain the water from the heating system before replacing the batteries. It can send its specialists to install radiators or supervise how they are installed. A homeowner who acts in accordance with such rules will not be responsible for a flood to his neighbors if it occurs.
Responsibility of the homeowner for unauthorized removal of the battery
Changing the location of radiators is legally considered a redevelopment of housing. This means that the owner must first coordinate his actions with the relevant authorities. He will need to provide a design for the future transfer of batteries along with a technical plan.
If the reconstruction of the heating system is not agreed upon with the management organization, it is considered illegal and is subject to a fine of one thousand to one and a half thousand rubles. The court may require that the radiators be moved to their original location. If the owner has unauthorizedly connected an additional battery, the management company has the right to charge him an increased heating fee. With an unauthorized connection, it can increase 10 times.
Types of pipe routing
Connecting heating radiators in a private house can be done using a single-pipe or two-pipe scheme .
The first method is widely used in multi-storey buildings, in which hot water is first supplied through a supply pipe to the upper floors, after which, after passing through radiators from top to bottom, it enters the heating boiler, gradually cooling. Most often, in such a scheme there is natural circulation of coolant.
The photo shows a single-pipe diagram for connecting a radiator in an apartment with a bypass (jumper)
Its main advantages:
- Low cost and material consumption.
- Relatively easy to install.
- Compatible with underfloor heating systems and various types of radiators.
- Possibility of installation in rooms with different layouts.
- Aesthetic appearance due to the use of only one pipe.
Minuses:
- Difficulty in carrying out hydro- and heat calculations.
- The inability to regulate the heat supply on a separate radiator without affecting the others.
- High level of heat loss.
- Increased coolant pressure is required.
Please note: During operation of a single-pipe heating system, difficulties may arise with the circulation of coolant through the pipeline. However, they can be solved by installing pumping equipment.
The two-pipe scheme for connecting heating radiators in a private house is based on the parallel method of connecting heating devices. That is, the branch that supplies the coolant is supplied to the system is in this case not connected with the branch along which it returns, and their connection is made at the end point of the system.
Advantages:
- Possibility of using automatic temperature controllers.
- Ease of maintenance. If necessary, shortcomings and errors made during installation can be corrected without damaging the system.
Flaws:
- Higher cost of installation work.
- Longer installation period compared to single-pipe wiring.
The diagram shows an example of a two-pipe heating distribution
Simple ways to increase battery efficiency
To increase the heat transfer of radiators, it is recommended to improve air circulation in the heated room.
To do this, you need to empty the heating batteries as much as possible, that is, remove nearby furniture, remove protective screens and curtains.
This will increase air circulation, which in turn will increase the temperature inside the room.
If the above method does not bring the desired results, then you can speed up the air circulation using fans.
In this case, it should be said that the faster the air moves, the more heat it takes from the radiator and distributes throughout the room.
It turns out that to increase the heat transfer of the radiators, it is necessary to install a fan opposite them. This method is effective, but noisy.
To make such a system quieter and give it greater autonomy, it is recommended to install computer fans. In this case, fans must be installed directly under the batteries.
Using this method, it is possible to increase the temperature in the room from 5 to 10 degrees. It is also worth noting that using computer fans to increase heat transfer from radiators is considered a fairly cheap way.
Another simple way to increase the heat transfer of batteries is to install a heat-reflecting screen behind the radiator. This screen allows you to direct thermal energy directly into the room.
In this case, the ideal option is foil isolon, which is a foam base with foil. It is worth saying that the use of foil isolon will not only direct heat in the right direction, but will also insulate the wall.
To install a heat-reflecting screen, you can use almost any adhesive. It is worth knowing that the screen area should be slightly larger than the size of the radiator.
Radiator connection options
To know how to properly connect a heating battery, you need to take into account that in addition to the types of pipeline wiring, there are several schemes for connecting batteries to the heating system. These include the following options for connecting heating radiators in a private home:
- Lateral (unilateral).
In this case, the connection of the outlet and supply pipes is made on one side of the radiator. This connection method allows you to achieve uniform heating of each section with minimal costs for equipment and a small volume of coolant. Most often used in multi-storey buildings, with a large number of radiators.
Useful information: If a battery connected to the heating system in a one-way circuit has a large number of sections, the efficiency of its heat transfer will significantly decrease due to weak heating of its remote sections. It is better to ensure that the number of sections does not exceed 12 pieces. or use another connection method.
- Diagonal (cross).
Used when connecting heating devices with a large number of sections to a system. In this case, the supply pipe, just like in the previous connection option, is located at the top, and the return pipe is at the bottom, but they are located on opposite sides of the radiator. Thus, heating the maximum area of the battery is achieved, which increases heat transfer and improves the efficiency of heating the room.
Types of piping, or how to properly connect a heating battery
Providing heat to a house or apartment is task number one during the cold season. Therefore, every average person strives first to create an efficiently operating system that would be economically justified. And since most heating systems are of the radiator type, the question of how to properly connect heating batteries is one of the most pressing.
For many, this means nothing, especially for those who are faced with the problem of piping the heating system for the first time. But anyone who has already dealt with the creation of such schemes understands perfectly what we are talking about.
There are not so many classifications of types of piping and routing of a pipe system, especially when it comes to radiator piping. Therefore, it will not be very difficult to understand this issue. Most often, it is the pipe layout that influences the nature of the connection of battery radiators. Therefore, it is necessary to consider the classification of various heating systems and determine which of them is best suited for a particular connection.
Installation
As a rule, installation of the heating system and installation of heating radiators is carried out by invited specialists. However, using the listed methods for connecting heating radiators in a private house , you can install the batteries yourself, strictly observing the technological sequence of this process.
If you carry out this work accurately and competently, ensuring the tightness of all connections in the system, there will be no problems with it during operation, and installation costs will be minimal.
The photo shows an example of a diagonal method of installing a radiator in a country house
The procedure will be as follows:
- We dismantle the old radiator (if necessary), after first closing the heating line.
- We mark the installation site. Radiators are fixed to brackets that need to be attached to the walls, taking into account the regulatory requirements described earlier. This must be taken into account when marking.
- We attach the brackets.
- Assembling the battery. To do this, we install adapters on the mounting holes available in it (included with the device).
Attention: Usually two adapters have a left-hand thread, and two - a right-hand thread!
- To plug unused collectors we use Mayevsky taps and stop caps. To seal the connections, we use plumbing flax, winding it counterclockwise around the left thread and clockwise around the right thread.
- We screw the ball valves to the connection points with the pipeline.
- We hang the radiator in place and connect it to the pipeline with mandatory sealing of the connections.
- We carry out pressure testing and test run of water.
Thus, before connecting a heating battery in a private house, you need to decide on the type of wiring in the system and its connection diagram. In this case, installation work can be performed independently, taking into account established standards and process technology.
The video will clearly show you how to install heating radiators in a private home.
The efficiency of the heating system depends on a number of factors, including the connection of batteries. After all, if connected incorrectly, part of the radiator may remain cold even at high coolant temperatures. Therefore, in this article we will look at how to properly connect heating batteries and in which cases, which circuits are advisable to use.
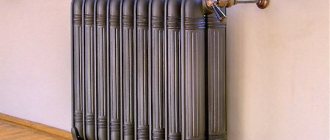
What is a bimetallic radiator
This is the most popular type of battery today. They are neat, easy to install, fit perfectly into a modern interior, and do not require regular painting. A characteristic feature of such thermoelements is their two-metal construction. The inner part is made of steel, and the outer part is made of aluminum. This allows for a strong base, resistant to high pressure and water hammer in central heating, and an efficient outer shell with high heat transfer. Bimetallic radiators are ideal for apartment buildings of any height. The only downside is their cost.
Connection features
Methods for connecting radiators
When installing heating systems in private homes, the following connection methods are used:
| Unilateral | In this case, the supply pipe is connected from above, and the return pipe is connected from below to the same section. This connection diagram for the heating battery allows the radiator to heat up evenly. However, if the accordion has a large number of sections, then significant heat loss will occur, so it is better to use other connection options. |
| Saddle and bottom | This method is an excellent option for cases where pipes run through the floor. The connection is made to the pipes located at the bottom of the structure, in opposite sections. The only disadvantage of this method is its low efficiency, since heat loss can reach 15 percent. |
| Diagonal | Used when connecting devices with a large number of sections. As you might guess, the inlet pipe in this case is connected from above, and the outlet pipe from below, in the opposite section. This scheme for connecting heating radiators in a private house promotes uniform distribution of coolant and maximum heat transfer from appliances. |
Note! When using a thermostat for heating parallel to the radiator, a bypass must be installed. This will allow you to regulate the degree of heating of the device.
As we can see, the methods for connecting heating radiators depend on a number of factors, such as the method of laying pipes, the power of the equipment, etc. In particular, the type of system is of great importance. We will talk in more detail about the types of heating systems below.
Types of system
When installing heating systems, two schemes are used:
- Single-pipe - is the simplest, since the coolant circulates through one pipe, to which heating devices are connected in series . Its disadvantage is that it does not allow you to regulate the heat supply. Therefore, heat transfer corresponds to the design norm laid down during the design. This scheme is used in small systems, since with a long pipeline and a large number of radiators, the devices will heat up unevenly.
- Double-pipe - its meaning is that hot water flows through one pipe, and cooled water returns to the boiler through the other . In this case, the connection of heating batteries in a private house is carried out in parallel. The advantage of such a device is the uniform heating of the sections, as well as the ability to adjust the heat transfer. The only drawbacks that can be highlighted are the need for more pipes, and accordingly the cost of the structure increases.
Features of the diagonal connection scheme
If you also wondered why a diagonal connection is the most effective, then you should consider this option in more detail.
If we take into account the process where hot air or water is involved, then the action will occur according to one physical law, which involves the rise of warm masses upward, while the cold ones sink downwards
To ensure uniform heat distribution throughout the volume of the radiator, the coolant should be distributed throughout the battery. As mentioned above, lateral connection in city apartments acts as the main circuit. After all, forced circulation under high pressure is used there. The diameter of the incoming and outgoing pipes is only 20 mm. Through them, water enters the battery under high pressure, which allows the device to be filled evenly and quickly.
If we are talking about private housing construction, where the circulation is natural, the filling of radiators occurs under the influence of the above-mentioned physical law. That is why hot streams penetrate through the upper pipe, pushing cold water through the lower outlet on the opposite side. The two pipes are located diagonally when viewing the device. This is where the name of the connection comes from. The coolant fills the battery gradually, releasing heat to the entire volume. It is necessary to take into account not only the law of heat transfer, but also the physical law. That is why this scheme is the most effective.
Methods for connecting heating radiators
Heating radiators are mounted on the wall, or, occasionally, on the floor. There are several ways to connect them.
The methods themselves are divided according to the side of the pipe connection (side, bottom) and according to the scheme for connecting several radiators at the same time (parallel, serial, cross).
The choice of a specific option is made based on several conditions:
- design number of radiators in the room;
- outlet side of connecting pipes: top, bottom, side;
- type of heating system: two-pipe or one-pipe;
- type of pipe laying: open or under plaster.
Let's look at connection methods in more detail.
Lateral
This option is the simplest and most common, since most radiator models have side pipe outlets. This is how it is calculated by the manufacturer.
The side connection is also convenient because unscrewing the nuts from the side is much more convenient than from below under the device body.
In addition to the bottom connection, there are wall-mounted radiators with top connection. The top side is usually clearly visible, so the connection will be visible and such a scheme is rarely used by manufacturers. The technological connection with it does not differ from the options with a bottom or side arrangement.
Lower
Bottom pipe connections are most often used when they are laid hidden under plaster. It must be taken into account that pipes with coolant, when laid even in non-combustible walls, require good thermal insulation.
Coolant temperatures up to 90 C do not pose a fire hazard. Thermal insulation is constructed so that only the radiator is heated, and not the wall from the inside. With properly designed thermal insulation, the efficiency of the heating system does not decrease.
Types of heating systems
One heating circuit is usually used for several rooms. The radiators in it can be connected either in series or in parallel.
In this case, a parallel connection requires the supply of two pipes to each radiator: with hot coolant and return with cold.
Parallel connection is justified for devices with high heat transfer. Consistent - ensures pipe savings.
Connection to a one-pipe system
In a single-pipe system, several radiators are placed sequentially one after another in a pipe section. The circuit is convenient for lateral connection. Then you will need a minimum number of pipes.
It must be remembered that one closed tap will disrupt the operation of the entire group that is connected in series behind it. A single-pipe scheme is usually used on the scale of one room.
Connection to a two-pipe system
A two-pipe system requires twice as many pipes. This disadvantage is largely eliminated if cheap heat-resistant polymer pipelines are used.
When is a two-pipe system beneficial:
- the purchased radiators have too much power and massive design for serial connection;
- There is only one radiator installed in the room; in any case, two pipes must be drawn to it;
- Only one room needs to be heated (for example, a studio apartment).
A two-pipe design will provide a higher level of reliability than a single-pipe design. It will also be possible to install taps on radiators and each individual tap will in no way affect the operation of the others.
Connection steps
The operating technology depends on the selected set of fittings and pipe material. If pipes are laid along the surface of the walls in a room, then the best option is classic metal pipes.
If heating lines are laid in advance under the plaster, or in specially designed channels, then a more modern option can be used. For example, polypropylene heat-resistant pipes.
Work with steel pipes is carried out with a standard plumbing tool kit. Plastic pipes and fittings require specialized crimping tools. They are not needed for all fittings. Many systems have a threaded crimp system.
How to install a heating radiator in a private house?
In a private house, everything is determined by the boiler and the existing heating wiring. A radiator is selected for it, and the selected model can have any design, material (aluminum or steel) and any suitable dimensions, but it must be consistent with the main technical characteristics:
- heat transfer power;
- operating pressure;
- compatibility by type of connection (classic threaded or fitting).
How to properly connect a radiator in an apartment?
In an apartment with a gas boiler (such options are especially common in older buildings where it is possible to install a chimney), radiators are installed in the same way as in a private house.
However, much more often you have to deal with the option when the apartment is connected to a common centralized heating network. In this case, the choice of the required radiator model must be consistent with it in terms of power and type of connections available.
Radiators for panoramic windows
In this article we will look at the main options for heating rooms with panoramic windows, their advantages and disadvantages. Large, wide floor-to-ceiling windows create a unique atmosphere in the house: they fill the room with light and open up a stunning view. At the same time, modern energy-saving double-glazed windows make it possible to use panoramic windows even in Russian conditions. It is not surprising that this architectural solution is gaining increasing popularity. But at the same time, it requires more careful planning of upcoming repair work.
In-floor convectors for panoramic windows
Most often, heating of such premises is assigned to in-floor convectors. This is the most obvious and simple solution from a design point of view: the convector is not conspicuous, does not block the view from the window, and at the same time is located directly under the window, reliably protecting the window from condensation. In-floor convectors are also convenient for interior designers: they may not take heating devices into account in their design, assuming that they will be invisible convectors in the floor. Most manufacturers provide the option of painting the decorative grille to match the color of the floor covering.
But in-floor convectors also have certain disadvantages that do not allow them to be called a universal solution:
- Firstly, it is not always technically possible to install them. For example, this may be due to too strict restrictions on the height of the convector, which makes it impossible to find a suitable model.
- Secondly, the design of convectors makes them difficult to clean: they quite easily collect dust, which is already difficult to remove from under the heat exchanger.
- Thirdly, in-floor convectors are a relatively low-power heating device. In most cases, they are not enough to fully heat the entire room. A solution could be to use forced convection convectors equipped with tangential fans, but this not only increases the overall cost of equipment and installation, but also negatively affects indoor comfort: constant slight noise from the fans, fine dispersive dust in the air, etc. .
In-floor convectors for panoramic windows.
Pros:
- Convectors fit well into the interior and do not block the view from the window
- Located directly under the window, convectors reliably protect the room from drafts and condensation on the glass
Minuses:
- It is not always possible to install convectors for technical reasons
- Trench convectors have low thermal power, which is why they can only be used in combination with other heating devices. Convectors with forced convection have high power, but they also have their own disadvantages.
- Like any convectors, trench convectors have dust removal pipes. Therefore, maintaining perfect cleanliness in the house will be more difficult.
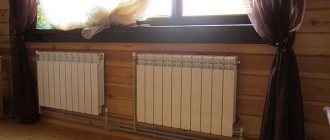
Low radiators for panoramic windows
Another heating solution can be low floor radiators. They are more versatile - they can be installed with almost any pipe layout in the apartment and at any floor pouring height.
The main disadvantage of low radiators is that they partially block the view from the window, and in some cases may interfere with its full opening, as well as with washing the glass.
Pros:
- Radiators are located directly opposite the window - they protect the windows from condensation, as well as the room from drafts.
- Low floor radiators can be installed in almost any conditions: any pipe layout and floor height.
Minuses:
- Radiators partially cover the panoramic window
- Low radiators will also interfere with opening the window (if provided for by its design), and also, in some cases, with washing the window.
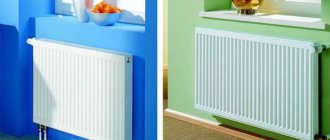
Radiators next to windows
An interesting design solution could be radiators located next to panoramic windows. In this case, the radiators evenly heat the room without covering the window. The main disadvantage here is the non-optimal location of the heating radiators.
Pros:
- In most cases this is the cheapest option
- Wide choice in the location of the radiator, as well as in the choice of radiator model
- Radiators are easy to clean
Minuses:
- The radiator does not block the flow of cold air from the side of the window, as a result of which the temperature near the window may be lower than in the rest of the room
- In some cases, condensation may form on the glass, but this is more likely a matter of insufficient ventilation or poor quality of the glass unit.
Radiator connection diagrams
The figure below shows connection diagrams for a one-pipe and two-pipe system:
Let's take a closer look at the correct location of the valve, faucet, jumper and air valve:
What taps should be installed on heating radiators?
Various designs of taps are placed in front of heating radiators. They serve to solve several problems:
- Mayevsky valve - to remove air;
- a regular tap - to adjust the amount of circulating coolant;
- The tap can be used to completely shut off the water during repairs.
The use of plastic pipe allows the installation of simple rotary taps. In an autonomous heating system made of metal pipes, it is better to use threaded valves that do not cause water hammer when closing.
In private autonomous heating systems, taps are placed at the entrances to the premises, in front of vertical sections and in other places. Their presence turns out to be very convenient when carrying out repairs of individual sections of the network.