Three-turn furnace laying diagram
The stove is a traditional means of heating rooms and entire structures. It is created from different materials, but the most popular are standard three-turn designs. They provide uniform heating of the rooms, and are also quite easy to form with your own hands. An important principle of competent masonry is strict adherence to the basic rules and requirements for this work. To do this, a special scheme is initially created, which must be followed during the construction process.
Principle of operation
Before the actual construction process, it is necessary to carefully and in detail study the entire operating principle of this equipment. In this case, it will be possible to avoid numerous problems during the implementation of the main stages of masonry formation. The following elements of the furnace can be distinguished:
As hot gases generated from combustion pass through various elements of the furnace, the room is heated. That is why the oven must contain all the necessary components to cope with all the tasks. Also, the masonry scheme must be carefully and competently thought out, since any violations can result in a low-quality design with low efficiency. Therefore, it is advisable to thoroughly study all the nuances of this work in advance and watch a training video in order to ultimately cope with the tasks with your own hands effectively and reliably.
Making a brick kiln
Since the structure is usually created from brick, you need to know exactly how this process is performed. To do this, not only a diagram is formed, but also an order is made, which indicates the correct sequence of use of each brick in the structure. The process of creating a furnace can be divided into the following stages:
Masonry structure
To do this, it is important to use drawings and other documents created in advance with your own hands.
If there are protruding elements, you can settle them with your own hands using a mallet. When the first row of masonry has been created, and the accuracy of the work done has been checked, the middle of the created row must be lubricated with masonry mortar . Next, the corner bricks of the second row are laid, and after that the perimeter is laid. As soon as two rows are laid out, you need to carefully check their evenness. The laying of subsequent rows is carried out in the same way, for which it is important to constantly refer to the existing order and diagrams. The seam in the stove masonry must be very thin, since the strength of the masonry depends on this . You also need to observe the correct ligation of bricks. For the firebox, the best solution is considered to be fireclay bricks, which are quite easy to work with your own hands.
Door installation
They can be cleaning or blowing. Before installing them, it is important to make sure that the fit of the canvas to the frame is sufficient. There should be no distortions or other problems that could cause the doors to not close properly. All defects must be removed before direct installation work.
Grate installation
Since this element is usually created from cast iron, it is important to remember that it heats up when the oven operates, which causes it to expand. Therefore, it is not allowed to firmly embed the element in the furnace masonry . Otherwise, you can expect structural destruction during heating of the furnace.
Installation of the combustion door
Installing additional items
The stove may contain a large number of different devices and parts that improve the comfort of its use. All these parts can be assembled by yourself. These include a cooking stove or a full-fledged oven, grill or other elements.
Basic tips for laying Dutch ovens
- Each brick must be dipped in water before laying. This will prevent the building material from absorbing moisture from the solution, worsening its properties.
- It is imperative to wrap the firebox door with asbestos cord. Otherwise, when heated, the styling will expand and may burst.
- You cannot lay down the combustion chamber with a simple brick. For this purpose, use only specialized fireproof material for construction. Fireclay bricks must be used in masonry from the 3rd row.
- The thickness of the seams also matters. In the combustion chamber they must be more than 3-5 mm. In other areas of the masonry - no more than 5-8 mm.
- If the stove is installed in the fall or during winter, in other words, when it is cold outside, it can be put into operation within a few days after the completion of the masonry. But the heating structure can be fully used only after 2 weeks.
The cross-sectional diagrams are very convenient and will be understandable even to beginners in the furnace business. But to dispel all your suspicions that installing a Dutch oven on your own is very easy, we suggest you watch the video. This small master class is designed to help you understand certain points that were not reflected in the publication.
Recommendations for work
In order for the stove to be reliable, durable and meet all the rules and safety requirements, during its formation with your own hands you need to follow certain tips, conditions and recommendations.
It is advisable to watch a special training video in advance, which explains the various nuances and features of this work. The basic rules include:
Thus, making your own brick oven that will meet all safety requirements is actually not difficult. It is only important to study all the necessary information in advance, know about all stages of work, and also use high-quality materials and tools. With the right approach, you can get a design that is reliable, durable and attractive. In this case, there will be no errors or problems in the stove itself.
Source
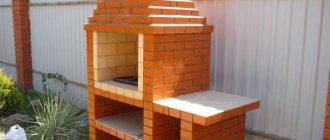
Small country stove made of brick
This heating stove, operating on the Dutch principle, has dimensions of 510 * 770 mm with a height of 2150 mm. Its heat output is 1760 kcal/h.
Preparation of materials
Construction requires 210 red bricks and 76 fireclay bricks for the firebox. For masonry you need about 80 liters of heat-resistant mortar. You will also need the following materials:
Stove diagram: 1 – roofing felt for waterproofing; 2 – blower door; 3 – firebox; 4 – cleaning door; 5 – valves.
Ordinal masonry scheme
The stove is placed strictly according to the order pattern, not forgetting about bandaging the seams and installing the doors. The doors are secured with steel wire, embedded in the masonry. The grate is installed after laying the fifth row. On the twenty-first row, the channel is narrowed by half a brick, and on the twenty-third row, a channel measuring 130 * 130 mm is laid out. The last row is laying the base of a chimney made of four bricks with a 130*130 mm channel.
Layout diagram from rows 1 to 15
Masonry sequence from 16th to 30th row
Upper rows of the oven
If laying a stove with your own hands seems like a complicated process, it makes sense to turn to professional stove makers for qualified help. In the hands of a master, an incomprehensible scheme can be transformed into a spectacular home hearth, warming the body and soul.
Order for a Dutch woman+
The three-turn Dutch oven+ is a large oven. It can easily heat a room up to 50 square meters.
Brief explanations of the order...
The 1st row is carefully laid on the prepared foundation and filled with mortar from above. There are 21 bricks at the base of the Dutch+.
The 2nd and 3rd rows are laid on the solution. It is necessary to pay attention that if up to the 3rd row inclusive, the bricks were laid flat, then further they will lie on the edge until the completion of the door trim in the 6th row inclusive.
On the 4th row, a stand should be equipped for the chimney partition.
Main! To make the oven easier to clean, “kick-out” bricks are placed along the back wall, in other words, bricks that are laid without mortar. You can look for Dutch schemes, where a sash is installed instead of “kick-out” bricks. But we do not propose to do this, since the disadvantage of similar structures is considered to be rapid heat loss.
At the same step, the firebox flap is installed, wrapped in non-flammable material, for example, asbestos. The door is secured with steel wire in the masonry joint.
Further rows repeat the contour of the 4th.
The 7th row is interesting in that the bricks lie not only flat on it, but also on an edge along the back wall. Starting from the 8th row, the material for construction again lies flat.
The 8-aerated concrete block row can cause difficulties, since it is necessary to place beveled bricks above the combustion chamber.
In the 9th row, the brick moves back a little. Do not forget to place a non-flammable material on top of this row.
material. This is very important for those who are planning to install a heating and cooking stove model.
The 10th row is the beginning of the development of the base for the chimney. If a brick chimney is an overly bulky and heavy solution for you, you can choose a metal pipe.
on the 11th row . Here a junction is formed between the stove structure and the chimney pipe. It is necessary to note that the laying of the Dutch here is done in quarters.
Further rows are performed in order. The process should not cause any difficulties.
When the installation is completed, install a chimney and close the gap between the floor and the stove with a pre-furnace sheet so that sand does not spill out from under the Dutch oven. Specialized skirting boards are installed at the junctions with the floor.
There are many options for decorating a Dutch dress. For example, it can be tiled or painted. In most cases, a similar stove design looks quite beautiful without any excessive decoration at all.
Types of stoves
The most popular modifications of brick kilns are:
heating stove units. The main function of this design is clear from its name. This stove is used for heating rooms. Heating stoves are characterized by fairly easy and quick construction;
heating and cooking stove structures. They are the most optimal, popular and in demand option among private developers. In addition to heating, such stoves make it possible to cook various foods, which allows you to save a lot on gas and other sources of thermal energy. This design includes a special stove or even a spacious oven;
Heating and cooking Dutch ovens
The working principle of all Dutch stoves is elementary - heated air follows an artificially elongated path to the chimney , but the design schemes are different:
- Shapes : rectangle, circle.
- Dimensions.
- The presence of additional equipment (stove, oven, stove bench).
- Gas distribution systems : multi-channel and bell-type . The latter is more effective, as it has a high efficiency - when fuel burns, heat remains in the chambers. Cool air entering the heated oven passes through, bypassing the chambers. The multi-channel system, for its part, is easier to construct, the number of channels reaches 6.
This design differs from the standard one in that it is equipped with an electric stove on rows 3-5 from the combustion chamber . The best material for such a part is a cast iron plate 5-8 mm thick .
The stove can be solid, solely for heating food, or with burners installed in it for cooking food. There may be several burners .
With electric stove and oven
This Dutch oven design is also equipped with an oven . The oven can be placed above the stove or on the side of the combustion chamber .
The first position is better, because in this case the hot air equally flows around the entire area of the oven. Being on the side of the combustion chamber, the structure heats up mainly on one side.
How to build a stove correctly
In the vast majority of cases, construction begins with the construction of a foundation for a future heat source. An exception may be outdoor mini-ovens, which due to their low weight are sometimes placed directly on the concrete screed of the yard. All others, regardless of location, must be built on a solid foundation. Moreover, it is not allowed for the foundation of the stove to be connected to the base of the house or placed close to it; it is necessary to leave a gap of at least 5 cm, and preferably 10.
Important. Failure to comply with this requirement may lead to the fact that after a year or two the stove may crack and even deviate from the vertical
If the house has a good foundation in the form of a cement screed, and the total weight of the stove does not exceed 750 kg, then a foundation is not required; masonry can begin directly from the screed, having previously laid sheets of asbestos and roofing steel. The structures presented in the previous section weigh over 750 kg, and therefore it is necessary to provide a reliable foundation for them. There are 2 types of foundations for the furnace: rubble and reinforced concrete.
Regardless of the type of base, you first need to dig a hole whose dimensions exceed the area of the stove by 10 cm in each direction. The depth depends on the thickness of the upper layer of chernozem or other subsidence soil, while the base of the foundation should rest on a denser layer. In the first case, the pit is laid with rubble stone and dressing, using a solution of the following components:
All voids between the stones are also filled with this solution, and the upper part, located at a depth of 80 mm from the floor, is also leveled with it. The reinforced concrete base is poured with formwork and reinforcing mesh, having previously poured a 10 cm thick cushion of crushed stone onto the bottom of the pit.
Important. After the mortar or concrete has hardened, a waterproofing barrier made of roofing felt in 2 layers must be laid on top of the foundation
The furnace is laid according to the procedures, observing the thickness of the seams within the range of 3-5 mm. After laying each row, it is necessary to control compliance with the vertical and horizontal using a plumb line and a building level. The mortar can be applied to the brick with a trowel or by hand; light tapping of the stone after placing it in place is allowed.
The remaining mortar is removed from both sides of the wall, and the inside is wiped with a wet rag to create a smoother surface. This is necessary to ensure the least resistance to flue gases.
When installing fittings and water tanks, it is important to ensure that there are no gaps between the masonry and the metal surface; the joints must be carefully filled with a solution, otherwise the stove will begin to smoke. Upon completion of construction, it is necessary to wait 2 days until the solution dries completely, after which you can test fire the stove starting with a small amount of firewood
How to build a small stove at home is described in detail in the video:
How to build a brick oven with your own hands
Brick stoves are popular in private households. It performs not only an aesthetic function, but also heats the house and serves as a hob. You can make the design yourself.
Why are brick ovens popular?
Brick stoves are found in private homes and country cottages. Despite the fact that there are more modern and technologically advanced ways to heat rooms of any size, it is possible to achieve comfort and a stylish interior only with such a design. Do-it-yourself brick veneer looks good in cottages.
The popularity of such heating elements lies in several factors.
- Thoughtful design. This helps retain heat much longer than with cast iron or steel varieties. One stack of firewood is enough for a full day of heating. Solid fuel is added to metal stoves every 5-6 hours.
- Economical. Combustion of fuel produces high heat transfer. Excess heat warms up the masonry, which in turn warms the rooms.
- Environmental friendliness. During the combustion of wood, carbon dioxide and a water base are released. These substances do not harm the environment.
- Soft thermal radiation. External parts do not heat up to maximum limits.
- Optimal humidity level. When bricks are heated, moisture evaporates from the pores, and when cooled, it is absorbed again. Thanks to this, the humidity levels in the room are 40-60%.
A hob is often installed on the surface of the stove. This allows you to prepare dishes with a special flavor.
Calculation of basic parameters
Before starting construction work, it is necessary to calculate what power stove is needed for installation in a particular house. Dimensions are determined based on the heat transfer capabilities of the furnace. For well-insulated buildings, the calculation algorithm of I.V. Kuznetsov is suitable. It involves the use of average thermal power, which can be obtained from 1 m2 of oven surface.
For most fireboxes, the typical indicator is 0.5 kW/m2, and for intensive operation during a significant cold snap - 0.76 kW/m2.
When determining the thermal power of a brick kiln, only those surfaces that participate in the heat exchange process are taken into account.
It is not recommended to choose massive rough bars for small rooms. This is due to the fact that they will take too long to warm up, and half of the heat will escape through the chimney. It is recommended to place it at the intersection of living rooms so that they warm up evenly.
Drawings and diagrams of brick kilns
Based on the proposed drawings, you can design and make a brick stove with your own hands.
The given diagrams are some of the most popular design solutions. You can construct such rough bricks with your own hands in a private home without outside help.
Firebox
The optimal dimensions of the firebox can be determined based on the maximum volume of the fuel fill. The amount of combustible materials is calculated taking into account the calorific value and their specific gravity. In order for the stove to operate at the required power, the volume of the firebox must be 2-3 times greater than the obtained value.
With the correct volume of the combustion chamber, you can fire the stove at extremely low temperatures outside the window. The size of the combustion chamber must correspond to the parameters of the bricks from which the stove will be built.
The maximum volume of solid fuel should not exceed 2/3 of the furnace.
Ash pan
The height of the ash pan is calculated taking into account the type of fuel that will be used to heat the room.
Low-ash varieties - coal, peat briquette. For this type of fuel, the height of the ash pan should be about 1/3 of the height of the firebox. Solid wood fuel – pallets, firewood. In this case, the height of the ash pan is reduced to 1/5.
Arrangement of an ash pit in the furnace is mandatory. Combustion products will enter this chamber and will not spread over the entire internal surface. Cleaning your oven before the cold season will be easy.
Chimney
The chimney is an essential part of the heating system, since fuel combustion products exit through it. Gas boilers require good draft, so the pipe is installed in a round shape. For a stove operating with solid fuel, a rectangular version will be sufficient.
When calculating the dimensions of the chimney, it is taken into account that the cross-section of the blower should be smaller than the area of the flue. The parameters of standard brick used as the main building material are also taken into account.
It is not recommended to significantly increase the cross-sectional indicators: cold air will penetrate through the wide pipe. This will degrade performance and lead to dangerous situations.
Chimneys that are too narrow can produce a lot of smoke. This leads to carbon monoxide poisoning and the possibility of fire. The problem can be prevented by building up an asbestos cement pipe or laying another row of bricks.
The chimney should not touch the wooden parts of the ceiling. During construction, you need to ensure that the distance from the chimney cut to the nearby ceiling beams is the same. The chimney should be 1.5 m from the roof ridge and rise above it by 0.5 m.
Preparatory activities
Before starting construction, it is necessary to go through the preparatory stage. It is worth taking it seriously - the more scrupulous the approach, the better the result. Making a brick stove with your own hands from scratch is a very real task.
Preparation for construction occurs in several stages.
- Buy building materials.
- Determine the location of the building in a residential building.
- Pouring the foundation.
- Prepare a solution for working with bricks.
These are the basic preparation steps before building a brick kiln.
Required materials and tools
To make a brick stove with your own hands, you need to select high-quality materials. To build the structure you need to take:
brick. Individual quantity calculations are carried out for each project; doors: for the blower and firebox; clay for mortar; lattice; soot cleaner; flap; grates; valve; cast iron hob.
It is forbidden to use sand-lime bricks to build a furnace - even the double variety is not suitable.
Refractory bricks are optimal for furnaces; ceramic bricks are rarely used.
The basis for the solution will be clay. Red is suitable for red brick, fireclay - for fireclay. There are also special mixtures for sale for the construction of stoves; to work with the solution, it is enough to prepare it as written in the instructions.
To build a furnace, take the following tools:
- putty knife;
- Master OK;
- tape measure;
- plumb line;
- mop broom;
- level for construction;
- knitting wire;
- containers for preparing cement and clay mortar;
- grinder;
- metal strips and corners;
- bushhammer.
The foundation under the structure must be strong and reliable. To do this, you need to prepare a stable foundation. The following materials and tools will be useful:
- sand;
- crushed stone;
- reinforcing mesh;
- cement;
- boards and nails;
- waterproofing material.
If external wall finishing work is planned, then you need to buy material for this.
Features of choosing a place to install a heating device
Usually the location of the furnace is designated even before the construction of the house in the project. This is necessary in order to install heating equipment in a place from where warm air currents will be evenly distributed throughout the rooms. The foundation for the stove must be separate from the general foundation of the house. The distance between their walls must be at least 150 mm.
Failure to comply with the rules regarding foundation construction will lead to deformation of nearby walls.
A properly installed stove should heat several rooms located across the wall at once. If there are several rooms in the house, it is worth installing the grub at the crossroads of the walls. Since the foundations must be separate, it is better to make the internal walls light.
There are cases when the stove is installed next to the front door. This is how a thermal curtain is made to protect rooms from the penetration of cold air masses.
It is better not to place the edges of the stove close to the walls of the house. This is due to the fact that it is necessary to ensure full access to the rough. Owners are advised to regularly inspect heating equipment to comply with safety regulations. If the stove is part of the wall of a residential building, then a layer of heat insulation is laid between it and the end part of the partition.
If the stove is installed in a built room, then it is necessary to ensure that the chimney is not located too close to the beams. The distance is more than 15 cm, taking into account the thermal insulation gasket.
The area in front of the firebox is covered with fireproof material. Typically, metal sheets or ceramic tiles are chosen.
Construction of the foundation
In order for the stove to operate safely and efficiently, the foundation must be properly equipped. It must be separate from the common house.
Before starting to construct and lay the foundation, you should pay attention to the fact that the distance of the chimney from the roof slab should be more than 15 cm. Markings are applied where the grout will be located.
If the house has wooden floors, they are cut out at the location of the stove. 15 cm retreat from the outer edge. A pit is dug in the resulting hole. Its depth depends on the climatic conditions of the region and the degree of soil freezing, usually 0.7 - 0.8 m is sufficient.
15 cm of sand is gradually poured into the bottom of the hole. It needs to be watered to compact it. Crushed stone is poured on top in a layer of up to 15 cm. It is compacted tightly and evenly. Wooden pegs are driven into the corners of the resulting pit, and cladding boards are attached to them. The walls are covered with a polyethylene wall to prevent cement mortar from seeping into it.
A reinforcing mesh is installed 5-10 cm from the floor. It is placed on metal rods or broken bricks nailed to the bottom.
Concrete is prepared to pour the foundation. To do this, mix cement (M-400), sand and crushed stone in a ratio of 1:3:4. Pour in a small amount of water: the consistency should be medium fluid. If you overdo it, the base will turn out to be fragile and will begin to quickly collapse under the load of rough material.
The prepared mixture is filled into the formwork and leveled using the rule. After a few hours, when the composition “sets”, it needs to be covered with film. The prepared site for the structure is left for several weeks until the solution dries.
The upper base of the stove should be located 15-20 cm below floor level.
Preparation of the solution
For laying stoves in a private home, clay and sand mortars are used. Kaolin and fireclay marl are suitable for fireclay. For ceramic bricks, use ground gray and blue Cambrian clay with fire-resistant characteristics.
For 100 bricks you will need about 40 kg of clay.
Before preparing the solution, the clay is checked for fat content. This is necessary in order to determine in what proportion it should be mixed with sand.
To test, 1 kg of clay powder is filled with water to the top edge and left for 24 hours. If marl is used in construction, it only needs to stand for 2 hours. After souring, the clay is diluted with water; the consistency should resemble thick dough.
The resulting wet clay is divided into 5 equal parts. Sand is added to each in different percentages: 10%, 30%, 50%, 70%, 100%. After this, the resulting composition is dried for 4 hours. From each mass, roll small sausages (diameter - 1.5 cm, length - 30 cm), roll them into a circle.
- If there are no cracks in the mortar, it is suitable for any construction.
- There is a dry crust and minimal damage - it can be used.
- The cracks are about 1 mm deep - suitable only for low-power heating equipment.
- If there are kinks or deep damage, the solution must not be used.
The solution can be prepared using an identical algorithm.
- Pour the required amount of clay with water for a day.
- Knead it to the consistency of dough, sift through a 3x3 mm sieve - this will remove lumps.
- Add sand in the proportion that testing has shown to be optimal.
- Pour in water and stir until the consistency resembles thick sour cream.
If the fat content is not enough, you need to add sand or clay. It is checked with a trowel - the trowel is soaked in the solution and the result is assessed. With a normal ratio of components, 1-2 mm of the composition will stick, no more and no less.
How to properly build a brick oven. Instructions for the progress of work
Before starting work, you should familiarize yourself with the procedure for the selected type of oven. Visual diagrams will tell you in what order to lay the bricks.
After choosing the type of rough stone and its arrangement, you can proceed to instructions on how to build a brick stove in your house. This step-by-step guide is suitable for those who would like to get oven equipment with a hob.
This completes the installation of the brick stove with your own hands. Next you need to move on to constructing the chimney. It is laid out from the first row of the rough and finished where indicated in the order. In the example given, this is the 26th row. If necessary, the chimney is made higher.
In the third row of the chimney you need to install a special door. It is necessary in order to clean it from combustion products. On the 27th they install a central damper. Starting from the 31st row, the cross-section begins to gradually decrease so that the pipe can be taken outside.
In the place where the pipe from the furnace will pass through the ceiling, you need to lay a layer of non-combustible material. Expanded clay and mineral insulation are usually used.
Furnace arrangement options
These are the main popular options. It is worth carefully reviewing the diagrams before starting construction work - they show step by step how and in what sequence materials should be placed.
- The order of the Swedish oven.
- Dutch order.
- Order of the Russian stove.
- Ordering a sauna stove.
- Ordering of the Kuznetsov furnace.
Briefly about the installation of the oven and heat exchange register
Some designs provide for the installation of an oven. It needs to be mounted in a place where it would be washed by the maximum amount of heat flow. The optimal zone is the transition from the firebox to the heat exchanger. Metal corners are placed on the side walls of the horizontal flue. At the points where the oven touches the wall, asbestos cord or basalt cardboard is laid as a seal.
The heat exchange register is placed in the hottest zone of the stove. It can be located at the beginning of the flue, in the rear part of the firebox or under the hood (for non-revolving options).
Assembling a brick stove for a private home is not a difficult task. If you have the necessary tools, diagrams and quality materials, you can make a productive and durable roughener for regular use.
The process of laying the Radonezh stove
First step. Cut a hole in the wall for the stove. Drive reinforcing dowels into the ends of the beam (if the wall is made of this material).
Second step. Pour the foundation.
Start laying 1-1.5 months after laying the foundation. It is during this period that the concrete will gain the required strength.
Third step. Cover the dried foundation with waterproofing material.
Fourth step. Lay out the first row of the oven. Check the evenness of the masonry using a level. Make seams no wider than 3 mm.
Continue laying the stove in accordance with the order.
The grate and ash pit are installed in the combustion chamber. The width of the furnace vent must be sufficient to allow the required amount of air to flow to the loaded fuel during operation of the heating unit.
Lay out the furnace combustion chamber and sew the channels. Trim off excess mortar.
When laying the 26th row, make a 20 mm overlap on each side.
Complete the laying of the main part of the stove in order and begin laying out the chimney.
Continue installing the chimney in accordance with the previously prepared project.
Dry the finished oven. To save time, install a fan in the combustion chamber.
After the masonry has dried, make several test runs. Don't make the first fires too intense.
If everything is done in accordance with the instructions, order and basic requirements, after an average of 30-40 minutes, the side of the stove facing the room will heat up. After about 1.5 hours, the unit will warm up evenly and begin to fully heat the room.
Building a heating stove with your own hands is a rather complex and lengthy process, but if you wish, you can cope with such an event. You just need to follow proven technology, use only high-quality building materials and adhere to the chosen masonry scheme in everything.
As a result, the heating unit will serve as long as possible, reliably and efficiently, and you will additionally save on arranging the heating system for your home by refusing the services of third-party stove makers and doing everything yourself.
Video - Do-it-yourself heating stoves
Video - Do-it-yourself heating stoves
Everything is very well written. I’ll add on my own that there is no need to look for fireproof clay. Now ready-made mixtures for laying stoves and fireplaces are sold on the building materials market. Everything is already mixed there in the right proportion. There is one more point about drying the oven. Make the first launch using exclusively paper and cardboard as fuel. Firewood is highly undesirable. Then you will get the required temperature. Warm it this way for no longer than an hour. When drying, the clay may smoke a little. That is, there will be smoke in the room. Don't be scared by this. The clay will dry very quickly and the oven will work as it should.
I would like to suggest one interesting idea that I myself have experienced. Inside the oven you can lay out “Gabrodiabase”. This stone is a type of granite and is used to make monuments. You can ask for trimmings at funeral services, after making sure that it is really gabrodiabase and not simple granite. You can buy it, but this stone is very expensive because it can withstand high temperatures! Good luck!
At the dacha, I twice made stoves in the house and in the bathhouse on my own. In the latter, the second option turned out to be relatively successful, but the design itself is simple. In the house, the basis was metal stoves lined with bricks. I immediately rather modestly assessed my capabilities in constructing a more complex structure, and I still think so, having already had experience. That is, for the construction of a good stove and, especially, a fireplace, it is best to turn to good stove makers. By the way, my sister did just that and until they installed the boiler, it worked great for them.
Have we answered your question?
Swedish small three-turn
Rice.
38. Small Swedish three-turn design by K. Ya. Buslaeva Additional tiles are attached to the main plate; the dimensions of all parts are shown in the figure and on the plans-drawings of the masonry in rows.
In Fig. 38-a shows the masonry from the 1st to the 6th row.
Rice. 38-a. Masonry of a small Swedish three-turn from the 1st to the 6th row
The 1st and 2nd rows can be laid out from halves and crushed stone, observing the bond. A blower door is installed on the 2nd row.
The 6th row is laid out as shown in the drawing.
In Fig. 38-b shows the masonry from the 7th to the 12th row.
Rice. 38-b. Laying a small Swedish three-turn from the 7th to the 12th row
The 7th and 8th rows are laid out as shown in the drawings. On the 9th row, additional tiles are applied to the main slab under the firebox 40 x 25 cm and in continuation of the slab 40 x 15 cm.
The 10th and 11th rows are laid out as shown in the drawings. If the door frame is flexible, then on the 12th row you need to put strip steel at least 55 cm long.
In Fig. 38-c shows the masonry from the 13th to the 18th row.
Rice. 38-in. Laying a small Swedish three-turn from the 13th to the 18th row
After laying out the 13th row, corner steel (steel 1 and strip steel 2) are laid on the mortar. If corner steel is not available, strip steel can be installed.
The 14th-18th rows are laid out as shown in the drawings.
Basic design elements of a heating furnace
Diagram of elements of a heating furnace
All existing heating stoves have approximately the same and fairly simple design. However, despite their simplicity, stove units are capable of fully solving the problems associated with heating residential premises.
The main components of a heating stove are the fuel compartment and the smoke exhaust structure. If a heating and cooking stove is being considered, the design must include a stove or oven. At the owner's request, his stove can be supplemented with a tank for heating hot water.
Heating stove. General scheme
Heating stove. General scheme
The most important part of any heating stove. Calculate the volume of the firebox in accordance with the area of the heated space, the characteristics of the fuel used, etc. To make a stove firebox, use high-quality fire-resistant bricks. The walls of the firebox should be half a brick thick.
Ash pan (ash pan) for the stove
This compartment is designed to collect waste from the furnace. Oxygen is also supplied to the combustible fuel through the ash chamber.
The ash pan is located below the grate and is equipped with an individual door.
The height of the firebox is usually 3 bricks.
Rules for constructing a brick chimney
A very important component of any oven. Gases are removed through the chimney. At the same time, the design provides additional heating of the room.
Brick stove - arrangement of a chimney for it
If possible, the chimney should be designed so that it is as straight as possible. Any bends will negatively affect the efficiency of the heating stove.
Mortar for laying out a heating furnace
In order for the operation of your heating stove to be as efficient, reliable and safe as possible, and for the structure itself to last as long as possible, you must properly prepare the masonry mortar.
The laying of heating stoves is carried out using a viscous solution prepared on the basis of clay and sifted sand.
To obtain such a solution, you need to fill the clay with normal humidity with water and soak it thoroughly. Pass the mixture through a sieve and stir until smooth. Then add sand to the mixture in the amount necessary to obtain a solution with the required plasticity and viscosity.
Furnace mortar
Pay due attention to preparing the mortar for masonry. The quality of the finished furnace unit, its main characteristics and service life depend on the correctness of its preparation.
Do-it-yourself oven with stove - simple procedure
Test kindling is carried out with a small amount (about 500 g) of paper. This is done in order to determine the presence of draft and remove residual moisture from the oven. The blower should be completely open at this moment. After this, the oven is left for another day.
Advice. If it's damp outside, the fire may not burn well the first time. In this case, in order to “push” the air upward, you can burn a newspaper rolled into a tube in the upper cleaning door or view.
Subsequent kindling with wood chips and a small amount of firewood should be carried out carefully. The maximum amount of fuel can be added only after several kindlings
An ideally built stove does not smoke and heats up evenly. You can determine the degree of heating by touching different parts of its surface with your hand. A brick oven should also cool evenly.
The density of the masonry and the absence of cracks are determined by burning materials that produce a lot of smoke in the smoke channel. If cracks are found through which smoke will pass, they are covered with a solution.
Smoke movement pattern
Types of sauna stoves of our own production
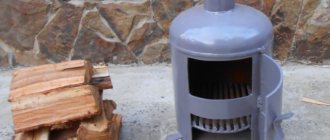
Brick stove
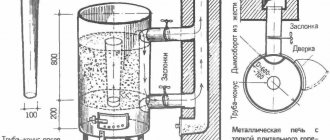
Rice. 1 Device of a flow-through heater. 1 – blower; 2 – firebox; 3 – water tank; 4 – combustion grates; 5 – grate bars for the heater; 6 – stones; 7 – heater lining; 8 – compensation distance (5–8 mm) of the lining brick from the furnace brick; 9 – furnace lining; 10 – finishing the walls of the heater with metal sheets.
Flow-type heater: flue gases from the firebox pass through the stones. This is only possible if you have a direct-flow (all gases go directly from the firebox into the atmosphere) or a recirculating (3-5 channel, knee) furnace.
Such a stove is heated with non-resinous wood. At this time, the loading and cleaning hatch is hermetically closed. Water is applied to the stones after complete heating, when only ash remains on the grates.
Periodically, the stones need to be washed and cleaned.
In the popular Kuznetsov bell-type sauna stoves, the heater is closed.
Rice. 2 Kuznetsov furnace
It is located in the upper cap. A coil for heating water is also laid here. Such a sauna stove with a tank that can be easily inserted compares favorably with a channel stove.
Metal stove-heater
The main problem with this design is to organize the heating of water so that it does not evaporate intensively.
Fig.3 Construction of a metal stove-heater. 1 – firebox; 2 – ash box; 3 – chimney; 4 – protective screen; 5 – pipe for heating water; 6 – heater; 7 – scenes; 8 – visor; 9 – combustion grate.
Here the heater is solid: it heats up due to the heat coming from the firebox. The wings slow down the speed of gases, which helps warm up the stones.
The water is heated by a coil made from a water pipe, which is laid under the stones. The water container is located in the washing compartment.
Combined: metal, lined with brick.
The appearance of such a design is dictated by the fact that the bathhouse, as a structure, must be dried after the procedures
This is especially important because it is simply impossible to protect the frame and wooden cladding from rotting with chemical compounds. Their vapors, one way or another, will end up in the atmosphere of a steam room or sink
It is clear that a metal stove cools down quickly after burning wood. The brick acts as a heat accumulator.
Rice. 4 Oven lined with brick.
This option is quite common. Its only drawback: in an existing bathhouse with a metal stove, you cannot do without an additional foundation.
Do-it-yourself bricklaying of a sauna stove
If during the construction of a house the seams between bricks can reach 10 mm, then for a stove their thickness of more than 4 mm is already a disaster. Due to periodic heating, such seams very quickly crumble, and smoke and carbon monoxide begin to enter the room. Therefore, brick stoves for a bathhouse must be built from the same one-dimensional bricks with an even bed and side walls.
Ordering a sauna stove
Under the steel corners on the 5th row, areas are also selected with a grinder so that the metal is flush with the plane of the brick. The grate bars are laid freely on the corners and, if they burn out, they are just as freely exchanged for new ones. In addition, by expanding the grate bars do not destroy the brickwork.
Next, you should start constructing the combustion chamber, and after that, continue to raise the outer walls. In this way it is much more convenient to maintain the required dimensions of the high-temperature firebox and adjust the size of the thermal gaps between it and the outer wall.
Lay out the firebox of the sauna stove
The firebox is laid from fireclay stove bricks and refractory clay. It is not advisable to make the entire furnace from fireclay bricks, since it has a low heat capacity and cools quickly. On the other hand, using ordinary red brick, even ceramic, in the firebox leads to its rapid destruction from high temperature, and a do-it-yourself brick sauna stove simply fails.
The firebox doors, as well as the doors of the heater chamber, are secured using wire or metal strips, as mentioned above. The perimeter of the door frames should be wrapped with a stove basalt cord, which compensates for thermal fluctuations in size. Similar compensation is made on the guide frames of the chimney dampers.
Selecting grates and stones for the bath
Particular attention should also be paid to the selection of grate bars. They work in very aggressive temperature conditions and therefore can quickly burn out
Therefore, grate bars are usually made from heat-resistant thick cast iron, but in no case from reinforcement or construction wire rod, no matter how thick it is. Excellent DIY brick sauna stoves are made from scraps of rails or rail pads. The service life of such grates exceeds the service life of the stone stove itself.
Cobblestones for the heater should be round in shape and of a size that allows you to easily load and unload them through the door of your chamber. The role of cobblestones can be played by medium-sized pieces of broken insulators of high-voltage lines. They are made of heat-resistant glass and can withstand rapid temperature changes. But the heat capacity of glass is worse than stone, such a furnace will cool faster.
Sauna stove with bottom heating
In addition to 260 pcs. You will still need bricks for construction:
- firebox door 210 x 250 mm and blower door – 140 x 140 mm;
- cleaning doors 140 x 140 mm – 2 pcs.;
- chamber doors for stones 210 x 250 mm – 2 pcs.;
- cast iron plate 410 x 410 mm;
- grate 175 x 255 mm;
- valves 130 x 240 mm and 130 x 130 mm.
Next, to lay out a brick oven, you must adhere to the following rules:
- soak each brick in a container of water before laying;
- apply the solution not to the stone, but to the previous row;
- lay the brick with its smooth side facing the smoke duct;
- First lay out each row without mortar to fit the stones;
- the remaining solution is removed, and the inner surface is washed off and wiped dry every 3-4 rows;
- horizontal and vertical checks are performed on each row.
After finishing the masonry, it is allowed to dry for a couple of days, after which a test kindling is done with a small amount of firewood. When the dampness is completely gone, the stove can be fully heated.
Brick stove for a bathhouse: ordering
If you lack the skill to build a brick sauna stove with your own hands, it is not advisable to try to develop the project yourself. It’s easier to find a drawing and put it in order. For an inexperienced builder, the Kuznetsov bell-type model is suitable, it is easy to construct and takes up little space in the bathhouse.
Brick rows start without mortar. Standard designs sometimes do not allow you to fit a stove into a bathhouse. Dry-laid bricks can always be rearranged to determine the optimal dimensions. When the situation clears up, continue bricklaying with mortar.
The zero row of the order is laid out continuous. A small window is left on the side for better traction. The next rows come with dressing. A displacement of 30-50% gives stability to the brick structure.
A blower door is installed on the 3rd row of brickwork. The ash chamber ends on the 6th row with grates. Above the ash pit there is a firebox, where a door is similarly built into the brickwork.
Approximately on the 12th row, a stove slab is laid above the firebox, covering one part of the shaft. The main shaft is approximately driven out to row 26-27, gradually moving on to forming a chimney.
Plastering surfaces
Having studied the ordering process, now every novice master knows how to build a brick stove for a Russian steam room. Having completed the main construction work, you can proceed to plastering the structure. Applying plaster improves the visual characteristics of the stove and prevents it from catching fire.
For plastering, you can use a solution based on clay, gypsum or an asbestos component. To ensure better adhesion of the plaster on the surfaces being treated, it is recommended to add regular table salt to the finished solution. If you don’t want to bother with mixing the solution, you can purchase ready-made clay-sand mixtures.
Before plastering begins, the furnace structure must be dried. All surfaces are thoroughly cleaned of the connecting solution, the seams are cleaned 10 mm deep. Some craftsmen apply the plaster solution to a pre-attached mesh of metal wire, which serves as a sheathing.
Using a spatula, spread the finished solution onto the moistened surface in two layers. The first layer should have the consistency of thick sour cream, and the second layer should be denser and more viscous. The thickness of each layer can reach 10 mm.
After applying the solution, the surface is rubbed and leveled.
A finished brick stove with your own hands can be lined with ceramic tiles, tiles, or simply painted with white paint.
Now any master has an idea of how to build a Russian stove from refractory bricks. Having previously prepared your own drawing of the future structure will allow you to bring any idea to life without involving outside help.
Types of brick kilns
Before starting the construction process, it is necessary to decide on a specific design scheme. There are only 4 of them, and they differ in the heating method:
- "In white." This stove takes a long time to warm up. This process takes about 12 hours. Its obvious advantage is the absolute absence of dirt in the room due to the use of stones.
- "In black." This method of heating a bath has been used for quite a long time. This stove does not have a chimney, so the air in the room will be saturated with aroma and steam. The disadvantage of this method is the need for final combustion of the fuel.
- "In gray." Due to the presence of a chimney in the stove, the bathhouse warms up more intensely. The disadvantage of this scheme is the same as the previous one.
- "With a stove." The essence of this design is that there is a tank fixed with bath stones on a cast iron plate. It (the tank) is fenced on three sides with brick walls and is most often placed above the firebox, while the stones are above the chimney. The plates are not completely closed. In some cases, the location of structural elements may differ.
Brick oven "black"
Also, a brick sauna stove can be of continuous or periodic operation.
In the first case, the stones will be placed in a box or metal flooring. Warming up will be carried out due to heat transfer between materials.
In the second case, the fire passes through the stones.
Parameters of brick kilns
The dimensions of the structure are selected in accordance with the area of the bathhouse itself. Most often, the base for such a stove has dimensions of 89x102 cm or 102x129 cm, and its height, excluding the chimney, is 168 cm and 210 cm, respectively. A larger design is more suitable for rooms with high ceilings.
The tank for heating water in brick kilns can be placed either at the top or at the bottom.
Mixing connecting masonry mortar
To mix the solution, clay and sand are used in a ratio of 1: 2 (for one clay part, 2 sand parts). The clay is pre-soaked in a small amount of water.
To do this, the material is placed in a container, filled with water and mixed thoroughly. To simplify the kneading process, you can use a drill with an attachment. The clay is kneaded until it becomes sufficiently plastic.
Only after this is slightly damp sand introduced into it in parts and stirred. A well-prepared stove solution should be viscous.
After preparing the base, the next step is mixing clay and sand. It would seem that why exactly such a composition is needed if there is cement, but the answer is obvious - the cement mortar is completely unable to withstand exposure to high temperatures. That is why all designs of a brick heater stove for a bathhouse require a sand-clay composition.
The best clay for laying a stove in a bathhouse can be obtained at a depth of about half a meter. Naturally, the material must be thoroughly cleaned and soaked for several days before use. For soaking, you can make a small groove next to the bath. It is necessary to prepare not only clay, but also sand - it must be cleaned of various impurities and thoroughly sifted so that there is no debris in the masonry joints.
The clay is kneaded directly in front of the slave. Experienced stove makers use a special “oar” for these purposes, which is perfect for these purposes. Next, water is added to the clay, and it all mixes well until it becomes sour cream. Moistened sand is added to the clay mixed with water.
To determine the quality of the resulting solution, a dry and clean stick is lowered into it, and the result is determined by the following criteria:
- If a layer of mixture less than 1 mm thick has stuck to the stick, you need to add clay;
- If the thickness of the adhering layer exceeds 3 mm, sand is added;
- If 2 mm of the mixture adheres to the stick, then the solution is suitable for use.
Kiln brick laying up to the chimney is done exclusively with clay mortar, without cement. To prepare it, you need to take the same amount of sifted sand and clay purified from impurities (that is, the proportion is 1: 1), mix and add water. A good consistency is when the solution slides off the shovel easily, but there is no excess water in it.
You can also take clay from a nearby ravine and prepare it yourself. It will need to be soaked in a trough for 2-3 days, and then mixed thoroughly and manually pushing the mixture through a sieve, separating stones and other foreign fractions. The amount of water for soaking is taken in a ratio of 1: 1 to clay.
Cement does not tolerate high temperatures well, so it is not used for ovens. Masonry is made using a solution of clay, mined at a sufficient depth without impurities of earth and other foreign inclusions, and sand.
Before starting work, the clay should stand in water for several days and soften. Before combining with sand, it is thoroughly mixed with water to the consistency of thick, thick sour cream. The remaining lumps can be broken up using a construction mixer or a drill with a special attachment.
But the fat content of clay varies, and the fatter it is, the more sand should be in the solution. That is why experienced stove makers check the viscosity by shaking it from a stick or trowel.
The normal thickness of the layer remaining after shaking is 2 mm. If it is less, clay is added. If the consistency of the solution resembles plasticine, and after shaking, more than 3 mm of solution remains, more sand should be added to the mixture.
Place for the furnace
Choose the optimal location for the heating stove. For example, a stove installed in the center of the room will distribute heat as efficiently and evenly as possible. However, such placement of the stove is not always convenient.
Stove in the center of the room
If the stove structure is placed against the wall (this option is the most popular and frequently used), cold will flow across the floor of the house.
Select in advance the location of the combustion chamber door. Design the stove so that in the future you do not have to carry fuel throughout the room, spreading dirt around the room.
The heating stove is located against the wall
The best option is to install a firebox in a room that is rarely visited.
Recommendations regarding the foundation are standard - an individual concrete foundation is installed. It cannot be connected to the main foundation.
Calculate the design of the foundation in such a way that it is able to withstand the load not only of the furnace itself, but also of the smoke exhaust structure, which is also strongly recommended to be built of brick.
Dutch oven five-turn
After installing a new hob, you need to cover all the holes with a mixture that is resistant to high temperatures. In cases where bricks are damaged somewhere, they also need to be replaced. Before plastering the stove, it is necessary to clean its surface from old paint and plaster that does not adhere well.
To do this, you need to boldly use a trowel or spatula, scattering everything that does not hold securely on the walls of the stove. The resulting dust must be swept away with a broom or large brush dipped in water. Then you need to plaster the resulting potholes. This can be done using a spatula and a trowel or trowel. If possible, it is best to use natural clay.
Dry mixtures, of course, are much easier to dilute and apply, but clay is the most environmentally friendly. The plaster is applied to a surface previously moistened with water, as water provides better adhesion. After the plastered areas have dried, they need to be whitened or painted over with the paint that you are going to use for the entire surface. After the whitened areas have dried, you can begin painting the entire stove. As a rule, stove repair is combined with whitewashing the entire house, so the work needs to be carried out comprehensively, but first of all, clean the chimney and wells.
The dirtiest areas of the stove are painted last: near the firebox, the vent and above the hob. All stove repair work is carried out in the warm season; the stove must be cold.
Features of stove heating
Stove heating has a number of advantages, thanks to which wood-burning brick stoves have not lost their popularity for several centuries. The most important advantage is the ability of the ceramic bricks from which the stoves are made to accumulate and release heat for a long time.
At the same time, radiant energy useful for the human body is released into the space, giving a feeling of warmth and comfort. With regular heating during the cold season, the house is always warm and dry, and natural ventilation is formed due to the stove draft. In hot weather, the stove, on the contrary, cools the rooms by removing excess heat into the ground and air through the foundation and chimney.
In addition to creating a comfortable microclimate, a brick oven can provide additional functions, the availability of which depends on the design:
Furnaces that provide several functions are called combined. These types of stoves include heating and cooking stoves, fireplace stoves, as well as several popular basic models, including the Russian stove.
Stove heating also has disadvantages, including the inability to effectively heat remote rooms. Therefore, in large houses, they usually install several stoves with separate or combined chimneys or combine stove heating with other types of heating.
In compact houses consisting of one or several rooms, the stove is usually located in the center, so that its walls are located in all rooms. The hob and oven are placed on the kitchen side, the stove bench is in the bedroom or nursery, and the open fireplace is in the living room or dining room.
How to make a three-turn oven
The overall structure and design of the furnace depends on the smoke circulation system. The more revolutions, the larger the oven becomes. From the history of furnace business it is known that multi-turn systems previously consisted of 7, 9, 11 and even 13 vertical channels connected in series, and that multi-turn furnaces were very often built with mixed channels - vertical and horizontal.
From multi-turn systems we switched to designing furnaces with no more than five turns, which have sharply decreased in size. In Fig. 24 shows a schematic diagram of the smoke circulation system of a furnace with bottom heating. The principle of the device is that hot gases pass through the back wall of the firebox, go down and heat the entire space at the level of the ash chamber. This “walk of flue gases” occurs due to the fact that in the center of the rear wall of the firebox there is a wall that forms, as it were, two channels - one lowers the gases down, and the other directs them along the revolutions.
An interesting phenomenon occurs with the speed of movement of flue gases inside the channels. If you put glass in a window for cleaning and monitor the movement of gases, it turns out that the speed of gas movement inside the channels is close to the average wind speed. This experience characterizes the traction force of the furnace.
Of great interest is a smoke circulation system with one ascending and several descending channels, subject to lower heating and unequal heights of the descending channels (schematic diagram in Fig. 25).
Rice. 24. A system of alternating ascending and descending chimney channels. Rice. 25. Smoke circulation system with one ascending and three descending channels.
Construction of a stove for a summer residence and its features
The main elements of any brick stove for a summer residence are:
Foundation. For any stove it is necessary to build a separate foundation, not connected to the main foundation of the house.
Ash pit (ash chamber). This element of the furnace is designed to collect products during fuel combustion. Oxygen is also taken in through the ash pan, which is necessary for the combustion process.
The ash pan is located below the combustion chamber and is always equipped with a metal door through which cleaning takes place. A grate is laid between the ash pan and the combustion chamber. Typically, the ash chamber is 3 bricks high.
Scheme for laying a stove for a home
A diagram for laying a stove for a home is the first thing that a person who decides to install heating in his home using a stove will need. In this material we will look at what layout schemes for home brick ovens exist, what are their features and differences.
Laying a stone stove can be done in the following ways:
When arranging a stove using the first method, plastering the stove is not required, since all seams are filled with mortar. The thickness of the kiln walls determines the way in which the bricks are laid. The walls are laid out with a thickness of one brick and half a brick. Sometimes you can find a masonry of 3.4 bricks. For work on the installation of a stove, it is imperative to use stove bricks. It is also called “red brick”, solid. Under no circumstances should you use bricks that have been taken from a dismantled building, expanded clay blocks or slotted bricks.
The first row is laid simply with bricks, without using mortar. The brick is leveled, the front wall and the places where all the doors will be located are determined. These operations can be called the last "estimate". When these actions are completed, the bricks are laid with mortar.
After this, they begin to lay the corners. The next stage, according to the advice of experts, is the arrangement of the contour of the entire stove. Using plumb lines, string is stretched from the ceiling to the corners of the stove. With the help of these vertical lines, you can easily navigate while working.
Considering the model of the stove you have chosen, you should determine the areas in which the following will be located: the ash pan, the combustion chamber, and the ash pan. The door under the ash pit is installed when the third row of bricks is laid, and after one row the ash pit is laid out.
After this, the firebox is arranged. Each door is attached with burnt wire. When you get to laying out the vault, you will need to cut the bricks. A calculation will be required to ensure good joining of the bricks with each other. The laying of the vault begins after the second row of bricks is laid after the firebox door.
To line the combustion chamber, special refractory bricks are used. Since facing bricks and masonry bricks have different temperature characteristics, installation of the lining to the furnace itself should not be done rigidly. When installing a chimney pipe, care should be taken to install a special valve, the adjustment of which should be smooth and easy.
Types of Dutch ovens
There can be all sorts of variations of stoves for a country house, a house outside the city or a garage. Their sizes and parameters are determined by the internal characteristics of the premises where the Dutch oven is installed. There are the following options for Dutch ovens for residential premises:
- Kolpakovaya. A characteristic feature of the design is considered to be a high level of efficiency, which is greater than that of traditional channel furnaces. A similar Dutch machine does not stop working due to the fact that a specialized cap is placed on top, which is necessary to retain the heated gas. You can heat a Dutch oven with wood, but its dimensions must not be too large.
Round. The mechanism of its action is based on the work of channels, the number of which can vary from three to twelve. This is a special type of Dutch steel, which is “dressed” in an iron casing, which makes it possible to save the use of bricks. The good qualities of a round Dutch oven include: low weight, high level of heat transfer, and low cost.
Grum-Grzhimailo. This is another type of round stove that does not have ducts or smoke circulation. Many details for such a Dutch woman are sold ready-made. Working principle: gases move under their own gravity, which makes it possible to lower the cooling heavy ones down, lifting the lighter and hotter ones up.
Ancient. A similar Dutch house is classically tiled with tiles or tiles. Such stoves are rare and are classified as antique.
With a fireplace. Such a stove can be called a hybrid design, because the Dutch used the firebox part and smoke circulation to equip their own stove, creating a new type of Dutch stove with a fireplace. The stove is heated with wood, preferably oak and pine. What sets this mechanism apart from a traditional English fireplace is the small, modest dimensions of the combustion chamber.
With a stove. It is used in dachas where you need to cook and heat the premises. For a Dutch oven with a stove, it is distinctive to use a hob that does not have burners. It makes it possible to cook, heat water, reheat. A Dutch oven with a hob is perfect for preserving at your dacha.