Connection diagrams for bimetallic heating radiators are virtually no different from standard installation methods for other types of heating batteries, for example, cast iron. Regardless of whether you plan to do the work yourself or turn to professionals for help, you should initially think about which scheme to choose and why.
The first thing you should know is that there are three connection diagrams for bimetallic heating radiators :
- Lateral.
- Diagonal.
- Lower.
If you want to connect bimetallic heating radiators in the optimal way, that is, so that labor costs are minimal and the efficiency of the devices is maximized, then when determining a suitable circuit, you need to focus on the following parameters:
- System type: one- or two-pipe.
- How the coolant is supplied: from below or from above.
- Number of sections in the radiator.
Heating system type
Single pipe systems can be routed vertically or horizontally. The latter option is most suitable for low-rise dwellings: usually we are talking about one- or two-story houses. Three-story buildings are rarely equipped with horizontal wiring. Vertical wiring is usually used in high-rise buildings. This scheme consists of a pipe coming out of the flow, going to the radiator, and then to the floor. This picture can be observed in all (or almost all) rooms. Sometimes there are cases where two radiators are powered from one riser at once. However, it is not at all necessary that they be in the same room.
The strengths of this scheme are the low installation costs and stability of operation (it is quite difficult to unbalance it). However, if significant changes in the parameters of batteries and pipes occur, this can significantly affect the hydraulic resistance. As a result, only the first two sections turn out to be warm, and the rest of the device remains cold.
Single-pipe wiring is characterized by a gradual decrease in the temperature of the coolant as it moves away from the boiler. The efficiency of heating the battery of the neighbor above (with top supply) is inversely proportional to the heating of the radiator on the floor below. To avoid such situations, a law on common ownership of the heating system was adopted. Now, in order to replace a pipe or heating device, you need to obtain the appropriate permits. High-rise buildings are not so often equipped with two-pipe wiring. This is explained by the large consumption of pipes for its organization. In addition, the large dimensions complicate the balancing of the circuit.
A two-pipe system in a multi-story building has the following diagram:
- Two pipes are brought into the room.
- The hotter part serves to supply coolant to the battery.
- The second removes the coolant that has cooled down after the radiator further.
Thanks to this scheme, the temperature of the coolant supplied to all heating devices is identical. It is important to remember that if there is a change in hydraulic resistance in just one radiator, the entire system can be completely unbalanced. A very small resistance will provoke the passage of almost the entire volume of coolant through this section. Therefore, in the presence of such wiring, installation of control valves is mandatory. Most often these are manual control valves or thermostats.
Self-installation of sectional heating batteries
Before installing the radiator, the surface of the wall that will be behind it must be plastered and puttied. After this, it is recommended to stick a sheet of foil insulation on it, corresponding to the size of the heating device.
During the finishing process, the reflective surface can be wallpapered, painted or tiled - the foil will still provide heat reflection towards the living space.
Necessary tools and additional materials
To perform installation work on installing sectional bimetallic heating radiators, you must prepare:
- adjustable wrench;
- hammer drill or impact drill;
- Popov pipe wrench (ass);
- building level;
- tape measure and pencil;
- radiator wrench with 24 mm end blade;
- a set of end plugs with a plug and a Mayevsky tap;
- ball valve ½ inch with detachable connection, external and internal threads;
- faucet regulator for thermal head;
- radiator gaskets;
- combed flax (tow);
- plumbing silicone or investment paste.
Depending on the installation method, fastening elements can be wall-mounted or floor-mounted. In the first case, you need 4 of them, in the second - 2.
Repacking radiator sections
Before installing the battery in place, it is necessary to assemble the device with the estimated number of sections. The factory equipment includes sets of 10 elements. Therefore, in most cases, you will have to separate or add a few pieces. This is done using a special radiator key, the length of which is at least 8 sections, and the width of the end blade is 24 mm.
Look at the thread direction on one of the radiator end holes. Insert the key inside so that the key blade is in the joint area between the sections to be separated. Turn the key in the opposite direction from the thread direction. The moment the elements separate is usually accompanied by a click.
Adding the removed sections to another set is done in the reverse order.
Options for connecting the heating device to the distribution pipelines
After repacking is completed, plugs, shut-off valves and an air release valve are installed on the battery. The method of connecting a bimetallic heating radiator in an apartment is determined by the type of piping system, which can be:
- saddle;
- diagonal;
- one-sided.
In the first case, shut-off valves are installed on both sides of the device, in the holes of the lower plugs, and the Mayevsky valve is installed in the upper one, further along the coolant flow. The name of the second piping option determines the installation of fittings in the upper and lower plugs located diagonally on the radiator.
A one-way connection scheme is used for single-pipe vertical risers of multi-storey buildings. In this case, the taps are mounted at the top and bottom on one side of the battery.
Installation of a bimetallic radiator on the wall
After repacking the sections and installing shut-off and control valves, you can begin installing the heating device in its intended place. In this case, the procedure for doing it yourself is as follows:
- measure the distance from the bottom edge of the section to the center of the upper nipple connection and add 100-120 millimeters to this value;
- make a mark on the wall at the height of the measurement taken;
- draw a horizontal line passing through the mark you made earlier;
- on this line draw the position of the middle of the window;
- take a measurement between the nipples of the penultimate sections of the radiator at the edges, divide the result by two and put it along a horizontal line in both directions from the center of the battery;
- measure the distance;
- from the obtained marks, vertically downwards, set aside the distance corresponding to the measurement between the centers of the section nipples (usually 500 or 300 mm);
- drill 4 holes according to the marks obtained, insert plastic plugs into them and screw the hinged fasteners into the threads;
- hang the radiator on the installed supports.
After this, you need to measure the distance from the battery to the wall and check the horizontal position of the upper plane of the device with a level. If necessary, the fasteners should be unscrewed or tightened, and the horizontal installation should be adjusted by bending the installed supports up or down.
Floor installation of heating radiators
This type of installation of radiators is used in the absence of a strong load-bearing wall. This happens when constructing window openings up to floor level, display railings, or covering the surface with plasterboard slabs at a significant distance (more than 200 mm) from the main walls.
Floor mounts are a metal support structure in the shape of the letter “H” with a lower transverse bar for screwing to the surface. They are manufactured in two versions:
- from steel angle;
- from bent profile pipes.
The easiest way to install a heating device without fixing it to the wall is as follows:
- take 2 fasteners and simply put them on the radiator from below;
- place the device together with fasteners at its installation location;
- ask an assistant to hold the battery and make marks on the floor through the holes in the bottom bar;
- remove the fasteners, drill holes and screw the support to the floor using dowels.
It is recognized that floor installation of radiators is less reliable than wall-mounted installation. But there are options that this will be the only possible solution for heating the room. An alternative can only be heated floors.
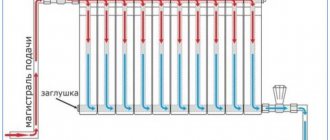
Direction of coolant circulation
The lower saddle connection of the batteries using a lower vertical collector allows you to not depend on the direction of coolant supply. This cannot be said about the lateral and diagonal leash, as well as when radiators with a bottom connection point are used: here the supply must be clearly adjusted. Otherwise, the heating of the device may stop completely, or it will heat up very weakly. A lateral or diagonal connection involves the use of a top feed (the return pipe in this case comes from below).
When installing a bimetallic radiator with a bottom connection, it is important to clarify in advance which of the inputs will be connected to the supply. Usually this information is indicated in the passport. It is important not to confuse the directions, because... The supply in such heating devices is equipped with a tube extending upward from the inlet assembly. With its help, the coolant is brought to the upper collector. After this, it spreads over the radiator.
The coolant collection point is the lower collector, from where it is supplied to the return pipeline. The connection point is located on the left or right side of the radiator (it is recommended to choose the point closest to the riser). This makes it possible to save on pipes for bimetallic heating radiators and achieve a more aesthetic appearance.
Types and features of heating radiators
In the retail chain, the buyer is offered a wide range of heat exchange radiators made from various materials in various shapes to choose from. Based on the materials used, they are all divided into the following groups.
Cast iron
Cast iron batteries are classified as classic; unlike their predecessors, modern products are painted in different colors and give them an aesthetic appearance. Cast iron radiators received a second life as decorative elements to emphasize the designer's retro style.
The molded battery sections have a pattern, are installed on legs and painted in colors that match the color scheme of the room or style.
Features of cast iron radiators are their heavy weight, high thermal capacity, and the ability to change the number of sections connected to each other by nipples. Cast iron has fairly high corrosion resistance and can be used for about 50 years; it can withstand pressures of up to 50 bar (low-grade Chinese can burst at 20 - 30 bars) and high temperatures of liquid or vapor coolant up to + 120 ° C. Due to the relatively low thermal conductivity, the thermal power of one cast iron section is 140 - 150 Watts.
The most famous manufacturers of cast iron batteries: the Russian company Nova (produces budget options), companies Viadrus, Konner, Bohemia with higher prices for their products.
Rice. 2 Designer batteries made of cast iron
Aluminum
Heat exchangers made of aluminum, or more precisely its alloy with silicon (silumin), today occupy a leading position in use in any heating systems. They are manufactured in the form of separate aluminum sections, inside of which passage channels are created for coolant circulation.
Methods of industrial production of aluminum radiators are casting and extrusion.
The main physical and operational characteristics of aluminum heat exchangers: light weight, heat transfer of one standard section 80 by 80 mm - about 180 W, maximum coolant pressure 10 - 15 bar for cheap products and up to 50 bar for expensive Italian ones, operating environment temperature no more than 115 ° WITH. Due to their high thermal conductivity and low thermal capacity, they can quickly warm up a room.
The disadvantages of radiator heat exchangers made of aluminum include low strength characteristics for certain operating conditions (silumin, unlike pure aluminum, is a brittle alloy). Also, aluminum radiators have low corrosion resistance when used in a working environment with a high or too low pH value.
If the pH of the coolant exceeds the range of 7 - 8 units, either increasing or decreasing, the protective Al2O3 oxide film on the metal surface, which gives it anti-corrosion resistance, is destroyed.
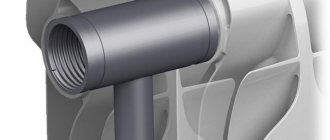
Rice. 3 Construction of an aluminum radiator section
The metal constantly forms a new protective film to replace the destroyed one, while its layer gradually becomes thinner until a fistula forms. Also, the process of the appearance of a new oxide is accompanied by the release of hydrogen H2, which further accelerates the destruction of aluminum.
If a consumer leaves water in the radiators of an aluminum heat exchanger for the summer, the appearance of hydrogen from the formation of an oxide film and the activity of bacteria can even lead to rupture of sections of a closed battery.
Aluminum heat exchangers are not recommended for installation in a central heating system due to the inability to control pH.
The best manufacturers of such radiators are Italian companies Green, Sira, Group, Fondital.
Bimetallic
As the name bimetals suggests, radiators of this type use two types of metals - steel and aluminum.
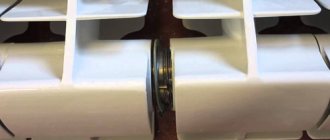
A bimetallic radiator consists of sections, each of which is a steel pipe channel placed in an aluminum heat exchanger.
Despite the heavier weight compared to aluminum ones, the introduction of an internal steel collector into the design made it possible to increase the strength and temperature characteristics of bimetallic batteries. They can withstand a coolant pressure of 50 - 100 bar (depending on the manufacturer) at temperatures up to 135 °C. In this case, the hydrogen index of the working environment does not play a significant role. The heat output of bimetallic radiators is about 160 - 170 W.
It might be interesting to read about: Autonomous heating system for a private house - a complete guide
Rice. 4 Design of bimetallic heat exchangers
Steel
Inexpensive, simple and reliable steel radiators come in two types - panel (Fig. 5) and tubular.
The simplest tubular convection radiator consists of two front metal sheets, between which there is a pipeline with heat exchange plates through which the coolant circulates. Heating of rooms occurs due to convection of air masses.
On top, the outer metal panels are covered with a protective layer of varnish, applying it using high-temperature firing in ovens.
Steel heat exchangers are produced using spot welding technology; they are not sectional or collapsible.
The maximum operating fluid pressure thresholds for tubular products are 9 - 15 bar, for panel products 5 - 11 bar, the heat transfer of one battery ranges from 1200 to 1650 watts. Steel radiators can withstand operating environment temperatures up to 115 °C. The hydrogen index is not significant for steel and can deviate from the neutral value of 7 units by several points in one direction or another.
However, the problem of corrosion is urgent for steel, that is, the high oxygen content in water leads to its rapid destruction.
Therefore, it is not recommended to install steel radiators in communal apartments and supply coolant to them through pipes that are not protected from oxygen diffusion.
Also, steel panel heat exchangers are sensitive to pressure changes and often cannot withstand water hammer, which in centralized heating networks reaches values of the order of 35 - 40 bar.
Manufacturers of steel batteries are domestic companies “RS”, “Harmony”, German “Kermi”, “Zehnde”, Italian “Israp”, “Tesi”.
Rice. 5 Construction of steel panel batteries
Number of sections of bimetallic radiators
How many sections there will be on a bimetallic radiator has a direct impact on the choice of connection method. A battery of up to 8 sections can be connected with a side, bottom saddle or diagonal connection. If there are more than 8 sections, it is better to use a diagonal connection.
When using side switching, a flow extender will be required. This refers to a tube inserted into the supply manifold. It helps out in situations where the side connection provides heating only for the first sections. Thanks to the tube inserted inside, the coolant flows further than the inlet, heating the surface of the device more evenly.
Flow extension length options:
- 2/3 batteries.
- To the center of the last section.
Different cases show the effectiveness of both the first and second options. The main thing is that a noticeable optimization of radiator heating is achieved. Sometimes it happens that installation to the middle of the last section provokes a decrease in the heating level of the first sections. In this case, it is recommended to shorten the tube. But such situations rarely occur, which is influenced by the pressure in the riser and the cross-section of the liner.
As practical experience suggests, it is better to install a long tube, because You can always shorten it (but you won’t be able to lengthen it). Another way to distribute the coolant more evenly is to equip the flow extension tube with a series of holes. Thanks to this, the coolant flows into nearby vertical collectors. However, in general a single tube is sufficient.
Pipe fittings and heating devices
Certain rules must be followed when selecting and installing pipe fittings or individual heating devices (convectors, radiators). For example, it is recommended to place batteries under windows, providing free access for inspection and cleaning. They should not be blocked by furniture to ensure sufficient air exchange.
The most suitable length of a heating radiator, comparing it with a similar characteristic of the opening under which it is installed, is as follows:
- 0.75 for public non-residential premises
- 0.5 for residential premises
Heating radiators are allowed to be covered with decorative grilles, but do not forget about the possibility of easy and quick access to them at any time. Installation of electric or water heaters is permitted in multi-layer external wall surfaces or in floor coverings.
If heating devices built into the ceilings are used, it is necessary to take into account the maximum surface temperatures:
- 30 degrees – for floor surfaces with periodic occupancy
- 25 – for floor surfaces with constant occupancy
- 70 – for walls bordering the street
If single heating pipes are laid in the floor along the walls, the temperature restrictions described above can be ignored.
In residential premises, it is necessary to install shut-off valves at the entrance to each battery. We should not forget about automatic temperature control mechanisms. Each riser must be equipped with a device for draining coolant.
Let's sum it up
- Must be reliable and safe for others
- Must comply with the selected architectural and planning solution
- Should ensure minimal costs for arrangement and operation
- Must be safe for others
What kind of fittings are needed
To connect a sectional bimetallic radiator, you will need a standard connection kit.
We are talking about the following elements:
- Plugs.
- Manual air vent valve (Maevsky faucet) and the key to it.
- Pair of adapters (with right-hand and left-hand threads).
Adapters are supplied to the right and left sides of the radiator. You can connect fittings or pipes to them. Their diameter (½ or ¾ inch) directly affects the diameter of the fittings and liner.
Step-by-step instructions for installing cast iron batteries in an apartment
A standard cast iron radiator has 10 sections. Before installation, you need to screw the nuts with winding into the holes. Often the sharp edges of the nut damage the sealing material. Grinding the edge with a rasp helps to avoid this.
Wind the winder onto the threads of the nut in the direction opposite to the thread.
You need to wind it tightly so that the material does not slip while screwing the nut. Lubricate the winding with silicone sealant.
Tighten the nut with an adjustable wrench.
Perform the same operation with the other nut. Prepare the taps in a similar way - wrap a linen thread and lubricate them with sealant.
Screw the tap into the previously installed nut.
Tighten using a large screwdriver or a homemade wrench.
In order to connect the polypropylene pipe from which the line is made to the tap, wrap it with thread and lubricate the coupling with silicone. Twist the coupling and tap. Assemble the supply and return units.
A Mayevsky tap will be installed to remove air. Hang the cast iron radiator on hooks fixed in the wall. Now it is ready to connect.
Pipes
When replacing radiators in a high-rise building, it is necessary to use the same pipes and with the same diameter. This is not just a whim. The fact is that multi-storey buildings use systems with certain parameters. The main ones are hydraulic resistance and operating pressure. A test (pressure test) pressure used during system startup is specially organized for them. As a rule, it is an order of magnitude higher than the working one.
The use of polypropylene and metal-plastic pipes to connect bimetallic radiators, despite all their advantages, is not recommended in such conditions. Their external attractiveness does not in any way contribute to increasing the service life in conditions of centralized systems, which is fraught with the appearance of leaks with all the ensuing consequences.
The same applies to the diameter of the pipes. When changing the diameter of the liner, the hydraulic resistance of the entire circuit changes greatly. And no one can guarantee that this will have beneficial consequences. Therefore, when using half-inch pipes in a system, there is no need to experiment with other diameters. The same goes for fittings and battery adapters.
Calculation of the number of sections
To calculate the required number of sections, it is necessary to take into account a number of factors. First of all, you need to know the battery power and the area of the room
There are also more complex calculation methods that take into account additional parameters (for example, non-standard ceiling heights, the number of windows and doors, the number of external walls, etc.).
Before installing the radiator, you need to calculate the number of sections
The simplest formula for calculating the number of sections looks like this:
number of sections = room area x 100/battery power.
The standard ceiling height is 2 meters 70 centimeters.
If there is a 12 meter room and radiators with 180 watt sections, then the formula will look like this:
12 x 100/180 = 6.66.
We round the resulting value up and as a result we find out that 7 sections are needed to heat the room.
Purpose and selection of bypass
When installing a bimetallic radiator in a single-pipe system, it is imperative to use a bypass. This is the name given to the jumper between the supply and return pipes. It allows excess coolant to bypass the battery. This scheme allows you to avoid blocking the drain and subsequent troubles with the management campaign. Most often, the bypass is made offset: its optimal location is between the radiator and the riser. If you insert a tap into the jumper, this will make it possible to adjust the temperature of the radiator. However, in this case there is a possibility of blocking the riser.
A more effective solution is to use an unregulated bypass, equipping the radiator directly with control valves. This is mainly done in cases where the room is very hot. If there is no such problem, then it is better not to reduce the efficiency of radiators, which inevitably happens when installing regulators.
The automatic fittings are designed for a pressure of 10 atm. Therefore, when the testing pressure drops below 15 atmospheres, operation does not encounter any difficulties. Exceeding this limit will most likely lead to device failure. If it is absolutely impossible to do without a thermostat, and the test pressure is very high, it is better to dismantle the device before starting the circuit and replace it with a drain. Upon completion of the pressure testing, the device is mounted back, which makes it possible to clean the valve at the same time.
Heat loss
In addition to the heat loss that occurs during the heating radiator connection diagrams, there is a certain type of heat loss when the heating radiator is located.
If the radiator is located under the window sill, heat loss during worst-case convection is, at best, about 4%. And if the heating radiator is completely located in a niche in which holes are made (a common practice when installing a radiator in a niche under a window sill), then heat loss during this type of operation of the radiator reaches 30%. When designing a heating system and calculating radiator sections, these factors must be taken into account.
Selection of shut-off valves
As some manufacturers recommend, do-it-yourself installation of bimetallic heating radiators should be accompanied by the installation of shut-off valves at the inlet and outlet. We are talking about ball valves. To ensure normal coolant permeability, it is better to use full bore products.
Thanks to the shut-off valves, the radiator can be dismantled at any time for repairs and maintenance without stopping the entire system. To do this, just turn off the taps and wait for the coolant to cool. After which the device can be removed. In such cases, it helps to have a bypass through which the coolant will bypass the battery being serviced. Otherwise, you will have to turn off the entire riser, which can only be done with the permission of the management company.
Diagonal battery connection diagram
The diagonal circuit is connected as follows. Hot coolant enters from one edge of the bimetallic radiator. It then passes through the radiator, then cools and exits from the other edge of the radiator. Accordingly, the coolant moves diagonally across the radiator.
This scheme is not always convenient and effective, since the pipe will come from a common sun lounger and will be located in a visible place. One way out of this inconvenience is to turn the taps to the desired degree.
The advantage of such a connection system is the low amount of heat loss. Only about 5%. With a diagonal design, you can use longer radiators in the amount of 12-14 sections with a conditional passage of shut-off valves of sufficient diameter.
The main difference from the side battery connection diagram is that the coolant comes out of one tap, and the coolant, already cooled, comes to the other end.
Air vents
The standard installation kit includes a manual air vent (Maevsky valve). The place where it is installed is the free upper manifold. The presence of an air bleeder is mandatory when connecting a bimetallic radiator. The fact is that the contact of the coolant with the materials of the collector provokes chemical reactions, as a result of which gases are formed.
Thanks to this small device, it is possible to remove air and gases accumulated inside the radiator. If this is neglected, excess pressure will appear in the system, causing circulation problems and uneven heating of the batteries. To release gases, you need to open and close the valve with a key.
If you don’t want to remove gases manually, there is an option to install an automatic air vent. It is mounted in the same place as the Mayevsky crane. The device has a cylindrical shape and a height of 6-8 cm: when installing, it is necessary to maintain strict verticality. To hide the automatic air vent from view, a decorative screen is usually used for the radiator.
Calculation of the number of sections
To make an accurate calculation, it is better to entrust such work to the masters. If this is not possible, then you can do it yourself. This does not require any special knowledge or skills.
You just need to know two indicators:
- radiator model power;
- area of the room where it will be installed.
The first indicator can be found in the product passport. It is installed by the manufacturer. Next, you will need to calculate the dimensions of the room along the perimeter and divide this value by 10.
The obtained indicators are divided by the power of the radiator. The result is a number that will tell the user how many sections all batteries in the room should have. If the installation is carried out taking into account these parameters, then an ideal heating system can be created for the apartment.
Why increase the power of heating batteries?
The need to think about how to connect heating radiators to each other can arise for only one reason - lack of heat transfer.
In other words, the temperature regime does not contribute to comfortable living in the house. It is quite possible that all this is a consequence of improper operation of the boiler equipment or a clogged system, but this is a topic for another discussion. We will discuss errors in calculating the heating circuit, because this is a common reason for its unsatisfactory operation. What can I say when the material of the walls of the house/apartment, the degree of their thermal insulation, and the height of the ceiling are not taken into account.
How many sections are needed?
Heating devices made of bimetal are known not only for their large margin of safety and excellent heat transfer performance. Nodes with nipple connections are very convenient in terms of selecting the required number of sections. To determine the required number of ribs there is a simple formula: K=S(100/R), where
- K – number of sections.
- R – section heat transfer.
- S – area of the room.
Let's say we have Global Mix K radiators with a heat output of 145 W and a room of 16 m². According to the formula, for optimal heating of a room, a heating device with 11 sections is sufficient. After performing the calculations, you can already think about how to connect the bimetallic radiators together into a single system.
There is a simpler way: count the number of ribs at the rate of one section per 2 m². Both methods are quite working, but for rooms up to three meters high. We must not forget about the correction factors:
- In rooms with several windows, heating devices are placed under each window opening. In this case, the total number of sections is divided by the number of windows.
- The number of sections for corner rooms is multiplied by a factor of 1.2.
- For a room with energy-saving glazing, when placing bimetal batteries, the same coefficient is applied, but with a decreasing sign.
Important! The maximum number of radiator sections is 16. If, according to calculations, you have a larger number, then the battery must be divided into two parts.
Pros and cons of bottom eyeliner
The advantage of the bottom connection is hidden pipes
The bottom connection has many advantages; hiding the pipes makes it easy to integrate them into interiors with complex design solutions and select good options taking into account the layout of the room. It must be remembered that the radiator will heat up faster and more strongly in the lower part due to the accelerated passage of coolant current. Despite uneven heating and a slight decrease in efficiency due to blockages or air accumulation, such radiators perform their main functions in the same way as with a standard connection. There are several types of eyeliner:
- in the direction from top to bottom;
- with one-way connection;
- with versatile connections;
- with central connection.
The list of disadvantages includes difficulties with connection, and it will also be difficult to create an optimal climate in the room if there is not enough space to connect heat transfer units. There is not enough space at the bottom to place the fittings. A tap and valve are installed in this area to regulate the temperature - they also require additional space. If you develop a rational connection diagram and plan all the details, these problems can be easily compensated for through the most thoughtful installation.
When installing from the bottom and sides, regardless of the layout, you must always follow the installation requirements. It is very important to take into account the proportions between the width of the battery itself and the window opening.
Bimetal and semi-bimetal: what is the difference?
Conventional bimetallic radiators have a casing made of aluminum. The rest of its parts are made of other metals. During the manufacturing process, steel cores are placed into special molds and then filled with molten aluminum. After solidification, this metal does not come into contact with the coolant in any way, and serves solely as a heat exchanger. Such batteries are best suited for installation as part of any heating systems.
If we talk about semi-bimetallic radiators, then in their design the steel pipe is present only in the vertical part of the radiator. The horizontal passages remain aluminum. It is possible to install such batteries as part of a central heating system, but since the coolant in such systems can rarely boast of purity and the absence of alkaline impurities, such radiators may last less than completely bimetallic ones.