A mixing unit in a heated floor water system is needed to adjust the temperature of the coolant. The installed boiler heats the coolant to the required temperature - 55 degrees. This is enough to warm the floor up to 30 degrees. This indicator is comfortable for the cold season. In the manifold, the mixer independently mixes hot and cold water to the desired temperature.
If you plan to have a heated floor without a pump, then the coolant is supplied to the system at a given temperature, but this requires a separate boiler or a centralized heating system.
Battery connection methods
Batteries can be installed in a structure such as a single-pipe heating system for a two-story house (a photo of such equipment is clearly demonstrated on the page) using any of the currently available technologies. The connection diagram is:
- Lower. In this case, the “supply” and “return” pipes are connected to the battery from below.
- Diagonal. With this scheme, the pipes are connected to the radiator from above and below from opposite sides.
- Vertical. In this case, the main line is connected at the top and bottom on one side.
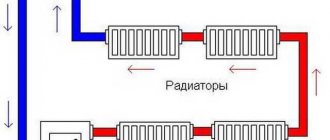
To ensure that the air in both the rooms farthest and those closest to the boiler is heated evenly, radiators are usually connected to the pipe bypass. This creates a simplified analogue of a two-pipe system. With a bypass, it is easy to regulate the volume of flow passing through the radiator.
Conclusion
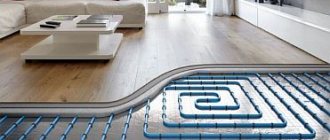
The installation scheme for a heated floor is selected based on the area of a specific room, based on the heating option. Laying pipes with a snail is a universal and economical way to heat a room in any weather conditions.
The longer the plastic pipes are, the more powerful the pump should be. After all, you will need good pressure and the need to overcome large hydraulic resistance.
It is better to purchase and install adjustable pumps that have three speeds.
Pipe laying methods
Along the perimeter of the house, highways in such a system, both on the first and second floors, are usually carried out under the floor. Such a “hidden” system does not spoil the appearance of the premises. However, it should be taken into account that with such an installation, most likely, you will have to use the bottom method of connecting radiators. And with this insertion method, unfortunately, the batteries do not work at full capacity. The solution may be to use a bypass of a special design.
In this case, a metal-plastic piece of length equal to the height of the battery is cut into the “supply” pipe in front of the radiator. Connection to the main line is made through it, at the top of the section. A short vertical section is welded to the “return” pipe. The radiator is connected to it at the lower point of the opposite section.
Heating speed of heated floors
According to their characteristics, heating systems can be divided into two types:
- Water, where the coolant function is performed by water, antifreeze or ethylene glycol solutions;
- Electric, where carbon rods, electrical cables or infrared film act as the coolant.
Each system has its own advantages and disadvantages. The heating time of such floors depends on the design of the coolants and the depth at which they are laid.
To heat one square meter of surface with a screed depth of 5 - 6 cm, an average of 1.5 - 2 hours is required.
Warm-up speed of water floors
A water heated floor takes a long time to warm up. The heating time can be 20 - 30 hours; the rise in temperature for the feet will be noticeable after about 5 hours. Most of the time and energy is spent on heating the screed, which on average reaches a thickness of 5 cm. Only after it is heated does heat release into the room. After switching off, a comfortable temperature of the surface and room can be maintained throughout the day. As a rule, the total heating and cooling time depends on the thickness of the tie elements. A significant disadvantage of such a coolant is the difficulty of installation.
Heating speed of electric floors
Electric floors warm up quite quickly compared to water floors. Electric coolants heat up instantly. This takes them no more than 6-8 minutes. The rest of the time is spent uniformly heating the screeds around the entire perimeter of the room. Warming up time to the set values takes on average from 12 to 24 hours depending on the surface area; the effect on the feet will be noticeable within a couple of hours. If the power is turned off, the cable floor will be able to maintain the selected thermal regime for a long time. A thermostat is connected to the design, which, when the heat drops by 2 - 3 degrees, will automatically regulate the heating strength.
Heating speed of infrared film and rod floors
Rod and film infrared floors are considered innovative and the fastest in heating. Their peculiarity is that heat transfer occurs due to direct radiation. Already in the first hours, a general increase in air temperature in the room becomes noticeable. Heat transfer to the air occurs directly without unnecessary heating of the screeds and the main coating. In addition, such floors have the smallest screed thickness. After the first switching on, the elements only need 10 minutes to reach nominal mode and begin heating the room.
Since the human body temperature is 6 degrees higher, at first there is no significant effect. However, comfortable conditions for the feet appear already in the first hours of operation of the system.
Power
To install a water heated floor in an apartment, it is useful to know what the energy consumption of the system depends on. Power is determined by the temperature of the coolant: the higher the temperature, the greater the power output. When using such a heating system, it is important to remember: the water temperature should not exceed 50, and the power from 1 sq. m - no more than 140 W. When a water-heated floor in an apartment is the only source of heating, it is recommended to cover most of the room.
Forced circulation heating system
The coolant circulation is carried out using a circulation pump. This solves the problem of low return temperature by adding hot water from the supply line. More comfortable heating conditions are also achieved thanks to the ability to adjust the temperature in heating devices. However, there are also significant disadvantages:
- The likelihood of overheating increases if the heating devices in the room are set to low heat consumption.
- If there is no power supply, the circulation pump will no longer be able to perform its function, and therefore the movement of the coolant will stop. This can also lead to overheating.
For example, in order to reduce the risk of an emergency increase in temperature in the heating system, Trayan solid fuel pyrolysis heating boilers are equipped with external or built-in emergency heat exchangers.
The inclusion of storage tanks in the piping scheme allows you to accumulate excess heat and release it into the heating system as needed. This solves several problems:
- In case of low heat consumption, excess hot coolant is accumulated for later use.
- With low heat consumption, the solid fuel boiler still operates at rated power.
- Allows the use of higher power devices.
The figure shows the wiring of a solid fuel boiler with a heat accumulator and a circulation pump:
Photo 4: Piping according to the forced circulation scheme
Many owners of private houses designing a heating system are interested in the question: is it possible to piping a solid fuel boiler with polypropylene? The use of polypropylene pipes imposes certain requirements on the temperature of the coolant. Experts advise that when using polypropylene pipes in a heating system, the first 1-1.5 meters of the supply line should be made of metal, and also use a larger pipe diameter and a thermostatic valve. Naturally, overheating of a solid fuel boiler should be avoided in every possible way.
When performing this type of piping, it should be taken into account that the cost of additional equipment can be equal to or even exceed the cost of the solid fuel heating device itself. This is not suitable for those who decide to buy a TT boiler for home heating, focusing on its relatively low price.
Manufacturing materials
Three-way thermomixing valves are made from the following materials:
- Brass is a copper alloy with zinc additives. The product is not subject to corrosive destruction, it is strong and durable. Sometimes these thermomixers have a chrome or nickel coating, which protects against darkening. This option is most often used in residential areas.
- Bronze is a copper alloy with tin additives. It is rare, although the quality is no worse than brass.
- Stainless steel is an excellent metal for making control products. It is characterized by durability, strength, and corrosion resistance. But the cost of appliances made from it is high, so they are not suitable for a private home.
Established standards for the surface temperature of underfloor heating
The reference book of Construction Norms and Rules (SNiP) establishes strict regulations on what the floor temperature should be. According to paragraph 44-01-2003, the maximum and minimum temperature of the heated floor should be in the range of 26 and 35 °C.
The minimum point of 26 °C should only be set if there are always people in the room. If visitors rarely enter the room, then the optimal temperature should be at 31 °C. This value is usually set for bathrooms, swimming pools and toilets, where a comfortable temperature for the feet is most necessary. The main limitation is that the temperature along the heating axes should not exceed the permissible 35 ° C; a higher temperature will cause unwanted overheating of the system and floor covering.
For a parquet surface, the maximum value is 27 °C. This is caused by the characteristics of the material and its thermal properties; overheating of such a floor covering can lead to its deformation.
For a comfortable stay in the room, 22-24 °C is enough. This temperature is pleasant for the feet and evenly heats the air in the room. Unlike classic batteries, the air temperature will be maximum over the entire height of the area. In practice, a coolant value of 30 °C is rarely achieved.
As a rule, all parameters are calculated at the design stage of the heated surface. Before installing water and electric heating systems, their tasks and room heat loss indicators should be taken into account.
Pie recipe"
Each element of the heating system performs a special function. In order to buy and install a heated water floor in a private home, you need the following “ingredients”:
:
- cement mixture;
- plastic film with a thickness of at least 0.1 mm;
- thermal insulation material;
- plasticizers;
- reinforcing mesh 50x50 or 100x100, rod thickness - 3-5 mm;
- heat-resistant floor covering.
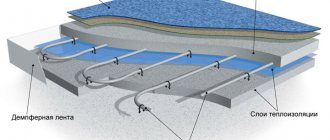
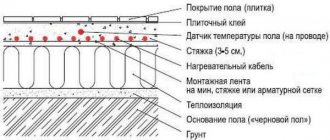
A thin layer of polyethylene film is laid on the base, soil or concrete slab. Then the floor is covered with heat-insulating material: density from 40 kg/m3, thickness from 300 mm.
Plasticizers
added to cement fill for elasticity of the material. Inside this layer there will be water-heated floor pipes. The screed is reinforced with a reinforcing mesh, and then a heat-resistant floor covering is applied. Installing a water floor under tiles or laminate is a good idea, since these building materials have sufficient thermal conductivity.
Joint connection of two boilers
To increase the heating comfort of a private home, many owners install two or more heat sources that run on different energy sources. At the moment, the most relevant combinations of boilers are:
- natural gas and wood;
- solid fuel and electricity.
Accordingly, the gas and solid fuel boiler must be connected in such a way that the second automatically replaces the first after burning the next portion of firewood. The same requirements are put forward for connecting an electric boiler to a wood boiler. This is quite simple to do when a buffer tank is involved in the piping scheme, since it simultaneously plays the role of a hydraulic arrow, as shown in the figure.
As you can see, thanks to the presence of an intermediate storage tank, 2 different boilers can serve several heating distribution circuits at once - radiators and heated floors, and in addition load an indirect heating boiler. But not everyone installs a heat accumulator with a TT boiler, since this is not a cheap pleasure. In this case, there is a simple diagram, and you can install it yourself:
Note. The scheme is valid for both electric and gas heat generators operating together with solid fuel.
Here the main source of heat is a wood heater. After a stack of firewood burns out, the air temperature in the house begins to drop, which is registered by the room thermostat sensor and immediately turns on heating by the electric boiler. Without a new load of firewood, the temperature in the supply pipe decreases and the overhead mechanical thermostat turns off the pump of the solid fuel unit. If you ignite it after some time, everything will happen in the reverse order. This video is described in detail about this joint connection method:
Tying using the method of primary and secondary rings
There is another way to combine a solid fuel boiler with an electric one to supply a large number of consumers. This is a method of primary and secondary circulation rings, which provides for hydraulic separation of flows, but without the use of a hydraulic needle. Also, for reliable operation of the system, a minimum of electronics is required, and a controller is not needed at all, despite the apparent complexity of the circuit:
The trick is that all consumers and boilers are connected to one primary circulation ring by both the supply and return pipelines. Due to the small distance between connections (up to 300 mm), the pressure drop is minimal compared to the pressure of the main circuit pump. Due to this, the movement of water in the primary ring does not depend on the operation of the secondary ring pumps. Only the temperature of the coolant changes.
Theoretically, any number of heat sources and secondary rings can be included in the main circuit. The main thing is to choose the right pipe diameters and the performance of the pumping units. The actual performance of the main ring pump must exceed the flow rate in the most “gluttonous” secondary circuit.
To achieve this, it is necessary to perform a hydraulic calculation and only then will it be possible to select the right pumps, so an ordinary homeowner cannot do without the help of specialists. In addition, it is necessary to link the operation of solid fuel and electric boilers by installing shut-off thermostats, as described in the following video:
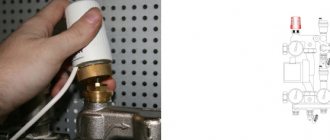
Self-assembly of the mixing unit
The cost of the mixing device is significant, for this reason many consumers prefer to assemble the required unit themselves.
Required Tools
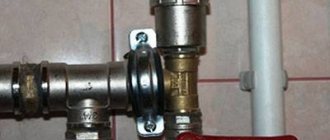
For assembly you should prepare:
- valve of two- or three-way type,
- special nuts,
- manual air vent,
- return valve,
- clamps,
- ball valve,
- pumping unit,
- tees,
- device that determines temperature conditions,
- set of keys, tow.
To install the mixing unit you will need a set of keys
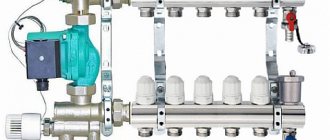
Connection diagram
Let's look at the connection option for the Vaitec node. First, the manifold is assembled, the tees of which can be soldered or twisted. The first option is more expensive because each hole is equipped with an expensive MRN.
A hydraulic arrow is being manufactured. To do this, you can use a simple control valve installed on radiators. You will also need a pair of diverters and the same number of nipples with internal and external threads.
The pump is being assembled. Naturally, you will have to purchase it in the store. Mount it below the hydraulic needle using the detachable connections included in the delivery set. It is possible to install it instead of the mentioned arrow - the pump will cope perfectly with its functions.
The hydraulic arrow is connected to the comb. For the pump you will need to buy a separate coupler of the appropriate length.
Now you can install taps, valves, and an air release device.
Installation subtleties
Installation of shut-off valves will be required. They are mounted on the unit and heating kennels. In order not to get confused in the actions, it is recommended to follow a simple algorithm - connect the flow and return of the next segment in series.
The possibility of condensation formation should be taken into account and electrical components should be protected from moisture.
Whether a mixing unit is needed for a heated floor, everyone decides for themselves. But you need to choose it individually so that the system provides the microclimate required for a comfortable life.
How to connect a solid fuel boiler
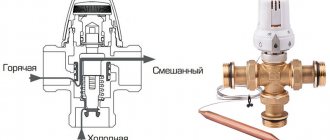
The canonical connection diagram for a solid fuel boiler contains two main elements that allow it to function reliably in the heating system of a private home. This is a safety group and a mixing unit based on a three-way valve with a thermal head and a temperature sensor, shown in the figure:
Note. The expansion tank is not shown here, since it can be located in different places in different heating systems.
The presented diagram shows how to connect the unit correctly and should always accompany any solid fuel boiler, preferably even a pellet one. You can find various general heating schemes anywhere - with a heat accumulator, an indirect heating boiler or a hydraulic arrow, on which this unit is not shown, but it must be there. This is explained in more detail in the video:
The task of the safety group, installed directly at the outlet of the supply pipe of a solid fuel boiler, is to automatically relieve pressure in the network when it rises above a set value (usually 3 Bar). This is done by a safety valve, and in addition to it, the element is equipped with an automatic air vent and a pressure gauge. The first releases the air appearing in the coolant, the second serves to control the pressure.
Attention! It is not allowed to install any shut-off valves on the section of the pipeline between the safety group and the boiler
How the scheme works
The mixing unit, which protects the heat generator from condensation and temperature changes, operates according to the following algorithm, starting from kindling:
- The firewood is just starting to burn, the pump is on, the valve on the side of the heating system is closed. The coolant circulates in a small circle through the bypass.
- When the temperature in the return pipeline rises to 50-55 °C, where the attached remote-type sensor is located, the thermal head, at its command, begins to press the three-way valve stem.
- The valve slowly opens and cold water gradually enters the boiler, mixing with hot water from the bypass.
- As all the radiators warm up, the overall temperature increases and then the valve closes the bypass completely, passing all the coolant through the heat exchanger of the unit.
This piping scheme is the simplest and most reliable; you can easily install it yourself and thus ensure the safe operation of the solid fuel boiler. There are a couple of recommendations regarding this, especially when piping a wood-burning heater in a private house with polypropylene or other polymer pipes:
- Make the section of the pipe from the boiler to the safety group from metal, and then lay plastic.
- Thick-walled polypropylene conducts heat poorly, which is why the surface-mounted sensor will openly lie, and the three-way valve will lag. For correct operation of the unit, the area between the pump and the heat generator, where the copper flask is located, must also be metal.
Another point is the installation location of the circulation pump. It is best for him to stand where he is shown in the diagram - on the return line in front of the wood-burning boiler. In general, you can install the pump on the supply side, but remember what was said above: in an emergency, steam may appear in the supply pipe. The pump cannot pump gases, so if steam gets into it, the circulation of the coolant will stop. This will speed up a possible explosion of the boiler, because it will not be cooled by water flowing from the return.
Way to reduce the cost of strapping
The condensate protection circuit can be reduced in cost by installing a three-way mixing valve of a simplified design that does not require connecting an overhead temperature sensor and thermal head. It already has a thermostatic element installed, set to a fixed mixture temperature of 55 or 60 °C, as shown in the figure:
Special 3-way valve for solid fuel heating units HERZ-Teplomix
Note. Similar valves, which maintain a fixed temperature of mixed water at the outlet and are intended for installation in the primary circuit of a solid fuel boiler, are produced by many well-known brands - Herz Armaturen, Danfoss, Regulus and others.
Installing such an element definitely allows you to save on piping the TT boiler. But in this case, the possibility of changing the temperature of the coolant using a thermal head is lost, and its deviation at the output can reach 1-2 °C. In most cases, these shortcomings are insignificant.
Advantages and disadvantages
Three-way thermostatic mixing valves are simple in design, yet reliable and durable. Their use allows for high-quality and precise control of the floor heating level.
Thermostatic valve for heated floors: types and their design, how to choose, installation diagrams and alternative connection methods
The devices are sealed and compact. Plus - they do not allow the pipes and screed to overheat, which extends the life of the system.
The benefits of control valves are irrefutable, but they have a number of disadvantages:
- They increase hydraulic resistance - this negatively affects the functioning of a unit that has more than one collector.
- There is a risk of a large volume of hot coolant entering the floor pipes. And this can lead to leakage and airing of the system. Such problems most often occur when the device is starting up.
Heating a house without a pump. Two time-tested options
Until the 90s of the last century, heating a house without a pump was the only option available, since the direction of manufacturing circulation pumps and promoting them to the masses was not developed. Thus, owners and developers of private houses were forced to install heating in their houses without a pump.
But when good boiler equipment, pipes and compact circulation pumps began to be brought to the CIS in the 90s, the situation changed dramatically. Everyone started installing heating systems. which do not work without a pump. They began to forget about gravity systems. But today the situation is changing. Developers of private houses are once again thinking about heating a house without pumps. Since interruptions and shortages of electricity, which is so necessary for the operation of the circulation pump, can be traced everywhere.
The issue of quality and quantity of electricity supply is especially acute in new buildings.
That is why today, more than ever, one proverb comes to mind: “Everything new is well-forgotten old!” This proverb is very relevant today for heating a house without a pump.
For example, previously only steel pipes, homemade boilers and open expansion tanks were used for heating. The boilers had low efficiency, steel pipes were bulky, and it was not recommended to hide them in walls.
Expansion tanks were located in attics. Because of this, there was heat loss and the threat of the roof flooding or the pipes in the tank freezing. Which in turn often led to a boiler explosion, pipe rupture and human casualties.
Today, thanks to modern boilers, pipes and other heating devices, it is possible to create a luxurious, economical heating system without a pump. Thanks to modern, efficient boilers, significant savings can be achieved.
Modern plastic or copper pipes can be easily hidden in walls. Today, home heating can also be done with both radiators and heated floors.
Today there are two main home heating systems without a pump.
The first and most common system is called Leningradka. or with horizontal spill.
The main thing in home heating systems without a pump is the slope of the pipes. Without a slope, the system will not work. Due to the slope, Leningradka is not always suitable, since the pipes run along the entire perimeter of the house. Also, due to the fact that the slope may not be enough, you have to lower the boiler below the level of your floor. In this case, the boiler is inconvenient to heat and clean.
Also, when installing a heating system at home without a Leningradka pump, doorways along the route of the pipes interfere. In this case, it is necessary to make window sills with a height of at least 900 mm.
This is necessary so that the radiator is mounted and there is enough height for the pipes along the slope. Otherwise, the system is quite functional, namely with cast iron, steel and aluminum radiators.
The second home heating system without a pump is called a "Spider" or vertical top-spout system.
Today this is the most reliable and practical home heating system without a pump. The main thing is that the “Spider” system is devoid of all the disadvantages of the “Leningradka”, with the exception of the slope of the return line, due to which the boiler also has to be lowered below the floor.
Otherwise, the Spider system is the most efficient system. You can attach any radiators and heated floors to the Spider system. You can mount valves under the thermal head on radiators in the “Spider” system and hide pipes in the walls, and so on.
Today, it is increasingly necessary to recommend the “Spider” system to developers, because... Today this is the ideal home heating system without a pump.
Thank you for reading this article!
Where to place the security group and what element the scheme cannot do without
The security group should be located at the top point of the system. When the boiler does not have an expansion tank, it is additionally built into the system. Although this scheme is used, it is not so often, since it is often used as a supplement to radiator heating.
Before connecting the heated floor to the heating system, you must check whether the boiler has a built-in circulation pump; if not, then you will need to use another scheme in which such a pump is connected additionally.
Installation procedure
A one-pipe system is assembled as follows:
- In the utility room, the boiler is installed on the floor or hung on the wall. Using gas equipment, the most reliable and efficient single-pipe heating system for a two-story house can be installed. The connection diagram in this case will be standard and will allow you to carry out all the work, if desired, even independently.
- Heating radiators are hung on the walls.
- At the next stage, the “supply” and “return” risers are installed on the second floor. They are located in close proximity to the boiler. At the bottom, the outline of the first floor is connected to the risers, and at the top – to the second.
- Next, the connection to the battery lines is made. A shut-off valve (on the bypass supply section) and a Mayevsky valve should be installed on each radiator.
- An expansion tank is mounted in the immediate vicinity of the boiler on the “return” pipe.
- Also, on the “return” pipe near the boiler, a circulation pump is connected to a bypass with three taps. A special filter is installed in front of it on the bypass.
At the final stage, the system is pressure tested in order to identify equipment malfunctions and leaks.
As you can see, a single-pipe heating system for a two-story house, the design of which is as simple as possible, can be a very convenient and practical equipment
However, if you want to use such a simple design, at the first stage it is important to make all the necessary calculations with maximum accuracy
13 signs that you have the best husband Husbands are truly great people. What a pity that good spouses don't grow on trees. If your significant other does these 13 things, then you can s.
11 Weird Signs That You're Good in Bed Do you also want to believe that you please your romantic partner in bed? At least you don't want to blush and apologize.
How to look younger: the best haircuts for those over 30, 40, 50, 60 Girls in their 20s don’t worry about the shape and length of their hair. It seems that youth is created for experiments with appearance and daring curls. However, already last.
What is it like to be a virgin at 30? I wonder what it’s like for women who didn’t have sex until almost middle age.
Why do you need a tiny pocket on jeans? Everyone knows that there is a tiny pocket on jeans, but few have thought about why it might be needed. Interestingly, it was originally a place for storage.
Never do this in church! If you are not sure whether you are behaving correctly in church or not, then you are probably not acting as you should. Here's a list of terrible ones.
Kinds
Mats for water heated floors vary in function and quality, design and production method.
Foil products.
Foil foam is the main component of these mats. Mats with foil are used in heated rooms as an additional heat source. The pipes are placed on the side covered with foil. To do this, you need to purchase additional fasteners.
Mats with bosses.
On the surface of such products there are shaped protrusions (bobs). The production of mats with bosses is based on hydropellet stamping.
Mats for water heated floors with film.
The products consist of three layers - polystyrene foam, foil and film. The density of such a mat is 30-35 kg per cubic meter, which is enough for a water-heated floor. The advantage of this product is the markings, which facilitate the installation process.
Flat mats made of polystyrene foam.
The thickness of the material of such a mat is 50 mm, and the density is up to 40 kg per cubic meter. Thanks to this feature, the product is able to maintain its shape and size under external influences. Special plastic brackets are suitable as fasteners for a flat mat.
Before buying mats for water heated floors, you should check for certificates of conformity. Respectable manufacturers do not hide their product documents.
Regulating the temperature of heated floors
To create comfortable conditions, as well as to control the consumption of electricity and other resources, users resort to adjusting the temperature of heated floors.
Adjusting water floors
On water systems, a thermostatic valve or pumping and mixing groups with automation are usually installed.
They prevent overheating of the system and the floor covering, respond to changes in room temperature and open or close valves, maintaining specified modes.
The advantage of such regulators is the simplicity and ease of assembly of the structure.
Regulation of electric and infrared floors
For electric floors, electromechanical, digital and programmable thermostats are used. They are connected in parallel to the circuit and use special sensors that analyze changes in surface heating modes. When the maximum set heating thresholds are reached, they turn off the coolants. When the temperature drops a couple of degrees, they re-energize the electric heaters. Such thermostats allow you to save from 30 to 60% of electricity, significantly reducing the cost of utility bills.
Why “should it be 45...55”? What if I heat the house with warm floors and walls? – at 55 you can already boil the eggs (softened). What if I have very small (plinth) radiators? – at 45 you will freeze even now.
“45...55” are ordinary stereotypes of thinking, based on the usual radiator scheme of the “1 elbow per 2 m2” type.
Less is better. However, it will be completely “0” only if there is no heat transfer (heating) at all. You can switch the pump to mode 2 or even 1.
A delta of 20 degrees is considered ideal. But if there is no delta and the batteries are hot, then this is also not bad. This means that the battery power is less than the boiler power. And the uncooled water returns back to the boiler. So in your case, the boiler will turn on less often (it already receives hot water). You can reduce the flow rate. Then the delta will be higher, but the boiler will also turn on more often. Strictly speaking, if heat losses in the pipes are neglected, the efficiency of the system will not change. The amount of energy the boiler consumes will increase the temperature in the house. So what?
I have a solid fuel gun, it doesn’t turn off and it won’t turn on either)))
By hand kmk less than 20 degrees.
Well, this is when it already goes out. Although I can set the electric boiler to 65 degrees. It will warm up
By the way, why is it not recommended where to go when it’s already completely burned out, turn off its supply and wait until it boils.
And below there is condensation, and it is very angry with firewood (sulfur, and as a result, sulfuric acid). Accelerated corrosion of the heat exchanger. It's not so scary for cast iron. And steel can be “eaten up” in a season or two (there were posts on SOK). When it has already burned out, there are no problems - there is no more condensation. But at the stage of kindling - well, it can be a very long time - the boiler itself is cold + the return flow is cold. That’s why they provide protection against cold return flow in the form of a controlled bypass directly on the boiler piping. It works very simply: until the return temperature reaches +65°C, the water circulates in a small circle (almost like a thermostat in a car). Some manufacturers build a bypass directly into the boiler.
Data. Solid fuel boiler 25 kW on coal. On wood I think below.
The heated area is 100 sq.m. There is no insulation of any 15 cm timber, the floors and ceilings are actually 20 cm of cotton wool)), not caulked. There are 8 convectors with a total power of approximately 12 kW. And the boiler is connected. But DHW is not consumed much, so it doesn’t really take part in the calculation (I turn it off altogether; when the boiler has cooled down, the boiler cools down too (( )
And I wouldn’t say that it’s very warm in my large rooms. You can't breathe in the bathroom or bedroom. But in the hall and kitchen it’s so-so, 20 degrees, but I would like 25)) But all approaches to the convectors are hot.
PS there are suspicions that this is what heats up, but in general it sucks.
In an apartment, I would throw it away))) but at the dacha you need 15 of them. It turns out to be expensive and these are very inexpensive.
Maybe replace it with cast iron, or leave it as is for now.
Something's cheap no matter what. On average, 1 radiator costs 5 thousand. In total there are 2 pieces, plus thermal heads and connections, etc. and TP)))
I know Denis, but what’s the point, he won’t give a 70% discount))))
Common mistakes
Most common mistakes made during installation work:
- The pipes were poured into the floor and they forgot about insulation. A foil backing is not suitable ; it is better if it is foamed polystyrene. Otherwise, half of the heat will go to heating the floors or the ground.
- Installation is carried out only under tiles (with the exception of electric heated floors). When professionally assembled, buildings with a thick layer of coating on the floor can be heated.
- The heated floor structure is connected to the boiler without a mixer. This is a necessary part that maintains the temperature to power the system.
- Laying metal-plastic pipes in a snail pattern in all rooms.
Different rooms require different installation approaches. For example, a pipe that runs from the outer walls at a distance of 40-80 cm must be installed tightly to compensate for heat loss.
Steam heating
Heating with membrane tank
Sometimes steam heating is associated with water heating structures for a room. And there is actually no mistake here, but there is one nuance: steam is water heated to boiling.
Thus, the principle of operation of a steam heating system is that the water in the boiler is heated to form steam, and then this coolant flows through pipes into the heating elements.
The heating system with coolant in the form of steam consists of the following structural elements:
- a heat generator, presented in the form of a boiler, which heats water and accumulates steam;
- an outlet valve that controls the flow of steam into the system;
- main pipes;
- heating radiators.
It is important to know: when installing a steam heating structure, the use of plastic pipes is strictly prohibited. As for the classification of steam heating, it is absolutely similar to water heating systems
As for the classification of steam heating, it is absolutely similar to water heating systems.
Manufacturers
Preference should be given to mixing valves from manufacturers that have proven themselves well in the market. Such companies include:
- Esbe (Sweden) - occupies a leading position in the quality of products of this type. The valves are reliable, with a warranty period of more than 5 years.
- Valtec is a Russian-Italian company; its mixing taps have good characteristics at an affordable price. Warranty - 7 years.
- Honeywell (America) - the priority of mixers from this company is considered to be convenient and uncomplicated installation. They are reliable, but expensive.
However, it should be remembered that even high-quality products if installed incorrectly will not ensure correct operation of the system.