A variety of heating systems provide a comfortable air temperature inside residential premises. The basis of the vast majority of heating concepts are special heat transfer devices, commonly called batteries. You can install them yourself if you know the nuances of the work.
We have collected and systematized for you all the information about connection options and methods. Taking into account our recommendations, installing heating radiators with your own hands will be carried out without the slightest difficulty. All readers of the article we presented will be able to cope with it without any problems.
A detailed description of connection options and technologies is supplemented with visual diagrams, photo collections, and video instructions.
Calculation of the number of sections
In order for radiators to provide the required heating power, it is necessary to determine the optimal number of sections (for sectional devices). SP 60.13330.2010 is used as a regulatory guide, containing recommendations for the calculation of heating, ventilation and air conditioning systems.
The technique is not simple, it involves the use of various coefficients and the following data:
- room volume;
- orientation relative to cardinal directions;
- climatic parameters;
- presence of thermal insulation of external surfaces;
- number, type and sizes of windows;
- characteristics of the heating system;
- power of one radiator section.
In practice, when installing heating batteries in an apartment or private house, simpler calculation methods are used that give results with acceptable accuracy.
Method No. 1. Determining the number of sections based on the required standard heat transfer of 100 W per square meter of room.
For example, you need to calculate sections for a room of 18 sq.m. Heat transfer according to the standard is 18x100=1800 W. We divide this value by the power according to the passport of 1 radiator section. For aluminum it is about 200 W, bimetallic 150 W, cast iron 100 W.
We get the required number of sections:
1800/200=9 aluminum or 1800/150=12 bimetal or 1800/100=18 cast iron.
Method No. 2. Using an online calculator. In each field of the program you need to enter your data, the radiator model and click “Calculate”. You will receive an answer in 1-2 seconds, and specific parameters and coefficients will already be taken into account.
The required power calculated using method No. 2 may differ from the value obtained by method No. 1 by 10-50%, both up and down. In order for the heating system to operate efficiently and be economical, it is recommended to carry out calculations using a more accurate scheme.
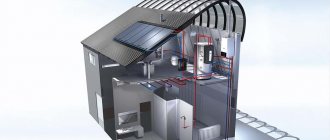
Choosing a radiator design
The parameters of the local heating system are an important characteristic when choosing heating. The private home system has the following advantages:
- operated under favorable conditions and low pressure;
- the quality of the coolant is much better than in systems of multi-storey buildings;
- there are no pressure surges, there is no threat of water hammer.
With such characteristics, the choice of radiator models is quite wide. When buying batteries, you should focus on a high efficiency with the right price-quality ratio. Devices made of any material are suitable for a home system.
Heat transfer table for heating radiators
Let's look at different battery designs:
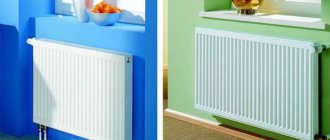
- Panel and sectional radiators are often the most inexpensive. With good heat dissipation they have compact dimensions. They can be installed in the heating system according to different connection schemes.
Panel radiator
- Tubular batteries are more expensive than previous options, but their technical characteristics are approximately the same. The increased price is due to the more stylish design. They are also convenient for drying things.
Steel tubular radiator
Materials and fittings for installation
To install heating radiators with your own hands you will need:
- special brackets;
- shut-off valves;
- Mayevsky crane;
- stub;
- sealing materials, dowels.
Brackets
Often they are already included in the radiator package. If they are not available, you can purchase fasteners of suitable length, diameter and profile in the store. When selecting, take into account the type of wall (for wall mounting), load, collector shape, and radiator depth.
Types of brackets:
- anchor with immersion in the base;
- invoices.
For concrete or brick walls, short anchor brackets up to 20 cm long are used; for aerated concrete or ceramic block, longer ones are needed - up to 30 cm. Overhead fastenings are applicable to all walls, including wood or plasterboard.
Types of wall and floor brackets
Some manufacturers produce brackets that are adjustable in length. This is a universal option that you can buy without fear of getting the wrong size.
Mayevsky crane for air release
Any coolant contains air in dissolved form. When passing through pipes, it accumulates in those places where the speed of movement or pressure is lower than in the main channel. Air pockets form, preventing the normal operation of the heating system. Where there is water contact with aluminum, hydrogen is mixed into the air, which poses a risk of explosion.
Installing the Mayevsky crane
For timely removal of gas bubbles, a Mayevsky valve is built into the system. This is a needle valve that can be operated manually or automatically. To release the gas, turn the valve handle until a hiss appears, and close it after liquid is released from the valve.
Photo of the air vent
You can determine the presence of air pockets by simply feeling the battery. If it heats unevenly and there are cold spots, you need to bleed the air using an air vent.
Stub
Used to block the flow of coolant in the dead-end hole of the radiator. Depending on the direction of the thread, it can be left or right. So that the part does not stand out against the general background, it is made painted in the color of the radiator.
Installing a plug depending on the connection method
The contour of the plug is wrapped with sealing materials. When installing, tighten it with a wrench for greater compaction.
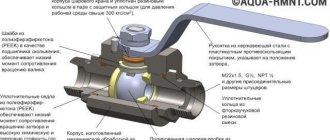
Shut-off valves
Serves to open the heating system when any part of it ceases to be used, as well as to regulate the temperature of the radiator. Shut-off valves are represented by taps of various designs:
- ball - used only in the on-off position;
- rod ones - more technologically advanced, they can change the water flow to regulate the temperature;
- check valves - prevent the outflow of coolant from a certain area of the system.
Shut-off valves increase the safety of the heating system, and, if adjustable, reduce the overall energy costs to maintain a comfortable temperature.
Tools and related materials
To install radiators yourself you will need:
- drill or hammer drill;
- level;
- pencil;
- winding for pipes;
- dowels;
- adjustable wrenches with attachments for mounting fittings;
- nipples with gaskets, if you need to increase the number of sections.
For winding, you can use FUM tape, plumbing thread or linen thread.
Sequence of work
Installation of batteries begins with complete shutdown of the circuit. When replacing old radiators with new ones, the water is drained and the heating elements are dismantled. It would be correct to use a pump to eliminate the presence of coolant residues in the system.
After all the water has been removed, the mounting location of the batteries is aligned in both planes. Brackets are installed.
The next step is to pack the radiators using sealing flax, packaging paste or special shut-off valves. Using a torque wrench, tighten the connection, creating the force specified in the documentation.
Installation work
Installation of radiators on the wall is carried out by welding or polypropylene pipes. In the first case, it is enough to use two fasteners; in the second, at least three are required. Two should be at the top, one at the bottom.
With ten or more sections, the number of fastenings should be increased to five. There should be three at the top, two at the bottom.
Spatial location control
The position of the batteries is monitored in both planes. It is advisable to provide a slight slope towards the wall. This will avoid airing the system during its operation.
The final stage
Threads are cut on the risers and all elements of the heating system are connected. The tightness of all connections is carefully monitored.
Test tests can then be carried out to detect possible leaks.
If until now everything was done with your own hands, at this stage it is better to invite a housing and maintenance mechanic. By turning off the American taps, you can open the connecting tap. It is better to leave the opening of the return pipe to a mechanic.
If there are no leaks at the connection points, it will be possible to open the valve on the batteries and close the bypass valve. The coolant will begin to flow into the heating system. To bleed air, you should use the Mayevsky tap.
Once the heating circuit in all rooms has warmed up, the plumber will open the straight pipe. This will restore pressure in the system. The control tests can be considered completed. If the installation was done correctly, the apartment will be comfortable at minimal cost.
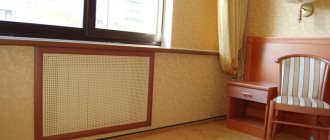
Posting rules
Radiators are most often attached to the wall under window openings. You can additionally install them in places where large heat losses are possible - along long blank walls, near entrance and balcony doors, in the corners of rooms. In this case, the total power of all radiators must be equal to the required heat transfer.
Recommended dimensions for installing radiators
For free air circulation around the battery, you need to retreat at least:
- 25 mm from the wall surface;
- 50 mm from the window sill;
- 60 mm above the floor.
When installing heating radiators in an apartment with a screen or in a recessed niche, you need to remember that heat loss will range from 3-4 to 20-25% of the device’s power.
In gravity systems, it is necessary to ensure reverse flow of water in the event of repairs. To do this, the battery is mounted with a slope of 1-1.5° towards the supply pipe, otherwise the coolant will not drain completely.
Boiler location
The regulatory framework that would regulate the installation of a solid fuel boiler in a private home has not yet been developed. However, the basic requirements for the placement of such equipment can be found in SNiP “Heating and Ventilation” and SNiP 31-02-2001 “Single-apartment buildings” (for the Russian Federation), as well as a number of other individual acts.
It is worth noting that the SNiP “Boiler Installations”, which is often mentioned on the Internet, is not designed for low-power household appliances - its requirements apply to equipment with a power of more than 360 kW, and the rules for installing gas equipment are too strict.
Based on the analysis of the available regulatory framework, which relates to the procedure for placing heating devices on wood, the following tips can be highlighted on how to install a solid fuel boiler in a house:
- Any type of solid fuel, be it wood, coal or pellets, creates a large amount of dust. In addition, during operation of the boiler, varying amounts of smoke may enter the room. In this regard, it is not recommended to install a solid fuel boiler inside the living rooms of the house. Although the regulatory framework does not directly prohibit the installation of a solid fuel boiler in the kitchen, hallway or other rooms, with the exception of the bedroom.
- The best option for placing a solid fuel boiler would be an equipped separate boiler room or one attached to a common house. You can also focus on technical rooms in the house itself, a basement, garage or hallway with good ventilation.
- Heating equipment should be located as close as possible to the outer wall in order to facilitate the work of laying out the chimney, not to create too long a horizontal section or not to lead the pipe through the ceiling.
- Any solid fuel boiler requires periodic cleaning of the heat exchanger and maintenance. Therefore, it is necessary to ensure free access to it. To do this, leave at least 1 m of space in front, and approximately 60 cm in the back and sides, but not less than 25 cm.
- It is prohibited to connect the flue duct of a solid fuel boiler to brick ventilation ducts inside the walls.
In small-sized boiler rooms, heating equipment can be placed quite close to the wall, but only on the unattended side. In this case, the gap can be at least 10 cm, and there must be a gap of at least 25 cm at the back.
How to install correctly
Metal radiators, except cast iron, are quite lightweight. When fastening them, there are no problems with the load-bearing capacity of walls made of aerated concrete or brick. But in some cases, for example, frame houses or rooms with a large glass area, the equipment can be fixed to the floor.
To select fasteners, the battery load is taken into account. Cast iron can be hung on strong hooks or mounted with floor brackets, lightweight steel and aluminum can be hung on plate brackets or overhead corners. Installation diagram:
- for 8 sections - 2 on top and 1 on bottom;
- for every additional 5-6 sections - 1 more on top and 1 on the bottom.
Steel panel radiator diagram
With this arrangement of fasteners, the heating device will be stably and securely fixed to the wall. It is recommended to place the brackets closer to the outer sections.
Wall mount
Installation begins by marking the surface. First mark the points on the wall for attaching the lower brackets and screw them loose.
Then the center distance is set upward, the points are marked and the upper brackets are mounted.
The radiator is hung on the wall and checked for horizontalness. If necessary, make adjustments. After this, the brackets are finally fixed.
Wall marking
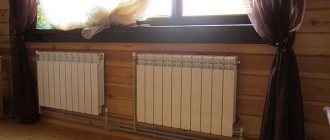
The installation of batteries in a wooden house (as in any other house) begins with marking the walls, according to which heating devices will be installed in the next stages of work. If a system with natural circulation of coolant is installed in the house, then the pipeline must have a constant slope of at least 6 degrees along the flow of water. Failure to comply with this rule will certainly lead to the appearance of air jams, and in the worst case, will not allow the system to function. For systems with forced circulation, this rule does not matter.
You need to mark the wall along which the brackets for the radiators will be installed. Radiators cannot be installed close to the wall - the distance between them should be about 5-10 cm. The radiator must be removed from the floor by at least 10 cm, and from the window sill by 8 cm. The markings are done level with a pencil. When marking, you need to take into account the width of the radiator sections so that the installed holders are strictly between the sections.
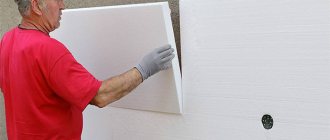
It is advisable to install foil material behind the radiators, which will act as a heat reflector. If there is a gap of at least 3 cm between this material and the radiator, it is possible to significantly increase the efficiency of the radiator and reduce heat losses.
When the marking is completed, holes of the required sizes are drilled in accordance with it. The dowels are driven in with a hammer, after which the brackets are secured using self-tapping screws. To make your work easier, you can purchase special battery holders equipped with threads that allow you to screw them directly into the dowel.
When selecting brackets, you need to take into account the type and characteristics of the radiators being installed so that the elements match each other. You also need to pay attention to the number of brackets used for one radiator (in most cases, three holders are enough, two of which are located at the top and one at the bottom).
Floor fixing
To securely install the radiator on a horizontal surface, floor brackets of various designs are used. These can be short legs with brackets, clamps, chain clamps, or supporting racks with movable brackets.
Floor mounting is carried out according to the following algorithm:
- First, insert a bracket or chain behind the lower radiator manifold and screw the nuts onto the ends.
- Screw the legs to the protruding parts of the rods.
- Place the radiator on the floor, firmly fix the legs using suitable fasteners.
- Put on decorative and protective caps.
Floor bracket
If the radiator is installed on stands, they are first mounted, then the equipment is hung on the movable brackets.
Options for tying heating batteries
The coolant pipe can be connected to the radiator:
- diagonally;
- side;
- below;
- above.
The choice of type of piping depends on the design of the radiator. Each manufacturer recommends a connection diagram for its products, which it is advisable to follow.
Diagonal
This is the most effective type of strapping. The coolant entering the radiator warms up the battery well in all areas, and the efficiency of the heating system reaches its maximum value.
Diagonal heating connection diagram
Lateral
The coolant is supplied to the upper or lower collector, moves along the radiator and falls or rises through vertical channels. The disadvantage of this method is uneven heating of the battery. The hottest area is located closer to the feed point. The efficiency is lower than that of diagonal piping.
Side battery connection
Lower
This connection is often called a saddle connection. It is used for bottom or hidden wiring, when the pipe is laid in the floor. The hot coolant, according to physical laws, moves upward, and then cools and falls. In terms of efficiency, the bottom connection is in third place after the diagonal and side ones.
Bottom battery connection
Upper
This method is rarely used - when the height of the heating device is high. To direct the coolant flow along the desired path, a plug is provided in the upper channel of the radiator.
What to do
In a simplified form, the replacement procedure is reduced to six stages:
- Empty heating system.
- Removing old batteries.
- Preparing pipes for connecting a new radiator - cutting new threads or running old threads.
- Installation of shut-off valves.
- Connecting the battery and checking the tightness of the connections.
- Putting the radiator into operation: bleeding air, adjusting the thermostat.
Replacement of heating radiators equipped with taps that shut off the incoming and outgoing coolant flow will require minimal time and labor costs (see photo below).
In this case, the work can be carried out without draining water from the heating system. The radiator section is designed for 200–400 ml of coolant and can be easily drained into a nearby container.
Installation of bimetallic batteries: step-by-step instructions
Consider an installation with a side connection. Before starting work, drain the water from the pipe, dismantle the old heating device and prepare the radiator:
Screw 2 paired nuts from the ready-made kit - left and right - into the holes for connecting the pipes.
On the opposite side of the radiator, install a plug from below, and a Mayevsky tap from above.
Place the battery against the wall and mark the top connection line of the device with a pencil. Then measure the distance from the top of the radiator to the mounting point of the bracket and place it on the wall. It is convenient to mark using a laser level. For aesthetics, the radiator is oriented exactly in the middle of the window; to drain into the system, do not forget to give a slight slope.
Drill holes, insert dowels and screw in brackets.
To connect to the pipe, screw an American piece of suitable diameter onto its outlet hole.
Install the American one on the battery hole.
Measure the distance between the nuts.
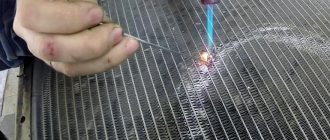
Cut a piece of polypropylene pipe and use a plastic welding machine to weld it into the gap. The photo shows the heating of the pipe and coupling.
Connect the second radiator hole to the pipe in the same way. After installation is completed, fill the battery with water, connecting the supply and return, and bleed the air using the Mayevsky tap.
Soldering polypropylene pipes
- We warm up the soldering iron well, then nothing will stick to it.
- We bring the tap with the coupling to the soldering iron in alignment.
- Smoothly immerse the coupling and tube into the soldering iron and wait 7 seconds.
- We take everything out from the soldering iron and, maintaining alignment and observing the horizon of the corner outlet, fuse the coupling into the tube.
- We repeat the procedure with the upper/lower tap.
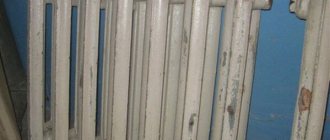
Step-by-step instructions for installing cast iron batteries in an apartment
A standard cast iron radiator has 10 sections. Before installation, you need to screw the nuts with winding into the holes. Often the sharp edges of the nut damage the sealing material. Grinding the edge with a rasp helps to avoid this.
Wind the winder onto the threads of the nut in the direction opposite to the thread.
You need to wind it tightly so that the material does not slip while screwing the nut. Lubricate the winding with silicone sealant.
Tighten the nut with an adjustable wrench.
Perform the same operation with the other nut. Prepare the taps in a similar way - wrap a linen thread and lubricate them with sealant.
Screw the tap into the previously installed nut.
Tighten using a large screwdriver or a homemade wrench.
In order to connect the polypropylene pipe from which the line is made to the tap, wrap it with thread and lubricate the coupling with silicone. Twist the coupling and tap. Assemble the supply and return units.
A Mayevsky tap will be installed to remove air. Hang the cast iron radiator on hooks fixed in the wall. Now it is ready to connect.
Radiator assembly
Preparing the radiator
Before installing the radiator, it needs to be assembled. We disconnect the part with the threaded connection and wrap this place with winding. To do this, use tow with oil paint or a more modern option - sealing paste, which can withstand high temperatures. A special fum tape is also used to help seal the pipe joints.
Before winding, apply a wide layer of paste onto the thread and distribute the composition over the joint. The prepared strip of tow is wrapped around the pipe in the direction of the thread.
We wind the seal onto the threads of the taps
Next, we put the nut from the faucet on the part with the tow and carefully screw the entire structure into the battery plug. We do this first by hand, and then tighten it with a wrench. In the same way we install Mayevsky taps and plugs on inactive pipes.
Advice! Instead of tow windings, you can use standard gaskets.