How to warm the water in the pool? Personal experience.
Anyone who has a swimming pool on their property is familiar with the problem of heating water.
Summer is often cold, even an average pool with 10 cubic meters of water does not warm up, and it is not comfortable to swim. Nobody even dreams about swimming in the fall. In September, everyone already drains the water. I’ll get ahead of myself - and we’re swimming)) It’s -1 outside. The water in the pool is +35. Class!
So the first stage in the fight against the cold was the greenhouse. Dimensions 5 by 6. The pool fit perfectly. And there is still room for changing clothes and pumps. But alas. By mid-September the water became cold.
I connected a 3 kW electric heater from Bestway. During the week of operation, the water did not warm up at all. The device is complete crap. Threw away.
I started googling and found the Vesnina oven. Heating water with wood. I bought a stove. I made a boiler room for it so it wouldn’t rust. I bought firewood. And he started drowning))
So, after heating for one day, I was happy to discover that the ice water became +26. Already a victory! After the second day of heating, the water became like in a jacuzzi +33. And this is already a complete victory!)) By the way, it is advisable to heat it with birch logs. If you burn any garbage, the effect is worse.
Article on the topic: Who treats varicose veins with a swimming pool, reviews
To keep the greenhouse warm, I hung up infrared lights. Stable +20. Although during the day if it’s sunny it’s +40 even without them. Due to the greenhouse itself.
Total costs. Greenhouse farmer 70t. Stove 10t. Infrared cameras 2 pieces 6t. Firewood 5t. For boiler room material 5t. All sorts of wires and small items - 3 thousand. About 100 thousand in total.
Are these costs worth it? A friend says you can go to the city pool for the rest of your life for this money. Yes you can, I don’t argue.
But the pleasure and buzz that your own pool gives you, when you are lying in hot water and there is snow outside the window - no amount of money can replace it! So I decided for myself, it’s worth it!))
In the fight against the cold, I burned a bunch of wood until I realized that the problem was not heating, but heat loss. You heat it during the day, but everything cools down overnight... we had to insulate the pool itself. I bought TechnoNIKOL 30mm 12 meters and insulated it all around. I also covered the foam plastic with film in a circle to remove moisture. I bought another awning for the top of the pool. Total two awnings on top, extra. costs +2500 rub.
The insulation solved all the problems. After heating the water to 38 degrees, it lasts for 2-3 days without any heating. After 2 days, the water temperature is +30 degrees. At the same time, it’s -5 outside and +9 in the greenhouse.
Insulation options
Experts recommend using foam concrete, expanded clay concrete, foam plastic, expanded clay and foamed polyethylene to insulate the bottom of the pool.
Foam concrete
Foam blocks are convenient to use for insulation due to the fact that it is impossible to make a foam concrete mixture on site. This requires special equipment. Foam concrete is also not transported in the mixer.
Among the advantages of the material it should be noted:
High thermal insulation ability.- Light weight.
- Easy to install.
- Low cost.
- Mechanical strength (grades D500 and higher). If the blocks have a lower grade, then in a few years they will be destroyed by the soil. This will be especially affected by frost heaving of the soil.
Among the negative aspects, there is a high degree of water absorption due to wetting of cement joints. Foam blocks cannot serve as a waterproofing material.
Important! You should resort to insulating the bottom of a pool using foam concrete only in cases where the bowl is located in a heated room. Foam blocks do not like melt and rain water; it is not recommended to use them in outdoor pools.
Expanded clay concrete
A lightweight material produced by mixing concrete with expanded clay.
Pros:
- Light weight.
- Quick installation.
- Resistant to temperature changes.
- Small price.
The disadvantages of expanded clay concrete are as follows:
- Weak frost resistance due to the porous structure.
- Doesn't like moisture.
It is advisable to use it for insulation in pools where the ingress of moisture from outside is minimized.
Styrofoam
A universal material for pool insulation that can be used in any type of bowl.
Foam is chosen for the following advantages:
High mechanical strength that can withstand small soil movements.- The material is an ideal hydro- and vapor barrier.
- Little weight.
- Availability and low cost of material.
- Easy to install and does not require special equipment.
Attention! The only disadvantage of polystyrene foam is the insulation of structures that have the correct shape. The material has a sheet structure, so covering a bowl with rounded or non-standard bends will be problematic.
Expanded clay
The material is obtained by firing ceramic pellets.
It is chosen as insulation because of:
- Low price.
- Good thermal insulation.
- Durability.
- Resistant to temperature changes. Expanded clay is not afraid of cold weather.
- Light weight.
- Strength.
- Easy to install.
- Environmentally friendly.
Among the disadvantages of expanded clay it is worth noting:
- High level of water absorption. Due to its structure, it can take months to dry. Wet expanded clay conducts heat poorly and does not tolerate frost.
- Dust formation due to pellets.
It is best to use expanded clay to insulate a pool indoors, where it will not be disturbed by rain or melt water.
Foamed polyethylene
A modern material that has gained wide recognition in many areas of the national economy.
Advantages of foamed polyethylene:
- High moisture resistance, heat and vapor insulation.
- Does not corrode.
- Light weight.
- Eco-friendly and hygienic.
- Relatively low cost.
Reference! The material usually lasts a couple of seasons and then breaks. It has no other disadvantages. Suitable for outdoor bowls and indoors.
Why is thermal insulation necessary?
Thermal insulation of a frame pool in a country house or country house is especially important if the structure is buried in the ground.
Typically, the depth is up to 2 m. It must be taken into account that even in the hottest period, the soil temperature at such a depth is not higher than +11° C.
The temperature difference between the surface of the frame at night and during the day can reach 10°C . This affects both heating and heat retention in the lower part of the structure. First of all, the wear-resistant qualities of the frame deteriorate.
Even if on a hot day the top layer quickly heats up under the sun's rays, the water will also cool down quickly due to the cooled lower part of the pool.
If you plan to cool the water less quickly and to enjoy swimming longer, it is recommended to lay a layer of insulation.
Insulation of the basement floors of houses without basements
For seasonal homes, the thickness of insulation is calculated according to current standards based on comfort, and for permanent homes - based on energy saving. The calculations below were performed for the climatic conditions of the Moscow region. The required minimum value of the total resistance to heat transfer of the basement floor of a country house based on the comfort condition is 1.52, and from the energy saving condition - 2.8 m² ⋅ C/W. Knowing the design of the basement floor and the thermal conductivity coefficients of the materials, you can determine the required thickness of the insulation. Table 1 shows the results of calculations of some insulation materials with the following initial data:
- basement floor - monolithic reinforced concrete slab 150 mm thick;
- floor - made of tongue and groove boards (35 mm);
- underground - either ventilated or a non-heaving sand cushion 0.8 m thick.
Insulation dimensions
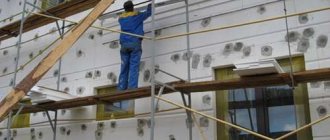
What thickness of insulation is required for effective soil insulation? According to the recommendations of specialists who carried out thermal calculations and based on the experience of operating insulated blind areas near houses, the minimum thickness of extruded polystyrene foam insulation is 50 mm. But around the corners of the building (within 2 m from the corner), where the cold accumulates, double thickness is needed.
It is recommended that the width of the insulation at the level of the soil surface be no less than the freezing depth. This will ensure sufficient band width with a positive temperature. But typical designs of shallow insulated foundations provide for the laying of horizontal thermal insulation at the level of the base of the foundation - 0.4 - 0.5 meters of depth, while the width of the insulation strip is much narrower and is determined by calculation. The wide pit is backfilled on top with non-heaving fine material.
Thermal insulation design
Sheets of extruded polystyrene foam insulation must be connected to each other in a groove; they must be laid close to the foundation insulation.
The strip is laid with a slope of 2 - 3% from the foundation to ensure water drainage from the house. Often, drainage is laid in the ground along the edge of the insulation, which removes water from the foundation.
A trench is made 0.5 - 0.6 meters deep. The bottom of the trench is filled with sand 10–20 cm thick, which also forms a slope away from the house.
Sheets of extruded polystyrene foam are laid on the sand and covered with waterproofing. The insulation is covered with a sand cushion at least 20 cm thick. Piece material for paths is laid on top of the cushion, which forms the blind area around the house. It is not recommended to concrete the blind area due to the unreliability of such finishing.
Insulation of soil under light buildings and roads
Very often it is necessary to insulate the soil under all kinds of extensions to the house - a veranda, a terrace, a staircase with a porch, a driveway to a garage, etc. All these buildings need protection from frost heaving. Soil insulation is carried out in the same way as near the foundation. But in this case, the buildings are not heated and freeze in winter, so the soil needs to be insulated under their entire area.
A pit is made to a depth of up to 0.6 meters from the base of the structure and wider to the depth of freezing in each direction (calculated widening).
A sand bedding is placed at the bottom of the pit, which forms the flow of water in the desired direction (usually from the center of the structure). Sheets of insulation are laid on the bedding, covered with waterproofing material, and a sand and gravel bedding with a thickness of 300 mm or more is made on top, which forms a cushion to redistribute point pressures. Sometimes, for this purpose, ready-made reinforced concrete blocks are laid, or a light foundation is poured.
Thermal insulation of pipelines
Typically, pipelines are insulated with a shell made of extruded polystyrene foam. But this method is bad because if warm water (energy) stops flowing into the pipeline, it will still freeze in frozen soil, no matter how thick the shell is.
Basic rules of insulation
Before you begin insulating a frame pool, you need to take into account the nuances of the procedure:
- The surface on which the structure is installed must be either cemented or with tightly compacted soil.
- The insulation procedure is carried out when installing the structure in a permanent place. The sides of the pool can be insulated later.
- Lay the insulation material so that the number of joints is minimal. If there are any, seal them.
Article on the topic: I once went to the pool
Pool made of polystyrene foam blocks
Having your own swimming pool is the dream of every country house owner. Cool water relieves fatigue, charges you with positive energy and is best refreshing on hot summer days. Many summer residents have the opinion that a swimming pool is an unaffordable luxury. However, costs can be significantly reduced if you build the structure yourself from polystyrene foam blocks. To make your dream come true, you will need desire, a little skill and knowledge of construction technologies.
IMPORTANT! The thermal pool consumes a lot of electricity - 6 kW and above. This consumption is associated with heating a large volume of water, so powerful pumps are needed. A three-wire power supply is often used.
Recessed or non-recessed tank
To properly insulate an in-ground pool, it must be properly deepened.
To do this you need:
- Measure the perimeter of the pool and dig a pit that will be 1 m wider than the perimeter. The depth of the pit should be no more than 2/3 of the height of the frame pool.
- Make sure that the soil or sand at the bottom of the pit is thoroughly compacted. The best option would be to concrete the surface. Before laying the insulation, make sure that the pit is perfectly level.
Only after such measures have been carried out can you proceed to the procedure for insulating the pool structure. If the pool is buried in the ground, it is additionally recommended to insulate not only the bottom, but also the sides of the pit.
Unforeseen difficulties
It is necessary to foresee in advance those non-obvious moments that can spoil the result even with a seemingly absolutely correct organization of the site. An example of this is rodents that tear up the soil under the pool, which causes subsidence, leading to the formation of uneven spots on the bottom and the legs falling through.
The only adequate option to combat this phenomenon is to lay galvanized metal mesh with a fine mesh (up to 10 mm) along the walls and bottom of the pit. The second method, which gives only a temporary effect, is to annually scare away earth-moving animals using a deep vibrator to shrink the concrete.
To combat rodents, you can use electronic or homemade repellers
Another problem that you may encounter when using a frame pool is the growth of trees and shrubs. Some trees have shoots that are so tough and fast growing that it is only a matter of time before they pierce the bottom of the bowl. However, the plant will not develop a root system in soil whose pH is very different from normal. Electrolyte for lead batteries, which is poured into a pit at the rate of 0.5 l/m2, will help permanently change the acidity of the soil.
How to choose material?
When choosing a material, you need to take into account that it must meet certain requirements:
- Perform not only heat-insulating, but also waterproof function.
- Withstand high loads (including being resistant to mechanical damage and withstanding low temperatures in winter).
- A good effect will be achieved by using a material that leaves a minimum number of seams and places for cold penetration.
The best options for insulation would be the following materials:
- Styrofoam;
- thermal insulation membranes;
- sprayed polyurethane foam.
It is not recommended to use materials as insulation that can damage the structure or those where there are many joints left after installation.
Work progress
It’s worth noting right away that if you insulate plastic windows for the winter with your own hands, the warranty on them will automatically expire.
If the owner nevertheless decides to carry out the work himself, it is necessary to find a place for a draft. Sometimes it happens that it occurs due to depressurization of double-glazed windows. Unfortunately, in this case, it will not be possible to carry out high-quality insulation on your own. In most other cases this is quite possible.
Insulation of slopes
If voids appear under the facing of the slope, this means that it needs to be repaired. Finding them is quite simple: this is done by tapping on the surface. There is empty space where the sound would be louder.
The old insulation under the slope lining needs to be replaced
In this case, it is necessary to remove the facing material. There will be insulation underneath. In most cases, foam serves as insulation. If the problems are not too serious, it is enough to simply add material to the places where the voids form. When the insulation has already served its purpose, it must be replaced. The material can be very diverse: basalt wool, polystyrene foam, foam, etc.
After replacing the insulation, it is necessary to check the facing material. If the sheet has cracks or other serious damage, it must be replaced. It is better to use PVC or a plastic panel as cladding. Such materials not only look good, but also provide excellent thermal insulation.
You can choose polystyrene foam as a slope insulator
Insulation of street slopes is carried out in the same way. However, if the apartment is located above the second floor, you need to contact professionals. It will not be possible to carry out the work without special equipment.
Replacing seals
In plastic windows, one of the fastest wearing parts is the rubber seal. After several years of use, it loses its properties and ceases to perform its functions. To increase the service life of the seals, you can use a special silicone grease (this is done twice a year). However, if the material has already worn out, it must be replaced.
To replace it, you need to pry off the glazing bead that holds the glass unit. After this it must be removed. Now the rubber is easily pulled out of its groove.
Replacing the sealing tape will increase the thermal insulation of the window
New material should be cut (it is better to leave a margin of 5-6 cm and cut it to the desired length after installation). Before assembly, you must ensure that the site is free of dirt. If necessary, the seal can be fixed with glue.
Setting the pressure
In modern plastic windows, the window sash pressure can be adjusted. This is done by rotating the eccentrics (located at the end of the sash). A 4 mm hex wrench is used for adjustment. There is a mark on the eccentric itself that helps determine the adjustment. If it is located on the street side, the pressure will be weaker.
Modern windows allow you to set summer and winter modes for pressing the sashes
Setting the position of the sash relative to the frame
There is another mechanism in the hinges of the sash, with which you can adjust the sash. Adjustment is carried out by tightening the screws.
How to insulate: step-by-step instructions
Several material options can be used as insulation for a frame pool. The specifics of insulation depend on the material used and whether the frame will be buried in the ground or not.
Foam plastic
This material is best used for insulating pools of regular shapes without bends or surfaces of non-standard shapes. Foam plastic is one of the most popular materials for insulating not only swimming pools, but also foundations. It is considered a mechanically strong product that can withstand even minimal ground displacements.
Stages:
- Clearly mark the contours of the place where the pool will be located (if it is not buried). It is desirable that the sand or soil underneath is not loose.
- Place a backing in the place where the pool structure will stand. If its edges protrude slightly beyond the contour, it is better to bend the material inward. It is not recommended to trim such edges.
- Lay out sheets of foam plastic. Make sure that the edges also match the contour of the pool area. The sheets should fit tightly to each other. It is better to trim off excess edges with a stationery knife.
- After laying the material, glue all foam plastic seams so that there are no gaps and they are immovable.
Article on the topic: Where is there a swimming pool in Poltava
The surface is ready for installation of the pool structure.
It should be taken into account that the foam insulation layer may sag a little over time.
Roll material
To carry out the insulation procedure, you need to follow the rules:
If the perimeter where the structure will stand is not concreted, you need to pour a layer of sand (or dig the soil 2 bayonets deep) and compact it thoroughly.
It is advisable to water the surface again, compact it and level it. To avoid shrinkage, such activities should be carried out over 2-3 days, the soil should be well compacted before laying the insulation and installing the pool.
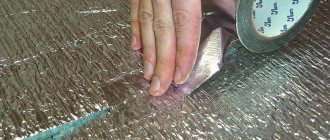
- Place roll insulation on top. Do this so that there are no gaps or waves on the surface. After thorough installation, all joints should be covered with a special tape for sealing. The insulation must be placed under the entire surface of the structure.
- Additionally, roll insulation can be used as a lining on the sides, especially if the pool has a recessed design.
- If the structure will simply stand on the ground, then you first need to outline the dimensions of the bottom and cover it with a layer of sand or soil. It is better to add them several times, giving each time time for shrinkage of 2-3 days. After this, the outlined area is covered with a substrate (if desired and financially possible, two layers can be laid).
- If the structure is deepened into the ground, the bottom of the pit is carefully leveled with sand or soil, followed by shrinkage of the material over several days. When installing an in-ground pool, the best option would be to concrete the surface. In this case, the substrate can be laid not only on the bottom of the pit, but also used as a gasket on the sides of the frame structure. It can serve as insulation and protect the sides from damage.
Underlay under laminate or old linoleum
Such material will not only maintain a comfortable water temperature (serves as a heat insulator for the bowl), but will also preserve the appearance of the surface. When choosing the amount of substrate, be sure to focus on the area of the pool bottom and its shape.
Features of laying the substrate or old linoleum depend on whether the pool will be buried or not:
Wooden flooring
- When installing boards, you must maintain a distance of 50 cm. Place supports every 75 cm.
- If wood flooring is laid on concrete, it is better to take care of waterproofing.
- Calculate the dimensions of the bottom of the frame and the dimensions of the boards so that the latter protrude no more than 25 cm under the pool. Before laying the boards, it is advisable to treat them with an antiseptic.
Article on the topic: Fitness bracelet xiaomi mi band 2, can you swim in the pool?
When laying any type of insulation, it is recommended to lay an additional substrate underneath in the form of linoleum, polyethylene or thick tarpaulin.
Comparative characteristics of the use of various types of insulation for frame houses
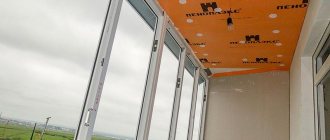
The walls of frame houses with cotton wool have a thermal resistance 1/3 times worse than that of houses with walls made of PENOPLEX® insulation, because The cotton wool is located between the pillars, which are “cold bridges”. If you fix PENOPLEX® with a thickness of 30 mm outside the studs, then the reduced heat transfer resistance will increase by 30%, and if instead of cotton insulation you choose insulation for a frame house from PENOPLEX outside the studs, then we will get an improvement in the thermal protection of the building by 50%.
Option No. 1 (cotton wool only):
- Imitation of timber;
- Vapor barrier;
- LVL stand 150 x 50 mm;
- Inter-column space wadding parquet extra 150 mm;
- OSB 9 mm;
- Moisture and wind protection;
- Imitation of timber.
Thermal heterogeneity coefficient 0.663
Reduced heat transfer resistance = 2.7 m2hdeg/W
The reduced heat transfer resistance of the structure is R=2.674 m2 oC/W (corresponds to approximately 80 mm PENOPLEX®).
Additionally, you will need at least 20 mm of mineral wool (thermal conductivity coefficient 0.042 W/mK).
Option No. 2 (mineral wool + PENOPLEX®):
- Imitation of timber;
- Vapor barrier;
- LVL stand 150 x 50 mm;
- Inter-column space mineral wool 100 mm;
- On the top of the racks there is Penoplex Comfort 30 mm with the seams taped with construction tape;
- Imitation of timber;
Thermal heterogeneity coefficient 0.857
Reduced heat transfer resistance = 3.43 m2xdeg/W
Option No. 3 (PENOPLEX® 100 mm):
- Imitation of timber;
- Vapor barrier;
- LVL stand 150 x 50 mm;
- Inter-column space without insulation with electrical wiring + ventilation;
- On top of the racks, Penoplex Comfort® 100 mm with seams sealed with construction tape + plastic mushrooms with a metal core, 4 pieces per 1 m2;
- Imitation of timber;
Thermal heterogeneity coefficient 0.977
Reduced heat transfer resistance = 4.0 m2hdeg/W – the best option for thermal resistance
The walls of a frame house with wool and PENOPLEX® are 42% cheaper than with just wool with the same thermal resistance.
Estimated cost of 1 m2 for structures: Option 1. Approximately 936 rub/m2 for materials (including additional insulation with 20mm wool: +33 rub/sq.m., i.e. total: 903.5+33=936.5 rub/m2. ) Option 2. Approximately 658 rub/m2 is the best insulation option for frame houses at a price Option 3. Approximately 808 rub/m2
The need for thermal insulation of the pool
One way to extend the life of a pool is to insulate it. There are two types: wall insulation and bottom insulation.
Pool insulation is done for two reasons:
- The temperature difference between the pool bowl and the ground, the water will cool quickly;
- The second reason follows from the first. The energy costs for heating the water in the bowl are too high.
It is necessary to insulate the pool with a material whose thermal conductivity coefficient is quite high. Because the ground temperature is about 5 degrees Celsius, and the pool temperature is 25 degrees. The difference is too great.
What is penoplex?
The most famous of polystyrenes is polystyrene foam. Everyone knows its characteristics well, and it consists of inflated polystyrene balls, firmly glued to each other using high-temperature treatment. Penoplex is extruded polystyrene foam - a solid mass that is obtained by pressing through an extruder. Penoplex does not crumble, has a high density, is bendable and, unlike polystyrene foam, does not crumble into small pieces from external influences.
It is this material that is most suitable for insulating the bottom of a concrete pool.
IMPORTANT! When choosing penoplex, take slabs marked “FOUNDATION”. Since this type of penoplex is used in the construction of basements, foundations, as well as insulating septic tanks. The slabs have increased strength and practically zero water absorption coefficient. The density of the slabs should be 29-33 kg/m3.
Types of pools
Swimming pools come in various types, from special sports and recreational pools to stationary and stationary ones installed at the dacha.
Stationary
Such a pool cannot be moved around the site; a pit is dug under it and formwork is poured for the pool bowl. A place for drainage and water intake is arranged. But there are times when there is no water on the site with which to constantly fill the bowl. In this case, resort to the following solution. At the owner's request, a fire truck is brought in to fill the pool bowl with water. But what about water purification you ask? That's how. A skimmer cleaning system is installed, which, with proper care and proper use of water in the pool throughout the year, the water can not be changed for several years.
Stationary pool
Mobile
This type of pool costs the owner less than a stationary one and does not require year-round maintenance. Only for the summer swimming season. In addition, this type of pool can be moved by the owner to different parts of the summer cottage. In turn, there are several subtypes of mobile pools: inflatable and frame. The first one is one of the simplest. But it is easy to perforate if handled carelessly. The second type is more durable and durable. The water in it can not be changed all season long if a good filter is installed. But unfortunately, you have to face the following problem: many insects, in search of water, find your pool and often drown there. The most unpleasant thing is that wasps can fly in on a hot afternoon and interfere with your rest.
Article on the topic: When will swimming pools open in Kazakhstan?
External waterproofing
Groundwater can have a negative impact on the pool bowl, even to the point of its destruction. To protect pools from the destructive effects of hydrostatic pressure, groundwater is removed using drainage systems. Lowering the groundwater level is the most reliable method of protecting swimming pool bowls . A diagram of the drainage arrangement in the presence of groundwater for the pool is shown in Fig. 1.
| Rice. 1. Swimming pool drainage diagram (cross section) |
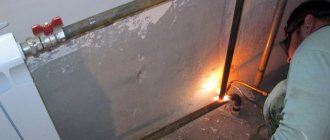
In some cases, when the groundwater level is low, external waterproofing is used. It does not allow groundwater to penetrate through the capillaries of the reinforced concrete bottom and sides into the bowl. For the manufacture of external waterproofing, various materials are used : steel, PVC films, hydroglass insulation, mastics, cement-polymer mixtures and polymer-based roll materials, clay castles, as well as various waterproofing mixtures . When performing waterproofing work, the choice of method of protection against groundwater, as well as the materials used, is very important. The price of the structure and its durability will depend on this. In addition, the quality of execution is especially important. Further, the cheapest materials can accomplish the task if performed well. But if funds allow, then it is better not to save money and purchase special roll-type membranes. They are reliable, durable and easy to install. Installation of such membranes is carried out using hot air welding using industrial hair dryers.
Thermal insulation materials for swimming pools
You cannot insulate a pool with any material you like. This will be wasted money. Because it may not be suitable and may not provide the necessary parameters. Let's figure out which material is best.
Thermal insulation membrane
The advantages of this material include:
- Mechanically strong and elastic;
- Meets all hygienic requirements;
- Very little water shedding;
- Easy to install and weld by hand;
- The welding seams are very durable and double thickened;
- Environmentally safe;
- Easy to repair;
- Can be sent for recycling.
Foam concrete
This type of material waterproofs the pool well, as it has:
- low water permeability;
- resists high pressure;
- withstands impact in aggressive water environments;
- is one of the most budget-friendly waterproofers.
Foam concrete - material for pool insulation
Styrofoam
Polystyrene foam is one of the most accessible and inexpensive types of insulation for a swimming pool, which will stop the transfer of heat from the water to the ground. Its advantages include:
- availability;
- little weight;
- environmental friendliness;
- low price;
- high thermal insulation and waterproofing properties;
- does not promote corrosion.
In addition, this material is easy to install and does not require special installations or machines.
User reviews
It is quite cheap, but has good quality. With its help, you can not only insulate the surface, but also achieve its leveling.
Users indicate that the material is moisture-resistant, waterproof, and retains its qualities for a long time. Even under the influence of unfavorable factors, it is not destroyed. If you make a hole through the polystyrene foam to drain water, operating the pool is much easier.
On the negative side, some people point out that polystyrene foam can crumble. Colored crumbs appear due to a violation of the structure of the material. The surface can be damaged by pecking birds or rodents. The defect can be corrected by applying a protective film.
Reviews can be found on this and this forum.
Technological features and advantages of sprayed polyurethane foam
Polyurethane foam is most effective for insulating a house or swimming pool. This is due to its cellular structure. In addition, the cells are filled with carbon dioxide. In addition, the heat transfer coefficient of this material is higher compared to other materials. In this regard, polyurethane foam is superior even to air.
Other advantages of the material:
- spraying does not leave seams through which cold could penetrate;
- spraying can be carried out on structures of various shapes, any configuration and complexity;
- simultaneous insulation and waterproofing is provided by spraying polyurethane foam;
- It is fireproof, as it goes out on its own when ignited.
Preparing the site - removing the turf and planning the soil
While small pools up to two tons can simply be placed on the lawn, this will not work with larger swimming pools. A massive “puck” will sink unevenly, and besides, the walls of the pool will almost always be damp and slippery.
Let’s start marking the area and first determine what shape “in plan” the base will take. For round pools, markings are made along a string tied to a peg in the center. Pools in the shape of a capsule are marked by two such circles connected tangentially by straight lines. Bowls with a contour close to an ellipse are drawn with three circles: one large in the center and two small ones at diametrically opposite points, then the conjugation is made manually.
The markings should outline an area that is 30–50 cm wider than the pool on each side. First, we go along the contour and undermine the turf with a shovel, driving it into the whole bayonet. We remove the top layer and take away the resulting “bumps” - good material for creating a new lawn. Using a long rule and a level, we prepare a preliminary horizontal plane, and remove the soil deposits with a shovel.
In the center of each of the holes on which the marking is based, we drive a 20 mm tube about 300 mm long so that its upper edge is at a level of minus 5 cm from the plane of the adjacent territory. For further alignment, you should prepare a radius rail - a block, through one edge of which a pin is screwed, inserted into the tube in the center. We tape the rack level tightly on top with tape, and screw a spacer board 100 mm wide from below.
Insulation methods and materials
There are slight differences in the insulation of pools made of different materials. Let's take a closer look.
Plastic pool
The pool is insulated by spraying polyurethane foam. You can do this yourself by purchasing a special device. Next, the bowl is placed in the ground or placed in a specially designated room. This type of insulation helps prevent the water in the pool from cooling.
Concrete swimming pool
Insulation is carried out by spraying polyurethane foam. Here it acts as both a heat insulator and a hydro- and vapor barrier. However, insulation must be carried out not only outside, but also inside. To prevent early cooling of the water in the pool bowl. Inside the pool, the polyurethane foam is sanded, reinforced, and then cement mortar is applied. Then everything is decorated with mosaics.
Article on the topic: The pool is like a fish in Odintsovo
Spraying polyurethane foam - a method of insulating a pool
Construction stages
The first step is to decide on the location where the pool will be located.
If you have experience in creating such structures or at least artificial reservoirs, building a pool from polystyrene foam blocks with your own hands will be a completely feasible task. The main stages of the construction work complex are:
- creation of a pit;
- arrangement of a drainage system;
- installation of a water drainage system;
- thermal insulation;
- bottom sealing;
- bottom reinforcement, pouring concrete;
- creating a bowl;
- Finishing work.
In addition to blocks, concrete is used to create the bowl. However, it is much easier to build a pool from polystyrene blocks. Moreover, such structures have better thermal insulation, high strength and a longer service life.
Laying blocks
So, the pit is drained, the drainage line is ready, the reinforced bottom is filled and hardens. Next, we need to lay polystyrene foam blocks around the perimeter of the bowl. The ease of connecting the blocks and the lightness of the material itself make the work quick and productive. And the precision of manufacturing materials will significantly reduce the cost of connecting components.
In order to determine the number of required rows of installation, you need to divide the depth of the pool by the height of the block (25 cm). Before installation, make sure that you leave a niche for the stairs if you planned to install one.
Each polystyrene foam block has special holes for vertical reinforcement. Thanks to this, the process of reinforcing the bowl occurs without any particular difficulties. Next, you need to fill the pool with the mixture and leave it for several days until it dries completely. Afterwards you can begin plastering the walls and finishing. Usually the pool bowl is covered with PVC film or lined with special anti-slip tiles.
You can make a pool with your own hands if you follow the above steps and technology.
Source
Thermal insulation of bowl and pipeline
It only makes sense to insulate the bowl and pipeline in stationary pools. Mobile models simply do not need this. The simplest option for thermal insulation of a bowl is the use of polystyrene foam. Sheets of insulation are simply laid around the concrete during pouring.
As a rule, the bottom is not insulated. The average depth of the pool is enough to prevent the water from freezing. Insulating the pool with foam plastic will also protect the structural material from moisture.
Ultimately, this will save the concrete from the freeze-thaw cycle when moisture enters. Polystyrene foam performs an additional function of moisture protection. Sometimes, in addition to polystyrene foam or instead of it, they use expanded clay backfill with a layer 20-30 cm thick.
For thermal insulation of the pipeline, it is better to use shells made of foil and basalt mineral wool. The shell has already been formed to the size of the pipe; all that remains is to insert the pipe into the insulation and seal the joint with foil tape.
You cannot immediately cover the insulation with earth, since fallen clods of dirt and stones can damage the insulating layer. Therefore, a sand cushion is always poured under the bottom of the insulation. Ideally, the pipes should also be filled with sand until the main part is hidden under its layer.
Pool insulation is an important part of the installation work. Thanks to which you can further save money on electricity, and the water in the pool bowl will always be at the same set temperature.
Construction of a rigid and level platform
For good load distribution, we prepare a dry mixture of 10 parts of “dirty” crushed stone (PGS) and one part of grade 300 cement, which can be replaced with light crumbly clay, increasing the binder content by 1.5 times. Pour a layer of about 5–6 cm, then level it in a circle with a lath. We compact it with our feet, add more mixture and level it again.
Please note that if the pool frame requires embeddings in the ground, they must be installed before pouring the bottom layer. You just need to trim the edges a little so that the difference in the level of diametrically opposite points does not exceed 10 mm.
Now you need to twist the spacer board from the lath and pour washed quarry sand into the pit to a level of minus five centimeters to the block. Afterwards, the sand needs to be compacted with a hand tamper, the missing amount must be added, compacted again, then spilled with a small amount of water. To level, you need to stock up on a second 50 mm shorter block, which will scrape off excess sand in a circle. After alignment, do not forget to pull out the centering tube.
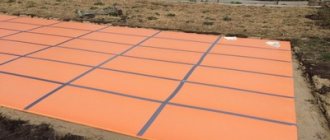
A damper lining is placed on top of the sand cushion. For it, most manufacturers recommend extruded polystyrene boards with a thickness of 30–50 mm. Laying should begin from the center, gluing the joints with reinforced tape. At the edges, where the contour of the pool forms roundings, the slabs are cut with a knife with an outlet 7–10 cm from the bottom of the bowl.
Next, the issue of dynamic compensation is resolved: the water in the pool works as a counter-balancer, swinging the bowl from side to side. In the plane of contact, where the pressure is very high, such vibrations can undock the substrate plates, and if there is a small pebble or sand on the surface, they will eventually wear out the bottom. Therefore, an EPS bed is covered with a slippery synthetic lining. Some people use banner fabric for this, others make do with plastic film.
What to put under the pool for insulation
What to lay under a frame pool?
Frame pools are made from durable vinyl that can withstand heavy loads and is highly durable and reliable. But such a coating can easily be damaged by an ordinary stick, stone, reinforcement or glass. For this reason, manufacturers of frame pools recommend laying a substrate, building podiums and cement bases before installing them on the surface. With their help, the reservoir will not break through during use and will last a long time. We’ll talk further about what to put a frame pool on and other nuances.
Possible problems and difficulties, solutions
Difficulties may arise in the process of insulating the pool area. They can be easily eliminated if you use the right methods :
| Problem | Solution method |
| Water leaks into the structure | Be sure to use polyurethane foam and pour concrete |
| The concrete base is weak and falls apart quickly | Use reinforcement to secure |
| Joints on polystyrene foam do not meet | Use a hacksaw to level the surface |
| Expanded polystyrene slabs quickly disperse before pouring concrete | Use mounting tape or construction clips, connecting closer together |
| The fittings are poorly attached and come apart | Use wire or welding machine for adhesion |
Basic requirements for a substrate for a frame pool
- Due to the large mass of water, the base must be level and the flooring must be strong - during installation of the substrate, a deviation of 5 mm per 1 m is allowed. If this criterion is not taken into account, the frame and bowl may become deformed, making the pool unsuitable for use.
- The substrate must lie on a solid surface - good stability can be achieved by compacting the soil.
- The substrate should be spread in an even layer on a flat surface: without bulges, debris, tree roots, etc. Foreign objects can damage it and, under heavy load, break through the pool bowl.
Article on the topic: Is it possible to go to the pool after being vaccinated against diphtheria?
Experts do not recommend laying a backing on loose surfaces, or near buildings and trees. For a frame pool, a special area on the site should be allocated, where you and your family can comfortably swim and spend time near the pond. The absence of trees and bushes nearby will allow you to spend less time on cleaning, since leaves, sticks and fruits will not fall into the bowl.
Pros and cons of using
The advantages are manifested in:
Low (close to 0 for compacted extruded grades, no more than 3% for ordinary) water absorption rates.- Good thermal insulation properties.
- Chemical inertness and preservation of performance characteristics even in direct contact with the ground.
- Ease of cutting and processing, high speed of installation of the substrate and the possibility of obtaining a seamless base when using sheets with an L-shaped or grooved edge.
- Sufficient rigidity and strength, long service life.
The disadvantages include:
- The comparative high cost and the need to use extruded, rather than cheap granular grades of polystyrene foam.
- The need to protect open areas from ultraviolet radiation and external influences during long-term use. Compacted brands such as Penoplex better withstand exposure to the sun, but using them as a material for a temporary substrate is not economically profitable.
- The need to protect the substrate from rodents (the highest when using conventional polystyrene foam).
What can be laid under a piece of pond?
Today, there are no problems with what to put under a piece of pond, since there are many different options for substrates on sale. They are easy to install, protect the bowl well from damage and last a long time. Most often, bedding is already included in the package of a piece of pond, but they can also be purchased separately. If you don’t want to overpay, you can make the backing yourself using available materials: wood, linoleum, etc.
Special substrate
Most often, users of frame pools buy ready-made special substrates, which in some models are already included in the package. They have many advantages:
- meet current quality standards;
- serve for a long time;
- prevent the bottom of the artificial pool from breaking through due to its high strength;
- correspond to the size parameters of the pool;
- easy to install and remove;
- suitable for all-season use;
- are inexpensive.
Special substrates are an ideal solution for small and medium-sized frame pools, which are assembled for the winter at the end of the season. If a piece of pond is installed on a permanent basis, it is better to give preference to more functional and aesthetic substrates made of wood, cement and decking boards. In addition to a reliable design, they make it possible to create a relaxation area next to the pool.
Linoleum
If the pool did not come with a special underlay, but you still have unused linoleum at home, you can lay it under a custom pond. Its properties are close to the required ones: strong, durable, wear-resistant. But there is one significant drawback - when wet, linoleum becomes slippery, which is dangerous. Also, such an alternative looks ugly from the outside.
Polyethylene film
A substrate of this type is well suited for small frame pools, during use of which there will not be a large load on the base. Polyethylene film as a flooring for a piece of pond has a number of significant advantages:
- It is cheap compared to other types of substrates.
- They come in different sizes, allowing you to choose the optimal length and width.
- It is highly resistant to external factors: wind, temperature changes, precipitation.
- It is very light, which gives you the opportunity to lay it yourself without resorting to the help of third parties.
- It has medium strength, which is enough to protect the pool bowl from damage during operation.
Article on the topic: At what depth to install a pool filter
A significant disadvantage of polyethylene substrates is rapid wear. With normal use, such flooring will be enough for a season, but no more. Sun rays help reduce elasticity, strength and frost resistance. If you do not plan to remove the pond for the winter, this substrate is not suitable for all-season use. You will have to remove the pool frame, replace the deck, and reinstall it every year, which is not practical.
Rolled rubber coating
This coating works well as a substrate for a pool because it retains heat and does not slip. The material is highly resistant to long-term loads and mechanical damage, easy to clean, dries quickly, and is not afraid of temperature changes. Rolled rubber coverings are available for sale in thicknesses from 2 to 40 mm. Thanks to this, you can choose the best option for yourself without overpaying for features you don’t need. Thin models are well suited for children's and single-person pools, while thicker ones are suitable for large ponds.
Installation on wood flooring
Wooden substrate is the optimal solution for both temporary and all-season structures. When you use ponds, you don't have to worry about the bowl being damaged or broken. At the end of the season, the pool frame can be removed for the winter, and the area can be used for other purposes: installing a gazebo, arranging a garden or a creative area.
The underlay is a good solution for both temporary frame pools and those installed for all-season use. With its help, you don’t need to worry that while swimming a pond will break through and flood the area, because ready-made canvases are made of durable materials. If aesthetic beauty also plays a significant role for you, you can design the substrate yourself.
Review: Frame pool Intex 54452 488x122 - This thing turned our estate into a piece of paradise
For 4 years now, our site has been decorated with a huge Intex frame pool with a diameter of almost 5 meters and a depth of 122 cm.
The idea to buy it came for the reason that, firstly, our youngest son suddenly became afraid of water and categorically did not want to learn to swim, and secondly, among the natural reservoirs nearby, we only have a fast mountain river, the water in which is quite cold even in summer.
Four and a half years ago, we bought a pool in September, during the discount period, and it cost us about $1,000. I don’t remember how much it was in rubles, I think it was around 30-32 thousand.
The kit included: the pool itself, a “galosh”, a ladder, a pump with a paper filter, a substrate under the bottom, an awning for covering the pool from above, a rope for tightening the racks, a net for removing debris with a telescopic handle,
The box stood on the veranda all winter. And then the day came (it was the last days of May 2011) when the weather allowed work on installing the pool to begin.
To begin with, we leveled the site. measuring 6x6 meters. Then they laid the backing that came with the pool, then rolled insulation (silver side down) so that the cold of the earth would not be transferred to the water. Since our soil is black soil and loose, we had to place a piece of wood cut to size under the legs.
The first time the pool was installed it took an hour and a half. In subsequent years, my husband and I, with our son helping us, spent no more than 30 minutes on installation.
Now we have a solid foundation poured under the pool in a circle 30 cm wide. Sand is poured and compacted on top of the ground inside the circle. On top of the sand, so that pebbles do not make holes in the bottom and to improve thermal insulation, we place cardboard from large boxes. Then we lay the backing. On top is insulation, but now with the shiny side up, towards the pool. And we only install the pool on insulation.
Making a substrate for a piece of pond with your own hands
If you don’t like film backings for custom ponds, you can make your own from wood or cement. The design of the base does not include any difficulties, but requires care and accurate calculations. So that you can make your own substrate, we will consider all the stages of preparatory and installation work in more detail.
Article on the topic: How to cover a pool
Selecting a location
You need to choose a place for installing the substrate, and subsequently the pond itself, taking into account the distance to the nearest source of water supply, electricity and sewerage. Experts recommend installation on flat surfaces that have been previously cleared of construction debris and other contaminants.
Also, installation of the substrate and a piece of reservoir is possible on an uneven surface with holes, trenches and other depressions. If there are uneven areas and debris on the site, all foreign objects must first be removed and the soil leveled using sand and a tamper.
Marking
Once you have decided on the location for installing the frame pool, proceed to the next stage - applying markings. To do this you will need a can of spray paint, a tape measure, pegs and cord. If your pond is round in shape, drive a peg in the center, attach a tape measure to it and walk in a circle, making dotted marks, drawing a circle. For rectangular or square pools, use the same procedure, but using a square.
Experts recommend applying markings half a meter larger than the diameter of the pool bowl. This will help correct flaws during installation, and also, if necessary, provide space for arranging a recreation area.
Preparatory stage
In well-prepared areas, you can use ready-made film as a substrate or construct a podium yourself. In the latter case, you need to first prepare the surface: remove vegetation, weeds, stones. Next, using a bayonet shovel, the top fertile layer is cut along the contour. At the end, the area must be leveled and compacted well.
Installation of film backing
The substrate for a piece of pond must have high wear resistance and durability. Using this principle, you can select a material that meets the specified parameters: geotextiles, polypropylene. Once you have decided on the substrate, you can begin installation work. To do this, you need to lay the canvas in an even layer on the already marked, cleaned and prepared area. Upon completion, you can install a pool and arrange a recreation area.
Wooden pool podium
Most often, a wooden substrate is made from boards and beams. The latter are laid parallel to each other strictly according to the size of the reservoir or with a reserve for equipping a recreation area. Next, the boards are installed perpendicular to the beams. At the end of making the podium, the entire surface is covered with a special product that prevents the wood from rotting. A finished wooden podium has many advantages:
- looks beautiful;
- lasts a long time;
- allows you to use the site for various purposes, not limited to the installation of a pool;
- does not slip;
- protects the pool bowl from puncturing;
- retains heat, preventing the water in the reservoir from cooling quickly;
- does not fade.
Article on the topic: How to seal a pool filled with water
If you want to equip a luxurious podium for swimming and relaxation, you can replace the classic boards with terrace boards. They do not rot, do not scratch, have an anti-slip coating, do not fade and are easy to clean. Such boards are available for sale in a wide range of colors and different textures, which allows you to choose the most suitable option based on your individual preferences.
Cement base
For frame pools, a cement podium is a reliable and durable solution that can solve the problem of what to put under a single-piece pond for many years. It allows you to dismantle the reservoir at any time in order to use the area for other purposes: install a gazebo, build a guest house or a workshop. When installing a cement base, consider some requirements:
- Before laying the cement pad, you need to dig a level depression in the ground that corresponds to the dimensions of the reservoir or a few centimeters more. There should be no trash, stones, sticks or leaves.
- The surface must be well compacted and level; the area can be leveled by compacting sand.
- It is imperative to construct formwork from boards.
- A special cement mortar must be mixed in accordance with the proportions.
- Before laying the cement pad, lay down layers: sand, crushed stone, reinforcing mesh.
If construction work is carried out in hot weather, the cement pad must be periodically moistened with water during the drying process. This will help prevent the surface from cracking under the influence of high temperatures.
The finished cement base can be used in its pure form or pre-decorated with paving slabs, awning fabric, vinyl film or polystyrene foam.
Avoid These 5 Mistakes When Planning Your Loggia
And as a reminder, we want to provide a list of common mistakes that many people have made. We will help you find out exactly what mistakes are made and how to avoid them.
Mistake #1: redevelopment without permission
People often think about how best to insulate a loggia, but few people think about the fact that your decision to make one large room out of a loggia and a room must be registered by BTI representatives. This measure is necessary so that you do not have problems in the future with the sale of an apartment when inconsistencies are found with the real apartment and the technical passport.
Mistake #2: moving the radiator to the loggia
If you have permission to re-equipment, then you are unlikely to decide to take such a step, but just in case, it is worth warning that removing radiator pipes and heating equipment is unacceptable. There is too much heat loss on the loggia, and sometimes even with insulation the pipes freeze, which causes accidents. In addition, because of this you will have to pay extra for heating.
Mistake #3: dimensionless glass
This design solution looks great - when closed it is a smooth surface, and sometimes it is not disturbed even by edges. In addition, such sashes are convenient to assemble into an accordion, and this will not take up the space of the loggia. But for insulated rooms this is not an option - single glazing and cracks will not protect against the cold. In addition, dirt and dust quickly accumulate on them, as well as fingerprints, and there is no way to attach a mosquito net.
Mistake #4: glazing on brackets
To increase the area, or more precisely, the volume of the loggia, apartment owners often want to build a frame for glazing (extended by a couple of tens of cm). This is how a canopy is made along the upper perimeter, on which snow will accumulate, and in bad weather the sound of rain will be heard. The main thing is that a glass build-up will form on the facade, which will spoil the appearance of the structure.
Mistake #5: Overusing sealant
A real perfectionist's nightmare is seams with bubbling foam. They are unsightly, and they can also ruin the microclimate of your apartment - the fact is that the foam of polyurethane sealants cannot withstand exposure to sunlight and moisture, and without protection it will quickly collapse, thereby opening all sealed cracks and gaps to street noise and drafts.
What should you consider when choosing a substrate for a frame pool?
- dimensions;
- shape;
- ease of installation and dismantling;
- strength and durability of the material;
- insulating properties;
- safety.
Experts recommend choosing a substrate with a diameter larger than the frame of the reservoir. After taking water procedures, you will be able to go out to a dry and clean area, and also leave things there.
Each of the presented substrates has its own advantages and disadvantages, which play an important role when choosing flooring for a piece of pond. Experts recommend giving preference to full podiums made of wood or cement. But other options also exist if you don’t want to worry about preparing a place for installing a full-fledged foundation - digging a pit, laying several layers of different materials, constructing a frame, and so on. Ready-made solutions significantly save time, effort and money.
Possible alternatives
The following have similar properties to sheet expanded polystyrene:
branded underlays supplied by pool manufacturers;- polyurethane mats;
- rolled materials (linoleum, waterproofing membranes, polyethylene film folded in several layers, penofol, geotextiles);
- sheets of wood-polymer or mineral-based composites;
- flooring made of boards or pallets.