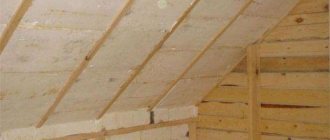
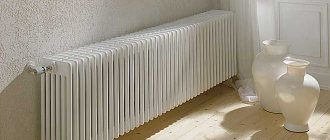
One of the problems in a private home is heat leakage through the ceiling. If in an apartment building there is a warm apartment above, then in our case there is only a cold attic overhead, or even just a street. How to insulate the ceiling from the inside in a private house if, for some reason, it is not possible to do this from the attic?
How to insulate a ceiling from the inside, reducing heat leakage through the ceiling to a minimum? Let's try to figure it out.
Insulating walls from the inside: the principle of insulation
It is possible to insulate walls from the inside, but in order to avoid mistakes that will affect financial costs, it is necessary to understand the physical processes occurring inside the wall. It is very important to do everything possible to prevent condensation coming from the room through all the layers of different materials.
Attention!
A clear understanding of where the dew point is located and how condensation will behave in a particular case is required.
When using wall insulation inside a building, the following aspects must be taken into account:
- what the load-bearing walls are made of, their thermal conductivity and thickness;
- the presence of external insulation, its material, thickness and installation features;
- climate features in the region where the work will be performed.
Only after analyzing these factors can you choose a material for insulation. But it is worth considering that it is impossible to say in advance what will be used more effectively: isolon or budget mineral wool. In any case, you will also need to organize a ventilation system so that condensation can freely exit the room.
Installation stages
How to insulate a ceiling from the inside using foil material? We offer a detailed algorithm of actions:
- A cellular sheathing is made from wooden beams or metal profiles.
- Cut sheets of foil to the desired size.
- They are fastened to the sheathing with a construction stapler.
- Cover the ceiling with plasterboard or clapboard.
Advice! In order to avoid excessive heating of the foil insulation, “air cushions” are created between the sheets.
What materials are used for wall insulation
How best to insulate a wall inside a house/apartment is a pressing question, since there are many materials on the market and choosing the best one is problematic. To avoid this, experts have compiled a review. So, the most popular insulation materials are:
- Mineral wool. One of the best choices is basalt (stone) wool. When it comes to mineral wool, this is often what is meant. And this is not surprising: it is convenient to work with, it has a number of operational and technical characteristics. This material is resistant to fire and rotting and does not emit toxins. Basalt mineral wool is produced in different forms: rolls, slabs, etc. But there is one drawback - it absorbs liquid, which makes installation somewhat difficult and there is a need for additional operations.
- Styrofoam. This insulation is a leader among its “brothers”. The reason for its popularity is its availability, light weight, easy installation and processing. The material is waterproof, has stable dimensions and geometry of the plates, and steam does not pass through it. For internal insulation, this option is most preferable due to its price and quick installation.
- Penoplex. This is an analogue of polystyrene foam, but it is heavier, more durable and more expensive.
- Polyurethane foam. A specific heat insulator, which is sold in liquid form and applied by spraying onto the surface to be treated. In air, the material foams and hardens, resulting in a sealed layer that looks like polyurethane foam. It will be an ideal option if you need to insulate walls with complex geometry, protruding parts or minor defects. It is characterized by a high price and the need to use special equipment. The material is moisture resistant, airtight and covers surfaces well, leaving no cracks or gaps. But still, its use is somewhat limited.
Attention!
When choosing a material, it is important to take into account such characteristics as vapor permeability. To insulate the inside of the wall, it is necessary to prevent any contact with the air in the room. If this is not done, the surface will begin to get wet.
These are not all materials suitable for this type of work. However, the ones listed are the most popular, as their characteristics are good and the price is not the highest.
Izolon
Izolon is an elastic insulating material made from polyethylene with a cellular structure . It is available in the form of plates or rolls and may additionally have an aluminum foil coating.
Its main advantages include:
- durability;
- environmental safety;
- excellent shock and sound protection.
Izolon
How to insulate walls from the inside in an apartment with your own hands
Before you begin insulating your apartment, you should study all the nuances of the procedure and prepare for it. Regardless of the material chosen, insulation has a certain algorithm that must be strictly followed:
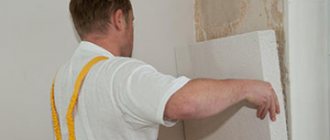
- Preparing the wall. This stage includes cleaning furniture, cleaning the surface from finishing material to plaster. If the latter is missing, then you will need to plaster the wall.
- Waterproofing. It is better to use special polymers for this, but polyethylene film will also work. It must be applied to the walls, and the places where the strips are fastened must be taped with construction tape.
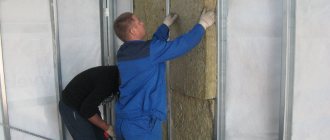
- Installation of sheathing. You can use guides made of wood and metal. In the first case, the material should be treated with antiseptics and fire-fighting solutions. When installing sheathing, the step size must be selected depending on the insulation in order to prevent the formation of gaps and voids.
- Insulation of walls. The heat insulation is laid strictly into the openings of the sheathing so that the edges of the insulation do not extend onto this frame.
- Installation of vapor barrier film. When using it, the insulation becomes protected from moist steam, which is always present in the apartment. This step should not be neglected, since moisture will begin to accumulate in the material, which will have a detrimental effect on its properties. The vapor barrier film must be laid without gaps or omissions, and the joints and cracks must be treated with sealants.
- Installation of plasterboard sheets. You need to choose those that are suitable for residential premises.
If there is nothing on top of the drywall, then the wall insulation work is completed. But in the case of further painting, putty, or wallpapering, you will need to prime the surface, install a reinforcing mesh, and only then apply decorative materials to the wall.
Polystyrene foam and polystyrene foam
Polystyrene foam is more environmentally friendly and easier to use.
Waterproofing with this insulation technique is not required, and the small thickness allows this material to be used in rooms with low ceilings. Insulating the basement ceiling from the inside with foam boards will only take a few hours. The plates are easy to cut, and they can be attached with glue without building the sheathing.
Polystyrene is a direct relative of foam plastic, a denser and less friable material.
The price of such insulation is slightly higher than others, but its advantages are difficult to overestimate. Zero moisture absorption allows it to be used in any type of premises without worrying about waterproofing. The thickness of extruded polystyrene sheets is 1-10 cm.
Such a large assortment allows the use of polyplex for insulation of floors, walls, ceilings, and external communications. Manufacturers, as a rule, ensure ease of installation by cutting grooves along the edges of the plates in advance. This makes it possible to secure the material without gaps, providing maximum insulation.
When insulating from the inside, polyplex is attached to supporting structures or between them
The surface of polystyrene boards is quite smooth. Insulating the ceiling with polystyrene foam from the inside allows you to immediately begin finishing by simply filling the surface.
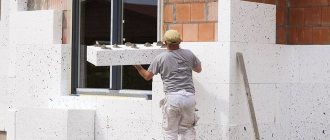
Insulation of walls from the inside in a private house with penoplex
Insulating the walls from the inside of the room with penoplex is also possible. The algorithm is like this
- Surface preparation. This stage involves removing wallpaper and other facing materials from the wall. Then you need to clean the surface from dust and dirt, and check if there are any unevenness. If a depression or crack is found, it must be filled with putty. Surfaces on which condensation has appeared for a long time are often affected by fungus or mold. To get rid of this problem, you need to treat the wall with antiseptic solutions. After this, apply the primer, wait for it to dry, and only then can you move on to the next stage of work.
- Cut the slabs to the required sizes. For this you need to use a ruler, a knife and a square.
- Prepare an adhesive solution. It is selected according to the recommendations of the manufacturer of the insulating material. Knead strictly according to the instructions indicated on the package.
- Apply glue to the slabs and wall. Attach a heat insulator.
- Using plastic dowels, provide additional fixation. This step is optional, but it guarantees greater reliability.
- Check the tightness of the connection in the areas of door and window openings. Fill the seams between the plates with sealants. If you find areas with a large distance, you can cover them with foam.
- Vapor barrier. For penoplex, this is another optional installation step, but this procedure will help avoid unexpected problems.
Attention!
You can begin interior decoration of the room only after completing the listed steps.
Thermal insulation wallpaper
Wallpaper with thermal insulation properties is an excellent solution that will not only insulate walls from the inside, but also hide small defects on the surface.
This type of wallpaper is made from polystyrene foam and is produced in rolls, the length of which reaches 10 meters, and the width ranges from 0.5 to 1 meter. Thanks to its insignificant thickness - 3.6 and 10 millimeters - thermal insulating wallpaper practically does not reduce the area of the room .
They have many advantages:
- pronounced thermal insulation properties (6 mm of such wallpaper is equivalent to 12 cm of a brick wall);
- providing reliable protection from extraneous noise;
- excellent moisture-resistant properties that prevent the formation of mold and fungi.
Wallpaper with thermal insulation properties is glued end-to-end using special glue onto a pre-made substrate.
The backing is applied to the cleaned walls after filling existing potholes and cracks with plaster. You can glue it with a special glue designed for heavy wallpaper or regular PVA. It is necessary to coat both the substrate itself and the wall with adhesive.
The backing for warm wallpaper to insulate the walls should be glued end-to-end. After this, you can start gluing the wallpaper in such a way that its sheets overlap the joints of the backing.
Insulation under wallpaper
Independent insulation of walls from the inside with mineral wool plus plasterboard
It is necessary to begin the installation of this insulation by cleaning the surface of all hanging elements. So, you need to remove all the brackets, window slopes, window sills, etc. Next, the work algorithm is as follows:
- Inspection of the wall. If there are cracks or other defects, they need to be filled. The first ones must be expanded in advance using a spatula, since they may be much larger inside than outside.
- Place a surface to install direct drywall hangers. The standard profile pitch is 0.6 m. It is necessary to outline the axes of the guides, each with 4-5 hangers. Their installation is mandatory for plasterboard guides.
- Installation of insulation. The material is laid in rows, in one or several layers, so that the joints are covered with entire mineral wool sheets of the upper tiers. The appearance of cracks and gaps must be avoided. If there are any, they need to be filled with polyurethane foam. The wall must be completely covered with insulation. Window slopes also need to be covered with mineral wool up to the line of contact with the frame. Guides for plasterboard partitions are installed on top of the material.
Attention!
If you are installing slab mineral wool, which is more rigid, then you must first install guides and then attach the insulation.
When choosing mineral wool as wall insulation, you must take into account that they will become 5-10 cm thicker - this is exactly how much is needed to install the material. When using mineral wool plus plasterboard, the wall turns out to be perfectly flat and suitable for any type of finish.
Basic Operations
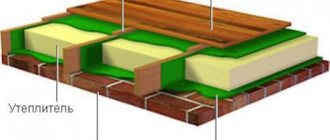
As an example, let's consider insulating the ceiling from the inside in a private house for the case when there are beams overhead with a plank ceiling attached to them. The climate is temperate; We will be insulated with mineral wool 50 mm thick.
- Armed with a stapler, we attach plastic film to the ceiling. It will completely stop the flow of moisture to the boards from the room and extend the life of our ceiling. An overlap of ten centimeters is required.
- We stuff the sheathing. We will hem the ceiling with PVC panels; a thin mounting rail is sufficient for them. But let's not forget about the thickness of the thermal insulation and take a 50x50 block.
We will stuff it across the future panels in increments of 60 centimeters: in this case, the panels will not sag, and the mineral wool will not have to be cut to width. Most rolls are this size .
- We fill the gaps between the bars with mineral wool. It is better to wear textile gloves and protect your eyes and nose: cotton wool fibers are volatile.
At this stage our ceiling looks something like this.
- Armed with a stapler again, we hem the sheathing from below with a second layer of polyethylene. Additionally, we glue the connections of the sheets with adhesive tape: the greater the tightness we provide, the longer the insulation will retain its properties.
- Finally, the last stage: we hem the wall panels from below. We won’t focus on how this is done: installation methods have already been described hundreds of times.
Hemming panels to wooden sheathing is a fairly simple task.
What problems can arise when insulating walls from the inside?
When insulating walls in an apartment or private house, owners may encounter the following problems:
- high humidity;
- the appearance of mold.
Such consequences are quite expected and they occur regardless of what type of insulation was used. To avoid this, it is necessary to make a hydro- and vapor barrier during the installation process. But, if fungus and moisture have already appeared, then only dismantling the insulation, overhauling the walls, treating them with antifungal compounds and subsequent plastering will help get rid of them.
Even beginners in the construction business can independently insulate walls from the inside. But for the work to be successful, it is necessary to choose the right material for thermal insulation, as well as strictly follow the recommendations of specialists. Training videos will help you do everything without errors.