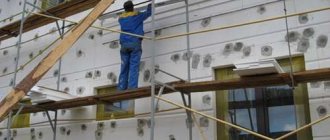
Insulating a balcony or loggia allows you to increase the area of your home and get additional space for work or leisure. But in order to feel comfortable on the balcony all year round, it is necessary to insulate it well. One of the important stages is the insulation of the balcony ceiling, since warm air moves from bottom to top. When planning insulation, special attention should be paid to the choice of insulation and compliance with the technology for performing the work.
Insulating a balcony or loggia allows you to increase the area of your home and get additional space for work or leisure. But in order to feel comfortable on the balcony all year round, it is necessary to insulate it well. One of the important stages is the insulation of the balcony ceiling, since warm air moves from bottom to top. When planning insulation, special attention should be paid to the choice of insulation and compliance with the technology for performing the work.
You should also check to see if the ceiling or roof is leaking. After all, if moisture accumulates between the ceiling and the insulation layer, dampness, mold and a musty smell will form in the room.
Why insulate the ceiling on the balcony
Heat leaves the room to a greater extent through the ceiling, as the heated air mass is directed towards it. If the walls, windows, and floors are insulated, then with a ventilated roof, the work done will be reduced to almost zero. Plus, cold bridges contribute to freezing of finishing materials and the formation of condensation inside the room.
On a canopy, if installed, with a ceiling without insulation, icicles always grow due to the active release of steam from the glazed balcony. Read more in the article “How to make a canopy on a balcony.”
Without thermal insulation work, complete interior decoration of the balcony is almost impossible. This is due to changes in temperature and humidity, which not all materials can withstand for a long time.
Options for using solid insulation
By insulating the ceiling with your own hands using solid materials, you will encounter fewer difficulties and will be able to avoid the use of special protective equipment. To work, you will need polystyrene foam or penoplex, formed taking into account the space between the elements of the sheathing with a margin of 1-1.5 centimeters. The insulation does not have to be glued, since if it is tightly fixed, it will be firmly fixed due to friction and the whole process can be carried out with your own hands.
The installation of the slabs is followed by fixation using dowels installed in the drilled holes. The cracks and gaps are sealed with polyurethane foam. The next step is laying foil insulation, fixed with a stapler to the sheathing and gluing the joints with metallized tape.
Polystyrene foam and foil polystyrene foam can be used separately. In this case, a different fastening method will be relevant.
Points to consider before insulation
If the balcony is not located on the top floor, then it is worth talking with the neighbors above. This is necessary to find out the condition of the floor in their premises. Often the gaps between walls and ceilings are end-to-end. The durability of the soldering result will be ensured only by continuous processing of the gap.
In any case, thermal insulation of the ceiling can be carried out on a prepared base.
Here is a list of required work:
- Dismantling. The decorative coating, old joint fillers, and weak areas must be removed.
Preparing for insulation
If you decide to refurbish and insulate your balcony, you must:
- Glazing the balcony or replacing single-glazed windows with modern double-glazed windows with low thermal conductivity;
- Select materials that will be used for insulation and finishing;
- Calculate the amount of required materials (insulation, waterproofing), antiseptic, fasteners, glue, polyurethane foam, etc.
- Decide how the balcony will be heated (heater, infrared heater, or “warm floor” will be used);
Quartz heater Tepleya
Materials for insulating the ceiling on the balcony
To insulate the ceiling, it is more convenient to use roll or slab-type materials. On trading platforms of this kind, products are represented by mineral wool, polystyrene foam and foamed polyethylene. Each option has subtypes, its own characteristics regarding technical indicators and installation rules.
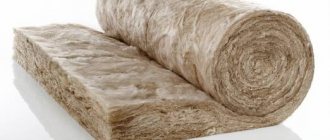
Mineral wool
Mineral wool is represented by fibrous sheets, slabs made from glass, stone or waste from industrial enterprises for the extraction and processing of rocks.
The advantages of such thermal insulation include the following:
- budget;
- pliability regarding cutting, flexibility;
- ability to retain heat and absorb noise;
- resistance to temperature changes;
- ease.
But it is worth noting some disadvantages:
- protection from moisture and steam is required;
- It is necessary to work with a respirator, mask, gloves and completely cover the skin;
- laying is carried out in the grooves of the pre-assembled sheathing.
To insulate the insulation, the base of the ceiling is coated with a compound that does not allow water to pass through. It is recommended to create a ventilation gap between the tree and the hydrobarrier. A vapor-proof membrane is laid on top of the mineral wool.
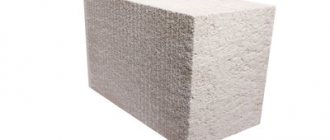
Styrofoam
The production of polystyrene foam is based on two methods: foaming and extrusion. Depending on the technology, products have different technical characteristics. The most important difference is the density of the slabs.
In any case, the materials have the following advantages:
- rigidity and strength;
- a light weight;
- ability not to transmit heat;
- flexibility regarding cutting;
- moisture resistance.
Among the disadvantages, relative to other materials, the high price, thickness and shorter service life stand out. The latter depends on density. If mineral wool retains its properties for 25, 50 and 80 years, then polystyrene foam lasts up to 15 and about 30 years.
Read more in the article “Insulating a balcony with polystyrene foam.”
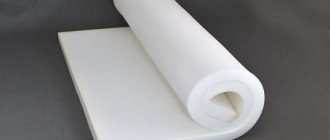
Penofol
Elastic foam plastic is protected on one side by a layer of aluminum foil. The fabric is often used as an intermediate moisture-resistant layer in order to reduce the thickness of the thermal insulation cake.
Among the advantages regarding the use of penofol for insulating the ceiling of a loggia or balcony, the following can be noted:
- resistance to temperature changes;
- the ability to retain heat and prevent the penetration of cold;
- low vapor permeability, can be used as waterproofing.
Like expanded polystyrene, foil foam plastic is unstable to organic solvents and products from oil refineries. Fixation is carried out, as a rule, by pressing the canvas to the ceiling using slats.
It is not recommended to damage the metal coating, since the declared insulation characteristics will be reduced in this case.
Table of technical indicators
The table shows the basic technical characteristics of various thermal insulation materials.
| Parameter | Glass wool | Slag | Stone wool | Styrofoam | Penoplex | Penofol |
| Thermal conductivity in W/m*K | 0,03-0,052 | 0,042-0,048 | 0,035-0,042 | 0,028-0,034 | 0,025-0,03 | 0,037-0,052 |
| Soundproofing | 0,8-0,92 | 0,75-0,82 | 0,75-0,095 | 0,45-0,65 | 0,52-0,75 | 0,4-0,55 |
| Water absorption | 1,7 | 1,9 | 0,095 | 4 | 0,4 | 0,7-0,35 |
| Temperatures in ℃ | -60-+500 | -50-+300 | -150-+600 | -50-+75 | -50-+80 | -60-+100 |
The strength and density of thermal insulation materials depends on the raw materials, binders, and production technology used. In addition to GOSTs, manufacturers comply with specifications. And this is reflected in standardized indicators. Therefore, weight and density must be determined separately for each product.
But we can note the distinctive flexibility of penofol, elasticity, causticity of mineral wool made of glass or slag, fragility of polystyrene foam, rigidity of basalt slabs and extruded polystyrene foam.
Insulation scheme without lathing
When insulating the ceiling with polystyrene foam and extruded polystyrene foam, there is no need to build a frame. At the same time, the base is also protected from moisture with a foil insulator, which is attached directly to the base ceiling. After this, the slab insulation is mounted on mounting foam that does not contain toluene.
To do this, foam plastic is cut into slabs according to the width of the room. The back side is lubricated with an adhesive mixture. The plate is applied to the ceiling surface and pressed well. The next insulation panel is glued flush against the previous one. All seams are covered with polyurethane foam. After that, they are glued with reinforced tape.
Important! After gluing, polystyrene boards are additionally secured using disc-shaped dowels.
Do-it-yourself insulation of the ceiling on the balcony
How to insulate the ceiling on a balcony? The process is carried out using technology corresponding to the specific material: with or without lathing, with glue or dowels. The main thing is to observe all the nuances regarding the preparation of the foundation. All the steps are simple enough to implement the event yourself.
Installation of mineral wool
The laying of sheets and slabs is carried out using lathing. To assemble it, a beam with a cross section of 50-60 mm is used. For fastening, self-tapping screws with dowels will be sufficient. The groove width is calculated according to the width of the mineral sheets. In this case, to compact the heat-insulating carpet, the distance should be reduced by 20-30 mm on each side.
Direct contact of wool with walls and windows should be excluded by means of a wooden frame. If the material used is of small thickness, then it is laid in 2 layers, overlapping the joint seams of the previous coating. The second sheathing is assembled perpendicular to the main one, and is attached to it with wood screws.
Insulating the ceiling on a balcony or loggia with stone and basalt insulating sheets can be done without lathing. To do this, you will need plastic dowels with a wide head and cement-based adhesive intended for installing mineral slabs. Double-layer insulation is also laid with an overlap.
Before finishing, the fiber insulation must be covered with a vapor-proof fabric. It is attached in two ways: using double-sided universal tape or construction staples and a stapler. Additionally, pressing with slats is carried out. If you have to make an overlap, it should be at least 15-20 mm, sealed with double-sided adhesive tape.
Installation of foam plastic and penoplex
It is enough to glue the polystyrene foam boards using a special solution and secure them with plastic dowels in the form of a fungus. If further finishing is meant with sheathing material, then it is easier to install the sheathing on the base and place insulation in the cells.
Read more in the article “How to insulate a balcony with penoplex.”
Regardless of the chosen method, polystyrene foam and penoplex move when temperature changes occur. Therefore, it is necessary to leave a technological gap of 15-25 mm along the entire perimeter of the slab. And to ensure the tightness of the insulating cover, the voids are filled with polyurethane foam with a low expansion coefficient, so as not to deform the insulation sheets.
Working with foil penofol
Insulation of the ceiling on a loggia or balcony with foil foam can be independent or auxiliary. The installation technology remains unchanged.
The metallized coating should be directed towards the finish. If the ceiling on the balcony or loggia was insulated with another material, then penofol is laid instead of a vapor barrier. Tightness is ensured by gluing the joints with special aluminum tape. This prevents the formation of overlaps.
An air cushion must be installed around the canvas to prevent condensation from accumulating.
The best option for attaching penofol to the ceiling is an adhesive solution. Manufacturers offer a choice of materials with an already applied composition, which significantly speeds up and simplifies installation work.
Another option, self-insulation with foil insulation, is excluded. Staples and a stapler are used for fixation, and a hanging sheathing is additionally installed to support the canvas.
Finishing
If the balcony ceiling was insulated using frame technology, then moisture-resistant plasterboard can be used as the final finishing of the room. After installation, the plasterboard surface is covered with wallpaper, painted, plastered or tiled. PVC panels and wooden lining are also suitable for finishing ceilings insulated using the frame method.
The ceiling, insulated with foam plastic using frameless technology, is finished after the polyurethane foam has dried. The protruding foam is cut off with a stationery knife so that the ceiling becomes even. Then the surface is plastered with cement-sand mortar, puttied, sanded, primed and painted.
Balcony roof insulation
Insulation of the ceiling is only possible if the canopy over the balcony is in good working order. Therefore, either repairs are made, strengthening of the old structure, or replacement with a new one. Next, you need to install a reliable frame for future work. As a rule, it is assembled from a hollow metal profile with a square section. The parts are connected using a welding machine.
A lathing made of wooden beams is installed on the frame. Waterproofing is laid on it to protect the under-roof elements of the balcony ceiling structure. Next, you can form the decorative flooring with corrugated sheets or metal tiles. Before insulation, all that remains is to fill all the voids with all-season polyurethane foam or a universal sealant with a long service life.
Fastening finishing material
To finish the ceiling we will use an easy-to-install and truly universal material - plasterboard. You can glue wallpaper onto it, apply a layer of plaster, or fix any other material. Let's take a closer look at how to install drywall.
Step 1: attaching the joists . We need an air cushion between the insulator and the false ceiling; this is easiest to do with a 50x40 wooden block (you can use a metal profile), which is fixed at a distance of 5 centimeters from the insulator. For fastening, use a corner and dowels. The frequency of wooden logs (or metal profiles) is 50 centimeters. We fix the first joist at the lowest point of the ceiling, all the rest are fastened level, as in any construction operation.
Step 2: screw the drywall to the wooden joists . We use self-tapping screws and a screwdriver; if necessary, you can cut sheets of drywall to the desired size (cut the paper shell and then break it along the line).
Step 3: completion of work. We seal the seams with finishing putty and prime the drywall for subsequent application of plaster or wallpaper.
Thus, you can insulate the balcony of a Khrushchev-era, Stalin-era, or modern apartment in a new building with your own hands. The estimated time to complete the work is 1-2 days, but it can be completed in a few hours.
Options for organizing the roof on the top floor balcony
There are specific requirements for the roof over the balcony. It must withstand the load from wind, precipitation, and maintain its properties under changes in temperature and humidity. An important point is also the choice of roofing covering with high reflectivity. These can be materials with a silver or white coating.
Regarding the slope of the roof, the issue of eliminating avalanche snow is being considered. To do this, it is enough to maintain a slope of about 45 degrees (30 cm per linear meter) or attach a snow guard in front of the edge.
What to insulate
When calculating the required amount of materials, the question will arise: is it necessary to insulate the wall of the room adjacent to the balcony? After all, it is adjacent to the room and therefore should be warm! Actually this is not true.
The outer walls of houses contain a layer of insulation inside them, which will not allow heat to pass out through the wall. But after insulation, this wall inside the balcony will warm up a little due to the air passing through the doorway from the adjacent room, but the corners around the perimeter of the balcony will remain cold because they are in direct contact with the frosty air of the street.
Condensation or even frost may appear in these places. The same applies to the ceiling slab. Even if the upper and lower neighbors have insulated their balconies, the ceiling and floor should still be carefully waterproofed and insulated. Only with such measures can, in addition to eliminating heat loss, also ensure good sealing of the room and avoid the appearance of condensation or even mold.
Recommendations from experts
The main aggressor for finishing materials on the balcony is water. Therefore, the installation of a hydraulic barrier cannot be neglected. Loggia owners often opt for universal protective equipment from the budget group. This is a wrong decision.
Durability can only be ensured by a product designed for use on concrete structures located outside the building. That is, the hydrobarrier must have a layer of more than 4 mm for external use. The service life should be at least 10-15 years.
As a rule, not only the ceiling is insulated. Therefore, a waterproofing coating must be additionally applied to the adjacent corners. It is better to leave a vapor-proof fabric or isolon with a small allowance in order to later avoid unnecessary hassle with organizing hermetic protection of insulation.
Balcony waterproofing
If the windows have not yet been installed, then it is worth calculating in advance the minimum height of the upper profile of the frame. To do this, sum up the thickness of the insulation, leveling solutions, ventilation gaps and decorative materials with or without lathing. Based on this, a beam will be installed to increase the mounting support for the glazing.
Wooden elements of frames, frames or sheathing must first be treated with an antiseptic composition and dried. Metal profile, fasteners are used with a galvanized coating or painted independently with anti-corrosion paints.
It is not worth taking products for working with drywall, since they are intended for work with small differences in temperature and humidity, that is, inside the building.
Preliminary surface preparation marking
In order for the balcony walls, floor and ceiling to be ready for the application of finishing materials, you need to treat them by removing layers of old paint and sealing the seams, cracks and crevices using polyurethane foam, cement mortar or alternative compounds.
The next stage will be the elimination of mold, mildew, questionable stains and the application of antiseptic agents to the surface affected by the attack of microbes. Additional procedures for leveling and puttying will not be relevant, since all defects and irregularities will be reliably hidden under the insulation and finishing layer.
Marking is carried out for correct fastening of the frame for cladding with clapboard and plasterboard. Plan whether the elements will be placed along or across and calculate the step between them, which should not exceed fifty centimeters when fixed longitudinally. The second option involves fastening three bars along the length of the balcony and the center of the ceiling surface. The frame is installed using a drill with a diameter of no more than five millimeters, nails for fastening bars and dowels.
An alternative to wooden sheathing components can be a metal profile, proposed for creating suspended ceilings, but this option is only relevant when working with plasterboard. The disadvantage of this alternative is the high thermal conductivity of the metal, which requires fastening the insulation under the sheathing, which is often inconvenient. When installing it yourself, consider lighting and options for installing electrical appliances for air conditioning and heating the space
Comparison of thermal insulation materials
The table below gives a comparative description of popular heat-insulating materials. A meter-thick brick wall was taken as a standard for comparison: in the climatic conditions of the central zone of the Russian Federation, this thickness is considered sufficient for high-quality thermal insulation at average (not record!) winter and summer temperatures.
| Material name | Layer thickness providing thermal insulation equivalent to 1 m of brickwork, mm | Advantages | Flaws |
| Wood (timber, board) | 380 | Environmental friendliness, aesthetic appearance, you can do without finishing, high-quality sound insulation | Combustible, requires sheathing for fastening or leveling walls (floor, ceiling), not resistant to moisture, large thickness and high price |
| Mineral wool | 140 | Inexpensive and proven material, good sound dampening, low flammability | Requires sheathing for fastening, has a large thickness, surface finishing is required |
| Penofol, foil-coated on one side | 107 | High-quality thermal and sound insulation, resistance to moisture, ease of installation (especially for the self-adhesive version), environmental friendliness | The high price, due to foil when in contact with exposed wiring, can provoke a short circuit. Requires a ventilation gap, cannot be finished with wallpaper or plaster due to the softness of the material |
| Penofol, foil-coated on both sides | |||
| Penofol self-adhesive | |||
| Basalt fiber | 87 | Does not burn, has high sound and heat insulating properties, the slab version is quite easy to install | High price, need for lathing for soft rolled varieties |
| Fiberglass | 85 | Inexpensive, with good insulating characteristics | In case of fire, it melts and releases toxic substances; it requires protection in residential areas and during installation. |
| Styrofoam | 83 | Good thermal insulation, long service life, very low price, easy installation | Toxicity at high temperatures (depending on manufacturer), low sound absorption coefficient |
| Extruded polystyrene foam | 65 | Easy to install, good thermal and sound insulation, moisture resistance | High price, toxicity during combustion and high heat, fire hazard |
| Penoplex | |||
| Penoizol | 55 | Inexpensive, high-quality insulator, non-flammable, saves space | Requires pouring into prepared cavities, so it is of little use without major restoration of the balcony |
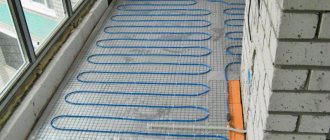
In the absence of strict financial restrictions and the desire to carry out all the work independently, mainly slab and roll materials are considered - mineral or basalt fiber, extruded polystyrene, polystyrene foam, penoplex, penofol. Next, the total area of the room and its permissible reduction are taken into account. For small sizes, it is advisable to insulate and sheathe the balcony with minimal loss of space, without installing sheathing or with a small cross-section. Thus, with relatively flat floors, ceilings and walls, we will consider in detail for the walls and ceilings: extruded polystyrene and polystyrene foam for plaster, double-sided foil foam for lathing with subsequent cladding. For the floor, we will accept two options - mineral wool in a lathing for a subfloor made of OSB, followed by laminate flooring, and self-adhesive mats for installation of an electric (cable) heated floor, followed by laying tiles.
We believe that balcony frames have an acceptable coefficient of heat and sound insulation and do not require additional insulation along the contour.
Performing markup
It is necessary to mark the level of the ceiling surface in order to know where its plane needs to be completed, since after installation is completed, the ceiling should not interfere with the opening of the windows. This means that the distance from the structure to the window sash when open cannot be less than 2 centimeters.
Since balcony frames are usually placed level, focusing on their elements, an even horizontal line can be obtained along the window. Then it is transferred to the opposite side using a spirit level. The line from the window drawn on the adjacent wall is also moved to the opposite side. Marks are made in the four corners with a pencil and connected with a tracer, which requires the participation of a partner.
Frame technology for installing insulation
Now let's talk about how to insulate the ceiling on the balcony. First, let's look at frame technology.
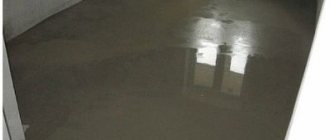
Before insulating the ceiling surface, the base must be carefully prepared:
- the old finish is completely removed, the surface is cleaned of dust and dirt;
- antiseptic impregnations are used in the presence of traces of mold and for prevention;
- all holes and cracks are well covered with cement mortar to protect against drafts;
- there is no need to carefully level the base, because a frame will be built on the ceiling that will hide all the unevenness;
- The balcony ceiling must be waterproofed from the inside.
For waterproofing the ceiling surface, foil roll materials are used. Foam insulators (Izolon, Penofol) are at the same time a hydro- and vapor barrier, and due to the foil layer they reflect heat into the room. The material is secured with a layer of foil inside the room.
Installation of waterproofing is carried out in the following sequence:
- The material is cut into separate strips along the length of the room. They are glued to the ceiling end-to-end using polyurethane glue.
- After attaching the insulator to the ceiling, all joints are sealed with reinforced self-adhesive tape.
- In some cases, the material is additionally fixed to the ceiling surface using mushroom dowels.
Tools and materials
Before installing insulation on the balcony ceiling, prepare everything you need for work:
- steel profiles or wooden blocks for making a supporting frame;
- screws and dowels;
- direct hangers for attaching the sheathing at a certain distance from the ceiling surface (if the room is of low height, the use of hangers can be avoided);
- mushroom dowels (needed for additional fastening of insulation to the ceiling, but you can do without them);
- polystyrene foam boards or mineral wool;
- reinforced tape;
- folgoizol (the material is purchased taking into account that it is laid in two layers);
- polyurethane glue;
- Double-sided tape;
- polyurethane foam (choose one that does not contain toluene, which melts the foam);
- stapler and staples for it;
- scissors;
- moisture-resistant drywall;
- stationery knife;
- ceiling finishing (emulsion, plaster, tiles or PVC panels);
- screws for wood or metal, depending on the frame material;
- roulette;
- ruler;
- pencil;
- drill and hammer drill;
- laser or construction level;
- screwdriver;
- chop cord;
- ladder.
Installation of lathing on the ceiling
The frame is made of steel profiles for plasterboard systems or wooden slats. When choosing the distance at which the frame will be installed from the base, take into account the thickness of the insulation.
The work is carried out in the following order:
- To begin with, the ceiling surface and walls are marked. This is done using a laser level and a chop cord. The bottom line of the frame is drawn on the walls. To do this, the lowering height of the new surface is set aside from the lowest angle on the balcony. Then the resulting point is transferred to the remaining angles.
- Places for installing direct hangers are marked on the ceiling. They are attached taking into account the arrangement of the frame guides. The pitch of the sheathing slats depends on the width of the insulation boards.
- According to the markings on the walls, we mount guide profiles or slats. We fix the elements with dowels and self-tapping screws, installed in increments of 300 mm.
- We attach straight hangers to the base ceiling using dowels and self-tapping screws.
- We install the longitudinal profile of the frame. On our narrow balconies, one element is enough. We insert the ends of the profile into the groove of the guides, and attach its central part to the hangers. For fixation we use metal screws. We connect the elements of the wooden frame with wood screws and metal corners.
- If necessary, install transverse battens of the sheathing. The installation step depends on the dimensions of the insulation.
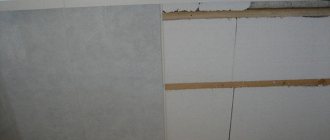
Installation of insulation
When the sheathing is ready, they begin to lay the insulation. Roll or slab material is cut into pieces of the required size. When using soft thermal insulation material, it is cut slightly larger than the pitch of the frame slats so that it fits into the spacer.
The prepared insulation boards are laid between the sheathing slats. After this, install the second layer of foil insulator. The material is cut into separate strips along the length of the room. The strips are attached to the wooden sheathing with a stapler, and fixed to the metal frame with double-sided tape. All joints are taped with reinforced tape.
Next, another sheathing is constructed from slats of a small cross-section (2x2 cm). It will additionally fix the vapor barrier layer and create the necessary gap for ventilation. An air gap between the insulator and the finish will protect against condensation.