In order to provide warmth in the house and reduce energy costs for heating the building, they resort to insulating the facade.
The insulation process is a simple type of work; it can be done independently and does not require the use of special equipment or the involvement of specialists.
Insulation of the facade can be done in several ways using various insulating materials.
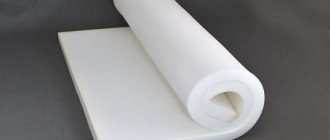
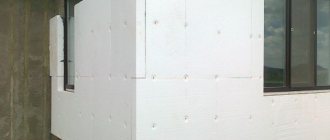
One of the popular insulation materials, which is widely used for external wall insulation, is polystyrene foam.
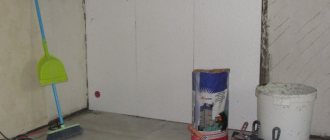
We present to your attention a master class on how to insulate a facade yourself.
Fastening foam plastic to the facade, basic rules
adhesive fasteners will affect the quality
Work begins with applying glue. For these purposes, one spatula is used - large (200 mm), and another - small (up to 100 mm), which will act as an additional tool. The adhesive mixture is always applied to the wall, and never to a sheet of foam plastic. Firstly, this will affect the quality of the installation, and secondly, it will bring unnecessary inconvenience. The wall may not be perfectly flat, and the glue will help hide all the imperfections. In addition, if you apply the mixture to the insulation itself, the sheet will immediately gain weight and will be harder to lift.
When lubricating the facade with glue, you should not strive to distribute the composition in an even layer, but try to achieve a perfectly flat and smooth surface, without dents and bumps. For example, if there are small depressions left on the wall, then they can be filled with the mixture, thereby smoothing out the overall relief.
When placing insulation sheets, you need to ensure that they are located on the surface of the facade in a checkerboard pattern. That is, a T-shaped joint should form. It is impossible to glue a sheet of foam plastic located in the top row parallel to the bottom sheet.
Before you start fixing the insulation, you need to wait for the adhesive mixture to dry. Three days is enough for this. During this period of time, the insulation has time to settle a little. In order to properly and correctly fasten the foam to the wall surface, you must initially select the appropriate fastening material. Usually the insulation is nailed with dowels. This fastener has two components: plastic and a nail made of iron or plastic, which is driven into its middle. The selection of ideal dowels should be based on the following components:
- The material from which the device is made.
- Price category of the product.
- Dimensions.
When choosing dowels, it is better to give preference to products with a plastic nail, since they are not very expensive, and at the same time are well suited for insulation such as polystyrene foam. Although, it’s still not worth saving too much on purchasing fasteners. Cheap dowels are made of low-quality plastic, which can lead to deformation of the material. To fasten the insulation you need to use a hammer drill. Using this tool, you need to drill a hole in the foam, the depth of which is slightly greater than the length of the mushroom leg of the dowel. By the way, if we talk about the optimal size of the fastening material, it is worth noting that it should be sufficient for the nail to penetrate the wall. Ideally, the length of the dowel leg is approximately 5 cm greater than the thickness of the foam sheet.
There are two ways to fix the insulation:
- Separately secure each block with five dowels: four at the edges and one in the middle.
- Nailing the sheets together at their joints with the addition of additional fixation in the center of the block.
As you can see, the methods are slightly similar to each other in the location of the dowels. However, the second option is considered the most acceptable, since it requires much less consumables and also fixes the blocks more firmly, fastening them together.
We attach the starting strip and plinth profiles
Based on your data, you need to determine the lowest point of the surface that you decided to insulate. Then, using a hydraulic level, you need to move this point to all corners of the building. Connect them with coated cord. You will have a starting line. At this mark, start attaching the base profile. It will be used to hold the first row of foam sheets in place, since they will move with wet glue. Attach the starting strip to 6mm dowels at a distance of 25-35cm.
Important! Never overlap starter joints.
Principles of thermal insulation of facades with expanded polystyrene
The video image shows a facade with expanded polystyrene.
Today, the technology of insulating facades with extruded polystyrene foam has become quite popular and has found application as a thermal insulator in the construction of almost every building.
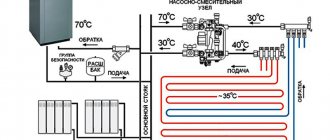
This heating technology is called wet façade and its application consists of several phases.
If the order of façade design is changed or if one of the classes is omitted, there is no guarantee of high quality and long-term thermal insulation.
The wet-facade closure method is most often used for houses built on cinder, brick and reinforced concrete.
The process of thermal insulation of facades using expanded polystyrene should be carried out with the help of a specialist to monitor the final process.
In this case, it should be noted that it is better to warm up in clear weather, but not too hot.
Otherwise, humidity, high wind or air temperature may damage the structure of the building material between the building parts.
What is a good polystyrene foam as a heater?
Among the obvious advantages of building materials are the following: reduced thermal conductivity, increased humidity for firing properties, high strength and durability, resistance to biological and chemical factors, self-extinguishing ability without damage to the human body and ease of handling.
Reduced thermal conductivity is the most important advantage of any thermal insulation material, since it allows the facade to be insulated with the thinnest polystyrene.
In addition, it offers great comfort in decorating the facade of the house with your own hands.
Increased resistance to moisture from foamed polystyrene allows you to dry up to 94% of the material in the most difficult conditions.
The building material can withstand up to 50 freezing and thawing cycles without damaging its own structure. This quality allows the use of polystyrene foam in regions with predominantly cold climatic conditions.
A structure made of polystyrene foam boards can maintain thermal insulation properties for 60-70 years.
The structure of the material is not affected by climatic conditions; it will never rot under the influence of frost, rain or sunlight.
Fungal or mold bacteria do not endanger the thermal insulation of the façade. In this case, unlike other types of heaters, it does not undergo processing that is harmful to human mixtures.
Therefore, its harmless properties appear as the foam is also used in some types of food products due to its lack of toxicity.
Installation of the plates is very simple as their light weight allows you to work in complete safety.
Wall pie when using insulation - polystyrene foam on the outside
A wall pie refers to layers of materials that are laid in a certain order, each of which performs its own functions to ensure a normal microclimate in the room.
When thermally insulating brick walls with polystyrene laid outside, the wall pie looks like this:
- interior plaster;
- outer wall;
- adhesive solution for gluing polystyrene foam;
- insulation (expanded polystyrene);
- adhesive solution for gluing the next layer;
- fiberglass mesh;
- adhesive composition;
- primer;
- finishing plaster.
NOTE!
When arranging a wall using polystyrene foam, it is necessary to lay the layers in strict sequence.
Internal and finishing plaster can be replaced with other finishing materials that are provided for in design solutions.
Wall cake "wet"
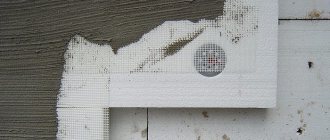
Sealing joints and fastening points
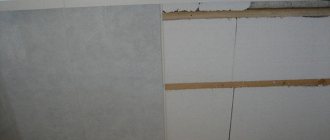
Before further finishing, the façade covered with foam plastic must be leveled. To do this, you need to inspect the wall for protruding edges of the slabs.
They are usually cut off. There are also special graters for this purpose. This kind of work will take quite a lot of time.
To eliminate cold bridges between the slabs, the joints should be sealed with strips of insulation. They are covered with glue used for installing foam panels.
A spatula is used to apply the glue. The seams can also be sealed with polyurethane foam, only after drying you will have to cut off the excess. Recessed fungal caps are also sealed with adhesive.
Important! When grouting caps and seams, the surface should be made as smooth as possible. The glue should not protrude to the surface.
Installation of reinforcing mesh
Only after approximately 24 hours have passed can you begin sanding the polystyrene foam surface and then gluing the reinforcing mesh to the wall. Here is the sequence in this case:
- the adhesive composition is applied to the prepared insulation surface;
- mesh is glued;
- then another layer of glue is applied, closing the glass mesh between two layers of the applied composition.
It is better to start gluing the mesh to the wall from the corners, but you should not sound the alarm if the edges of the fragments overlap one another. Ideally, they should generally extend to about 2 thirds, which helps to better strengthen the mesh and perform its direct function.
Expanded polystyrene and polystyrene foam, what are the differences?
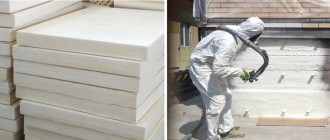
Common people, and sometimes even the builders themselves, believe that expanded polystyrene and polystyrene foam are the same material. But in fact, expanded polystyrene for wall insulation is a type of polystyrene foam. The insulation is made from polystyrene raw materials, which are processed in extruders. This is special equipment where polystyrene is melted and then poured into a mold, which then forms a homogeneous material with granules of the same size. Such a long and labor-intensive production process determines the qualitative differences and advantages of this insulation, which, although more expensive than foam plastic, is more durable and dense, has a uniform structure, is indifferent to mechanical damage, better maintains its integrity during transportation, and is hygienic, since it is not a favorable environment for the development of microorganisms and is not damaged by rodents and insects.
When insulating facades with polystyrene foam, insulation of the PSBS-25-F brand is used (f means facade), which is a self-extinguishing, environmentally friendly heat-insulating material and has a flammability class of “G-1”.
In what cases and under what conditions is it possible to insulate the facade with polystyrene foam?!
As a rule, insulation of facades is carried out in this way along the walls of enclosing structures:
- made of sand-lime brick;
- made of porous brick;
- made of hollow brick;
- made of solid brick;
- from OSB board (OSB);
- from cement-bonded particle board (CSB board).
Next, we will give in more detail examples in which facades are insulated with polystyrene foam on walls consisting of the above building materials:
- the use of thermal insulation of the facade in the construction of houses, cottages, and brick buildings, in this case, allows not only to retain heat, but also to save usable space indoors by reducing the thickness of the load-bearing wall and using insulation on the outside of the building;
-option of using façade polystyrene foam on walls made of OSB boards (OSB panels)
wears only an intermediate layer as a “buffer” or “damper” for additional shock absorption, or, more simply put, to reduce the loads at the joints between OSB panels (OSB boards) in order to avoid the formation of cracks on the facade. Of course, in addition to this useful property, an additional insulation contour for the facade is also obtained.
- the use of façade polystyrene foam on a DSP board follows the same scheme as in cases with OSB boards. Here the insulation also plays the role of a “damper”, in which it takes on all the loads.
Types of expanded polystyrene
Expanded polystyrene is classified according to the method of production of the material and the inclusion of various additives in it:
- pressed polystyrene foam . Produced by pressing;
- pressless polystyrene foam . Produced by removing moisture by drying and then foaming at high temperatures;
- extruded polystyrene. Not much different from pressless; an extruder is additionally used in production. The best and optimal option for thermal insulation of walls.
There are other types of polystyrene foam (extruded, autoclaved), but they are not used as insulation materials because they have different characteristics.
In addition to types of expanded polystyrene, there are also various types of insulation, such as:
- mineral wool;
- penofol;
- penoizol;
- penoplex;
- polyurethane foam.
How to insulate a ventilated facade with your own hands
A ventilated façade is a suspended structure that looks like a layer cake. The principle itself is that a gap of 30 to 50 mm is left between the wall to which the insulation is attached and the decorative protective panel. Thanks to this gap, the facade got its name, and through this air gap, excess moisture evaporates. Thermal insulating material has an important function here, and its high-quality choice will further ensure the correct functioning of the entire system.
Material selection
Mineral wool has tangible advantages. This insulation is vapor permeable and has excellent, although slightly more modest, thermal performance. Basalt wool is a fairly hard material and tends to cake over the years, becoming even more durable. In addition, mineral wool is a fairly inexpensive material. Another plus is the wide variety of insulation shapes and thicknesses, which allows you to adapt to any technological requirements.
Installation of mineral wool on a ventilated facade
Attaching the insulation
Thermal insulation from mineral wool is inserted into the sheathing, which is made of an L-shaped profile or wooden blocks. To do this, vertical profiles are mounted to the wall, and the distance between them should be slightly less than the width of the heat-insulating slab. It is best to pre-glue the insulation to the wall, but it can only be mounted on disc-shaped dowels, as shown in the photo.
A wind barrier is attached to the insulation. It protects it from destruction from atmospheric influences. After this, a decorative protective panel is installed.
Video: Installation of a ventilated facade on a brick wall
Insulating the facade with your own hands using modern materials is quite feasible. The most important thing is to follow the installation technology and take into account the properties of heat-insulating materials.
Useful tips for thermal insulation of external walls with foam plastic
#1. Remember that insulation of walls from the outside must be done at positive temperatures, not lower than 5 degrees and not higher than 25 degrees. Air humidity can be up to 80 percent. It is not allowed to expose the insulation to solar radiation, or leave it in the rain and wind. This applies to all stages of work.
#2. With the help of strong scaffolding or scaffolding, it should be possible to reach any part of the wall, as well as the side surfaces. To make it convenient to work, scaffolding is mounted 20 or 30 centimeters from the walls.
#3. We cover the doors and windows with plastic film, securing it with masking tape. You should also close the brackets and communications running outside the building. We will protect the blind area and porch with cardboard or the same film. After the painting work is completed, remove the tape.
#4. If the foam insulation on the wall has been left for a long time without reinforcement, it will turn yellow and begin to “dust.” This yellowness must be removed using sandpaper.
#5. If you don’t have enough experience, start working on the wall that is least noticeable. Or you can start insulating the simplest surface. Gradually the technology will be developed.
#6. In the event that insulation has to be suspended for the winter, consider installing reinforcing layers. Parapets and slopes will be securely closed if special metal protective elements are installed. Don't forget about window sills.
#7. When planning work, try to make all “wet” stages of work continuous on one wall. This is especially true for reinforcement and finishing.
For this method of insulation, only suitable materials must be used. You need to take polystyrene foam, which has a density of at least 25 kilograms per cubic meter. Never glue it or the reinforcement mesh with tile adhesive.
Use only special solutions, and then the insulation of external walls with foam plastic will last a long time and will bring the desired result.
Necessary tools and façade preparation
To insulate facades with foam plastic, it is recommended to use thermal insulation boards with a thickness of at least 30-40 mm for penoplex and 50-60 mm for other types of foam.
Characteristics of polystyrene foam.
Tools that will be needed to insulate the facade of a house with polystyrene foam:
- mounting adhesive or adhesive mounting foam;
- construction and assembly gun;
- dowel-nails for fastening heat-insulating boards, spacer plinth dowel-nails for fastening plinth profiles;
- notched trowel for applying and leveling adhesive solutions;
- impact drill or hammer drill;
- building level;
- base profile;
- chop cord;
- nylon sags.
Tools that will be needed for plastering and final finishing of the facade of the house after insulation with foam plastic:
- reinforced mesh made of metal or fiberglass;
- deep penetration primer;
- cement-based putty;
- façade or decorative plaster, marked “for exterior use.”
An example of insulating a house with polystyrene foam.
The façade must first be prepared, that is, all uneven surfaces should be leveled, bumps knocked down, and the surface should be cleaned of dust, dirt, grease stains, bitumen, and fuels and lubricants. Then the façade of the house is primed and measured to the building level. Beacons are being installed. Only proper preparation of the walls guarantees adequate insulation of the house with polystyrene foam.
Thermal insulation boards made from a type of foam such as extruded polystyrene foam initially have very weak adhesion. Therefore, before installation, they are treated with emery or a needle roller to impart some roughness in order to better adhere to the surface and improve the quality of insulation.
Fastening methods
To glue polystyrene foam, use foam or special glue. Each of the means has its own advantages and disadvantages. For example, polyurethane foam allows you to hide large gaps, as it is more voluminous. It takes longer to dry and adhere firmly. Foam glue, in turn, dries much faster.
As you can see in our case, polyurethane foam was used.
It is applied using a special gun attached to a spray can.
Pistols are made from different materials. Teflon turns out to be the most practical. This is a very slippery material that is easier than others to remove stuck foam
Let's summarize our exterior insulation with foam plastic: we have already laid out the scaffolding, primed the walls, taken care of the window sills and selected the material for gluing the foam plastic. The next important step is to install the lower profile.
Step-by-step instructions for insulating a non-ventilated facade using the wet method
In order to understand the two insulation systems, it is necessary to understand what types of facade systems there are.
As can be seen from the diagram, there are several types of facade systems. Dry protection involves a frame method of thermal insulation, and wet protection involves laying insulation in contact with water-soluble materials - mortar, plaster, primer, etc. Let's consider the “wet” method of insulation in more detail.
Types of facade systems
Preparing the walls
Surface preparation is one of the keys to the success of high-quality insulation. If you omit this stage, you may subsequently end up with a loose-fitting insulation, which means that cold and moisture are not permeable, and a skewed decorative design that will deteriorate much faster and will not look presentable.
First of all, it is necessary to remove all protruding parts on the wall: window frames, lighting fixtures and their connections, cornices, drainage systems, etc. If there are decorative protrusions on the wall, then they will have to be dismantled, otherwise you will have a “wet” façade system If it doesn't work, you'll have to use a sheathing. Next, we begin to tap the entire surface of the walls. We clean problem areas, plaster them, or eliminate the problem in another way.
Priming a wall for a “wet” façade
All potholes are primed, all areas affected by fungus are scraped off, soaked in a special antifungal solution and re-leveled. If the surface was covered with oil paint, it should be removed or sanded with coarse sandpaper to ensure adhesion to the wall. After completely leveling the surface, we prime the walls with a special solution. It will increase adhesion, remove excess dust from sanding seams and ensure better adhesion of the glue.
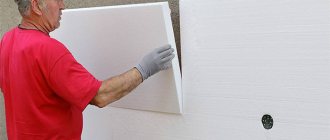
Sticking
It must be remembered that for “wet” facades, mineral wool with a density of 180 kg/m2 or expanded polystyrene is used. The moisture absorption coefficient of the heat insulator should be no more than 1.5%. You will need a fiberglass reinforcing mesh and special glue. Now you can proceed to the next stage - gluing the insulation.
- First you need to install the base profile. If you don't do this, you won't have any markings or support for the bottom base layer of insulation material. We install the bar using self-tapping screws or dowels and a hydraulic level. If you do not check the horizontal, a shift of a millimeter can cause serious distortions of the entire structure.
- Let's prepare the adhesive solution immediately before starting work. To do this, mix the glue in a plastic bucket for 5 minutes, and then apply it directly to the insulating sheet using a spatula. This can be done as shown in the photo, or over the entire area of the sheet. The technology of applying glue directly to the wall is adopted by professional builders.
Installation of the base profile
Now we begin to apply the insulation sheets. The work is done from the bottom up: from the base profile. The sheets should be glued either with a T-joint or a bandage, like laying bricks. Make sure that no glue gets between the plates, then gaps will begin to form and as a result the entire gluing will be uneven.
Applying glue to polystyrene foam
It is better to join the corners using a serrated method. After the insulation has dried and the corner has formed, the excess can be trimmed off.
Nailing
After gluing, 2-3 days should pass, then we begin nailing the insulation to the wall. This is done in several steps. First, markings are made for fastening and holes are drilled. For 1 sq.m. 6-8 fastenings are required. They are located in the corners and in the center. For fastening it is best to use plastic disc dowels. They do not provide an additional path of cold into the wall. A “fungus” is hammered into the already drilled hole to a distance of the thickness of the sealing plate and another centimeter. If the cap does not fit, but hangs over the surface, then it should be pulled out and the hole deepened with a puncher.
Nailing sheets
Before applying the decorative layer, it is necessary to apply a reinforcing mesh. This is an auxiliary reinforcing layer. The mesh is cut into strips of length equal to the height of the wall and glued to the insulation. The slopes of doors, windows and corners of the building are reinforced with perforated corners. After drying, you can prime and apply a decorative layer. The “wet” facade technology has its pros and cons. The undoubted advantage is that doing all the work with your own hands is not difficult even for a person far from construction.
Video: Installation of a “wet” facade
Preparing the walls
First, free the wall from all protruding objects: air conditioning units, window sills, storm gutters, ventilation grilles, lighting fixtures, etc. Determine the strength of the exterior finish if the walls were previously plastered.
Tap them. Check if there are vertical deviations in the plane. What can you use a cord or plumb line for? If there are any, mark them with chalk. Often at this stage, weak spots in the plaster and large differences in level are identified. If these problems are found, then you need to get rid of them. Potholes and cracks on the wall of a house are primed using deeply penetrating compounds. Then, when the composition has dried, it needs to be puttied with a cement-based solution. Cracks no larger than 2 mm do not need to be covered up.
Then, when the preliminary preparation of the facade has been completed, the walls are smooth and dry, waterproofing has been done, screeds have been poured, plastering has been done - you can begin to insulate the walls with foam plastic with your own hands.
About the pros and cons of insulating the facade of a house with foam plastic
Each thermal insulation material tends to have its own pros and cons. Regarding polystyrene foam, we can say with confidence that it is no exception here.
The advantages of polystyrene foam include the following characteristics
- Relatively low cost
- Moisture resistance
- Easy to install
- Long service life
- Ideal thermal conductivity
- Optional vapor barrier
The disadvantages of polystyrene foam include increased performance
- toxicity;
- flammability;
- exposure to the negative effects of small rodents.
As you noticed, the number of advantages significantly outweighs the number of negative qualities of the material.
Polystyrene foam is distinguished by its durability; it is not prone to deformation; unlike mineral wool, you don’t have to worry about it forming into a ball over time.
Climatic conditions are not able to influence the size of the material to change.
It is not difficult to insulate the facade of a private house with polystyrene foam.
The main conditions for such a task are: compliance with the basic rules for installing the material, correct selection and calculation of consumables, availability of the necessary tools.
Before you go to a specialized store to purchase material, you should measure the area of each outer wall of the house.
After which it will not be difficult to calculate how many sheets of foam plastic you will need to insulate the facade of the house.
Each specific case requires an individual approach, since this indicator directly affects the zero point, which must be calculated as correctly as possible.
Otherwise, insulating the facade with polystyrene foam, done by yourself, will create a lot of trouble for you.
If you follow the recommendations of experts, the thickness of the foam sheets for insulating facades should be 60 cm
In addition, it is very important that the foam brand meets all requirements
Returning to the zero point, it should be added that incorrect calculation can lead to the accumulation of dampness in the interior of the room.
As a result, you are unlikely to be able to avoid such troubles as the formation of fungus on wall surfaces, increased humidity in the room, and the constant presence of an unpleasant odor.
It is also very important to pay special attention to the density of the foam.
Laying a reinforcing layer
Installation of auxiliary reinforcing mesh
To prevent cracks from appearing in the corners of the openings of windows and doors, pieces of reinforcing mesh measuring 20 by 30 centimeters must be glued to these places. This reinforcing mesh is installed in exactly the same way as the main reinforcement layer.
When insulating facades with foam plastic in the lower part, up to a height of two meters, it is necessary to lay an additional layer of reinforcing mesh. It will protect the wall from destruction.
Installation of perforated corners
To strengthen the corners of the house, as well as slopes and decorative elements, corners with perforations are used. They are made of plastic or aluminum, and pieces of reinforcing mesh are attached to the edges. To secure the corners, they are coated with glue (including the mesh), and then pressed with a spatula onto the insulation.
Pre-cut the corners. The glue that comes out through the mesh and perforations must be smoothed out. In the corners, we connect the profiles together tightly, cutting off the mesh and shelves at an angle of 45 degrees.
Glued corner.
Installation of the main reinforcing layer
When the additional layer has dried and all the corners are securely fastened, you can begin fixing the main layer of reinforcement. For this, a special facade mesh made of fiberglass is used. It is alkali resistant and does not stretch. A strip of such mesh, 5 centimeters wide, can withstand a load of up to 1.25 kilonewtons.
To glue this mesh and protect the thermal insulation, a special solution is used. It has a different composition than the adhesive mixture, but is prepared in approximately the same way.
Before reinforcing, the foam boards must be sanded. This will smooth out irregularities at the junction of the insulation boards. We sand the foam with a float and coarse sandpaper. After this, thoroughly clean the surface of the insulation and apply the solution in a layer of 2 millimeters.
The reinforcing mesh is cut into pieces, the size of which corresponds to the height of the wall. Apply the solution to the surface of the walls vertically in a layer equal to the width of the mesh. To do this, we use a metal grater or grater. It is convenient to remove excess glue with a notched trowel to form grooves. Then we apply the mesh to the wall, sinking it into the solution and pressing it with a grater or a smooth spatula.
After leveling, the mesh should not be visible on the surface.
Smooth out the mesh carefully, from the middle to the edges. We distribute the excess glue on the wall plane.
Important: do not stretch the mesh too much and do not press it against the thermal insulation. Its place is in the middle between the wall and the insulation.
As soon as the mesh is glued, we do not wait for the solution to dry and apply another layer of it, but at the same time leaving a free edge of 10 cm. Its thickness is the same as the previous one - 2 millimeters. We apply a second strip of mesh to the free edge 10 centimeters wide.
The top layer of the solution should completely cover the mesh; it should not peek out from under it. After this, all of the above steps are repeated with the second strip of the grid. The stripes should overlap each other by 10 centimeters.
We are waiting for tomorrow, and the next morning we can fill up the unevenness with putty. It's okay if it hasn't dried completely yet. But if the unevenness is large enough, you will have to wait for it to dry and then apply an additional layer of glue.
Tools and materials
To glue the foam, you will need two spatulas.
One should be approximately 100 mm wide, and the second should be about 200 mm. A narrow tool is intended for collecting glue from a container. To cut foam boards, you will need to use a fine-tooth saw.
You will also need to prepare the glue. A special composition should be selected. The packaging with the material must indicate “for polystyrene foam boards.”
This glue has two varieties:
- A universal adhesive used not only when installing insulation boards. It is also used for finishing work. A composition intended only for gluing polystyrene to the facade.
If you need to save money, you should purchase two compounds for different tasks. This is explained by the very high price of universal glue. The following works are performed with the participation of glue:
- gluing foam plastic to the facade; lubricating the joints of insulation boards; lubricating fastening fungi.
Work carried out with universal glue:
- creating a leveling layer; gluing the mesh to the corners of the facade.
The consumption of each composition turns out to be approximately the same. It is equal to 5 kg per 1 sq.
m. You can reduce consumption if the walls were smooth before installing the foam boards. The consumption of the composition for the leveling layer depends on how smoothly the insulation is fixed.
After gluing the polystyrene foam boards, they must be secured with dowels.
For this purpose, special products are used in the shape of fungi - with a long stem and a wide cap. Steel dowels are inserted into plastic forms. If insulation is made with polystyrene foam, it is better to choose plastic dowels. They are not able to conduct cold, have less weight and are cheaper.
In addition, the load on the facade is reduced. To install the fungi in the foam, you will need to have a hammer and a drill. To apply the leveling layer you will need to use a wide spatula. To sand the leveling layer, use a plastic float and sandpaper.
The process of insulating a house
First, you need to calculate the amount of polystyrene foam that will be needed to insulate the building.
This is quite easy to find out; you just need to measure the outside area of the house. The main thing is to correctly calculate the zero point for each wall. If the task is to insulate a residential building, then experts recommend purchasing polystyrene foam with a thickness of 3% -50 mm. When thermally insulating industrial premises, it is necessary to use sheets with a thickness of at least 70 mm for walls, and 90 mm for roofing.
Do-it-yourself insulation of walls with polystyrene foam takes place in the following order:
- surface preparation;
- installation of the starting profile;
- foam fastening;
- sealing joints;
- surface plaster;
- applying a leveling layer.
Finishing window sills and slopes with foam plastic
Each additional façade element is installed before the foam is installed.
It is important to take into account the additional thickness that is formed due to the insulation layer and external finishing. If there are already installed slopes and window sills, they should be removed
Such elements will be short.
To create an organic look for windows and fit various elements into the insulation layer, each part must have the following dimensions:
It is necessary that the window sill protrudes from the wall by 4 cm. With a thickness of insulation material of 60 mm, the window sill is made 100 mm deep. When installing the window sill, all voids must be filled.
The gaps between the foam plates and the window sill are filled with polyurethane foam. After installation, the plastic element is pressed with something heavy and left for 4 hours. It is necessary that the slopes protrude beyond the wall surface by about 1 cm. This will make it easier to install the foam.
The insulation material when finishing slopes should have a maximum thickness of 30 mm. Otherwise, it will simply climb onto the window. You need to install a drip lining between the foam and the base. This element is a strip of galvanized steel coated with powder paint.
It is installed on the base, secured with self-tapping screws. You can use dowels for fastening. The distance between the fastening elements is left at 20 cm.
The ebb is sold in pieces of two meters each. This element must be installed on the window opening so that moisture that flows down the wall does not flow inside the house. At low tide it flows into the street.
As you can see, preparing the facade of a building before insulation requires quite a lot of effort and time.
About temperature thresholds
Temperature is considered to be +18ᵒС as the lower threshold of human comfort, and for good reason. This is the turning point for the psychophysiological perception of temperature. If it is lower, then the person begins to shiver, he feels drowsiness and fatigue. If the temperature has exceeded 18ᵒC, your health improves significantly - you can walk around the house in light clothes, and taking a shower no longer seems like sheer torture.
We advise you to study - How to build a wooden pergola with your own hands
+22ᵒС is the threshold regulated by sanitary standards. This is the temperature that should be maintained in all medical institutions – this increases the effectiveness of treatment.
The optimal temperature for the body is +25ᵒC - a person is warm, he can walk around the house undressed, but if you go outside, you can easily catch a cold.
The upper threshold of comfort is +28ᵒС. The house is already relatively hot, and if you go out into the cold, there is a chance of catching pneumonia.
To create an optimally comfortable atmosphere in your home, foam insulation is necessary. Let's look at how to do this.