There is nothing unusual in dismantling a relatively new cast iron radiator; the technology is quite simple and only requires the ability to use the key correctly. It’s a completely different matter if you need to disassemble a cast-iron battery that has been in the system for ten years. The work is hard, requiring endurance and accuracy. In this case, physical strength and a key alone cannot be done unless you know the procedure for disassembling a cast iron battery with your own hands.
For disassembly you will need a reliable tool
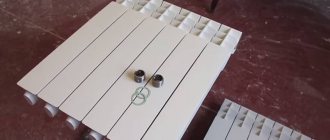
Design of heating radiators
A standard battery is assembled from individual cast sections, without the use of external fasteners or retainers. Thus, you can build a radiator of almost unlimited length.
To properly disassemble a cast iron battery, you need to know some features of its design:
- The individual sections are assembled into one housing using internal threaded bushings or nipples. To disassemble a cast iron radiator, you need to be able to remove the end plugs and internal inserts;
- Each nipple is a cylindrical glass, on which two sections are cut with threads of two types - with left and right directions of turns.
End caps are also manufactured with two types of threads; as a rule, blind plugs are produced with a left-hand thread, and the fitting nut for connecting to a pipe is produced with a right-hand thread.
Important! To disassemble the sections, you will need to choose the correct direction of rotation, otherwise you can quickly break the cast-iron battery case.
To secure a separate register into a common cast-iron body, a pair of nipples are used, which are simultaneously screwed between the two sections with a long key with a square head. In order to disassemble and avoid splitting the cast iron body, you will also need to carefully unscrew the nipples, making only 1-2 turns on each.
Useful tips
Interesting fact. Many people do not want to use cast iron radiators solely because of their appearance. But recently, retro cast iron heating batteries have become widespread. Precisely those models that were so diligently avoided. Fans of retro style often specially order such models in stores. Fans of a more modern design can be offered to decorate cast iron radiators with special screens.
There is no heat loss from the screens, but the batteries look somehow particularly simple, but stylish. For those who do not want to change their batteries, you can simply restore them to their original beautiful form. The batteries can be repainted using modern materials or you can give them a rather unusual look yourself. When choosing materials, be sure to choose those that can withstand high temperatures of more than 80 degrees. It is advisable to consult with sellers about painting materials. There are some paints that can change color when exposed to hot surfaces. In this case, by carefully painting the battery snow-white, you can see a completely non-crystal white version during the heating period.
Preparatory work
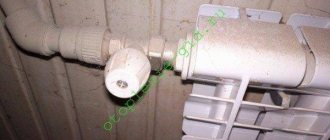
In order to disassemble the cast iron body, it must first be removed from its mounting on the wall. The hooks on which the battery is suspended are removed, then you need to disassemble the taps or couplings with which the radiator is connected to the heating pipes.
The weight of one assembly of 8-10 sections can easily exceed a hundred kilograms, so the battery is lifted to its end and in small “steps” it is moved to the place where it is planned to repair the radiator or simply disassemble it.
If the cast iron battery is relatively new, then a platform with an impact-resistant coating will be sufficient, for example, a sheet of chipboard can be laid on the floor. To disassemble an old cast iron heater, you will need a place where you can work with a torch and a heavy crowbar.
Installation of squeegees
The main advantages of installing squeegees are:
- ease of installation. Connecting pipes with a bend does not require a welding machine or skills to work with it. The work can be done by a novice craftsman;
- low cost;
- obtaining a detachable connection;
- the ability to carry out repairs without shutting down the entire pipeline.
Fitting locations
It is recommended to install the drives:
- after taps and/or valves, which will allow the subsequent section of the pipeline system to be disconnected for repair or maintenance work;
- on the central risers of any system;
- when connecting equipment (heating radiators, boilers, individual metering devices, and so on);
- on stationary type connections.
Places where installation of the squeegee is required
Required Tools
It is impossible to disassemble the cast-iron case with bare hands; without a tool, the battery can be broken with a sledgehammer or split if handled carelessly and dropped on the floor. To work, you will need at least four types of equipment:
- A special key with a square head for unscrewing nipples;
- Socket wrench for turning out plugs;
- Grinder with cutting wheels;
- Gas burner with reducer and cylinder.
Nipple keys
In addition, you will need a heavy plumber's hammer, chisel, tow, kerosene or brake fluid. All this will be needed in order to try to disassemble the sections with minimal damage. When rebuilding old batteries, the plugs and nipples still need to be replaced, so sometimes it's easier to cut them out than to try to unscrew them.
Where to begin
There are several options for sawing a cast iron bathtub. They can be divided into mechanical and thermal. Thermal methods are used in production.
Before you start cutting a cast iron sewer pipe, you should prepare:
- Clear the room of objects that may interfere with work;
- Shut off the water supply to the house;
- Turn off the toilet and put it away;
- Remove pipes directly approaching the riser;
- Place the cuffs on the bell and clean the bell of lubricants.
Because cast iron is a brittle material, some pipes can be knocked down with a hammer. This can only be done with pipes that are located far from the riser.
How to disassemble a new cast iron radiator
The easiest and fastest way is to dismount a relatively new battery. If the housing has not yet been installed in the heating system or has been used for a maximum of one season, then the chances of disassembling a section of a cast iron radiator without using cunning techniques and tools are quite high.
First of all, you will need to unscrew the plugs; they are usually located on the left side of the cast-iron battery case. You can disassemble the plugs with a regular coccyx wrench, provided that the length of the tool handle is at least 70 cm.
Important! Even a new cast iron battery mounted on heating pipes should not be disassembled; the most that can be done is to unscrew the plugs. Otherwise, you can easily damage the radiator, for example, split the nipple.
You can only turn it with a lever
To disassemble the sections, the plug will have to be removed without fail. Since the plugs always have a left-hand thread, you will have to unscrew them clockwise.
In order to dismantle the section, you will need to place the radiator on the side. Next we proceed in the following order:
- After removing the plugs, the first nipples will be visible through the holes;
- We turn both nipples counterclockwise;
- The top section lifts up and can be removed by hand.
It is more difficult to disassemble a cast iron battery that has served for at least one season. Due to the fact that cast iron parts stick to each other. For new sections, fabric or cotton cord soaked in brake fluid is wound under the plugs and at the connections. After a day, the radiator can be disassembled without much effort.
After disassembly is completed, the liquid will need to be washed out with detergent, otherwise the sealing gaskets may quickly fail during reassembly.
After unscrewing the plug
Drill a hole
This air bleed option will require additional tools. The advantage will be the guarantee of successful completion of the event and the absence of the risk of thread failure. The essence of the method is as follows:
- Take a drill or screwdriver, as well as a metal drill with a diameter of 2-4 mm.
Using a drill with a metal drill, drill a through hole in the battery plug. Wait until air comes out of the formed hole. After the water begins to drip, screw in the self-tapping screw prepared in advance. This will prevent further coolant leakage. For greater reliability, the surface of the rubber ring adjacent to the plug can be coated with sealant.
The second way to bleed air from cast iron radiators is effective and reliable. However, the most optimal solution would be to install a special tap that will allow you to bleed air at any time and without unnecessary effort.
How to disassemble an old cast iron radiator
The greatest number of problems arise when disassembling cast iron heating radiators that have served for decades. Cast iron serves well and practically does not wear out when in contact with the coolant, but due to the large amount of rust and dirt falling on the inner surface, the efficiency of heat transfer drops significantly. Ideally, such a system can be disassembled, washed and reinstalled. One way to disassemble old cast iron batteries is shown in the video:
Removing the battery
Unfortunately, it is clearly not possible to disassemble the couplings on which the cast-iron battery is connected to the heating system using coccygeal wrenches or any other tool at home.
In theory, there are vibrating electric machines capable of disassembling stuck and rusted plumbing fittings, but it is difficult to find such a device in everyday life. Professionals burn out couplings with a blowtorch or gas torch. In approximately half of the cases, the pipes can be unscrewed and disassembled; in other cases, the pipes have to be cut with a grinder.
How to remove plugs
In order to dismount the sections, it is necessary to gain access to the nipples. To do this, take the battery to a safe place and burn out the plugs with a propane torch.
Need to heat for 5-10 minutes
In order to unscrew the plug, you need to heat its body, and not the sections. The metal must become red hot, only in this case the sealant and dirt will burn out. Without waiting for the cast iron to cool, place a key on the hexagonal base of the plug and use a crowbar to unscrew it from the body of the section.
Spanner
How to unscrew a nipple
The most difficult stage in the entire battery disassembly procedure. The nipple can be unscrewed through the opened holes, or the section can be cut into two parts, as in the video:
It all depends on how old the cast iron is and how long the radiators have been in use.
Cut sections
In the worst case, it is impossible to disassemble the case using a key. In such a situation, you have to use a grinder to cut the junction of the sections. If you cut carefully and in a thin circle, the “cheeks” of the sections will not be damaged. The seal will be removed and the threaded insert body will be cut through.
In this case, pieces of the nipple will remain inside the sections, which can be cut with a hacksaw and knocked out of the body using a chisel and hammer. You should not feel sorry for the insert; it is a consumable item and must be replaced in any case.
Dismantling aluminum options
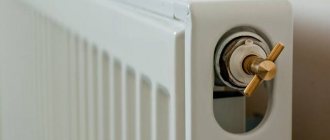
Aluminum batteries are monolithic, there are some variations with sections, but usually they are just two radiators connected together. Their dismantling simply involves draining the water from the system and unscrewing it from the pipe. Often it is enough to overlap the pipe that goes to the radiator itself and the pipe that comes from it. Each aluminum battery has a special valve through which water can be drained. The radiator is unscrewed from the pipe using a regular gas wrench.
Work algorithm
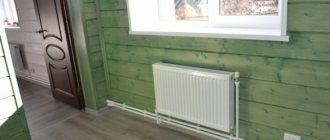
Installing a new one is much easier than removing an old battery. It is possible to do such work yourself without the help of specialists.
The important thing is that when performing work you must strictly adhere to the rules and regulations. When installing the battery, it is imperative to monitor its level, which must be strictly vertical, which is checked by the building level
If this is not done, the system may compromise its tightness and thermal characteristics.
In cases where several cast iron radiators need to be installed in one room, they must be level with each other without error. The easiest way would be to install the fasteners (brackets) using a laser level and then control the installation of the radiator.
The main material for such “patterns and templates” is plywood, which is slightly larger than the structure itself. There are special places on this template that indicate the places of fastenings through which holes for fastenings are drilled. The number of brackets must be equal to the number of blocks in the radiator. Typically, 1 bracket goes per 1 linear meter. The fasteners are mounted according to the level, they should be at zero, without deviations.
Holes are drilled where the marks were indicated. You can drill with either a hammer drill or a hand drill, but it will take a very long time. The depth and diameter must match the fastening so that it extends 13 cm or more. The next step is to cover the holes with mortar to prevent the brackets from falling out. They will be ready for work only after the solution on which they are laid is ready.
The requirements for fastening the brackets were made for a reason due to the enormous weight of the cast iron battery itself. It, but under load, weighs about 12 kg, and not all, but each section, of which there are usually 5.
When everything is ready, the brackets are reattached, the radiator is assembled, all that remains is to mount the radiator on the wall and connect it to the system. Before this stage, it is necessary to remove the plugs. All threaded joints are coated with some tow or foam. This is done to improve the tightness characteristics, as well as eliminate the possibility of leakage.
The main property of cast iron is slow cooling. That is why tools, kitchen utensils and radiators were made from cast iron. This is due to the fact that such radiators retain heat much longer, so replacing them, unless they are broken, is completely unprofitable. The exception is areas with a mild and warm climate, where heating is practically not needed.
Tips for installing and dismantling radiators are in the next video.
Assembling a cast iron heating radiator
Before assembly, first of all, it is necessary to clean the threads of all sections from traces of packing material and jute. To do this, you can use a wire brush, kerosene and rags.
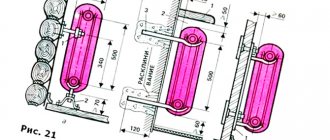
The quality of the thread must be checked by testing new nipples and plugs. The assembly procedure is shown in the diagram.
Before assembly, each glass is treated with Tsiatim or graphite, wrapped in jute tow and screwed into the body of the register by one thread.
You only need to collect it on the table
Install the o-ring on top, the next battery register and align along the axis. After which you can turn it with a key. If the thread “does not work,” then it is better to disassemble it and try to determine the cause. Assembly is performed with minimal effort.
General recommendations
Experienced craftsmen and professionals recommend taking into account the following points:
When using a cast iron radiator plug on heating appliances, caution should be exercised. The fact is that cast iron is easily compressible, but is considered a rather fragile material
Therefore, even a slight mechanical impact or impact on a hard surface can cause the formation of microcracks. As for steel products, they are more reliable in this regard.
When studying materials for the assembly and installation of heating devices, there are recommendations for using ordinary paint for more airtight connections. To some extent, these statements are true, but it should be noted that such connections do not have a very attractive appearance, and when disassembling them you may encounter certain difficulties
It is important to understand that modern heating devices and their additional accessories do not require painting
Selecting and installing radiator plugs is not difficult, but you need to approach this process quite responsibly
It is very important to select matching materials, correctly determine the type of thread and size of the plug, as well as its purpose. By following the recommendations of professional technicians, you can avoid many problems during the operation of the heating system, including batteries and radiators.
Washing with soda ash and whey
Cleaning with soda ash is carried out as follows:
- Plugs (plugs) are placed on the two holes of the outer section.
- Soda ash is diluted in hot water. Half a standard pack for 6-10 liters is enough.
- They lift the heating radiator from the floor and place it on the section with plugs. The section with two free holes should be at the top.
- Water with soda ash is poured through one hole. Air will escape through the other, so there is no need to plug it.
- Plug both holes and place the battery on the floor. The heating device must lie down.
- So that the soda ash can eat away any adhering dirt, rust, and possibly even old paint that has come in with the water, the radiator needs to be shaken. To do this, grab the top and raise/lower it several times. The bottom should not come off the floor. The same is repeated on the other side.
- Rest for 1 hour.
- Lightly tap along the entire perimeter with a wooden hammer. This is done so that the dirt is completely removed from the walls. At this time, the paint may come off. This means that it was poorly attached to the cast iron.
- Place the radiator on the nightstand so that one of the plugs is in the air.
- Place a bucket under the plug and unscrew the plug.
- After draining the water, the radiator needs to be flushed. To do this, unscrew the plug at the opposite end and insert the hose from the water supply. Open the tap. Water will flow into the radiator under pressure, thanks to which it will be possible to wash away dirt and completely clean the heating device.