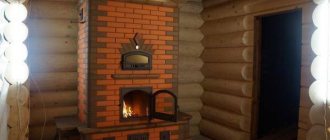
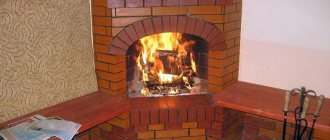
08/03/2017 19570 Stove maker (Moscow) The corner brick fireplace stove has a number of distinctive features and is universal. Such a heating unit can be installed both in a fairly spacious two-story house and in a small country house.
A corner stove, a fireplace made of brick, with fairly small dimensions and average weight, does not take up much space and at the same time can act as the main source of heating.
In this article you can get acquainted with the simplest arrangement, learn more about its design features and view the rating of the best purchased corner metal hearths. Selected photos will help you with visual familiarization.
Three-turn furnace laying diagram
The stove is a traditional means of heating rooms and entire structures. It is created from different materials, but the most popular are standard three-turn designs. They provide uniform heating of the rooms, and are also quite easy to form with your own hands. An important principle of competent masonry is strict adherence to the basic rules and requirements for this work. To do this, a special scheme is initially created, which must be followed during the construction process.
Difficulty of installation
Inexperienced stove-makers may have some problems when installing a fireplace stove.
- The structure is "filled up". This fact can be eliminated if you carefully check the horizontal and vertical lines when installing each new row of bricks. It is necessary to control not only the evenness of the placement, but also the uniformity of the thickness of the seams.
- The seams are covered with cracks. This can happen if the proportions were violated when mixing the solution. To detect such defects, it is enough to operate the fireplace in test mode for a month.
It is quite possible to build a fireplace stove with your own hands, but this process requires high-quality preparation and a responsible, competent approach. Otherwise, you may face serious consequences that could cause a fire and more.
Principle of operation
Before the actual construction process, it is necessary to carefully and in detail study the entire operating principle of this equipment. In this case, it will be possible to avoid numerous problems during the implementation of the main stages of masonry formation. The following elements of the furnace can be distinguished:
As hot gases generated from combustion pass through various elements of the furnace, the room is heated. That is why the oven must contain all the necessary components to cope with all the tasks. Also, the masonry scheme must be carefully and competently thought out, since any violations can result in a low-quality design with low efficiency. Therefore, it is advisable to thoroughly study all the nuances of this work in advance and watch a training video in order to ultimately cope with the tasks with your own hands effectively and reliably.
Making a brick kiln
Since the structure is usually created from brick, you need to know exactly how this process is performed. To do this, not only a diagram is formed, but also an order is made, which indicates the correct sequence of use of each brick in the structure. The process of creating a furnace can be divided into the following stages:
Masonry structure
To do this, it is important to use drawings and other documents created in advance with your own hands.
If there are protruding elements, you can settle them with your own hands using a mallet. When the first row of masonry has been created, and the accuracy of the work done has been checked, the middle of the created row must be lubricated with masonry mortar . Next, the corner bricks of the second row are laid, and after that the perimeter is laid. As soon as two rows are laid out, you need to carefully check their evenness. The laying of subsequent rows is carried out in the same way, for which it is important to constantly refer to the existing order and diagrams. The seam in the stove masonry must be very thin, since the strength of the masonry depends on this . You also need to observe the correct ligation of bricks. For the firebox, the best solution is considered to be fireclay bricks, which are quite easy to work with your own hands.
Door installation
They can be cleaning or blowing. Before installing them, it is important to make sure that the fit of the canvas to the frame is sufficient. There should be no distortions or other problems that could cause the doors to not close properly. All defects must be removed before direct installation work.
Grate installation
Since this element is usually created from cast iron, it is important to remember that it heats up when the oven operates, which causes it to expand. Therefore, it is not allowed to firmly embed the element in the furnace masonry . Otherwise, you can expect structural destruction during heating of the furnace.
Installation of the combustion door
Installing additional items
The stove may contain a large number of different devices and parts that improve the comfort of its use. All these parts can be assembled by yourself. These include a cooking stove or a full-fledged oven, grill or other elements.
Possible problems and their solutions
Even an experienced craftsman can make mistakes when laying bricks on mortar. Therefore, first perform a dry test laying. This will allow you to once again carefully study the layout sequence and make sure that there are enough prepared materials.
If, nevertheless, a mistake is made while working with the mortar, remove all incorrectly laid bricks, thoroughly clean them and only then lay them again. The clay solution cannot be reused.
Failure to properly bind bricks leads to cracks in the structure. Correct laying - each brick rests on two lower ones, the vertical seams in the rows do not coincide. A small error is permissible only when laying out the internal elements of the oven.
The correct application of the mortar is a thin layer over the entire surface of the brick bed without empty spaces. The brick is placed in the chosen place, moved a little and pressed tightly. The next brick is laid according to a similar principle, but the mortar is applied to the bed and to the butt.
Recommendations for work
In order for the stove to be reliable, durable and meet all the rules and safety requirements, during its formation with your own hands you need to follow certain tips, conditions and recommendations.
It is advisable to watch a special training video in advance, which explains the various nuances and features of this work. The basic rules include:
Thus, making your own brick oven that will meet all safety requirements is actually not difficult. It is only important to study all the necessary information in advance, know about all stages of work, and also use high-quality materials and tools. With the right approach, you can get a design that is reliable, durable and attractive. In this case, there will be no errors or problems in the stove itself.
Source
Other tips
The living room with the kitchen can be combined and decorated with various shortcomings
It is important to calculate and anticipate everything in advance. Decorators and craftsmen share tips that will help avoid problems during repairs and furnishings:
The result depends on how detailed the project is drawn up. Oddly enough, it is worth taking into account the growth of loved ones and relatives. It is also recommended to calculate the approximate number of possible guests. You can get rid of food smells by installing a strong hood or ventilation system.
Small models are more suitable for housewives who do little cooking. If you plan to have a sleeping place in the living room, then it is important that the ringing of appliances and other kitchen utensils is not heard. Silent dishwashers and other appliances will come in handy.
In addition, you can install a sliding door and install a soundproof partition. If there is sensitivity to ultraviolet radiation, the owners hang thick curtains made of light-proof fabric. If household appliances do not match the direction of the interior, they are hidden behind furniture or put away in kitchen cabinets. When installing luminaires and lamps, they are guided by several criteria
It is important that the light falls evenly throughout the entire space. Especially bright lighting is preferable in the kitchen area and where the dining table is installed
In the living room, designers create a subdued atmosphere using wall sconces and table lamps. Multi-level stretch ceilings with LED strip also look good in this room. Moisture-resistant finishing materials are more durable and easy to clean. Thus, they retain their appearance for a long time. The kitchen combined with the living room combines:
- personal tastes of the owners;
- reliable finishing materials;
- current design ideas;
- convenience;
- trends. The best photos of kitchen living room design
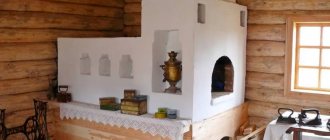
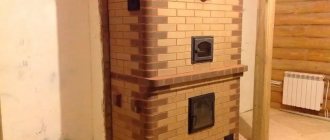
Small country stove made of brick
This heating stove, operating on the Dutch principle, has dimensions of 510 * 770 mm with a height of 2150 mm. Its heat output is 1760 kcal/h.
Preparation of materials
Construction requires 210 red bricks and 76 fireclay bricks for the firebox. For masonry you need about 80 liters of heat-resistant mortar. You will also need the following materials:
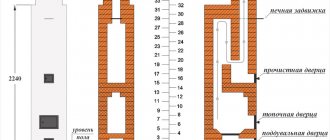
Stove diagram: 1 – roofing felt for waterproofing; 2 – blower door; 3 – firebox; 4 – cleaning door; 5 – valves.
Ordinal masonry scheme
The stove is placed strictly according to the order pattern, not forgetting about bandaging the seams and installing the doors. The doors are secured with steel wire, embedded in the masonry. The grate is installed after laying the fifth row. On the twenty-first row, the channel is narrowed by half a brick, and on the twenty-third row, a channel measuring 130 * 130 mm is laid out. The last row is laying the base of a chimney made of four bricks with a 130*130 mm channel.
Layout diagram from rows 1 to 15 Layout sequence from rows 16 to 30 Upper rows of the stove
If laying a stove with your own hands seems like a complicated process, it makes sense to turn to professional stove makers for qualified help. In the hands of a master, an incomprehensible scheme can be transformed into a spectacular home hearth, warming the body and soul.
Order for a small Dutch woman
A small Dutch oven is perfect for a summer house (the area of the heated room should not be more than 16-20 square meters). The size of this heating structure is only 520x520 cm. Such compactness is achieved due to the fact that the smoke circulation seems to be rolled up into a ring. The height of the oven can be increased by repeating the group of rows from the 17th to the 22nd.
Brief explanations of the order...
The first 2 rows are solid. To lay them you will need 8 bricks. When laying the base of the furnace, observe the geometry very carefully: control the equality of the diagonals, angles, and impeccable dressing of the seams.
The 3rd row consists of only 5 bricks; the blower flap is also placed here.
In the 5th row, the blower flap is closed. Moreover, here the building material is trimmed a little so that the grate can be placed on it. Moreover, the niche for the grate should be approximately 5 mm larger than the grate itself.
A secret from a skilled stove maker! Fill the gap between the brick and the grate with asbestos cord, and lay corrugated cardboard on top to protect it from clogging with clay mortar. When you heat the stove for the first time, the cardboard will burn, but the asbestos cord will remain clean.
On the 6th row there is a flap through which you will load firewood.
In the 8th, it is recommended to put a 5 mm sheet of metal approximately 40 mm wide, and its length should exceed the dimensions of the combustion chamber on all sides by 3 cm.
In the 9th, a brick is placed on this sheet of metal, which closes the fuel door.
From the 10th row , a smoke circulation is formed, in other words, channels through which hot gases pass from the combustion chamber. Strictly follow the given order so that your idea of folding a mini-Dutchman with your own hands will be crowned with success.
In the 16th, lay two steel corners 50x50 mm, which will hold part of the masonry of the smoke circulation channels. The thickness of the steel should not be less than 3 mm.
Other rows are laid very simply. All you need to do is follow the order with great care. And only in the 29th row you will need to cut the bricks a little in order to install the view-latch.
Types of stoves
The most popular modifications of brick kilns are:
heating stove units. The main function of this design is clear from its name. This stove is used for heating rooms. Heating stoves are characterized by fairly easy and quick construction;
heating and cooking stove structures. They are the most optimal, popular and in demand option among private developers. In addition to heating, such stoves make it possible to cook various foods, which allows you to save a lot on gas and other sources of thermal energy. This design includes a special stove or even a spacious oven;
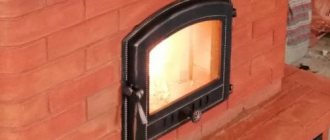
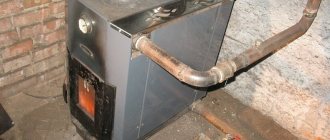
Wood-burning metal stoves-fireplaces
This equipment is compact and has a high degree of heating. Wood-burning corner stoves and fireplaces for summer cottages are devices that have a firebox that is covered with fireproof glass (read: “How to install a metal fireplace for your home with your own hands”). They can be equipped with a kitchen tile and a heat exchanger tank designed for arranging a water heating system.
The advantages of these units include:
- easy installation;
- high efficiency;
- small parameters and weight;
- no need to make a foundation;
- attractive appearance;
- affordable price;
- safety of operation.
A corner stove, a long-burning fireplace, made of metal and operating on wood, is economical and characterized by high efficiency. Oxygen is supplied to the device in doses and therefore there is no active combustion of wood.
Solid fuel smolders slowly, resulting in increased heat transfer and less ash formation. Operating in continuous burning mode, the unit can operate for up to 6 hours on one load of fuel, and the sealed door protects from sparks and hot coals.
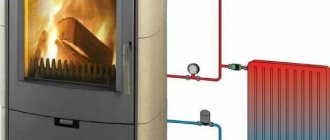
If the fireplace stove has a water circuit, you can connect a heating system to it and get full heating of your country property. The presence of a stove in the upper part of the structure makes it possible to cook food, heat water and forms another plane with a high degree of heat transfer.
How to build a stove correctly
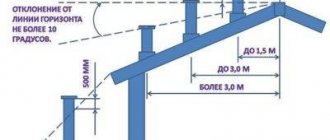
In the vast majority of cases, construction begins with the construction of a foundation for a future heat source. An exception may be outdoor mini-ovens, which due to their low weight are sometimes placed directly on the concrete screed of the yard. All others, regardless of location, must be built on a solid foundation. Moreover, it is not allowed for the foundation of the stove to be connected to the base of the house or placed close to it; it is necessary to leave a gap of at least 5 cm, and preferably 10.
Important. Failure to comply with this requirement may lead to the fact that after a year or two the stove may crack and even deviate from the vertical
If the house has a good foundation in the form of a cement screed, and the total weight of the stove does not exceed 750 kg, then a foundation is not required; masonry can begin directly from the screed, having previously laid sheets of asbestos and roofing steel. The structures presented in the previous section weigh over 750 kg, and therefore it is necessary to provide a reliable foundation for them. There are 2 types of foundations for the furnace: rubble and reinforced concrete.
Regardless of the type of base, you first need to dig a hole whose dimensions exceed the area of the stove by 10 cm in each direction. The depth depends on the thickness of the upper layer of chernozem or other subsidence soil, while the base of the foundation should rest on a denser layer. In the first case, the pit is laid with rubble stone and dressing, using a solution of the following components:
All voids between the stones are also filled with this solution, and the upper part, located at a depth of 80 mm from the floor, is also leveled with it. The reinforced concrete base is poured with formwork and reinforcing mesh, having previously poured a 10 cm thick cushion of crushed stone onto the bottom of the pit.
Important. After the mortar or concrete has hardened, a waterproofing barrier made of roofing felt in 2 layers must be laid on top of the foundation
The furnace is laid according to the procedures, observing the thickness of the seams within the range of 3-5 mm. After laying each row, it is necessary to control compliance with the vertical and horizontal using a plumb line and a building level. The mortar can be applied to the brick with a trowel or by hand; light tapping of the stone after placing it in place is allowed.
The remaining mortar is removed from both sides of the wall, and the inside is wiped with a wet rag to create a smoother surface. This is necessary to ensure the least resistance to flue gases.
When installing fittings and water tanks, it is important to ensure that there are no gaps between the masonry and the metal surface; the joints must be carefully filled with a solution, otherwise the stove will begin to smoke. Upon completion of construction, it is necessary to wait 2 days until the solution dries completely, after which you can test fire the stove starting with a small amount of firewood
How to build a small stove at home is described in detail in the video:
detailed instructions
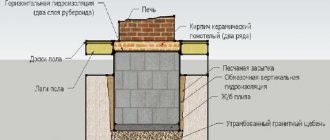
Creating a foundation
The foundation is the base of the Dutch oven, without which the structure in the room will not stand. The base of the stove must be reinforced, for which a monolith slab is used, and the foundation is not connected to the base of the house or garage. The gradual scheme for creating a foundation looks like this:
- The land where the furnace will be built is being cleared; dimensions are outlined to dig a pit up to 60 cm deep.
- You need to fill the bottom of the pit with sand or crushed stone, its thickness should be 15 cm.
- Reinforcement bars are laid on top, creating a grid, the dimensions of each cell of which range from 100 to 120 mm. Where cells create intersections, it is necessary to install the reinforcement vertically. The joints are carefully rewound with wire to create a durable structure.
- Install formwork, covering each wall with rolled roofing material.
- The mesh is filled with a concrete solution, onto which you need to sift dry cement and lay a couple of layers of rolled roofing material.
Foundation laying scheme
The foundation can be secured on top with a layer of sand so that the stove stands level on the surface. You cannot immediately begin construction work on the Dutch woman - the foundation must become strong, which happens over the course of four weeks. In emergency cases, you can start laying after seven days.
Furnace solution and ordering
The main element that plays a binding role in the furnace insert is considered to be clay mortar. The mixture is prepared in-house 2-3 days before construction begins. After this time, the solution will infuse to the required consistency to firmly hold the bricks together. To prepare the mixture you will need:
- Place the clay in a separate container, add water, and let it soak.
- After a certain period of time, clay residues will begin to float to the surface of the water, which should be removed.
- After a couple of days, the clay will swell enough, which will make it possible to add seeded quarry sand to the mass. The ratio of clay and sand varies, but most often it is 1 part clay and 2 parts sand.
- Water is added again, in a ratio of 1 to 8.
The sequential masonry scheme takes into account the creation of the stove, and then the laying out of the chimney.
A Dutch oven with a stove is formed as follows:
- The 1st row is laid on top of the foundation so that all the bricks lie flat. Then another 1 ball of cement solution is poured.
- The 2nd-3rd rows need to be laid flat, connecting the bricks with mortar. Plumb lines are placed in the corners. The joints of the first, second and further rows must be overlapped by a new row, which will ensure their correct connection.
- 4-5th rows: in the fourth, a stand is made for the hole in the ash pan, for which the bricks are stacked on edge. The wall located at the back should be laid down without using mortar - this will make it possible to take out and put back the bricks when they warm up. After that, a sash is placed on the masonry, which is mounted in rows using wire. An asbestos cord is wound around the edges of the door, providing impermeability and thermal insulation of the structure.
- Rows 6-8: the ash pan is covered with masonry, leaving space for installing a fire grate. Laying bricks in rows continues further.
- 9-13th rows: after the eighth row, the construction of the combustion chamber begins, with the installation of doors and subsequent laying out.
- Rows 14-15: the firebox is covered with bricks, a small opening is left behind it so that smoke can escape there.
- 16-17th rows: a cleaning hole is formed, which is closed by the sash.
- Rows 18-26: reverse channels are made, the number of which differs, but the shape always remains serpentine. All walls should lie without ledges and be lubricated with clay.
- 27-28th rows: the channels are blocked, leaving space in the last one for the chimney. The bricks are laid so that they are moved 5-6 cm back when compared with the previous rows.
- Rows 29-30: a chimney is formed, onto which a valve is then placed to help adjust the draft.
Furnace arrangement diagram
Before building a Dutch oven, it is necessary to make a detailed drawing of the stove, indicating the placement of doors, ducts and chimneys. During the laying itself, you have to make sure that both vertically and horizontally, the bricks lie level. To do this, it is recommended to use a plumb line every 2-3 rows so that the stove does not come out skewed.
A chimney is designed separately, without which the Dutch oven cannot operate. The height above the roof is determined for any structure personally, in compliance with all fire safety standards. Where the pipe will pass, high-quality and good thermal insulation should be prepared. For example, you can line the chimney with asbestos, which is a non-combustible protection material.
In places where the chimney is blocked, special seals should be prepared from bricks - fluff, and they should not affect the diameter inside the structure. During the construction of a chimney, cement is added to the clay solution in a ratio of 1/10. At the very top it is necessary to install a head made of strong metal.
The finished stove must be plastered and then laid out (as required). It is recommended to do this 14 days after installation has been completed. You can heat a Dutch oven for the first time a month after the completion of construction, using good quality fuel. There should be a total of 2-3 test combustion chambers in order to gradually increase the load and prepare the furnace for operation.
The size of the Dutch oven can be either small or large, depending on the functionality. Small stoves are suitable for heating rooms up to twenty meters2, and large stoves are suitable for heating rooms up to 50 m2.
The process of laying the Radonezh stove
First step. Cut a hole in the wall for the stove. Drive reinforcing dowels into the ends of the beam (if the wall is made of this material).
Second step. Pour the foundation.
Start laying 1-1.5 months after laying the foundation. It is during this period that the concrete will gain the required strength.
Third step. Cover the dried foundation with waterproofing material.
Fourth step. Lay out the first row of the oven. Check the evenness of the masonry using a level. Make seams no wider than 3 mm.
Continue laying the stove in accordance with the order.
The grate and ash pit are installed in the combustion chamber. The width of the furnace vent must be sufficient to allow the required amount of air to flow to the loaded fuel during operation of the heating unit.
Lay out the furnace combustion chamber and sew the channels. Trim off excess mortar.
When laying the 26th row, make a 20 mm overlap on each side.
Complete the laying of the main part of the stove in order and begin laying out the chimney.
Continue installing the chimney in accordance with the previously prepared project.
Dry the finished oven. To save time, install a fan in the combustion chamber.
After the masonry has dried, make several test runs. Don't make the first fires too intense.
If everything is done in accordance with the instructions, order and basic requirements, after an average of 30-40 minutes, the side of the stove facing the room will heat up. After about 1.5 hours, the unit will warm up evenly and begin to fully heat the room.
Building a heating stove with your own hands is a rather complex and lengthy process, but if you wish, you can cope with such an event. You just need to follow proven technology, use only high-quality building materials and adhere to the chosen masonry scheme in everything.
As a result, the heating unit will serve as long as possible, reliably and efficiently, and you will additionally save on arranging the heating system for your home by refusing the services of third-party stove makers and doing everything yourself.
Video - Do-it-yourself heating stoves
Video - Do-it-yourself heating stoves
Everything is very well written. I’ll add on my own that there is no need to look for fireproof clay. Now ready-made mixtures for laying stoves and fireplaces are sold on the building materials market. Everything is already mixed there in the right proportion. There is one more point about drying the oven. Make the first launch using exclusively paper and cardboard as fuel. Firewood is highly undesirable. Then you will get the required temperature. Warm it this way for no longer than an hour. When drying, the clay may smoke a little. That is, there will be smoke in the room. Don't be scared by this. The clay will dry very quickly and the oven will work as it should.
I would like to suggest one interesting idea that I myself have experienced. Inside the oven you can lay out “Gabrodiabase”. This stone is a type of granite and is used to make monuments. You can ask for trimmings at funeral services, after making sure that it is really gabrodiabase and not simple granite. You can buy it, but this stone is very expensive because it can withstand high temperatures! Good luck!
At the dacha, I twice made stoves in the house and in the bathhouse on my own. In the latter, the second option turned out to be relatively successful, but the design itself is simple. In the house, the basis was metal stoves lined with bricks. I immediately rather modestly assessed my capabilities in constructing a more complex structure, and I still think so, having already had experience. That is, for the construction of a good stove and, especially, a fireplace, it is best to turn to good stove makers. By the way, my sister did just that and until they installed the boiler, it worked great for them.
Have we answered your question?
Stove with stove - types
There are many varieties of heating and cooking stoves; every stove maker probably has in stock several tested drawings and diagrams, according to which he carries out the masonry with his own hands. But, one way or another, they are all built on the basis of long-known ones, which are discussed below.
Swedish oven
"Swedish" was originally intended to perform several functions:
- heating;
- cooking;
- drying food and herbs;
- keeping clothes warm.
Its design is thought out to the smallest detail, the oven is equipped with:
- hob;
- oven;
- perfectly heated niche-stoves.
In addition, its smoke channels are designed in such a way that the body of the stove is heated evenly from bottom to top , due to which a stable temperature is maintained in the room.
A distinctive feature of the Swedish stove shown in the photo is the oven. And its function is not limited to baking and baking.
The oven is located next to the firebox and is separated from it by a thin layer of masonry. The firebox arch is formed by a slab located in a niche. Immediately after starting the fire, the cooking surface and the wall between the firebox and the oven warm up well.
In winter, when the furnace is fully loaded, the initial heating of the room occurs by convection currents from the stove and oven, after the end of the fire - due to the heated walls of the furnace.
The cooking surface of the oven does not overheat , since air constantly circulates above it.
In summer, the stove is used mainly for cooking . In this case, intense convection does not occur, since there is no temperature difference, and a small amount of fuel is sufficient for good heating of the stove.
The oven also warms up, creating a high-temperature zone at the exit from the firebox, due to which the flue gases go into the channels completely burnt. The furnace body heats up slightly .
Layout of the Shvedka stove
The diagram and drawings of the masonry of a Swedish-type stove with your own hands are shown in the figure.
To lay a classic “Swedish” with your own hands you need:
- red solid brick grade M 150 - 580 pieces;
- clay-based dry masonry mixture - 200 kg;
- cast iron grate;
- firebox door;
- ash door;
- cast iron stove with two collapsible burners;
- oven welded from sheet metal;
- chimney damper - 2 pcs;
- cleaning - 3 pieces;
- equal-flange steel angle 40 mm - 170 cm;
- steel strip 5x50 mm - 65 cm;
- flat slate 10 mm thick - 1 sheet;
- roofing iron.
Foundation for the "Swedish"
The foundation for the swedish is made solid, from concrete.
Under the foundation it is necessary to make a sand and gravel cushion 15-20 cm thick. The height of the foundation itself is at least 30 cm, with two-layer reinforcement made of rods.
Before laying begins, the foundation is kept for at least 20 days to gain strength.
Level the foundation using a screed with the floor level.
After it dries, it is necessary to thermally insulate the furnace from the concrete, otherwise it will absorb a significant part of the heat.
Thermal insulation is performed as follows:
- An asbestos sheet 3-4 mm thick with dimensions 30 cm larger than the dimensions of the stove on the sides and back and 60 cm on the firebox side is placed on the foundation.
- A heat reflector is placed on the asbestos - foil or thin galvanized sheeting.
- Next is another similar layer of asbestos with the same dimensions.
- A sheet of roofing iron with the same indentations as asbestos.
- On top of the iron is technical felt, impregnated with clay milk according to the size of the furnace.
Do-it-yourself oven: ordering a stove with a hob
On top of the felt, after it has dried, they begin laying the stove according to the order:
The first two rows are solid. They form the base of the oven.
The third and fourth - install the blower door, clean and begin to form the lower part of the smoke circulation and the ash pan.
In row 5, a grate and oven are installed.
In the 6th row they continue to lay out the smoke channels and install a partition between the oven and the combustion chamber.
In the 7th row , place the firebox door and secure it.
In rows 8 and 9, the laying out of channels continues.
Row 10 forms a support for the hob.
To properly install the hob, you must first lay the brick on a dry surface, attach the slab and mark the laying grooves.
Bricks are numbered for ease of laying.
The row is disassembled and, using a grinder, a recess is selected for laying the slab in such a way that there is a gap of 5 mm on all sides.
After which the row is assembled onto a masonry mortar, and the slab itself is placed on a clay-asbestos liquid mortar.
To prepare it, crushed asbestos is introduced into the masonry mortar, diluted to a creamy consistency.
When laying the slab, be sure to check its level. If the burners are of different sizes, the larger one is placed above the firebox, the smaller one - above the oven.
Rules for laying a hob: video
From rows 12 to 16, the walls of the niche above the stove and the smoke ducts are laid out.
on top of the 16th row according to the size of the niche.
In the 17th and 18th rows they lay it with bricks, forming the ceiling of the furnace.
Next, the laying is carried out according to the scheme up to row 30.
In the 30th row they install a valve, after which they begin laying a chimney of the required height.
Small cooking stove - how to fold a stove with a stove
In a country house or summer kitchen, a stove can be installed for only one purpose - cooking.
In this case, there is no need to waste material on smoke circulation.
An excellent model of a cooking stove for the home - drawings with instructions
This multi-functional wood burning stove performs several functions:
- You can cook and fry on the hob,
- in the oven - bake,
- heat water in the built-in water heating tank.
The sketch of the facade shows its elements:
- 1 - firebox;
- 2 - ash pan and ash pit;
- 3 — oven;
- 4 - water tank;
- 5 - cleaning door.
The stove resembles a Swedish stove in design and type of heating, but without smoke ducts.
The heated smoke goes straight into the chimney, so the stove is heated with a small amount of fuel.
The exit to the chimney is located at the rear, which allows you to remove the pipe through the wall yourself, observing fire safety standards.
Such a stove requires no more than 250 bricks , which allows it to be installed on the floor of the house without building a foundation.
In this case, it is also necessary to do thermal insulation, but in the reverse order: lay felt on the floor, soaked in a liquid clay solution, and on it - a sheet of roofing iron. Laying begins on top of the sheet.
Scheme - order:
The first two rows , like the Swedish one, are solid.
In row 3, cleaning is installed.
In 4 and 5 - the ash pan door, forming a smoke circulation and exit to the chimney.
In row 6, the ash pan door is covered, an oven and a water tank are installed.
In the 7th row, a grate is placed at the bottom of the firebox.
From rows 8 to 10, lay out a partition between the firebox and oven, and install the firebox door.
Row 11 - overlap over the firebox door, oven and tank. Also in the 11th row a recess is made for laying the slab.
The top of the stove is covered with a cast iron hob with two burners. They are selected so that the maximum heating element is located above the firebox. Place the slab with a gap of 5 mm on a clay mortar with the addition of asbestos.
Kuznetsov furnaces
A fundamentally new design of furnaces was implemented in Kuznetsov furnaces.
Unlike channel ones, they do not have a complex system of internal passages, and the circulation of gases occurs in cavities - caps.
For this feature, Kuznetsov stoves are called bell stoves.
Among his developments:
- heating;
- cooking;
- sauna stoves;
- stoves for the cottage.
In channel furnaces, hot gases pass through labyrinths of passages, gradually releasing heat. This causes uneven heating and sometimes destruction of the furnace elements.
If the channels are insufficiently long, for example, in sauna stoves, the gases do not have time to cool, as a result, efficiency decreases, and the stove heats the air.
In bell-type structures, heated smoke rises into the bell - a cavity bounded at the top by the ceiling and with an exit at the bottom.
The hot gas at the top of the bell gradually cools, heating the walls of the furnace, and gradually falls down.
The circulation of gases in Kuznetsov bell furnaces is shown in the figure.
For complete heat transfer in Kuznetsov stoves, not one, but two or three hoods are made, and their placement can be either vertical - on top of each other, for example, in sauna stoves, or horizontal - in models equipped with a stove bench.
Heating and cooking stoves, as a rule, imply a vertical arrangement of the hoods.
The hob is located either above the firebox or forms the arch of the lower hood. In the second case, the temperature on it will be more stable.
Procedures for do-it-yourself masonry, as well as photos of the most popular designs of Kuznetsov stoves are presented below.
Heating and cooking stove - diagram with order
Basic design elements of a heating furnace
Diagram of elements of a heating furnace
All existing heating stoves have approximately the same and fairly simple design. However, despite their simplicity, stove units are capable of fully solving the problems associated with heating residential premises.
The main components of a heating stove are the fuel compartment and the smoke exhaust structure. If a heating and cooking stove is being considered, the design must include a stove or oven. At the owner's request, his stove can be supplemented with a tank for heating hot water.
Heating stove. General scheme
Heating stove. General scheme
The most important part of any heating stove. Calculate the volume of the firebox in accordance with the area of the heated space, the characteristics of the fuel used, etc. To make a stove firebox, use high-quality fire-resistant bricks. The walls of the firebox should be half a brick thick.
Ash pan (ash pan) for the stove
This compartment is designed to collect waste from the furnace. Oxygen is also supplied to the combustible fuel through the ash chamber.
The ash pan is located below the grate and is equipped with an individual door.
The height of the firebox is usually 3 bricks.
Rules for constructing a brick chimney
A very important component of any oven. Gases are removed through the chimney. At the same time, the design provides additional heating of the room.
Brick stove - arrangement of a chimney for it
If possible, the chimney should be designed so that it is as straight as possible. Any bends will negatively affect the efficiency of the heating stove.
Mortar for laying out a heating furnace
In order for the operation of your heating stove to be as efficient, reliable and safe as possible, and for the structure itself to last as long as possible, you must properly prepare the masonry mortar.
The laying of heating stoves is carried out using a viscous solution prepared on the basis of clay and sifted sand.
To obtain such a solution, you need to fill the clay with normal humidity with water and soak it thoroughly. Pass the mixture through a sieve and stir until smooth. Then add sand to the mixture in the amount necessary to obtain a solution with the required plasticity and viscosity.
Furnace mortar
Pay due attention to preparing the mortar for masonry. The quality of the finished furnace unit, its main characteristics and service life depend on the correctness of its preparation.
Order drawing of the masonry of a country stove 4x3.5 bricks.
Setting up the oven is quite simple, just do everything as in the photographs using a clay-sand mortar with a seam thickness of 3-8 mm and everything will work out.
I did not post the process of lining the firebox in order because it is intuitive and described in the video above.
Dear readers of the site, if you have questions about the laying of this or another stove, please do not ask questions in private messages, ask in the comments on the site or YouTube channel or our VKontakte group so that other subscribers can also see the answers and draw conclusions.
Sources:
https://sdelaikamin.ru/pechi/kak-izgotovit-podovuyu-pech-svoimi-rukami-instrukciya-po-kladke https://ogon.guru/stroitelstvo-svoimi-rukami/pech/vidi-pechey/dlya-dachi /3-na-3-kirpicha.html https://www.osnovaremonta.ru/dachnaya-pech-4×35-kirpicha-cenoj-11-tys-rub/
Place for the furnace
Choose the optimal location for the heating stove. For example, a stove installed in the center of the room will distribute heat as efficiently and evenly as possible. However, such placement of the stove is not always convenient.
Stove in the center of the room
If the stove structure is placed against the wall (this option is the most popular and frequently used), cold will flow across the floor of the house.
Select in advance the location of the combustion chamber door. Design the stove so that in the future you do not have to carry fuel throughout the room, spreading dirt around the room.
The heating stove is located against the wall
The best option is to install a firebox in a room that is rarely visited.
Recommendations regarding the foundation are standard - an individual concrete foundation is installed. It cannot be connected to the main foundation.
Calculate the design of the foundation in such a way that it is able to withstand the load not only of the furnace itself, but also of the smoke exhaust structure, which is also strongly recommended to be built of brick.
Country stove 4x3.5 bricks costing 11 thousand rubles.
Greetings to the readers of our site, the summer baking season of 2013 has ended, I have free time, I will start posting detailed videos and photo reports of the built stoves and outdoor complexes. I'll start with the simplest stove for a summer house, made of 420 bricks.
This stove, despite its simplicity of execution and small amount of materials, in my opinion, is optimal for a small cottage of 2 rooms with a total area of up to 30 m2. It has a summer and winter operation, a small firebox lined with refractory bricks on the edge, a large two-burner stove 70x40 cm. The heat capacity of the stove with a double firebox is about 3.5 kW per hour. The front part of the stove with the stove is located in a small room in the kitchen, and the main rear part with the heating panel opens into the common room (hall) of the dacha, evenly distributing heat. Thanks to a competent system of passes and a long system of vertical smoke circulations, the oven heats up evenly from the bottom to the outer row. To make it possible to cook food on the stove for 3 or more hours in a row without a large consumption of firewood and burning out the bricks, I made the firebox of the stove quite small; the width of the firebox is about 20 cm, the depth is about 40, the lining of the stove with fireclay bricks protects the stove from burnout.
Features of stove heating
Stove heating has a number of advantages, thanks to which wood-burning brick stoves have not lost their popularity for several centuries. The most important advantage is the ability of the ceramic bricks from which the stoves are made to accumulate and release heat for a long time.
At the same time, radiant energy useful for the human body is released into the space, giving a feeling of warmth and comfort. With regular heating during the cold season, the house is always warm and dry, and natural ventilation is formed due to the stove draft. In hot weather, the stove, on the contrary, cools the rooms by removing excess heat into the ground and air through the foundation and chimney.
In addition to creating a comfortable microclimate, a brick oven can provide additional functions, the availability of which depends on the design:
Furnaces that provide several functions are called combined. These types of stoves include heating and cooking stoves, fireplace stoves, as well as several popular basic models, including the Russian stove.
Stove heating also has disadvantages, including the inability to effectively heat remote rooms. Therefore, in large houses, they usually install several stoves with separate or combined chimneys or combine stove heating with other types of heating.
In compact houses consisting of one or several rooms, the stove is usually located in the center, so that its walls are located in all rooms. The hob and oven are placed on the kitchen side, the stove bench is in the bedroom or nursery, and the open fireplace is in the living room or dining room.
Rating of purchased metal hearths
A corner fireplace stove made of brick is distinguished by a rather complex assembly and installation; the simplest are ready-made purchased metal hearths. In this table you can learn more about the most inexpensive and popular models today:
| Model | Descriptions and characteristics |
| Bayern corner | Installing such a fireplace is quite possible with your own hands. The fireplace body is made of steel, the thickness of which is six millimeters. The interior of the installation is lined with fireclay bricks. The sides are made of ceramics, and the power of the heating unit is 6 kilowatts, which allows you to heat a house with a total area of up to 50 square meters. |
| Amur | The model is based on small fireproof panoramic glass. The design itself is equipped with a small hob for cooking food on two burners. A power of nine kilowatts allows heating a house with a surface area of about 170 cubic meters. The sides of the model are also lined with panels made of refractory ceramics, which significantly increases the efficiency and heat transfer of the fireplace. |
| Neva | The instructions for this model indicate the possibility of simple use. This firebox has a power of 6 kilowatts, which allows you to evenly heat a space with a total area of up to 50 square meters. Additionally, the fireplace is covered with heat-resistant paint, which significantly extends its service life and prevents the formation of rust and corrosion. |
| Teplodar | One of the most powerful combustion chambers is 12 kilowatts. This heating unit is suitable for buildings with area up to 70-80 square meters. Fire-resistant glass ceramics are used to decorate the door. The main part of the structure is made of stainless steel. |
Interesting to know: a purchased metal hearth is distinguished by its high efficiency, affordable cost, and easy installation. For such installations there is no need to assemble an additional foundation, and installation is possible on any floor and ceiling, since the firebox has small dimensions and weight. The design itself can be made in any style and have a number of additional functions, for example, long-term burning or self-cleaning of the fire-resistant glass with which the door is equipped.
In order to become more familiar with the models presented in the table, we also recommend watching the video in this article.
Construction of a stove for a summer residence and its features
The main elements of any brick stove for a summer residence are:
Foundation. For any stove it is necessary to build a separate foundation, not connected to the main foundation of the house.
Ash pit (ash chamber). This element of the furnace is designed to collect products during fuel combustion. Oxygen is also taken in through the ash pan, which is necessary for the combustion process.
The ash pan is located below the combustion chamber and is always equipped with a metal door through which cleaning takes place. A grate is laid between the ash pan and the combustion chamber. Typically, the ash chamber is 3 bricks high.
Tips for using a Dutch oven
The finished oven must dry for 14 days . The test combustion chamber is made first of all with small chips: 30 minutes each with the valves open . Afterwards, the amount of fuel gradually increases. Such drying lasts about a week in the summer and 2-3 weeks in the fall and winter.
Advice. If the stove was folded during the construction stage of the house , its combustion chamber is not allowed without windows and doors in the room.
During operation, it is necessary to constantly clean the chimneys from accumulated soot. It is not allowed to overheat the stove, or to heat it with materials not intended for this purpose. If the structure is built correctly and is used carefully, it will last up to twenty-five years without repairs or additional costs.
Scheme for laying a stove for a home
A diagram for laying a stove for a home is the first thing that a person who decides to install heating in his home using a stove will need. In this material we will look at what layout schemes for home brick ovens exist, what are their features and differences.
Laying a stone stove can be done in the following ways:
When arranging a stove using the first method, plastering the stove is not required, since all seams are filled with mortar. The thickness of the kiln walls determines the way in which the bricks are laid. The walls are laid out with a thickness of one brick and half a brick. Sometimes you can find a masonry of 3.4 bricks. For work on the installation of a stove, it is imperative to use stove bricks. It is also called “red brick”, solid. Under no circumstances should you use bricks that have been taken from a dismantled building, expanded clay blocks or slotted bricks.
The first row is laid simply with bricks, without using mortar. The brick is leveled, the front wall and the places where all the doors will be located are determined. These operations can be called the last "estimate". When these actions are completed, the bricks are laid with mortar.
After this, they begin to lay the corners. The next stage, according to the advice of experts, is the arrangement of the contour of the entire stove. Using plumb lines, string is stretched from the ceiling to the corners of the stove. With the help of these vertical lines, you can easily navigate while working.
Considering the model of the stove you have chosen, you should determine the areas in which the following will be located: the ash pan, the combustion chamber, and the ash pan. The door under the ash pit is installed when the third row of bricks is laid, and after one row the ash pit is laid out.
After this, the firebox is arranged. Each door is attached with burnt wire. When you get to laying out the vault, you will need to cut the bricks. A calculation will be required to ensure good joining of the bricks with each other. The laying of the vault begins after the second row of bricks is laid after the firebox door.
To line the combustion chamber, special refractory bricks are used. Since facing bricks and masonry bricks have different temperature characteristics, installation of the lining to the furnace itself should not be done rigidly. When installing a chimney pipe, care should be taken to install a special valve, the adjustment of which should be smooth and easy.
Design Features
The diagram of a Dutch oven, which is assembled with your own hands, consists of the following elements:
- The combustion chamber is a special type of niche that must be as capacious as possible.
- Smoke pipe - smoke will pass through it, which penetrates into the first smoke channel, and the heat begins to be transferred to the walls of the stove. Then the smoke gradually descends through the passes to another channel (to the combustion chamber). Here it is heated in order to again enter another channel leading upward. In a similar way, the smoke reaches the chimney pipe in stages.
- Heating mechanism, which consists of outlet and inlet channels. Their number stands out, but often in a Dutch oven there are three inlet and three outlet channels.
- Ash pit.
- Gate valve for adjusting the traction intensity.
- Cleaning compartment.
- Smoke circulation.
A Dutch heating stove can be of a wide variety of types: round, rectangular, cylindrical and corner.