0
05.01.2022
In most brick and panel houses, facade insulation was not provided. Brick and concrete have a low level of thermal insulation, so they need additional insulation. To minimize the uncomfortable temperature in the apartment, eliminate dampness, as well as cold walls, it is worth worrying about insulation from the inside of the home.
Insulating an apartment from the inside is a necessary measure
What is the difference between internal and external wall insulation
Page navigation
The process of insulating an apartment from the outside was previously considered a more preferable technology. This type of work has many advantages, including:
- Reliable protection from external influences, freezing of the wall, moisture saturation and, as a result, the formation of mold.
- Reducing the risk of wall deformation during sudden temperature changes.
- Reduced heating costs.
- Saving useful square meters in the apartment.
Every year, more and more often, apartment residents began to choose internal wall insulation.
This process also has undoubted advantages. Namely:
- Ability to perform work at a convenient time and in any weather conditions.
- You can do this kind of insulation yourself.
- Absolute safety, since no special equipment with a lift is involved (not relevant for residents of the first floors).
- Materials for interior decoration are more affordable than for exterior work.
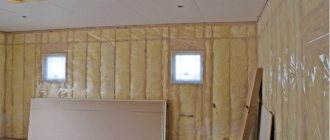
What does insulating walls from the inside entail?
In addition to the many advantages of insulating the interior walls of an apartment, there are also disadvantages. The heat insulator from the inside takes away part of the room's space. For example, if the area of a room is 18 sq.m., then due to several layers of finishing, about 0.5 sq.m. is lost. usable area.
If the rules of the process being performed are violated, all possible “horror stories” can become reality. Namely, when choosing the wrong material, a greenhouse effect occurs, which leads to the formation of fungus and mold.
Internal thermal insulation, in any case, “steals” the square meters of the room
Principles that must not be violated
Whatever insulation method is chosen, there are key principles that must not be violated under any circumstances.
The vapor-conducting layer should be on the outside, and the heat-intensive layer should be heavy on the inside.
When installing a heavy type of insulation inside a room, this principle is violated. As a result, possible problems begin to arise associated with the loss of heat capacity and failure to remove steam properly.
In order not to violate the “wall principle”, it is worth choosing a material whose vapor permeability will be less than the walls of the apartment.
Expert advice
Not everyone trusts the installation of insulation to professionals; more and more often they do the work themselves.
Experts share their experience with beginners:
- when choosing materials and fastenings, it is necessary to calculate the energy efficiency of the layers, taking into account the climate;
- When performing lathing, it is necessary to use a building level;
- lumber for sheathing must be dry;
- a day before work, the mineral wool must be unpacked;
- vapor barrier material is laid overlapping;
- Penofol joints should be taped with aluminum tape.
With internal insulation, the air in the room is sometimes quite humid. It is advisable to measure the level of carbon dioxide - exceeding the indicators indicates low efficiency of the ventilation system.
Features of insulation from the inside
A considerable number of skeptics argue that it is absolutely forbidden to insulate the inside of housing. But what to do if the option to insulate the wall in the apartment from the inside is the only option for one reason or another. Of course, like other work, finishing has its own characteristics that must be taken into account.
As a rule, there is a lot of vapor in the apartment: due to cooking, the presence of bathrooms, or constant wet cleaning. Excess moisture, of course, leaves through windows and ventilation, but not all of it, some of it settles on the walls, saturating their pores.
As a result, ideal conditions for the growth of bacteria and mold are formed between the insulation and the wall. We should not forget that such living quarters become harmful and even dangerous conditions for the whole family.
Dew point location
To prevent this from happening, you should adhere to the basic rules:
- mandatory compliance with technology;
- proper arrangement of vapor barrier;
- selection of suitable material.
Insulating walls from the inside is fraught with the main problem - condensation. This is exactly what you should pay special attention to.
Heat insulator thickness
Difference between materials according to thermal conductivity characteristics relative to brickwork
Calculation of the required thickness of insulation is carried out by multiplying its thermal conductivity coefficient by the regional indicator. So for Moscow the optimal choice is the following numbers:
- mineral wool - 150 mm;
- polyurethane foam - 100 mm;
- polystyrene foam - 100 mm;
- expanded polystyrene - 100 mm;
- penoplex - 100 mm.
When finishing houses, you can combine heat insulators, applying them to the features of the architecture and wall materials.
Which insulation to choose
To choose a suitable insulation, do not forget about the peculiarity that it will be the inner wall of the apartment that will be finished.
Before purchasing building material, you should pay attention to some important characteristics:
- Thermal conductivity of insulation. The lower this indicator, the better, and the layer of material will be many times thinner. Among the insulation materials that have shown themselves to be positive, mineral wool and polystyrene foam should be noted.
- Flammability degree. This indicator shows how the material changes its structure when exposed to fire. For example, mineral wool has non-flammable properties.
- Ecological properties. For interior work, this point is especially important. To eliminate the negative impact of insulation on human health, it is necessary to carefully study its composition.
- Density. The weight of the building material depends precisely on the density indicator.
- Degree of moisture absorption. The lower the indicator, the less the insulation can absorb water into itself.
- Vapor permeability. The characteristic indicates how much steam and air a particular material allows through. It is worth noting that a low indicator will interfere with the penetration of air into the apartment.
Expanded polystyrene is superior in its properties to standard polystyrene foam.
How to insulate a wall in an apartment from the inside if it is cold? Right! First, decide on the appropriate material. You should consider the most popular options, the quality of which corresponds to the desired result.
Extruded polystyrene foam is one of the most acceptable insulation options suitable for interior walls of housing.
Its peculiarity is its increased density, clear shape and rigidity. At the same time, the level of vapor permeability is practically zero, and the thermal conductivity coefficient is low. It is impossible not to mention the affordable price of the material.
An alternative is penoplex, which has also shown good results in insulation inside residential buildings.
Mineral wool is capable of transmitting steam well. Because of this property, the dew point shifts from the wall to the insulation itself. Over time, moisture and fungus accumulate in the material. After which it will be necessary to replace the insulation with a new one. This trouble can be avoided by following certain nuances.
What materials cannot be used for wall insulation
It is worth understanding that there are no bad or good materials for home insulation. There are those that are suitable in their characteristics to the existing conditions and those that do not meet these requirements.
The material must be safe
In the case of insulation inside, it should be noted that the material must be safe for health and not emit harmful substances at high temperatures in the apartment. Also, moisture should not accumulate and create condensation, which is also harmful to humans.
We must not forget about another important factor: if the work is done independently, it is ease of installation. You should not give preference to insulation, which is not so easy to install, because it is unlikely that you will be able to cope without a specialist.
Options for thermal insulation materials
The main advantages of modern materials are affordable cost, the possibility of independent and quick installation.
Frequently used insulation materials are presented in the table.
| Material | Important points | Advantages | Flaws |
| Mineral wool | The insulation density should be from 35 kg per m² | Low cost, non-flammable, light, environmentally friendly | Dustiness, the need to install a vapor barrier indoors |
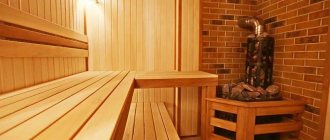
| Expanded polystyrene | PPS is not suitable for insulating baths and saunas, because it is toxic when heated | Availability, high thermal insulation properties and vapor permeability, ease of operation | Flammability, release of harmful substances |
| Warm plaster | Forms a thin layer that is final and suitable for fine finishing | The most effective method, and the material does not “eat up” space | Working with the solution requires skills and tools |
Foam is also used for insulation, but it has more disadvantages. It is easy to use and has a low price, requiring preparation. The sheets must be primed and dried before installation. Polystyrene foam is not the final stage in the repair.
Penofol is a multilayer but thin material (3-10 mm) made of construction foil. It is often chosen for insulation of country brick houses.
The advantage of penofol is the minimal loss of internal space. Foil 4 mm thick has the same properties as 8 cm mineral wool.
Sprayed polyurethane foam completely eliminates the accumulation of water inside the wall. Self-installation is not always possible, and the cost of services for applying the liquid mixture is high.
Sotoplast is an inexpensive and fast option, but its insulating properties are weak. The material consists of 2 sheets of plastic, between which there is paper honeycomb. These partitions are not always enough to keep the house warm.
Arbolite has poor thermal insulation ability. It is made from sawdust, straw, reeds and even paper. Suitable for temporary construction only.
General points of the technological process of arranging insulation from inside the room
General points include not only the choice of insulation and preparation of walls, but also the mandatory availability of construction tools, without which it will not be possible to complete the process quickly and efficiently.
Before you begin, it would be a good idea to study the features of the material and the installation process itself. Today, enough information has been collected on the Internet to make your own thermal insulation layer.
Of course, the hand of a non-professional worker will be traced, however, the main thing is the result and the creation of comfortable conditions inside the room. If you have doubts about your abilities, you can contact a private construction company.
The corner installation of sheathing and insulation has some features. It is worth paying attention to this issue so that there are no uneven joints and, especially, holes. Otherwise, you will soon have to redo all the repairs.
Treating the wall and neutralizing the fungus before starting work is a must
Tools and materials
When working with mineral wool, plaster, sprayed polyurethane foam, etc., you must wear a protective suit, respirator, goggles and gloves.
Installation is carried out using the following tools:
- Minvata. Screwdriver or drill, metal scissors, tape measure and level, self-tapping screws. For vapor barrier, glue or acrylic adhesive tape is used.
- Expanded polystyrene. Adhesive for polystyrene foam, construction foam, reinforcing mesh.
- Styrofoam. Hammer, tape measure and pencil, hammer, knife, spatulas. Glue, fiberglass, polyurethane foam for filling joints.
- Penofol. Hammer drill, level and tape measure, construction stapler, self-tapping screws. To create the sheathing, you need to prepare bars and a jigsaw.
- Sprayed polyurethane foam. Expensive equipment is required to work with the solution. The sheathing is constructed using the same jigsaw, self-tapping screws, tape measure, etc.
For the preparatory stage, you may need a roller, brushes, and primer. Always have a level and a utility knife at hand.
Preparation for installation of insulation
Before insulation, it is necessary to carry out preparatory measures, as in any other construction process. First of all, all defects and weak points are eliminated. After which the wall is thoroughly treated with antiseptic agents.
Having assessed the condition of the wall that will be insulated, it is worth sealing the cracks and removing bad plaster. If this is not done at this stage, over time the condition of the wall will worsen significantly and lead to destruction.
If mold was identified on the wall during the preparation stage, it is worth eliminating it immediately and effectively. You cannot begin the insulation process without solving the existing problem.
Once the wall is in proper condition, it’s time to start installing the sheathing.
- The distance between the beams must correspond to the dimensions of the insulation boards.
- When choosing beams, you should give preference to dry wood, without knots and cracks.
- Anchors are installed between them, which will hold the correct direction of the material.
Problems and solutions
Improper work will lead to the accumulation of condensation and fungus. When choosing an insulating material, it is advisable to use one with less vapor permeability than brick. Glue it onto a thin layer of mortar using a notched trowel.
The insulation is covered with an overlapping film, gluing the joints. Inside the house, brick walls are usually sheathed with moisture-resistant plasterboard, and then proceed to the final finishing. Additional ventilation will reduce indoor humidity.
Stages of insulation of internal walls
Before starting various construction work, it is necessary to clearly understand the upcoming stages and purposefully adhere to them.
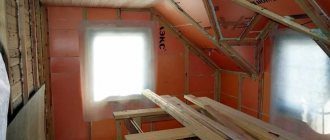
The installation of the sheathing should be approached with all responsibility, since the correct installation of thermal insulation will depend on this
The thermal insulation plan looks like this:
- Choosing suitable insulation for apartment conditions.
- Cleaning interior walls from plaster, wallpaper, etc.
- Preparing the wall, eliminating cracks and irregularities.
- Antiseptic treatment of the structure, priming.
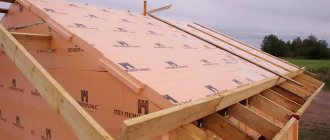
- Installation of sheathing.
- Installation of insulation.
- Installation of vapor barrier (film coated with foil).
- The sheathing over the insulation is usually drywall.
- Finishing work on top of the insulation (painting, wallpapering, etc.).
The vapor barrier is attached on top of the insulation and does not allow it to absorb excess moisture
Preparatory work
Preparing a brick wall before installing insulation depends on its type. Before laying extruded polystyrene foam, it is necessary to treat the surface with an anti-fungal primer.
Installation of polystyrene foam requires the creation of a sheathing made of timber of the same thickness as the insulation. Liquid polyurethane foam is applied to walls that have been cleared of dust and treated with a primer.
Installation of sheathing.
The real state of affairs
The reality is that not in all cases it is possible to carry out work according to the textbook. In some cases, it is impossible to insulate a house from the outside:
- The building is an architectural monument. The facade must be left untouched. The upper floors of a brick house in the absence of the ability to work at high altitudes. The distance between the houses is too small, which does not allow work to insulate them from the outside.
Let's consider actions in a situation where insulation from the outside of the building is impossible. How to insulate the walls of a brick house from the inside with your own hands?
The main problem that residents of the house will face is condensation in undesirable places with all that it entails. To protect yourself from this trouble, you need to hermetically insulate the walls with insulation from the rest of the room.
There are two ways to do this task yourself:
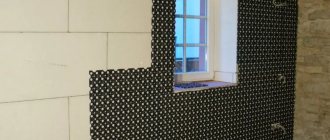
When choosing insulation, you should give preference to a material with very low permeability to water vapor. Common options include penofol and extruded polystyrene foam. The side with the foam foil and the compacted surface of the polystyrene foam should face the inside of the room.
Only in this way will it be possible to avoid the absorption of steam by the insulation. If mineral or basalt insulation is used, then they can be protected with the help of a vapor barrier. However, sealing should be carried out with special care: no possibility of steam contact with the insulation or wall should be left. The film is attached with an overlap, and the seam is taped.
DIY thermal insulation process
When planning to insulate your home with your own hands, you must strictly adhere to the rules of technology. To prevent such negative consequences as the formation of fungi, mold and destruction of brickwork, before installing insulation, the wall surface is plastered and special antifungal and antibacterial agents are applied to the walls. In addition, a brick house must have ventilation.
Methods for installing thermal insulation depend on the properties of the material used.
When planning to insulate your home with your own hands, you must strictly adhere to the rules of technology.
When is it not possible to insulate the outside?
Ideally, place a layer of insulation on the outside of the building along its facade. But owners do not always manage to implement this option. There may be several reasons for this:
- the facade of the house is prohibited from changing due to its historical value (the situation is typical for old brick apartment buildings); insulation work must be carried out at a high altitude, and the owners do not have the opportunity to turn to professional builders; the distance between neighboring houses is too small to allow work with external walls.
In all of the above cases, you will have to resort to internal insulation. The main task in such a situation is to avoid the harmful effects of condensation on the insulation.
There are two common ways to solve this:
- When using mineral (basalt) wool, the vapor barrier film is overlapped, and all seams are carefully taped. When using materials with very low permeability, you can dispense with the vapor barrier film, since the insulation does not get wet. As such a material, you can choose polystyrene foam or penofol with a foil layer.
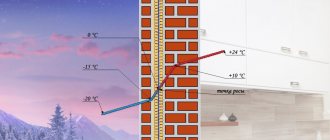
Dew point
According to professional builders, it is better to do insulation from the outside. Only in exceptional situations can thermal insulation be installed indoors. The main reason for such caution is the position of the dew point with improper insulation.
Note: red brick is more resistant to moisture than silicate brick. Houses made of white brick will have to be protected from getting wet with a vengeance: protected from precipitation outside and condensation accumulation inside.
Dew point position
Dew point position
If you consider different insulation options, you will notice the following patterns:
- When placing a heat-insulating layer on the outside, the entire wall remains protected from precipitation and freezing in winter. Steam leaves the room without any problems without moistening the load-bearing structures. When insulation is placed inside, the dew point shifts towards the inner surface of the walls or into the thickness of the structure. As a result, the house becomes damp, mold forms and the supporting structures of the building slowly collapse.
As for houses without insulation, the dew point in them is guaranteed to fall into the thickness of the walls, leading to rapid wear of the brickwork.