House with insulated masonry
Brick is the most common material for constructing load-bearing walls. It is successfully used both in multi-storey industrial construction and in private low-rise buildings. The only drawback of brick is its low thermal insulation qualities. To solve this problem, additional insulation of the walls is carried out. Brickwork with insulation inside makes it possible to build a warm house with minimal investment of time and money.
When are multi-layer walls needed?
Traditional single-layer walls came under great attention from heating specialists around the world with the beginning of the energy crisis in the 70s of the twentieth century. In the USSR, and then in the CIS, this process shifted by 10–15 years. But the most serious shifts in this direction took place in the 2000s. In Russia, standards for thermal efficiency of buildings have become more stringent.
Traditional single-layer walls came under great attention from heating specialists around the world with the beginning of the energy crisis in the 70s of the twentieth century. In the USSR, and then in the CIS, this process shifted by 10–15 years. But the most serious shifts in this direction took place in the 2000s. In Russia, standards for thermal efficiency of buildings have become more stringent.
According to the new standards, to achieve the required thermal insulation characteristics, a single-layer wall must be of the following thickness:
- from ceramic brick (thermal conductivity coefficient - 0.8 W/(m °C)) - from 1.1 to 4.5 m;
- from silicate (0.87) - from 1.2 to 4.8 m;
- from ceramic hollow (0.5) - from 0.7 to 2.9 m;
- foam blocks, with a density of 800 kg/cu.m. m. (0.37) – from 0.5 to 2 m, with a density of 400 (0.15) – from 0.2 to 0.8 m;
- expanded clay 1,800 (0.9) – from 1.25 to 5 m;
- the same at a density of 500 (0.23) - from 0.3 to 1.2 m;
- reinforced concrete (1.8 - 2.1) - from 2.2 to 11.5 m.
It turns out that only from foam concrete with a density of less than 500 kg / cubic meter. m. you can get a “digestible” wall thickness.
If the thermal engineering calculation of the wall shows that a wall made of aerated concrete should be more than 0.4 m, and for hollow ceramics with micropores - more than 0.45 m, then it is cheaper to build houses with two-layer walls.
In addition, single-layer walls have the following disadvantages:
- high humidity of the material, i.e. the thermal resistance of the wall is lower than the design value, and the house is colder;
- irrational consumption of materials, because the thickness of the wall is much greater than that required for its strength.
Therefore, to meet the thermal technical requirements of the walls, you need to use two, three or more layers, one of which will give the wall strength, the second will protect the house from the cold, the third will ensure quick drying of the wall after construction, the fourth will protect from bad weather, UV radiation, or simply make the wall beautiful.
Multi-layer walls are not needed:
- in areas with a mild climate and not frosty winters;
- when materials make it possible to build a heat-saving wall of the required strength and acceptable thickness.
In this case, the following can be used:
- poromaterials: porobrick, aerated concrete, gas silicate, expanded clay blocks, foam blocks, etc.;
- hollow: hollow brick, ceramic, sand concrete, slag concrete and expanded clay hollow blocks, etc.;
- large-format blocks: a) concrete foam blocks; b) composite blocks: wood concrete, sawdust concrete, polystyrene foam concrete, etc.
The thickness of the insulation is selected in two stages:
- They are chosen based on the need to provide the required resistance to heat transfer of the outer wall.
- Then they check for the absence of steam condensation in the thickness of the wall. If the test shows the opposite, then you have to increase the thickness of the insulation.
The thicker the insulation, the lower the risk of steam condensation and moisture accumulation in the wall material. But this leads to increased construction costs.
A particularly large difference in the thickness of the insulation, selected according to the two above conditions, occurs when insulating walls with high vapor permeability and low thermal conductivity. The thickness of the insulation to ensure energy saving is relatively small for such walls, and to avoid condensation, the thickness of the slabs must be unreasonably large.
| Rice. 6. Insulation of the walls of a private house with foam boards, expanded polystyrene - EPPS, XPS. If the load-bearing part of the wall is made of aerated concrete or gas silicate blocks, then the inner surface of the wall should be protected with a layer of vapor barrier. |
When insulating aerated concrete walls (as well as other materials with low resistance to vapor permeation and high resistance to heat transfer - for example, wood, large-porous expanded clay concrete), the thickness of the polymer thermal insulation according to the calculation of moisture accumulation is much greater than necessary
according to energy saving standards.
To reduce the entry of steam, it is recommended to install a layer of vapor barrier on the inner surface of the wall
(from the warm room side),
Fig.
6. To install a vapor barrier from the inside, materials with high resistance to vapor permeation are selected for finishing - a deep penetration primer in several layers, cement plaster, and vinyl wallpaper are applied to the wall.
The installation of a vapor barrier from the inside is mandatory for walls made of aerated concrete and gas silicate for any type of insulation and façade cladding.
It should be borne in mind that the masonry of the walls of a new house always contains a large amount of construction moisture. Therefore, it is better to allow the walls of the house to dry thoroughly from the outside. It is recommended to carry out façade insulation work after the interior finishing is completed, and not earlier than a year after the completion of this work.
Advantages and disadvantages of multi-layer walls
In double-layer walls, the thermal insulation layer is usually installed on the cold side, on the outside.
Most often, according to the recommendations of the Ministry of Construction, new brick walls should be three-layer.
In three-layer structures, a layer of thermal insulation is installed between two layers of load-bearing material of equal thickness. That is, the wall is divided in half and a layer of thermal insulation is placed between the halves. The halves of the walls are “tied” together repeating in 5–8 rows:
- one or two rows of solid brickwork;
- galvanized steel reinforcement ties or meshes;
- continuous reinforced concrete belts – vertical and horizontal.
But more often the outer layer is made of 0.5 bricks from a special facing brick.
There are also other methods, but they are used less frequently.
Advantages of multilayer walls:
- the wall is lighter, because strength is provided by a relatively small amount of material, and thermal insulation, by definition, weighs little;
- highly efficient insulation provides thermal parameters with a reserve, and the facing (outer layer) provides appearance;
- fire resistance;
- simple materials;
- You can build all year round and in winter too, etc.
Disadvantages of multi-layer walls:
- heterogeneity of the average density of the wall material (cold bridges from connections, concrete diaphragms, etc.), which gives different thermal efficiency of the wall in different places;
- highly qualified performers are required;
- ceilings facing the outer surface of the wall provide up to 20% heat loss;*
- load from temperature changes - the concrete of the floors is always warm, and the facing masonry is in the freezing/thawing zone; **
- minor repairs are almost impossible;
- accidental unintentional damage to thin layers is possible;
- the volume of hidden work is large and defects are possible: incorrect or incomplete installation of insulation, incorrect installation of vapor barrier, and many others. etc;
- high labor intensity;
- the cost of a house is more than with two-layer walls, and even more so with single-layer ones.
* When interfloor floor slabs on any type of wall face the outer wall, their steel reinforcement conducts heat much better than dense concrete, although concrete also has high thermal conductivity. Internal voids with a diameter of 130 to 250 mm, filled with air, also participate in this process.
To reduce heat losses:
- the ends of the slabs are covered with standard (design) thermal insulation and external cladding;
- the cavities of the slabs are filled with thermal insulation or foam-aerated concrete liners (at least 0.5 - 1 m). Precast concrete factories can do this on request during the production of slabs.
** When temperature changes occur, the floor concrete, protected from them by thermal insulation, has slight changes in size, while the entire facing masonry is under the influence of these changes. In the zone of their contact, crumbling of materials and gradual destruction are possible.
Required tools and materials
Tools for construction
Before you start laying brick walls with insulation, you need to prepare a drawing that indicates the relative position of the elements, the main dimensions and distances. You also need to stock up on enough insulation. You can use the table of thermal conductivities of basic materials. The higher the value of this parameter, the thicker the insulation layer should be.
You will also need the following tools to carry out the work:
- reinforcing mesh;
- container for mixture;
- waterproofing from rolled bitumen materials;
- construction anchor bolts;
- level;
- putty tool;
- trowel;
- plumb line
It is necessary to stock up on bricks for the construction of the wall structures themselves. With three-layer masonry, the façade part is made of special facing grades.
Choice of insulation
A wide range of insulation materials that meet the recommendations of SNiP can be used as a heat-insulating material.
Firstly, the thermal conductivity of the material must be such as to ensure protection of interior spaces at the maximum minus values typical for a given region.
You can familiarize yourself with the thermal insulation properties of insulation in the manufacturer’s instructions on its packaging or in the technical specifications tables of SNiP. By comparing these indicators with winter minimum temperatures, you can calculate the required thickness of the insulation layer.
Secondly, the insulation must have sufficient vapor permeability. Otherwise, moisture will accumulate inside it, which will lead to its loss of thermal insulation qualities.
And thirdly, the internal insulation must be fire resistant. Due to its non-flammability, it will not only not support combustion, but will also create a fire-retardant layer inside the masonry.
Mineral wool
Mineral board
A large family of insulation materials based on mineral fibers have excellent heat-saving characteristics. They are made by churning molten minerals in a centrifuge: glass, basalt, slag, etc. The low level of heat transfer in this case is achieved due to the high porosity of the material - air layers do not allow cold to penetrate through the mineral wool.
Mineral insulation is absolutely not flammable, but is very susceptible to dampness. When wet, it almost completely loses its heat-saving properties, so when laying it, care must be taken to ensure effective waterproofing.
Main characteristics of materials for thermal insulation
A very important task when insulating a brick house is choosing a reliable and durable material for treating the outer part of the walls. It must have certain characteristics that must withstand precipitation, high humidity, wind and frost, as well as heat.
Therefore, it is important to consider the following characteristics when choosing:
Water absorption. It is better to give preference to materials with a low water absorption coefficient. Thermal conductivity. This is the main criterion when choosing insulation. The amount of heated air in the house that is lost in one hour per square meter of material with a thickness of one meter depends on it. It is this indicator that you should rely on when choosing the thickness of the insulation layer. The most suitable materials for this would be polystyrene foam and mineral wool. Flammability. This characteristic determines the danger of the material in case of fire. Thus, products can be divided into 4 classes according to this characteristic, and it is better to give preference to G1, which can go out without an open flame
For example, polystyrene foam boards have a high ignition rate, and if they are used for cladding a house, you should choose the C marking, which means self-extinguishing. Pay attention to the density, which determines the amount of additional weight on the structure. The lower the indicator, the lighter the material will be. Sound insulation level
Allows you to reduce noise penetrating into the building. Almost all materials for thermal insulation have this characteristic. Environmental friendliness. For exterior wall decoration, this criterion is not particularly important, since it determines the level of health safety of the material. However, it is still better to use natural rather than synthetic materials. Difficult to install. In the case of finishing it yourself, without the help of specialists, it is better to give preference to a simple and understandable technology for laying heat-insulating material.
Thus, the choice of material is a decisive factor, depending on which the final result will depend, as well as the service life.
Requirements for insulation for interior work
When choosing a heat-insulating material, you need to take into account not only its heat-saving ability. The following qualities are important:
- ease of installation;
- environmental cleanliness;
- non-flammability;
- no harmful emissions when the temperature rises.
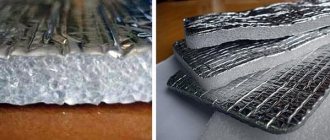
With a small area of the insulated room, slab material 50 mm thick plus a ventilation gap will lead to a smaller room. In this case, it is permissible to use penofol, which combines the functions of insulation and vapor barrier.
Important! the foil surface of penofol works to reflect thermal radiation only if there is a gap between the insulation and the finish.
How to insulate a brick house from the outside?
When installing inter-wall thermal insulation, it is necessary to have a ventilation gap between the insulation and the brickwork.
If we are talking about insulation from the outside, then it can be done in three ways. You can make “wet” insulation, insulation between walls, or make a ventilated façade.
If “wet” insulation is chosen, then the walls of the room must be covered with plaster, which is made of cement and lime. Then the brick wall surface is covered with a primer and adhesive, on which the heat insulator is installed, then the heat insulator is further strengthened with dowels. Then you need to start reinforcing, which consists of applying another layer of adhesive solution and then installing a special mesh. An initial layer of plaster should be laid on such a surface. Upon completion of the work, all this needs to be given a decorative look, this is done by means of plaster, but of a different type.
If we are talking about small brick buildings, then you can choose inter-wall thermal insulation, and the configuration of the wall structure should not be complicated. The outer wall is the external enclosing structure, and the inner wall must be plastered. In this case, mineral wool is best suited as a thermal insulation material. With this procedure, it is necessary to provide a ventilation gap and make additional brickwork approximately 12 cm wide. The outer and inner walls must be connected with embedded anchors.
When choosing a ventilated facade, the layers of the “cake” should be arranged as follows: plaster of the internal part, external surface of the wall, vapor insulation, insulation, building membrane, wooden frame, ventilation gap, external cladding. If everything is done correctly, the house will be warm and cozy.
Technology of insulation and wall cladding
In order to insulate the walls outside a building, it is not at all necessary to be a professional builder, the main thing is to strictly follow the recommendations.
Preparation of tools and materials
The choice of materials for home insulation is dictated by the local climate. Having decided on the insulation, you can choose tools - it could be a square, a building level, a trowel, a toothed trowel, etc.
Preparing the wall
Before starting work, it is necessary to prepare the facade for installation. To do this, the masonry is cleaned of dust and dirt, it is also necessary to seal the cracks and, if necessary, level the surface of the masonry. After this, we treat the facade with a primer.
Pre-cleaning of the facade
It is necessary to take care of the leveling of the walls because after installing the insulation, the resulting voids in place of the cracks can become a place for deformation of the insulation - a small mechanical impact is enough for this. Also, it will not be possible to tightly glue the insulation onto the pits and tubercles.
Wall insulation
The technology of three-layer masonry with insulation and facing bricks contains the following steps:
- We lay out the inner wall - there is nothing complicated about it, since the masonry technology is the same as the masonry of any load-bearing wall. For it, either aerated concrete blocks or solid brick are selected. The thickness to the straight line depends on the minimum winter temperatures in the area and can be either 1 or 1.5 bricks.
- The next stage is laying out the outer wall with cladding. It is performed in such a way that a gap is formed between the walls - heat-insulating material is inserted into it. If granules are used, wells are formed for them. For strength, the walls are connected to each other with connections made of reinforcement and die-cuts. Alternatively, you can make a brick dressing at certain intervals.
- Waterproofing is an important step that will protect the insulation from moisture, which inevitably penetrates the brick layer. A thick film or roofing felt can be used as an insulator against moisture.
- Backfill thermal insulation material is poured into a niche as soon as the height of the wall reaches 1 m. If roll or sheet facing insulation is used, it is attached to the inner wall - for this, “mushrooms” with a large-diameter plastic cap are used. Having secured the insulation, we cover it with external facing masonry.
- For normal gas exchange, it is necessary to leave ventilation vents every 0.5-1 m - this is the name for the vertical seams between bricks, which are deliberately not filled with mortar.
As practice shows, three-layer masonry allows you to achieve several results at once and significantly improves the operation of the building in winter.
You can do it yourself, but it is better to turn to professionals, since errors in the technical process will negate all the advantages of this option for facade insulation.
Well masonry
Well masonry scheme
Wall insulation is often used for lightweight bricklaying. This reduces the main load on the building. In addition, this method allows you to save materials, increase the percentage of sound insulation and thermal insulation. Insulation in this case is of two types. In the first case, two brick walls are erected, and the voids between them are filled with an even layer of insulation. In the second case, only one wall is made, and then insulation is attached to it. Currently, well masonry is most often used. It is carried out as follows: first, an internal load-bearing wall is erected using ordinary bricks, after which an external wall half a brick thick is built.
The next step is to install dressings in several rows. You can use metal rods for this. Another type of masonry can be used, in which the voids are filled with slag or concrete. The walls are built half a brick thick. In this case, the slag must rest for some time (six months).
Brick insulation options
The insulation of a brick house is attached in two versions: on the outside and on the inside. Although it is worth noting that internal insulation is less effective than external insulation and is used less frequently. But there are options when only this will do. If your exterior decoration is made of facing material, this can also include clinker tiles, then internal insulation is mainly chosen.
Attention: For any insulation, the brick must be properly waterproofed. Otherwise, all the work will be done in vain and you will not achieve the desired result.
Let's look at when each type is used:
External insulation
This option solves the main problem, which is saving heat to the fullest. In this case, you avoid the appearance of dampness in the room and the formation of fungus. When choosing this option, all work consists of the following steps:
- Application of adhesive material;
- Application of thermal insulation;
- Application of a reinforcing layer;
- Application of facing material.
Now let's look at what we achieve by using it:
Positive aspects Negative aspects
|
|
Internal insulation
Insulation for brick walls in this option is most often installed. This especially applies to multi-storey buildings. In this case, the work will be much cheaper. But there are also negative sides.
Thermal insulation protection
Some insulation materials require protection from getting wet, blowing or, for example, direct sunlight. Some of these tasks may be assigned to the finishing layer, but the main protection is provided by special membrane materials.
One of the most commonly used insulation materials in Canadian frames, stone wool, has the ability to sharply reduce the resistance to heat transfer when wet. The source of moisture can be precipitation or condensation of water vapor. In the first case, special synthetic burlap is used that allows air and water vapor to pass through, but retains water droplets.
The penetration of steam from the inside cannot be completely limited, because the building must carry out natural gas exchange with the environment. However, it is possible to limit the amount of water vapor to such a level that it is not enough to raise the relative humidity in the cooled indoor air to 85–90%. Typically, such a calculation is carried out for the point of separation of the rows of a frame or supporting system with external insulation. However, the same method can also be used to calculate layer-by-layer the dew point displacement throughout the year inside homogeneous walls.
Products
In the case of a system with an air gap 2-5 cm wide, for its ventilation, vents (holes) are installed in the lower and upper parts of the wall, through which vaporous moisture is removed outside. The size of such holes is taken at the rate of 75 cm2 per 20 m2 of wall surface.
The upper ventilation ducts are located at the eaves, the lower ones at the plinths. In this case, the lower holes are intended not only for ventilation, but also for water drainage.
- Air gap 2 cm
- Bottom of the building
- Top of the building
To carry out ventilation of the layer, a slotted brick is installed in the lower part of the walls, laid on its edge, or in the lower part of the walls, bricks are laid not close to each other, but not at some distance from each other, and the resulting gap is not filled with masonry mortar.
Insulation of a building with polystyrene foam using the “wet facade” method
Sheets of expanded polystyrene or its extruded version are attached to the insulated plane using the “wet” facade method, which bears this name because of the need for drying.
First, prepare the base, ridding it of dirt and surface imperfections. Then priming is done. In the basement area, a starting metal profile is attached, which keeps the insulation from moving and removes excess moisture. The glue is applied to the insulation boards pointwise, after which they are pressed tightly against the wall surface. Additional fastening is done with dowels in each of the corners and in the center of the slab
The work is carried out from the bottom corner; for greater stability of the structure, it is important to ensure the offset of subsequent rows. A plastic reinforcing mesh is laid on top of the installed insulation, and then a base plaster layer of small thickness
After drying the plaster layer, it is primed and finished with decorative finishing.
Making connections
The inner and outer parts of a three-layer brick wall are connected to each other by special embedded parts - ties. They are made of fiberglass, basalt plastic or steel reinforcement with a diameter of 4.5–6 mm. It is preferable to use connections made of fiberglass or basalt plastic due to the greater thermal conductivity of steel connections.
These connections also perform the function of fastening the insulation boards (the insulation is simply pinned onto them). They are installed during laying into a load-bearing wall to a depth of 6-9 cm in increments of 60 cm horizontally and 50 cm vertically at an average rate of 4 pins per 1 m2.
To ensure a uniform ventilated gap over the entire area of the insulation, locking washers are attached to the rods.
Often, instead of special connections, bent reinforcing bars are used. In addition to ties, the outer and inner walls of the masonry can be connected with steel reinforcing mesh laid at 60 cm vertical intervals. In this case, additional mechanical fastening of the plates is used to create an air gap.
The insulation boards are installed with the seams bandaged close to each other so that there are no cracks or gaps between the individual boards. At the corners of the building, gearing of the slabs is created to avoid the formation of cold bridges.
Mistakes to Avoid
Unscrupulous builders can take advantage of the fact that the owner does not understand anything about construction, so they violate masonry technology. This leads to cracks appearing on the walls, the finishing falls off, and mold and mildew form inside the insulation, spreading to the inner and outer walls. An inexperienced owner who does everything with his own hands can make the same mistakes.
Here are some of them:
- The elements are laid crookedly, unevenly, with a large deviation in the seams, with a small amount of mortar, not level, or in places where the roof goes obliquely - instead of trimming the bricks, simply lay the bricks along an inclined line.
- Laying out the basement or corners with hollow bricks. As a result, moisture will instantly enter the building through the holes. Plus, such a brick simply will not withstand the load and will crumble in the near future, and with it the house.
- Using low-quality bricks. A material that contains a lot of lime will lose some of itself over time, i.e. pieces of brick will fly off from it in wet weather, and water will begin to get into the voids.
- Lack of clearance for ventilation, as a result of which condensation accumulates in the wall, the walls freeze and become damp.
- Poor filling of seams. Using a mortar that is too thin or too thick will prevent the brick from being securely fixed in place. Because of this, the strength of the wall decreases. And if the mason turned out to be dirty, the terribly sealed seams will ruin the entire appearance of the wall and it will have to be plastered (even if this was not planned).
Masonry technology with insulation
- Laying the facing layer up to the tie level
- Installation of the heat-insulating layer so that its top is 5-10 cm higher than the facing layer
- Laying the load-bearing layer to the next level of connections
- Installing connections by piercing them through the insulation
if the horizontal seams of the load-bearing and facing layers of the wall in which the ties are placed do not coincide by more than 2 cm in the load-bearing layer of the brickwork, the ties are placed in a vertical seam
- Laying one row of bricks in the load-bearing part of the wall and the facing layer
Stage 2. Laying ceramic (cladding) bricks
There is a lot of information on the Internet about how to lay bricks, so I don’t think it’s worth writing about the basic principles. But there is not so much about the features of laying ceramic bricks, because... High-quality insulation of a house with brick requires special attention.
Work will begin by laying out the corners. Facing brick masonry should only be laid on waterproofing. To do this, use roofing material or thick polyethylene film. In our case, the waterproofing was built into the foundation itself, so we started laying the masonry directly on the foundation. Having retreated 4-5 centimeters from the main wall, we will carry out the masonry. We retreat these 4-5 cm for an air gap, I will explain why later. You need to lay ceramics in the same way as ordinary bricks, but only under a metal rod with a cross-section of 8 by 8 or 10 by 10, 12 by 12 millimeters.
And this is how it is done: a metal rod is placed directly on the masonry itself along the front edge of the brick, and a solution is applied near it. In such a way that the thickness of the applied solution near the twig itself is no higher than the twig itself. And on the back side the solution was ten millimeters higher. This effect can be easily achieved if you use a construction trowel to cut the mortar along the twig and hold the trowel at an angle.
The vertical seam is applied in the same way, only the rod is placed vertically to the end side of the brick (poke). The twig itself will not stand, so you will have to hold it while applying the solution.
Laying facing bricks is a painstaking process that requires care. Therefore, be patient.
Seal the cracks and prepare the sheathing
If the wall is severely damaged, it is repaired. Before insulating a brick house from the outside, it is important to inspect the walls. If cracks are found, it is important to seal them so that cold bridges do not form. This is done with stone sealant, cement or other natural materials.
When the option with a ventilated facade has been chosen for insulation, the sheathing should be prepared. It is attached to the wall at a distance of the width of the insulation so that the slabs can be laid evenly in the created space. Using a building level and a plumb line, the sheathing is aligned around the perimeter.
Preparatory activities
Before installing insulation between the block and the brick, preparation must be carried out. After purchasing and calculating the material, it is important to collect the following tools and consumables:
- brick;
- masonry mixture;
- mesh for reinforcement;
- material for thermal insulation (concrete, crushed stone);
- insulation (foam plastic, penoplex);
- plaster for brick cladding;
- trowel;
- putty knife;
- plumb line;
- building level;
- solution container;
- anchor.
Main stages of installation
Do-it-yourself insulation of a private brick house from the inside begins with installing sheathing to match the size of the slab material. When insulating EPS or EPS, you can use wooden blocks or guides for drywall, installing them at a distance corresponding to the width of the insulation boards. For mineral wool, the distance between the sheathing elements is calculated by subtracting 1-2 cm from the width of the material for a more dense installation of the insulation. If PPS or EPS is chosen as thermal insulation, after installing them it is necessary to foam the cracks, if any. After installing the expanded polystyrene, you need to secure a layer of vapor barrier along the sheathing, gluing the seams with special tape.
Important! Ordinary tape, even double-sided tape, is not a substitute for vapor barrier tape .
When working with extruded polystyrene foam, a vapor barrier is not required. Mineral wool insulation also requires a layer of vapor barrier. The final finishing can be lining or imitation timber. Before installing the wooden planks, it is necessary to secure the counter-lattice for the ventilation gap. When finishing with plasterboard, a ventilation gap is not required.
Note! Penofol can be used as a vapor barrier.
1.1Types of insulation, their differences
The modern construction industry offers a huge number of insulation materials to choose from, which can be used as you please. You can single out a few of the most important ones, but the decision itself will have to be made by you.
Only after assessing the specific situation and your capabilities can you really understand which one is best suited in each case. We will help you better understand the main nuances of using insulation, their properties and details.
For external insulation the following are most often used:
Polystyrene foam is the most common and popular material that is used for insulating facades almost everywhere. Some people say that you still won’t find anything better than polystyrene foam, but this is not true.
An example of installing mineral wool during wall construction
Of course, polystyrene foam has a lot of advantages. It is convenient, lightweight, perfectly protects the house from heat loss, and is quickly installed.
And its price is quite low. With such high-quality characteristics, polystyrene foam is cheaper than any other insulation. Isn't this an indicator of quality?
But polystyrene foam also has its disadvantages. For example, low strength and susceptibility to combustion.
The low strength of foam plays a disservice to it. But for wall insulation this indicator is not so critical. But the flammability of the slabs is already a big problem.
Remember that you are installing exterior walls. In the event of a fire, it is the façade that is the first to spread the fire across the floors. If the façade is on fire and there are no firefighters nearby, consider the house lost.
Penoplex is a type of polystyrene foam.
Essentially, it is improved polystyrene foam that has gone through an extrusion process. Penoplex has better characteristics, resists loads better and insulates the surface much better. But it costs more.
Also, Penoplex is not free from the disease of foam plastic - flammability.
Although Penoplex is still a little more practical in this regard, because it does not burn, but melts. Which is already a big plus
But still, Penoplex must be used carefully and with the correct preparation device
Mineral wool especially does not need any introduction - these are slabs or rolls of basalt fibers that have excellent thermal insulation characteristics and can be installed with your own hands.
Mineral wool is more expensive than polystyrene foam, but it retains heat better, is completely environmentally friendly and allows the walls to breathe. In addition, mineral wool is a non-flammable material.
Its main drawback, as in the case of insulating a wooden house, is swelling during prolonged contact with water. And although most manufacturers have already learned to solve this problem, we still do not recommend using mineral wool in a bathhouse or other places with high humidity.
A little has already been said about penoizol above. After hardening, penoizol is very similar to polystyrene foam, but it also has differences. It does not burn in fire and, moreover, extinguishes it due to the expansion of its molecules.
Another thing is that penoizol can only be filled with professional equipment and it costs a fair amount.
Layout of mineral wool slabs to avoid the appearance of cold bridges
What is written in SNIP about this
The regulatory document regulating the construction of the reinforcing layer, namely SNiP 3.03.01-87 “Load-bearing and enclosing structures”, has the following points:
- When reinforcing masonry of external walls and columns, the thickness of the seam should be no more than 1.6 cm, and exceed the sum of the diameters of the reinforcement at the intersection by at least 4 mm. When laying transversely in walls and piers, the mesh must consist of at least two rods in width. And it should protrude beyond the outer edge of the wall by 2-3 mm.
- Partitions may not be reinforced if they are not secured with temporary fastenings, and have a height of 1.5 m and a thickness of 9 cm. With a thickness of 12 cm, the height should not exceed 1.8 m.
- With longitudinal steel reinforcement bars are connected by welding. If it is not used, then the rods end with hooks and are tied with wire. The rods overlap and each end should not be shorter than the sum of 20 diameters.
Calculations of the thickness, diameter and size of mesh cells are determined from the standards given in SNiP II-22-81 “Stone and reinforced masonry structures”.
Stage 3. Making a frame for a brick arch
In order to lay an arch out of brick, we first need to make a frame for it. We don't need beauty here. The main thing is strength and even bending. Take a USB sheet 10 mm thick and use a jigsaw to cut out two half-moon strips at least 6 centimeters wide. The length and curve of the crescents are individual for each window.
Next, these crescents need to be twisted together, as shown in the photo below. For this we use old bars, their thickness can be different, but the width is the same from 10 to 12 centimeters. And the length is equal to the height of our windows.
We insert the bars between the two crescents and twist them with screws 45 mm long, after which the frame is ready for use.
Types of reinforcement
Reinforcement on brickwork can have different locations:
- longitudinal;
- transverse;
- vertical.
Reinforcement mesh is purchased in a store or made independently at a construction site before laying.
Longitudinal reinforcement of brickwork
To strengthen the building under lateral loads and bending, longitudinal reinforcement is used. In this case, the mesh is installed quite rarely; mainly steel rods, corners, strips, and wire are installed. The reinforcement is placed in a longitudinal position when laying enclosing structures and partitions. Elements of the reinforcing layer can be located on the inside or outside of the wall.
What characteristics should a thermal insulation material have?
The following parameters are taken into account:
- Coefficient of thermal conductivity. As this parameter decreases, the energy-saving effect increases. For modern materials, the figure reaches 0.028 W/m*S.
- Vapor permeability. In a multilayer structure, this indicator should increase from the inside to the outside. Otherwise, moisture accumulates at the boundary between the layers, and the masonry quickly collapses. The vapor permeability coefficient of silicate and red brick is 0.11 mg/m*h*Pa, for hollow brick - 0.14-0.17.
- Moisture absorption. At a high rate, the material needs waterproofing. Otherwise, as a result of saturation with water, it will lose its working qualities.
- Weight. Heavy insulation significantly increases the load on the structure.
- Fire resistance.
- Environmental Safety.
Thermal insulation material must be vapor-tight.
A material with a higher index than brick is preferable. Such structures “breathe”, i.e. some of the moisture is displaced by partial pressure through them. The use of insulation with low vapor permeability will cause a chain of undesirable phenomena:
- The enclosing structures will have to be sheathed from the inside with a vapor barrier, otherwise water will accumulate in them.
- As a result, moisture will no longer escape through them, and to remove it it will be necessary to increase the ventilation performance.
- As a result, heat loss will increase, and with it heating costs.
Advice from professionals
Professionals know the secrets of their craft and are ready to share them with those who insulate the house themselves:
- When choosing insulation, its thickness and installation method, calculate the energy efficiency of the wall pie in accordance with the climate zone.
- When installing the sheathing, control the work with a building level. A leveled sheathing will make it easier to install the finishing touches.
- Use dry lumber.
- Having purchased compressed mineral wool, unpack it a day before installation.
- Follow the manufacturer's recommended vapor barrier overlap.
- Tape the foam joints with aluminum tape.
- Follow the material manufacturer's recommendations.
Internal insulation of the walls of a brick house using vapor barrier materials prevents the removal of moisture from the room. Take a carbon dioxide level measurement. Exceeding the standard indicates low efficiency of the ventilation system.
Main types of insulation and their brief description
Organic heat insulators on the market are represented by a wide range
They are based on materials of natural origin:
- Arbolite insulation is considered the newest material, which is based on sawdust, shavings, uncut straw and reeds. Also, the insulation is made of cement and organic additives. These are CaCl2, H2SO4, as well as the product obtained after processing ordinary clay, kaolin or nepheline, and Na2O.
- Foam-polyvinyl chloride insulation. It consists of polyvinyl chloride resin, which, after exposure to light or electromagnetic vibrations, acquires a characteristic foam structure. At the same time, it is considered a universal heat insulator.
- Chipboard insulation. Components - shavings, resin obtained as a result of controlled chemical processes, antiseptics, fire retardant.
- Insulation with a fiberboard base. It resembles chipboard in its own way. The base is wood waste, or trimmed corn and straw stalks. The material may well also consist of compressed old paper.
- Polyurethane foam is based on polyester, it includes H2O, an emulsifier and isocyanates. When catalysts begin to act, all elements interact as a result of a chemical reaction, in which a new type of insulation appears.
Minvata
This concept includes the following varieties:
glass wool, as well as stone wool;
slag wool
All these materials are characterized by corresponding fibers, which are based on glass, rocks, and slag.
Averages:
- thermal conductivity – 0.041-0.044 W/(mK);
- impermeability – 20-200 kg/m3.
IMPORTANT! Before deciding whether to insulate a brick facade with this material, you must take into account that it is prone to excessive moisture absorption. Therefore, it is additionally treated with special chemical materials.
Mineral wool
Styrofoam
An oversized material, which, due to its characteristics and affordable price, has become the most popular material for thermal insulation. In the construction market you can always find a copy whose average indicators are:
- thermal conductivity – 0.033-0.037 W/(mK);
- impermeability – 11-35 kg/m3.
Foam plastic is practically free from moisture, plus it is vapor-proof. In addition, the material is quite fragile, easily flammable, and during smoldering it releases many dangerous chemical elements. This material has many disadvantages, but it is ideal as an economical option.
Styrofoam
Extruded polystyrene foam
In terms of its characteristics, the material resembles the foam plastic described above, only there is one difference - exclusively the latest developments are used in its production.
Averages:
- thermal conductivity – 0.028-0.032 W/(mK);
- impermeability – 25-38 kg/m3.
It is often used for external insulation; it is quite strong and retains heat well. Naturally, its cost is several times higher than that of the two options discussed above.
Warm plaster
It is distinguished by sound insulation and vapor permeability.
Characteristics:
- thermal conductivity – 0.065 W/(mK);
- impermeability – 200-340 kg/m3.
This is an ideal insulation material for cladding the external wall of a brick house, but requires special conditions due to its characteristics:
- layer of plaster no more than 50 mm;
- the foundation must be further strengthened.
Plaster
Inorganic heat insulators
Mineral wool comes in two types: slag and stone. To produce the first, companies use slag. Stone wool is distinguished by: CaCO3, rocks that are used for paving streets, minerals containing calcium and magnesia, volcanic rocks and others.
Which three-layer wall design to choose
For regions with cold winters, in the case of using vapor-transparent insulation mineral wool or aerated concrete 100 kg/m3, the presence of a ventilation gap in the wall is mandatory to ensure its normal condition.
In this case, the ventilation gap remains open under the roof, and in the lower part of the wall for air supply, the vertical joints between the bricks are left unfilled; slotted bricks are used, so that the area of the holes is at least 75 cm2. for 20 square meters. masonry
Mineral wool with a density of up to 80 kg/sq.m. must be covered with a windproof superdiffusion membrane, which prevents air from blowing through its layer. The membrane and layers of wool are secured with 10 pcs disc-shaped dowels. per sq. m. into a load-bearing wall.
EPS, aerated concrete, erected using glue, in accordance with the recommendations above. Additional fixation is usually 3 - 5 plastic dowels per square meter.
In a three-layer wall, it is recommended to use a masonry mesh that binds all layers (and brick cladding). In this case, the vertical installation step of the mesh is 500 - 600 mm, according to the size of the insulation board (smaller possible). If fiberglass connections are used, their number should not be less than 4 pieces. per square meter, and the horizontal installation step is no more than 500 mm., near openings, at corners, the installation spacing of connections is reduced to 8 pcs. per sq. m.
The brick cladding is reinforced with masonry mesh with a vertical pitch of no more than 1.2 meters, with the mesh inserted into the load-bearing wall.
Doors and windows are located along the depth of the wall opposite the insulation-load-bearing wall boundary. In this case, better heat savings are achieved at the openings, and the risk of glass fogging is also reduced.
Stages of internal insulation of a house
First you need to apply plaster to the brickwork, if there is none. Clean and prepare the walls - remove old wallpaper and paint, fill cracks in the walls if there are any, remove unevenness and be sure to apply a deep penetration primer with antiseptic additives against fungus. Apply leveling putty and primer. Carefully dilute the glue strictly according to the attached instructions for gluing polystyrene foam. Apply the glue to the wall in an even layer, then go over it with a comb spatula. Glue the slabs exactly to the wall in horizontal rows, pressing them tightly to the surface so as not to deviate from the leveled area of the walls. Additional fastening to the wall with dowels is not necessary. The slab must be laid very carefully and tightly to avoid the formation of cracks. If you are going to finish with simple plaster, you will need to putty the panels, first sealing the joints.
Then reinforce the fiberglass reinforced mesh with a special mixture on top of the foam, apply the first layer of plaster, and after drying, a decorative one. If you want to attach drywall to the foam, then before gluing, mark the wall in increments of 40-60 cm, install fastening brackets to secure the frame. Having glued the foam panels to the wall, you need to attach a frame for mounting drywall, screwing self-tapping screws into the frame, and then putty the joints and fastenings. This coating is ready for painting or wallpapering.
You can insulate brick walls with mineral wool, which has excellent thermal insulation characteristics, is inexpensive and is easy to install.
But there are negative aspects: you will have to put plaster under this layer, and this is labor-intensive. You can, of course, skip this process and immediately start laying glass wool. To do this, you need to cover the entire wall using slats, the gap between which should be less than the width of the roll of insulating material.
Then you can begin installing the insulating material. If there is no plaster, another layer of cotton wool is added. The last layer is a vapor barrier material - foil, which is also attached with slats.
Polyurethane foam initially has the appearance of a foamed liquid, so it is difficult to work with it on flat surfaces to form a layer of the required thickness; it is more often used for thermal insulation of rounded surfaces such as roof slopes. The main advantage is maximum penetration into the wall, which makes it possible to achieve maximum thermal insulation. Polyurethane foam is more often used to insulate external walls; having made a frame with a solid wall, it is simply poured inside.
conclusions
Nowadays, low-density autoclaved aerated concrete is replacing mineral wool, due to the fact that it is more environmentally friendly and durable.
The use of aerated concrete insulating panels in a three-layer wall lined with brick and a load-bearing wall made of heavy materials seems optimal. But with this insulation it is advisable to create a ventilation gap, since the material itself is susceptible to moisture.
The use of heavy materials for load-bearing walls eliminates problems with moisture accumulation in the thickness of the wall. A load-bearing wall made of high-density aerated concrete must be protected from the inside with a vapor barrier for any two- or three-layer wall design.
It is better to use mineral wool boards of high density, from 80 kg/m3, without a windproof membrane, which is also a “weak link” in the structure, given its inseparability.
You can reduce construction costs and reduce wall thickness if you use expanded polystyrene for insulation without ventilation. gap They also have a lower thermal conductivity coefficient, they can be used in a thinner layer, which will ultimately result in a thickness savings of up to 5 - 8 cm. Additional savings are laying facade bricks on the edge, with a layer thickness of 6 cm. But this requires an increase in the number of connections.
The use of low-density polystyrene foam and mineral wool in a three-layer wall seems to be an unjustified saving.
Mineral insulation - low-density cellular concrete
Recently, another type of insulation has been gaining popularity - products made from low-density cellular concrete. These are heat-insulating boards based on materials already known and used in construction - autoclaved aerated concrete, gas silicate.
Thermal insulation slabs made of cellular concrete have a density of 100 - 200 kg/m3 and a dry thermal conductivity coefficient of 0.045 - 0.06 W/mOK. Mineral wool and polystyrene foam insulation have approximately the same thermal conductivity. Slabs with a thickness of 60 - 200 mm are produced. Compressive strength class B1.0 (compressive strength not less than 10 kg/m3.) Vapor permeability coefficient 0.28 mg/(m*year*Pa).
Thermal insulation slabs made of cellular concrete are a good alternative to insulation made from mineral wool and expanded polystyrene.
Well-known brands of thermal insulation slabs made of cellular concrete in the construction market: “Multipor”, “AEROC Energy”, “Betol”.
Advantages of thermal insulation slabs made of cellular concrete:
Household products
⇆
The most important thing is higher durability. The material does not contain any organic matter - it is an artificial stone. It has a fairly high vapor permeability, but less than mineral wool insulation.
The structure of the material contains a large number of open pores. The moisture that condenses in the insulation in winter dries quickly in the warm season. There is no moisture accumulation.
Thermal insulation does not burn and does not emit harmful gases when exposed to fire. The insulation does not cake. Insulation boards are harder and mechanically stronger.
The cost of insulating a facade with cellular concrete slabs, in any case, does not exceed the cost of thermal insulation with mineral wool insulation or expanded polystyrene.
When installing heat-insulating slabs made of aerated concrete, the following rules are followed:
Thermal insulating slabs made of aerated concrete up to 100 mm thick are attached to the facade using glue and dowels, 1-2 dowels per slab.
A wall made of slabs more than 100 mm thick is laid close to the insulated wall. The masonry is laid using glue with a seam thickness of 2-3 mm. The masonry of insulation boards is connected to the load-bearing wall with anchors - flexible ties at the rate of five ties per 1 m2 of wall. A technological gap of 2-15 mm can be left between the load-bearing wall and the insulation.
It is better to connect all layers of the wall and brick cladding with a masonry mesh. This will increase the mechanical strength of the wall.
What construction forums discuss on this topic, and what reviews and recommendations they give
Having looked through various construction forums, it cannot be said that there is a consensus on the question - is it possible to cover a house made of timber with bricks without consequences? Many forum users are convinced that a brick-lined house made of timber will not lose its properties and longevity. Main:
The only bewilderment among people is the very fact of covering the timber with bricks.
- Construction stores offer a large assortment of facade materials that are less expensive and do not require much effort or skill. But the timber wall itself looks complete. You don't have to do any cladding. Exception: ordinary timber. Profiled and glued have a beautiful texture and refined appearance. Why then build a wooden house and then line it with brick? You can immediately build a house from brick or other available material other than wood.
- It is necessary to take into account the fact of shrinkage of the wooden structure and inter-seasonal fluctuations of the walls. Will a lined house be able to cope with the process without cracks in the brick wall. The foundation and brick wall must follow the movements of the log house.
- Cladding a house made of timber is only required if the house is old, there are cracks, and the wood looks unsightly. It is not possible to correct shortcomings with less expense. Then you can use brick.
- Calculate the costs needed to cover the timber with brick. Are they worth the result? To complete all the work on lining a house on one floor, you will need at least 300,000 rubles, maybe more. It depends on where you live and the square meters of the house. There are alternative methods for less money.
It is better to try to restore a house made of timber to its previous appearance using sanding, caulking of walls, and paints and varnishes for wood. Brick is good, but if the initial choice was made in favor of wood, is there any point in covering it up? Decision is on you. Situations are different and require an individual approach.
Thermal insulation layer in masonry
In principle, any insulation can be used as a heat insulator, but experts recommend giving preference to basalt wool. Thanks to its high resistance to moisture and low thermal conductivity, there will always be a comfortable microclimate in the house. The optimal density is 140 kg/m3.
Expanded polystyrene and mineral wool are also used in three-layer masonry, but it must be taken into account that the first material has low resistance to fire, and the second - to moisture. These factors predetermine the safety of the structure in non-standard situations during operation. Polystyrene also does not allow vapor to pass through well, that is, it interferes with normal air circulation, which, if there is insufficient ventilation, provokes the development of mold and mildew in the home. Eliminating shortcomings takes a lot of nerves and money; it’s easier to think through everything at the stage of building walls.
According to the installation rules, the heat-insulating layer is installed as closely as possible to the load-bearing wall. This will prevent the formation of so-called open zones.
So should you buy three-layer blocks for construction?
Among the people, another name has been assigned to this building material - “miracle brick”. After all, one could only dream of a warm, prefabricated house before. Today, it is enough to read reviews about three-layer blocks to understand that such structures really are:
- environmentally friendly;
- do not ignite or support combustion;
- cheaper than traditional stone ones;
- highly thermally efficient.
We guarantee this building material for at least 50 years. But since expanded clay concrete houses in Europe are more than 100 years old, we are sure that housing built from our three-layer thermally efficient wall blocks will last no less. And if you want to build just such a family nest, buy inexpensive three-layer blocks. Call us at any time, find out about the cost of three-layer blocks and the price of a cottage that we are ready to build for you at any time of the year - even this is possible with a thermal wall.
What does a brick wall insulation pie consist of?
Before you insulate a brick wall at home yourself, you need to understand how to make an insulating pie. There are two options: wet facade and ventilated facade. The first is most often used for foam plastic, the second for mineral wool. The wet facade is done like this:
- Brick wall.
- Glue mixture.
- Thermal insulation layer (foam).
- Additionally, the insulation is fixed on dowels with umbrellas.
- Adhesive solution with reinforced mesh. The mesh is embedded in the adhesive layer so that it does not come into contact with the insulation.
- Primer, layer of plaster.
- Finishing decorative finishing: facing brick, decorative plaster.
As for the ventilated facade, the pie is like this:
- Brick wall.
- Lathing made of wood or metal.
- Vapor barrier.
- Insulation layer (mineral wool).
- Hydro-windproof film.
- Counter grille, thanks to which a ventilation gap is created.
- Finishing decorative layer (installation of siding, lining, decorative panels).
Stage 4. Making an arch
Having installed the frame in the place where the arched window will be, we begin to cover the frame with brick on top.
Only now we will lay the brick not horizontally, but vertically with the butt side on the face of the masonry. But since the length of the brick is 25 cm, and the width of our masonry is 17 cm (brick width 12.5 cm + air gap 4-5 cm), the brick will have to be cut to length. To cut bricks we will use a grinder with a diamond wheel for concrete.
The adjacent bricks of the main wall will also need to be cut at an angle. The arch should be flat in relation to the main wall at the same level or protrude outward by 2-4 cm, this is a matter of client taste. After a day, three arch frames can be safely disassembled. The arch is ready.
Pros and cons of use
There are several advantages of using such building material:
- there is no need to spend additional money on thermal insulation of the building;
- high strength;
- ease;
- there is no need to build a deep foundation.
One of the disadvantages is the complexity of the masonry process, since knowledge of the technology of working with this type of material containing insulation is required. Another disadvantage is the high cost compared to traditional ceramic blocks.
Methods of external insulation
- Insulation with polystyrene foam and expanded polystyrene can be done in two ways: laying tile insulation in the cells of the frame or gluing the slabs directly to the wall. A detailed algorithm for insulating a house with EPS is described in the article “Step-by-step instructions for thermal insulation of a log house with polystyrene foam.” Thermal insulation with foam plastic is carried out in a similar way.
- Thermal insulation with polyurethane foam (PPU) is carried out by spraying using professional equipment.
- Installation of thermal panels is quite simple. Each element is provided with a “groove and tenon” type fastening. First, a starting profile is installed on which the elements are laid, joining them to each other. After final installation, the space between the wall and the panels is filled with foam.
- When laying mineral wool, installation of lathing is mandatory. The material strongly absorbs and accumulates moisture, which causes a decrease in its thermal insulation characteristics. The frame installation method allows you to make a ventilation hole between the wall and the insulation, as well as install a hydro- and vapor barrier layer on both sides of the insulation. Detailed instructions for installing mineral wool can be found in the article “Features of external insulation of a house with mineral wool.”
Useful tips
You cannot lay out more than 6-7 rows at a time, as the masonry may become deformed under heavy load. Every 3-4 rows are checked with a level to achieve maximum verticality. You cannot fill the gap between the cladding and the wall of the building with anything; the air gap is necessary for ventilation of the surfaces, in addition, it also performs thermal insulation functions. Slope jointing can be done immediately after laying, so as not to rearrange the scaffolding twice.
Brick cladding
Prices for construction and facing bricks
Construction and facing bricks