An electric boiler is an effective solution to the problem of hot water supply for a private home. Such equipment, however, like any other, periodically breaks down.
If you wish, you can repair the water heater yourself, provided that the breakdown is simple. But serious damage will have to be repaired at a service center.
In this article, we will analyze common types of breakdowns and provide recommendations for eliminating them, which will allow any more or less experienced technician to cope with the repair.
Water heater device
Both electric and gas boilers are installed in apartments. The most popular electric water heater consists of the following elements:
- a thermostat that shows what the temperature of the water is in the tank and is a digital indicator or scale with an arrow;
- a thermal insulation layer responsible for maintaining high water temperatures;
- a tube that discharges hot water;
- outer box for all parts, made of metal or plastic;
- internal stainless steel tank;
- heating element or heating element, which periodically needs to be replaced;
- magnesium anode, which protects the tank and heating element from rusting;
- tubes through which cold water enters the tank;
- thermostat that controls and automates water heating;
- an insulating gasket that seals the structure and protects against electric current.
In an electric boiler, in most cases, the heating element and magnesium anode break down
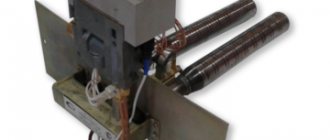
A gas instantaneous water heater is made up of other parts. Its design includes:
- pilot and main burners;
- solenoid valve;
- gas combustion unit;
- heat exchanger;
- thermometer (thermoelectric);
- device for measuring thrust conversion;
- piezoelectric igniter.
The device can be equipped with an anode
Diagnostics
What to do if an electrical appliance that was working yesterday shows no signs of life?
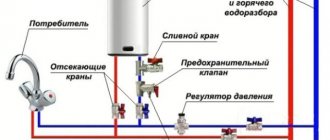
First of all, you need to check the input electrical circuits.
- sounds trivial - but look to see if the electricity in the house is turned off (after turning on the boiler);
- we check the circuit breaker on the line to which the water heater is connected;
- in 90% of cases (especially if you have an instantaneous water heater), the connection is made through an RCD: we also check this circuit breaker;
- We look at what temperature the thermostat is set to (sometimes in a hurry the user forgets to set the required mode);
- inspect the plug and socket of the storage water heater (under high loads, the contacts may “burn out”).
If there are no external causes or have been eliminated (you turned on the machine, etc.), and the water heater still does not work, we will deal with the electrical appliance. Of course, you can call a specialist or take the equipment to a workshop. However, this will incur additional costs. Despite the apparent complexity of the design, repairing a water heater with your own hands is possible, even in the absence of special equipment. You will need a set of wrenches, a good screwdriver, pliers and a multimeter, and you may need a soldering iron. If you have one and you know how to use it, your chances of repairing the boiler yourself are significantly greater.
There are no fundamental differences in the design of electric heaters. The Polaris water heater has the same heating element and control element as Ariston. Moreover, many brands are united by large corporations (costs of globalization), so the design of household appliances can be absolutely the same. The only exceptions are little-known Chinese brands, or Japanese models imported unofficially. They contain design solutions that cannot be found on the Thermex or Electrolux water heater.
Although the repair of such electrical appliances follows a general logic, it would still be better to find branded electrical circuits.
Principle of operation
A gas boiler operates thanks to a burner, which is located inside a metal casing and heats the water entering through the heat exchanger. The safety of this process is ensured by automation, which forces the valve to operate when the water tap is opened and pushes the gas into the burner. There, the substance lights up either automatically or by pressing a special button. Gas combustion products are discharged through the chimney.
The gas boiler can operate in a single- or double-circuit circuit
A water heater powered by an electrical network performs its task in a different way. The tank is filled with cold water from below and it is distributed inside the housing using a jet divider. The device helps to displace hot water upward and remove it through the tube.
Hot water is supplied to the bathtub and sinks
A separate procedure is replacing the heating element
This is necessary when a malfunction of the heater is clearly established, or if its mounting flange has leaked. In any case, it won’t hurt to inspect the internal space of the boiler. At the same time, you can clean the heating element from scale.
Of course, this situation is only possible with very calcined water. However, even normal water hardness, as well as ignoring maintenance, will turn your heater into a useless piece of iron.
Tip: if you get to the heater, it’s a good idea to check the condition of the magnesium anode. It is located next to the heating element.
Malfunctions and their possible causes
When operating a water heater, you may encounter various problems.
If the device functions intermittently, it needs repair
Those who are constantly faced with burning out heating elements should consider the only possible cause of equipment malfunction - the deposition of a large amount of lime in the heating tube.
If the boiler of the equipment “does not see” the boiler, that is, does not react to the flame, this can only mean one thing - a malfunction of the electrode.
When the owner of a boiler is concerned about the flashing of the display, he should check whether everything is in order with the thermostat, RCD and electrical cord of the equipment.
Table: the most common causes of boiler malfunctions
| Malfunction | Possible reasons |
| The equipment does not turn on |
|
| Poor or long water heating |
|
| Overheating and sudden shutdown after a few minutes of operation |
|
| Boiler leak |
|
| Boiler check valve stopped working |
|
| The water heater emits current through the water |
|
| Presence of air in the boiler |
|
| There is no water flowing into the equipment |
|
| Rapid waste of hot water in the boiler |
|
| The water heater turns on and off |
|
| The whistle of a gas water heater heating water |
|
| Black tap water |
|
| Bloating of the water heater, which can result in an explosion of the equipment |
|
| The boiler thermostat does not make a click when the temperature changes |
|
| Knocks out the thermal relay |
|
In an extremely dangerous situation, when a pipe breaks off a water heater, a faulty emergency pressure release valve or a broken thermostat should be blamed. In some cases, a pipe breaks off from a boiler due to the fact that both metal and plastic pipes were not used when installing the equipment.
Video: why the boiler explodes
Recommendations for home repairs
Regardless of the nature of the breakdown, before starting repair work, you first need to turn off the power supply, remove the protective cover, disconnect the wires, pipes and drain the water.
Wall-mounted models are usually removed from their brackets. The protective cover, which hides the connection point for electrical wires and the mounting of heating elements, may have a different position depending on the model.
On horizontal devices, this element is usually located on the left, on vertical heaters - at the bottom, and on small models - in front. In some devices, you first need to unscrew the main mounting bolt located in the center. Sometimes this element is hidden under a decorative sticker.
After this, you need to carefully remove the thermostat, and then remove the temperature sensor tubes. They must be handled very carefully. If the integrity of the temperature sensor tube is damaged, liquid filler will leak out of them. As a result, you will simply have to throw away the water heater and buy a new device.
The temperature sensor tubes highlighted in blue should be protected from any deforming influence; if they break, the entire device will have to be completely replaced
If the thermostat of a household water heater has become unusable, it will have to be completely replaced. The models of such devices are varied; it is best to choose an analogue with a similar device and characteristics
If there are stickers on the case that indicate the serial number, they must be preserved, even if they interfere with the maintenance and repair of the product. This may affect the manufacturer's fulfillment of warranty obligations, as well as make the work of service center employees easier.
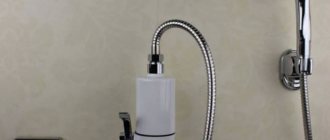
How to replace the hose?
Tools for work
The whole procedure can be divided into 2 stages:
- dismantling the old structure;
- installation of a new flexible connection.
But first you need to prepare the tools and materials:
- hoses of the required length;
- gas key;
- Adjustable wrench.
After preparing everything you need, you can begin replacing the connecting elements.
Step 1. Shut off the water supply to the mixer by turning the special valves on the wiring.
Step 2. Drain the remaining water from the faucet by opening the tap.
Step 3. Place a bucket or basin under the old line to collect water that will drain when the hoses are disconnected.
Step 4. Unscrew the union nuts and fittings using a wrench, turning it counterclockwise.
unscrew the hoses from the mixer and pipelines
Step 5: Connect the new flexible hose. The main thing is to tighten all the fasteners tightly, but do not overtighten them, so as not to damage the rubber sealing gasket.
We wind the tow
Screw the flexible hose to the mixer
Screw on the second hose
The photo shows what the hoses look like under the kitchen sink.
First hose connected
Tighten the nuts
The connection is ready. The hoses should not be stretched; it is better to take a longer product and make a smooth loop during installation. Also, no kinks on the eyeliner are allowed.
Connecting a second flexible hose
When you turn on the water for the first time, you should check the tightness of the entire connection.
As can be seen from the article, installation is quite simple if you follow the basic rules. And it is important not to save money when purchasing quality products.
Connecting a second flexible hose
Tighten the nuts
The photo shows what the hoses look like under the kitchen sink.
First hose connected
Screw on the hose
We wind the tow
Screw on the flexible hose
unscrew the hoses from the mixer and pipelines
Tools for work
Choose an eyeliner of sufficient length and flexibility
Laser engraving on the product indicates high quality
High quality eyeliner
Poor quality eyeliner
Flexible connection fittings
Disassembled faucet and connection Flexible polymer connection for the mixer
Supply hose diagram
Flexible connection for faucets
Faucet connection
How to change a hose on a faucet
When to call a specialist
When the water heater stops heating water, it immediately becomes clear that it is faulty. However, sometimes this is noticeable indirectly, the automation simply regularly knocks out, the RCD is triggered, and upon contact with water it gives an electric shock. All this also indicates a faulty boiler. Of course, in most cases you can repair a water heater yourself, but there are times when you need to call a specialist.
There are breakdowns that only a professional can fix.
Such breakdowns include the following:
- an almost new boiler shuts down unexpectedly;
- The settings on the thermostat are constantly reset;
- The RCD is constantly tripping;
- The water heater bulb is leaking.
It is worth noting that in the latter case, repairs are rarely effective; it is better to purchase a new boiler. Of course, you can replace the magnesium anode yourself, but it is better to entrust it to specialists by contacting a service center.
Dirty and foul-smelling water from the heater
If, when you turn on the hot water, something similar to kvass flows out of the tap, having a characteristic swamp smell, then it’s time to clean the heater. This situation occurs when sediment accumulates inside a closed tank and flows through the pipes. Visually this may not be noticeable, but debris tends to accumulate and settle not only on the heating element, but also on the walls of the boiler.
The problem should be solved in two stages:
- Place a filter at the cold water inlet: it will trap debris and dirt, as well as bacteria that can live in a closed tank system. The water will become much cleaner, and preventative cleaning of the boiler will be needed less often.
- Clean the boiler: you can pour special disinfectant solutions through the supply tube, then drain the contents into a bucket. There are a lot of special products to clean your boiler.
The cleaning procedure will not cause any particular difficulties. The sequence of actions depends on the chosen tool:
| Name | Quantity | Sequencing |
| Lemon acid | 20 g of powder for every liter of water | Mix the required amount of citric acid with 2 liters of water, then introduce the solution through the water supply hose. Plug in and set the maximum values on the relay. Let it boil for 3-4 hours, then open the hot water tap and completely drain the water from the boiler. |
| Vinegar essence | 10 ml for every liter of water | Vinegar should be introduced into the boiler through a hose, and then connect the hose to the pipeline. Set to maximum temperature and drain completely after 4 hours |
| Acidic solvents for cleaning boilers | Please refer to the instructions for proportions. | The product is poured into the boiler and left for 1-2 hours, after which the water is completely drained |
Comments (1)
- Oleg: 05/14/2018 at 18:24
Hello! I would like to ask you for technical advice. I have been using an Ariston brand storage water heater, model ABS PRO ECO 80V (topmost photo on the site) for 8 years now, I am satisfied with the product. But time takes its toll and a certain problem has arisen, namely, the next time the temperature sensor is triggered (if the period between switching on was 1 hour or more), the entire display on the front panel blinks and frequent clicks under the plastic casing of the indicator panel are observed for about 10 minutes, then the frequency of clicks gradually decreases and the device turns on. It should be noted that if the period between the activation of the temperature sensor is short (15-20 minutes), the heater turns on without problems. But during the period of frequent clicks, it seems as if some relay cannot be pulled in, then gradually magnetizes and closes the contact, the heater starts working.
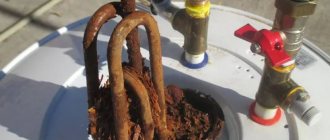
Removing scale
After you empty the tank, you will need to disassemble the boiler yourself. To do this, carefully disconnect all the fastons connected to the thermostat and unscrew the bolts, of which there are usually 6 pieces.
When removing the heating element, some more water that remains in the tank will pour out. It is recommended to clean the heating element itself immediately, while it is wet and scale deposits have not hardened. For cleaning, we recommend using special products that can be sprayed onto the heater. After some time, the deposits can be easily removed with a wooden spatula or even a dull knife. Also, for repairs, you can boil the heating element in a bucket with the addition of a special acid to the water, which will effectively solve the problem. To be sure to get rid of scale, we recommend using fine-grained sandpaper (“sandpaper”) to clean the tubes to a metallic color.
Simultaneously with the repair of a boiler that heats water for a long time or poorly, it is recommended to replace the magnesium anode, which protects the tank from corrosion. To do this, dismantle the worn rod and purchase exactly the same one so you can replace it yourself!
After this, you need to reassemble the boiler in the reverse order and check whether the weak water heating was repaired. Do not forget that first of all you must fill the tank completely with water, after which you will connect the plug to the power supply and start.
We draw your attention to the fact that there is a situation when the boiler does not heat the water because the heater is broken. In this case, self-repair consists of testing it with a multimeter, setting the resistance measurement mode. We will tell you about this below!
What's under the lid
When the cover is removed, the wiring of the heating element is visible, which needs to be disconnected. Before doing this, you need to sketch or photograph the original position of the wires. This will come in handy during the reverse assembly stage. After photographing, you can unscrew the bolts of the wires.
Wires under the removed housing cover
Many models have a thermostat under the cover. To remove the device, you need to grab it firmly and pull it down. It is better to do this with a sharp but precise movement. You can watch the video in detail:
Some Ariston models have a thermometer on the body. To remove it, after disassembling the electrical circuit, the device is pryed off from both sides with flat screwdrivers. This allows it to pop out of the nest with a click. Next, carefully pull out the wires disconnected from the thermostat.
Some boilers are designed in such a way that a non-return valve may prevent the removal of the lid. Then you need to unscrew it. A temperature sensor is sometimes attached to the back of the cover. It must be removed by disconnecting the contacts from the heating element.
In Termex boilers, an electronic control board (power unit) is located under the lid. It is secured with self-tapping screws and is also easy to remove. The control board and the external sensor board are connected by connectors that need to be unscrewed. The grounding attached to the nuts is also disconnected.
The boiler body is electrocuted
If you accidentally come into contact with the heater, you may notice how it transmits a discharge. It may not shock much, but it is quite unpleasant. One reason is the direct contact of electricity with water. This happens due to a crack in the heating element, which is caused by accumulated scale. When the boiler is connected to the network, not only its body, but also the flowing water can carry a charge.
If the body of the water heater is electrocuted, then it is necessary to check the heating element
In this case, it is necessary not only to check the heating element and, if necessary, replace it, but also to ensure proper grounding of the electrical appliance. If this causes difficulties, then it is better to entrust the repair to a specialist.
It is extremely unsafe to use a hot water heater. Sooner or later this will provoke a global breakdown or cause health problems.
Basic rules for servicing the device
For long-term and trouble-free operation of the water heater, it is important to follow the rules of its operation and maintenance. Otherwise, breakdowns are inevitable
The fact that problems have arisen in the operation of the device may be indicated by some changes in its operating mode:
- increasing the time for heating water to a given temperature;
- the appearance of unusual sounds accompanying the operation of the device;
- the appearance of foreign impurities in tap water, changes in its color, smell or taste.
If at least one of these signs is observed, you should immediately clean the water heater.
To do this you will have to perform the following operations:
- Disconnect the device from the power supply.
- Remove the protective cover.
- Disconnect the contacts of the electrical wires.
- Shut off the cold water supply.
- Use a hose to remove any remaining water from the tank.
- Unscrew the bolts that hold the heating element.
- Remove the heating element and descale it.
- Clean the inside of the drive from dirt and scale particles.
- Rinse the device thoroughly.
- Check the serviceability of the magnesium anode.
- If necessary, replace this element immediately.
- Wait for the cleaned tank to dry completely.
- Reinstall the heating element.
- Reassemble the device.
- Check the reliability of all fastenings.
- Connect the water heater to the power supply.
- Check for grounding.
The heating element should be removed from the tank carefully; the bolts may be too stubborn; sometimes the heating element is difficult to remove due to too much scale.
The heating element is cleaned by mechanical or chemical means, as is the removal of contaminants from the tank. If a large amount of scale is found inside the device, you should consider reviewing the operating mode of the water heater.
This phenomenon is often observed when the device operates at maximum power for a long time. It is recommended to set the maximum heating temperature no higher than 60 degrees to increase the life of the device and reduce the number of breakdowns.
If the body of the heating device receives an electric current, the heating element may be deformed and ruptured, or there may be a breakdown in the control system.
Nomenclature
Champion model – classic round body, bioglass porcelain coating. A high-quality and inexpensive model – it is very popular and has good reviews.
Presented in the following modifications:
- Water heater Thermex ER 50 V
Thermex ER 50 V; - Thermex ER 80 V;
- Thermex ER 100 V;
- Thermex ER 150 V;
- Thermex ER 200 V;
- Thermex ER 300 V;
- Thermex ER 80 H;
- Thermex ER 100 H.
Champion slim - Small diameter - only 36cm. Bioglass porcelain coating. An ideal solution for small apartments.
Modifications of this model:
- Water heater Thermex ES 50 H
Thermex ES 30 V; - Thermex ES 40 V;
- Thermex ES 50 V;
- Thermex ES 60 V;
- Thermex ES 70 V;
- Thermex ES 80 V;
- Thermex ES 50 H.
Termex flat plus - impeccable design, flat body, snow-white color scheme and electronic control with an LCD display.
The model is presented in the following modifications:
- Water heater Flat Plus IF 50 H
Thermex IF 30 V; - Thermex IF 50 V;
- Thermex IF 80 V;
- Thermex IF 100 V;
- Thermex IF 30 H;
- Thermex IF 50 H;
- Thermex IF 80 H.
Termex round plus – classic style water heaters. 7-year trouble-free operation guarantee.
Modifications presented in the line:
- Water heater Thermex IR 100 V
Thermex IR 10 V; - Thermex IR 15 V;
- Thermex IR 80 V;
- Thermex IR 100 V;
- Thermex IR 150 V;
- Thermex IR 200 V;
- Thermex IS 30 V;
- Thermex IS 50 V.
Thermo power – The most powerful and most modern model. Double area of heating elements, and power 2.5 kW. Double guarantee, double efficiency. Stainless steel heating elements and the ubiquitous bioglass porcelain.
Water heater Thermex ES 50 V
Models:
- Thermex ERS 80 V(Thermo);
- Thermex ERS 100 V(Thermo);
- Thermex ESS 30 V(Thermo);
- Thermex ESS 50 V(Thermo);
- Thermex ESS 80 V(Thermo).
You may be interested in an article about Termex instantaneous water heaters.
Read the article about instantaneous electric water heaters for taps here.
Hit – The most compact model. Ideal for small apartments. Bioglass porcelain and plastic body. Designed for mounting above the sink.
Presented in the following modifications:
- Thermex H 10 O;
- Thermex H 15 O;
- Thermex H 30 O;
- Thermex H 10 U;
- Thermex H 15 U.
Thermex Praktik – classic round shape and stainless steel tank. Guaranteed quality and durability.
Water heater Thermex Round Praktik IRP 80 V
Modifications:
- Thermex IRP 30 V;
- Thermex IRP 50 V;
- Thermex IRP 80 V;
- Thermex IRP 120 V;
- Thermex ISP 30 V;
- Thermex IRP 50 V.
Thermex light - A miniature body of an unusual design, made of plastic, similar to a children's balloon. Combination of characteristics of flow and storage heaters. The tank capacity of up to 30 liters allows you to quickly heat water. Convenient for summer cottages.
There are three modifications of this line on the market:
- Thermex Light MS 10;
- Thermex Light MS 15;
- Thermex Light MS 30.
Thermex Combi is a new direction in the field of combined type water heaters, with an indirect heating boiler.
It works both from internal heating elements and from external heat sources: central or gas heating. It has a huge advantage in saving energy.
Water heater THERMEX ER 80 V (combi)
The model is presented in the following forms:
- Thermex ER 80V;
- Thermex ER 100V;
- Thermex ER 120V;
- Thermex ER 200V;
- Thermex ER 300V.
All Thermex electric heaters are certified for compliance with GOST requirements.
You may also be interested in an article on how to clean a Termex water heater.
Read the article about installing and connecting a Termex water heater here.
After reading this article, you will learn about the nuances of repairing a Termex water heater with your own hands.
What you might need
- Adjustable wrench - for disconnecting pipes.
- Wrench – for unscrewing the bolts securing the unit to the wall (not required if the mounting is on hooks).
- A hose to the return valve or to the water inlet - for draining (not required if you use containers to collect water).
- Phillips screwdriver for unscrewing the protective cap.
- Two flathead screwdrivers: needed to lift a protective cap that is too tight.
- Gas wrench number two or hub wrench 55. Sometimes a socket wrench is preferable for tightening nuts.
- A thin screwdriver for unscrewing and removing power cables.
The dismantling of boilers is preceded by the following preparatory stages:
- de-energizing the installation;
- draining;
- removal from the wall.
First, the device is disconnected from the outlet. Then you need to lighten it as much as possible by removing the water. An eighty-liter heater weighs about twenty kilograms. With water its weight approaches a hundredweight.
Disconnecting from the electrical network
Start of disassembling the Ariston water heater
Before any work involving electrical appliances, you must first de-energize them.
If the water heater is powered by a separate cable from the electric meter, then it is connected through a two-pole circuit breaker and must be turned off.
If the water heater is connected to a regular outlet, you simply need to remove the plug from the outlet.
After this, you can safely begin disassembling the Ariston water heater:
- First, the lid is unscrewed; it is secured with several screws.
- Further, if there is a danger that something could be mixed up during subsequent assembly, it is advisable to photograph the existing position of the parts from several angles.
- The next stage: disconnecting 3 electrical cables, 1 – phase, 2 – neutral, 3 – ground. This is easy to do with a screwdriver. Since we disconnected the first two wires from the thermostat and freed it, we can now pull it out of the tube with a little effort.
- This completes all electrical procedures. You can start draining the water.
Tools required for the operation
All water heaters are similar to each other, so they have the same drainage system and to carry out this procedure you will need an adjustable wrench, a rubber hose and access to the bathtub into which the water will flow. If the water does not drain into the bathtub, then you need to prepare several large containers so as not to flood your neighbors and simply avoid any tricky situations.
Emptying the boiler
In the case of an Ariston water heater, you will need various screwdrivers, a hexagon and adjustable wrenches of different sizes.
A person who reads the instructions and adheres to a clear algorithm will not have any difficulty emptying the boiler correctly.