Features of using sawdust for insulation
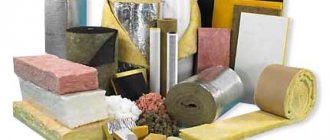
The materials used for thermal insulation are constantly being improved, and new, more modern products appear on the domestic market every year. Its cost regularly increases and the owners of a private house do not always have enough money to purchase insulation.
For this reason, the so-called “old-fashioned methods”, used for many years for thermal insulation of walls and roofs, are still popular and relevant. Ceiling insulation with sawdust has stood the test of time for many decades, while it is difficult to say what condition, for example, polyurethane foam will be in after a 20-year service life.
The main advantages of this method include:
- environmental cleanliness;
- hassle-free purchase of sawdust;
- symbolic cost;
- simple installation;
- long service life.
At the same time, savings in the case of using sawdust as ceiling insulation consists not only in reducing financial costs, but also in caring for nature, which helps improve the environmental situation and reduce home heating costs.
The process of insulating a home consists of several stages, including insulation of the ceiling, walls and floor. Moreover, each type of surface requires a special approach. When the ceiling surface is insulated, the material intended for this can be laid both externally and internally.
It is not difficult to verify the economic benefits of insulating a home with sawdust if you compare the costs of them with the cost of popular materials and the work involved in their installation. Thermal insulation using this wood material is practically free. In addition, you can agree with a woodworking company to deliver it to a specific address for a small fee.
Of course, as with the use of other thermal insulation materials, there are pros and cons to insulating the ceiling with sawdust. The disadvantages of this method include the fact that not all varieties of this type of wood waste are suitable for ensuring heat conservation in the house.
Advantages and disadvantages of the material
Sawdust has successfully passed the test of time and still remains one of the most practical materials for insulation.
Main advantages:
- availability;
- versatility;
- environmental friendliness;
- ease of installation;
- long service life.
The disadvantages of insulating the ceiling with sawdust are that the material quickly absorbs moisture and is considered a fire hazard. Therefore, you should take care of high-quality waterproofing and use only materials treated with antiprenes. The technology of application differs according to the type of placement of the material: from inside the room or outside. But before you start work, you should choose the right sawdust.
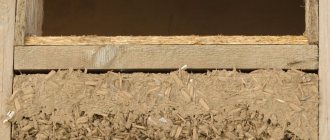
Choosing the right sawdust
Medium-sized sawdust is best suited for insulating the ceiling in a private household. The fact is that it will be difficult to work with small wood waste, and coarse-grained material does not have a sufficient degree of thermal insulation.
The optimal insulation material is considered to be sawdust obtained as a result of sawing in carpentry production, since it has a low degree of humidity, does not require additional drying and does not begin to rot when used.
If round wood waste, which has natural moisture, is available, then before use it should be spread out under a canopy and thoroughly dried. You should not cover the sawdust, as it will then begin to rot.
Experts advise giving preference to waste from softwood processing. Since such material contains a lot of resinous substances, pests are afraid to settle in it. True, when deciding how to insulate a bathhouse ceiling with sawdust, it is better to use raw materials from deciduous trees.
Before installation, this type of insulation must rest for about a year. During this period, the level of sugars in sawdust decreases significantly, and it is they that contribute to the process of decay. It is necessary to pay attention to ensure that there are no foreign impurities in the insulation. It is advisable to sift the sawdust and remove large debris by hand.
How to choose suitable sawdust for insulation?
Both small and large sawdust are suitable for protecting a house from freezing, but the former are slightly warmer than the latter. You can also use wood chips and shavings. Both are cooler than sawdust, and the difference is on average 15-20%.
At the end of the topic, we note that it is advisable to dry the sawdust well before filling it. To do this, they are scattered under a canopy in a layer of no more than 50 cm and raked a couple of times a day for better ventilation.
Softwood sawdust most effectively resists rotting due to its high resin content - a natural antiseptic
Hemming of floor beams
Work related to how to insulate a ceiling in a private household with sawdust should begin with filing the ceiling; it is performed in a certain sequence:
- Prepare boards approximately 2.5-3 centimeters thick - this parameter depends on the distance between the beams. It is desirable that the lumber be tongue-and-groove or with a quarter, and certainly planed and dry, even if their cost is higher than unplaned edged products.
- On top of the assembled vapor barrier layer, boards are attached solidly with nails 10 centimeters deep or screwed with screws 5-6 centimeters long, 2 pieces at each fixation point. In this case, the nails are driven in at an angle relative to the wooden plane. It is necessary to ensure that the direction of the adjacent nails driven in does not coincide, and then the fastening will be strong and most reliable.
- Before starting installation work, boards and beams must be treated with special compounds - antiseptic and fire retardant. This will protect the wood material from fungus and various pests, and will also help reduce its flammability.
Before you start
Before deciding to insulate the ceiling in a private house with sawdust, it is wise to perform evaluation calculations:
- what layer thickness is needed in your region;
- how many materials will be needed;
- what is the approximate complexity and duration of all work (including drying the sawdust and drying the applied thermal insulation layer);
- Do you have the strength to cope with the entire volume on your own or will you have to hire help;
- How much will a square meter of insulation cost?
Despite the cheapness of the components, based on the calculation results, it may turn out that in a particular case, using, for example, mineral wool will be more profitable.
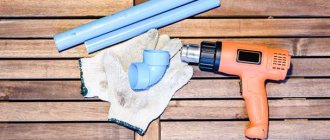
Tool
Tools and equipment you will need:
- drying shed;
- container for mixing the solution;
- shovels or construction mixer;
- construction sieve;
- buckets for supplying the solution to the pouring site;
- trowel and rule for leveling the layer;
- stapler and double-sided tape for attaching vapor-waterproofing membranes to walls and beams.
The work ahead is technologically simple, but requires participants to be in good physical shape. It is quite possible to insulate the ceiling in a bathhouse alone; for the home it is better to involve a partner, or even two.
Ceiling insulation options
When insulating the ceiling with sawdust, you should be careful not to miss the cracks that are always present on the surfaces. To eliminate them, polyurethane foam is used.
There are several options for arranging thermal insulation of the ceiling using sawdust, both using pure wood raw materials and by adding additional additives to it, such as clay, lime, etc.
The most popular methods are:
- use of sawdust in its pure form;
- the use of additives - cement and lime;
- the use of additional components - clay and lime.
Surface preparation
Before insulating with sawdust on flat floors, the following preparations are carried out:
- the wood is treated with an antiseptic and fire retardant or a complex action drug;
- the subfloor is laid out - the surface of the beams is covered with boards;
- the cracks are sealed with polyurethane foam or silicone;
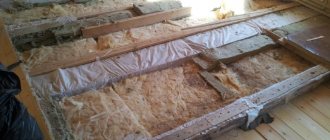
- A vapor barrier film is laid on the subfloor from the attic or upper floor.
ATTENTION! You cannot use ordinary polyethylene - its durability does not exceed 3 years. Selecting the optimal composition of the insulating mixture The choice of binder affects the thermal insulation properties, weight and durability of the insulating mixture.
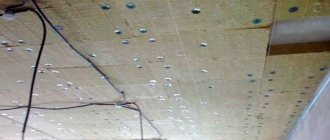
Ceiling insulation only with sawdust
This method is simple and consists of several steps:
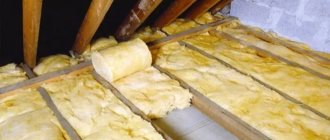
- Ceiling insulation made from sawdust is poured onto the floor of the attic in a layer of 15-20 centimeters and carefully leveled, often to the very level of the beams, but not compacted.
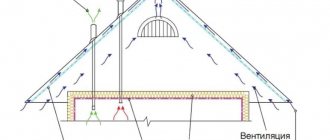
- Furnace ash is poured in one layer on top of the insulation. Now a vapor-permeable superdiffusion membrane is being used instead. Thanks to this coating, moisture is removed from the sawdust without hindrance, and this circumstance prevents the process of rotting. Such films are characterized by one-sided vapor permeability.
- If the attic space is planned to be used, then plank flooring must be secured along the beams. The boards are nailed so that there are small ventilation slots between them.
Insulation under heating structures
Installation of the elements of the “warm floor” system can be carried out on any type of base, if before this a support was made in the form of a screed and an insulating layer was laid on it. A solution of sawdust with any binding material (recommended proportions is 3:1) solves both problems simultaneously: the frozen mixture becomes a strong support; The high sawdust content allows the screed to be considered a heat insulator. The strongest screed will be made from cement and sawdust.
Tape-type heaters are laid on top of the insulating layer. For other elements (pipes, cables), channels are made in advance or filled with a second screed made of heat-conducting material.
Thermal insulation of the ceiling with sawdust and additives
There are several options for how to properly insulate a ceiling with sawdust, if you use additives such as lime, clay, cement and others.
To prepare the insulating mixture according to the first recipe, you will need the following ingredients:
- well-dried sawdust - 10 parts;
- lime and cement - 1 part each;
- water – from 5 to 10 parts;
- a little copper sulfate, used as an antiseptic.
Work on insulating the ceiling with sawdust in a private house is carried out in stages:
- First, cement and lime are mixed.
- Pre-prepared sawdust is placed in a large container; you can use a concrete mixer.
- A cement-lime composition is added to them and all components are thoroughly mixed.
- 3 tablespoons of copper sulfate are poured into 10 liters of water and slowly poured into the previously prepared mixture of sawdust and additives. When working with vitriol, you must follow safety precautions, using a mask and gloves.
- All components are mixed well. The mixture is then considered ready when there is a small amount of it, it will not crumble if you unclench your palm, and when water does not drain from it.
There is another recipe for making a heat-insulating mixture consisting of sawdust, cement and limestone. It is often used to insulate the ceiling in a bathhouse with sawdust. In this case, vitriol is not used, since at high temperatures it begins to release harmful components into the environment.
To prepare the composition, take:
- dry sawdust – 10 parts;
- clay – 5 parts;
- lime – 1 part;
- water - from 7 to 14 parts.
The mixture is made as follows:
- The clay is poured with 2 parts of water and waited until it is completely soaked. The solution is stirred until its consistency is similar to thick sour cream. There should be no lumps in it.
- Lime is mixed with sawdust and added to the clay solution. Mix all the components thoroughly, adding another portion of wood raw materials from time to time.
- To make sure the composition is ready, use a regular wooden stick. It is placed vertically in the solution and waited for a while. It is considered ready if the stick does not fall. When the mixture turns out to be too liquid, it should be left for 24 hours to allow the excess moisture to evaporate.
An alternative recipe can be used. In this case, instead of clay, gypsum is used in the same amount. But this mixture has a big drawback. It lies in the fact that the prepared solution dries quickly and therefore needs to be prepared in small portions.
General
It is worth noting that this material alone is not able to play the role of thermal insulation. Sawdust insulation is supplemented with clay, cement, lime and other similar substances with astringent properties. Before using the mixture, additional processing is also necessary. In such cases, copper sulfate or other substances of a similar type are used. This is done in order to protect the material from rapid combustion, as well as to prevent the appearance of various living creatures, such as termites or ants.
Using sawdust as insulation
Creating ceiling insulation from sawdust
There is nothing particularly difficult about how to insulate a ceiling in a private house with sawdust. After completing the preparation of the ceiling surface, they begin laying thermal insulation in small layers, leveling and compacting each of them. The height of the insulation should be level with the top of the ceiling.
A thin layer of ash is poured on top of the mixture of sawdust and additives. It will protect the insulation from pests and fungus. A couple of weeks after completing the insulation of the ceiling with sawdust in a private house, when the mixture is completely dry, a vapor barrier layer is laid on top of it. It is necessary to prevent wood waste from becoming saturated with moisture present in the air.
Vapor barrier material, usually polyethylene film, is attached to the floor beams using a mounting stapler. The result of the work done will be a thermal insulation layer covered on both sides with a vapor barrier.
Why sawdust as ceiling insulation has been relevant for so many years
Despite the variety of a large number of materials for thermal insulation of ceilings offered by the modern construction market, sawdust continues to be popular because it:
- the cheapest method to keep warm;
- time-tested method;
- An easy-to-install insulation option that anyone can do with their own hands.
The effectiveness of sawdust insulation is influenced by compliance with the technology of the work performed. The most important thing is to use only well-dried material, wait until the mass consisting of different components has completely dried before you start finishing the floor. A correctly prepared solution and high-quality installation will extend the service life of the insulation and enhance its properties.
Nuances of insulating ceilings in a wooden house
There are a number of nuances regarding how to insulate a ceiling with sawdust in a wooden house. Thermal insulation of floors in this case can only be done from the top side, if the raw materials are not pressed into slabs or mixed with clay.
When using sawdust to insulate wooden floors, you need to make sure that they are dry. Such chips, unlike wet ones, will crunch and crumble when squeezed into a lump by hand.
All cracks on the wooden surface are filled with polyurethane foam. Sheets of cardboard are laid on the ceiling and nailed with a stapler. Then, when insulating the ceiling in a wooden house, the first layer about 10 centimeters thick is filled with sawdust. Larger shavings are also suitable for this. After completing the installation, the sawdust must be compacted by walking on it.
Next, a second layer of the same thickness as the first is poured onto the compacted material. Fine sawdust is used for it. They are compacted again.
How to determine the thickness of the insulation layer?
All other things being equal, sawdust requires a greater wall thickness than mineral wool and other artificial insulation materials. Which one depends on the region in which construction is taking place, the material of the enclosing structures and a number of other factors. In the most general terms, we can say that houses for year-round use require insulation with a thickness of at least 30-35 cm (for an energy-efficient building, a thickness of 40-50 cm is recommended); for a summer house or house for seasonal use, 25 cm may be sufficient.
Determining the amount of backfill material is quite simple. You need to multiply the perimeter of the house by the thickness and height of the walls, without subtracting the area of windows and doors (so that there is a reserve). If the floors are insulated with the same material, you need to make similar calculations and sum up the numbers. And then multiply the result by two, since sawdust, remember, settles quite strongly.
Thermal insulation of bath ceiling
When insulating a bathhouse, the ceiling surface is sheathed with wide boards. To install the chimney, a ceiling cut is performed. Components can be purchased ready-made in a store or made by yourself. In the second case, a circle is cut out in the middle of a stainless steel sheet that completely covers the hole for laying the chimney.
Next, the edges of the cutout in the ceiling are sealed with basalt wool, and strips of metal are stuffed on top of it. The chimney is secured with guide strips so that it can move freely due to thermal expansion. A plate is screwed from below and the resulting passage is thermally insulated.
Insulation of the ceiling in the bathhouse is carried out in the following sequence:
- In the attic room, a vapor barrier is laid with an overlap of 10-15 centimeters with a bend on walls of a similar size.
- The mixture for the sawdust ceiling, prepared in accordance with one of the previously described recipes, is laid in layers, each time, well leveling the insulation and compacting it. If the bathhouse is planned to be used only in summer, then the thickness of the thermal insulation layer can be 5 centimeters, and when in winter, then at least 15 centimeters will be required.
- After finishing laying the insulation, you need to wait until it dries. If cracks have formed on the surface, they are sealed with the same composition. To keep their quantity to a minimum, salt is added to the mixture before installation at the rate of 5 - 6 tablespoons per 10 liters of water.
- It sometimes takes up to a month for the insulation with sawdust to dry. Then a thin layer of lime is poured over the mixture and a vapor barrier is laid. Next, the surface is covered with boards, if desired.
When using a mixture of sawdust and gypsum for thermal insulation, it should be applied in thin layers. When performing work, you must not forget that the gypsum composition dries quickly. By the way, both methods of insulation can be used when working with horizontal and vertical surfaces.
We insulate the house
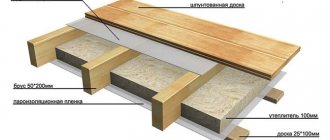
The ceiling is insulated with sawdust only from above. The first thing to do is to stitch the floor beams with wide boards. Their thickness should be from 25 to 35 mm. The cheapest option is to take simple planed ones and dry them to natural moisture. But experts advise using sheet piling, this option is more expensive. The boards can be attached to the beams using nails or screws. But sawdust insulation is heavy and the boards need to be secured in a special way. Nails or screws are driven in at an angle, each time changing the angle in the opposite direction. Nails take 100 mm, screws 50 mm.
The next step is to treat the beams and boards with an antiseptic. This way they will be less susceptible to rotting and fungi. A vapor barrier is spread on top. Roofing felt or PVC film is also suitable for home use. It is attached over the entire surface with an overlap of 10-15 cm. All joints are glued with bitumen or tape. In this case, the edges of the vapor barrier should extend 10-15 cm onto the walls. If there are voids on the sides, then they need to be covered with polyurethane foam. The bends must be attached to the walls using a stapler.
The sawdust is laid out in layers, constantly leveling and compacting. The height of the embankment usually reaches the upper level of the ceiling. Experts recommend scattering a thin layer of ash on top. It plays a protective role against fungi, mold and bugs. After spreading, the composition is allowed to dry for 2-3 weeks and covered with a vapor barrier on top, which prevents moisture from getting to the insulation and excess evaporation. You need to attach the vapor barrier to the floor beams using a stapler. As a result, the sawdust should be wrapped in an envelope of lower and upper layers of vapor barrier.
Then the floor beams are extended, and sheathing is made for the finishing or subfloor. Or a metal mesh is laid on top of the beams, and a cement screed is made. It all depends on the choice of material for the floor in the future.
Pros and cons of using sawdust
Thermal insulation materials are becoming more and more advanced. A new generation of insulation products appears on sale almost every year. Unfortunately, the more high-tech and new the insulation is, the higher its price. Not everyone can afford to use the latest developments in construction. This is the reason that the old methods used by our grandfathers to preserve heat in homes do not lose their popularity and relevance. Many years ago, ceilings were successfully insulated using sawdust, and this insulation still exists and successfully copes with its tasks. At the same time, it is difficult to predict how, for example, polystyrene foam will perform after a couple of decades of service.
The main advantages of this insulation method include:
- natural origin of the material and its purity;
- buying sawdust will not be difficult;
- minimum cost;
- installation is extremely simple;
- The service life of such insulation is long.
By using sawdust as thermal insulation, you can not only save your savings, but also take care of nature. Sawdust is as environmentally friendly as possible and does not harm humans and the environment. And they help significantly save on payments for heat carriers - coal, gas, electricity. The process of thermal insulation of a residential building itself is divided into several stages, including insulation of the surface of the ceiling, floor and walls. Each type of surface requires a special approach, since it has its own characteristics. In the case of insulating the ceiling surface, the insulating material can be placed on the attic side or on the living room side.
What to consider?
It is important to select a material with an appropriate particle size. Fine sawdust from cutting wood has the best thermal insulation properties, but it is heavier, scatters during operation, and is difficult to work with.
Large chips have lower thermal protection characteristics. Therefore, it is better to use carpentry waste. This material does not have to be dried additionally, since already dried wood is used for joinery.
For thermal insulation of the house, you should choose pine sawdust, as it contains resin, which pests do not like.
Pine sawdust will save your home from pests.
Sawdust must be prepared accordingly. The material is treated with an antiseptic composition, dried well and always mixed with fluff lime to protect the insulation system from pests. The required amount of lime is at least 10% of the total mass of wood material.
The mixture is thoroughly mixed until smooth. To ensure uniform mixing, the materials are poured onto a special board made of wood or metal. Then the mass is turned over with shovels until the components are completely mixed.
The layer should vary between 20–30 cm. The secret is good compaction. This is the insulation of the roof with sawdust.
The advantages of this method of insulation
At first glance this seems absurd. In modern conditions, there is an abundance of artificial materials and insulation for every taste and budget, to resort to ancient methods of insulating roofs and ceilings, to use old “old-fashioned” methods? However, not everything is so obvious, because everything new is often well forgotten old, and some technologies of the past remain relevant to this day, and the method of insulating the ceiling of a bathhouse with earth has not sunk into oblivion.
Regular exposure of the bathhouse ceiling to hot air and water vapor requires a special approach to the issue of its insulation, both from the inside and from the outside (attic).
All methods of thermal insulation of roofs and ceilings can be divided into:
- By type of materials used:
- using natural materials;
hemmed (the ceiling is made from the inside, fastened to the floor beams);
For frequent use, other requirements for thermal insulation are met: the use of vapor barrier membranes, heat-reflecting foil, etc. These materials have their undeniable advantages: long service life, they are not subject to rotting, inedible for rodents, unsuitable for insects, quite light and durable, insulate from noise, easy and convenient to work with, increased fire resistance.
The most popular way to insulate the roof of a bathhouse was considered to be clay coating with the addition of sawdust. This mixture was used to cover the ceiling of the bathhouse from the attic side, and then additionally covered it with a layer of peat, sawdust, moss, tow, a mixture of these materials with sand, etc.
The advantages are the availability of materials, almost free of charge, environmental friendliness, etc.
- There is an attic space.
In this case, the ceiling insulation consists of the standard technology described above using natural materials. The method is not expensive, but requires physical labor and time. The ceiling is made of boards at least 4 cm thick, with them attached to the floor beams or continuous flooring. The work is carried out from the outside, attic side!
The second stage is to seal the seams between the boards with thick clay without additives. When the seams are dry, the entire surface of the ceiling is covered with a mixture of clay and some other natural material - sawdust, for example. The layer must be at least 5 cm thick. After drying, a layer of earth of 10 centimeters or more is poured on top.
You may be surprised, but the method described above for insulating the ceiling of a bathhouse with earth can also be used... in the absence of a roof as such! A ceiling with a layer of earth will itself act as a roof, and moreover, in addition to its useful function, it will also perform a decorative function. We are talking about Scandinavian green roofs, on which strawberries are grown, grass and even small shrubs grow.
The main difference between such a “roofing cake” installed over a bathhouse will be the additional layers of waterproofing, because Precipitation passing through the ground should not be absorbed into the clay. Despite the fact that a layer of soil of 10 cm is enough to absorb rainfall, average rainfall does not always occur.
To create a grass-covered roof, waterproofing is laid over a layer of dried clay mixture. Then a layer of geotextile is desirable (previously tree bark and birch bark were used for these purposes), and at least 20 cm of soil is poured. Warmed from the inside and moistened by rain from the outside, the soil on the roof of your bathhouse will quickly be overgrown with grass or moss and will become a wonderful decoration for the site.
It is no coincidence that the use of clay is so popular. This method of insulation has a number of advantages compared to other methods:
- proven and reliable technology: it has been developed over the centuries, it has long proven its effectiveness;
- environmental friendliness: the material is completely safe for the health of people, animals, and the environment;
- this method of insulation does not significantly load the floors and foundation;
- all work can be done with your own hands, even without much experience in construction;
- the material does not attract rodents and insects;
- fire safety: clay does not burn, so it can be safely used for insulation near pipes, stoves and other heating devices;
- cheap: you can even dig up the clay yourself, i.e. for free.