The advantages of heated floors (abbreviated as TP) over conventional radiators are well known. Therefore, many owners of apartments and private houses want to install underfloor heating circuits and supply coolant from the existing radiator system.
A number of difficulties arise here - you need to install and correctly connect the water heated floor from the heating system so that the water temperature in the loops remains within 55-60 °C. But the first task is to make sure that it is technically possible to lay the TP “pie” and connect to existing highways at the lowest cost.
Features of two-pipe circuit wiring
The two-pipe system comes in several varieties.
They have a different connection diagram for heating radiators in a private house, and a different vector of coolant movement. In small private houses, the following types of two-pipe heating systems are used:
- dead end;
- passing;
- collector (radial).
Brief characteristics of two-pipe systems
Collector is the most expensive heating distribution scheme for a private house due to the need to lay pipes to each battery, and their installation is hidden.
Open "gravity" two-pipe system
For successful operation of the “gravity” system, a slope of 3-5 mm/m is ensured during installation. Due to gravity, any type of heating system can operate if the necessary conditions are created - the slope of the coolant supply lines for natural circulation. It must be taken into account that the “gravity” system can only work with an open expansion tank.
Closed two-pipe system
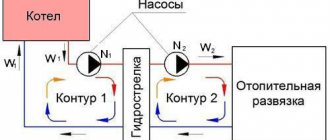
And in order to install the heating of a two-story private house with your own hands, the wiring diagrams must contain the required number of liquid supply branches. One branch of the collector should power the batteries on the upper floor, the second branch should power the batteries on the lower floor. The water that has given up its heat returns to the boiler through the “return”. A closed system must have a circulation pump to create pressure.
What is the best way to heat?
There are as many opinions about how to heat a house as there are people. Some people prefer to heat with electricity, some with gas, and others with coal. Let's consider each option.
Coal is used in areas where there is no gas pipeline or as a backup type of heating. When burned, coal emits a large amount of smoke and soot. It has low humidity levels. This property ensures the release of high temperature. Due to the use of coal, the room becomes very dirty, and it is also necessary to have a place to store fuel. It is necessary to periodically maintain the combustion process by adding a new batch of coal into the boiler and cleaning the boiler itself.
Electricity is a costly service for heating large areas. It can be used in small rooms and compact spaces. In our regions there are often power outages, and therefore, despite the variety of electric heater installations (from infrared emitters to boilers and electric boilers), there is a risk of being left not just without light for an indefinite period, but also in a cold house.
Gas is the best and most popular heating option for a private home, for all types of areas and houses, since it completely warms up the space.
Heating system elements
In country houses it is better to use water heating. This method is considered traditional. Heat is supplied to the house using a coolant, which can be heated by various energy carriers.
Such a system includes the following components:
- heating system devices;
- heat source;
- pipeline network.
If you do not have the time and opportunity to handle heating yourself, then contact the GWDE Engineering Company. Specialists in the installation of engineering systems will perform their work efficiently and will provide a guarantee for up to 7 years.
Full work is impossible without such equipment as:
- expansion tank;
- buffer capacity;
- circulation pump;
- distribution manifold;
- automation devices;
- hydraulic separator;
- heating boiler.
It is important that for a water heating system a mandatory piece of equipment is an expansion tank. Everything else is installed if required.
Three-way valve circuit
In the vast majority of houses, this combined underfloor heating system is installed.
Specification of materials and equipment
It includes:
- presence of heating radiators with heating up to 70-80C
- separate TP circuit with an average water temperature of 40C
The main question here is how to get a flow of water for heated floors from the 80 degrees going to the batteries at half the temperature.
The problem is solved using a three-way thermostatic valve.
It is mounted on the supply pipe. At the same time, do not forget to install a circulation pump after it.
Colder water is taken from the return of the heated floor. Mixing with hot water coming from the boiler, the coolant acquires the lower temperature necessary for underfloor heating.
The disadvantage of this scheme is that you will not be able to accurately limit and regulate the flow of cooled water from the return. What does this mean?
The fact is that both water that is too cool and, vice versa, water that is overheated beyond normal will periodically enter the pipes of heated floors.
The efficiency and comfort of the entire system suffers because of this.
An unprincipled person may not notice this, however, these temperature differences are present in this circuit, and there is no escape from them. Of course, time periods of supply of hot and unheated coolant can be compensated by the thermal inertia of the screed concrete.
But this is all relative. You can never accurately calculate the optimal thickness with such heating.
The advantages of such a combined scheme with a three-way valve:
- easy installation
- affordable price of equipment
This installation method justifies itself if you have a small apartment or house. And you don’t suffer from excessive demands for super-comfortable living conditions.
Heating with electricity
It's no secret that not all communication and engineering networks reach suburban villages. But one network is present always and everywhere. This is a power line. True, in most cases one can argue about the quality of supply, but electricity is available everywhere.
Therefore, heating the house using electric current is the best option. In this case, you can use heating devices such as:
- Oil radiators
- Electric convectors
- Heat fans
- Infrared emitters
- Electric boilers for water heating
The first four options are the simplest. All you need to connect them is an outlet. Such devices can be installed in any room and anywhere. Simplicity, convenience and safety are what characterize them. And the only negative is the receipts that you will receive for the electricity consumed. The numbers in them will be rather large.
But with a heating boiler that runs on electricity, there are more problems:
- Firstly, you will have to install the entire heating system, which includes pipes, heating radiators, shut-off valves and all kinds of devices for monitoring and regulating the temperature.
- Secondly, this is the boiler itself. It's not cheap, plus its wiring and connection. So you can’t do without financial expenses.
There is one more point that is worth paying special attention to. The supply of electricity largely depends on the quality of the laid lines and the power of the transformer. And power outages in most cases are associated with these two factors
And power outages in most cases are associated with these two factors.
The first is fraught with broken lines in winter. And if there is not enough transformer power for all consumers, the boiler will operate inefficiently. What can you do? Option one is to install a combination boiler that runs, for example, on both electricity and wood. You can choose another combination of different types of fuel.
Choosing a heating boiler
If there is a gas main in the region, then the question of fuel for the boiler simply does not arise - gas units will be both affordable and economical. In addition, gas will in any case be cheaper than electricity or solid fuel. However, if the settlement is not gasified, then the only option will be a solid fuel or liquid fuel unit.
Gas combi boilers, which can also operate on liquefied gas (the nozzle needs to be replaced), can be a good option in case of gas supply interruptions. However, liquefied gas itself is not advisable to use, since it is quite expensive and is consumed quickly.
Provided that diesel fuel is purchased at wholesale prices and in large quantities, it would be quite logical to purchase an oil-fuel boiler. It is quite capable of heating a large house. In all other cases, the best option would be to connect heated floors and radiators to a solid fuel boiler - coal, wood, pellets.
Please note that when developing a diagram for connecting underfloor heating and radiators, it is worth considering that floor heating is more efficient and economical. However, you don’t need to think that radiators are of no use. These devices help retain heat inside the house and prevent its loss through windows, doors and cold walls. Therefore, a well-designed project and selected components, as well as reasonable control, will allow you to create an effective and at the same time economical heating system.
The most profitable option for heating equipment would be a condensing boiler. Fuel consumption in such installations is more economical, due to which the efficiency of the units reaches values much higher than those of other boilers. Condensing boilers are equipped with automatic electronic ignition and require a circulation pump. Therefore, such units require electricity.
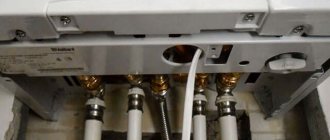
How to connect to the boiler
An economical option, if you have any own boiler (gas, steam, running on liquid or solid fuel) in a private house, is to use a circuit for connecting a water heated floor directly to it. This is very convenient, since the floor will work regardless of the heating in the room, even in summer if necessary.
All necessary fittings are connected to the boiler. A circulation pump is connected; there are modules where it is already mounted inside the container. From the tank, water goes to the collector unit, where it is distributed along the contours of the floor. Having passed through the loops, the liquid returns to the thermogenerator through the return pipe.
The advantage of this method is the ability to adjust the boiler to the heating level of the coolant required for heated floors.
The main features that you need to pay attention to when installing such a structure:
- When using a gas device, it is recommended to connect a condensing boiler - this will achieve the highest efficiency of the system and extend the life of the heat exchanger.
- When using a solid fuel boiler, a buffer tank will be required. Without it, it is difficult to adjust the heating level of such devices.
But for this, a heat exchanger must be installed above the firebox, to which the floor pipes are connected. It will also be necessary to install a pump to circulate the liquid, and a mixing unit to dilute the water to the desired heating level.
Regulations and restrictions
The main feature of water-heated floors is that they are not high-temperature. According to regulations, heating of the coolant in this system should not exceed 55 degrees. But in practice, the standard is considered to be from 35 to 45 degrees.
It is worth noting that the temperature of the liquid circulating through the pipes differs from the degree of heating of the floor. If there are 35 - 45 degrees near the water, the surface will warm up to an average of +28.
According to the standards, the recommended floor temperature for private houses or apartments is:
- kitchen, bedroom, living room - 26 degrees;
- in rooms where people are not constantly present (bathtub, toilet, corridor) - 31.
A warm water floor is an independent pipeline, which can be single-circuit, double-circuit, or even multi-loop, so the design requires a separate circulation pump.
It can be built into the boiler, or can be located separately. With its help, not only the movement of water is carried out, but also the temperature difference of the liquid at the inlet and outlet is adjusted. According to the standards, the permissible difference is 10 degrees.
Important! When choosing a pumping device, the main thing is not to make a mistake with the power. The maximum permitted coolant speed is 0.6 m/s.
Based on these standards and restrictions, you can assemble a heated floor with your own hands.
Which heating is better: warm water floor or radiators
Which is better: warm water floor or radiators?
In most cases, the choice of heating system is between water heated floors or radiators. In order to decide, it is enough to compare both options according to several key characteristics, which will allow you to evaluate all the possibilities, pros and cons of the technologies.
Economical
This is one of the most important issues, which in the future will determine the amount of annual/monthly heating costs. If we compare both options for the distribution of hot air flows in the room, it turns out that the greatest heat from the battery remains next to it. Heating from the heated floor occurs throughout the entire area of the room.
Batteries are always installed under a window to avoid intense condensation. But this same decision causes intense heat loss to occur in the same zone. In addition, if the walls are insufficiently insulated due to the high temperature difference, the situation is aggravated.
Also, the efficiency of using a heated floor is increased due to the fact that during its operation the concrete slab is heated, which becomes a powerful source of heat, and the radiator can only act on the nearby air. As a result, savings when using heated floors average up to 30%.
Which is cheaper: water heated floors or radiators?
In this case, much depends on the area of the premises and the installed equipment. But due to the large amount of work involved in installing concrete screeds, hidden laying of pipelines, and the need to attract specialized specialists to perform such tasks, the cost of equipment and its installation when using a radiator system will be lower.
Inertia
The rate at which the room heats up when the heating is turned on is an important issue that largely determines the degree of comfort in using the system. In this case, deciding whether a warm water floor or radiators is better will not be easy. The peculiarity of the first option is that, for objective reasons, it will take longer to heat up a concrete slab than a radiator exposed to air. But at the same time, cooling when the heating is turned off using a heated floor will occur much more slowly. In this regard, the decision about whether this is a plus or a minus of water heated floors can only be made by the user himself.
Maintainability
The main problem in this case becomes the issue of accessibility of installed equipment and pipelines. For water heated floors, this is a minus, but at the same time, provided that the equipment is properly selected and the system is correctly designed and installed, the service life of hidden heating without the need for repairs will be equal to the service life of the pipes. That is, on average, you won’t have to open the screed for about 50 years. Equipment based on radiators is always open to access, but at the same time it requires repairs much more often.
There are many arguments in favor of each option, but the optimal solution in most cases is to use a combined system using both technologies. At the same time, all the pros and cons of warm water floors and radiators will be taken into account and used so that in the end the project will only benefit from their joint use.
Connection options
To ensure normal operation of the TP circuits and get the long-awaited feeling of comfort, it is necessary to resolve 2 issues:
- Supply coolant with a temperature of no higher than 50 °C (maximum 55 °C) into the heating circuit pipes. Overheated floors cause discomfort for most people; the optimal temperature for finishing is 26 °C.
- Ensure the required coolant flow in radiators and underfloor heating loops. If the diameter of the supply line is too small or the circulation pump does not develop the required performance, the radiators and heated floors will heat equally poorly.
Let's look at several schemes that allow you to connect a water-heated floor to an existing heating system. Let's see how well the issues of temperature and coolant flow are resolved in each option:
- direct connection to a two-pipe radiator network;
- the same, using regulating thermostatic heads;
- insertion into the main line of a single-pipe system with an additional pump;
- full connection with a separate pipe from the boiler.
Direct connection to the radiator network
The insertion of the TP circuit into the supply and return of a two-pipe distribution will function tolerably under the following conditions:
- the total heated area is relatively small - up to 100 square meters;
- heat source – gas boiler capable of maintaining the coolant temperature within 40-50 °C;
- the circulation pump installed in the boiler room has sufficient performance;
- heated floors are designed for heating small rooms - bathroom, kitchen, children's room.
The direct connection scheme is suitable only for small heating areas.
The direct connection scheme has a right to life, but in general it is very imperfect. Judge for yourself: it is much easier for water to move along a path of low resistance further along the main line than to flow into a long pipe of the heating circuit.
Point two: when severe cold weather sets in, you yourself will raise the temperature in the boiler, the floor surface will heat up, and the room will become stuffy. The tiled bathroom will turn into a bathhouse. Please note: intensive heating of the bathroom is absolutely useless; people are not there all the time.
Option for direct insertion of the circuit instead of a dead-end radiator with two-pipe wiring
For reference. As some home craftsmen also do: they connect the TP circuit to a break in the return line running from the batteries to the heat source. And then they wonder why the heated floors and radiators don’t work. The reason is an increase in the hydraulic resistance of the entire branch and a decrease in coolant flow.
Using RTL valves
Special thermal heads of the RTL type will directly help to correctly solve the issue of regulating the water temperature when connecting a heated floor. An automatic valve is installed on the return pipeline and can be easily adjusted to a certain temperature. The work algorithm looks like this:
- Until the heating of the coolant reaches the value set on the thermal head, it quietly circulates through the pipe of the floor circuit.
- When the water temperature rises to the set value, the head actuator closes the thermostatic valve. The circulation stops and the coolant cools down.
- After the temperature decreases as a result of cooling, the thermostat opens the passage and the movement of water resumes.
Heating is regulated based on the temperature of the return flow limited by the thermal head
Reference Information. The European company Oventrop has long been offering solutions for such cases - UniBox blocks built into the wall. There is an RTL type thermal head inside, the adjustment handle is brought out. There are versions with two valves - one controls the coolant flow based on the return flow temperature, the second controls the heating of the surrounding air.
The disadvantage of the solution is the limitation of the pipeline length. If the length of the loop exceeds 50 m, the transformer transformer will begin to operate unevenly due to increased resistance. To heat medium and large rooms, you will have to divide the heated floors into 2-3 circuits and the same number of monoliths separated by expansion joints, as shown in the drawing.
Now about the pros:
- heating with heated floors can be organized in any room, without being tied to the boiler and furnace;
- the price of the product is incomparable with the cost of mixing units and additional pumps;
- if the batteries are equipped with air thermal heads, the TP system will be able to operate in the summer - the radiators will turn off themselves.
The described scheme is also suitable for connecting underfloor heating to a two-pipe centralized heating network. But keep in mind one nuance: dirty coolant can quickly clog the thermostatic valve or damage it. The master will tell you about the intricacies of the operation of RTL heads in the next video:
Is it possible to connect to a single-pipe distribution?
In order to power the heated floors from heating - the single-pipe "Leningrad" favorite of many craftsmen - you will have to assemble the mixing unit with your own hands and install a second pump, as shown in the diagram. For the normal functioning of the system, the following conditions must be met:
- the internal diameter of the distribution line is at least DN25, the maximum number of radiators on the ring is 5 pieces;
- the connection of the TP loop is made into the return pipeline after all batteries;
- the minimum distance between the supply and return taps of the heated floor is 30 cm;
- To maintain the temperature in the circuit, a three-way mixing valve is installed.
Note. A similar scheme is used by apartment owners to unauthorizedly connect TPs to the old type of central heating - single-pipe vertical risers.
In this and other diagrams, shut-off valves and automatic air vents are not shown, but it is necessary to install these fittings.
Three-way valve - a simplified design, capable of preparing water at a fixed temperature of 45-50 ° C. The pump “drives” the coolant through the loop, and the valve mixes in portions of hot water from the main line.
In practice, the scheme is used quite rarely. The reason is instability of operation and imbalance of radiators connected to a single pipe of the Leningradka. When the three-way valve opens slightly and recharges the heating circuit, the pump pressure is transferred to the main line, and the water flow in the batteries changes.
Advice. If you want to assemble a reliable underfloor heating system with your own hands, it is better to install separate supply and return pipelines from the boiler. The consequences of perversions with a single-pipe radiator network are unpredictable.
Traditional scheme with mixing unit
When it is necessary to install underfloor heating in each room of a two-story house, you cannot connect to the existing radiator heating. It is necessary to lay separate pipelines and install a distribution comb. What connection options are used:
- if the length of the circuits does not exceed 50 m (including connections to the collector), thermal heads are installed on the comb that respond to the return flow temperature;
- mixing unit with manifold and two-way valve;
- the same, with a three-way thermostatic valve.
In the first case, the principle of operation is similar to inserting one loop through the RTL head, only the regulators are located on the comb and control each circuit separately, as is implemented in the photo. Circulation is provided by the main pump located in the combustion chamber or inside a wall-mounted gas boiler.
In the second option, hot water is mixed by a two-way valve installed on the supply and controlled by a thermal head with an external temperature sensor. The latter is hidden in the collector pipe or screwed to it from the outside.
When the temperature of the supplied coolant increases, the liquid from the sensor flask presses on the valve stem and it closes. The scheme provides for the installation of an additional pump that pumps water through all loops of the TP.
The scheme with a three-way valve, whose operating principle is described above, is more advanced and is designed for a significant flow of coolant in heated floors. The disadvantage of both options is the high price of the equipment and the complexity of installation. All details about assembling the comb and how to connect the heating circuits are set out in the corresponding manual.
Which pipes are suitable for combined heating
It is very convenient to install the water circuit for underfloor heating using cross-linked polyethylene pipes. Due to the flexibility of the material, products can be laid in rooms with complex configurations, and not just in a straight line. Installation of such pipes in a screed is allowed. Products are delivered to places of sale in coils, so it is not difficult to deliver them to the place of work.
As for connecting radiators, polypropylene pipes are suitable for these purposes. They are quite cheap and easy to work with. To install them, you will need to prepare a chamfer, nozzles, a socket welding machine and a shaver if the pipes are reinforced. In addition, for the installation of radiators, locking elements are also needed.
Connection from central heating
According to the legislation of the Russian Federation, the Republic of Belarus, Ukraine and other countries of the former USSR, unauthorized intervention in the centralized heat supply system is prohibited. Simply put, for connecting additional heating devices and heated floors, you face a large fine and an order to dismantle the extra heaters.
Note. Similar measures and responsibility are provided for connecting the transformer substations to the centralized hot water supply (DHW) network.
How is an unauthorized connection from centralized heating detected:
- neighboring apartments receive less heat, residents begin to write complaints, a commission from the management company identifies your modernization;
- due to pressure surges or poor-quality installation, a breakthrough and flooding of the lower apartment occurs;
Leaking connection inside a concrete monolith - responsible persons note a large difference in the readings of the common house meter and apartment heat energy meters;
- if you connect the heated floor circuits in series with the batteries, the hydraulic resistance of the entire branch increases, the flow decreases, and the apartments along this riser become colder.
Some “cunning people” advise connecting the TP loops through a plate heat exchanger in order to isolate the circuits from the central heating. The catch: the hydraulic resistance of the network will not increase and a pipe break will not cause serious flooding, but the amount of heat removed will still increase.
How to do underfloor heating legally:
- Contact the heating supply organization with an application and obtain permission.
- Together with the permit, obtain technical specifications for installation and connection of floor circuits.
- Develop and approve the project.
- Install the system yourself and put it into operation.
It must be admitted that the vast majority of applicants are rejected at the application stage. An exception is made for residents of new buildings with individual connection of apartment heating to distribution risers. But if you decide, at your own peril and risk, to embed heating circuits into the heating network, proceed to study the next section.
Installation procedure
A one-pipe system is assembled as follows:
- In the utility room, the boiler is installed on the floor or hung on the wall. Using gas equipment, the most reliable and efficient single-pipe heating system for a two-story house can be installed. The connection diagram in this case will be standard and will allow you to carry out all the work, if desired, even independently.
- Heating radiators are hung on the walls.
- At the next stage, the “supply” and “return” risers are installed on the second floor. They are located in close proximity to the boiler. At the bottom, the outline of the first floor is connected to the risers, and at the top – to the second.
- Next, the connection to the battery lines is made. A shut-off valve (on the bypass supply section) and a Mayevsky valve should be installed on each radiator.
- An expansion tank is mounted in the immediate vicinity of the boiler on the “return” pipe.
- Also, on the “return” pipe near the boiler, a circulation pump is connected to a bypass with three taps. A special filter is installed in front of it on the bypass.
At the final stage, the system is pressure tested in order to identify equipment malfunctions and leaks.
As you can see, a single-pipe heating system for a two-story house, the design of which is as simple as possible, can be a very convenient and practical equipment
However, if you want to use such a simple design, at the first stage it is important to make all the necessary calculations with maximum accuracy
When thinking about installing heating, we first determine what type of fuel will be used
But at the same time, it is extremely important to decide how independent the planned heating will be. So, a heating system without a pump will be truly autonomous, which does not require electricity to operate. To operate effectively, all you need is a heat source and properly positioned piping
To operate effectively, all you need is a heat source and properly positioned piping.
A heating circuit is a set of elements designed to heat a home by transferring heat to air. The most common type of heating is a system that uses boilers or boilers connected to a water supply as a heating source. Water passing through the heater reaches a certain temperature, and then is sent to the heating circuit.
In systems with a coolant that uses water, circulation can be organized in two ways:
Boilers are used as a heat source for heating water. Their principle of operation is based on the conversion of a specific type of energy into heat and its subsequent transfer to a coolant. Depending on the type of heating source, boiler equipment can be gas, solid fuel, electric or fuel oil.
Depending on the type of connection of circuit elements, the heating system can be single-pipe or two-pipe. If all the circuit devices are connected in series relative to each other, that is, the coolant passes through all the elements in order and returns to the boiler, then such a system is called a single-pipe system. Its significant drawback is uneven heating. This is due to the fact that each element loses some amount of heat, so the difference in boiler temperatures can be significant.
A two-pipe type system involves parallel connection of radiators to the riser. The disadvantages of such a connection include the complexity of the design and twice the material consumption compared to a single-pipe system. But the construction of a heating circuit for large multi-storey premises can only be done with such a connection.
A system with gravity circulation is sensitive to errors made during heating installation.
Single-pipe wiring and connection to it
When there is only one pipe in the system through which the coolant flows, it is called single-pipe or “Leningrad”. Previously, all houses were connected in this manner, but now more efficient working schemes have been developed.
Single-pipe wiring
The Leningradka is characterized by trouble-free operation and high reliability. Its main drawback is the temperature drop as the coolant moves. The first radiators are much hotter than the last ones. The temperature may not be sufficient for rooms far from the boiler. If you connect a heated floor circuit to such wiring, the temperature will drop even more, plus the hydraulic resistance will increase, which will require the installation of an additional pump.
Coil of pipes for heated floors
To more or less balance such a system, you will need to meet the following requirements.
- To prevent the temperature on the radiators from dropping, the connection must be made on the return section of the line, after all the batteries.
- For this you need to use a DN pipe
- Such a connection is allowed only to a circuit with no more than 5 radiators.
- To maintain the floor temperature at the same level, you need to include a three-way mixing valve in the system.
- This valve is designed in such a way that it constantly mixes hot water into the cooled water, keeping the temperature at the same level.
- Together with it, a pump must be included in the circuit for forced circulation. Due to it, water will move even when the valve is completely closed.
Three-way valve for mixing coolant
No matter how you cast magic, the result will always be somewhat negative if you don’t initially do everything as it should be. This system is also rarely used, since its operation cannot be called stable. A running pump creates some pressure inside the circuit to force the coolant to flow in the desired direction. When the valve opens, this pressure is transferred to the radiators, creating additional hydraulic resistance. This causes the radiators to become unbalanced and changes water flow.
When heating operates in this mode, accidents often occur. Therefore, before connecting, think about whether it might be cheaper to run the route normally from the boiler, through the mixing unit.
Advantages and disadvantages of underfloor heating from existing heating
Installing a water heated floor according to this scheme has several advantages:
- optimal and uniform heating of the entire floor surface, which is achieved by introducing additional control devices into the design;
- creating a comfortable indoor environment. All the heat is concentrated from below, and the cold air is located near the ceiling. This scheme is considered more comfortable for any person;
- for the construction of all elements, a material is used that is not susceptible to corrosion and destruction over a long period of time, subject to all installation rules;
- when installing a warm water floor, the movement of air masses in the room is reduced, which reduces the amount of dust. This has a positive effect on the body of people who suffer from allergies;
- using one source for floor and conventional heating, you can significantly save on installation and the number of additional units for their normal functioning;
The disadvantage of this design scheme is the impossibility of its use in multi-storey buildings with centralized heating. Some difficulties may also arise during the installation of all elements. But if you take into account all the recommendations, this is not so difficult.
How to fit a “pie” into a room with low thresholds
Almost all homeowners who decide to install underfloor heating in a habitable house or city apartment face this problem. The essence of the issue: the height of the thresholds of entrance or interior doors is not enough to install a full-fledged “pie” of warm water floors with screed (see drawing below).
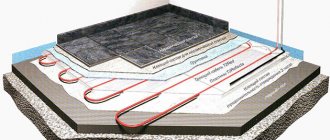
Let us analyze the composition of a monolithic heating circuit located on an interfloor or basement floor:
- Waterproofing - bitumen coating, more often - polyethylene film.
- Insulation – extruded polystyrene foam with a minimum thickness of 30 mm or polystyrene foam 5 cm.
- Damper tape around the perimeter of the room.
- A heating pipe (usually metal-plastic or cross-linked polyethylene with a diameter of 16 x 2 mm), laid in a snail or snake pattern.
- Cement-sand screed 8.5 cm thick.
- Floor covering (sometimes a vapor barrier layer is placed underneath it). The thickness depends on the material, laminate and linoleum will take up to 1 cm, ceramic tiles with an adhesive mixture will take about 20 mm.
The traditional surface heating scheme is made without reinforcement
An important nuance. If a monolithic heated floor is installed above the ground, the thickness of the insulation increases to at least 100 mm of polystyrene foam or 60 mm of extruded foam. The density of both materials is 35 kg/m³.
In total, the total height of the “pie” with a laminate coating will be 85 + 30 + 10 = 125 mm. No normal owner envisages such high thresholds. How to solve the problem and implement underfloor heating in a similar situation:
- Dismantle the existing screed to the very foundation - the ground or floor slab.
This is what multifoil looks like - a durable material with closed air chambers - Instead of a heat-insulating polystyrene layer, use multifoil up to 1 cm thick.
- Reduce the power of the tie to 60 mm. The structure will have to be reinforced with masonry or road mesh with dimensions of 150 x 150 x 4 and 100 x 100 x 5 mm, respectively.
- Use flooring systems - “dry” heated floors installed in wooden houses without screed. The total thickness of the “pie” is 6-10 cm.
- Heat the flooring with electric carbon film instead of a water pipe system.
Reference. The only room in the apartment where the thresholds remain high is the balcony and loggia. There is no need to reinvent the wheel; usually the monolith fits freely along with thermal insulation.
Overlay surface heating system, laid using a dry method.
Some home-grown craftsmen do not lay insulation at all or reduce the thickness of the screed to 4 cm. In the first case, half of the generated heat will go into the basement, the ground or to the neighbors below; in the second, the monolith expanding from heating will soon crack.
An expert will tell you in more detail and clearly in the video how best to make a heated floor in an apartment building:
Criteria for choosing a boiler for autonomous heating of a private house
When choosing the type of boiler for heating, there are no alternatives only if gas is supplied to the house; it is the cheapest type of fuel and, in comparison with other sources (electricity is not considered), has a number of operational advantages - it does not require space for storing reserves, highlight There are fewer combustion products released into the environment and does not pollute the chimney system as intensively.
The main parameters that people pay attention to when choosing a boiler are:
- Unit power: directly related to the area of heated premises and temperature conditions, which are usually chosen based on building codes and GOSTs.
- Number of circuits: if the house does not have hot water supply, it is more practical to choose a dual-circuit model that can heat water.
- Location: usually the unit is installed downstairs in the basement on the floor; there are also hanging options for small houses.
- Material of manufacture of the unit and heat exchanger: cast iron, stainless steel, copper.
- Type of combustion chamber according to the method of supplying air to the firebox: open or closed.
- Availability of automatic control and monitoring systems, possibility of programming operating modes.
- The ability of the boiler to work with alternative fuels: relevant for liquid fuel modifications.
Rice. 14 Design of the Rinnai gas boiler
When choosing a boiler, the following tips may be useful:
- If there is no hot water supply in the house, it is rational and cheaper to choose a double-circuit boiler model than to install a separate single-circuit unit and a gas water heater, an electric boiler.
- When using electricity, the night tariff is much cheaper than the day tariff, in this case you can save on the cost of electricity. To do this, at night they warm up the entire house, with the exception of the bedrooms, and during the day they turn off the boiler for a long time or operate it in the minimum heating mode.
- For reliable operation of all boilers controlled by automation powered from the mains, you should purchase an electric generator with automatic switching on in case of power failure - this will allow the boiler equipment to continue operating in case of emergency situations on the power line.
Rice. 15 Construction of a Kolton solid fuel boiler
DIY system installation
Design, installation, startup, regulation of the TP system - all these technological processes require a fairly high level of knowledge, skills, and experience. Therefore, even at the stage of obtaining permission, it is advisable to acquire a qualified consultant. Any alterations will then be expensive, because the TP will be covered on top with a concrete monolith.
Material calculation
The design of the heating system must be carried out taking into account all factors affecting the thermal balance of the room: the size of the area, the material and design of the external walls, the type of finishing floor covering, the size of windows and entrance doors.
To calculate the length of pipes in TP circuits, use the formula:
L=S/N x k.
Here:
S is the area of the heated room;
N—step;
k is the safety factor for bending, which is usually taken equal to 1.1.
One linear meter of pipe is capable of transmitting approximately 11 W of heat. Multiplying the estimated pipeline length by this figure, we obtain the total thermal power of the designed heating system.
To overcome the hydraulic resistance of the CO, the pump must create an appropriate pressure, which can be calculated using the formula:
H=L x Q x 2/k.
Here:
L—pipe length;
Q - coolant flow, usually in the range of 0.3–0.4 l/s;
k is the hydraulic resistance of the system, which can be determined from reference literature.
When choosing a circulation pump, it is necessary to take into account that the speed of water movement should not exceed 0.8 m/sec. Otherwise, additional sound insulation will have to be provided. This will not only increase the cost of the project, but also the amount of floor level rise.
Specification for a room of 15 m2:
- Metal-plastic pipe 16 x 2 - 100 m.
- Damper tape 10/0.1-25 - 20 m.
- Thermal insulation TP-25/1.0-5 - 18 m2.
- Three-way mixing valve 3/4″.
- Circulation pump 25-40.
- Nipple adapter 1″ x 3/4″ – 2 pcs.
- Nipple 3/4″.
- Tee 3/4″.
- Collector 4 outlets 3/4″ x 1/2″.
- Shut-off valve 3/8″.
- Adapter B-H 1/2″ x 3/8″.
- Adapter 1″ x 1/2″.
- Ball valve 1/2″ - 2 pcs.
- Straight connector with transition to internal thread 16 x 1/2″ - 2 pcs.
- Tee 1/2″.
- Barrel 1/2″ x 60.
- H-B adapter 3/4″ x 1/2″.
- Automatic air vent 1/2″ – 2 pcs.
- Drainage tap 1/2″ – 2 pcs.
- Bracket for manifold.
Preparatory work
Before starting installation, it is advisable to clean the floor down to the floor slabs. Then the rise in its level will not be so noticeable. The old screed will have to be dismantled. A regular hammer drill with a chisel attachment will not work here. You must use a jackhammer.
The mounting brackets must be cut with a grinder. Joints of floor slabs, irregularities, and cracks should be puttied. The surface must be level in a horizontal plane.
Collector installation
The TP system control unit is mounted in a standard metal box located above the level of the heating circuit. The size of the case depends on the dimensions of the equipment. The installation location is selected next to the input from the centralized CO.
System installation
The circuit must be laid in one piece, without connections under the floor. The length of one lash should be up to 60 m. If such a segment is not enough to cover the entire area of the room, then install two segments of equal length.
Perform installation work in the following order:
- Treat the cleaned surface with a polymer primer.
- Glue the damper tape around the perimeter of the room to the height of the future concrete screed with a small margin.
- Spread waterproofing - polyethylene film with an overlap of the edges of the sheets of 100-150 mm. Along the perimeter, make an overlap on the walls at the height of the damper tape. Secure the joints and edges of the film with tape.
- Lay the insulation boards tightly.
- Lay out and secure the reinforcing mesh.
- Roll out the coil, straightening the pipe. Lay the contour according to the design drawing. Secure the hinges with harpoon brackets and mounting rails.
- Connect the ends of the circuit to the manifold.
- Fill the circuit with water and perform a pressure test (check the system for leaks) with a pressure of 4–6 bar. Do not drain the water so that the pipe does not float in the liquid concrete.
- Prepare the concrete mixture and pour the screed.
- Finish the floor surface after 28 days.
Launch
After installation is complete, rinse the pipes thoroughly with water under maximum pressure. Then drain this water completely. Blow out the circuit with a compressor.
Now you can fill the pipeline with the working coolant - distilled or boiled water. If there are several contours, fill them one by one. The air must be completely forced out through the air vents.
Now you need to briefly turn on the pump to create pressure in the system. As a result of coolant circulation, air pockets will be displaced. Add water again and turn on the pump. Repeat the process until the system is completely filled.
The launch of the TP into operation begins with a minimum thermal regime. The coolant temperature is set at 20–25 ºС. Then add 5 degrees every day until the maximum mark of +40 ºС is reached. Then the thermostat is set to design mode.
Laying schemes for water heated floors
The uniformity of surface heating depends on the correctly selected layout scheme. “Snake” is used when the same intensity of heating of the floor covering is not needed. For example, in a living room it is not necessary to heat the space under cabinet furniture or wardrobes.
The “snail” scheme allows you to arrange pipes with coolant for uniform heating.
The combined method makes it possible to warm up the corners of the outer walls of the room.
Snake
The “snake” layout begins along the perimeter of the entire room, then the loop is bent 180 degrees and laid from wall to wall in zigzags. In this case, the surface is heated unevenly; there are areas with more and less intense heating.
The second “snake” method implies that pipes with hot and cooled water are placed side by side. As a result, uniform heating of the entire surface occurs.
The “Snake” scheme has the following features:
- The maximum bend of the loop reaches 180
- the circuit laid in this way operates from a not very powerful circulation pump
- actively used in the bathroom and toilets
- installed in rooms with a linear slope, laying from the mixing unit towards the slope
Snail
The pipes are laid along the walls, then at the farthest wall the loop turns back. It is laid in a spiral, moving towards the center of the room. The advantage of this method is the uniform heating of the entire surface, even near the outer walls, which makes it possible to reduce the boiler power while maintaining the coolant output.
Features of the “Snail” installation scheme:
- pipe bend is 31-90
- used for heating large areas, where heating occurs due to several water circuits
- do not use in rooms with a linear slope, because there is a high probability of frequent formation of air jams
Combined layout scheme
With a combined scheme, part of the room is heated with a water circuit laid in a “snail” way, and the second half is heated using a “snake” scheme. Or two living rooms in the house can be heated according to the “snail” scheme, and several turns of the “snake” can be laid in the bathroom and shower room. How to draw up a floor laying plan according to plan?
When drawing up a floor installation plan, consider the following:
- decide in which rooms the “warm floor” system will be installed and where the radiators will remain
- boiler power
- room sizes in m2
- number of heated floors
- base material (wood, concrete, polystyrene)
- arrangement of furniture in rooms
- surface inclination angle
Also, when calculating, you should pay attention to some nuances:
- the length of the circuit (total length of the coolant pipe) should not exceed 80 m, otherwise circulation will be disrupted
- the difference between the length of the contours in different rooms should be no more than 15 m
- the minimum contour area should be 15 m2
- the amount of material depends on the laying step
| Loop distance/cm | Material consumption/linear meter |
| 10 | 10 |
| 15 | 6,7 |
| 20 | 5 |
| 25 | 4 |
| 30 | 3,4 |
That. the amount of material is calculated by the formula:
linear meter of pipe (taking into account the distance between loops) x room area
The plan of a house or room is transferred to graph paper or a special program is used.
Nuances of installation and selection
Design work is needed not only to obtain a permit. The customer will receive a fairly accurate list of necessary materials, parts and components. After carrying out simple marketing, the exact cost of creating additional comfort will be calculated.
How much higher will the floor become?
For apartments with high ceilings, raising the floor level by 10–15 cm will be almost unnoticeable. But for most of the housing stock this can be a problem, with the exception of balconies and loggias.
A layer of insulation - expanded polystyrene with a thickness of at least 30 mm - will need to be laid on the floor slabs. A heating circuit will be located on it, which is poured from above with monolithic concrete 85 mm thick. Finishing with tiles or laminated boards will add at least another 10 mm of height. As a result, the total height of the mounting layer will be 125 mm.
You can reduce the rise in floor level in the following ways:
- Completely dismantle the old screed down to the floor slabs.
- For thermal insulation, instead of polystyrene foam, use multifoil up to 1 cm thick.
- Reduce the screed height to 60 mm. In this case, there must be at least 30 mm of concrete above the pipes, the strength of which will need to be increased by reinforcement with steel mesh.
- Use flooring systems - “dry” heated floors 6–10 cm thick. They are installed without concrete.
Thermal insulation mats
As the floor temperature rises, possible additional heat losses through the ceiling to the lower floor increase. Therefore, pipes must be laid only with thermal insulation. Usually this is foil polystyrene foam. The foil should be at the top, then this significantly increases the heat-reflecting ability of the insulation.
Thermal insulation materials come in various types:
- Rolled. Made from foamed polyethylene with a thickness of 2–10 mm. On one side there is a coating of aluminum foil. It will not be possible to fix the pipes on such a base, so a reinforcing mesh is laid on top.
- Expanded polystyrene mats. They have a film on the surface with markings along which it is easier to lay pipes in accordance with the design drawings. You will also need to lay reinforcing mesh on the mats to secure the pipes. Expanded polystyrene has high thermal insulation properties, a service life of up to 60 years in conditions of temperature changes from -40 to +40 ºС, and does not accumulate moisture. To increase fire safety, fire retardants are added to the insulation during production, which makes it a self-extinguishing material.
- Profile mounting plates EPS (extruded polystyrene foam). The most technologically advanced and convenient for installation. Protrusions with a certain pitch are formed on their surface for fixing pipes with a diameter of up to 20 mm. The ends of the mats have locking projections for connection with adjacent blocks. This results in a continuous surface with minimal heat loss. Mats are available in thicknesses from 10 to 35 mm.
Which pipes to choose
All elements that are laid under the floor are subject to increased requirements for strength, reliability, durability, and corrosion resistance. The pipes must be seamless, capable of withstanding a pressure of 8 bar, as well as dynamic loads in case of water hammer.
Polypropylene and steel pipes cannot be used. The heating circuit of the TP must be laid under the floor without joints or couplings.
The following types of pipe products are most often used:
- Products made from cross-linked polyethylene. Produced by extrusion under high pressure. Crosslinking occurs at the molecular level. The result is three-dimensional structures that increase the strength characteristics of the polymer. Such products are characterized by minimal hydraulic resistance to the movement of the coolant. They tolerate pressure changes well. Corrosion resistant.
- Metal-plastic. The walls of the pipes consist of several layers, so they combine the strength of metal and the resistance of polymers to corrosion.
- Copper. They have a long history of use, are durable and reliable in operation. Copper transfers heat very well to the surrounding space, but is rarely used for the TP circuit due to its high cost.
How best to lay pipes (diagrams)
The uniform heating of the entire floor area depends on the correct location of the circuit. When designing, it is necessary to take into account that areas near external walls and windows are cooled more intensively. In addition, we must remember that as it moves along the circuit, the coolant gradually cools down.
The following laying schemes are distinguished:
- simple snake;
- double snake;
- corner snake;
- snail.
The arrangement of the contour with a simple snake is the most common scheme. The best option for a room with one external wall. The supply pipe with the hotter coolant is located in the cold part of the room.
Double snake and volute are used for interior rooms when equal heating is required over the entire area. In such schemes, the hotter pipe is located next to the cooler one. The “snail” version has lower hydraulic resistance.
A corner snake is the best option for a room with two external walls. Here, the maximum heat transfer of the circuit occurs in the corner part of the room.
Pipe distribution rules
In places adjacent to external walls, to increase the heating intensity, installation is done with a smaller distance (step) between adjacent pipes.
To maximize the effectiveness of CO, you should adhere to the following rules:
- Installation of the circuit begins from the cold outer wall.
- A gradual reduction in the intensity of floor heating is achieved by laying pipes using the “simple snake” technology.
- Uniform heating is achieved by spiral laying from the edges of the room to the center with a double pitch of turns. Then the return contour will fall into the resulting gaps.
- The greater the heat loss in the room, the more often the pipes must be placed. The standard step is usually 10–30 cm. In this case, the foot should not feel the difference in floor temperature in different areas. For border areas, a minimum pitch of 100 mm is recommended.
- The number of bends and turns should be minimal to reduce the hydraulic resistance of the CO.
- It is prohibited to join pipes under the floor.
Selecting a collector-mixing unit
The layout of the collector depends on the number of heating circuits. Installation of shut-off valves, automatic air vents and control thermostats is provided for each lash.
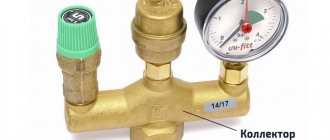
The collector and mixing unit must be equipped with the following parts:
- thermal head with remote temperature sensor;
- pump;
- pressure gauge;
- safety valve;
- expansion tank.
Types of radiators
If we consider radiators, they are available in three types:
- Aluminum is the most common model. The entire battery body is made of aluminum, which makes it lightweight and increases heat dissipation. The only negative is not high strength.
- Bimetallic - have an aluminum body with a steel or copper core. The presence of such an insert gives the product strength; it can withstand high pressure and temperature changes.
- Cast iron is a classic, they are still popular today, although they have an impressive weight and are quite inert. They have a long heating time, but they hold and release heat well.
In addition, radiators are divided into gravity and forced. The essence of the gravity system is to heat the water in the boiler, after which, according to the laws of physics, it rises up the riser and falls when it cools.
There are one and two pipes. In forced-action batteries, the presence of a pump is implied, which promotes the movement of liquid in the pipes.
Selecting radiators
Aluminum and bimetallic radiators have been in greatest demand lately. Their characteristics include improved heat dissipation, as well as durability (for bimetallic devices it is longer). Steel appliances are noticeably inferior on all fronts, but cast iron products are quite worth paying attention to. In addition to heat transfer, cast iron batteries are also resistant to corrosion.
In a private home, you can install any type of radiator, since the heating system in them operates under low pressure, and the possibility of water hammer is excluded. Sometimes batteries are installed in the floor, which is very original and beautiful. Aluminum radiators are beautiful in appearance, quite efficient, but do not have a long service life and are quite expensive. But cast iron batteries will cost much less, and they will last much longer, although they produce less heat.
To install heated floors and radiators on the same collector in an apartment with central heating, the choice should be made between cast iron and bimetallic products. Only they are distinguished by sufficient strength and durability to work successfully under the influence of high pressure and possible water hammer, as well as when in contact with an aggressive coolant environment.
It would be best, of course, to purchase bimetallic radiators. Leading European manufacturers: Sira, Global Style, Radena, Regulus-system. Their cost is quite acceptable for the consumer. If we consider Russian brands, then we should pay attention to the company Rifar, in particular, to the radiators of the Rifar Monolit model. In terms of quality and properties, these products are quite on par with their European counterparts, but much cheaper.
In favor of bimetallic radiators, we can say that they combine the best qualities of two metals. Thanks to this, they are durable, resistant to any load and energy efficient. Such batteries warm up very quickly and look quite aesthetically pleasing.
A little background
The very idea of insulating floors, as well as walls, by laying hot water pipelines inside them is by no means new. Back in Soviet times, experimental projects of panel houses were created and implemented, in which hot water circulated inside the floor slabs and walls, thereby providing apartment heating without radiators. It was believed that the absence of batteries saves useful space in rooms and does not spoil their aesthetic appeal.
Connecting a heated floor to a heating system
It is quite natural that such buildings have not stood the test of time, due to the almost zero maintainability of heating systems and extremely low economic feasibility. Indeed, most of the heat was not spent on heating the interior, but went to heat the structural elements of buildings and the surrounding atmosphere.
Channels made of iron corroded very quickly due to constant contact with water under pressure and at high temperature.
This publication is devoted to a description of floor heating systems combined with heating communications, as well as consideration of the nuances of installing heated floors.
Positive experience of heating a house using only underfloor heating
On the largest construction portal in Russia, FORUMHOUSE, you can find many reviews about the successful heating of a house only with heated floors. Thus, a portal participant from Tomsk with the nickname TTJ believes that discussions on this topic should be taken into account in the past - of course, a warm floor can heat a house.
TTJFORUMHOUSE Member
The banner should be hung here, in large letters on the floor of the screen: “WARM FLOOR IS ENOUGH FOR THE EYES WITH A CORRECTLY BUILT HOUSE!”
Our Canadian participant with the nickname Roracotta has a house of 300 square meters. There are no radiators - only heated floors.
RoracottaFORUMHOUSE Member
I have a system that heats hot water, temporarily disconnecting from the heating. A very rational option. The water is heated for a maximum of 30 minutes. During this time the house will never have time to cool down. But everything needs to be calculated. Heating is the most important and main system in the house. You can't do it at random here.
Our participant with the nickname vlkam has a heated bathroom: 3 external walls, one and a half bricks, without insulation and even with tiles on the walls.
vlkamFORUMHOUSE Member
Heating with only underfloor heating at -30 degrees was sufficient.
Special radiator models
In apartment buildings, heating wiring is often made in such a way that only side or bottom connection of heating radiators is possible. Changes to the project can only be made in agreement with the commission, and this is a long and tedious task. But many manufacturers of radiator batteries anticipate this problem and produce systems with diagonally routed collectors:
- For lateral connection of radiators, a flow extraction extension is used. This is a bracket with a tube installed, which is screwed into the lower or upper inlet. Due to the bracket, the coolant is taken in or released in the far corner of the radiator and the flow passes through the entire battery diagonally.
- For the bottom connection of radiators, insulation of the outer section is most often used. To do this, a plug is installed at the factory at the junction of the lower manifold of the last and penultimate sections. It blocks the direct flow of the coolant, turning the entire remaining battery into a radiator with a diagonal connection.
Such upgrades can be made with already installed batteries. Brackets with flow extensions can be easily found at plumbing supply stores. An experienced plumber will be required for installation, as it will be necessary to disconnect the radiators from the network, disassemble the approach or outlet pipeline and seal the assembly.
There are similar solutions for covering the end section. Most often this is a coupling that twists at the exit point and has a remote plug. It closes the hole between the penultimate and last sections of the radiator and redirects the main coolant flow along a bypass path.
And finally, some useful tips:
- do not make branches that are too long, especially to other floors. The coolant must reach the radiator;
- When placing the collector in a room, do not place it at the end. The length of the branches to the radiators should be approximately the same. Otherwise, the temperature of the coolant in different radiators may differ markedly;
- When installing pipes in the floor or ceiling, lead them to the radiators entirely, without breaking the connections. Otherwise, if one day such a pipe leaks, it will be a very big problem.
As you can see, there is nothing complicated in the connection diagrams for heating radiators of typical heating systems. Anyone with a general secondary education can understand them in order to design and install their own system. Of course, when creating heating systems, it is necessary to take into account many nuances, but this is a topic for another discussion.
The advantage of heated floors over radiators
Unlike radiators, heating with warm water floors leads to uniform heating of the room. In addition, this device provides more comfortable conditions for a person, since, with floor heating, the temperature below is higher than at the top.
Therefore, your feet will be warm and your head will be in a cooler space, which is good for your health.
Another positive aspect of such heating is savings, heat loss is reduced by up to 20%. Without a doubt, a big plus is the aesthetics of the design. The “filling” of the heated floor is hidden under the floor covering, thereby not spoiling the interior of the apartment, in comparison with radiators that are placed on the wall.
Of no small importance is the fact that the air does not dry out and hot currents do not drive dust particles around the room, as with radiator heating.
The disadvantages of such a structure include a rather labor-intensive and lengthy process that requires significant financial costs. In addition, when connecting a heated floor to a radiator, it will only function if there is heating in the radiators.
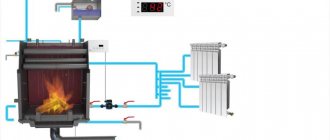
Heating with solid fuel boiler
Combined heating with a solid fuel boiler is a closed gravity system with a heat storage device. Both one-pipe and two-pipe wiring are allowed. To increase efficiency, it is worth installing chokes on each of the heating devices.
During operation of a solid fuel boiler, a large amount of heat is generated. It is better not to interfere with this process, but to redirect the excess heat to the heat generator. Then the fuel will be consumed efficiently, and the system will not quickly cool down after the fuel burns out in the boiler.
When the coolant in the main circuit begins to cool, hotter water from the heat generator will be supplied to the system. If the electricity goes out, the water supply from the heat storage tank stops and the bypass opens.
One of the best options for solid fuel boilers will be a unit with a pyrolysis type of combustion. The fuel in it is burned in two stages, which releases more heat and less carbon monoxide. Almost only carbon dioxide and steam remain at the boiler outlet.
Each consumer makes the final choice of a heating boiler, radiators, pipes for connecting them and for heated floors, as well as the wiring diagram, taking into account many factors. Among them are not only the costs of arranging the system, purchasing fuel and the principle of operation, but also personal preferences. If necessary, all work on system design can be ordered from professionals.
Installation of combined heating in a system with a gas boiler
The most difficult moment in the process of installing combined heating is the need to supply coolant with different temperatures from the manifold for the heated floor and radiators through two pipes. Proven methods include installing a hydraulic switch or connecting devices in series. A series connection saves fuel, but thanks to the hydraulic arrow, you can operate the condensing boiler in optimal conditions. In this case, the warm floor will receive water at a lower temperature than the radiators.
On each radiator, the temperature is controlled automatically. As soon as the water begins to cool, the circulation pump turns on. If you need to stop the operation of the radiator, just turn off the pump on one or another circuit. If you connect heated floors and radiators with one pump, then all devices will turn on and off at the same time. It is noteworthy that pipes for distribution are chosen with a small cross-section - 20 mm is best.
For safety reasons, a gas boiler requires a separate room with a ceiling of 2 m and a total volume of 7.5 m3. In addition, it is important to provide a high-quality ventilation system.
Wiring of a solid fuel heating boiler, diagram
It should be noted that the piping diagram of a solid fuel boiler includes several elements and devices that must be used. so that the heating system operates for a long time.
The wiring diagram for a solid fuel boiler is the necessary devices and elements that together form a single heating system. This heating system includes:
- Boiler.
- Circulation pump.
- Expansion tank.
- Emergency power system.
- Co-mixing system.
- Buffer capacity.
- Emergency circuit
- Corrosion protection system.
- Pressure gauge, drain cock, special valve. It's all collected in one block
- Thermal valve.
- Float valve.
Tips for use
It is worth saying that a warm water floor is an inert heating system. Therefore, it is possible to feel temperature changes in the room only after several hours after adjustment.
Experts recommend during operation:
- Maintain a temperature level of the floor surface in living rooms of 25 - 30 degrees. In the corridor, bathroom and along external walls, heating up to 35 degrees is allowed.
- Add fiberglass or other filler to the solution - this will reduce the degree of shrinkage of the concrete screed. The dosage can be found on the packaging.
- Replenish the system with liquid in a timely manner and monitor the heating temperature.
- Choose pipes for underfloor heating of the same diameter as the heating system (supply and return).
- When using a two-pipe scheme, make the length of the floor loop no more than 50 meters.
For your information! Warm floors require virtually no additional maintenance.
The temperature regime of the heating circuit is often regulated manually. Although it is possible to install an automatic adjustment device, equipped with a controller with a program that controls the servo drive and pump. Such a device is capable of creating a comfortable microclimate according to specified parameters independently.
When deciding whether to connect a heated floor to a radiator with your own hands, experts recommend making a careful calculation. In addition, when choosing a scheme, you need to take into account its features, as well as all the recommendations that are outlined in this article, and then you will be able to install a properly heated floor in an apartment using a radiator.
Choosing between electric and water heated floors
During operation, water and electric heated floors work with almost the same heat output, unless gross violations were committed during their installation. However, significant differences between these two systems lie in the cost of their installation and further operation.
During installation, you will have to spend much more money on a water heated floor than on laying an electrical circuit. However, the price of electricity is such that you will have to pay a lot for its use and constantly during the heating season.
In this regard, many consumers make the choice in favor of a water floor. It is best to choose to install a water-heated floor and radiators from one condensing-type boiler.
If we are talking about an apartment in a multi-storey building, then there may be problems connecting radiators and heated floors to one collector. But the total cost of installing the water circuit and its further operation will depend on the complexity of the system.
As for the electric floor, in an apartment, on the floor you can lay infrared film, carbon heating mats or two-core cables. The choice in this case depends entirely on the desires and financial capabilities of the apartment owner. The advantage of electric floors is their ease of installation.
Warm floor as the only CO - arguments against
1. Where there are wardrobes, sofas, beds and armchairs on a warm floor, it does not heat the air in the room, but the furniture. When calculating, it makes sense to calculate not the total area, but the area not occupied by furniture.
2. Greater inertia of the heated floor. The screed takes a long time to cool down, but also takes a long time to heat up. You won't be able to turn on the heating for an hour or two.
3. The underfloor heating system may not cope with heating rooms with an area of more than 25 square meters, especially with large windows and other translucent structures.
4. TP is categorically not suitable for heating the vestibule.
AleroFORUMHOUSE Member
The vestibule is always a risky area for COs. Not everyone may have this room in the area of main walls; of all the options for heating it, you need to choose the safest one and exclude defrosting. If the outer walls or floor are frozen, condensation will not “fall out”, but frost will happen easily. It is almost impossible to prevent the flow of warm air from the living space into a cold vestibule.
5. It may not be comfortable.
vladimirtmb43FORUMHOUSE Member
Floor surface temperature +27 - +28 degrees. It’s comfortable for my feet, but +26 in the room is hot for me. If you do less so that the air is +24, your legs are already uncomfortable and cool.
6. Due to the high inertia of heated floors, it is impossible to configure the automation based on the internal temperature - only using the external sensor.
Radiators or water convectors, which is better?
Convectors are based on the principle of heating a room through air flow. It heats up as it passes through the body of the heating installation. In turn, radiators heat the room by radiating heat from the surface body.
Radiators have gained great popularity. Their operating principle can be compared to the operation of a Russian stove.
Convectors are heating panels; they heat a space using the movement of cold and warm air masses. The convector includes a pipe in which the coolant is located. The pipe is framed by ribs, plates that heat the surrounding space. The plates are often made of copper or steel. Convectors are divided into external and built-in. The first type of convectors is mounted on the wall, the second can be mounted along the floor or wall. Convectors also include warm baseboards. This device is an excellent solution for people who do not want to depend on public heating systems.
Convectors are used as additional and main heating; they are especially indispensable in places where standard radiators are not used. For example, built-in convectors in the floor are also located along sliding doors and glass walls. Convectors heat a room much faster and cool it down faster. The devices are durable in use.
If it is better for you when heating a private house when the room warms up faster and more evenly, then install convectors. The most common options are steel radiators (60% convection) or copper-aluminum (90% convection). If these points are not important, then install regular radiators.