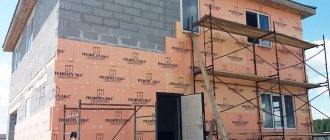
Houses built of brick, various blocks or monolithic reinforced concrete require not only finishing, but also insulation. How to carry out this work correctly so that the house is warm and the plaster does not become cracked after a couple of years?
One of the most common today is the “wet” facade system, which includes elements and parts selected in a certain way that ensure long-term joint operation of all components. Stages of constructing a “wet” facade.
Characteristics of the plaster layer and external coating
It is important to take into account that the plaster layer must also meet certain characteristics. So, the layer density should be in the range from 145 to 200 g/m2
whereas the thickness should be approximately 3-5 mm.
It is important to choose the right material for the decorative layer, which must have increased vapor permeability characteristics. But it is recommended to choose a density equivalent to 1.6 g/m3
If you comply with all these requirements when choosing a material, then the wet facade will meet all the characteristics of a high-quality system that will last for as long as necessary.
The “wet facade” finish today continues to be popular for the reason that the house looks very presentable after the work, and the costs do not break the owners’ pockets.
We recommend checking out: https://fb.ru
Types of decorative plaster
The following types of decorative plaster are presented on the Russian market:
- Mineral
- Acrylic
- Silicone
- Silicate
Read about the features of decorative plaster and the secrets of making the right choice in our article “decorative plaster for facades”
The most common facade plaster is mineral. Due to its relatively inexpensive cost and high productive qualities, mineral plaster is the leader in popularity.
Mineral plaster is supplied dry. It must be diluted with water to obtain the desired consistency. Mineral plaster is highly reliable, so it is most often chosen for wet facades.
Acrylic, silicone and silicate decorative plasters are sold ready-made. They do not need to be diluted with water. You just need to open the lid of the jar.
As a rule, these types of plaster are tinted immediately, so the subsequent stage of painting the house is not required.
Flaws
Almost all of the disadvantages of this method of thermal insulation of a room are associated with the installation process. These are certain requirements that cannot be neglected in order to achieve a high-quality surface with a long service life. Failure to follow the recommendations can negate all the benefits and only bring disappointment in the work performed.
Temperature
When installing a wet facade, you need to take into account the temperature recommendations of the manufacturers of adhesive and plaster compositions. The permissible operating range for working with them is approximately from -5 to +50 degrees Celsius (the exact parameters are indicated by the manufacturer on the packaging). When working in the cold season, in order to avoid uneven hardening of the mixture, you will have to build a polyethylene cover to protect the adhesive composition from hypothermia. At subzero temperatures, you will need a heat gun, and it must work until the mixture completely hardens, and this depends on the thickness of the layer, in some cases - up to 24 hours. The amount of electricity spent on drying cancels all the advantages of the design associated with its low cost.
Air humidity
Another disadvantage of the “wet facade” technology is the strict requirements regarding ambient air humidity. The fact is that with a relative saturation of the atmosphere with water vapor of more than 40%, uniform drying of adhesive and plaster mixtures cannot be achieved. As a result, spots of untimely hardened plaster will appear on the surface. The same conditions apply to working in the rain.
Excessive heat
Strict adherence to temperature conditions during installation are the main disadvantages of the wet façade design. Installation in hot weather, as well as under the influence of direct sunlight, is unacceptable for this technology. Excessive heating of a separate area of the surface or the entire wall can lead to accelerated evaporation of liquid from the finished plaster mixture. Thus, the surface will harden, but in violation of the technical conditions, which will lead to premature cracking and peeling of the plaster layers. Comparing all the pros and cons of wall insulation using the “wet facade” technology, we can conclude that in fact such thermal insulation is positively different from most known options.
Advantages and disadvantages
The main advantage of using this technology is the combination of decoration and thermal insulation functions .
A number of other positive aspects can also be added to this
- finishing does not require special skills, and the process itself cannot be called too labor-intensive;
- provides high-quality insulation of light and weak walls;
- allows you to save on heating your home;
- installation can be performed on any surface;
- improves the quality of sound insulation of house walls;
- increases the service life of the building;
- the interior is protected from overheating.
Now as for the disadvantages:
- the main disadvantage is that insulation work cannot be carried out at air temperatures below 5°C; in case of emergency, when insulating in the cold period, heat guns and scaffolding covered with polyethylene should be used;
- You should not carry out installation work at high air humidity - a “wet facade” does not tolerate such conditions;
- The plastered surface needs protection from the wind, since when dust and dirt settle on the fresh finish, the appearance of the coating can be significantly damaged.
Installation of a wet facade
The structure of such a facade is distinguished by the presence of three main layers:
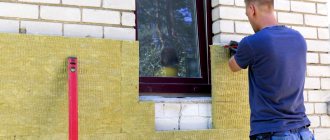
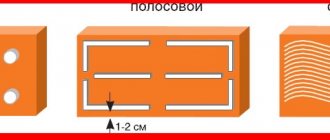
Thermal insulation. Fixed on a bare wall with glue. As a rule, for a wet facade, glue is used in the form of a polymer-cement solution, which has excellent adhesion to both the load-bearing surface and all types of insulation. Polystyrene foam is mainly used as insulation for private houses. In addition, quite hard mineral wool slabs are often used.
Installation of a wet facade
- Base layer. It creates a fairly rigid layer that protects the insulation from various mechanical influences, while acting as the basis for the design of a decorative coating. Most often, a polymer-cement mortar and a reinforced mesh with glass fiber impregnation that protects against alkali are used for this purpose.
- Decorative coating. Quite often it is practiced to cover a wet facade with textured plaster. It is characterized by ease of implementation, reasonable price and low weight. Thus, heavy porcelain tiles cannot be mounted on polystyrene foam or mineral wool with a thin reinforced mesh.
Step-by-step execution of work
Throughout the entire working area, it is necessary to seal existing cracks and cracks and, if possible, get rid of pronounced irregularities.
Creating an insulating coating
Typically, mineral (basalt) wool is used to create a thermal insulation layer. This material has a fairly dense structure and has acceptable tensile strength.
The use of foam sheets (expanded polystyrene) is not excluded. But in this case it is necessary to choose a special low-flammable material.
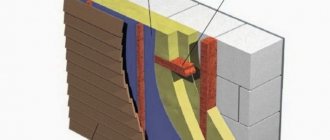
Structure with polystyrene foam: 1 - layer of paint; 2, 4 - primer; 3 - plaster; 5, 7, 10 - adhesive solution; 6 — reinforcing mesh; 8 — polystyrene foam; 9 — hat dowel; 11 - soil; 12 - brick
Expanded polystyrene has been developed for the “wet facade”, which has optimal insulating properties for such systems. The material is made using technology that takes into account the use of different structures on facades.
The basis of façade expanded polystyrene is raw material tested by fire testing (GOST 31251). The material is documented as PPS 16F (facade grade according to GOST 15588-2014). The density of PPS 16F approaches values of 16.5–18.5 kg/m3.
Based on the fire test performance, the insulator was assigned a fire hazard class - K0. Therefore, polystyrene foam PPS 16F is allowed to be used as insulation for thermal insulation of facades.
The use of expanded polystyrene is characterized by making cuts along the perimeter of each sheet. Such cuts are filled with mineral wool. This is an additional fire safety measure.
Basalt wool is recommended as the optimal insulating material for a wet façade. In addition, this choice provides a high level of fire protection
Thermal insulating sections made of mineral wool are initially fixed with glue, and then additionally attracted to the wall with “hat” dowels.
Adjustment, reinforcement, plastering
After cladding with slabs, work is carried out to adjust the insulation in window and door openings. “Contiguous” systems and reinforcement in corners, depressions, and slopes are also made there.
The next step is to lay a reinforcing mesh over the insulation and secure this material to the wall in a checkerboard pattern using the same dowels.
Next, the first layer of plaster (4-6 mm) is applied to the mesh. A day later, another layer is applied - the main one - and covered with a dye of the appropriate color.
It would seem that the “wet facade” technology is simple and understandable. However, in practice, the execution of a “wet facade” is professional, with high quality, and is available only to specialists. Without work experience and knowledge of construction features, it is difficult to achieve high-quality results.
Choosing insulation for the structure
The main purpose of a wet facade is to insulate buildings, so much attention is paid to choosing high-quality insulation. It must meet the following criteria:
- small weight;
- environmental friendliness, since the work is performed for a residential building;
- low water absorption rate;
- good resistance to mechanical stress;
- even with a sharp change in temperature, the material should not change its structure;
- installation must be simple and cost low.
Only some thermal insulation materials meet these requirements. These include:
- polystyrene foam - has a specific structure, which contains a huge number of closed air bubbles. It has low cost and is also easy to install. It has a small mass, so it does not affect the foundation and other parts of the structure. Resistant to mold or mildew growth. Its disadvantages include poor breathability. It is also not durable, so even minor mechanical impacts easily lead to its destruction. It is not advisable to use it for wooden buildings;
- expanded polystyrene is a modern type of polystyrene foam. In the process of creating a wet facade, preference is often given to polystyrene foam. Its structure also contains numerous closed air bubbles, so it has good thermal insulation parameters and does not allow moisture to pass through. It is resistant to fire and has a low mass. The material is considered unsuitable for wooden houses because it impairs their breathability;
- mineral wool - created using special fibers obtained by melting all kinds of rocks. The material is popular because it contains only natural and environmentally friendly components. Cotton wool is lightweight and affordable. The disadvantages include the lack of resistance to moisture, due to which mineral wool loses its thermal insulation parameters.
Mineral wool is most often chosen for wet facades. It is available in slabs that are easy to attach. To insulate a building using this material you will not need to spend a lot of money.
Foam plastic Expanded polystyrene Mineral wool
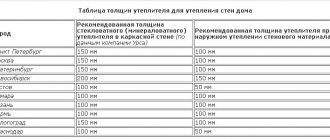
Calculation of insulation thickness
You can find out the required thickness of insulation yourself by performing a small calculation. It is necessary to use the tabular data and information from SNiP, which are given below.
It is very important to know what thickness of insulation is needed. If it is made insufficient, then there will not be the maximum effect of insulation, resulting in great damage. During long-term operation of an under-insulated building, very significant amounts of money will be lost. But overconsumption of insulation also reduces economic feasibility.
The optimal resistance to heat transfer of a wall (enclosing structure) is prescribed in SNiP. We need to insulate the wall so as to achieve the standard thermal resistance or slightly exceed it.
Collection of materials
When preparing for finishing and insulating walls, you need to clearly understand the composition and sequence of technological operations.
This point is especially important in the case when the owner of the house decided to make a wet facade with his own hands.
For private, small houses, this approach is quite justified. During the installation process, a person will acquire primary finishing skills and become familiar with different types of insulating materials in practice.
Craftsmen who are engaged in finishing multi-storey buildings are given step-by-step instructions on how to perform technological operations and rules for handling materials.
Fastening is done either using dowels, or the insulation board is fixed with glue.
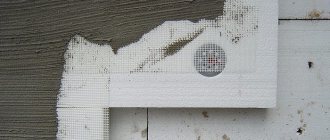
To ensure the necessary adhesion of the plaster mortar and thermal insulation material, a reinforcing mesh is used.
The mesh gasket not only reliably connects certain layers of the sandwich, but also gives the finishing layer the necessary rigidity.
A sand-cement mortar is applied to the mesh, and a decorative layer of plaster is applied on top of the mortar.
Photo:
Choice of insulation
At the preparatory stage, before starting the installation of wet facade elements, you need to select the insulation suitable for a particular house. The customer must give preference to mineral wool or polystyrene foam.
It should be immediately warned that mineral wool, well known to all builders, is not suitable for use in a wet facade system.
The fact is that this insulation tends to lose its initial parameters over time. For wet finishing and insulation processes, high-density basalt wool is used.
Its operational parameters fully comply with the technical conditions for installing a wet facade.
The technology for insulating private houses involves using not only basalt wool as insulation, but also using polystyrene foam.
When drawing up cost estimates for finishing and insulating the facade, the work contractor needs to compare these materials according to the following parameters:
- vapor permeability;
- manufacturability;
- insulation cost.
Basalt wool has optimal vapor permeability, which allows the walls of the house to “breathe”. At the same time, it is more convenient to work with polystyrene foam, and it is noticeably cheaper than cotton wool.
Before choosing a specific insulation, you need to evaluate the pros and cons of each of them.
Photo:
Glue and reinforcing mesh
A fiberglass reinforcing mesh is applied to the insulation, which is glued to the wall or secured with dowels.
In this way, two problems are solved: firstly, the entire multilayer system becomes more durable, and secondly, the mesh, as an intermediate layer, ensures reliable adhesion of the plaster mortar to the insulation.
It is impossible to achieve high-quality and durable adhesion of two layers of a wet facade in any other way.
The technology of finishing house facades using the wet method has become widespread as a result of the appearance of a special glue on the market.
Video:
The plaster-adhesive mixture, which is produced using original technology with the inclusion of special polymer additives and binding minerals, has the necessary plasticity, strength, frost resistance and moisture-repellent properties.
To have a clear idea of how to work with this glue, there are step-by-step instructions.
If adhesion is strengthened when installing a wet facade, a brittle layer may form on the surface of the plaster.
To avoid such a result, all finishing operations must be done in strict accordance with the current instructions.
Preparing for work
Before proceeding directly with installation, you need to select the material for the insulation. It was already mentioned above that mineral wool is better suited as such. But it can be different.
The insulation must withstand the plaster on the front side and the glue on the other. It should be dense and not afraid of compression or delamination. No glass wool or slag wool, only basalt wool of increased strength and density. Some manufacturers produce a ready-made version specifically for a wet facade.
The thickness of the material also plays a role. Too small a thickness will not produce the desired effect, and too much will lead to condensation accumulation. The thickness is selected from the standard indicators for a particular region. In addition to the insulation itself, you will need other materials and tools.
Base profile for the bottom row. Its width must exactly match the thickness of the insulation. To fix the profile you will need connectors. With their help, the profile will stand straight. The connector is placed one at a joint if the thickness of the insulation is less than one hundred cm. And if more, then two. The profile must be fixed. Dowel nails are used for this purpose.
The length of the nails varies depending on the wall material. Concrete and brick walls - 4 cm. Empty brick - 6 cm. The pitch between dowels is calculated from the thickness of the insulation. More than 8 cm, step - 3 cm. Less - step - 5 cm. The dowel is secured with a spacer washer.
Priming is a necessary step for a more durable fixation. A coat of primer increases adhesion and increases protection. It must be applied, so you will need a deep penetration primer.
The insulation is fixed with glue. Therefore, the solution must be special for attaching the thermal insulation layer. Manufacturers often indicate on the insulation itself the optimal solutions for a given material. Dowel mushrooms will be needed to secure the insulation. Their length should be the same as the thickness of the insulation and spacers.
A suitable option would be to use the same glue in this capacity. You will also need a reinforcing mesh. And also the corners that will cover the corners along the entire height of the corners. For cladding you will need decorative plaster or paint. It all depends on your personal preferences.
Preparing walls for work
The insulation process consists of several stages, among which there are those that are not directly related to installation, but for that reason they are no less important. Failure to do one of these could result in a poor-quality installation and subsequently wasted effort and materials.
Preparation is one of these stages. At first glance, it seems insignificant, but how well the material fits depends on proper preparation. The glue will adhere well only to a clean surface.
The old layer of plaster or paint must be completely removed, otherwise the adhesive may come off. You can heat the wall with a hair dryer or use special solutions to remove old finishes.
It would be a good idea to wash the wall too. If you direct a strong pressure of water onto the wall, this will save you from many contaminants: stains or peeling plaster. But after that it must be allowed to dry. Mold and mildew also need to be removed and then treated with a bactericidal solution.
To prevent microflora from forming on the wall, it is subsequently treated with an antiseptic. If there are irregularities, they need to be repaired. Putty is suitable; it must be applied tightly and leveled to the general level of the wall. On the contrary, all potholes are removed.
Check the walls for slopes. Deviations of more than 2 cm must be corrected immediately. Cement plaster is suitable for these purposes. But you will have to wait for it to dry completely, which may delay the repair. After all the work is completed, the walls are primed. If the base material absorbs well, then two layers will be needed.
Wet front pie
Based on the fact that the façade is subject to constant exposure, the choice of finishing method is very important. You need to choose a method that guarantees protection from moisture and wind, insulates the room, and the material will not fade in the sun. One of the most reliable and high-quality types of finishing is the wet facade of the house.
The wet facade method means multi-layer application of various types of finishing materials, which as a result will create complete protection of the facade. A few words should be said about the technology of constructing a wet facade:
First layer
The first layer of a wet facade should protect the material of the load-bearing walls, create good steam and wind protection, on which subsequent layers will be applied.
Second layer
The second layer of the wet facade must be made of some kind of insulation. The insulation system for a wet facade can be as follows:
- Styrofoam;
- dense mineral wool;
- polyurethane foam.
Third layer
The third layer of the wet facade should be made of a reinforcing mesh, which will hold the insulation, and on which the finishing will need to be applied.
Fourth layer
The fourth layer, that is, the finishing layer, can be made of any finishing materials that can be applied or glued to the reinforcing mesh:
- ceramic tiles or porcelain stoneware;
- decorative plaster or bark beetle;
- decorative or natural stone.
Thus, it becomes clear that finishing the facade using the wet method is a good substrate for any finishing material that can be applied in this way.
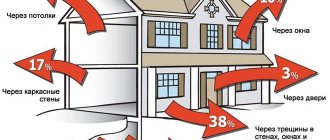
What is the importance of vapor permeability of the finishing coating?
In facade insulation systems, materials with high vapor permeability should be used. At a room temperature of 20°C and a relative humidity of 55%, its air contains 8 g of water vapor per 1 kg of dry air, which creates a partial pressure of 1238 Pa. Outdoors at a temperature of –10 °C and a relative humidity of 83%, per 1 kg of dry air there is about 1 g of steam, creating a partial pressure of 216 Pa. The difference in partial pressures outside and inside leads to a constant movement of moist air through the wall to the outside. But if there is a layer of material near the outer surface of the wall that does not allow water vapor to pass through, then moisture from the passing air begins to accumulate at the border of the vapor-impermeable layer, causing dampness in the structure. As a result, its thermal protection deteriorates sharply.
Wet façade fastening system
There are three main types of fastening of a “wet” facade. The first method of fastening is rigid. When using it, the insulation is fixed with dowels. Due to this type of fastening, it is possible to achieve particularly thin plaster layers with a thickness of no more than 5-8 mm.
With the second fastening method, the insulation is attached to the wall using movable hinges. Thanks to this, the system moves freely along the wall, compensating for shrinkage and other loads on the facade. The thickness of the plaster layers in this case is about 30 mm.
The third option is the most common. It involves the use of both glue and dowels. First, the insulation is attached to the wall with glue. After which it is fixed to it with dowels. Sometimes only one glue is used. However, this method of fastening is applicable only to perfectly smooth walls, and only on condition that 90% of the insulation is glued. It is worth noting that fastening using dowels and glue is the most common. This is due to the fact that the dowel bears the wind - the main load acting on the facade. Over time, the dowel becomes loose under the influence of wind. To prevent this, the insulation is fixed with a plaster-adhesive layer. In addition, using this layer the walls are leveled.
The general rule for all fastening methods is to arrange the insulation in a checkerboard pattern. This is done in order to avoid cracks in the finish coating. The latter cracks if the vertical seams of the lower and upper rows of insulation coincide. In addition, the applied adhesive layer must cover at least 40% of a single insulation board. The dowels are installed after the adhesive layer has dried. The most commonly used are disc dowels with wide-diameter caps. Moreover, two types of dowels are used more often than others: screw dowels with a spacer element in the form of a screw, and driven dowels with a spacer element in the form of a nail. The choice of one of the two types of dowels depends on the type of wall being insulated. For walls made of hollow bricks and foam concrete, screw dowels are selected. If the walls are made of solid brick or reinforced concrete, driven dowels are used.
The dowel is the most important fastening element, as it passes through all layers of the wet facade. As a result, a thermal conductivity coefficient close to zero is especially important for it. If this coefficient does not have a minimum value, the dowel will become a kind of bridge for delivering cold to the load-bearing wall of the building. An almost 100% solution to this problem is to use a dowel with a metal rod in a plastic shell. This dowel has a thermal head. The plastic shell of the rod must be alkali-resistant, and the rod itself must have a zinc coating of at least 5 microns. The zinc coating protects the dowel from corrosion, which can occur due to the formation of condensation on its rod. In addition to the above, dowels must withstand temperature changes from minus 55 to plus 80 Celsius.
The number of dowels themselves per 1 sq. a meter of wall is determined based on the wind load, the weight of the system without taking into account gluing the slabs to the base and the façade area. The latter can be ordinary and glue. On average, when insulating a wall made of dense material, 5 dowels are used per 1 square meter. meter of wall.
Materials and installation methods
No work is complete without “pressing in” the fiberglass mesh
There are three technologies:
- The fastening is rigid. In this case, the insulation is fixed with dowels, and the thickness of all layers of plaster is up to 8 mm;
- The insulation is mounted on movable hinges. The mixture moves freely along the walls and compensates for shrinkage. The thickness of the layers of applied mass is about 30 mm;
- The thermal insulation layer is fastened with dowels and glue; dowels are used with large caps - disc-shaped. The average number of fasteners is about five pieces.
You will need a vapor-tight plaster composition and a putty reinforcing mortar, a primer, a profile for the sheathing, insulation, and glue. And also, reinforcing mesh, dowels, antiseptic, aluminum strip, sealant, spatula, brushes, roller, sealing tape and paint.
Instructions
If you follow a certain work technology, the construction of a wet facade will not take much time. The structure is built in a certain order:
- First of all, scaffolding with a protective film or mesh is installed;
- The walls are cleaned of old paint, dirt, plaster, fungi and mold, efflorescence, then an antiseptic is applied;
- The wall is leveled to one meter in length, differences of one centimeter are permissible;
- Surfaces prone to crumbling should be treated with a primer;
- An aluminum strip is attached to the upper level of the plinth; it protects the lower edge of the insulation from the influence of negative environmental influences and serves as a horizontal leveler.
To ensure that the outer layer of the facade, finished with the wet method, is durable, thermal insulation is applied with glue. The slabs are glued, the process is carried out from the bottom up, by analogy with brickwork, that is, “with dressing”.
- The gaps between the panels are sealed with polyurethane foam;
- To strengthen door and window openings, special profiles are used;
- The junctions to the openings are filled with sealant, then they are sealed with tape;
- The slabs must be secured with dowels only after the glue has dried;
- To strengthen window and door openings, special profiles are attached;
- The adhesive composition is applied to the insulation, and the reinforcing mesh is heated in it;
- The last step will be to apply all layers of plaster and paint.
Wet facade technology using mineral wool
Main scope of work:
- Preparatory operations.
- dismantling all foreign objects from the façade surface (brackets, fastening elements, etc.);
leveling the surface with sealing depressions and cracks, cutting down protruding parts;
- cleaning of old coatings, including plaster of slopes of openings, and dirt;
- primer of walls.
- Installation of the starting support bar. The U-shaped profile is mounted with a gap of 40 cm from the ground level. To accommodate temperature expansion, 3 cm gaps are left between the horizontal elements. Horizontal installation is carried out using a laser level. The planks are fixed with self-tapping screws and dowels; the fastener spacing is from 10 to 20 cm.
- Framing the corners of the building with special corner profiles.
- Installation of insulation boards.
Installation begins from the bottom, in rows resting on the starting strips. Glue is applied in wide strips along the entire perimeter of the slab and in the middle; the unspoken rule is to cover ≥ 40% of the surface of each slab with glue. It is unacceptable to install vertical continuous seams in adjacent rows. The ends of the plates must touch tightly. Adhesive protruding from the seams is immediately removed. After 72 hours, when the glue has hardened, the slabs are additionally secured with dowels with disc heads. The heads are flush with the slab surface. Consumption per 1 sq. m is 6...14 pieces.
- Installation of the reinforcing layer. Reinforcement begins with a break of three days after fixing the insulation. Initially, the outer corners of the house, the slopes of openings and the vertical joints of lintels and slopes are reinforced. Then the rest of the wall surface. Execution order:
- applying glue to thermal insulation boards;
laying fiberglass mesh embedded in a layer of glue. Overlap of canvases 10 cm
- covering the entire surface with a second layer of adhesive. The total thickness of the reinforcement should be ≤ 6 mm, with the mesh embedded in the glue by 2 mm.
- Plastering walls. This is carried out at least 3 days after completion of reinforcement using protective and decorative mixtures.
- Final coloring. It is carried out after the plaster layer has completely dried.
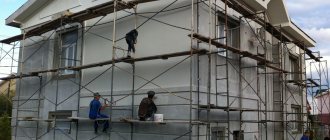
Installation of scaffolding around the building with protective shelter from rain and sun. At low positive temperatures, a thermal circuit is installed.
This completes the finishing; if done correctly, the house will be well protected from weather influences and will acquire a beautiful, presentable appearance.
How is insulation installed?
First you need to prepare the walls. Before finishing work, the walls must be cleaned, if necessary, the old coating must be removed, cracks must be repaired and the surface leveled.
After the preparatory measures have been carried out, they proceed to the start of the direct installation of the facade.
The first step is to arrange the base profile. This profile serves as a protective barrier against moisture penetration to the bottom row of thermal insulation. Next comes the laying of thermal insulation material. The insulation is fixed from bottom to top. The adhesive composition dries for about 3 days, then additional fixation occurs with dowels. The third stage is the installation of reinforcing mesh. It is fixed on top of the insulation boards with an adhesive composition. After the reinforcing layer has completely dried, plaster is applied. The last stage is waterproofing the lower part of the facade.
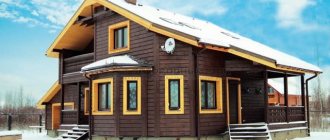
An original house insulated with a “wet facade”. Source 1stroitelny.kz
Advantages and disadvantages
Insulating walls using the “wet facade” method is one of the cheapest options. The low cost does not allow us to talk about its significant shortcomings. Like any other option, insulation in this way has its pros and cons.
Advantages
- Low cost of materials and work;
- Thermal insulation of this type (external) allows you not to take up useful space inside the building;
- The light weight of the structure does not place unnecessary stress on the foundation; • a wet facade is not only insulation, but also a decorative finishing of walls, which allows you to transform the building;
- Insulation in this way allows you to modify the surface by simply painting it a different color.
Flaws
It is important to know
All the disadvantages of this type of insulation relate to the installation process
Therefore, when performing work yourself, it is extremely important to take them into account
- Work should only be carried out at positive ambient temperatures. To be more precise - no less than +5 degrees. If it is necessary to carry out work at lower temperatures, the installation of protective polyethylene casings and the presence of a heat gun are required to maintain the recommended temperature regime;
- Insulating the facade during rain is not recommended. The adhesive solution may dry unevenly, which will lead to gradual peeling;
- Direct sunlight on the surface is also not recommended;
- During strong winds, particles of dirt and dust may fall onto the wet façade.
How to correctly calculate the thickness of insulation
Energy resources around the world are increasing in value. This trend makes us think about more economical heating options. Installing modern equipment can only partially solve the problem. Only high-quality insulation of building structures can keep precious heat inside and keep coolness out.
- 1 Video instructions
- 2 What would you like to know?
- 3 Calculation example
- 4 Popular methods of wall insulation
- 5 Possible problems associated with choosing the wrong insulation thickness 5.1 The thermal insulation layer is too large
- 5.2 Thermal insulation layer is too small
Not many people know what exactly the thermal insulation layer should be and how the thickness of the insulation is calculated. It only takes a mistake of a couple of centimeters to face numerous problems in the future. In some cases they are easily fixable, in others they require large material costs.
Video instruction
What would you like to know?
When starting calculations, it is necessary to clarify what materials the surfaces are made of and what their thermal properties are. Among them, special attention is paid to two indicators:
- Thermal conductivity
- Heat transfer resistance coefficient
They are fully capable of reflecting what the heat loss will be on each square meter without insulating the surfaces. You can find out more about most materials by reading SNiP number 2-3-79.
In the above document it is necessary to take the GSOP coefficient (heating period in degrees-days). One of the most important indicators is based on it - heat transfer resistance.
Wet façade system
Wet façade is the latest technology that ensures a minimum level of heat loss. At the same time, interest in this technology is not lost, but, on the contrary, increases. The design of a wet façade looks like a multi-layer sandwich. There are three layers in total, each of which has its own function.
- The base or reinforced layer is a composition of glue and reinforced mesh that levels the load-bearing wall and also reliably fastens the thermal insulation.
- The thermal insulation layer is a special board made of insulating material with a low thermal conductivity coefficient (mineral wool, polystyrene foam).
- The outer layer is necessary as a protective and decorative coating. This layer is made of plaster. It is called wet because the plastering solution is applied wet. At the same time, this technology provides for the possibility of painting the outer layer with a special paint.
Installation technology
Forming a protective layer using this technology is simple - a reinforcing mesh is installed on a flat base, then a layer of insulation, waterproofing and a decorative layer of plaster. If the goal is not to insulate the walls, you don’t have to install thermal insulation material.
For the durability of the facade, the following factors must be taken into account before installation:
- Preparing the walls. Their surface must be level and free from moisture. This especially applies to wooden structures. Sometimes an auxiliary layer of sheet material is used - moisture-resistant fiberboard or plywood.
- Insulation fastening. The best option is adhesive-based fixation. If this is problematic due to the properties of the material, you can use mechanical fastening with special dowels. The joints must be treated with sealant for external use.
- Vapor barrier film. It is mounted on top of the insulation and is designed to remove moisture. If basalt wool is used as a thermal insulation material, installation of a vapor barrier film is not necessary.
- Mounting polymer mesh. It is attached to the insulation and is designed for better adhesion of the primer layer.
- Base for plaster. A primer intended for external work is used.
- Facade plaster. It performs two functions: protecting the thermal insulation and creating the appearance of the facade. To achieve the latter, special paints can be used.
The technology largely depends on the characteristics of the materials used. Therefore, at the first stage you need to choose them correctly.
Features of wet finishing
Currently, on the market of finishing materials and structures that provide insulation of houses, you can find materials with different technical characteristics.
Having even a minimal budget at his disposal, a qualified specialist will find the optimal solution to make the house warm and visually attractive.
Upon closer examination and evaluation of the options, it becomes clear that the wet facade is in no way inferior to curtain structures in terms of heat-saving parameters, while the overall costs of materials and installation are noticeably lower than when using other methods.
The term “wet facade” itself implies that when performing finishing work on the outside of the house, liquid mixtures of various materials are used.
These include plaster mortar, primers and paints. This technology is used for houses made of any building material.
The protective layer resembles a kind of sandwich, which has significant strength with minimal weight.
The advantages of the wet composition are as follows:
- relatively low cost of installation and materials;
- the opportunity to attractively decorate the house from the facade;
- additional sound insulation;
- ease of updating and repair.
It should be noted that the work is entrusted only to qualified plasterers.
Despite many positive properties, the installation of a wet facade also has some disadvantages. First of all, these features must be taken into account when carrying out work.
The installation technology is designed for certain weather conditions. When drawing up a schedule for finishing work, you need to check it with the weather forecast.
Insulation and finishing of the facade is not carried out at ambient temperatures below +5 degrees. A wet facade is negatively affected by increased air humidity, especially precipitation.
If the installation of insulation is carried out in cool weather, then the scaffolding must be covered with film.
Photo:
When listing the existing disadvantages and disadvantages of installing a wet facade, it should be noted that the finishing material at the formation stage must be protected from direct sunlight.
The sandwich fixed to the wall must be ensured to dry evenly and gradually, otherwise cracks may form on the surface.
While the plastered surface is drying, it is advisable to protect it from the wind, which brings dust and dirt.
For those who undertake to apply a wet facade with their own hands to a wooden or any other house, you need to know about these features before starting installation.
Over the past decades, a large number of opportunities have appeared to beautifully decorate a home without using aqueous solutions. In particular, these are hinged ventilated facades.
This system is reliable and durable in operation. However, despite all the advantages of such solutions, they are suitable for a very limited circle of developers due to their high cost.
A wet façade is not inferior in its operational parameters to modern façade systems under one condition – strict adherence to installation technology.
Photo:
Requirements for choosing plaster
The most important thing in choosing materials for a “wet facade” is the choice of plaster mixture, because the attractiveness of the facade and its durability depend on it.
According to experts, in this case it is worth choosing elastic plaster mixtures based on silicone. Why them? It’s just that such mixtures will be of the highest quality and most durable. For example, decorative bark beetle plaster would be an excellent finishing option.
Let's consider a number of advantages that make elastic plasters the best choice for installing a “wet facade”:
- High moisture resistance. Silicone-based plasters are 100% resistant to moisture. Moreover, due to its elasticity, the composition adheres so tightly to the main surface that water will never reach the walls of the house.
- Elasticity. Bark beetle plaster and other silicone-based compounds have increased elasticity. This property protects the finish from the appearance of microcracks after drying. Considering that any building undergoes shrinkage after construction, and some are built in places where they are forced to constantly vibrate, this quality becomes the most valuable.
- Preservation of original color. The presence of silicone resins in the compositions under consideration ensures protection of the plaster from fading in the sun. Moreover, on such facades minor damage and scratches are almost invisible.
- Durability. It has been virtually confirmed that silicone-based plasters, in particular “Bark Beetle,” last 5 times longer than silicate compounds. Having made the right choice, you get significant savings, allowing you to update the facade no more often than once every 20-25 years!
- Lack of care. The elastic composition of the plaster mixture allows you to obtain a smooth, virtually glossy surface to which debris and dust do not cling. Any rain and wind will easily clean such a wall, which means the owner will not have to worry about the need to clean the facade.
- Ease of tinting. Unlike most mixtures for installing “wet facades,” silicone plasters are easily tinted in a wide variety of colors and shades. Experts count more than 2,500 shade options to suit any, even the most selective taste.
- Low material consumption. If to form a “wet facade” with silicate plasters, at least 5 kg/1 m² of wall surface is spent, then silicone mixtures can boast an economical consumption of 3 kg/1 m². And this is a serious saving if you take into account the entire scope of work.
Base profile
The technology of finishing a building in this way involves installing a very complex load-bearing structure at the base of the facade. Such an insulation system is installed taking into account a variety of internal and external corners, door and window openings, connections to the base and roof, and various external decorative elements.
During the operation of construction projects, door and window openings are systematically subject to physical and vibration influences. Since materials contract and expand differently when temperatures change, difficulties may arise where facades adjoin the plinth, roof or other buildings. If the finishing area is very large, you will have to lay expansion joints.
In order to be able to do high-quality cladding, before installing the insulation system, special profiles are often installed, through which such unfavorable factors are eliminated. These devices are designed for installation on corners and along the entire plane of the walls of the house. A fiberglass mesh and an elastic membrane for waterproofing are installed on a base made of a polyvinyl chloride frame.
The technology of cladding the walls of a house with a wet facade and installing a thermal insulation system involves the installation of profile strips. They are necessary to ensure uniform load distribution of the thermal insulation elements, which are laid out one after another to prevent moisture from entering the lower and outer rows of insulation slabs.
Installation of such profiles is carried out using self-tapping screws, as well as dowels, the type and quantity of which depends on the weight and type of material used as a heat insulator. Installation must be carried out at a distance of 40 cm from the ground. Taking into account possible expansion, it is necessary to leave a gap of 3 mm between the horizontal strips. For corners, a profile of the appropriate shape is used.
The beginning of façade insulation
Facade plaster using insulation technology
At what stage of construction is facade work carried out?
- When the roof installation is completed;
- External waterproofing of the foundation has been completed;
- Shrinkage of the house has already occurred;
- Windows, ventilation, air conditioning and other systems have been installed;
- The building has been dried out;
- Weather with a stable above-zero temperature is expected for 2-3 weeks (beginning of autumn or end of spring, facade work “does not like” heat or frost).
Preferred, but not required:
- We completed the initial finishing of the interior walls, concrete work, pouring and screeding of floors;
- Installed electrical wiring, alarm, etc.;
- The building is heated (for the cold season).
The main steps will be listed below in order to understand how to insulate a wet facade. Each “system” seller provides installation instructions, taking into account the installation features of this particular system. Don't forget this.
Creation of a wet facade system using bark beetle plaster
The use of bark beetle plaster for arranging a wet facade is ideal for people interested in creating an individual architectural appearance for their home.
Detailed diagram of creating a wet facade.
Externally, bark beetle plaster is a mixture of white powder with small granules, which influence the creation of a textured layer on the base of the walls. Most often, the size of the granules does not exceed 2.5 mm.
The main advantages of bark beetle plaster include the following:
- The material consists of a mineral filler that replaces heavier quartz sand, so you can use it to create a wet facade without fear of excess load on the foundation of the building.
- The bark beetle coating can be given any shade if you paint the finished façade with acrylic paints or add coloring pigments to the plaster mixture at the mixing stage.
- Bark beetle plaster has excellent vapor permeability, impact resistance and frost resistance, which allows it to be used even in difficult climatic conditions.
- The product is environmentally friendly.
- Bark beetle plaster is non-toxic, responds well to temperature changes, including sudden ones, and is fire resistant.
- The material will last for many years without requiring special maintenance, is resistant to mechanical damage, mold and fungal growths, and will make the facade more aesthetically pleasing.
Installation of bark beetle plaster as part of a wet facade can be divided into several main stages:
First stage. The bark beetle mixture is mixed according to the instructions until a solution suitable for finishing work is obtained.
Second phase. Using a metal spatula, the material is applied to the prepared base in an even layer of medium thickness.
Third stage. Half an hour after application, the bark beetle layer of plaster is processed with a plastic grater as carefully as possible to create the desired pattern - smooth, rounded or spiral.
Application of decorative plaster
A very important stage for both the façade builders and the home owner. First you need to choose the type of plaster, because this determines how aesthetically pleasing your house facade will look.
There are 3 types of decorative plaster
- Pebble (root, lamb)
- Bark beetle
- Fur coat
The most common decorative plaster is pebble plaster. In our work on insulating houses in Moscow and the Moscow region, the choice of house owners falls precisely on root with a fraction of 2 mm.
In second place in popularity is the bark beetle. Very interesting textures can be obtained using this decorative material. This plaster got its name due to its textured patterns, reminiscent of the passages of bark beetles in wood.
Fur coats for private homes are not very popular, as they look quite rough in small quantities. However, on large administrative buildings or multi-story buildings, the texture of the fur coat looks excellent.
Decorative plaster is applied using spatulas in small areas of approximately 2 m2 to prevent rapid drying of the plaster, especially at the border.
Then, after applying a layer of decorative plaster, using a special plastic trowel, a certain texture and pattern of the facade is set.
What is a wet facade system
The most popular materials used for the construction of various structures are brick, concrete or wall blocks. They produce buildings that have good strength, but do not have excellent thermal insulation parameters, so insulation is an indispensable process. For this, wet facade technology would be an excellent solution.
With the help of the work performed, not only high-quality insulation is ensured, but also the decorative design of private houses. All work is carried out exclusively using specialized building solutions. At the end of the process, the walls are plastered, which guarantees their attractive appearance.
The wet facade consists of the following layers:
| Construction layer | Functions it performs |
| Adhesive | Provides reliable fastening of the entire structure |
| Insulating | Guarantees high-quality insulation of building walls |
| Reinforcing | Responsible for the high strength and reliability of the wet facade, and also creates the basis for easy and quick creation of the next layer |
| Decorative | Acts as a plaster coating that protects heat-insulating materials from external influences and provides a beautiful appearance to the structure |
When using this technology, the usable area of the premises is not reduced, since all work is carried out outside.
Video
The “wet facade” technology, despite its apparent accessibility, requires proficiency in plastering skills. And this is not the easiest construction specialization. But if you have time, the necessary tools and desire, then, following the instructions and recommendations of manufacturers of building mixtures, you can do the insulation of a private house with your own hands. Although it is better to entrust this to specialists.
When the term “wet façade” is mentioned, the image of a façade abundantly moistened with water immediately appears in the imagination. But in fact, this method of finishing, of course, has nothing to do with such an association.
This phrase is just one of the attributes of figurative folk speech and cannot be found in textbooks. The question “what is a wet façade?” will be discussed in detail in the material below.
General description of the design
This type of construction consists of several layers that perform a specific function:
- Glue. It consists of an adhesive mixture, the quality of adhesion of the insulating material to the wall of the building depends on it;
- Thermal insulation. Insulation using the “wet” method is performed using expanded polystyrene or mineral wool. This choice is determined by the fact that these materials have low thermal conductivity, which allows for high-quality insulation of the facade;
- Reinforced. A reinforcing alkali-resistant mesh is applied to the insulation attached to the wall, which makes it possible to strengthen the adhesion of the protective and decorative layers to the surface of the slabs. Fastening is done using mineral glue;
- Protective. Priming the surface allows you to increase the durability of the entire structure;
- Decorative. Includes finishing decorative plaster, which protects the facade from the harmful effects of climatic conditions and mechanical damage. With its help you can create a facade of almost any shade.
Required Tool
To make it more convenient and easier to work, the tool is taken care of in advance. You will need to perform several types of work, not just plastering itself, so the set of tools is varied.
Mechanical means:
- Electric drill (screwdriver);
- hammer drill (prepare an attachment for installing dowels);
- construction mixer;
- cutter for cutting profiles.
Hand tools and equipment:
- spatulas with a blade width of 350 and 80-100 mm;
- serrated stainless steel trowel with teeth 8-10 mm;
- hammer;
- building level;
- ironer;
- a grater equipped with sandpaper or an abrasive mesh;
- roller, wide brush (for priming);
- grater;
- grater for forming a decorative structure (300-400 mm long);
- construction knife for cutting reinforcing mesh sheets;
- container for adhesive mixture;
- masking tape;
- nylon cord;
- clean rags.
Those who use sheet polystyrene foam will find a home-made device for cutting sheets according to thickness useful. A homemade bow saw (“goat”) is made from wooden slats. A nichrome thread with a diameter of 1.0 mm is used as a cutting “blade” (acceptable limits are 0.8-1.2 mm). Voltage is supplied through a transformer with a power of 250 (up to 400) W, 220/24 V.
Briefly about the main thing
The wet facade is a multi-layer external cladding of a house without a ventilation gap, which includes the following structures:
- Glue.
- Insulation.
- Reinforcing mesh.
- Plaster.
- Finishing.
Among its main advantages are:
- Good indicators of heat, wind, moisture, noise insulation.
- Ease.
- Durability.
- Resistance to external factors.
- High aesthetic qualities.
Disadvantages include the need to strictly adhere to installation requirements - temperature, humidity and weather conditions. During installation, it is important to consistently carry out the stages of the technology. Therefore, it is better to entrust the procedure to a professional team.
Definition
Those who first encountered the technology in question for the exterior decoration of a house often have a question about what features a wet facade is characterized by, what it is from a technical point of view and what structure it has. To give a clear answer to this, let’s look at these aspects in more detail.
The external cladding of the structure must have heat and sound insulation properties. Therefore, a layer of insulation must be located under the decorative outer layer. As a rule, various modifications of foam compounds or mineral wool are chosen as a heat-insulating material. All facade finishes are divided into two main categories:
- Ventilated.
Insulation is attached to the wall of the house, then strips are installed, to which slabs are in turn mounted - dry plaster, siding, etc. Thus, there is a small air gap between the heat-insulating material and the finishing.
- Non-ventilated.
The facade has a similar structure as in the first case, but the finishing is adjacent directly to the insulation.
Installation of a wet type facade Source fasadec.ru
Often in the second case, plaster and adhesive compositions are used, applied directly to pre-fixed layers of thermal insulation. Since at the time of application they are in a liquid state, the technology is called “wet”. This is where the name of the façade itself, made using this algorithm, stuck.
Helpful information! Despite the fact that the facade is called wet, the installation of its main thermal insulation elements to the wall is carried out using special fastening elements - dowels and nails with large diameter heads.