To build a comfortable, warm home, it is not enough just to install heating and seal the seams .
With thin walls that do not retain heat well, heating costs will be incredibly high, and the heat in the house will not be retained.
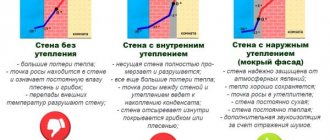
To ensure that warm air does not escape from the room, and that the walls perform not only the function of protection from external influences, but also the function of thermal insulation, it is necessary to insulate them.
The following materials are suitable for insulation:
- mineral wool;
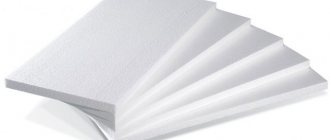
- Styrofoam;
- extruded polystyrene foam;
- penoplex;
- penofol;
- penoizol;
- polyurethane foam.
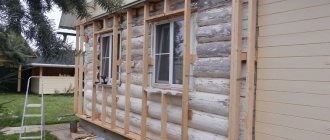
Lathing and finishing for ventilated facades
The ventilated façade has the advantage of being created without any wet processes.
The structure can be assembled in stages, with breaks, if necessary, disassembled, remade... Assembly does not require special qualifications of a plasterer. All work can be done with your own hands. For facade finishing, a sub-supporting structure is assembled - a lathing made of wooden or metal parts, which is firmly fixed to the load-bearing wall.
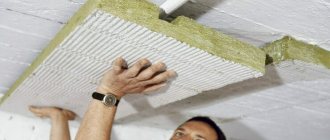
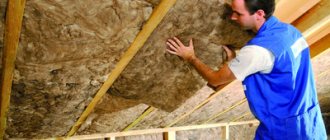
The most commonly used insulation material is mineral wool. In this case, leveling the wall is not required; it is enough that the sheathing is made in the same plane.
Another vapor-transparent insulation is gaining popularity - low-density aerated concrete. But to eliminate the gaps between it and the wall, it is necessary to level the wall and apply insulation. Aerated concrete is more durable according to manufacturers, but this insulation has not yet passed the test of time.
Lathing for a ventilated facade can be of various designs. Heavy and durable panels for facade finishing are equipped with metal lathing with special fastening elements, including a layer of insulation on the wall. But more often an economical option is used - lathing from dry wooden beams.
Triple wooden lathing for ventilation façade
The beams are packed in three layers - first vertical sheathing, then horizontal, and again vertical. Despite the apparent cumbersomeness, this is the most versatile option.
To insulate walls made of dense heavy materials in our climate, due to economic feasibility, a layer of insulation 100 - 150 mm thick is required. This thickness is obtained from insulation boards in 2 or 3 layers of installation.
Typical use of insulation boards with a thickness of 50 mm. 2 layers are placed first between the vertical sheathing, one layer - between the horizontal sheathing. The next vertical counter-batten serves to form a ventilation gap above the insulation 40 - 50 mm thick.
The bars of the upper vertical sheathing are placed in increments necessary for fastening the panels - 30 - 80 cm. For example, for vinyl siding, it is necessary to fasten more often, every 30 - 40 cm, and the required width of the wooden planks is 60 - 80 mm.
The beams of the lower battens are installed in increments according to the optimal placement of the insulation, the width of the slabs of which is usually 60 cm. Therefore, a distance of 59 - 60 cm is chosen between the beams to prevent leaks when installing sideways.
Dimensions of bars
The height of the beams used: - lower vertical - 50 or 100 mm depending on the number of layers of insulation; — horizontal — 50 mm, — for one layer of insulation; - the second vertical - 35 - 50 mm in size of the ventilation gap.
(the insulation can be selected in accordance with the calculation, for example, 80 or 120 mm thick, the height of the beams is selected accordingly, how to calculate the thickness of the insulation for a wall)
The minimum width of the beams is 40 – 50 mm. They are fastened with steel dowels with a diameter of 6 mm and passed through the timber. The distance between the fastening points along the length of the beam is no more than 800 mm.
The beams of the first sheathing are aligned in one plane - along a plumb line and along a cord. If necessary, place pieces of plywood under them.
At the corners of the building, on the slopes of windows and doors, on various openings and gables, usually wider, stronger beams - 80 - 100 mm - are installed around the perimeter.
Choice of insulation
To insulate vertical walls, mineral wool slabs with a density of at least 60 kg/m3 should be used. Insulation with a density of more than 80 kg/m3 (top layer of insulation) can be used without a windproof membrane.
It is recommended to use only insulation with the highest vapor permeability, even for walls made of dense, heavy materials. Typically, either mineral wool or low-density aerated concrete is used. Better drainage of the wall contributes to a longer service life.
The unhindered movement of air above the insulation along the ventilation gap from bottom to top between the bars of the counter-lattice must be ensured. Protrusion of insulation or membrane is unacceptable.
The gaps at the bottom and top are fenced with stainless plastic or metal mesh to prevent the penetration of insects and rodents.
Fastening thermal insulation boards
Layers of mineral wool laid between the battens are pressed against the wall with plastic disc-shaped dowels - from 5 pcs. per square meter Wedging plastic dowels are inserted into heavy materials to a depth of at least 5 cm, and for porous lightweight materials, screw-in fasteners are used to a depth of at least 9 cm.
A windproof diffusion membrane is used on low-density mineral wool insulation to prevent the insulation layer from blowing through and spreading microfibers. It is stapled to the beams and pressed with dowels along with the insulation.
It is important to maintain the continuity of the insulation layer; cold bridges are not allowed, including at the boundaries, at the junction of the insulation of the wall and roof, wall and base...
Simplified options for wooden sheathing
To insulate walls made of lightweight porous materials (aerated concrete, porous ceramics...), usually, due to economic feasibility, a layer of insulation of 3–7 cm is sufficient. Accordingly, the insulation can be laid in one or two layers.
Then the previous version of the lathing for a ventilated facade can be simplified - only horizontal lathing is used, onto which vertical bars are placed to provide ventilation. gap and securing the finish.
Horizontal lathing is more expedient - it prevents the insulation from slipping and collapsing, and less dense and cheaper samples of mineral wool can be used with it.
One row of vertical bars
When the insulation thickness is up to 100 mm, you can use the most economical version of the lathing - one row of vertical bars, which are secured with dowels through them.
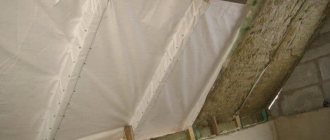
Vapor barrier layer: nuances
The presence of a vapor barrier in a wooden house is very important, since as a result of insulation, the wall is blocked between 2 thermal insulation layers. In this case, the level of humidity in the room increases, since walls constructed in this way are not able to breathe. What to do in this case? A high-quality ventilation system saves the day; only with its help is it possible to effectively combat humidity. If you prevent dampness on the walls, you will avoid the process of wood rotting.
Simply put, you need to install a high-quality vapor barrier. It is performed using a special film, which is placed on the surface of the wall with its rough side towards the wooden surface.
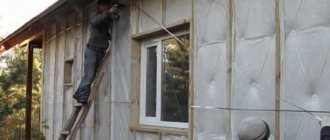
Insulation of external walls with mineral wool. Step-by-step instruction
Insulation of house walls from outside with mineral wool
According to statistics, heat losses that occur due to poorly insulated or uninsulated walls of a house amount to 25-30%. To make your home more comfortable and thermally efficient, you need to insulate it. It is very advisable to choose the right materials for insulating the house and follow the recommended thickness of the insulation depending on the climatic conditions.
Next, in step-by-step instructions, the external insulation of the walls of the house was carried out using Isover Classic Plus mineral wool.
House wall: timber, brick or block. Required materials and tools:
- universal thermal insulation Isover Classic Plus;
- wooden blocks 50x50 and 20x50 mm;
- hydro-windproof membrane Isover HB;
- construction tape;
- construction stapler;
- screwdriver;
- screws;
- staples for a construction stapler.
Step 1. Installation of vertical sheathing
A vertical wooden sheathing made of 50x50 mm bars is attached to the wall, in increments of 600 mm. The thickness of the bars varies depending on the thickness of the insulation. A distance of 600 mm between the sheathing bars allows the installation of the Isover Classic Plus insulation board by surprise without additional fasteners. The elasticity of the insulation ensures a tight fit to the wall and sheathing, eliminating cracks and gaps. When installing thermal insulation with a different lathing pitch, the insulation boards are cut with a knife to the required width with an allowance of 10-20 mm.
Installation of vertical lathing
Step 2. Laying insulation
For external wall insulation, it is recommended to use mineral wool in Isover Classic Plus or Isover Optimal slabs. Depending on the required thickness of thermal insulation, the insulation is installed in 1 or 2 layers. When insulating in 2 layers, the second layer of insulation is laid with the seams staggered in the second vertical or horizontal sheathing, which avoids the formation of “cold bridges”.
Adviсe
In conclusion, a few words should be said about small tricks that will help avoid numerous problems after insulating the ceiling with mineral wool:
- The small fibers that make up mineral wool cause itching and irritation when they come into contact with exposed skin and respiratory tracts. To avoid harm to health, it is necessary to use special clothing and a respirator.
- When using metal profile lathing, it may later turn out that cold air continues to flow through the ceiling in the corners. To eliminate the occurrence of such a problem, after fixing the metal profile to the ceiling, all corners are carefully filled with polyurethane foam.
- Due to errors in calculations, the thickness of the mineral wool layer may exceed the width of the lathing. In this case, additional bars are nailed onto the wooden beams. If the sheathing is made of a metal profile, you will have to replace the hangers or reduce the insulation layer.
- When laying mineral wool, compacting and pressing it is strictly prohibited - this leads to a decrease in the number of air bubbles inside the insulation and, as a result, loss of thermal insulation properties.
- In places where spotlights are installed, it is necessary to provide space for air circulation in order to avoid subsequent problems with their constant burnout.
- The most suitable screws for fixing a metal profile are self-tapping screws made of hardened steel.
- You can determine the current state of the insulated ceiling using a device such as a thermal imager. When turned on, the screen indicates in red the places where cold air passes through.
- All of the above is designed to minimize and optimize the financial and physical costs of insulating the ceiling with mineral wool. However, to get the best results, you should seek advice from specialists. They will help you make correct calculations of the required thickness of the insulation layer and, based on this, calculate the total amount of material and its cost. Often such companies directly cooperate with manufacturers of insulation materials, which can result in additional savings on purchases.
Types of construction
There are two types of sheathing. The first type is solid. For it, plywood or boards 150 mm wide and 30 mm thick are used. If large loads will be placed on the roof, then a solid structure will be installed. Sometimes installation is done in two layers.
The second type is sparse. This type of laying of beam strips is used everywhere. And the installation of the slats is carried out at different pitches, depending on the type of roof that will lie on the lattice structure.
Ready solution
If you do not know exactly how to properly make a sheathing for siding, what technical characteristics of the fastening system are necessary for a particular type of siding, choose a ready-made solution from a panel manufacturer.
So, I developed a special plastic sheathing that is suitable directly for branded siding. Moreover, different types of panels have their own profiles. For example, for the Alta-Siding and Canada Plus collections, a D 4.5 profile was made, for Block House siding - VN-01 and VN-02.
The company also provided two options for installing siding - with insulation (then 138 mm studs are used) or without it (53 mm studs).
Installation of such a ready-made system does not require special skills or equipment. The algorithm of actions is simple:
Select and order the necessary elements from the company’s assortment.
Set the horizon around the perimeter of the house and make markings.
Secure the bottom heel of the profile horizontally.
Align the profile vertically using a level and secure the top heel.
Secure the middle heel.
Sequentially install the remaining profiles in increments of 30-40 cm.
For corners and openings, use a flat profile with a metal corner element.
Check the accuracy of installation vertically and horizontally and finally align the profiles using a hexagon. After this, you can install the siding.
Standard step when installing a profile
Marking is carried out using measuring instruments, using a tape measure, a building level and a plumb line.
It is convenient to use laser tools, which significantly speed up and simplify the application of lines. Trim strips are often placed horizontally, so the racks are placed vertically. The pitch between the profiles is chosen at 40 - 50 cm, the exact value depends on the severity of the material. The distance to the wall is 25 - 40 mm, the distance is determined by the curvature of the vertical fence. The staples are placed at a distance of 40–50 cm.
Disadvantages of markings in the form of protruding edges of the profile will certainly manifest themselves on the front part of the siding, so the calculation must be taken carefully. The profiles are placed so that they are located in a plane along their width (60 mm) and do not turn out when secured in the bracket. To do this, pull the thread and make sure that the profile touches it with both edges.
Internal thermal insulation work
The first caulking from the inside of a timber house is carried out immediately after construction. For work, use natural jute or linen material. You can use ready-made material in the form of twine or tape, which is twisted while working. For work, a tool is used: caulk or chisel, hammer. You need to go through the walls starting from the bottom link along the entire perimeter. You cannot caulk first one wall, then another, the house may become warped. Usually the caulk from the inside is combined with the outside.
Lathing
Lathing is used for ventilated facades. This is due to the fact that soft insulation, in principle, is not used for “wet” facades. It does not have sufficient rigidity to support the required weight of the plaster layer.
If you plan to finish in the form of “Bark Beetle” or “Lamb”, proceed to the following methods. Lathing is often used for thermal insulation from the inside. There she fully justifies herself.
So, how is the sheathing done?
- Necessarily! A vapor barrier film secured with staples must be laid on the wall;
- The lower base profile is screwed on;
- On top of the vapor barrier, using self-tapping screws, a beam with a thickness equal to the thickness of the insulation is screwed. The width of the beam should be actually equal to the width of the slab, but be 2-5 centimeters smaller. The most commonly used beam pitch is 60 cm.
- After this, starting from the bottom into the sheathing, the mineral wool is laid.
The slabs in the sheathing should fit tightly. In this case, the cold will not pass through the gap between the timber and the slab. But this approach is not used very often. It is applicable primarily to wooden houses. Also, soft mineral wool slabs necessarily require not only a vapor barrier on the inside, but a windproof layer on the outside. Otherwise the wind will blow. Installing wind protection is an additional expense, so two other mounting methods are often used.
Laying the slabs in the sheathing is the right way when the question arises: how to attach the insulation to the ceiling.
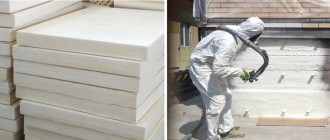
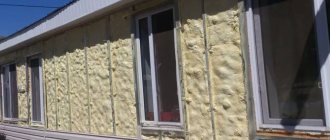
Alternative
Polyurethane foam has very low thermal conductivity. For this property it is often used in northern latitudes. It is produced in the form of foam and sprayed using special equipment. Such insulation is more expensive, but is more effective.
The second stage - preparation of the bar
The finished material must be prepared accordingly.
The work instructions look like this:
- STEP 1: the material should be placed for a couple of days in the room that will be finished. This will allow the bar to acclimatize so that its temperature and humidity are the same as in the room.
- STEP 2: the elements are treated with an antiseptic composition. This can be done using a regular brush, treating all surfaces in order. You can do it differently and make a trough from the boards, which is covered with film. An antiseptic is poured there, and the block is simply dipped; this option provides the highest quality protection.
If there is a lot of bar, then it is easier to make a trough so that you can quickly process it by dipping
- STEP 3: While the products are drying, you can prepare the walls. To do this, markings along the width of the racks are applied to the surface. The work is done using a pencil and a level so that the lines are straight. This will allow you to clearly see what the structure will look like and will simplify your work; you will not need to be distracted by monitoring the correct position of the elements;
When marking vertically, you can use a plumb line rather than a level
- STEP 4: Measurements are taken to determine the length of the bars. It is better to do this in several places, since the walls or ceiling may be uneven;
Do not forget to leave gaps of 5-10 mm so that the block does not rest and deform due to changes in temperature and humidity.
- STEP 5: cutting the block is done with a hacksaw or jigsaw. Here it is important to correctly mark the elements and cut them perpendicularly so that the ends are even. It is also advisable to treat the cut off areas with an antiseptic so that the bar is completely protected from moisture and pests.
Seal cracks in walls and insulate
In wooden beams dried using the appropriate technology, cracks form that need to be sealed.
Means for sealing cracks are:
- sealants and other synthetic products : resins, mastics, mounting foams. Synthetic sealants should not have an acrylic substance. Silicone seals must have a high level of frost resistance. The mixtures are placed deeply into the gap, and after drying the area is leveled. Polyurethane foam is used in places where facing work will subsequently be carried out;
- wood shavings mixed with wood glue . Used at any stage of finishing, as well as during additional inspection. The prepared mixture is poured into the previously cleaned crack of dust, then, after complete drying, the area is processed by grinding. The method is advisable to use for small cracks;
- decorative mixtures for sealing;
- fibrous materials - caulk (moss, wool, tow). Pre-cleaned cracks, impregnated with antiseptics and solutions that prevent the formation of mold, mildew, and dampness, are clogged with caulk.
Wood requires constant care and timely sealing of cracks that may appear over time. Regular inspection of the wood will help prevent gaps from growing, which can reduce the insulation properties of the walls.
Installation of siding on sheathing
Once the sheathing is ready, you can begin installing the siding.
Siding fastening
You can master this technology by watching a video demonstrating how to attach siding to the sheathing, and below are just brief installation instructions:
- We attach PVC siding to the sheathing using special self-tapping screws with a wide head.
- To ensure unhindered movement of the siding during thermal expansion, do not tighten the screws all the way, but leave a gap of about 1 mm. For the same reason, we try to attach siding only to special holes for fastening, which have an oval shape.
- A drainage system must be attached to the bottom of the wall - a specially shaped siding strip designed to remove moisture from the foundation.
- On top of the drainage we install a starting strip into which we insert the first siding panel.
- We edge windows, doors and other protruding elements with special corners. We use the same corners to decorate the external and internal corners of the building.
We hope that this instruction describes in sufficient detail how to properly make sheathing for siding. And yet, the main conditions for success will be not only careful study of the recommendations from this article, but also diligence and practice. However, this recipe is valid for any business!
Selection of mineral wool
There are several types of cotton wool.
- Basalt or stone. This material differs from others in its long service life and low thermal conductivity. It is made from metallurgical waste. The material is completely safe for humans and environmentally friendly. It is easy to cut and also quick to install. This material is distinguished by a high level of sound insulation. For this reason, it is used to insulate facades under a layer of plaster. The disadvantages of basalt wool include its too high cost. In addition, during work, small pieces of cotton wool may come off, forming basalt dust. The density of basalt mineral wool is 135-145 kg per cubic meter.
- Mineral glass wool. For its manufacture, an alloy of staple fiberglass is used, which makes it quite strong and dense. The material is low in cost, resistant to frost, does not shrink, and does not ignite. The density of the material is 130 kilograms per cubic meter. This type of wool is considered the best among mineral insulation materials.
- Slag mineral wool. It is made from melted blast furnace slag. Its density is in the range of 80-350 kilograms per cubic meter. The cost of the material is not too high. This makes cotton wool especially popular among buyers. Experts do not recommend using this type of wool for places with frequent precipitation and sudden temperature changes.
In addition, mineral wool also differs in its fiber structure. It can be vertically layered, horizontally layered, or corrugated. The insulation also has different markings.
- Cotton wool, the density of which is within 75 kilograms per cubic meter, is designated P-75. It can only be used on surfaces where the loads are light.
- The P-125 marking denotes mineral wool with a density of about 125 kilograms per cubic meter. It can be used for finishing horizontal planes.
- For finishing walls made of metal profiled sheets, as well as reinforced concrete floors, cotton wool marked PZh-175 is used.