It is difficult to imagine a country cottage or dacha without a veranda. Basically, such a building is used only in the warm season. But often, to increase the usable area and use the premises in winter, they insulate the veranda attached to the house. We will tell you how to implement this correctly and at minimal cost in this article.
Is it necessary to insulate the veranda?
There is an opinion that if you insulate the veranda, the house will become warmer. There is some truth here. The veranda is always located on the side of the house where the entrance is located. The additional room is a barrier to wind, precipitation, and low temperatures. The cold does not immediately enter the house through the entrance doors. However, this protection is minimal. If you initially calculate the costs of thermal insulation of the veranda, it will be cheaper to install reliable insulated doors.
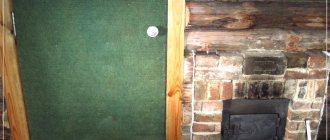
You need to insulate a heated veranda, where a comfortable temperature is constantly maintained in winter
The second nuance is the design of the extension. If this is an open terrace, then there can be no talk of any thermal insulation. She's simply useless. Even if the veranda is glazed, you need to carefully study its structure again. Typically, such extensions are initially built of a cold type. The simplest design has a wooden frame. It is covered with boards. The outside walls are lined with a windproof membrane. The canvas prevents cold wind from penetrating through the cracks. The final exterior finishing is done using a block house or other types of panels. The inside walls are also lined with clapboard. The extension turns out to be cold, but thanks to the windproof membrane, atmospheric moisture and wind do not penetrate into the room.
Now, if you simply insulate a veranda from boards from the inside, then there will be no point. Regardless of the thickness of the insulation, the room will be cold. The insulation must be laid outside and a ventilated gap must be created between it and the block house. Here you need to consider whether it is profitable to tear off the wall cladding, because some panels will become unusable after dismantling.
The last nuance is related to the presence of heating. After insulation, the inside of the room will not become warmer unless a heater is installed. If you don’t want to heat the veranda and insulate it, it makes no sense.
Open-closed terrace. First stage of evolution
It happens that family members cannot agree on one decision, and then a compromise has to be sought. A member of our portal with the nickname Pavel Again lived in an old house with an old veranda, the lower part of which was covered with boards, and the upper part consisted of frames with many pieces of glass of different shapes.
When they started modernizing the terrace, some family members insisted on an open version, while others dreamed of a closed one. We agreed on removable windows. Here is the technology used:
Pavel Again
We screw threaded rods into the wall and hang sheets of transparent plexiglass on them from the floor to the roof (this is about 2.5 meters).
This is how this terrace lives: in autumn and winter it is closed.
And in the summer it is open.
Useful link for those who want to repeat something similar: A little practice on working with light-transmitting materials .
Methods for insulating a veranda
They are engaged in work related to thermal insulation during the construction phase or when the extension has already been erected. You can insulate as desired: from the inside and outside. The technology provides for complex work. That is, you need to insulate the floor, ceiling, walls and basement. If you leave one of the elements without thermal insulation, there will be no sense in the work done.
Insulating the veranda from the inside
On the inside, weather conditions do not interfere with work at any time. This is the advantage of the chosen method. However, installing insulation takes away some usable space. For this reason, it is optimal to insulate walls from the outside. From the inside they are engaged in arranging the floor and ceiling.
It is optimal to insulate the floor and ceiling from the inside
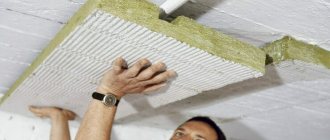
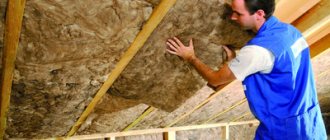
Mineral wool is usually used to insulate the ceiling. First, a sheathing is created from slats. The next layers are waterproofing, mineral wool, and vapor barrier. The entire pie is covered with clapboard.
Important! Mineral wool should always be protected with vapor and waterproofing on both sides. The material tends to absorb moisture.
The principle of floor insulation is similar, but there are nuances. The insulation is laid between the rough and finishing flooring. If the gap under the joists allows, then the subfloor boards can be placed under them. If there is no gap in the subfloor, a finishing flooring is used. Thermal insulation is rolled out over it, timber is secured, and boards of the new finishing flooring are laid.
Insulating the veranda from the outside
The advantage of external insulation is the preservation of the internal usable space of the extension. The downside is that work cannot be carried out when it is snowing, raining or severe frost.
A popular external insulation is the arrangement of a ventilated façade
Most often, it is customary to insulate the walls outside so as not to steal the internal usable space of the veranda. If the extension is wooden, a ventilated facade is installed. Brick, foam block and cinder block walls are optimally insulated using wet facade technology. It is based on attaching thermal insulation without lathing and applying plaster as a finishing touch.
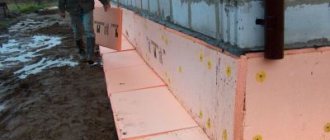
In addition to the walls, the basement needs to be insulated from the outside. Usually it is sheathed with Penoplex slabs. If the veranda is on a pile foundation, even the insulated floor will have heat loss, since the frosty wind blows from below in winter. Here it is optimal to pour a concrete strip along the perimeter of the building between the piles, lay out a brick base and insulate it with Penoplex.
How to prepare a veranda for insulation
Preparatory work depends on which side the insulation is supposed to start from. If external thermal insulation of the walls and base is planned, space is freed up near the veranda so that you can move freely. If there is a finishing cladding, it will all be dismantled. Eliminate cracks. Cracks on wooden walls are caulked with flax. The cracks in concrete and brick are filled with putty.
With internal insulation, the veranda is completely freed from foreign objects. If the technology requires it, then the floor covering, wall and ceiling cladding are dismantled. They immediately think through the laying of communications, electrical wiring, the location of switches, sockets, and lighting fixtures.
For internal wall insulation, preparation involves arranging lathing
The disadvantage of thermal insulation of walls from the inside is not only the reduction of space. The negative aspect is the shift in dew point. If, nevertheless, internal insulation of the walls of the frame veranda is chosen, then a sheathing is constructed from slats or profiles. The structure is needed for laying thermal insulation, creating a ventilated space, and attaching the finishing cladding.
Natural and synthetic materials for caulking
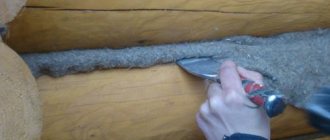
The cracks in the wooden parts of the house need to be caulked. For this purpose, fur, tow and other natural materials are used. They are sold by weight or in the form of ropes. Such insulators are environmentally friendly, but birds love to take them away. To avoid this, the seams are treated with chemical compounds on top.
An alternative could be polytherm, a synthetic material made from polyester fibers. It is non-toxic and safe for people. Available in the form of strips ready for installation.
Tow for caulking cracks.
The best way to insulate a veranda
The choice of material depends on several factors. They take into account the design of the veranda, what the walls are made of, and what method is chosen: external or internal. To successfully complete the work, you need to follow one rule. It is optimal to attach rigid thermal insulation in the form of slabs to vertical and inclined surfaces. You can insulate a horizontal surface by rolling out rolled mats.
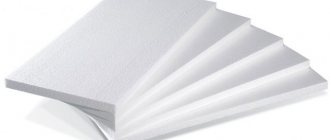
How to insulate a veranda with foam plastic
The popularity of polystyrene foam is explained by its low cost and ease of processing. The slabs are suitable for laying on floors, walls and ceilings. Foam plastic is not afraid of moisture, which eliminates the need to use a waterproofing and vapor barrier membrane.
Foam plastic slabs are fixed without vapor and waterproofing
Important! Foam does not allow air to pass through. To create a favorable microclimate inside the veranda, ventilation is installed.
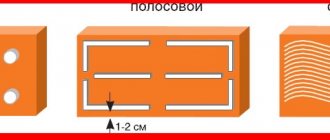
Using dry facade technology, foam plastic slabs are laid in the cells of the sheathing. The joints are covered with polyurethane foam to avoid the formation of cold bridges. On the outside, wet façade technology is usually used. The polystyrene foam is glued to the wall and secured in the corners and center with umbrella dowels. The plaster is stretched on top.
Advice! It is optimal to insulate a plastic veranda with polystyrene foam, since both materials are lightweight, do not allow air to pass through, and ventilation will be required in any case.
How to insulate a veranda with Penoplex
The composition of the material is similar to polystyrene foam, but has improved characteristics, which affects the increased cost. First of all, the slabs are more resistant to mechanical loads. The installation technology is no different from working with foam plastic. You can insulate walls, floors and ceilings with Penoplex. However, the veranda still has a plinth. This is where Penoplex is best used, since other thermal insulation will not work.
If the veranda was built a long time ago on a strip foundation, it will have to be dug up. A trench is dug along the perimeter until the beginning of the concrete base appears. The base and foundation of the veranda are cleaned of dirt. The concrete surface is covered with waterproofing. Bitumen mastic or a special membrane will do.
Penoplex slabs are glued using foam glue using the foam installation method. They are fixed at five points with umbrella dowels. An adhesive plaster mixture with reinforcing mesh is applied on top of the slabs. The lower part of the foundation is covered with earth. The base protruding to the surface is decorated with decorative plaster for beauty.
How to insulate a cold veranda with mineral wool
The concept of mineral wool covers three types of insulation: glass wool, basalt wool and mineral wool. Release form: rolled mats or slabs. Rolled mineral wool cakes quickly and has a low density. The mats are rolled out on a horizontal surface: floor and ceiling. Can be cut into pieces and pushed tightly between joists and beams.
Rolled mineral wool is laid on a horizontal surface
Mineral wool slabs are optimally used when you need to insulate the facade. However, they are also laid on the floor and ceiling. The facade with mineral wool is made ventilated. Thermal insulation must be protected on both sides with vapor and waterproofing.
High-density basalt wool slabs are suitable for wet facade technology. They are attached using the foam method (with glue and dowels), and plaster is stretched on top.
Important! The advantage of mineral wool is not only the ability to retain heat, but to allow oxygen to pass through. The veranda “breathes”, which eliminates the need for mandatory ventilation.
It is optimal to insulate a shield veranda or a plank building with mineral wool. The walls, together with thermal insulation, are reliably protected by vapor and waterproofing, and finishing cladding. The extension turns out to be warm. Due to the fact that the walls “breathe”, a favorable microclimate is always maintained inside the veranda.
How to insulate a veranda under a living space with polyurethane foam
There are three forms of polyurethane foam: rigid boards, flexible boards and spray foam. The third option is popular and effective. Spraying polyurethane foam allows you to reliably insulate all elements of the veranda structure without the formation of cold bridges.
To spray polyurethane foam you will need special equipment
Sprayed polyurethane foam is the same polyurethane foam, only in large quantities. It is applied to a clean, prepared surface using special equipment. The foam adheres reliably and fills all voids. After hardening, excess areas are cut off and the thermal insulation is covered with finishing.
How to insulate a cold veranda in a private house
When insulating a cold extension, it is important to follow the sequence. Usually they do the ceiling first, then the walls, and finish with the floor. If desired, the order is changed if they think that it will be more convenient to insulate this way. The main thing is that there are no areas left in the veranda without thermal insulation, otherwise the money and effort spent will be in vain.
How to insulate a ceiling on a veranda from the inside
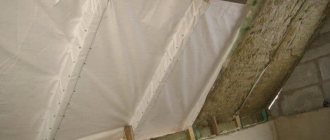
There are two ways to insulate the ceiling: from the inside and from the outside. The first option is taken when it is necessary to insulate an already built veranda. The lining is removed from the ceiling. Since the roof is exposed to precipitation, waterproofing must already be present under the roofing. Its absence is a grave mistake that will have to be corrected. The waterproofing membrane is attached from the inside of the veranda, surrounding the floor beams. Wooden elements will rot faster, but this is the only way to insulate and protect the ceiling from moisture. The next stage is traditionally the creation of sheathing, laying insulation, vapor barriers and finishing.
From the inside, the insulation is tightly pushed between the sheathing beams
It is possible to insulate the ceiling from the outside when there is no roof on the veranda yet. Here it is better to use Penoplex. After laying the floor beams, a board is sewn on top. Penoplex slabs are laid over the entire surface and secured with dowels. The joints are covered with foam. Since Penoplex can withstand heavy loads, a counter-lattice is installed on top of the slatted slabs. Attach it to the floor beams. A waterproofing membrane is rolled out over the counter-lattice and the roof covering is installed.
How to insulate veranda walls
Walls can be insulated from the outside and inside. The owner has the right to choose the option that is more suitable for him.
There are two ways to insulate walls from the outside:
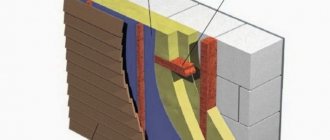
- To insulate a plank veranda, dry facade technology is used. Lathing is created on the walls. The cells are filled with insulation and covered with a windproof membrane on top. Using a counter-lattice, a ventilated gap is created and finishing panels are attached. Dry facade technology requires the creation of lathing
- To insulate a brick, cinder block or other similar material veranda, wet facade technology is often used. Heat-insulating boards are glued to the walls, secured with umbrella dowels, and plaster is stretched on top. Wet facade technology is based on fixing slabs to the wall without lathing
When installing internal insulation, it is optimal to create a sheathing so that a ventilation space is maintained between the cladding and the thermal insulation. If Penoplex slabs are selected, then they can be fixed to a brick wall using the wet facade method. However, first they install reliable waterproofing. The wall is covered with bitumen mastic or membrane. The measure is necessary because the dew point is shifting.
How to insulate a veranda floor
The method of insulation often depends on the foundation on which the extension stands. If you are insulating the veranda floor on stilts, you first need to tear off the boards. A subfloor is created under the beams from any board or moisture-resistant slabs. The voids are filled with expanded clay or filled with any other heat-insulating material. Do not forget about vapor and waterproofing. The torn boards are laid back on the beams.
If it is impossible to secure the subfloor under the joists, the insulation is laid out over the finishing floor covering
When insulating the floor on a veranda in a wooden house that stands on a strip foundation, the flooring boards do not need to be torn off, but can be used instead of the subfloor. The downside of the technology is that it steals a little space in height. However, a veranda on a pile foundation has a gap from the ground under the joists. Here it is convenient to fasten the subfloor boards from below. In a building with a strip base, the logs are usually laid on the ground, supported by brick linings. It is almost impossible to insert subfloor boards into small gaps, and dismantling the joists is extra work.
What tools will you need?
Tools are selected depending on which finishing option has been chosen. The frame method is considered the most effective, because it allows you not only to lay any material for thermal insulation on the walls, but also helps to hide it both under the lining and under plasterboard.
To do this, you need to prepare nails or self-tapping screws, a screwdriver, a level to help you do everything correctly, a pencil to highlight the necessary points, a stapler, antiseptic, polyurethane foam, etc. Without these tools, insulating a veranda in a wooden house will be quite difficult.
Wall insulation
The main task is to make a frame structure on the walls: place the wooden blocks horizontally across the entire plane, with an interval of 50 centimeters. The dimensional characteristics of the timber depend on the number of layers of thermal insulation and its thickness. Place the first block directly under the ceiling covering.
Then you need to mark the required space (50 cm) from the bottom edge of the beam with a tape measure and select an area for the next product. On the highlighted lines, screw the frame elements, working with a screwdriver and self-tapping screws. Don't forget to use a level while working.
As soon as the wooden frame structure is created, you can safely move on to insulation. Insert the cut sheets of foam into the formed openings and glue along the end. Thermal insulation in rolls is nailed to the slats, and the excess is removed. Do not forget that the mineral wool must be inserted tightly with a small spacer between the frame. Make sure there are no holes or cracks.
To insulate the walls of the building, all that remains is to attach a vapor barrier - it will prevent moisture from getting inside. Work with an overlap, with a margin of 10 centimeters. To attach the material, use a stapler and staples: attaching the protective layer to the frame structure will not be difficult. And finally, seal all joints with tape.
Insulation of windows and doors
The main heat losses occur through windows and door panels. Inspect your old windows: what quality they are, how long they have been in use, and whether they retain heat well. If there are problems, replace them immediately. Install double or triple glazed windows - you can retain heat and the sound insulation will be normal. Make sure that the areas connecting the window beams and walls are completely treated with polyurethane foam.
Advice from professionals
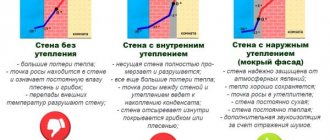
A common problem for developers is the difficulty of determining which side is more profitable to insulate the walls on the veranda. Professionals advise doing this outside. If the insulation is located inside the veranda, the dew point will shift. The wall material freezes, cold meets heat, and condensation forms. Dampness causes slow destruction.
The location of the thermal insulation determines how destructive the displaced dew point will be for the walls.
When arranging a warm veranda, you must not forget about the windows. It is optimal to install energy-saving double-glazed windows with three glasses. Old doors are also replaced, because a large percentage of heat loss occurs through them.
It is easier to use electric heaters for heating. Power is calculated using the standard formula: 100 W/1 m2 of room.