Wooden floors are more often than others, especially recently, used in the construction of private country houses and cottages. Floors are constructed both on wooden beams and on reinforced concrete floors.
The thermal conductivity of wood is much lower than that of stone or concrete, making it warmer to the touch. Nevertheless, very often it is necessary to insulate wooden floors, especially on the first floors of buildings.
Features of thermal insulation
How to insulate a floor in a wooden house? The process of installing thermal insulation is relatively simple. However, the quality of work is largely determined by the technical features of the coatings used for insulation. Before purchasing material for covering the rough foundation, you need to take into account several important nuances:
- expected load on the coating;
- humidity level;
- temperature loads;
- height of thermal insulation coatings.
The base insulation technology itself is simple and consists of several stages:
- installation of logs;
- fixation from below on wooden sheets on joists;
- installation of insulation on joists;
- covering the base with vapor barrier material;
- finishing of the rough base.
When planning work, it is very important to take into account the microclimate in the room. To insulate the first and second floors, various heat insulators are used, correctly. Moreover, technologically the insulation process also has some differences, which we will talk about a little later.
Why insulate the floor in a wooden house?
Wooden houses with high-quality insulation of the floor surface are extremely rare. During severe frost it is very uncomfortable to be in such a room. A cold floor does not retain heat in the house, and the room cools down quickly enough.
This is due to the laws of physics, which state that colder air is at the bottom, while warm air rushes up. Due to missing thermal insulation or improperly performed work, cold bridges appear between dried boards, through which about 25% of thermal resources are lost.
After high-quality floor insulation, this problem disappears. The room becomes more comfortable and cozy. It is necessary to carry out thermal insulation not only during repair work, but also during the construction of a new wooden house.
Optimal thermal insulators
What material is best to use for finishing the rough coating with your own hands? To insulate wooden floors, both natural and synthetic thermal insulators are used. The most popular of them include:
- Wood sawdust;
- Expanded clay;
- Minvatu;
- Izolon;
- Styrofoam;
- Penofol.
Each material has its own technological features and thermal insulation parameters. To understand their disadvantages and advantages, let’s consider all of the above heat insulators in more detail.
When is the best time to carry out
The ideal option is when all such work is carried out at the stage of construction of a private house or cottage, but this situation does not always occur. As a rule, thermal insulation is carried out during renovation and forces the floor covering to be completely dismantled.
Thus, insulating a wooden floor is a process consisting of several stages that can be easily done with your own hands. A properly insulated floor, which includes an appropriate insulating layer, will retain up to 20% of the heat.
Thermal insulation with sawdust
Sawdust insulation is one of the most budget-friendly options for thermal insulation of wooden floors. The environmentally friendly material is quite light, so it can be used to insulate interfloor ceilings. The thickness of the heat insulation layer can be easily varied due to its flowability. Thus, it is possible to regulate the level of heat loss in the room.
When finishing the base with sawdust, you can use the following types of wood-based coatings:
- Blocks of pressed sawdust. The material is produced from copper sulfate, sawdust and dry cement. As a rule, it is laid between the joists when insulating the first floor. Lightweight blocks of small thickness - up to 15 mm, can be used for wall cladding;
- Pellets with sawdust. Granular bulk material is made from sawdust treated with an antiseptic and glue. Hard-to-burn sawdust can be used to insulate interfloor floors, since they do not create a large static load due to their low weight;
- Arbolit. In this case, the base material is mixed with synthetic and organic additives, and then molded into blocks. The non-flammable thermal insulator has high bending strength, while it is hygroscopic. Therefore, during its installation it is necessary to use waterproofing layers;
- Sawdust concrete. Externally, blocks with sawdust resemble cinder blocks. They are made from a mixture of wood chip granules, cement and sand. Suitable only for thermal insulation of the first floor of a house.
Insulating the floor along joists with sawdust in any case involves the use of a waterproofing layer. Hygroscopic material is a good environment for the development of mold and pathogenic flora, so during the operation of the coating it is necessary to exclude the possibility of moisture ingress.
What is the basis for calculating the thickness of thermal insulation?
Even those readers who are not comfortable with physics and mathematics will be able to independently make such a calculation. Moreover, we invite them to take advantage of the built-in online calculator.
What is the basis for determining the required thermal insulation thickness?
The fundamental principle of the implementation is this: the total thermal resistance (or, more correctly, heat transfer resistance) of the enclosing building structure should not be less than the established value. This value is called normalized, and it is calculated for all regions taking into account their climatic characteristics. In addition, this indicator also takes on different values depending on the type of structure - there are standards for walls, coverings and ceilings.
It’s easy to find out this normalized value for your region of residence. Such information is probably available at any local construction organization. But it will be even easier to take the value from the schematic map below, covering the entire territory of Russia.
Normalized values of thermal resistance for building structures of residential buildings by regions of Russia
So, the normalized thermal resistance is known, but what does this tell us? The fact is that this total value is the sum of the thermal resistance indicators of each of the homogeneous layers of the structure.
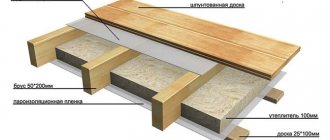
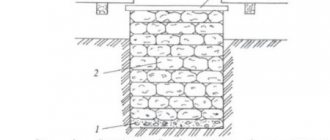
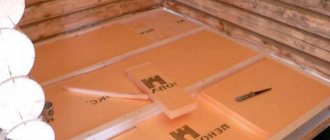
If we look at a wooden floor by floor beams or joists, it will look something like this:
Schematic diagram of insulation of a wooden floor on joists or floor beams
1 – floor beams or joists – load-bearing parts of a wooden floor.
2 – cranial bars or support boards. Necessary for laying subfloors.
3 – subfloor boards. They can be mounted as a continuous flooring or sparsely. Sometimes, instead of boards, sheet material is used, for example, OSB boards or plywood. In some cases, for example, when thermally insulating the floor with rigid polystyrene foam blocks, the subfloor is completely abandoned - only a few jumpers are left to support the insulating layer.
4 – windproof membrane, which must have the property of vapor permeability - for the free release of moisture into the atmosphere. Not used when insulating with vapor-tight and wind-resistant materials, for example, extruded polystyrene foam or polyurethane foam.
5 – insulation layer. Different materials can be used - bulk, block, roll, sprayed. But in any case, it is the thickness of this layer that we will calculate.
6 – hydro-vapor barrier membrane that protects the insulation from moisture from the premises.
Prices for vapor barrier membrane
vapor barrier membrane
7 – flooring. These can be boards attached directly to the joists. Another option is plywood or OSB flooring with a thickness of 15÷20 mm, which becomes the basis for any chosen floor finish.
Which of these layers can have a significant impact on the degree of thermal insulation of the structure? There are not many of them - three or two. And one of them is the layer of thermal insulation itself.
Rest:
- First, a subfloor made of boards or wood-based sheet material. But only if it is made solid, without gaps.
- Secondly, this is the flooring itself on top of the joists - boards, plywood or OSB.
We will not take membranes into account - they do not have any serious insulating qualities. Let's also take the finishing floor covering out of the equation - due to its insignificant thickness or, for some decorative materials, too high thermal conductivity.
It should be correctly understood that the diagram shown above demonstrates only the principle of floor thermal insulation, but does not in any way reflect the entire possible variety of options. Just off the top of my head - two more schemes. Changes are obvious, but the general principle of the structure of the “insulating pie” does not undergo any special “transformations”.
Two more possible schemes for the structure of an insulated floor on floor beams and joists. In fact, there may be much more options.
Go ahead.
The thermal resistance of each homogeneous layer of the overall structure can be determined by the formula.
Rc = hc / λc
hc is the layer thickness expressed in meters.
λc is the thermal conductivity coefficient of the material from which this layer is made. These coefficients are tabular values. And finding them for almost any building or thermal insulation material is not at all difficult; there are plenty of these tables on construction sites.
You may be interested in information about how thermal calculations of floors based on soil are carried out online
So, if the owner of a house under construction already knows the approximate design of the planned floor of the first floor, then it will not be difficult to calculate the thickness of the insulation, which ensures that the total thermal resistance is brought to the standard value.
This is what the calculator below is based on. Below it there will be several notes regarding how to use the program.
You may be interested in information about how the thickness of insulation for a floor in a wooden house is calculated
Thermal insulation with expanded clay
Expanded clay is a granular insulation material with good sound and heat insulation properties. Why is it worth insulating foundations with expanded clay? The heat insulator has considerable advantages, which include:
- environmental friendliness;
- frost resistance;
- strength;
- low thermal conductivity;
- non-flammability.
When finishing the coating with expanded clay with your own hands, you need to take into account the low level of hydrophobicity. The material quickly absorbs moisture, although it does not deform. However, insulation with expanded clay is fraught with the formation of mold under the floor. Therefore, during the installation process it is necessary to think about additional waterproofing.
How to properly make thermal insulation with expanded clay?
Types and installation of floors in a wooden house
- Before expanding expanded clay, lay a layer of waterproofing on the base. It can be plastic film or roofing felt;
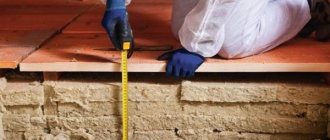
- The layer thickness should vary from 10 to 50 mm, no more;
- As you can see in the photo, a vapor barrier is placed on top of the insulation;
- Coatings with a foil layer can be used as a vapor barrier. The best option would be Penofol.
If you want to insulate a plank floor with expanded clay with your own hands, under which there is a basement, it is advisable to pour a layer of sand underneath. Thanks to it, condensation will not accumulate under the floor, which will significantly reduce the risk of mold or mildew.
Tips for use
In order for the thermal insulation layer to last long enough, it is worth taking a responsible approach to the procedure for its operation. It is necessary to regularly carry out measures to help extend the life of the floor covering and the insulation underneath. This can be achieved if:
- do not walk on the floor in street shoes, the soles of which always contain dirt and small pebbles that act as an abrasive on the floor covering;
- use a powerful vacuum cleaner for cleaning, helping to collect dirt from hard-to-reach places;
- protect wooden flooring from direct sunlight;
- try not to exceed the maximum load that can act on the floor surface.
By following these recommendations, you can significantly extend the service life of the floor surface. It does not matter what type of insulation was preferred when performing installation work. This will extend the life of the insulation and help maintain its properties.
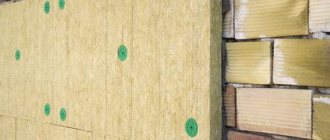
Thermal insulation with mineral wool
Is it possible to insulate a wooden base along the joists with mineral wool? The environmentally friendly thermal insulator is made from fibers obtained from glass containers and slag. The advantages of finishing the rough base with mineral wool include:
- ease of installation;
- low cost;
- light weight;
- environmental friendliness;
- resistance to mold;
- good thermal insulation.
However, in the case of treating the floor along joists with mineral wool, several negative points must be taken into account, namely:
- Upon contact with water, a coating insulated with mineral wool loses its thermal insulation qualities;
- It is not recommended to use the material for cladding the second floor due to low vapor permeability;
- It is not advisable to insulate rooms with a high static load with mineral wool due to its low strength.
What is the work schedule?
- Preparing the base. From below you need to install a plank floor treated with an antiseptic;
- Waterproofing. It is necessary to make additional waterproofing using polyethylene film, and first clean up the house;
- Cladding with mineral wool. During the installation process, you need to ensure that the layers of material are laid on the joists very tightly to each other;
- Installation of vapor barrier. It is better to make a high-quality vapor barrier with Penofol;
- The final stage. At this stage, the finishing coating is installed.
The thickness of mineral wool is determined by the microclimate in the room. If there is a basement below the room, the material can be laid in two layers.
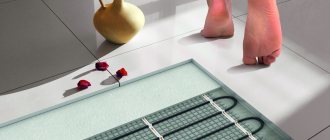
Warm floor systems
Connoisseurs of advanced technologies will like the “warm home” system. Its execution can be very diverse. It is possible to install a warm water floor placed under a layer of thermal insulation material or screed.
Electric heated floors are simpler in terms of installation work and subsequent operation. They are supplied with everything necessary to perform installation work, and therefore can be installed on their own, even in the absence of special skills and knowledge. It is so expensive, but it works quite effectively.
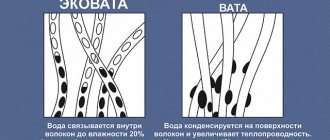
Ecowool thermal insulation
Why is it better to make thermal insulation with ecowool? 100% natural coating has good technical parameters and a relatively low cost. It is made from cellulose and mineral additives, so even when heated, the ecowool coating does not emit caustic chemicals. A product impregnated with boric acid is practically invulnerable to fungus and mold.
What advantages does this type of insulation have?
- Good heat and sound insulation;
- Fire safety;
- Environmentally friendly;
- Low thermal conductivity.
As you can see in the photo, finishing the rough base using ecowool joists can be done in two ways:
- Manual. In this case, finishing with ecowool involves installing insulation along the joists on boards attached below. To prevent heat loss, the joints are treated with polyurethane foam;
- Mechanical. To finish the base of ecowool, blowing machines are used: through a special hose, crumbly insulation is evenly distributed over the coating. In this case, the layer thickness should be at least 3-4 mm.
The process of thermal insulation of ecowool floors is shown in more detail in the video clip.
Thanks to the glue that is included in the thermal insulator, it can be used to insulate not only the floor base, but also walls. It is also worth noting that ecowool is convenient for insulating not only the first floor of a house, but also interfloor ceilings. The vapor-permeable coating does not contribute to the accumulation of condensation and the development of mold.
Types of floor insulation and their characteristics
The construction industry produces a variety of materials for thermal insulation that meet the requirements of GOST and SNiP.
For floor insulation the following is used:
- granulated - expanded clay, blast furnace slag, vermiculite, perlite, foam glass;
- rolled - stone, glass, slag wool, polyethylene foam, polystyrene foam, technical cork;
- slabs with and without foil coating - basalt wool, expanded polystyrene, penoplex, wood concrete, plywood, chipboard or oriented strand board, chipboard, OSB;
- concrete-based mixtures - expanded clay concrete, slag concrete, foam concrete, polystyrene concrete, sawdust concrete.
- foams, liquids - polyurethane foam, ecowool, heat-insulating paints.
Modern thermal insulators increase the energy efficiency of the home
Insulation with Izolon
How to properly insulate joists with isolon? The heat insulator, made of foamed polyethylene, has low thermal conductivity. Thanks to this quality, it recently began to be used for insulating floor coverings. What are the advantages of Izolon?
- Small thickness (2-10 mm);
- Low thermal conductivity;
- High hydrophobicity;
- Environmental Safety.
As can be seen from the photo, the material is produced in rolls, which greatly facilitates the DIY installation process. When insulating a wooden floor with Izolon, you need to take into account the following points:
Do-it-yourself floor insulation in a country house or in a private house
- The coating has good sound insulation, so when laying it it is not necessary to use additional sound-proofing layers;
- To reduce heat loss in the room, when laying Izolon with your own hands, the material is not joined, but overlapped;
- The seams between adjacent sheets are treated with polymer glue or bitumen mastic.
Thermal insulation work can be seen in the photo below.
Materials
There are many ways to protect the interior of a house from the cold, but first of all you need to insulate the floor and roof, since it is through these structural elements that the main heat loss occurs. Only when these structures are well protected from the cold does it make sense to insulate a wooden house from the inside or outside.
It is advisable to insulate the floors of the second and subsequent floors if they are installed on concrete floors.
For insulation, various materials with a low thermal conductivity coefficient are used:
- polystyrene foam or penoplex;
- polyurethane foam;
- mineral or glass wool;
- penofol;
- wood sawdust.
Each of them has its own advantages, and in most cases the choice depends on the availability of a particular material and the personal preferences of the homeowner. The thickness of the heat insulator depends on the climate in which the wooden house is located, on its location in relation to the ground level, as well as on the manufacturer’s recommendations.
Thermoplastics
Polystyrene foam and penoplex are very similar materials. They are produced by foaming plastic masses, sometimes introducing additional additives that prevent decomposition and make them unattractive to rodents. Both of these materials have a very low thermal conductivity.
Note! For comparison: in terms of thermal efficiency, 5 cm thick foam is equivalent to 75 cm thick brickwork.
It is convenient to use such materials, as they are produced in the form of sheets of various thicknesses. Transporting them to the construction site is not a hassle. They are very light and durable. You can cut polystyrene foam or penoplex with a regular stationery knife. When insulating the surface, they can be used to seal the resulting gaps at the joints with ordinary polyurethane foam. Adhesion with insulation is very good.
Polyurethane foam is a material that is more commonly seen in everyday life as foam mats. Such mats are not used in construction, and polyurethane foam is applied to the surface by spraying. Later, during the process of hardening and polymerization, it foams and hardens. As a result, polyurethane foam forms a durable, waterproof, airtight, warm coat for building structures.
Mineral wool
Various construction wools have been used as insulation for a very long time. Currently, glass wool, mineral or basalt wool are most often used.
In appearance and production technology, they are very similar to each other, differing from each other only in the raw materials used. To obtain them, raw materials are heated, melted using special equipment, and then drawn into threads. Later, when these fibers harden, looms that vaguely resemble weaving machines knit a bulky mass of low density from them.
Such insulation is produced in the form of rectangular mats of various thicknesses or in the form of rolls.
Penofol
Penofol refers to thin plates or sheets of polyethylene foam. Their thickness can be from 3 mm to 10 mm. In terms of thermal insulation qualities, this material is comparable to foam plastic or penoplex, but it is more convenient to work with due to the fact that it is flexible. Penofol is produced and supplied for sale and to construction sites in rolls 0.5 meters and 1 meter wide.
The insulation is produced in three versions - foil on one side, on both sides, or foil on one side and with an adhesive layer applied on the other. The latter option is most preferable to use, since installation of such insulation takes very little time. It is enough to cut out the required blank from the sheet and, having separated the protective film from the adhesive layer, apply it to the wooden surface and press briefly.
Sawdust
Sawdust has traditionally been used as insulation, since it was a by-product of any sawmill production, and its origin has always accompanied the production of lumber. For a very long time, sawdust was used to insulate wooden floors, falling asleep in layers between the joists.
A mass of sawdust, if it is not subject to getting wet, can lie in a closed space for years without caking. At the same time, the low density of such insulation is maintained, which provides excellent thermal insulation properties. The disadvantage of such insulation is that the sawdust cakes very quickly and even begins to rot, as soon as you wet them a little. To prevent rotting of sawdust and damage by various wood borers, they are treated with a solution of potassium permanganate or the sawdust is mixed with lime.
Insulation with Penofol
Is it possible to insulate wooden floors with penofol? Penofol is a new generation insulating coating, available in roll form. To be more precise, Penofol is used for shielding, which prevents the dissipation of radiant energy. Lightweight and easy to use, the insulation has a reflective layer that prevents large heat losses. That is why it began to be used everywhere for finishing interfloor ceilings.
What are the benefits of Penofol?
- withstands heavy loads;
- non-hygroscopic;
- has low thermal conductivity;
- easy to install;
- does not involve the use of vapor barrier.
For your information. The technology for insulating bases with Penofol is not much different from insulating with Izolon. As in the previous version, the sheets are laid overlapping to prevent heat loss.
Vapor barrier - why is it needed?
The insulation must be protected from moisture. Any insulation, if it gets wet, greatly loses its heat-protective properties. And since mineral wool is a hygroscopic material, you need to take care that moisture does not get on it.
But protection is required not only from water. Protection is required against steam penetration. Vapor barrier plays a big role in creating optimal operating conditions for insulation.
Without delving into the concept of partial pressure, we note the importance of understanding two points:
-it is the vapor barrier that is the barrier that prevents moisture (in the form of steam) from penetrating into the insulation;
- it is important to correctly determine in which place of the “pie” the vapor barrier should be placed
Vapor barrier
The principle of placing vapor barriers
In order to briefly but clearly understand where the vapor barrier should be placed, you need to remember: steam always spreads from a place with higher pressure to an area of lower pressure. It can be put simply this way: warm steam always (almost) spreads from the room to the outside. You need to remember this and then it will be easier not to get confused about where it should be placed.
From the above it follows that the vapor barrier is not placed “above” or “below” the insulation. It is placed “between” a warm room-source of steam (usually internal heated rooms) and a cold room (outdoor space), where this steam moves. Therefore, in the case of insulating the attic floor, the vapor barrier will be under the insulation, and in the case of insulating a wooden floor above the basement - above the insulation.
Concepts of vapor barrier, waterproofing, membrane
In order for the vapor barrier to be effective, i.e. worked correctly and did not cause harm, the film must be laid on the correct side. To do this, you need to study the manufacturer's instructions and consult the seller. Nowadays a large number of different materials are produced for protection against steam and water. But there is a difference between them. The scope of their application depends on the type of premises, their humidity and temperature conditions, ambient air temperature, and for what structure they are used - roofs, ceilings or walls. Often confusion stems from the concepts themselves: vapor barrier and membrane; instead of waterproofing, a vapor barrier is used.
Vapor barrier is designed to protect against water vapor that is in the air of the room. In fact, steam is a water-saturated gas, or one can say the gaseous state of water. The vapor barrier must have a low vapor permeability rate, i.e. it shouldn't leak steam. It is approximately 10 g/m2/day.
Basically, vapor barrier is a film. They can be roughly divided into:
-vapor-permeable or “breathable” (membranes);
-vapor-tight, practically impermeable to steam, water, or air.
Waterproofing is designed to protect structures from water. Water molecules are larger than gas molecules.
Membrane. Nowadays the word membrane has become very popular. Membranes are already more high-tech films. In relation to the topic of vapor barrier, we can say that this is a material capable of permeating or, conversely, trapping certain substances. The most commonly used expression is a vapor-permeable moisture-proof membrane. This means that this material does not allow water to pass through, but at the same time allows steam to pass through and allows moisture to evaporate. These are the properties that are required during construction to protect thermal insulation.
The direction from which the membrane allows steam to pass through and from which it does not allow water to pass through may be different for different membranes, depending on its intended location. Therefore, you need to be very careful when choosing and ask the seller for all the necessary characteristics.
Features of insulation by logs
How to properly insulate a rough foundation along the joists? During the installation of the thermal insulator, the following scheme must be observed:
- The rough base is lined with boards that must be attached to the joists;
- To prevent moisture from getting under the coating, lay a layer of vapor barrier;
- Then the base is insulated with polystyrene foam, mineral wool or other materials.
If you need to make high-quality thermal insulation of a room above a non-residential and unheated room, then it is better to use mineral wool with a thickness of more than 40 mm as insulation. In this case, the “pie” made from a vapor barrier and mineral wool will retain heat in the room, preventing heat exchange between the cold basement and the first floor.
Expanded polystyrene
Expanded polystyrene is an insulation material that has a porous structure and is excellent for insulating the wooden floors of a private house or apartment on the ground floor. Most often it is used for thermal insulation directly on the ground or in areas located above basements. The material is laid directly on the concrete floor, eliminating the need for additional waterproofing.
Features of thermal insulation of the first floor
Since wood tends to deform, over time, cracks may form in the floor, through which heat gradually begins to escape from the room. How to make high-quality insulation of the first floor in an old house?
- The first step is to remove the old flooring;
- Then the lag is inspected for deformation or rotting;
- If necessary, rotten beams are replaced;
- Then they treat the wood with an antiseptic with their own hands;
- From below, blocks for laying wooden boards are nailed to the joists;
- Insulation is poured onto the boards;
- Next, lay a layer of vapor barrier;
- The work is completed by installing the finishing coating.
The insulation technology is shown in detail in the video.
Obviously, a layered cake of additional heat and vapor barrier layers provides the floor with reliable protection from basement drafts and condensation.
Insulation of the first floor floor using wooden beams
The usual scheme involves only one layer of insulation. That is, the logs are simply placed on top of the screed, or a waterproofing film is pre-laid if it was decided to save money on the screed. Then the gaps are filled with insulation and covered with a vapor barrier film. Thin slats are nailed along the joists, and a covering of finishing floor boards will be laid on them. Sometimes they save on slats. And on plywood. Then the boards are fixed directly to the beams.
The described options are applicable for wooden floors on the first floors. In the apartments located above, the insulation steps are practically the same, only a reinforced scheme is useless. The vapor barrier film is spread on the concrete of the floor slab, and the beams are mounted on top of it.
On the second and higher floors, vapor barriers become mandatory when insulating the floor. Especially if mineral wool or ecowool is chosen as insulation. Moreover, there must certainly be another layer of vapor barrier on top of the insulation. Counter slats are screwed on top, and finishing boards are placed on them.
By adhering to this sequence, there is no doubt that the wooden floor will outlive the owners of the apartment. Perhaps even their heirs will not have to worry about repairing and replacing it.
Video:
Features of thermal insulation of the second floor
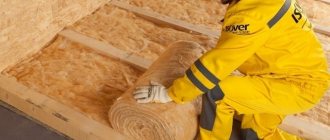
If you want to insulate the floors between floors in an old house, it is better to use roll coverings for these purposes. Why? They are quite light and therefore do not create a static load on the load-bearing parts of the structure. To organize a heat-insulating “pie” on the second floor, you need to do the following:
- Place roll insulation on the prepared base;
- Adjacent sheets of material are overlapped with a margin of 10-15 mm;
- To fix the thermal insulator to a wooden base, you can use a stapler;
- When using foil insulation, it is advisable to fasten the seams with masking tape;
- Now all that remains is to install the finishing coating.
The process of insulating interfloor ceilings is shown in detail in the video below.
As it turned out, there are a lot of different thermal insulators that can be used to insulate floors in a wooden house. Each of the considered heat insulators has its own disadvantages and advantages. Taking into account the basic parameters of the materials, you can choose the appropriate insulation to create an optimal microclimate in the room.