The procedure for insulating walls with Penoplex is a technology that is not particularly difficult and is carried out not only from the inside of the building, but also from the outside. Currently, it has become popular to independently carry out thermal insulation of residential buildings made of wood or other materials. This insulation allows you to ensure a stable temperature regime inside the residential premises of the building. Therefore, it is important to figure out how to insulate a house with Penoplex.
The effectiveness of penoplex for interior wall cladding
If you line the walls of a house with penoplex from the inside, this can lead to a shift in the dew point. The temperature value below which condensation forms depends on this indicator.
Before buying penoplex, the insulation of which you plan to do yourself, you need to familiarize yourself with all the technical characteristics of the thermal insulation material. This will allow you to compare it with other insulation materials in order to determine the ideal option for thermal insulation of the external walls of the house.
When wondering how to insulate a house from the outside with penoplex, you need to know the positive and negative aspects of this stage of building construction. The square footage of the room is significantly reduced even when using insulation that has a small thickness. This is explained by the need to install lathing when carrying out thermal insulation work. Another negative aspect of using penoplex for thermal insulation of the internal walls of a building is the factor of deterioration of the microclimate inside the house.
The dew point should move inside the room. As a result, humidity increases, and the walls of the house begin to become covered with condensation. In this case, mold formation is observed.
Internal thermal insulation of a house leads to a decrease in room space.
Even those insulation materials that are manufactured using the latest technologies for the production of thermal insulation materials do not allow wood or other types of building materials to “breathe.” Do-it-yourself insulation of a wooden house with polystyrene foam prevents the dew point from shifting, so thermal insulation of the facade is planned at the stage of building the house.
Advantages and disadvantages of wall insulation with penoplex
The positive side of using this heat insulator is associated with saving energy costs. The effectiveness of using this material lies in the fact that it differs from mineral wool or other insulation materials in that it is not affected by high humidity. Penoplex, used as insulation, has a special advantage over other types of heat insulators:
- the use of insulation technology does not require the installation of vapor and waterproofing;
- purchasing a heat insulator does not involve large expenses due to the low price of the material;
- has low thermal conductivity;
- the material is light in weight and easy to transport;
- increases the service life of the building due to strength and durability;
- the insulation is environmentally friendly and safe to use;
- The heat insulator has a high density and resistance to loads.
The material is self-extinguishing in case of fire. Penoplex is very convenient for finishing wooden houses. Carrying out such work will not cause difficulties even for a beginner. The material has virtually no disadvantages, but it should not be exposed to direct sunlight. To professionally insulate the outside of your home with polystyrene foam, you can seek the services of specialists.
The lack of disadvantages of this heat insulator is the main reason for its widespread use in construction. In most cases, its characteristics are similar to those of foam plastic.
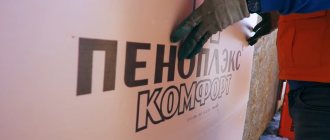
Types of penoplex for insulating houses
Since 2011, the production of 4 types suitable for the construction and insulation of wooden houses has been launched. As a result, the release of this insulation provides the consumer with the opportunity to choose the most suitable option from the following types:
- "Fundamental";
- "Comfort";
- "Wall";
- "Roof";
- "Industrial".
The types of penoplex listed above have different densities. The value of this parameter is in the range of 25.0-45.0 kg/m³. Each of the listed types of material has its own purpose, which depends on the name.
The use of penoplex as insulation
Repairing the building and insulating the facade with penoplex is best done in the summer season. In hot weather conditions, wooden surfaces dry faster. Drying the material in this way prevents unwanted moisture from appearing in the future.
Houses built from wood are able to retain heat well inside. Therefore, external wall insulation is required in cases where:
- the old house is dilapidated and the wood lets in a stream of cold air;
- the joints of the walls were in poor condition;
- the logs were cracked.
Since wood is a material that requires special processing, before insulating it, you will need to carefully examine the total surface area of the walls.
This involves carrying out the following types of work:
- cleaning the surface from the old layer of paint;
- checking the quality of joining logs and filling potholes;
- leveling those parts that protrude beyond the surface;
- impregnation of wood with a special composition.
Wood should be processed using special antiseptics of high quality. Otherwise, penoplex will not be hygroscopic. The foam insulation used for the walls of a wooden house must comply with modern standards. This means that the thickness of the material layer should be 5-30 mm, which should provide the maximum level of thermal insulation.
Calculation of the required material thickness and calculation of parameters
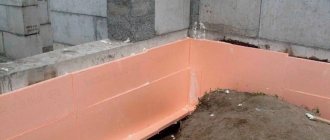
Before considering how to insulate a foundation with penoplex, it is worth understanding how much material will be required.
A simple formula is used for calculation - K=P/E/100. In this case, K denotes the amount of material. To make the calculation, take the surface area P and multiply it by the freezing coefficient.
If you simply pour the foundation without documentation, you will not be able to make a miscalculation. The thickness of the partitions and much more are taken into account. Beginners naturally ask why complicate everything. Many people believe that it is better to take the material with a reserve, and then everything will be great.
To protect the surface from dampness, fungus and destruction, it is important to adhere to the standards. That is, the surface must breathe, no extra protection is required.
At the same time, experts introduce a new variable into the formula - land.
The type of soil really affects the longevity of the foundation. Even beginners have heard about soil types, groundwater and more. If you use sandy soil and humidity above 65%, it is worth making an amendment.
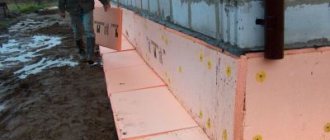
Basic instructions give an idea of the consumption of penoplex under standard conditions.
Penoplex consumption can be calculated
In the absence of experience, the basic parameters are taken. Thus, external insulation is carried out based on the area and degree of freezing. If you use an online calculator for calculations, you should be prepared that the error will be 5.5%.
In this situation, it is important to reserve more than 10%. For example, 40 slabs are enough to insulate the foundation, then it is better to take 5 more pieces. Then the outer segment will be made with a margin.
How to choose penoplex insulation
Before carrying out thermal insulation work, you will need to select a material. To choose the right insulation, you need to focus on 3 indicators:
- thickness;
- density;
- a type of heat insulator.
Before choosing penoplex, you should not pay attention primarily to its prices. This moment is not always decisive. If you focus only on cheap insulation, then expensive material may turn out to be more effective, durable and reliable.
Penoplex insulation of a wooden building can be done using this material, which has a density of 25 kg/m3. If the density increases, then the strength of the material also increases. The main indicator of this thermal insulation material is thermal conductivity. As its density increases, the thermal insulation characteristics of the material decrease.
This requires additional calculations before purchasing. To determine the thickness of the insulation, it is necessary to take into account the location of the house, as well as the climatic conditions of the region where it was built. To clarify the value of this indicator, it is best to seek help from a sales consultant.
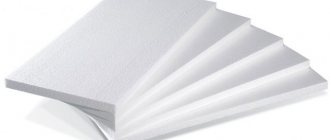
When considering the advantages of using various types of materials for insulating wood walls, special attention should be paid to extruded polystyrene foam. It is a productive heat insulator with many positive qualities:
- low moisture absorption due to the cellular structure, which practically does not absorb water;
- high thermal efficiency, allowing the use of an insulating layer of the smallest thickness;
- fire safety, the material is not flammable;
- expanded polystyrene does not emit toxic substances;
- is easy to install;
- has good strength;
- resistant to mechanical stress;
- resistant to mold and mildew.
What is required for installation?
Types of tools and volume of consumables depend on:
- insulation brands,
- specifics of work - external or external,
- selected heat-protective cake,
- number of storeys of the object,
- technical condition of the walls.
External thermal protection
For external protection, the master will need to purchase Penoplex in packs from the retail chain.
What should I use to glue the material to a brick wall? Depending on the manufacturer of the insulation, you will additionally need to purchase consumables according to factory recommendations; usually their list includes:
Primer solution to increase the adhesion of the material to the brick; you can use a product with deep penetration of the solution at the rate of 300 ml/m2.- The starting profile for fixing the 1st row of slabs is calculated based on the perimeter of the building.
- Profile fasteners according to the number of joints, 2 pcs. at the junction.
- Dowels for fastening supporting parts, every 30 cm.
- Adhesive for fixing slabs, first layer 5 kg/m2, additional layer for reinforced mesh - 10 kg/m2.
- Mushroom dowels for Penoplex, 6 pcs/m2.
- Fiberglass mesh for reinforcement, 1.1 m2 per m2 of insulation.
- Plaster mixtures and paint for finishing, according to the recipe of the manufacturer of the finishing material.
In order to perform high-quality work, the master must have a set of tools, which includes:
- construction level,
- ruler,
- plumb line,
- pencil,
- different spatulas,
- sandpaper,
- needle roller,
- hacksaw,
- knife,
- hammer drill,
- Bulgarian,
- electric drill,
- ladder.
Internal
Consumables for internal thermal protection of walls are selected especially carefully, since they must meet, first of all, environmental safety, be inert, and not release microparticles into the environment.
The insulation must have a minimum thermal conductivity coefficient of no higher than 0.04 W/ (m * K) and a low vapor permeability coefficient so as not to absorb moisture from the room. In addition, before purchasing, you need to pay attention to how the heat insulator is combined with finishing materials.
Additionally, the master will need to purchase:
- starting metal profile,
- slats on the sheathing,
- screws,
- foil tape,
- adhesive compositions,
- soil and antiseptic fungicidal impregnation.
In the standard kit for a heat insulator for interior work, you will additionally need to purchase a carpenter's tool for installing the sheathing and a screwdriver.
Preparation for insulation of external walls
The process of insulating external walls with Penoplex is not associated with a change in the internal area of the building, the facade of which is planned to be updated or equipped. In accordance with the law of physics, thermal insulation of wall surfaces with penoplex from the outside is considered effective. They use extruded polystyrene foam, the sheets of which have a thickness of 80-100 mm or more. You can also use thinner sheets of material 30-40 mm thick, laid in 2 layers. This will lead to a reduction in heating costs and provide savings in internal heat, which should amount to 50%.
Material laid in 2 layers will significantly reduce internal heat loss. The savings should be 50%.
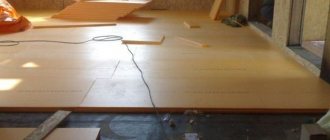
Before insulating the outside of the house with penoplex, all walls will need to be cleaned, since old paint must be removed from them. The surface is leveled if there are noticeable differences or various irregularities on the wall exceeding 2 cm. To eliminate these problems, before insulating the walls with penoplex, you can level them by plastering. The smoother the wall, the less leveling mortar will need to be prepared.
Costs for building materials
Today, the construction markets of Moscow and the Moscow region can offer buyers the following materials at prices:
Penoplex in packs, thickness 100 mm for outdoor use, RUB 1,550;- Penoplex in packs, thickness 50 mm for interior work, RUB 1,250;
- primer solution 10 l, 300 rub.;
- plaster mixtures, 25 kg, 360 rubles;
- fiberglass mesh for reinforcement, 35.50 rub/m2;
- profile fasteners, packaging, RUB 740;
- glue for fixing plates, 25 kg, 230 rub.;
- mushroom dowels for Penoplex, 3 rub. /PC.;
- dowels for fastening supporting parts, packaging, 740 rub.;
- starting profile, 120 rub.;
- facade paint for finishing, 15 kg, 513 rub.
Cost of work in the Russian Federation
The technological process of installing Penoplex on brick walls also consists of many separate operations that determine the total cost of work per 1 m2 of brick wall area.
Prices for finishing work depend on the region where the property is located, transport links and the height of the building.
Average prices by region of the Russian Federation for different types of work:
- Insulation of external brick walls, RUB 380. /m2.
- Internal protection of brick walls, RUB 310. /m2.
- Reinforcement of a brick wall with fiberglass mesh, 410 RUR/m2.
- Rubbing walls with glue, 220 rub. /p.m.
- Primer of walls, 80 RUR/m2.
- Application of decorating plaster, 380 RUR/m2.
- Wall painting, 110 RUR/m2.
If you are interested in how and with what you can insulate brick walls from the inside and outside, take a look at this section.
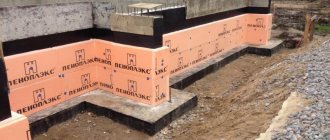
Penoplex facade insulation technology
Do-it-yourself foam insulation slabs are fixed after cleaning the wall surface from various contaminants. It should be slightly moistened, and the polystyrene foam should be covered with an adhesive solution. After this, the sheet is applied with adhesive to the wall surface and pressed tightly.
The gaps between the sheets can be filled with polyurethane foam to prevent “cold bridges” from appearing on the surface of the insulated wall. When the adhesive composition has completely set, you can proceed to using dowel nails. To begin installing foam sheets efficiently, you must further adhere to the sequence of work described below:
- Mix the adhesive mixture into the container using an electric drill with an attachment.
- Apply a 10 mm thick layer of adhesive using a notched trowel with an appropriate comb size onto the foam sheet.
- The sheets should be glued from the bottom corner of the façade, making an indentation of 30-40 cm from the bottom of the plinth.
- Penoplex for insulation is glued along the entire perimeter of the building above the base; this row represents the first level of thermal insulation.
- Facade insulation glued to the wall requires bandaging of vertical seams, so the technology is reminiscent of bricklaying.
The next level of wall covering involves the installation of scaffolding. The fastening of each sheet with an adhesive composition is reinforced by a mounting umbrella having a length twice the thickness of the sheet. After completely pasting the surface, you need to wait for it to dry.
It is necessary to plaster the insulation using a basic composition that requires the presence of a reinforcing mesh with a density of at least 145 g/m², the size of the overlap should be 10 cm. Apply a leveling layer of plaster 5 mm thick and cover the heat-insulated surface with a protective and decorative finish, the principle of which is described in the video below.
Penoplex wall insulation is secured using dowel nails. In this case, you will need to drill a number of special holes in the walls with a hammer drill. Their diameter usually matches the diameter of the dowel. Next, a mounting umbrella is installed in the hole, the length of which includes the thickness of the sheet with a margin of 4-6 cm. This type of fastener is required in the amount of 4 pieces per 1 m². For window and door openings, 6-8 pieces are required.
The slabs must be installed closely. If there are cracks in the surface being treated, they will need to be foamed with foam. After the foam has dried, its excess will need to be removed with a construction knife. Then you can apply a layer of plaster to level the surface. Its thickness should be 5 mm. Next, decorative finishing material is applied.
Lathing
Lathing is used for ventilated facades. This is due to the fact that soft insulation, in principle, is not used for “wet” facades. It does not have sufficient rigidity to support the required weight of the plaster layer.
If you plan to finish in the form of “Bark Beetle” or “Lamb”, proceed to the following methods. Lathing is often used for thermal insulation from the inside. There it fully justifies itself. So, how is the lathing done? Absolutely! A vapor barrier film secured with staples must be laid on the wall; The lower plinth profile is screwed on; A beam equal to the thickness of the insulation is screwed on top of the vapor barrier using self-tapping screws.
The width of the beam should be actually equal to the width of the slab, but be 2-5 centimeters smaller. Most often, a beam pitch of 60 cm is used. After this, starting from the bottom into the sheathing, the mineral wool is laid. The slabs in the sheathing should fit tightly. In this case, the cold will not pass through the gap between the beam and the slab. But this approach is not used very often.
It is applicable primarily to wooden houses. Also, soft mineral wool slabs necessarily require not only a vapor barrier inside, but a windproof layer outside. Otherwise the wind will blow. Installing wind protection is an additional expense, so two other fastening methods are often used. Laying the slabs in the sheathing is the right way when the question arises: how to attach the insulation to the ceiling.