Tools
The use of an expansion tank is necessary in every closed heating system, and even in some systems connected to central heating. The process of installing an expansion tank is quite complicated, but if you carefully study the instructions, doing it yourself, without involving specialists, is quite possible.
Table of contents:
- Operating principle of the expansion tank
- Types of expansion tanks for heating
- Calculation of expansion tank for heating
- Installation of an expansion tank for open heating
- Installation of a closed expansion tank
- Tips and rules for installing an expansion tank
- Maintenance of the expansion tank for heating
Operating principle of the expansion tank
The expansion tank is a metal tank that is connected to the heating system. The main function of this device is to eliminate the increase in pressure in the pipeline due to expansion of the coolant.
Expansion tanks come in two types: open and closed. The operating principle of each of these tanks differs from each other.
The open expansion tank has a metal lid that opens to add coolant to the system.
A closed expansion tank consists of a metal container that does not have any openings other than the connection to the system. The container is separated by an internal membrane made of rubber. When the pressure increases, the rubber bends and the coolant enters the tank; when the pressure decreases or the coolant leaks, the rubber presses on half of the tank in which the gas is located and the coolant enters the system. Thus, the expansion tank is a pressure regulator that prevents high voltage surges in the system. If you do not use an expansion tank, the heating system will not function properly, and taps, pipes and the boiler will quickly fail.
Expansion tanks are used in a private heating system, and in some cases also in a system connected to central heating.
Types of expansion tanks for heating
Expansion tanks are divided into:
- open,
- closed.
An open expansion tank has a number of disadvantages, so it is rarely used, mainly in cases where the system is not connected to a pump and water circulates freely.
Disadvantages of an open expansion tank:
- due to frequent opening of the lid, contact between components of the oxygen heating system occurs, which causes rust to form on the walls of pipes and radiators;
- when the water temperature rises, the liquid evaporates, so you should periodically add coolant to the system;
- an open expansion tank is installed at the highest point compared to the heating system, so installing such a device takes a lot of time.
The only advantage of an open expansion tank is its low cost compared to a closed one.
A closed expansion tank is called a membrane tank; depending on the type of membrane, there are:
- expansion tanks of replaceable type,
- non-replaceable expansion tanks.
Replaceable expansion tanks require replacing the membrane if damaged. To replace the membrane, simply unscrew the flange.
Non-replaceable expansion tanks mean replacing the entire tank if the membrane is damaged. Such tanks are more resistant to pressure changes, and the membrane fits perfectly and hermetically to the outer wall of the container.
Expansion tanks come in two forms:
- balloon,
- flat.
The balloon shape resembles a large container in which a membrane or lid is located, depending on the type of tank.
Flat expansion tanks have a flattened shape and a membrane in the form of a diaphragm. The advantage of flat expansion tanks is that they take up little space and are easy to install.
Calculation of expansion tank for heating
The size and volume of the expansion tank is affected by:
- system type;
- system capacity;
- maximum permissible pressure;
- installation location of the expansion tank.
The easiest way to determine the volume of the expansion tank is to find out the capacity of the heating system and divide this amount by 10%. For example, if the heating system contains 400 liters of coolant, then the volume of the expansion tank will be 40 liters if the coolant is water. If glycol fluid is used as a coolant, then another 50% must be added to this amount.
Please note that 3% of the coolant in the closed expansion tank goes to compensate for possible leaks. In any case, the volume of the tank obtained as a result of the calculation should be slightly increased.
To obtain an accurate calculation in large or complex heating systems, it is better to trust specialists or use an online calculator.
The correct design of the expansion tank is indicated by the failure of the safety valve.
Installation of an expansion tank for open heating
The open expansion tank is where water comes into contact with oxygen. An open container is used when water moves freely through the system without using a pump or when the system is connected to central heating.
Since air comes into contact with water, the entire heating system is designed at a slope so that excess oxygen is forced out of the radiators.
Expansion tank installation location: the highest point in relation to the heating system. The installation height of the expansion tank must exceed the installation height of the heating system.
Expansion tank installation diagram:
An additional expansion tank is installed if it is impossible to mount the heating system at an angle. The installation level of the main and additional expansion tanks must be the same.
The open expansion tank includes pipes:
- expansion,
- signal,
- circulation,
- overflow.
Using an expansion pipe, the tank is connected to the heating system.
In most cases, an open expansion tank is mounted near the boiler and connected to the water supply system using a signal pipe that monitors the coolant level.
The overflow pipe connects the tank to the sewer; when the tank overflows, the liquid is automatically drained into the sewer.
The circulation pipe ensures the supply of coolant if the expansion tank is located in an unheated room.
Installation of a closed expansion tank
Before studying the rules for installing a closed expansion tank, let’s consider the advantages of this device over an open expansion tank:
- minimal heat loss;
- do not need isolation;
- work at high pressure surges;
- installation anywhere, without reference to the highest point;
- closed type devices are more compact and easier to install;
- no rust formation on the internal walls of the heating system;
- ease of maintenance.
Tools for work:
- adjustable wrench;
- wrench for installing plastic pipes;
- step key.
The preparatory stage includes:
- disconnecting the boiler from electricity, gas or water supply;
- turning off the tap responsible for coolant circulation;
- draining the coolant from the heating section on which the expansion tank is installed.
Instructions for installing the expansion tank:
1. Install a shut-off and drain valve on the supply pipe to shut off and drain the water.
2. Connect the expansion tank to the system using screws or flanges. If the heating system pipes are polypropylene, you need to use a soldering apparatus, couplings, angles and fittings.
3. A fitting called “American” will help you easily remove the tank for replacement or repair in the future. Before installing the fitting onto the expansion tank, wrap linen tape around the threads and apply sealing paste.
4. When the water has been drained from the system, cut the pipe with special scissors and install a tee.
5. Install the safety valve and pressure gauge.
6. Before starting the system, clean the coarse filter.
7. Before connecting the expansion tank to the system, you need to create operating pressure. To do this, use a pump.
8. When the expansion tank is connected to the network, turn on all coolant supply taps and turn on the boiler.
Tips and rules for installing an expansion tank
1. Install the expansion tank so that the coolant flows from the top.
2. In the absence of data on the exact volume of the heating system, the capacity of the expansion tank is calculated based on the boiler power: 15 liters of liquid are calculated for 1 kW of power.
Calculation
To determine the volume of the expander, you can rely on several different methods. To do this, it is advised to contact specialists in special bureaus. As a rule, to carry out all the necessary calculations, they use special programs that allow them to take into account all the features and nuances that affect the operation of the heating system. However, it must be taken into account that the services of such specialists are in most cases expensive.
You can also calculate the volume of the tank yourself. To do this, use the generally accepted formula. In this case, you need to be as careful as possible, since even a small mistake can lead to incorrect values.
When making calculations, it is important to take into account absolutely all the nuances: the volume of the heating system, the specific type of coolant, and even its physical properties
In the given formula:
- C is the total volume of coolant in the system;
- Pa min – indicator of the initial absolute pressure in the tank;
- Pa max is the highest pressure parameter that can occur in the unit.
If you are afraid of making a mistake or you do not have time to carry out all the required calculations, then you should turn to the help of special online calculators. However, in this case, it is recommended to double-check the results obtained on several sites so as not to encounter incorrect operation of one or another portal.
Some people make it simpler - they estimate the necessary parameters by eye. In this case, the specific capacity of the heating system is equal to 15 l/kW. The result will be approximate values. But keep in mind that this method is only allowed during the feasibility study process.
Physical properties of water
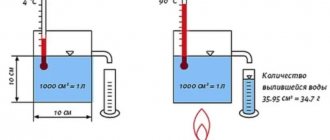
One of the physical properties of water is its almost zero ability to compress. This means that when you try to reduce its volume (that is, compress it), a sharp increase in pressure occurs.
And water (like other materials) can increase its volume when heated. This property is called thermal expansion . Near water it begins already at a temperature of +4°C. However, when the temperature drops below this mark, the water also begins to expand. This phenomenon is called the water paradox. At a temperature of +4°C, water has the highest density: weight 1 liter = 1 kg.
However, for heating systems this paradox is not important, because the temperature of the water supplied by the boiler to the radiators is much higher.
The volume of water increases when heated. Photo from the site agrovodcom.ru
Let's take a container with an overflow that limits the volume to 1000 cm³. Let's pour 1 liter of water into it at a temperature of +4°C, and then start heating. The density of water will begin to decrease, and the volume will begin to increase.
Since overflow limits a known volume, excess water will spill out. When heated from +4°C to +90°C (usual water temperature in the heating system), this excess will be 39.95 cm³ (or 34.7 g). This is exactly the process that occurs in the heating system when the boiler heats the water.
StroikaPortal.Ru
We are all about do-it-yourself construction and repairs
- home
- Articles
- Question answer
- Site Map
Suburban construction:
- Foundation and soils
- House walls
- Roofs
- Interior Design
- Wooden house
- Stone house
Engineering systems:
- Sewerage, water supply
- Heating, gas supply
- Lighting, climate control
- Home Security
Garden plot:
- Landscape design
- Garden Garden
- Construction of baths, etc.
- Fences, stairs, terraces
Repair and arrangement:
- Windows and doors
- Floor and ceiling
- Furniture
- Plumbing
Tools:
- Building tools
- Finishing tools
Decoration Materials:
- For floor, ceiling, walls
- Roofing materials
- paints and varnishes
- Lumber
- Tile, stone
- Bulk materials
How to choose a membrane expansion tank for a heating system?
When heated, any coolant expands and increases in size. As a result, the pressure in a closed heating system gradually increases and reaches a critical point. The membrane expansion tank of the heating system is designed to prevent the destruction of components and pipelines due to expansion of the coolant.
The main function of the expansion tank is to optimize the operating pressure in the heating system. Closed heating systems cannot operate properly unless a membrane heating tank is connected to them.
Diaphragm expansion tank design
Although membrane expansion tanks may differ depending on the manufacturer and purpose, some details remain unchanged in any model purchased. Namely:
- Metal body - a prerequisite for the production of tanks is the ability to withstand extreme loads without breaking the seal.
- The membrane must be highly elastic and capable of responding to changing pressure associated with heating of the coolant. At the same time, high demands are placed on the membrane in terms of strength. Typically, rubber is used in the production of membranes.
How does a membrane expansion tank work?
The operating principle of a membrane expansion tank is based on the use of physical laws. After heating the coolant, the following occurs:
Water or antifreeze begins to expand, resulting in an increase in its volume in the system.
The design of a membrane-type expansion tank implies that it is filled with gas.
The membrane is a kind of layer between the gas and the coolant.
When heated, the liquid, expanding and creating pressure, enters the tank and displaces air or gas.
After the coolant pressure drops, the gas pushes the coolant out of the tank using a membrane.
For normal heating operation, there must be a pressure in the membrane tank corresponding to the height of the top point. If the tank is installed in a two-story house and the maximum height from the boiler on the ground floor to the radiator on the top is 7 meters, then we take 0.7 into the calculations and add 0.5 to it. We obtain the initial pressure when coolant is supplied to the system. The resulting coefficient for the tank should be lower by 0.2. It turns out that the normal pressure in the membrane-type expansion tank in this case is 1 atm.
Types of expansion tanks for heating systems
Each manufacturer introduces innovations into the design of a closed expansion tank. But basically all modifications can be divided into several groups depending on the membrane used. Namely:
- The expansion tank membrane is in the form of a diaphragm. This device is more like a barrel separated by a movable rubber partition. When the liquid enters its section, it fills the reservoir, and then, under pressure, it begins to compress the gas, gradually moving the membrane. This device is not always effective for houses with a small heated area.
Round membrane tanks of balloon type. In this case, the air chamber is located around the perimeter of the entire tank. It surrounds the water chamber. As pressure increases, this chamber begins to expand like an inflated rubber ball. The uniqueness of such a device is that with its help it is possible to more accurately control the coolant pressure, even in closed systems with a small volume of liquid in the pipeline.
Non-removable membrane. The diaphragm is attached around the entire perimeter. Non-removable membranes are intended for use in private heating systems and for heating cottages. Limited use and installation in small industrial facilities is allowed.
Installation nuances
Installation of the expander can only be done at temperatures of 0 degrees and above.
Not all models of closed expansion tanks are equipped with an emergency liquid release valve. If it is not available, you must purchase it separately. The fuse is installed in close proximity to the tank in the direction of the water supply.
A pressure gauge to control pressure is placed near the expander and the valve connecting the heating to the plumbing system.
The size of the tank used must be no less than 1/10 of the amount of water pumped inside the heating network pipes. An additional criterion is the power of the heating boiler: the more powerful the boiler, the larger the volume required.
In order to be able to remove the cylinder at any time for repair or complete replacement, it is recommended to immediately connect the second tap and fasten the emptying fitting.
Some craftsmen advise hanging the expander any way you like, even “upside down”. There is a valve at the bottom that lets water in and out. This is allowed, but if the membrane breaks, the device will immediately fail. The correct location, even in the event of a breakthrough in the membrane layer, ensures that air and moisture will mix for a long time, and the installation will last for some time until it breaks completely.
Expander location
Some manufacturers intentionally fix the fitting below the middle mark so that it would be impossible to attach the expansion unit otherwise.
Large models are allowed to be hung on the wall, provided that it can withstand the expected load due to its bearing capacity.
Connecting the expansion tank
The location for installing such a tank is chosen where the intake of excess coolant will be as efficient as possible.
When figuring out how to properly install an expansion tank in an open heating system, you need to pay attention to three important points:
- select the highest point of the contour;
- place the tank directly above the heating boiler so that they can be connected by a vertical pipe;
- provide overflow in case of an accident.
The requirements are explained by the peculiarities of the functioning of gravity heating systems. The hot coolant moves from the boiler through the pipes and reaches the expansion tank, losing a significant part of the thermal energy.
The cooled water naturally flows through the pipes into the heat exchanger for new heating. The location of the tank at the highest point allows air bubbles trapped in the system to be removed from the coolant.
Calculating the tank capacity for an open system is easy. The total volume of coolant in the circuit is measured, 10% of this indicator will be the required figure. Most often, the expansion tank is installed in the attic.
This is especially convenient if you need a large capacity, because a significant amount of coolant may be required for normal operation of a gravity system. A small expansion tank can even be placed in the kitchen under the ceiling, if this allows it to be connected correctly to the heating boiler.
If the device had to be placed in the attic, you need to take care of its insulation. This is especially important if the attic is not heated. Although the coolant enters the tank already cooled, you should not neglect the opportunity to save some of the thermal energy. In the future, heating will require less time and fuel, which will significantly reduce heating costs.
To connect the expansion tank and overflow, you need to run two pipes into the boiler room. The overflow is usually connected to the sewer, but sometimes home owners decide to simply take the pipe outside, and an emergency discharge is made outside.
After the location for installing the expansion tank has been selected and its volume has been calculated, you need to find and install a suitable container. Small tanks are mounted on the wall using brackets or clamps.
Large containers must be placed on the floor. There is no need to seal this tank hermetically, but you will still need a lid. It is necessary to protect the coolant from debris.
Some of the water from an open system evaporates, the lost volume must be replenished. The coolant is usually added to the open circuit through the expansion tank.
This point must be taken into account when choosing a place to install the device. It is not always convenient to carry water into the attic with a bucket. It is easier to provide in advance for the installation of a supply pipe that leads to the expansion tank.
Installation of PVC windows in wooden houses
Plastic windows in wooden houses
The construction of country wooden houses is traditional in the middle and northern latitudes of Russia. Logs or beams are often used in private housing construction as an alternative to standard urban architecture.
Modern production offers high-quality lumber, which ensures the construction of comfortable buildings with good insulation characteristics. Installing plastic glazing structures in houses made of logs or beams significantly increases their energy efficiency.
MAIN ADVANTAGES OF PVC GLAZING IN WOODEN HOUSES:
Plastic windows are the most effective glazing structures in terms of insulating properties.
Welded metal-plastic frames have high rigidity and geometric stability.
Plastic windows are practical - they do not require painting, retain their original appearance for a long time, and are easy to clean and maintain.
PVC window profiles are laminated with decorative colored films of various colors and wood-like embossing.
Conditions for installing plastic windows in wooden houses
Shrinkage (and shrinkage) of walls in a new wooden house lasts 2-4 years. Each row of profiled timber (logs) sags by 5-10 mm. Also, the mobility of walls is affected by the annual change in temperature and humidity conditions. Correct installation of windows in wooden houses is determined by the presence of a casing frame in the window openings, which is a stabilizing, insulating and decorative element.
An important element of a window opening in wooden houses.
Casing (frame) is a structural reinforcing frame to minimize the load of the weight of the walls on the windows and stabilize the logs (beams) in the window opening.
Side casing decks (“racks”) limit the “spreading” of logs in the horizontal plane and serve as guides for their shrinkage.
A gap of 50-70 mm is left between the upper part of the casing (top) and the log (2-3% of the height of the window opening is recommended), which is filled with soft insulation.
MAIN TYPES OF CASING DECKS:
The casing in the window opening fixes the frame in a vertical plane, while providing the possibility of shrinkage of the frame. Casing blocks are installed in the opening using a tongue-and-groove connection without the use of metal fasteners. The joint is sealed while ensuring conditions for shrinkage of the log house - without the use of adhesives and polyurethanes (for example, flax tow).
T-shaped casing ("into the tenon").
At the ends of the log house, a groove is cut into which a timber (“tenon”) of the casing deck is inserted. To ensure the necessary rigidity, the timber is fused to the base of the deck.
U-shaped casing deck (“in the deck”).
A ridge is cut out at the ends of the log house, onto which a log with a groove is placed. The U-shaped deck is cut from solid timber and is considered the most durable type of casing.
Installation of plastic windows in casing frames
Guaranteed quality window installation.
A correctly manufactured casing frame limits the load of the walls on the window frame and ensures the stability of the opening in conditions of shrinkage of the house and annual changes in humidity inside and outside the room.
Window frames are attached to the casing to a depth not exceeding its thickness. Screws or mounting plates are used for fastening. The minimum recommended gaps (10-20 mm) between the frame and the casing are allowed, and it is important to comply with the conditions for thermal expansion of plastic frames.
Our plastic windows in wooden houses:
Glazing in country houses:
Rehau plastic windows for cottages and summer houses:
"Window company VESTA" is the official representative of Rehau. We offer plastic windows from all REHAU profile systems presented on the Russian market.
We recommend using Rehau 70 mm profiles with the best insulation characteristics in the middle price segment for suburban construction. Read more »
CALLING A MEASURER
"Window company VESTA"
- Products
- Rehau plastic windows
- Office, entrance and portal doors
- Blinds, roller blinds, curtains
- Services
- Glazing of balconies and loggias
- Finishing balconies and loggias
- Slope finishing
- Prices
- Prices for plastic windows
- Prices for glazing of balconies and loggias
- Application for calculation
Moscow, st. Znamenskie Sadki, 11 Opening hours: 10:00–19:00, seven days a week Phone: +7 (495) 411-9045 (multi-channel) [email protected] Site map
© 2006-2020. Rehau plastic windows in the official sales office of REHAU "Window Company VESTA" LLC. All rights reserved © Price information is for reference only and is not a public offer. The exact cost of products is determined by managers.
Price of expansion tanks
| Volume l. | Price, rub. | Volume l. | Price, rub. | Volume l. | Price, rub. |
| 8 | 1280 | 24 | 1750 | 80 | 5270 |
| 12 | 1480 | 35 | 3430 | 100 | 7470 |
| 18 | 1700 | 50 | 4050 | 150 | 10350 |
Mounting the membrane tank
With its help, the membrane tank can be easily mounted on the wall. The mount is designed for tanks with a volume of 8 to 35 liters. Expansion tanks of larger volume are usually produced in a floor-standing design.
The price of fastening is 530 rubles.
Wall mounts
Standard kits for attaching expansion tanks to the wall can withstand a weight of up to 50 kg . These include a bracket or bracket, steel clamps, plastic dowels and steel screws. If it is not possible to purchase a ready-made kit, parts for installation are purchased separately.
Having decided on the location and making sure that the wall will support the weight of the device, proceed to fastening. First, mark the future holes for the bracket with a pencil. Then take a drill ( 8 mm ) and drill recesses for the dowels . The dowels are driven into the holes and the bracket is secured with screws. Steel clamps are threaded into special holes in the bracket and the tank is secured.
How to check and pump up the expansion tank
Before connecting and filling the tank with coolant, it is necessary to check the pressure in the air chamber of the tank for compliance with the pressure in the heating network. To do this, a plastic plug is unscrewed or removed from the side of the air compartment, and under it there is a regular spool, familiar to you from car cameras. You measure the pressure with a pressure gauge and adjust it to your system by pumping it up with a pump or releasing it by pressing the spool rod.
The tank is inflated through the fitting using a conventional hand pump
For example, the design pressure in the network after filling should be 1.3 Bar. Then in the air compartment of the expansion tank you need to make 1.1 Bar, that is, 0.2 Bar less. The trick is to keep the rubber “bulb” of the tank pressed against the water side. Otherwise, when cooling, the compressed coolant will begin to draw air through automatic air vents, which is unacceptable. After setting up, open the tap, fill the entire system with coolant and calmly start the boiler.
Note. Some manufacturers indicate on the packaging of their products the factory pressure in the air compartment. Using it, you can choose a suitable tank and not bother with pumping.
How to install plastic windows in a wooden house with your own hands
In our wooden house, we decided to replace the old wooden windows with modern plastic ones. This article discusses in detail the installation of double-glazed windows with your own hands in a wooden house. The article is based on personal experience. Why is it profitable to install windows yourself:
- When installing double-glazed windows in a wooden house by a supplier or manufacturer, the cost of the window along with installation will cost 40-50% more than its original cost.
- As a rule, about 95% of companies that install windows do not guarantee the quality of installation in a wooden house. Therefore, when you install plastic windows in a wooden house yourself, you do not lose the warranty period, but only save for your own benefit.
For example, if the cost of a double-glazed window is $184, the fee for removing the old window and installing a new one will be approximately $92. That is, the total price of the window will be $275. If you replace all the windows in your home (approximately five), the savings is $459!
Window installation is shown using the example of self-installation of a double-glazed window, without the help of others, which takes an average of two and a half hours (for one window). The following describes step by step the process of inserting a plastic window into the window opening of a wooden house.
Removing old windows
Self-installation of double-glazed windows in a wooden house is carried out on a solid foundation (frame). Since in our example, the window boxes were installed quite recently (about 5 years ago) and were without damage (cracks, chips, rotten formations and wormholes), we decided to use them instead of a frame for installing new windows.
Important: all measurements for window installation must be made taking into account that the window frames remain in the same place.
Old window frames that are in good condition and strong enough can be reused, for example, to install a greenhouse. Therefore, in order not to damage the wood of the frame, they must be dismantled carefully; it also does not hurt to remove the glass from them before doing this. In our case, we did not remove the glass from the frame, since the durable frames did not warp when removing them and were dismantled quite easily.
Preparing a site for installing double-glazed windows
With a dry and clean rag (or soft brush) you need to wipe the window frame and remove the waste and debris that has accumulated after dismantling.
Window sill installation
The PVC window sill is installed first, since it is the base of the double-glazed window when it is installed. In this regard, the window sill should be installed as level as possible (ideally horizontal). We check the exact horizontal installation of the window sill with a level, both longitudinally and transversely.
To ensure that the window sill stands firmly, we make cuts up to 8 mm deep on the sides of the window frame. To adjust the evenness of the window sill, we use special plates made of plastic or fiberboard, or thin wooden planks treated in advance with an antiseptic. After the final installation of the window sill, we measure the evenness of the window sill with a building level.
We fasten the window sill with self-tapping screws to the bottom of the window frame, while making a 2 cm indentation from the outer end of the window sill. When tightening the screws, we place washers under their heads in order to protect the surface of the window sill from damage that is possible if it is broken through by the screw head (PVC window sills have cavities). After the window is completely installed, the places where the window sill is attached will not be visible, since they will be hidden from view.
Preparing a plastic window for installation
At the very beginning, even before installing the window, you need to install the handle. There is no need to remove all the protective film from the window surface yet, as it protects the window from possible mechanical damage. The protective film is removed only in the place where the handles need to be installed. When installing them, the handle handles must be in a horizontal position (as shown in the photo). This position means that the window opens on its side, and if the handle is turned down, the window will be locked in the closed state, but if the handle handle is turned up, the window will open in the crank mode.
We fix the handle to the window with two bolts and move the handle handle down. On the side posts of the window (at the ends) we make markings for making holes on which the window will be fixed to the block. Next, using an electric drill, we drill two through holes (lower and upper) along this marking in the right pillar of the double-glazed window and in the lower pillar (4 holes in total). The distance between the bottom and top parts of the glass unit to the hole should be from 25 to 35 cm. The diameter of the drill for this work should be 6 mm, while the diameter of the screw is 5 mm.
To ensure that the head of the self-tapping screw rests firmly on the window frame, we drill out holes on the side posts from the inside for fastening with a drill with a large diameter - 10 mm, right up to the metal frame itself. The hole should be such that the head of the screw fits freely into the cavity of the window post.
Window installation
We install the assembled window into the window opening. We control the center using measurements taken with a tape measure starting from the edge of the window and ending with the surface of the window frame on both sides, the distance should be the same (about 1 cm). We install the window on the surface of the previously installed window sill. Since we have already checked the window sill for levelness using a building level, there is no need to check the window itself for horizontalness.
To install a window parallel to the wall of the house, we install a building level between the wall and the siding for support. If the house was sheathed with another finishing material, for example, clapboard, which fits tightly to the wall and does not allow placing a level, then you need to use a plumb line for control.
We install a spacer bar 1 cm wide between the window frame and the window. It is necessary that this block fits tightly enough between the window frame and the window. This block is needed as a stop at the moment when the window is attached to the window opening using self-tapping screws. If this is not done, then the window may move to the side when it is fastened (it will simply be pulled away) and at the same time the mechanism for opening and closing the window will not function well, or the window sash will not open at all.
When the installation of the stop bars is completed and the window is aligned with a level or slope parallel to the wall of the house, then we fix the double-glazed window with self-tapping screws. We fix the window to the window frame from the bottom and top of its side posts, so that the self-tapping screw is in the free space between the frame and the window.
Such fastening of a double-glazed window is not only reliable, but also provides a floating effect. If there are seasonal shifts in the structure of the house, warping the window openings, then windows that are not rigidly attached to the frame are almost not subject to warping, due to the fact that the self-tapping screw can arbitrarily move in the direction of the skew of the window frame.
Installation of double-glazed windows in a wooden house
First, install adjusting plates between the drain holes. This is necessary so that the glass unit does not cover the openings through which condensation is drained from the window.
Carefully install the double-glazed window into the window opening. We make sure that it does not fit tightly between the window posts, since if seasonal changes occur and, accordingly, distortions of the window frame, the glass in the double-glazed unit may burst.
If your glass unit fits tightly, and there is no gap between the window mullions and the glass unit (at least 5 mm), then you should seek an explanation from the company that made the glass unit according to your order, so that the company’s employees can eliminate this deficiency. It is necessary to check the gaps between the frame and the glass unit before removing the old window.
We install the double-glazed window evenly and fix it with plastic beads, which have profile tenons that are inserted into the grooves of the window frame by lightly tapping the beads, when the tenon goes into the groove and a click is heard. A click means the staple is securely fastened.
After the window is installed, we fill the void between the window frame and the window with foam for installation, both on the inside and outside of the house. Excess hardened polyurethane foam is cut off with a sharp knife.
After this, you can begin finishing with platbands, fittings and drainage.
How to maintain the expansion tank?
Before starting work on the tank, turn off the boiler!
Next, close the valve (1; see diagram above). Open the tap (2) to drain the remaining coolant from the tank. Then we measure the pressure in the tank with a regular car pressure gauge (simply attach a pump with a pressure gauge to the nipple and watch the readings). If necessary, we pump it up, bringing the pressure in the expansion tank to the desired value. After the pressure in the tank is raised, close the tap (2), open the tap (1). All. You can turn on the boiler.
Important! Before starting the heating system and throughout its operation, the tap (1) must be open!
What happens if tap (1) is closed? It’s easy to guess: the coolant will have nowhere to expand - the pressure in the system will increase - the coolant will begin to drain through the safety valve or, if it fails, destruction of either the pipeline or some equipment will occur.
This creates a dilemma: on the one hand, the tap is needed to service the expansion tank, on the other hand, they forgot to open it or the children were playing and closed it, and the heating system “flew”. The solution is simple: we install the tap, open it, but remove the “lamb” (handwheel) from it.
General rules
Having determined the hypothetical location of the expansion tank, choose the correct actual location for its installation.
The expansion tank must be installed so that it is easy to maintain.
- the compensating tank must be installed so that it is convenient to service: free space must be left between the tank and the wall or other equipment;
- the water supply fittings should not put pressure or pull on the tank pipe: secure the supply pipes separately; this will also simplify dismantling the container if necessary;
- For dismantling and repair or replacement, install a separate shut-off valve in front of the tank.
After installing a closed expansion tank, it may be necessary to calculate the pressure and adjust it.
Diaphragm expansion tank design
When the coolant warms up, the pressure on the pipes increases and there is a need to discharge it.
Closed heating systems that do not have an expansion tank in their design may simply not withstand the increase in the volume of water or antifreeze and depressurize. Installation of circuits without the described parts is unacceptable. The closed expansion tank is a carbon steel capsule made by stamping. The tank design includes a rubber membrane. Thus, in the working position, one half of the tank is filled with coolant, and the other with air. The membrane is rigidly fixed around the perimeter of the expansion tank. Pressure can be controlled and taken into account using a special pressure gauge, which is integrated into the overall heating system. Installation of this device provides high-quality sealing of the connection point with the system.
There are also flanged tanks, the peculiarity of which is that the coolant is completely located in the membrane itself, without contacting the metal body. Installation of this type of product involves its vertical location on a horizontal surface and fixation to the base.
Installation of a plastic window in a wooden house
Hello dear readers! In today's article we will look at the technology for installing a metal-plastic window in a house made of timber or logs. The technology for installing windows in a wooden house is somewhat different from the technology for installing windows in a brick house for obvious reasons.
A house whose walls were made of logs or timber will shrink, because... The tree dries out and decreases in size over time. Shrinkage can reach 15 mm per 1 meter of wall height. This means that over the next 3-5 years after the construction of the walls of a wooden house 5 meters high, the walls will shrink by 8 cm.
In addition, in autumn and spring, the tree absorbs excess moisture from the air and thereby swells. In summer and winter, the exact opposite process occurs: moisture from the tree escapes into the environment and the tree shrinks. Thus, the dimensions of logs or beams change several times a year.
Such shrinkage can easily deform the frame of a plastic window, which can lead to jamming of the sashes and the appearance of cracks in the glass unit.
Construction of a window opening in a wooden house
To avoid this, before installing a metal-plastic window, a casing wooden box is inserted into the window opening, which is 8-10 cm in height less than the window opening. The casing box is made of well-dried wood or glued timber. The casing elements should be 40-50 mm thick. All elements are connected to each other using a tongue-and-groove system and secured with self-tapping screws.
Installation of casing
In the window opening of a wooden house, vertical cuts are first made with a chainsaw. These cuts are grooves measuring 50x50 mm. Bars with a cross section of 50x50 mm are inserted into such grooves. The most important thing is that the length of the bars is less than the height of the window opening of 10 cm. This is done so that the bars do not in any way interfere with the shrinkage of the wooden house. In no case should you screw the cranial bars to the ends of the window opening, so the cranial bars are spread out with wedges so that they do not dangle in the groove.
Casing box assembly Casing box
After installing the cranial bars, the casing is assembled. All elements of the box are fastened to each other with self-tapping screws. And the casing itself is attached with self-tapping screws to the cranial bars, which prevent the box from falling out of the window opening.
All gaps between the frame and the window opening are sealed with tow or other roll insulation. Under no circumstances use polyurethane foam to insulate the casing box, otherwise pressure from the logs will be transferred to the box during shrinkage and it will become deformed.
Thanks to this design, when shrinking, the logs will slide along the cranial bars without putting pressure on the window frame.
Casing box in a window opening
You can do the opposite: cut out ridges in the window opening, and make grooves in the casing. But in this case, the casing is assembled directly in the window opening. First, install the bottom element of the box, then the side elements, and lastly, install the top element of the box on top.
Installation of a plastic window in a wooden house
To prevent the plastic window from standing out against the background of wooden logs, the plastic frame is liminated to look like wood. This lamination allows you to replicate the color and structure of the wood.
After installing the casing, a plastic window is installed. The technology for installing a plastic window in a casing is practically no different from the usual installation of a plastic window in an apartment. Metal perforated plates are screwed on both sides of the plastic window at a distance of 15 cm from the bottom and 15 cm from the top of the window. There are 4 such plates in total. Thanks to the rigidity of the metal plates, the plastic window will be securely held in the casing. The plates should be screwed to the plastic frame using self-tapping screws with a press washer and a drill, so that the drill on the self-tapping screw will rotate the metal profile in the window frame. The window is leveled horizontally using plastic wedges placed along the supporting profile.
Next, you need to install the window in the casing box, screwing it with wood screws to the casing box. Make sure that the screws do not reach the ends of the window opening. Constantly check the vertical and horizontal levels when installing a plastic window, otherwise the sash will then spontaneously close or open under its own weight.
Then the window must be foamed around the perimeter with mounting foam.
After foaming the window, install the window sill and internal suction with cash. The slopes and window sill can be made of wood so as not to disturb the interior of a wooden house with plastic. Additional strips, which are used when installing interior doors, can serve as slopes.
From the outside, all the cracks between the casing and the window opening are closed with carved wooden platbands, and a metal ebb is installed below. In this case, you can make a wide platband on top so that it covers the large gap between the casing and the window opening. Or, instead of a wide casing, install a small wooden canopy.
Attaching the window to the cranial bars
It is possible to install a plastic window without installing a casing. In this case, the plastic window is attached directly to the cranial bars. A gap is left between the window and the window opening. The gap should be 2-3 cm on the sides, and 5-8 cm on top, so that the window does not become deformed when shrinking. Roll insulation (isover, mineral wool, glass wool) is laid between the window and the window opening. Do not under any circumstances use polyurethane foam for insulation. Internal slopes and window sills are also insulated with roll insulation.
Thanks to this technology, your windows will serve you for many, many years.
Where to put the expansion tank?
The placement of the compensating tank and the method of connecting the pipe to the heating network are best thought out in advance, even at the design stage - then there will be more room for maneuver. The choice of tank location in open and closed heating systems is dictated by the design parameters of the heating network. The reservoir is designed where there is a need to compensate for the expansion of water, with some systems requiring multiple tanks.
Many manufacturers of boiler equipment equip heating devices with built-in tanks, but in some cases the volume of the standard tank may be insufficient to stabilize the pressure in the network. The need for an additional reservoir for collecting water often arises when converting an open gravity system into a closed one. If communications are not replaced, the capacity of the built-in tank of the new boiler will not be enough to accommodate excess water. Also, a second tank may be needed when installing a “warm floor” system in addition to the radiator network.
You cannot do without an expansion tank in DHW systems equipped with indirect heating boilers. Due to large losses of hot water, there is no point in equipping indirect water heaters with relief valves, as well as large-sized electric heaters. Some companies also produce buffer tanks with the option of installing a compensating vessel.
In open heating systems of old buildings, expansion tanks are located at the highest point of the heating network - for example, in the attic. In small one-story houses, compact tanks are suspended from the ceiling in kitchens next to floor-mounted heat generators. This makes it more convenient to keep an eye on the pressure, although from an aesthetic point of view such a solution looks dubious.
In closed systems, sealed diaphragm tanks are installed, which feel comfortable at any point in the system. Such a tank is usually located in the boiler room or in the kitchen next to the boiler. The only condition is to avoid proximity to pumping equipment in order to avoid pressure fluctuations in the heating network.
Rules for installing expansion tanks
The compensating tank in an open system is located above the boiler; in this case, the units must be connected by a vertical riser of the supply pipe. To simplify the adjustment of the supply and water level in the tank, two additional lines are brought into the boiler room.
If the tank is planned to be placed in the attic, the housing should be thoroughly insulated. In case of a pipeline breakthrough, an emergency overflow is installed, which is discharged either into the sewer or directly into the street through the roof.
Sealed tanks in closed heating circuits can be placed in any position - either horizontal or vertical. A small vessel is hung on the wall using a clamp or bracket; more voluminous - placed on the floor.
Recommendations for installing diaphragm tanks are dictated mostly by ergonomic considerations. Unobstructed access to the air compartment, nameplate, shut-off valves and drain valve facilitates maintenance and repair of the unit. There should be free space between the floor tank and the wall, and wall-mounted tanks should be hung at a comfortable height so that the spool and shut-off valve are at hand. Do not run the supply pipe through the floor in the passage area or along the top at the height level, otherwise they will constantly trip over it, and the taps and pipelines are attached separately to make it easier to replace the tank when the time comes. In this case, the load from the fittings and supply lines should not be transferred to the pipe.
The tank will last much longer if the air compartment is on top. When cracks begin to appear on the diaphragm, air will not get inside, and the tank will continue to function even with worn rubber until the number of defects reaches a critical level, but this will not happen soon.
To successfully complete installation work, it is important to choose the right tool. In addition to the standard set of gas wrenches, you will need a special wrench for polymer pipes and a stepped wrench for detachable joints. To seal joints, only special sealants for heating systems are used - other types of seals will not withstand harsh temperature conditions.
Types of fasteners
There are certain requirements for installation and operation of each specific model. In particular:
- Installation is carried out in a room where the temperature is kept no higher than zero all year round.
- The container is installed above the boiler. The connection to it must be vertical.
- Emergency overflow is provided.
- There must be constant access to the air valve, drain tap, and nameplate.
- The reducer is placed after the water meter.