Selection criteria and types of winter insulation
For a long time, expanded clay concrete and foam concrete served as the main materials for insulating facades in winter. Then glass wool began to be used, and only with the development of construction technologies did many other materials appear that cope well with thermal insulation. Each material has its own characteristic advantages that determine their choice.
- Mineral wool. Excellent for insulating facades. It has many advantages: fibrous structure, high vapor permeability, non-flammability, and it is inexpensive. The facade insulated with mineral wool is able to “breathe”, which prevents the formation of fungus and mold. The material is suitable for all types of structures. Mineral wool is mainly used in “dry” processes.
- Expanded polystyrene. It is one of the most budget-friendly materials for insulating facades. It is light, airtight, and easy to work with. In parallel with its advantages, the material has a number of disadvantages. When exposed to sunlight, it ages, so it needs to be covered with primer, paint or cladding. Due to the fact that foam plastic does not allow air to pass through well, it cannot be used for thermal insulation of wooden houses.
- Thermal panels. The material performs two functions at once: cladding and thermal insulation. Design and content may vary. Minslabs, polystyrene foam, cellulose, etc. can be used as an insulating layer, and decorative plaster, metal, metal-plastic can be used as a cladding. The design can be assembled in the form of puzzles and conventional fastenings with self-tapping screws.
- Warm paint. Initially, the material was intended for use in the space sector, but over time it became in demand in construction. It's all about filling the paint. It contains microscopic glass spheres, inside of which there is a rarefied space. The binding elements are latex, acrylic, silicone or a mixture of them. A 1 mm layer of paint is enough to provide protection as much as 2.5 cm from mineral insulation.
- Izolon (foamed polyethylene). Available in soft rolls several millimeters thick. Often used in “dry” processes. Acts as a supplement to the main insulation of the facade with foam plastic in winter. Foamed polyethylene can be mounted anywhere in the frame: on the wall or under the sheathing. Isolon is vapor-proof and should not be used in the same structure with mineral wool.
Mineral wool
When choosing a material for facade insulation, pay attention to the type of structure, region of residence, insulation properties and your financial capabilities. But it is best to consult with specialists who will determine exactly which thermal insulation option is suitable in a particular case.
Selection of insulation material
The following materials are often used for finishing facades.
- Mineral wool slabs .
These products are not subject to combustion and have increased thermal insulation characteristics. The most popular are slabs made from basalt material. They have a tensile strength index for layer peeling of over 15 kPa. Mineral slabs should have a density ranging from 130 to 180 kilograms per cubic meter. Compliance with these parameters is necessary to prevent destruction of the final layers of plaster. About mineral wool brands and where each of them is used - Expanded polystyrene (foam) slabs. These materials have excellent thermal conductivity and increased lightness compared to mineral wool. Polystyrene foam has good flammability, and by using special fire-resistant processing agents, its significant disadvantages can be eliminated. In special cases, fire-resistant mineral fiber liners up to 15 centimeters wide can be installed between polystyrene foam boards throughout the entire depth of the insulation system. Thanks to such measures, the structure becomes non-flammable. Expanded polystyrene boards must have a tensile strength of at least 100 kPa.
Polystyrene foam as insulation
Table. Comparison of the properties of mineral wool and polystyrene foam.
Comparative table of characteristics of expanded polystyrene and mineral wool
It is important to know! The type and thickness of the reinforcement is determined by the design organization responsible for preparing the work project. These characteristics depend on the type of wall material and climatic factors characteristic of the area.
Table. Selection of insulation thickness for the main climatic zones of Russia.
Table for selecting insulation thickness for the main climatic zones of Russia
Prices for thermal insulation materials
Thermal insulation materials
Wet facade technology using mineral wool
Materials
The thickness of the insulation depends on the thermal insulation properties of the wall and climatic conditions. It can be calculated using an online calculator. To do this, you need to enter the following data:
- standard heat transfer resistance for walls in the region;
- thickness and material of facade walls;
- thickness and material of interior decoration.
Other required materials:
- Base profile. The width is equal to the thickness of the insulation.
- Docking elements for the profile.
- Fastening hardware for it. The length depends on the wall material: concrete and solid brick - from 4 cm, hollow brick - from 6, gas silicate blocks and other materials with low strength - from 10.
- Deep penetration soil (for bricks, gas silicate blocks, plastered walls) at the rate of 300 milliliters per square. For concrete - concrete contact primer, 400 ml per square.
- Glue - at the rate of 6 kilograms per square.
- Mushroom dowels - 5-7 pieces per square.
For your information
We recommend dowels with thermally insulating heads and steel with a durable anti-corrosion coating.
- Basic plaster or glue - up to 5 kg per square.
- Reinforcing alkali-resistant mesh - 1.1 m per square with a roll width of 1 meter.
- Reinforcing corners from the same mesh.
- Water-dispersed primer (for treatment before finishing) – up to 200 ml per square.
- Decorative plaster and/or facade acrylic paint. Consumption is indicated in the manufacturer's instructions.
Have questions? Call, Ask! +7
Or write to us Ask a question
Instructions for installing a wet facade using mineral wool
At the first stage of work, it is necessary to prepare the facade. The walls are cleaned of dirt, peeling plaster, fungus, and efflorescence. Level and cut off protruding reinforcement. Remove all communications, grilles, air conditioners, drainpipes, etc. The next procedure is as follows:
1. If fungus has formed on the walls, they should be treated with an antifungal compound.
2. It is recommended to treat the junction of the base with the facade with hydrophobic impregnation.
3. Prime the wall with a deep penetration compound. The composition is applied with a brush.
4. Mark the wall with a nylon cord. It is attached to reinforcing bars temporarily driven into the wall; upon completion of installation, the bars are removed. The cord is pulled at a distance from the hay equal to the total thickness of the insulation and adhesive layer.
5. A starting (basement) profile is installed in the lower part of the facade. The bottom row of slabs will rest on it. The profile is fixed with driven dowels. It is recommended to place a strip of reinforcing fiberglass mesh about 30 cm wide under the profile strip. After gluing the mesh onto the insulation, the outer edge of the strip is wrapped onto the profile.
6. The slabs are placed on a special glue (Ceresit CT190 or similar). It is diluted with water according to the instructions to a dough-like consistency, left for five minutes and mixed again. The viability of the solution is about two hours.
7. The glue is placed on the back surface of the slab and spread with a comb spatula. You cannot apply it in a spot way: because... The slab has quite a lot of weight; there must be adhesion over the entire area.
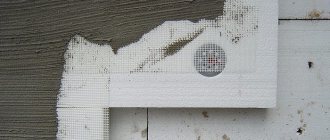
8. Place the first row of slabs on the plinth, align them level and relative to the marking cord. The slabs must be placed close to each other, without gaps. The remaining cracks and chips are filled with pieces of mineral wool.
9. The second row is installed with joints spaced apart from the first.
10. After the glue has hardened, additional fastening of the slabs is performed with disc-shaped dowels with metal cores at the rate of 5-7 pieces per square (for a small house height). Hardware is placed in the corners and in the center of the slab.
11. The holes for the dowels are filled with the same glue before reinforcing the façade.
12. The mesh is rolled out from top to bottom and secured at the top with mortar or hardware. Overlap of adjacent strips – 10 cm minimum. If the surface is uneven, a rough layer of plaster no more than a centimeter thick is placed under the mesh.
13. After a couple of days, the glue drips are cleaned off with emery cloth, and the surface is covered with primer or primer-paint.
At the end, decorative plaster is applied and the rest of the finishing is done (painting, etc.).
Are you planning to decorate the facade? All you have to do is call, and then we will do everything ourselves!
+7
Multiline phone
Main stages
Work on insulation with a “wet facade” begins with the preparatory work stage.
Surface preparation
All old hanging elements are dismantled from the facade - brackets for lighting fixtures, antennas and external drainage, as well as signs, canopies and ebbs. Install new brackets for attaching attachments, which should have an increased length taking into account the thickness of the insulating layer.
Inspect the wall surface for cracks, chips and sagging. Cracks are sealed after the causes of their appearance have been eliminated, and the sagging is simply knocked down.
If there are areas affected by fungus, this part of the wall is cleaned to the base and treated with a fungicidal compound using a roller. They also remove old paint, dirt, dust and crumbling areas. Treat the wall with a primer.
If necessary, level the surface. Height differences should not exceed 2 cm - this is the maximum difference in level, which can be compensated for by the thickness of the glue.
Installation of the base profile
On the base, the boundary of the bottom row of mats or insulation sheets is marked. From it, an adjustment is made upward for the distance of the profile mounting holes, and a horizontal level is struck. When insulating a private house, the line, having bypassed the perimeter, should return to this point. When crossing doorways, the line is controlled with a building level.
Then the base profile is mounted using dowels, the length of which depends on the material of the facade. The width of the profile must correspond to the thickness of the insulation. When extending sections along the length, a gap must be left to compensate for thermal expansion.
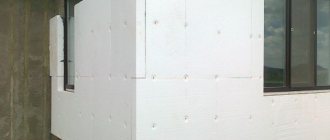
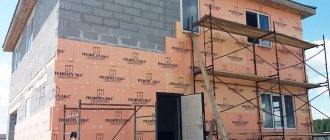
Installation of thermal insulation material
Installation of thermal insulation on the facade is carried out using mechanical fasteners - umbrella mushroom dowels. But first the insulation sheets are fixed to the wall with glue. Its functions are to compensate for unevenness and prevent the thermal insulation from “sliding” along the facade until installation is completed.
The glue must be applied to the surface of the insulation. The amount of glue and method of application depends on the quality of the surface:
- if the height differences in level do not exceed 5 mm, the glue is applied to the insulation in a continuous layer with a notched trowel;
- for unevenness of 5-20 mm, glue is coated around the perimeter of the slab, plus it is applied pointwise in the form of cakes (but not less than 40% of the surface).
The first row of slabs is supported on the starting profile. During installation, make sure that there is no gap at the joints of adjacent slabs, and the difference in height does not exceed 3 mm.
The second row is laid with an offset, which should not be less than 20 cm. The corners of the house must also be designed with the top and bottom rows tied.
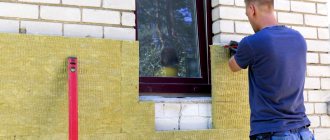
When installing thermal insulation, the corners of window and door openings should not fall on the “crossroads” of the slabs. Separate inserts must be cut for these areas.
Finally, the slabs are secured to the walls made of bricks and concrete blocks with disc-shaped dowels and a nail with a thermal head at the rate of 5 pcs. per 1 m 2. The length of the dowel is equal to the thickness of the thermal insulation layer plus the spacer. The spacer part, depending on the materials of the wall construction, must be at least:
- 60 mm for concrete and solid ordinary bricks;
- 100 mm for porous bricks and cellular concrete blocks.
When insulating a frame house with OSB walls externally, a different fastening method is chosen - using wood screws with a pressure collar.
Reinforcement
“Soft” and loose insulation boards do not hold the plaster layer well, and so that there are no cracks on it (especially at the seams), the surface is reinforced. For this purpose, a fiberglass mesh is used as an adhesive mixture that is resistant to alkaline conditions.
The mesh should be inside the glue layer; the total thickness of the reinforcing layer is 5-6 mm. This is done as follows:
- apply the first layer of 3-4 mm;
- the mesh is literally pressed into the solution with a spatula;
- level the surface;
- After the first layer has set, apply the second.
Reinforcement begins from corners and slopes. First, the mixture is applied in a strip of 20-40 cm on each side of the corner, then a perforated corner with a mesh is pressed into the solution. Then, starting from the corner, the remaining mesh sheets are glued, overlapping adjacent sections by 10-15 cm.
After the second layer has set, it is rubbed to a perfectly smooth state - it serves as a base for painting or applying decorative plaster.
Decorative finishing
The drying time of the reinforced base layer depends on humidity and air temperature. As a rule, the holding time under normal conditions is in the range of 24-48 hours and can be found out from the instructions on the glue packaging. At this time, it is advisable to cover the facade with a special film to protect it from external influences.
After the base has dried, the surface is primed and facade paint or plaster is applied.
Insulation of stone walls from the outside with mineral wool
The plaster is applied directly to the mineral wool.
Definitely, insulating walls from the outside with mineral wool is better than from the inside. This complies with all heat engineering standards and in this case the dew point shifts into the thermal insulation layer. Thanks to this, condensation does not form. Stone walls (made of monolithic concrete, brick, foam block) are insulated using two technologies:
- along the sheathing - ventilated façade;
- under the screed - wet facade.
The thickness of the mineral wool for wall insulation in each of the methods will be the same, only the method of laying and finishing the thermal insulation differs. To calculate how many centimeters of thermal insulation cake will be enough in your case, use an online calculator.
Wet facade
This technique involves attaching mineral wool slabs directly to the wall, and applying plaster on top of the insulation. This introduces its own requirements for the choice of material and its characteristics. Basalt wool should be placed under the plaster. It is hard and does not absorb moisture as much. At the same time, even when wet by 30%, it continues to retain heat. According to various estimates, the density of mineral wool for wall insulation should be such as to withstand the weight of the plaster. This is definitely no less than 85 kg/m. cube, and the optimal value varies within 125 kg/m. cube
Before attaching the mineral wool to the wall, it is advisable to level the working surface. If the insulation is laid on a flat wall, then the adhesive is applied in an even layer using a notched trowel. If the working surface is uneven, then the glue is applied with cakes. The layer thickness should be about 3-4 cm. The slabs are laid with the seam offset. Be sure to use plastic dowels, 4-5 pieces for each slab. If mineral wool is laid in two layers, then make sure that the joints of different layers do not coincide.
The last stage of insulating external walls with mineral wool is applying plaster in two passes. A fiberglass reinforcing mesh and corners are embedded in the first layer. The second layer is decorative; it can be smooth or embossed (the so-called bark beetle). The decorative layer is primed and painted. It is necessary to use acrylic-based paints so as not to interfere with the movement of steam from the insulating cake.
So, let’s summarize how to insulate walls with mineral wool using the wet facade method:
- basalt slabs are glued to the wall with universal glue;
- each plate is secured with 4-5 dowels;
- the first layer of finishing is tightened, into which the reinforcing mesh is embedded;
- a decorative layer of plaster is applied, primed and painted.
The cost of insulation using the two methods described above will be approximately equal, but the execution technique is more complicated for a wet facade. Here you need to have the skills of a painter and plasterer, so to speak, to have a full hand. Theory alone is not enough.
Ventilated façade
For each level of thermal insulation, its own sheathing is erected.
First, let's decide which mineral wool is best for walls insulated under siding (the so-called ventilated facade). This can be either glass wool or soft edged stone wool slabs. The density can be any, since there will be no load on the insulation. When constructing a ventilated façade, the thermal insulation is placed spaced between the sheathing guides. This is why the elasticity of the material is so important. The peculiarity of the technique is the ventilated gap between the insulation and the finish. Thanks to it, the moisture coming out of the heat-insulating cake evaporates, and also cools the house, which is important in the summer.
How to properly insulate walls with mineral wool using the ventilated facade method:
- the sheathing is being erected;
- mineral wool is laid at random;
- wind protection is attached;
- a counter-lattice is being erected;
- trim is attached.
The cross-section of the bars for the sheathing is selected no less, and preferably greater, than the thickness of the thermal insulation. The distance between the sheathing bars should be several centimeters less than the width of the insulation. There is no need to glue mineral wool laid out to the wall. For reliability and to avoid shrinkage (if the thermal insulation is very soft), you can fix it with dowels.
The size of the ventilated gap also depends on the height of the walls. Vapor barrier films cannot be used instead of wind protection, as this will cause moisture to accumulate in the insulation. It is necessary to create all the conditions so that steam from the room, having passed the wall and thermal insulation, can easily escape outside.
What does it consist of?
This type of cladding includes several layers , each of which performs a specific function.
This system consists of three layers:
- thermal insulation - includes foam boards or mineral wool;
- reinforced (basic) - consists of a plaster-adhesive layer reinforced with fiberglass mesh; when using the “heavy” method, steel mesh is used;
- protective and decorative - wet facade plaster is used, which is painted with special paints; the plaster can be applied in a thick layer - 3-4 cm and a thin layer - 0.7-0.9 cm.
Technique for insulating facades using the wet method
The Laes facade insulation system is designed for insulation and decorative finishing of facades.
The definition of “wet” was introduced for this type of thermal insulation, since various aqueous solutions and compositions are used here: plaster coatings, primers, paints. This method is a clearly developed system of materials and substances, a technique for gluing an insulating layer, its fastening and reinforcement, applying primer layers and plaster finishing, and a set of technological requirements for installation. The result is a strong and durable coating with excellent technical characteristics.
Important! Ceresit (made in Germany). This facade insulation technology is presented in two versions - ceresit WM (mineral insulation) and VWM (expanded polystyrene). A similar thermal insulator is used in LNPP technology, names LNPP-P and LNPP-M.
A similar thermal insulator is used in LNPP technology, names LNPP-P and LNPP-M.
Stages of work:
- surface preparation of the outer part of the building. This includes detection of damage to basement floors and violations of the integrity of walls. They are completely removed. If plaster coatings have defects, they are dismantled. Visually inspect the building for the presence of moss, growth, and fungi. Such surfaces are cleaned to a clean base;
- preparing the surface for applying thermal insulation of the “wet facade” type. The plaster coverings are removed along the slopes of various openings, and protruding seams on the surface are processed with a hammer drill. Finally, the entire surface is primed with either Ceresit CT 17 or LNPP “Universal Strengthening Primer.” This will prevent subsequent layers of adhesive from being absorbed into the thickness of the wall and will significantly increase the technical characteristics of the wall itself, preventing the development of fungi and microorganisms;
- If there are volumetric defects on the walls, they are repaired with special putty compounds. This is Ceresit CT 29 or LNPP “Plasty”. After complete drying, begin installing the insulating layer;
- First, metal profiles are fixed along the entire perimeter of the building, parallel to its base, 30-40 cm below the floor or ceiling of the basement. The width of the profile flange should be commensurate with the thickness of the insulation layer. Prepare the adhesive mass in strict accordance with the instructions. This can be Ceresit CT 85 for polystyrene foam boards, Ceresit CT 190 for mineral wool, or LNPP Extra adhesive reinforcing mixture (universal). Any of them is used within 1.5 hours;
- gluing slabs. involves gluing thermal insulation directly to the wall surface. In this case, the glue is applied to the polystyrene foam board at a distance of 20 mm from the edge and with one strip in the middle. Laying is done from bottom to top. The slabs are stacked tightly against each other. By lightly pressing the material, the glue is evenly distributed over its surface;
- after the adhesive has dried, the protruding edges should be grouted;
- installation of reinforcing mesh, which will give the entire structure the necessary strength. It must be made of inert materials that will maintain their integrity in the alkaline environment of the glue and primer. The reinforcing mesh is applied to the glue. In this case, use the same substances as when gluing insulation;
- A layer of plaster is applied to the reinforcing surface. The variety of finishing finishes of each of the developers of “wet type” facade insulation will allow you to choose a material not only of the desired shade, but also of texture.
No matter how much we would like it, winter comes every year and, as always, “suddenly”, and making itself known loudly with blizzards, frosts and snowfalls. The price of energy does not fall, but only rises, so you have to think about saving and preserving heat yourself.
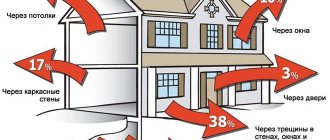
It is no secret that possible heat losses are distributed as follows:
- Doors and windows can lose up to 50% of all heat;
- Walls – up to 40%;
- Attics and basements – up to 20%.
And if everything is clear with doors and windows, the doors are insulated once and for a long time, the windows are covered either annually during the season, or before the onset of cold weather the condition of the seals in plastic windows and in wooden windows with double-glazed windows is checked, then the problem with the walls is not so easily solved .
What is the importance of vapor permeability of the finishing coating?
In facade insulation systems, materials with high vapor permeability should be used. At a room temperature of 20°C and a relative humidity of 55%, its air contains 8 g of water vapor per 1 kg of dry air, which creates a partial pressure of 1238 Pa. Outdoors at a temperature of –10 °C and a relative humidity of 83%, per 1 kg of dry air there is about 1 g of steam, creating a partial pressure of 216 Pa. The difference in partial pressures outside and inside leads to a constant movement of moist air through the wall to the outside. But if there is a layer of material near the outer surface of the wall that does not allow water vapor to pass through, then moisture from the passing air begins to accumulate at the border of the vapor-impermeable layer, causing dampness in the structure. As a result, its thermal protection deteriorates sharply.
What should you pay attention to during installation?
The most dangerous thing for “wet” facade systems is a violation of installation technology. The human factor plays a major role here. To reduce the risk of mistakes, each facility is given personalized technological regulations. The work takes place in three main stages: installation of thermal insulation, reinforcement, application of a decorative layer.
Scheme of laying insulation at the corners of the building
At the first stage, it is very important to correctly, according to the diagram, overlap the insulation slabs and gear them at the corners of the building.
When gluing the slabs, you should pay attention to differences in the plane of the wall. If they are more than 3–5 cm, cavities form under the insulation, which must be eliminated using special spacers.
During doweling
you need to strictly adhere to the technological scheme. The heads must be in the plane of the slab, but in no case are they recessed into it, as this will cause the seating area to break.
In the process of façade reinforcement
It is very important to protect the base layer of plaster from direct sunlight to avoid cracks during the hardening of the composition. In sunny weather, you can use special construction nets that diffuse direct light. At temperatures above 30 °C, reinforcement should not be performed. Compliance with these and other technological subtleties will ensure a long service life of the system.
In accordance with regulations, almost all houses require additional thermal insulation. Even two-brick walls, which were previously considered “safe,” are no longer considered so since 2003. Therefore, insulating a house is a common stage that is used both for the reconstruction of old and for the construction of new buildings. And one of the two most popular methods is a wet facade, the technology of which is applicable to both apartment buildings and low-rise buildings for one owner.
Features of installation technology
In order to carry out all installation work efficiently and achieve the efficiency of the system, it is not enough to simply know what a wet facade is - the technology for its installation is quite complex and difficult. Therefore, it is better to entrust the matter to real professionals. In general, the main work is reduced to the following stages:
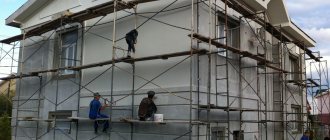
- Scaffolding is installed to prepare the surface of the walls - cleaning from dust, dirt, leveling and priming.
- A support profile is installed at a height of about half a meter from the ground.
Advantages and disadvantages of technology
A wet facade is fundamentally different from a ventilated one. This applies not only to the structure of the wall “pie”, but also to its operational properties.
The advantages of the technology include:
- Effective heat saving by minimizing the number of “cold bridges”. In a ventilated structure, they are formed by a large number of fastening elements of the sheathing.
- Saving money and time.
- Aesthetic appearance of the house.
- Additional insulation, high-quality sound and vapor insulation of walls.
- Reducing the load on the foundation.
There are also disadvantages to insulating the façade using the wet method. They are related to the conditions for laying materials and applying adhesives. Thus, the permissible air temperature during operation should be no lower than +5 °C, and humidity should be no more than 40%.
If these conditions are not met, there is a high probability that the glue and plaster will dry unevenly. This will negatively affect the quality of the final coating and its service life.
Briefly about the main thing
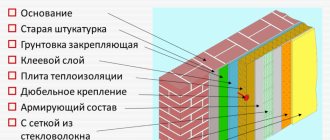
The wet facade is a multi-layer external cladding of a house without a ventilation gap, which includes the following structures:
- Glue.
- Insulation.
- Reinforcing mesh.
- Plaster.
- Finishing.
Among its main advantages are:
- Good indicators of heat, wind, moisture, noise insulation.
- Ease.
- Durability.
- Resistance to external factors.
- High aesthetic qualities.
Disadvantages include the need to strictly adhere to installation requirements - temperature, humidity and weather conditions
During installation, it is important to consistently carry out the stages of the technology. Therefore, it is better to entrust the procedure to a professional team.
Tips for finishing window and door openings
Designing wall openings is one of the most difficult stages of work. And here it is important to pay attention to the following:
- For fire safety purposes, cuts are made of non-combustible mineral wool along the perimeter of the openings. They must have a width of at least 200 mm, and a thickness equal to the thickness of the main insulation.
- Holes are cut out in slabs of heat-insulating material equal to the perimeter of the openings along the slopes.
- It is better not to glue insulation along window and door openings, but to blow out the formed cracks with polyurethane foam.
- The joints of the insulating material must be at a distance of at least 150 mm from the slope.
- The internal perimeter of the openings is reinforced with two layers of reinforcing mesh.
Taking these nuances into account is the key to the fire safety of your home and effective drainage from its external walls.
Thus, wet facade technology is a good solution for those who want to economically insulate the external walls of a house without losing their aesthetics.
Basic questions that arise before insulation
Before starting to create a wet facade, many home owners may have various questions. Often a problem arises with the choice of insulation and what specific materials and components may be needed during installation work.
Which insulation to choose
- Organic systems. They use fairly cheap foam. Reinforcement is performed using a special reinforcing mass of organic origin.
- Mineral. The mineral wet facade is made using high quality mineral wool. A mixture of mineral origin is used for reinforcement.
- Combined. Such insulation systems require the use of high-quality foam. Raw materials of mineral origin will be used for finishing.
- Price. The cheapest insulation option is polystyrene foam. Many buyers prefer it, despite its fairly high fragility rating.
- Difficult to install. Foam plastic is considered a simpler option, because it has a fairly rigid structure and can be easily processed.
- Fire safety. The fire safety indicators of the insulation used play a huge role. Polystyrene foam is a flammable material, so it should be additionally treated with special solutions - fire retardants. Basalt wool will not burn and can easily withstand temperatures that reach 1000 degrees.
Not least important is the thickness of the insulation used. There are a huge number of different insulation options on sale today, each with individual parameters and characteristics.
On average, the thickness of the slabs can be from 25 to 200 mm.
At the same time, a very thick layer of insulation will result in too high a temperature inside the room. In addition, preference should be given to materials produced by well-known companies, which to some extent is a guarantee of their quality.
What materials and components will be required?
It is imperative to use a base or starting profile
It is very important in this situation that its width must correspond to the thickness of the insulation used for the house. In addition, you need to pay attention to the quality of the material. To fasten the profiles, you will need dowel-screws or dowel-nails measuring 6/40. Sometimes you need extended dowels 6/60 if the facade of the house is plastered with a thick layer. You will also need a high-quality primer. It will be used at the stage of preparing the surface for further insulation. To securely fix the insulation, a special adhesive solution is purchased
Preference should be given exclusively to those adhesive mixtures that are intended for installing insulation. Be sure to buy enough insulation. It is better to purchase this material with a small reserve in case some slab is damaged during installation. In order to strengthen the insulation mechanically, you may need dowel mushrooms. Their length must correspond to the thickness of the insulation sheet along with the length of the spacer element present. You will need a reinforcing mesh and a special mixture for reinforcement. For exterior work, additional decorative finishing materials will be required, which may differ in each individual case.
Plastering insulation
Plaster on a wet facade performs two functions - an additional moisture-protective layer and decorative design. Its choice depends on the type of insulation, expected weather conditions and the desired effect. The most durable plasters are silicone (used with foam plastic) and silicate, also known as liquid glass (used with mineral wool).
With the help of plaster, you can create a smooth surface that is convenient to paint, and when used, it can be kept in order; dust and dirt will not settle on it.
Various types of decorative plaster can create a surface that imitates wood, stone or any other uneven texture. This will make the appearance of the house beautiful and unusual. Requires special tools for application and subsequent painting. Dirt may become clogged in uneven walls; such a façade will need to be cleaned occasionally.
Colored plaster gives an additional shade of color and allows you to use transparent materials instead of paint. Can create both smooth and decorative surfaces. It has the same advantages and disadvantages as colorless plaster for a wet facade.
Installing a wet facade is a great way to make your home warm in winter and cool in summer, and show your design talent in decorating walls. Having assessed the advantages and disadvantages of the design, you can choose the most suitable insulation and plaster and begin installation.
There are many ways to insulate the walls of a frame house. But for exterior work, in addition to the traditional design with lathing and a ventilated gap, only one technology is used. We are talking about a “wet” facade. It received its name due to the technological features of installation.
Definition
Those who first encountered the technology in question for the exterior decoration of a house often have a question about what features a wet facade is characterized by, what it is from a technical point of view and what structure it has. To give a clear answer to this, let’s look at these aspects in more detail.
The external cladding of the structure must have heat and sound insulation properties. Therefore, a layer of insulation must be located under the decorative outer layer. As a rule, various modifications of foam compounds or mineral wool are chosen as a heat-insulating material. All facade finishes are divided into two main categories:
Ventilated.
Insulation is attached to the wall of the house, then strips are installed, to which slabs are in turn mounted - dry plaster, siding, etc. Thus, there is a small air gap between the heat-insulating material and the finishing.
Non-ventilated.
The facade has a similar structure as in the first case, but the finishing is adjacent directly to the insulation.
Construction of a wet facadeSource fasadec.ru
Often in the second case, plaster and adhesive compositions are used, applied directly to pre-fixed layers of thermal insulation. Since at the time of application they are in a liquid state, the technology is called “wet”. This is where the name of the façade itself, made using this algorithm, stuck.
Façade durability criteria
The reliability of the system is largely determined by the quality of its components. The manufacturer does not arbitrarily select building materials, insulation, adhesives and plaster compositions, dowels and meshes, but only those that, during experiments, have proven themselves to work best together.
To insulate facades, only certified plaster mixtures can be used, and the work itself must be carried out by specialists who are well acquainted with the technology of their implementation. Each project is individual; at each site there is a need to work out technical components. Therefore, for a given building, the system manufacturer, together with the designer, issues individual design documentation in the form of an album of technical solutions for facade insulation. The slightest deviation from this documentation may subsequently lead to defects. For example, violation of the rules for fiberglass mesh reinforcement can cause the appearance of even vertical or horizontal cracks in the finishing layer of the facade. And errors when attaching thermal insulation (formation of air gaps of more than 1 mm between the slabs at the point of rupture, etc.) lead to short breaks in the reinforcement and finishing layer.
Finish coating
The final stage of work on creating a “wet” facade was the application of decorative plaster,
what were polypropylene graters used for? Which composition should I choose for the finishing coat - one that gives a smooth or rough surface? Experts recommend choosing the second option. This is due to the fact that the reinforcing layer is quite thin, and small differences cannot be eliminated with its help. As a result, with side lighting, all the irregularities of the wall plastered with a smooth compound are visible. If, in the architectural plan, the building has many elements that break up the plane of the facade (canopies, balconies, etc.), in this case the use of smooth plaster is acceptable. But on a large free surface at a certain lighting angle, the flaws will be noticeable.
When choosing decorative plaster with a rough texture, you should take into account that over time it becomes clogged with dust.
If the house is located near the road, then this is a critical factor. In this case, it is better to line the first floor with porcelain stoneware, which can withstand cleaning well. However, the decorative plaster used on the facades of this building can be easily washed with water with slightly alkaline compounds dissolved in it.
Many customers want to see their homes bright. But it should be remembered that such paints use synthetic dyes that are susceptible to fading. Only natural pigments are persistent, but they usually produce pastel, discreet colors.
Stage 2. Installation of conventional mineral wool slabs
Installation of thermal insulation boards consists of three steps:
- Applying an adhesive layer. For this purpose, special compositions for mineral wool slabs are used.
- Installation of the thermal insulation layer with glue.
- Additional fixation of insulation on dowels with a metal rod. Their number is determined by the design documentation of the building.
Step 1. Applying an adhesive layer.
Prepare the adhesive solution. To do this, you need to dilute the dry mixture with water, as indicated on the package. Mix the composition with a drill fitted with a special attachment for this task. The solution should have a uniform consistency, without lumps.
Step 2. Installation of the thermal insulation layer with glue.
Apply the adhesive solution along the perimeter of the working surface of the heat-insulating slab with a trowel, strips about 5 cm wide. In the middle of the slab, make 3 “cakes” with a diameter of approximately 8 cm.
Place the slabs horizontally on the wall, starting from the bottom. They should be pressed close to each other. Check the evenness of the installation using a building level.
When installing slabs around openings, align the slabs along the pre-installed adjacent profile. Plates with an “L” shaped cutout provide good crack resistance at installation sites.
Step 3. Installation of anchors
If the weather outside is warm, there is no wind or rain, then you can start installing anchors after 3 days.
First you need to check the slabs with the level again. If there are protruding joints, go over with an abrasive float, not forgetting to put a protective mask on your face. This is necessary so that small particles do not enter the respiratory system during operation.
Brush off any dust that has formed on the surface.
Install disc dowels with a steel core (approximately 6 pieces per sq. m). Make sure they do not protrude from the slabs.
How to check the quality of work performed
When checking the quality of work, it is necessary to determine the following points:
- to what extent and with what quality the foundation preparation was carried out;
- whether the standards for applying the adhesive composition to the insulation are met;
- how smoothly and neatly the insulation is glued;
- how tightly the mineral slabs fit together;
- do the fasteners protrude above the insulation;
- how well the reinforcing mesh is laid;
- whether the layer of plaster crumbles after application;
- are there any protruding irregularities throughout the entire area of the façade;
- are there cracks on the facade of the building itself, as well as in the corners of door and window structures;
- Is the façade properly protected from precipitation from window sills and roof ebbs?
If all norms, rules, instructions for choosing materials and performing work have been followed, the “wet facade” will effectively save heat and will serve faithfully for many years.
Common installation mistakes
What is a wet façade?
Correct design of the facade plays a very important role.
Not all home owners understand what the concept of “wet facade” means. In this situation, it is customary to use liquid or semi-liquid adhesive solutions for finishing the facade. Due to this, dew points will not appear in the future. In the case of using a wet facade, moisture is removed outside, rather than gradually penetrating into the ceilings, which leads to their destruction.
What is included in the system list
In order to properly arrange a high-quality wet facade, it is necessary to make a “pie”. It consists of several layers, without which a high-quality and reliable coating will not be obtained. The basis in this situation will be the facade wall, which can be made from a variety of materials. The main requirement is that the base must be perfectly flat. If there are various kinds of defects on the wall, this will lead to air circulation between the ceiling and the insulation. Because of this, it will not be possible to achieve the required insulation level in the room.
Next, a reinforced layer is installed, which contains reinforcing stack and mineral glue. Then a layer of decorative plaster is applied or special facade paint is used. Light weight façade slabs can be used as finishing material.
It is very important that the “pie” of a wet facade does not allow moisture to pass through. Therefore, finishing materials should be chosen so that each layer is more vapor-permeable from the inside than the previous one.
It is very important that there are no cracks or crevices in the finish through which heat can escape from the premises.
Pros and cons of technology
- A wet façade can combine a thermal insulation and decorative function. Due to this, you can save money and time on carrying out certain work on finishing the facade.
- A wet facade is ideal in situations where the building has very thin or very light walls. Such a system will not only improve the appearance of the building, but also make it warmer and more comfortable.
- A wet facade allows you to save on heating, because the house will not require additional heating even in the most severe frost.
- Wet façade technology can be used for buildings with a wide variety of foundation options.
- The technology helps provide a building with an additional level of sound insulation.
- A wet facade allows you to increase the service life of the building several times, because this type of finishing provides an additional level of protection from the negative effects of the environment.
- Such an interesting design will make the building not only visually attractive, but also more neat.
- Over time, salt-type stains, which are quite difficult to remove, will not appear on a wet facade.
- This type of floor is not very heavy, so there is no need to further strengthen the foundation.
- Professionals say that a wet facade will cost home owners several times less than other analogues.
Today, wet facades are done by absolutely all home owners who want not only to improve the condition of the building, but also to increase its service life. But it is worth remembering that this finishing option, like all others, has certain disadvantages. The main ones include the following.
- You can make a wet facade only when the air temperature exceeds 5 degrees. Otherwise, all materials will be unusable even during application.
- Work cannot be carried out if it is raining even slightly. It is also worth refusing installation during wet weather.
- Installation work must be carried out as efficiently and carefully as possible. Absolutely all materials used for a wet facade must fit tightly to each other.
- If a wet façade is constantly exposed to direct sunlight, this may cause the floor materials to dry out. As a result, the service life may be significantly reduced.
- The plastered base must be protected from the wind so that dust or dirt does not stick to the coating, which will negatively affect the appearance of the finish.
If everything is done correctly, these shortcomings can be easily eliminated or avoided.
Practical recommendations
If the base is insulated, then you need to adhere to the recommended technologies to the maximum extent possible. The surface of the base must be plastered and impregnated several times with a waterproofing solution before gluing the slabs. The fact is that concrete absorbs a lot of moisture, it will get on the glue. And polystyrene foam eliminates the possibility of evaporation, water accumulates under it, expands during freezing and the slabs will fall off, they will only be held on by dowels. If the base is then covered with rather heavy finishing materials, then with their weight they deform the foam plates. At best, the surfaces will become uneven; at worst, you will have to remove materials and repeat the insulation of the house from the beginning.
Base finishing, diagram
In the absence of experience in performing such work, it is difficult to know whether the foam is securely glued. We recommend doing a test gluing. Apply the solution around the perimeter and in the center, place the sheet against the façade wall and level its position. Immediately remove the foam and look at the glue marks on the wall. They must be uniform over the entire area, and the total area must be at least 40% of the sheet size. Such a simple test will make it possible to further focus on the amount and location of glue application. In addition, you will feel how hard you should press the foam sheet against the façade wall.
Testing, samples
Samples were torn from the wall, the result allows us to judge the quantity and quality of the glue
High-quality glued polystyrene foam is difficult to tear off from the wall
Always start installing a row from a corner and from the whole slab. If a whole slab does not fit at the opposite corner, then it must be cut to size and used second to last, and the last one must be intact. As a last resort, the area where the foam is glued should be twice the area of the part protruding beyond the corner of the house. Do not forget that the slab should protrude beyond the corner of the building by its thickness; in this place, the insulation from the two walls should overlap. It’s better to make a protrusion with a reserve, the excess will be cut off later. The solution should not get on the protruding part of the slab. The next rows of polystyrene foam are installed on top of the previous ones in gearing. The tighter they fit, the more secure the fastening. The outer corners have the greatest load, and you can’t protect yourself with dowels, remember this and carefully carry out all operations. The slabs on the wall must be placed staggered; vertical seams on the wall must not overlap.
Checker board installation diagram
Check the position of the first row especially carefully; it is this that sets the level for the entire wall. It is recommended to lay subsequent rows only after the glue on the first one has completely cured and fixed it with dowels.
Layout of dowels for fastening foam boards
Do not allow glue to get into the joints between the boards. Why? Cement mixtures have high thermal conductivity and form cold bridges. They will become noticeable on the façade walls in the form of wet stripes. There are cases when such imperfections cannot be hidden even with decorative plaster. The stripes are not permanent and appear or disappear depending on climatic conditions.
The main task of the reinforcing mesh is to protect the foam from mechanical damage. Experienced builders know that it is impossible to clean foam from dried high-quality glue without damaging the surface. This means that the role of the mesh in holding the plaster is minimal. If the mass falls off, repairs cannot be avoided anyway; the plaster will sag on the mesh. Hence the conclusion - reinforcement must be done in those areas of the facade wall that can be damaged by mechanical forces, as a rule, no higher than 1.5 m from the base. Everything above is at your personal discretion.
Reinforcing mesh
You can cut foam boards with a fine-toothed hacksaw. But this is not the best option. A much smoother cut is obtained after cutting with heated nichrome wire. It can be bought in specialized stores; the length of the wire depends on the diameter. Stretch the wire in a convenient place and connect to the outlet. Uneven cut edges after a hacksaw can be smoothed with a special grater.
How to cut foam
Foam cutting knife
Video - Device for cutting polystyrene foam
Extruded polystyrene foam has very low adhesion to adhesives. Before use, be sure to scrape it on both sides with a grater until shallow grooves appear.
Video - Preparing polystyrene foam for gluing
Do not use this material as the main thermal insulation; it can only be used to finish the base. And then only in cases where the finishing of these surfaces is done with heavy materials.
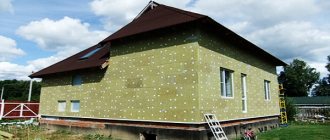
The exterior of the house was created using wet facade technology
Pros and cons of “wet” facades
Let's start with the shortcomings. Insulation of building facades according to the technology under consideration requires a serious approach in terms of compliance with the requirements regarding ambient temperature and humidity during the installation period. It is imperative that all work is carried out at a temperature of +5°C and above, with low humidity levels. Failure to comply with this rule can subsequently lead to rather sad results, such as peeling of the plaster.
It should be noted that the construction of a wet-type façade is also possible at sub-zero temperatures. To do this, the facade itself is first covered with a special polyethylene film, and then they begin to inject an air layer under it using heat guns. Using film also helps protect walls from dust and dirt, which can leave a permanent mark on a dried facade. Thus, thanks to this simple technique, favorable conditions for work are achieved.
Wet façade technology
But, despite all the existing limitations, “wet” type facade systems have many advantages:
- Guarantees a high level of noise and heat insulation of the house.
- Allows you to save energy resources in winter by approximately 2 times. In addition, it significantly increases the efficiency of air conditioning systems in the summer.
- Allows you to shift the “dew point” to the outside of the building, which helps to achieve the most optimal heat transfer and avoid moisture accumulation inside the thermal insulation layer.
- Promotes the formation of a balanced indoor microclimate thanks to the ventilated external façade finishing. This has a beneficial effect on the health of people living in the house, prevents the proliferation of pathogenic microorganisms and the appearance of fungal formations on the walls.
- Reliably protects the facade and load-bearing elements of the building structure from the negative influence of weather conditions.
- A “wet façade” can be installed on buildings with any type of main building material.
- Using this technology, it is possible to seal seams in panel houses.
- Installation of a “wet” type facade requires lower financial costs and allows significant savings on construction work.
- Thanks to a wide range of color and texture solutions, the use of this technique allows you to implement a wide variety of design projects. And the use of modern technologies for applying finishing decorative plasters makes it possible to obtain truly unique and aesthetically exclusive results.
- “Wet” finishing is easy to complete or partial renewal, repair and restoration. After many years, you can easily patch up the facade in those places where it is necessary.
- This type of installation significantly reduces the load on the foundation.
Vapor barrier and waterproofing
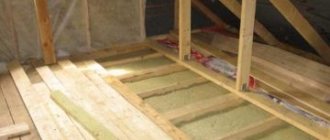
Hydro- and vapor barrier membranes are installed for external insulation of frame houses, as well as buildings made of timber and brick when using ventilated facades.
Protective films are laid under siding, lining, block house and other types of external cladding.
Special membranes reliably repel water and condensation, but allow air to pass through, so the walls can “breathe”.
The need for a vapor barrier when insulating with mineral wool is a rather difficult question, the answer to which is divided among experts.
Some say that the feasibility of using a vapor barrier material is determined by calculating by finding the condensation plane (the place where condensation falls).
Others simply suggest looking at the indoor humidity levels. If it is normal, a vapor barrier is not needed. If the house does not have a dry microclimate or is located in a humid climate zone (and people live in it all year round), then vapor barrier protection is necessary.
This material is mounted directly on the wall, in front of the insulation.
As for waterproofing, when using siding (and analogues) or the “ventilated facade” system, a protective membrane is needed in any case . This material protects the mineral wool from moisture that penetrates from the outside. The waterproof membrane is mounted on top of the insulation and secured with dowel nails.
Wet facade
Ventilated facade