I have already written about wet façade technology 3 times, after I experienced the work of insulating a house using the VWS (expanded polystyrene) system by one Astrakhan specialist “from a company” with a Ceresit certificate. I had to delve into it so as not to ruin the sowing season from the word “completely.” To make it easier to find information, below is a list of posts with an analysis of wet facade technology:
- what kind of insulation to use for a wet facade, polystyrene foam or mineral wool, what reinforcing mesh to choose, etc., you can read about all this HERE (Wet facade for the lazy);
- what thickness of insulation to choose, 50 or 100mm, read HERE (What thickness of insulation to choose);
- how to perform a smooth finish on a wet facade, read HERE (Smooth finish);
- download instructions for a wet façade for printing, and the organization standard (STO) HERE;
Since there is never too much good information, and even more so for work that is sensitive to adherence to technology, which is the wet facade insulation technology. I decided that spreading good information would benefit everyone. Moreover, the author does not mind.
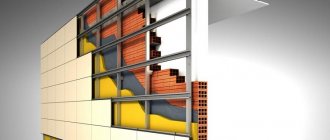
General appearance, wet facade using the VWS Ceresit system / (c) Ceresit
I highlighted some points to draw your attention. Critical information is highlighted in red. Yellow requires attention, blue is of general importance.
Regulations for insulation work and finishing of facades using the Ceresit system
Let us outline the main stages of work:
- Installation of scaffolding.
- Preparing walls for gluing insulation, treating with antifungal agents and primers.
- Hanging the facade with laces, determining the actual thickness of the insulation in different areas of the facade. Installation of a temporary starting profile to begin gluing the insulation.
- Installation of adjoining elements on blocks of window and door openings.
- Gluing the insulation with simultaneous alignment of the facade planes using Ceresit polymer cement or polyurethane adhesive.
- Caulking the cracks between sheets of insulation with strips of insulation, foaming the seams between sheets of expanded polystyrene with high-quality polystyrene foam.
- Sanding the insulation planes according to the 3-meter rule.
- Installation of dowels.
- Installation of diagonal and internal gussets, corners, droppers using Ceresit polymer cement glue.
- Installation of a base reinforcing layer on the main planes of the facade using Ceresit polymer cement glue and facade fiberglass mesh.
- Application of quartz primer Ceresit ST 16.
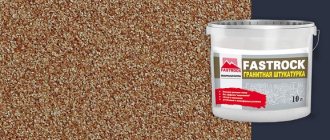
- Application of Ceresit decorative plaster.
- Dismantling of scaffolding.
Possible errors when performing work
Most often, beginners make the following mistakes that reduce the quality of their work:
- weak fixation of insulation - causes cracks, detachment and deformation;
- poor preparation of the walls - causes a decrease in adhesion, sliding of the insulation and even a shift in the dew point;
- installation in unsuitable climatic conditions - leads to a reduction in service life;
- loose joining of insulation boards, small overlap of the mesh - provoke cracking of the finish;
- improper treatment of window slopes - allows moisture penetration;
- choosing low-quality plaster is a prerequisite for rapid deterioration of the entire finishing layer.
In order for the home insulation system to serve for a long time and actually cope with the main tasks, it is important to strictly follow the technology and not skimp on materials. Then the house will become beautiful, comfortable and reliable, and will not require repairs for decades!
Installation of scaffolding
Before starting work, it is necessary to properly install the scaffolding.
Scaffolding should be installed at a distance from the outer wall equal to the thickness of the insulation plus 45 cm.
To anchor scaffolding, it is necessary to effectively use balcony slabs and other structures that reduce the number of attachment points passing through the thermal insulation system being installed. In areas where scaffolding must be directly attached to an external wall, the anchor anchors should be installed with a slight downward slope. This will prevent rainwater from entering the insulating layer. For ease of installation of thermal insulation systems, scaffolding should be installed around the corners of the building at a distance of at least 2 m.
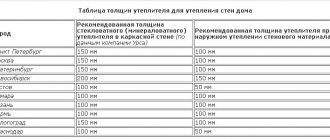
Calculation of material thickness
This point will be an important stage of work. Before you insulate the walls, you will need to determine the thickness of the insulation. It is important to know that the value for a wooden facade and a brick one will be different. This is due to the fact that wood retains heat better. The indicator also depends on the climatic region of construction and the purpose of the building.
| City | Recommended insulation thickness for external insulation, mm |
| Saint Petersburg | 100 |
| Moscow | 100 |
| Ekaterinburg | 100 |
| Novosibirsk | 150 |
| Rostov | 50 |
| Samara | 100 |
| Kazan | 100 |
| Permian | 100 |
| Volgograd | 100 |
| Krasnodar | 50 |
The calculation can be done in three ways:
- according to formulas from the joint venture “Thermal protection of buildings”;
- using the Teremok program;
- using various online calculators. The best option would be the Teremok program. It allows you to make accurate calculations and is easy to use. There is both an online version and a PC application.
Preparing walls for gluing insulation, treating with antifungal agents and primers
Preparation of the construction foundation should include the following operations:
- mechanical cleaning of the base from mortar residues, contaminants (dust, chalk, etc.)
- mechanical removal of fungi, lichens, mosses, blue-green algae, mold and subsequent treatment of the affected areas with the antifungal agent Ceresit CT99, work performed in accordance with the work schedule indicated on the Ceresit CT 99 can;
Ceresit CT 99. Antifungal agent (concentrate for protection against biocorrosion) (c) Ceresit
- checking the bearing capacity of the foundation;
- removal of crumbling and weak areas of the base;
- filling defects in the base surface more than 10 mm deep with repair plaster Ceresit CT 24, Ceresit CT 29;
- Ceresit CT 29. Plaster and repair putty for interior and exterior work (layer thickness from 2 to 20 mm) (c) Ceresit
- Ceresit CT 24. Plaster for cellular concrete (layer thickness 3-30 mm) (c) Ceresit
- treating the base with the universal primer Ceresit CT 17 (when working with cellular concrete, silicate and red bricks, multi-slot blocks, expanded clay concrete and other bases, priming should be done with a primer diluted with water in three passes 1x6, 1x4, 1x2, application with a sprayer and spray gun);
Ceresit CT 17. Deep penetration primer (c) Ceresit Priming the facade with CT 17 primer using a paint brush
- Priming the façade with CT 17 primer using a garden sprayer
- Handheld Garden Sprayer
- mechanical application of primer using a machine:
Mechanical application of Ceresit CT 16 primer.
- cleaning of rust and treatment with anti-corrosion primer of metal parts covered with a thermal insulation system;
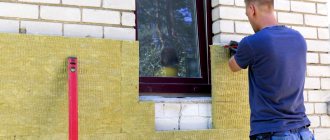
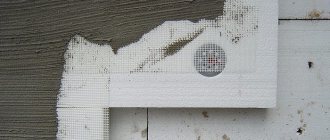
Installation of abutment elements on blocks of window and door openings
During insulation, the insulation should extend onto the window frame by at least 15-20 mm to prevent a cold bridge. The abutment element with the mesh is glued to the window frame on three sides, top, right and left.
- Installation of adjoining elements on blocks of window and door openings. Photo 1.
- Installation of adjoining elements on blocks of window and door openings. Photo 2.
- Installation of adjoining elements on blocks of window and door openings. Photo 6.
- Installation of adjoining elements on blocks of window and door openings. Photo 3.
- Installation of adjoining elements on blocks of window and door openings. Photo 4.
- Installation of adjoining elements on blocks of window and door openings. Photo 5.
Sanding the insulation planes according to the three-meter rule
Sanding is done using a plywood grater measuring 400 x 600 mm, 500 x 700 mm with sandpaper glued to it with a coarse grain of 100 microns (1 mm). This sanding allows you to smooth out small irregularities that occurred when gluing the insulation due to initial deviations in the geometry of the glued sheets and due to errors during gluing. Small graters should absolutely not be used on large surfaces, since small graters create unevenness and depressions when sanding.
- Sanding polystyrene foam with graters. Photo 1.
- Sanding polystyrene foam with graters. Photo 2.
Video of sanding planes under the three-meter rule. Video of the final alignment of the facade.
Insulation functions
In practical terms, warm walls have only two functions:
- Protective - protects walls from humidity, heat, light, temperature changes, even in the event of mechanical damage; it is easier to replace part of the insulating material and siding than to repair a load-bearing wall.
- Thermal insulation – high-quality thermal insulation creates an internal climate of the building that is practically independent of the external environment, and this rule remains relevant both in summer and winter.
To obtain results that meet expectations, it is recommended to apply and use only those materials whose production technology complies with GOST.
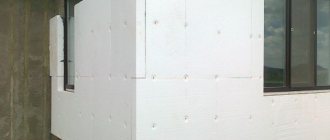
Installation of dowels
Dowels additionally secure the insulation sheets to the facade; they are installed either in accordance with the official recommendations of the system holders, two in the middle of the slab and the rest at the joints of the slab with neighboring slabs.
Installation of dowels according to the diagram. Photo 1.
Or one “star” in the middle and four dowels in the body of the insulation closer to the edges:
- Installation of dowels according to the diagram. Photo 2.
- Installation of dowels according to the diagram. Photo 3.
- Installation of dowels according to the diagram. The “correct” dowel with a metal core. Photo 6.
- Installation of dowels according to the diagram. Photo 4.
- Installation of dowels according to the diagram. Photo 5.
- Installation of dowels according to the diagram. The “correct” dowel with a metal core. Photo 7.
If the insulated wall is made of monolithic reinforced concrete, solid brick, expanded clay concrete, then the expansion zone of the dowel should be 50 mm, the total length of the dowel is approximately the thickness of the insulation + 50 mm.
If the insulated wall is made of foam concrete, aerated concrete, slotted brick, multi-slotted blocks, warm ceramics, then the spacer zone is 100 mm, the total length of the dowel is approximately the thickness of the insulation +100 mm.
The top of the dowels must be carefully covered with CeresitST 85 or ST 190 glue; the coating is done after the final sanding of the surfaces to the three-meter rule.
Video installation of dowels.
Briefly about the main thing
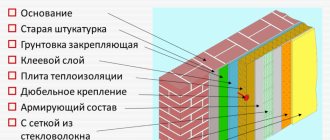
The wet facade is a multi-layer external cladding of a house without a ventilation gap, which includes the following structures:
- Glue.
- Insulation.
- Reinforcing mesh.
- Plaster.
- Finishing.
Among its main advantages are:
- Good indicators of heat, wind, moisture, noise insulation.
- Ease.
- Durability.
- Resistance to external factors.
- High aesthetic qualities.
Disadvantages include the need to strictly adhere to installation requirements - temperature, humidity and weather conditions
During installation, it is important to consistently carry out the stages of the technology. Therefore, it is better to entrust the procedure to a professional team.
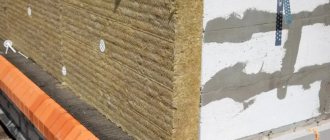
Installation of a base reinforcing layer on the main planes of the facade.
The base reinforcing layer is made using polymer cement adhesive Ceresit CT 85, Ceresit CT 190 and facade fiberglass mesh 165 g/m2, cell size 5 x 5 mm.
Breaking load of the mesh, not less than 2000 N/5 cm
Which manufacturers and brands of mesh are suitable can be read here:
After installing the gussets, a base reinforcing layer is installed on the main planes. CeresitCT 85 glue is applied to the surface of polystyrene foam with a metal float, a facade fiberglass mesh is applied, then it is embedded in the glue, the excess is removed into a bucket. The minimum overlap of roll on roll is 100 mm, rolls are installed vertically.
- Creation of a base reinforcing layer. Photo 1.
- Creation of a base reinforcing layer. Photo 2.
- Creation of a base reinforcing layer. Photo 3.
After drying, re-stretching and puttying is done, this is done in order to level out the unevenness and hide the mesh in a layer of Ceresit ST 85 glue.
The installation of a base reinforcing layer with a mineral wool slab is carried out similarly.
Before work, we re-inspect the mineral wool surface for the presence of “corks” - inclusions of pieces of metal and droplets of binder. All “kings” must be removed. If there are large beads, sections of the mineral wool slab are cut out and replaced with new ones.
After this, we proceed to priming the mineral wool board with Ceresit CT 190 cement glue. The surface of the mineral wool board is primed with Ceresit CT 190 glue, apply the glue with a metal float, press it into the structure of the mineral wool, remove the excess by scraping off. Afterwards, we wait for the glue to dry completely and inspect the surface. In some places where the mineral wool slab turned out to be inhomogeneous, we will see the primer layer blistering; it moves away from the base, clinging to inhomogeneous mineral wool fibers. In these areas, we remove the heterogeneity and repeat the operation - again let the primer layer dry completely, and if necessary, repeat again.
WE MUST OBTAIN A HOMOGENEOUS MINERAL WOOL SURFACE COATED WITH A THIN LAYER OF GLUE WITHOUT BUBBLES AND LAMPS WITH DEVIATIONS OF 4-6 MM FOR A RULE OF THREE METERS
Next, a base reinforcing layer is made. CeresitCT 190 glue is applied to the glue-primed surface and a façade fiberglass mesh is embedded into it. The overlap of roll on roll is at least 100 mm. There are corresponding marks on the rolls of Facade fiberglass mesh that make it easy to track this.
The overlap of the fiberglass mesh can be more than 100 mm, but cannot be less!
After drying, the base is re-upholstered with liquid glue to remove minor irregularities and completely hide the texture of the fiberglass mesh.
Application of quartz primer Ceresit ST 16
When the base reinforcing layer has completely dried, at least 72 hours after the last re-upholstery, you can begin applying the Ceresit ST 16 quartz primer. The Ceresit ST 16 primer is applied with a paint brush, a wide brush, or a flute. The primer can be white, not a tinted base, or it can be painted to match the color of the future Ceresit decorative plaster.
- Applying Ceresit CT 16 primer with a brush. Photo 1.
- Applying Ceresit CT 16 primer with a brush. Photo 2.
Application of decorative plaster Ceresit
Ceresit decorative plaster is applied with a metal plaster and rubbed with a plastic float. This applies to decorative plasters with bark beetle textures CeresitCT 64, CeresitCT 63, CeresitCT 175, Ceresit CT 35 and pebble textures Ceresit CT 60, Ceresit CT 174, Ceresit CT 137.
- Application of Ceresit decorative plaster. Photo 1.
- Application of Ceresit decorative plaster. Photo 2.
- Application of Ceresit decorative plaster. Photo 3.
- Application of Ceresit decorative plaster. Photo 4.
- Application of Ceresit decorative plaster. Photo 5.
- Application of Ceresit decorative plaster. Photo 6.
- Application of Ceresit decorative plaster. Photo 7.
Stone decorative plaster of the textures Ceresit CT 60, Ceresit CT 174, Ceresit CT 137 can be applied to decorative elements by spraying using a spray gun, or manually.
- Mechanical application of Ceresit stone decorative plaster. Photo 1.
- Mechanical application of Ceresit stone decorative plaster. Photo 2.
- Mechanical application of Ceresit stone decorative plaster. Photo 3.
Practical recommendations
If the base is insulated, then you need to adhere to the recommended technologies to the maximum extent possible. The surface of the base must be plastered and impregnated several times with a waterproofing solution before gluing the slabs. The fact is that concrete absorbs a lot of moisture, it will get on the glue. And polystyrene foam eliminates the possibility of evaporation, water accumulates under it, expands during freezing and the slabs will fall off, they will only be held on by dowels. If the base is then covered with rather heavy finishing materials, then with their weight they deform the foam plates. At best, the surfaces will become uneven; at worst, you will have to remove materials and repeat the insulation of the house from the beginning.
Base finishing, diagram
In the absence of experience in performing such work, it is difficult to know whether the foam is securely glued. We recommend doing a test gluing. Apply the solution around the perimeter and in the center, place the sheet against the façade wall and level its position. Immediately remove the foam and look at the glue marks on the wall. They must be uniform over the entire area, and the total area must be at least 40% of the sheet size. Such a simple test will make it possible to further focus on the amount and location of glue application. In addition, you will feel how hard you should press the foam sheet against the façade wall.
Testing, samples
Samples were torn from the wall, the result allows us to judge the quantity and quality of the glue
High-quality glued polystyrene foam is difficult to tear off from the wall
Always start installing a row from a corner and from the whole slab. If a whole slab does not fit at the opposite corner, then it must be cut to size and used second to last, and the last one must be intact. As a last resort, the area where the foam is glued should be twice the area of the part protruding beyond the corner of the house. Do not forget that the slab should protrude beyond the corner of the building by its thickness; in this place, the insulation from the two walls should overlap. It’s better to make a protrusion with a reserve, the excess will be cut off later. The solution should not get on the protruding part of the slab. The next rows of polystyrene foam are installed on top of the previous ones in gearing. The tighter they fit, the more secure the fastening. The outer corners have the greatest load, and you can’t protect yourself with dowels, remember this and carefully carry out all operations. The slabs on the wall must be placed staggered; vertical seams on the wall must not overlap.
Checker board installation diagram
Check the position of the first row especially carefully; it is this that sets the level for the entire wall. It is recommended to lay subsequent rows only after the glue on the first one has completely cured and fixed it with dowels.
Layout of dowels for fastening foam boards
Do not allow glue to get into the joints between the boards. Why? Cement mixtures have high thermal conductivity and form cold bridges. They will become noticeable on the façade walls in the form of wet stripes. There are cases when such imperfections cannot be hidden even with decorative plaster. The stripes are not permanent and appear or disappear depending on climatic conditions.
The main task of the reinforcing mesh is to protect the foam from mechanical damage. Experienced builders know that it is impossible to clean foam from dried high-quality glue without damaging the surface. This means that the role of the mesh in holding the plaster is minimal. If the mass falls off, repairs cannot be avoided anyway; the plaster will sag on the mesh. Hence the conclusion - reinforcement must be done in those areas of the facade wall that can be damaged by mechanical forces, as a rule, no higher than 1.5 m from the base. Everything above is at your personal discretion.
Reinforcing mesh
You can cut foam boards with a fine-toothed hacksaw. But this is not the best option. A much smoother cut is obtained after cutting with heated nichrome wire. It can be bought in specialized stores; the length of the wire depends on the diameter. Stretch the wire in a convenient place and connect to the outlet. Uneven cut edges after a hacksaw can be smoothed with a special grater.
How to cut foam
Foam cutting knife
Video - Device for cutting polystyrene foam
Extruded polystyrene foam has very low adhesion to adhesives. Before use, be sure to scrape it on both sides with a grater until shallow grooves appear.
Video - Preparing polystyrene foam for gluing
Do not use this material as the main thermal insulation; it can only be used to finish the base. And then only in cases where the finishing of these surfaces is done with heavy materials.
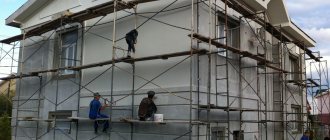
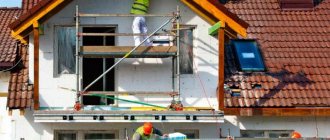
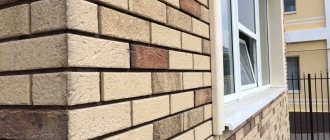
The exterior of the house was created using wet facade technology
The final appearance of houses insulated using VWS/WM technology (wet facade) Ceresit
As a result, we get beautiful, reliable Ceresit facades that are warm, economical and comfortable to live in at home.
- Appearance of the finished facade using the VWS/WM Ceresit system. Photo 1.
- Appearance of the finished facade using the VWS/WM Ceresit system. Photo 2.
- Appearance of the finished facade using the VWS/WM Ceresit system. Photo 3.
- Appearance of the finished facade using the VWS/WM Ceresit system. Photo 4.
- Appearance of the finished facade using the VWS/WM Ceresit system. Photo 5.
- Appearance of the finished facade using the VWS/WM Ceresit system. Photo 6.
- Appearance of the finished facade using the VWS/WM Ceresit system. Photo 7.
The article is based on materials from ForumHouse user with the nickname Reliable. Perhaps someone will say that he lobbies the interests of Ceresit and sells their goods. Firstly, following technology and selling quality goods is not a sin; secondly, the technology will be almost 1-in-1 for any wet facade system, be it Kraisel or something else.
Thanks to the author of the original publication for permission to use a wealth of practical information. The original can be seen here: https://www.ceresit.msk.ru/index.php/fasadnye-sistemy/eifs1/reglament-rabot-po-utepleniyu-fasadov-ceresit
Article rating
Pros and cons of technology
This technique has many advantages. The main ones are the actual insulation of the building and increasing the comfort of living in it.
In the cold season, walls with insulation are not blown through, do not freeze, and all cold bridges, which are usually “guilty” of significant heat loss, are eliminated. The temperature inside the room, thanks to the presence of insulation, will be distributed evenly.
The heat capacity of the walls will increase - they will begin to accumulate heat and retain it for a long time, slowly releasing it into the building. In hot weather, excessive heating of the structures is excluded, while the microclimate inside will remain comfortable even in damp weather.
Positive properties of walls with insulation using the wet facade method:
- there is no reduction in the usable area of the home, since the system is based outside;
- the sound insulation of the building is improved;
- financial expenses for heating are reduced;
- the operational life of the building increases;
- it is possible to use the technology for new buildings and old houses, for multi-storey/apartment and private buildings;
- you can carry out insulation at any stage of operation of the house, because for this you do not need to strengthen the foundation (the weight of the structure will be insignificant);
- low cost of all finishing components, materials are available and sold everywhere;
- limitless possibilities for decorating your home, you can implement the most daring design solutions;
- It’s quite possible to do all the work yourself, since the technology is not particularly difficult (with the exception of finishing multi-story buildings).
The wet facade technique also has disadvantages:
- when performing work, you will have to strictly observe a certain temperature regime, otherwise the efficiency of the insulation will decrease;
- if the ambient temperature and humidity are unsuitable, the glue will not dry evenly;
- you need to work in a short time, while protecting the facade with unfinished finishing, since the insulation is negatively affected by precipitation, ultraviolet radiation, and dirt.