In rural areas, wooden houses are in most cases built without a design. The owners independently decide how many floors there will be in the new building and their area. There is only one problem: how to heat. No one has canceled winter. Russian stoves have gone into oblivion - there is no suitable brick, the craftsmen have disappeared, and it is not prestigious. The only thing that can be installed is a fireplace. But they won’t heat the house.
What remains is a water boiler running on solid or liquid fuel, natural gas or electricity - heating is carried out by converting electrical energy into heat. At the same time, the water boiler can be used for traditional heating, using batteries, and progressive, using pipes with a liquid coolant running through the floor pie. Everyone knows about heating homes with batteries. Few owners talk about a “warm floor” in a wooden house.
The editors of the StroyGuru portal decided to fill the knowledge gap and prepared an article on how to make a heated floor in a wooden house.
How to make heated floors in a wooden house, design and installation options
Warm floors are an invention of the 20th century. Our great-grandfathers did not have electric heating cables or gas boilers. However, they came up with their own heating method. To do this they used the walls of buildings. When making masonry, they left channels in them for the movement of hot furnace gases.
Today there is no need to resort to such tricks. You can make heated floors in a wooden house with minimal effort and money.
Choosing a heating heating system is very simple:
- Electrical cable or mats with flat current-carrying conductors;
- Warm floor based on plastic pipes with liquid coolant.
Both heating options have earned positive reviews. They are equivalent in comfort and heat transfer, but not the same in energy cost. Electricity is significantly more expensive than gas, so heating cables for heated floors are best used in small spaces: bathrooms, kitchens and hallways. A liquid system made of pipes, a gas or solid fuel boiler is optimal for bedrooms and living rooms.
A lot has been written and said about the fact that heated floors are better than radiators.
We will only note its most important advantages:
- Optimal heat distribution. The comfortable temperature zone coincides with the living space (from the floor surface to a height of 1.7 meters). When the batteries are running, the air near the ceiling warms up the most.
- A radiator heating system activates dust movement to a greater extent than a warm floor.
- From the point of view of interior aesthetics, heated floors are superior to radiators.
Advantages of an underfloor heating system
Advantages of an underfloor heating system
Traditional heating devices are not able to provide uniform heating of the air in the room; they create convection heat flows in the room that rush from the floor to the ceiling and back. In this case, the main heat goes to the ceiling, where it remains. Already cooled air comes down, and when it reaches the floor, its temperature is far from comfortable.
The main advantage of heated floors is that they distribute warm air evenly throughout the entire area of the room. The temperature difference between the ceiling and the floor is minimized, and the warmest air settles below.
Another important advantage of underfloor heating is the ability to adjust the temperature. For this purpose, the system has a thermostat; one turn of its handle allows you to set the desired temperature. Thanks to this function, the user, in addition to convenience, receives significant energy savings.
The pros and cons of each heating system will be discussed in more detail in the review. This will help you decide on the choice of heated floors for your home.
Warm floor and its installation in the house
The flooring in the house depends on the type of system chosen. If you plan to lay a single cable, not on a mat, then the laying diagram will be as follows:
- First of all, a layer of waterproofing and thermal insulation is laid. This is followed by the step of applying aluminum foil. These layers are required as a base for a single cable floor.
- Mark the locations of the furniture, as the cable should not get under their installation. This may cause the heating element to overheat.
- Next, you should cut special slots in the joists for the cable to pass through them. The grooves are treated with metal plates to avoid overheating of the joists and further smoldering of the base. It is also necessary to impregnate all wooden elements with a special fire-resistant lubricant.
- A metal mesh is attached to the bars, which will serve as the basis for laying the cable. It is attached to the mesh with special fasteners, usually included with the cable.
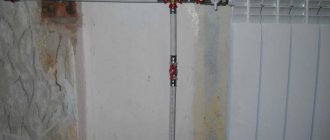
- The next step will be the output of the temperature control sensor. It is usually placed in a corrugated tube. The power cable is also routed out in the same way.
- After laying the heating cable, you should check the resistance of the current-carrying wires with a special device - a multimeter. After checking the equipment, you can begin laying the final floor covering.
When laying an electric floor, follow the safety rules for installing and operating heated floors.
Preparatory work - assessment of the condition of the ceiling, renovation, insulation
Before deciding which modification of heated floors is best suited for a particular wooden floor, it is necessary to make a correct assessment of its current condition, as well as the need for its renewal, replacement, repair and insulation. To do this, the following series of procedures are performed in relation to the main parts of the structure (boards, joists and other load-bearing elements):
- Visual inspection of the surface for defects.
- Feeling, scraping, drilling into the material to assess the condition of its structure.
- Replacement of elements with obvious damage - cracks, sagging, rot.
Laying heated floors requires careful preparation of the wooden base. Source sovet-ingenera.com
Is it possible to install such a system?
Despite what some experts say, installing such equipment is not only possible, but also an extremely reasonable decision. In order to properly install a heated floor in a private house, it is necessary to understand some of the features of its installation and the operational characteristics of the house itself, built of wood. For example, you should not heat the work surface to more than 30°C. This is due to the fact that wood does not tolerate high temperatures and their impact on it leads to deformation. Over time, such material will turn into dust and simply crumble.
No need for screed
Therefore, it is better to use heated floors not in combination with central heating, but with a separate heat source. Using a boiler means creating a “pie” of a heated floor, which will not allow the use of an additional layer of screed. In this case, the installation will have to be carried out dry, then running directly onto the beams and this is extremely inconvenient. In this case, completely different materials can act as floor coverings, such as:
- parquet board;
- laminate.
However, when such materials are heated to 25°C or higher, they begin to produce fumes containing formaldehyde.
Some manufacturers understand the need to use several heating circuits simultaneously. In this case, we are talking about different intensity of surface heating. They produce a series of boilers that allow similar connections of underfloor heating and heating radiators.
Installation procedure
Installing a warm water floor on a wooden floor with your own hands is practically no different from the structures used in other buildings. The exception is special safety measures necessary to protect wooden surfaces from moisture.
Practice has shown that the best option would be to use polypropylene pipes.
Installation work is carried out as follows:
- Floor design - it is with drawing up a diagram that the installation of the heating system begins. A hydraulic calculation is performed, the efficiency of the water circuit is calculated, and a decision is made to ensure an increase in heat transfer efficiency. Flooring designs are developed individually, or ready-made solutions are selected.
- The base is prepared - the floor is leveled with plywood. You can lay soft thermal insulation under the layer on the rough field. Correctly make reliable waterproofing. Traditionally, roll fused materials are used for this, but for better results, you can also apply a special waterproofing mastic in several layers.
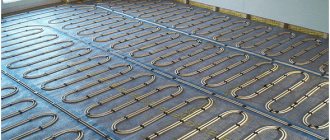
- Further actions depend on the choice of heating system. If you plan to pour a concrete screed, then a reinforcing layer must be laid. A water circuit is attached to the top of the mesh using clamps. The entire structure is filled with mortar. Filling of laid pipes is carried out exclusively with solutions intended for use with heated floors.
- If special mats are selected, installation on a wooden floor is carried out as follows. Polystyrene systems are laid on a leveled surface. The mats have ready-made recesses and latches for pipe installation, or grooves into which heat-reflecting plates are inserted. A water circuit spreads over the top.
- Floor covering - the efficiency of floor heating largely depends on the correct choice of finishing material. A sheet of fiberboard or plywood is laid on the mats. The remaining work is carried out depending on the choice of flooring.
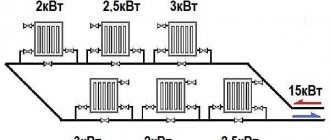
The maximum length of the water circuit should not exceed 70 m. If this is not enough for the heated area, so-called water floor laying areas are created. To ensure uniform supply to each heating circuit, a water manifold is installed.
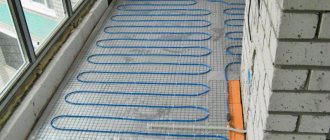
Wet method
- Waterproofing material is laid on the floorboards over the entire base area. It could even be a plastic film with a thickness of at least 0.2 mm. The waterproofing should rise up the walls, covering them to a height of 10-15 cm. If multi-strip insulation is used, the strips are laid overlapping with an offset of 10 cm, and the joints are covered with construction tape.
- Next, pipes are laid out along the floor according to the pattern you have chosen, which are attached to the wooden floor with special dowel clamps.
- Don't forget to lay damper tape around the entire perimeter of the room along the walls near the floor. It will restrain the pressure on the concrete screed wall as it expands under the influence of the temperature of the underfloor heating pipeline.
- The screed is poured. Its thickness varies from 5 to 7 cm, which depends on the loads to which the floor will be subjected.
Dry method
Pipe laying
This technology involves the use of materials that are completely water-free during installation. And these are slabs made from different bases. For example, plywood, gypsum fiber boards, chipboard (preferably moisture resistant), OSB boards and so on.
Essentially, the design should look like this:
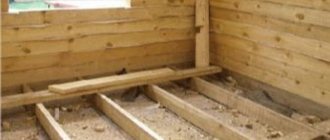
- Small logs are laid on a wooden base with short steps. By the way, the height of the log is determined by the diameter of the pipe used.
- A pipe structure is laid between them.
- Then the finished floor slabs are piled on top.
There are two more options:
- Along the boards laid on the logs, grooves are made for the pipes according to the required laying pattern. The heated floor itself is installed in them. Do not forget that in this case you will have to make structural elements in the boards that repeat the shape of the pipe. That is, bends, turns, etc. This installation method is the most difficult, so it is used very rarely.
- The second option is a new technology that contains special leveling elements. They already have grooves made at the factory. It can be both gypsum fiber board and chipboard. Today on the market you can buy polystyrene foam boards, only without grooves. Instead, bosses protrude on the surface, with the help of which the pipes of the “warm floor” heating system are clamped.
By the way, all elements with grooves are necessarily provided with special inserts made of aluminum alloy. In essence, this is a kind of screen with the help of which thermal energy is reflected towards the room.
Carbon rods and film
The coolant can be not only hot liquid or electricity, but also a carbon mixture. Carbon heaters are selected depending on the floor covering. Thermal film is suitable for a wooden topcoat. Carbon mats are preferable for tiles.
The mats are covered with concrete mortar or tile adhesive. The surface thickness is 4-5 cm. The rods are not afraid of “locking”. If one area overheats, the rest function normally. When the causes of overheating are eliminated, the system begins to operate fully.
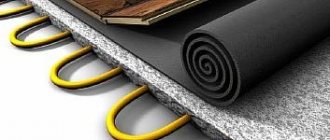
Thermal film is laid on the prepared concrete base. It is insulated and insulated with a substrate with a reflective screen. It will direct the infrared waves upward. It does not require screeds. Installation takes place in a short time. The system runs on electricity.
Varieties
Based on the type of energy resource used, heated floors that can be installed on wooden joists are divided into two types:
- Electrical.
The system is based on wired heating elements - cables and coatings. Their main advantages:
- Small dimensions and weight.
- Possibility of installation on any base, including old ones.
- Fast heating.
Film-type electric heated floor Source teplopol74.ru
See also: Catalog of companies that specialize in engineering systems (heating, water supply, sewerage and others) and related work
- Convenient selection of heating level - depending on the microclimatic requirements for a particular room.
- Microzoning - setting your own mode in each room.
- Service life with proper operation is at least 50 years.
However, the installation of electrical systems is associated with the risk of fire - with low-quality components, overheating, violation of operating conditions and other reasons, there is a high risk of a short circuit. In addition, with high power, such heating will consume quite a lot of electricity. You also need to make sure that the wiring can withstand the load created by the heating system.
- Mermen.
It is based on a pipeline network through which heated coolant circulates. The system is powered either from an individual heating boiler or from a centralized mains.
Water heated floors are more preferable from a fire safety point of view. However, they also have specific disadvantages. The first of these is the risk of leakage. Sooner or later, all connections leak, and the system piping is no exception. The second disadvantage is lower power than electric analogues.
Pipeline for water heated floor Source stroyvms.ru
Types of electric heated floors
If a water heated floor can be installed directly under a wooden floor, that is, under a plank floor, then an electric floor can only be installed under a coating made of relatively non-combustible materials. There are 3 main types of electric heating coatings of the type in question, each of which has its own power and type of finish:
- Heating cable. The operating power range varies between 120-180 W/m2. It is recommended to choose porcelain stoneware or ceramic slabs as the finishing coating.
- Mats. They are an analogue of the above modification, however, with the difference that the heating conductor is fixed on the substrate. Therefore, in addition to the power of the heater itself, products are characterized by the pitch of its location on the substrate. The best option for the final coating is ceramic or granite-based tiles.
- IR emitting film. The working surface of the material emits thermal energy on the principle of sunlight and heats surrounding objects. Its power varies widely - from 150 to 220 W per m2. Fits under parquet boards, linoleum and laminate.
Electric film heated floors are easy to install Source saucyintruder.org
Reference! Installation of a classic heated floor - with concreting in the screed - is also possible on a wooden floor. However, for this, wood structures need to be provided with reliable waterproofing with a ventilation gap and antiseptic protection, provided also that they are designed for the final weight of the poured concrete pad, equipment and finishing. It is recommended that the screed itself be made on the basis of ready-made mixtures with minimal setting time.
System design
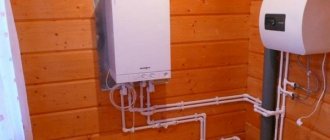
- A boiler used for heating. If the choice fell on water floors, then it is possible to use a solid fuel, electric or gas equipped boiler. They are practical and quite comfortable. Their use implies the absence of a constant supply of fuel, which is used in wood and solid fuel boilers.
- If you plan to create a truly warm house, then it is recommended to use combined systems that will allow you to heat both the radiators and the floor layer. Its temperature regime may differ, since the temperature in radiators can reach 60°C, but for wooden coverings the maximum is 30°C. If this condition is not met, the tree will crack quite quickly.
Types of pipes used
Metal-plastic and plastic pipes can be used to equip heated floors. Many plumbers have positively assessed cross-linked polypropylene pipes. They are characterized by a high degree of tightness, resistance to deformation and good thermal conductivity.
When choosing pipes for installing heated floors, carefully study their technical characteristics. In particular, pay attention to the suitability of the material for use in heating systems. Be careful, because some unscrupulous sellers may sell pipes intended for plumbing. As a result, the floor heating system will be ineffective. Therefore, pay attention to the markings on the pipes. Indicators that you should focus on when choosing pipes for installing heated floors:
- linear expansion (up to 0.025 mm/m);
- thermal conductivity (more than 0.43 W/m °C).
You can find out the required number of pipes, taking into account the diameter of the material and the pitch of its installation.
Source hydrost.ru
When selecting pipes for heated floors, there are a number of nuances, so it is better to entrust the choice to professionals
Frame house on stilts
The foundation can be made of piles. In this case, the base is well ventilated. In order for the floor in the house to be insulated, 4-5 layers of heat-insulating material are laid on the sheathing.
The “warm floor” in a frame house on stilts is installed from a liquid main or from electrical elements, but it is necessary to prepare the foundation for the heating system. What installation method is used for a frame house?
Concrete base
The forums are discussing the heating system in a house on stilts. It is recommended to raise the frame, make a strip foundation, sheathing and install the frame on the modified base.
Disputes arise due to the fact that all “warm floor” systems function effectively if they are laid on a screed and covered with concrete, but there is a risk that the wooden frame will not withstand heavy loads and will sag and deform. There is a danger that the sheathing will break. What recommendations do builders give?
- The logs are laid on the piles at a distance of 1.7-2 m. The length is 6-8 m. Experts advise making the laying step of the logs smaller, no more than 1.5 m, using short bars up to 4 m. In this case, the sheathing will be stronger. There is a possibility that it will withstand the load of the concrete coating.
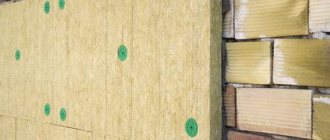
- To insulate the foundation, in addition to mineral insulation, additionally use slabs of expanded polystyrene and extruded polystyrene foam. The materials are light and will not weigh down the foundation. The total insulation thickness can be up to 1 m.
- Rolled bitumen-based waterproofing material is laid on the joists, sheathing and insulation. It will not only protect all layers of insulation from moisture, but also from wind, which will reduce the cooling of the base for the “warm floor”.
- The depth of the rough screed is low, 4-5 cm. The finishing coating is 5-8 cm.
On a concrete surface, a liquid line is used as the main heating. For additional heating of individual small rooms, electrical systems are installed.
On the forums they suggest laying “warm floors” on joists. This technique is often used in a wooden house. Heating systems are installed without screed.
Wooden base
The floor is insulated with combined materials, mineral wool and polystyrene boards. Be sure to make a backfill of expanded clay. Carry out waterproofing measures. They make a rough wooden sheathing.
- GVL sheets are laid on the sheathing. The surface is leveled.
- Metal thermal distribution plates are installed on the sheets. They form a circuit for pipes or cables.
- The liquid line is connected to the communication comb. The cable is connected to the thermostat.
- For cable or carbon mats, a reflective screen is installed.
- The heating elements are covered with finishing sheathing. The floor covering is already being formed on it. It can be laminate, parquet, or leave the lining.
The “warm floor” in a wooden frame house is laid not only on logs, but also on boards. Grooves are made in them and foil material is placed. A water or cable line is placed in the grooves.
Mats are not used. A good option for underfloor heating is thermal film, but it is recommended to install it only as additional heating.
Underfloor heating systems have long been used in country houses. When calculating, not only the area of the room is taken into account, but also the type of foundation. In a frame house on stilts, the sub-base is carefully insulated and insulated from moisture.
In a wooden cottage, screeding is done using the dry method; heating systems are mounted on boards, on the surface of gypsum fiber sheets, which are laid between the joists.
YouTube responded with an error: Daily Limit Exceeded. The quota will be reset at midnight Pacific Time (PT). You may monitor your quota usage and adjust limits in the API Console: https://console.developers.google.com/apis/api/youtube.googleapis.com/quotas?project=268921522881
Variations on a theme
In our country, based on Finnish technology, which facilitates the design and allows one to abandon monolithic casting, its variations have appeared - the principle remains, but the materials have been increased:
- Gypsum fiber sheets (GVL) - compared to plasterboard, they are denser, more resistant to bending and deformation, and contain cellulose fibers and other additives that increase their technical characteristics. For wet rooms, a moisture-resistant variety (GVLV) is used;
ТishinForumHouse Member
In such a floor, instead of plasterboard, it is better to use gypsum fiber sheets (GVL). I myself am now considering a dry screed for implementation in my home, I will only replace the bottom layer with OSB. I will assemble the middle part from two layers of gypsum fiber board.
- Chipboard, OSB, plywood - in terms of heat transfer, this design is worse, since wood and its derivatives act as an insulator. Ready-made sets of heated floors on a dry screed made of chipboard sheets, with grooves selected for hinges, are sold, but not everyone can handle their cost.
boatmasterFORUMHOUSE Member
Logs, with a pitch of 60 cm, plus insulation - 35 cm, OSB base, then a 20 mm pipe, plus a 5 mm clip, it turns out 25 mm, three layers of GVLV between the pipes 12x3 = 26 mm.
- Cement particle board (CSP);
- EPPS - pipes are laid directly into the insulation, and the voids are covered with glue. To increase the heat transfer of the elements, foil or similar material is used;
The thickness of the sheets for the middle layer with the main is selected based on the diameter of the pipe, so that after filling with glue, a flat surface is obtained, and the final layer does not put pressure on the pipe. As an option, two sheets are glued together if the thickness of one is not enough.
Forum users are actively organizing their underfloor heating systems on wooden floors.
Serg177FORUMHOUSE Member
If something happens to the pipe (today, tomorrow or in 25 years), you won’t have to break the screed. I will buy 50 sheets of plywood, 18 mm thick, for 200 m², cut it into strips, 16 mm pipe in between, and cover 200 sheets of ten sheets with laminate on top.
One of the options for making a dry screed with your own hands is laying pipes in special aluminum plates with grooves. They fit the pipes tightly and increase heat transfer. The disadvantage of this configuration is the high cost of these metal gaskets; their use increases the cost of the entire system.
Vladimir TallinForumHouse Member
There are not enough special aluminum sheets that are placed under the pipe and remove heat to the top. I have them, they “hug” the pipe, the size is about 30 cm per meter, there is a groove for the pipe with rare spikes to hold the pipe.
Sheets on a gypsum base are one of the most popular, as an optimal material in all respects.
- Reasonably priced;
- Easily cut into segments;
- Eco-friendly (does not contain synthetic binders like wood-filled boards) and suitable for home use;
- Non-flammable;
Which floor in a wooden house is better?
The answer to this question is not clear-cut. If the cost of construction and work is at the forefront, then it is better to use electric floors. If you compare the price of energy, the water system is more profitable. To save room height, a thin film floor is used.
Regarding insulation, the following should be said: polystyrene foam for heated floors is not the best material. Being in contact with a heated floor, the operating temperature of which can reach +70C, it ages, releasing toxic gas. Therefore, it is better to lay ecowool or perlite between the floor beams.
Having chosen mineral wool for insulation, it must be well insulated by wrapping it in a vapor barrier. Otherwise, warm air through gaps and leaks can carry its particles from the underground space into the room. It is better to use a chemically neutral sheet material for laying tiles: cement-bonded particle board, glass-magnesite board or gypsum fiber sheet. OSB and plywood are inferior to them in terms of environmental safety.
The wooden flooring above the heated floor should not be thicker than 21 mm. Do not forget that wood is a good heat insulator, which reduces the efficiency of the heating system.
Safety precautions when installing infrared flooring
Film electric heated floors themselves are safe and suitable for interior work when heating a frame, panel or wooden house outside the city, as well as for external insulation of an open parking lot, paths, etc.
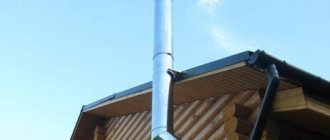
Statistics show that questions arise mainly when connecting the thermostat to the main power source. Therefore, when building a panel house or frame house, it is necessary to organize the laying of cables inside the walls in advance and use special fire-resistant corrugation.
In a house made of timber, it is logical to install open electrical wiring in decorative boxes. The heating cable is output directly to the machine, which comes out of the meter. A residual current device is strictly necessary!
Infrared film floor systems are completely safe; they are not susceptible to external damage or atmospheric influences. They warm up the room efficiently and are distinguished by their simple design and operation of heated floors in a wooden house. They are an excellent solution to the problem of heating a house outside the city or a wooden cottage.
IR heated floor in a wooden house
Warm electric floor in a wooden house
The desire for environmentally friendly technologies is forcing people to move into wooden houses. However, this path has its own nuances and is not as simple as it seems at first glance. For example, classic heating with gas or steam will not always be appropriate in these buildings. Many owners of log houses are trying to install a warm electric floor for themselves in a wooden house.
Different layouts have different options for solving this problem. There are methods that involve the presence of a concrete screed, and there is concrete-free installation. Which option to choose is up to each homeowner to decide for himself. We, in turn, will tell you what options exist and how to install them correctly.
- Preferred options
- Layout of wooden floors
- Application of electrical systems
- Technical requirements for installation
- Installation with concrete screed
- Installation without screed
Products by topic
- Choose …
View
Terrace and deck boards made of thermobirch
1140 ₽ – 3000 ₽
- Choose …
View
Terrace and deck boards made of thermo-ash
3600 ₽ – 7680 ₽
- Choose …
View
Thermal ash facade board
3600 ₽ – 7080 ₽
- Choose …
View
Facade board made of thermopine
960 ₽ – 5280 ₽
- Choose …
View
Thermal pine floor board
1680 ₽ – 2880 ₽
- Choose …
View
Thermal ash
78000 ₽ – 198000 ₽
- Choose …
View
Thermo birch
56400 ₽ – 58800 ₽
- Choose …
View
Thermal pine
42000 ₽ – 46800 ₽
- Choose …
View
Edged board, timber
20800 ₽ – 25350 ₽
- Choose …
View
Furniture board
2600 ₽ – 4420 ₽
- Choose …
View
Deck board
975 ₽ – 4550 ₽
- Choose …
View
Terrace board "Velvet"
975 ₽ – 2860 ₽
House with strip and monolithic foundation
The heating system is provided already during the construction of the foundation. With a strip or monolithic base of the house, not only radiator heating will be effective, but also floor heating. The foundation is insulated with gravel, expanded clay, and insulating materials. Perform waterproofing.
A well-prepared base does not have high heat losses. Heating elements for “warm floors” in the house are laid on a concrete surface. Both liquid and electric heating are used.
Liquid floor line
The system is a pipeline through which coolant circulates. It is heated in a heat exchanger located in a furnace or boiler. The supply and return circuits are removed from the boiler. The pipes are connected to the communication comb. The liquid circuit is laid on a concrete base. It supplies hot water or antifreeze.
The main line is connected to the collectors. For automatic regulation, a three-way mixing valve with a thermal head is provided. The liquid line is covered with a deep concrete screed 7-8 cm thick.
“Warm floor” in a private house can be installed in all rooms, including the bathroom, toilet, sauna, garage. Installation will require high equipment costs, but maintenance will be inexpensive for the cottage owner. The floor covering can be anything, regardless of thermal conductivity and texture.
Cable sections and mats
Electric heating elements can be laid on a concrete base. If the room has a complex geometry, it is recommended to use cable sections. A section is a conductor of a certain length and power.
Mats are used to heat a room with the correct geometry. They can be rotated by removing the mesh or cutting it with mounting scissors. The mesh is made of fiberglass or heat-resistant plastic. Sections and mats can be installed in a wooden house with your own hands. Underfloor heating systems are used in Moscow and other cities.
Options for arranging a water floor
Flooring under a water floor can be made in a variety of ways, which is especially popular with home craftsmen. Let's consider several options for such designs.
Option #1. Implementation of a ready-made solution
This is the easiest method to implement. You can purchase a decking kit from a hardware store. There may be two types of such a solution. The first is polystyrene mats equipped with pipe fastenings.
They can be duplicated with a layer of insulation. In this case, they can be laid directly on the base. The main advantage of such mats is their extremely simple installation. However, they are not strong enough to install flooring directly onto mats.
Under soft coverings, as well as under tiles, you will have to lay two layers of gypsum board. The flooring can also be assembled from modules made from chipboard. They are factory-made with recesses for pipes with a certain system pitch. The modules are equipped with fasteners, metal heat-distributing plates and pipes.
Polystyrene mats are an excellent solution for arranging a water floor. This option allows you to install a super-thin water floor that eats up a minimum of room height
To connect the parts together, a locking connection is provided, which greatly facilitates assembly. Such structures are quite durable and do not require additional reinforcement. Their main disadvantage is their high cost.
Any of the ready-made solutions requires careful preparation of the base. If it is an old floor, a thorough inspection is carried out. Damaged areas are discarded and repaired. The boards are securely fixed, height differences are eliminated. Then all debris and dust are removed and the base is primed.
After it has dried, insulation is laid and secured, if required. The next stage is laying the mats. A suitable adhesive, usually liquid nails, is applied to the outside of each of them, and the plate is glued to the base. It is important that the glue sets well and holds the mat securely in place.
If it is intended to lay chipboard flooring, it is assembled in strict accordance with the instructions issued by the manufacturer. After the pipe channels are ready, installation begins. Laying of underfloor heating pipes can be done using a “snake”, “snail” or any other suitable method.
The elements are combined into a single system and connected to the heating system. Next, pressure testing and testing of the functionality of the water floor is carried out, after which the installation of the floor covering begins.
Option #2. Flooring on joists
Work begins with preparing the wooden base. If it is an old floor, all necessary repairs are carried out. Then you need to lay the logs on which the warm water floor will lie under the wooden floor. The prepared logs are set strictly according to the level with a distance between elements of about 0.6 m.
This is the best option; you can place parts at a greater distance. But in this case, thicker boards will be required to form the flooring.
Preparing the foundation is a very important point. It is advisable to lay a new subfloor under the structure, but you can also use the old one if it is in good condition. All damaged areas must be repaired
The beams are securely fixed to the base. Next, a base is built between them with lags, on which the insulation will be laid. To do this, boards, plywood, chipboard or any other suitable material are tacked to the beams.
If you want to save money, instead of a base, you can nail corners or slats to the joists, on which the insulating coating will rest. But you need to understand that in this case it should be hard and not friable. Insulation is laid on the prepared base. This can be polystyrene foam, high-density stone wool, polystyrene, etc.
After forming the heat-insulating carpet, they begin to manufacture the flooring. To do this, take boards with a thickness of at least 0.03 m. They begin to screw them to the beams. The first one is fixed at a distance of 0.02 m from the wall surface; a similar gap is made when fixing all other parts.
An important point is the choice of the width of the boards attached to the floor. It must correspond to the width of the metal heat distribution plates, which will subsequently be inserted into the resulting grooves.
The pipe will be laid in a “snake” pattern, which requires making grooves for its turns. To do this, leave special gaps about 0.15 m wide at equal distances from each other.
To form a bend in the pipe through which the coolant circulates, part of the boards is fixed at a certain distance from the wall
In practice, it looks like this: Two boards are screwed at a distance of 0.5 cm from the wall, the next two - at a distance of 5 - 7 cm. And so on until the end of the row.
On the opposite side of the base, those boards that were fixed to the wall are screwed at a distance, and those with a gap are screwed closely. This creates a groove for the bend of the pipe. After the entire flooring has been laid, the installation of heat distribution plates begins.
They are inserted into the grooves formed by the boards and securely secured with staples or regular nails. It is optimal for the sides of adjacent plates to meet.
Then a continuous heat transfer screen will be formed. Now you can start laying the pipes. It's easier to do it together. One worker will unwind the coil, and the second will do the actual laying.
With a little force, the part is pressed into the groove of the heat distribution plate. It is best to run the return pipe of the contour loop along the wall under the decking boards.
After the entire circuit has been laid, check again for correct installation and connect it to the heating system. The water floor must be pressure tested. Then you can begin preparing for laying the flooring.
Option #3. Guide design
They start by preparing the base. As in previous options, it must be leveled and strengthened. Then any suitable insulation is laid on the base.
The simplest method of laying a water floor is the “snake” method, which is why it is used most often. For a structure made of guides, this will be the best option. To determine the dimensions of the parts, an accurate floor plan is drawn.
There are several options for laying a warm water floor. The simplest of all options is a snake; the figure shows its diagram
It marks the areas where the equipment serving the water floor will be installed and the places where the pipes will be connected. Then, with strict adherence to the selected laying step, guides are drawn. The number of required parts is calculated and their sizes are determined.
Now you need to prepare the guides. They are cut from any suitable and available material. After which you can begin installation. The parts must be laid on the base in strict accordance with the developed plan.
Each guide is placed on a rough base and securely attached to it with self-tapping screws. Between the parts there should be channels necessary for installing pipes. In areas where the pipeline turns, the sharp corners of the guides must be rounded so as not to accidentally damage the pipes.
After all the slats are secured to the base, begin laying the foil. To do this, take material with a thickness of at least 50 microns. The sheets are pressed into the channels, carefully going around each recess. Literally “laying out” foil on each channel.
To prevent the sheets from moving out of place, they are fixed to the slats using a stapler. For better heat transfer, it is advisable to wrap the pipes with the same foil before laying, but this is not necessary.
In order to make a smooth turn of the pipe and not accidentally damage it, the guides in the bending areas must be rounded. Their sharp corners are removed
Then the pipe is laid inside the prepared channels. To hold it in place, in some areas it is attached to slats or to the floor with metal plates. Upon completion of installation, the water floor is connected to the heating system and mandatory pressure testing is carried out. If it does not reveal any leakage problems, begin preparing for the installation of the finishing coating.
These are only three options for installing floor heating. In practice there are many more of them. Home craftsmen adapt them to their conditions, selecting available materials and suitable technologies.
The following article will introduce you to the rules, formulas and an example of calculating an underfloor heating system, which we highly recommend reading.
Types of heating cables. Which one is better to choose?
For an electric floor, it is necessary to select the optimal heating element option. So, heating cables are:
- Resistor;
- Self-regulating.
Resistor cables for heated floors
Resistor cables have a heating core, which is covered on top with a metal sheath, which converts electrical energy into heat. The cable is covered with a reliable layer of insulation on top, which prevents the possibility of fire and excessive heating of the cable.
Resistor heating cables are available in single-core and double-core types. Twin-core cables have a special conductive core that allows the distribution of current.
Self-regulating cables for heated floors
Self-regulating cables are somewhat similar to two-core cables; they have 2 cores and a layer of polymer material between them. The polymer material heats the cable and converts electric current into heat.
It is worth noting that such cables have many advantages, for example, they do not overheat under screeds and furniture, and also last much longer than resistor cables. You can install furniture on a warm electric floor that is equipped with self-regulating cables; this will not affect the floor covering, the characteristics of the furniture or the durability of the wires. Thanks to self-regulation of temperature, the heated floor will never overheat.
How to choose a cable for underfloor heating?
It is not recommended to select such a cable yourself. Before making a choice, read several reviews and compare heating cords from different manufacturers. It is not recommended to install cables that are too thin. The voltage in such cords will be quite high, which can lead to system failure or fire.
Purpose of heated floor
A “warm floor” system in a residential area can be either an additional or the main source of heat. In the first case, the system provides a comfortable surface temperature of the floor material. This is especially true for ceramic tiles. Traditional radiators serve as the main source of heating. The temperature of the coolant is maintained using the thermostatic regulation principle.
In the second case, when the water floor is the main source of heat, control of the level of heating of the coolant is used to compensate for heat losses inside the room and protect it from external temperature changes. The indicator directly depends on the temperature outside - the colder it is outside, the higher the temperature of the coolant.
In order for heating a house with a “warm floor” system to be economically justified, it is recommended to use a heat generator that will supply water heated to 30 - 50 degrees to the circuits. Thanks to the circulation pump connected to the boiler, the same temperature will be maintained in each circuit, which means that the room will be heated evenly.
For boilers that do not support low-temperature operation, a three-way mixing valve is used. In this case, you will need to install a thermostat on the mixing unit.
Important! When laying different floor coverings in a room, an independent contour is laid under each of them due to the difference in thermal conductivity, for example, laminate and ceramic tiles. To ensure uniform heating of the room, the circuits will need to maintain different coolant temperatures.
It is worth considering that some floor finishing materials cannot be used when installing a water system, but they are suitable for cable or film heating systems.