In recent years, with the development of finishing materials, an increasing number of people are using the balcony as a full-fledged room. Of course, the question of heating arises and the best solution is to install a water heated floor on the balcony.
In this article we will look at using this heating method. A water heated floor is a room heating system in which a hot coolant circulates through a pipeline located under the floor material.
Advantages and disadvantages
Pros:
- Long service life. A properly designed and well installed floor will ensure a lifespan of up to fifty years.
- Safety. There is no possibility of getting burned or injured.
- Uniform heating over the entire area of the balcony or loggia.
- The temperature can be adjusted using installed sensors.
- The heating device does not interfere with the aesthetic appearance of the room.
- Compared with radiator heating, the savings will be from 20% to 50%.
- It is possible to install a water heated floor with your own hands.
Minuses:
- Difficult installation. The wiring diagram should be carefully considered before installation. It is necessary to eliminate unevenness on the horizontal surface.
- High installation costs. Several times higher than radiator heating. However, after some time of use, the system completely pays for itself.
- The likelihood of a leak that is difficult to repair. If a problem arises, you will have to completely dismantle the floor covering.
- Installing a heated floor on the balcony of an apartment building from central heating requires permission from the BTI.
The heat source is a liquid coolant, boiler water, which can flow into a pipeline laid in the floor.
Advantages of this type of heating
Heated floor technology has many advantages:
- The features of the movement of air masses are taken into account . Thanks to this, the entire volume of air in the room warms up.
- Regulation of the amount of heat generated by such a design.
- This is neutral from the fire safety point of view. No electrical wires or sockets. The opportunity to use heated floors comes with the onset of the heating season.
- The technology is not “afraid” of children or pets , since the materials used in the outer part of the structure are resistant to mechanical stress. Taps and parts that can be twisted or chewed are easily removed. The control compartment itself closes.
- It's profitable. There are no additional costs required after connecting the floor heating from the central heating system. Only once - for the purchase of consumables and installation of the installation.
Related article: Attaching a loggia to the kitchen coordination
Selection of pipes for installation
Types of materials:
- Copper. Long service life. They are considered the most reliable, which explains the cost above other pipes.
- Metal-plastic. Durability and good flexibility. High temperature tolerance. High price.
- Polyethylene. Favorable price-quality ratio. Extremely elastic. Resistance against high humidity.
- Polypropylene. Reliable and practical. Resistance to acid-base substances. The cost is lower than that of metal products.
Laws
Before interfering with construction and communication systems, you should carefully read the Housing Code of the Russian Federation:
- Art. 15, paragraph 5 - here are the conditions that make it possible to recognize that the premises are intended for living. Based on this article, you need to prove to the housing inspectorate that the loggia will also become a living room after renovation.
- Art. 25, paragraph 1 - heating and other utilities can be transferred, but only in living rooms, to which the loggia does not belong.
These parts of the law will allow legal redevelopment to be granted, subject to a number of strict conditions being met.
Preparatory work
Installation should be carried out on a well-insulated balcony. Otherwise, you will heat the street and not your room. Therefore, before installing a heating system, you should insulate the walls, ceiling and floor.
It is also necessary to check the balcony slab. Will it be able to withstand the additional load when laying pipes? The slab must be level; if there are differences of more than 10 mm, they must be eliminated.
Let's consider 2 options for laying pipes when insulating a balcony or loggia:
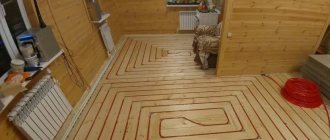
- Snake. This heating scheme is preferable for small rooms. The shape is not considered effective for heating large spaces. The maximum possible water temperature is at the beginning of the system, so installation begins from the coldest parts of the room.
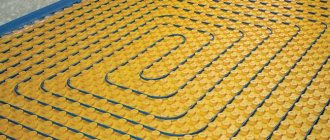
- Snail. The pipes are laid along the walls, moving to the center of the balcony floor. This form is suitable for large balconies and loggias. Allows you to avoid unheated areas by alternating cold and hot flows. In this scheme, the pipe bend reaches 90 degrees. Heating occurs evenly.
Heating with electric appliances
If you were able to insulate your balcony, but you don’t have enough time or money to install a heating system, use heaters. Understanding all the variety of these devices can be difficult. Let's look at each of them in more detail.
Fan heater
A fan heater is an inexpensive option for auxiliary or spot heating on a loggia.
It consists of:
- housings;
- heating element;
- heat dissipation systems.
The body can be made of plastic or metal. After prolonged use, the plastic may burn and melt in some places. This does not affect the operation of the device, but still you should not spare money on purchasing a high-quality heater.
The key part of an electric fan heater is the heating element.
Main types:
- Spiral made of nichrome wire. It is used in the cheapest devices. It has a high temperature and very low heat transfer.
- Tubular heating element. A metal tube filled with a heat-conducting substance. It has average heating and heat transfer rates.
- Ceramic. Semiconductor heating element coated with glass ceramics. Has the highest heat transfer parameters.
For a small room, floor-mounted stationary or mobile fan heaters in a metal casing are suitable.
Convector for the balcony
A convector is a thermal panel, an automatic heater that gradually changes the temperature in the room. Cold air enters the housing, heats up, and then is blown back out. The heating element does not heat up above 100 degrees, which reduces the likelihood of fire in surrounding objects to a minimum.
The thermal panel may have the following heaters:
- Electric. Nichrome spiral, tubular electric heater, infrared element. Expensive models are characterized by increased efficiency and reduced energy consumption.
- Gas. Economical, but requires connection to a gas cylinder and a central gas pipeline.
A convection heater should be used to maintain a constant temperature on the balcony.
Oil radiator
An oil heater resembles a regular water battery, but works much more efficiently.
It consists of:
- metal radiator;
- mineral oil with high thermal conductivity;
- tubular electric heater;
- temperature and power control systems.
Radiators come in two types:
- panel;
- sectional.
Always choose a sectional oil cooler. This design has an increased area of contact with the surrounding air. There are mobile and stationary models. Choose equipment depending on the size of the balcony.
Calculation of water heated floor for a loggia
Before purchasing materials and tools, it is necessary to carry out all calculations. Create a pipe laying diagram for clarity. You should take this seriously so as not to waste certain resources on correcting defects in the future. The best option would be if a design organization performs the calculation for you, but with the help of special calculators you can calculate it yourself.
There are a number of parameters that you will be asked to enter to calculate the heating specifically for your room. This data will help determine the required pipe length and installation pitch to achieve a certain heat transfer power.
Pipes are not installed in places where furniture will be located.
The distance between the pipes is approximately 10 cm. When calculating the purchased number of pipes for a warm water floor, it must be taken into account that the length of one circuit should be no more than 60 cm.
Heating mats
The cable is laid in this type of underfloor heating in increments of 5 cm, each heating core is made of a material that has a high degree of resistance. The main advantage of the system is that high-quality mats have a low electromagnetic field, which increases the safety of such a warm floor for humans.
Other advantages of the system:
- the thickness of the floor increases slightly;
- if necessary, the mat can be cut into several pieces - it is important not to damage the cable;
- heating mats are a finished structure that is ready for installation.
You can install the heated floor yourself. The concrete base is used as a substrate. It is thoroughly cleaned of dirt and dust. To ensure better adhesion, the base is primed.
Before installing heated floors, the mats are checked for functionality using an ohmmeter. Next, a place will be equipped to place the thermostat. For wires, grooves are made in the floor and wall. The temperature sensor is installed directly in the floor. It must not be placed near a heating cable.
After all the steps have been completed, you can begin laying the mats. They are placed directly into the adhesive mastic under the tiles. After completion of the work, the functionality of the mats is checked.
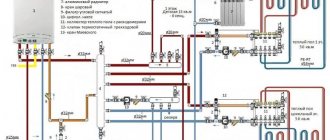
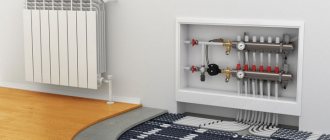
Collector system
The collector is a distribution unit consisting of two combs with a pump. It supplies hot water through pipes and regulates the entire system. The installation is carried out in a special collector cabinet. If possible, then into a hollowed-out niche on the balcony. It is recommended to place the cabinet in a place where the supply and return pipes can easily enter.
Collectors are:
- Electronic. Specially programmed for a specific temperature in the system.
- Mechanical. The temperature is controlled manually.
Boiler selection
Before purchasing a boiler, you should calculate the power. It must cope with the system load and have additional power reserves. Therefore, the boiler power should be equal to the power of the underfloor heating plus 10-15%.
When carrying out any additional work, in order not to drain liquid from the system, the boilers have shut-off valves.
First start
If you decide to make a heated floor from heating, legally or not, you should wait until the end of the heating season. Since no one wants to stop the heating in your home, especially if it is connected illegally.
To avoid disturbing the pressure and unbalancing the system, be sure to add a manifold and pump. But even here you should not overdo it with the pump power; it should be strictly limited for the required floor length.
To connect, simply loop the inlet pipe and the battery return, and the system will work. In this case, the collector and pump must have time to pass water and not increase the ceiling pressure. The additional pipe layout must be clearly adjusted and balanced.
Tips for installation and operation
We advise you to install two additional taps so that you can shut off the water supply in the pipes and thereby turn off the system. This is necessary to prevent emergency situations and simply turn off the heating when not needed. It is enough to use a regular water pipe tap, but of good quality. It’s better not to save money and buy a quality product so that it can withstand temperature fluctuations and high pressure.
Use pipes of the same diameter as standard pipes in the apartment, this way it will be much easier to balance the system. If you use them with a smaller diameter, then the water circulation will decrease, and you risk reducing the heat transfer from your neighbors' heating, which may lead to complaints.
It is better to make the first start at the initial stage of the heating season. Then the pressure increases gradually and the temperature rises smoothly. Thus, the new system will be able to adapt to changing conditions and smoothly enter the operating state. It is to prevent unforeseen situations at the first start-up that shut-off valves should be installed.
Instructions for installing a warm water floor
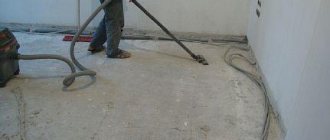
- We prepare the surface. Any unevenness should be eliminated in advance. Clear away debris and dirt.
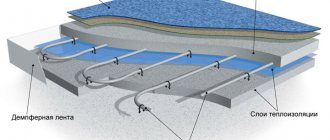
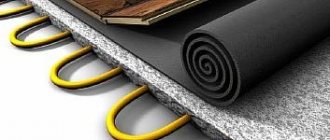
- Lay a thermal insulation layer. It is recommended to choose polystyrene foam or extruded polystyrene foam as the material. Their irreplaceable quality is considered to be a low thermal conductivity coefficient.
- Apply damper tape along the walls. It will prevent cement from leaking from the screed into the insulation, as well as deteriorating the thermal insulation qualities of the insulation.
- Lay a metal or plastic mesh for reinforcement on top of the waterproofing. Secure it with wire. The mesh secures metal-plastic or polypropylene pipes. Pipes of this material tend to move out of place.
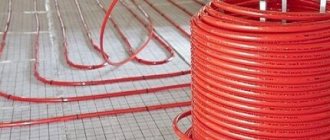
- We lay the pipes on the grid according to our drawn up diagram. Laying begins from the place where the collector is located. We fix the pipes with clamps, but do not tighten them tightly. The approximate consumption is two pieces per meter. The distance between the clamps should be about a meter, between the pipes 10 - 30 centimeters.
- We install the collector. We put corrugation on the ends of the pipes and connect them.
- We carry out a hydraulic test of the heating system within 24 hours. Set the water pressure to about 3-5 bar.
- If the system works properly, then move on to the next stage. Fill the water-filled pipes with concrete mortar. We use concrete of at least grade M300. The minimum height above the pipe is 3 centimeters. Helps distribute heat evenly over the surface.
- It takes about a month for the mixture to dry completely. Later we proceed directly to the final floor covering.
Do-it-yourself insulation of a balcony
If you don’t have time to do a full-fledged balcony repair with your own hands, use some folk methods of insulating a loggia. The temperature may rise by several degrees. Remember that this is a temporary measure. Such “tricks” cannot replace full thermal insulation.
Walk around the loggia with a candle or lighter. This will help determine from which joints and cracks the air is blowing. Seal them with putty. Draft is the worst enemy of heat.
Construct insulating panels from scrap pieces of foam. This material conducts heat poorly.
Such improvised insulation can be done in a few hours, but even this little thing reduces the chance of catching a cold from the cold coming from the loggia.
Other styling options
Not every balcony structure can withstand the weight of a cement screed. In this case, there are as many as 3 analogues to the standard installation procedure.
Polystyrene system
The system is used in all types of houses, as it is light in weight (a square meter is approximately 25 kg). It has good thermal insulation and sound insulation properties. Place on a base cleared of debris.
Step-by-step instruction:
- Cutting grooves in a sheet of foam plastic using a thermal knife.
- Inserting metal plates into grooves.
- Laying heating pipes in the grooves of the plates.
- We finish by covering the structure with polyethylene film and gypsum fiber board sheets.
Wooden modular
Chipboard modules are used in wooden houses with logs. When laying, it is recommended to cover the joists with a layer of waterproofing, and lay insulation between them.
Step-by-step instruction:
- Fastening modules to the floor.
- Inserting metal plates into module grooves.
- Laying heating pipes in the grooves of metal plates.
Wooden on slats
The rack system differs from the modular system only in that boards are used instead of chipboard sheets.
Step-by-step instruction:
- Laying wooden planks on a waterproofing film.
- Laying metal plates between the slats.
- Fastening the plates to the strips with self-tapping screws.
- Laying pipes in the grooves of the plates.
- Covering plates with pipes with waterproofing film.
- Covering the structure with gypsum fiber sheets.
Difficulties
Knowing the laws, the owner of the apartment will understand why it is impossible to transfer batteries to the loggia. These places are not intended for living, so they are not heated. You can't do any redevelopment there, you can't radically change anything. But subject to a number of conditions and strict restrictions, it is still possible to move it. Achieving this goal and making accurate calculations will require a lot of time, money and effort. Therefore, it is best to insulate the floor and install a heater. This is much simpler, cheaper and safer; such repairs do not need to be coordinated with anyone.
Before remodeling, you need to close all the cracks. If all insulation work is not carried out efficiently, the heating effect will be minimal.
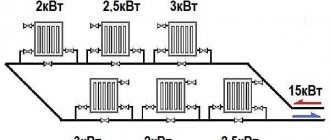
Layout of batteries on the loggia Source mastergrad.com
Punishment
Illegally removing the battery onto the loggia puts all residents of the house at risk and creates a number of difficulties for them. There is a penalty for unauthorized redevelopment. In 2022, individuals will pay a fine of 2,500 rubles, and legal entities - 70 thousand rubles.
In addition to paying a fine, the violator will have to remove the radiator from the balcony at his own expense and restore everything to its original condition. This decision can be challenged, but you will have to prove that the repairs will not harm anyone. You will need a conclusion from specialists and the signatures of all residents of the house.
Balcony after renovation Source proffstroygroup.ru
How to calculate the number of sections
There are standards that will allow you to make accurate calculations and indicate how many sections are needed to maintain warm weather indoors. The following conditions must be met:
- for 1.5 m2 - 1 part made of bimetal;
- for 2 m2 - 1 part made of aluminum;
- spare 1-2 parts.
All batteries are assembled from parts, so you need to know exactly the number of sections.
Scheme for moving a radiator to a balcony Source mastergrad.com