Basement insulation with isolon. Floor insulation from inside and outside
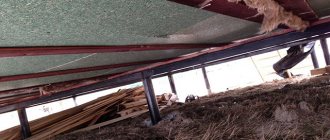
If during the operation of the house it becomes necessary to carry out work on insulating the floor, which is the ceiling of the basement, this does not mean that it is necessary to open the white finish. Treatment can be carried out both externally and internally, from the basement side.
Read more: ways to insulate basement floors.
Heating in the basement is one of the insulation options. But in severe cold weather, having a heating system may not be enough. In addition, unnecessary communications take up part of the usable space and interfere with the placement of racks for storing workpieces.
Insulation is one of the main elements in construction
The algorithm for insulating a basement in a wooden house is not much different from identical work in a brick or concrete building. The first step is choosing the material. When choosing insulation, first of all you need to pay attention to the thermal insulation properties of the material.
The next parameter when assessing the quality of floor insulation in the basement is hygroscopicity. Condensation concentrates at the boundaries of warm and cold rooms. This means that during installation the insulation must be protected with a vapor barrier membrane. The peculiarity of floor insulation from the basement side is that the vapor barrier is placed above the material, and not under it.
And finally, it is necessary to take into account the fire resistance of the selected insulation. Some materials are not recommended for use in residential premises due to their high flammability, but they are quite acceptable for thermal insulation of a basement. Let's look at how you can insulate a basement from the inside.
Let's sum it up
Insulating the floor of a log house is a very responsible job. The comfort of living in the house will depend on how correctly and efficiently it is done, so it is best to entrust it to specialists.
will help make your home warm and cozy. We have been providing finishing and insulation services for wooden houses for more than ten years and have accumulated vast experience in this area, which we want to share with you. We will be happy to provide our services to residents of Moscow and the region. Leave your requests, and we will send a specialist to you for free to inspect and draw up a preliminary estimate of the work.
On the Contact page you will find detailed information on how to contact us.
Calculate the cost of painting and insulating your home right now
Select types of work:
Select materials:
Floor insulation with isolon in a private house. Insulation of ceiling and floor with Izolon
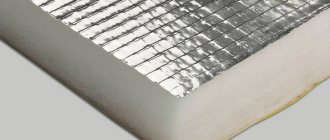
Metallized lavsan film Izolon.
The simplest option for insulating a floor with Izolon is to use it as a lining under a laminate, although it is also possible to lay linoleum on top of foamed polyethylene. In addition, this material can be used in structural elements of a building, for example, on the ceiling and wooden floor laid on joists. The installation technique in both cases is very similar, so we will consider them together.
Naturally, Izolon thermal insulation as an independent insulation gives insignificant results, since its thickness is too small. Therefore, in order to get a high-quality thermal insulation cake, you need to use more solid insulation materials, for example, mineral wool. In this case, in addition to auxiliary protection against heat loss, foamed polyethylene can act as a vapor barrier. Mineral wool, especially glass wool, is prone to absorbing moisture from the air, especially if it is laid on the ceiling. Therefore, insulating the ceiling with Izolon in some cases is not only desirable, but necessary.
Correct insulation method:
- Mineral wool is laid between the floor or ceiling joists;
- Izolon is tensioned along the joists;
- the counter-lattice is stuffed;
- finishing is being installed.
It is quite acceptable to lay this material directly under the finishing, as sound insulation. To do this, it is enough to secure the material with a construction stapler on the working surface end-to-end and seal the joints with tape. If it is technically possible, it is better to leave a gap between the polyethylene foam and the finish. Even if there is moisture on the insulation, it will successfully evaporate and will not be absorbed into the finishing materials, which will significantly extend their service life. Many people are interested in the question of whether it is possible to insulate the floor with Izolon in a wooden house. This is allowed, but again, as independent thermal insulation, it gives almost no results.
Rigid thermal insulation cylinders made of mineral wool are used to insulate communications.
You can read about which non-flammable insulation materials for roofing are best here.
Types of material
Izolon is a brand under whose brand various polymer sound and heat insulating materials are produced.
The product line includes:
- non-crosslinked polyethylene foam;
- chemically cross-linked polyethylene foam;
- cross-linked polyolefin foam;
- adhesive tapes;
- reflective heat insulators.
For the purposes of this article, we are most interested in the last position in the list. It is this material, as insulation, that will be discussed.
The heat insulator is presented in the following types:
- with one foil layer;
- with double-sided foil. This material is used to enhance thermal insulation characteristics;
- with a layer of foil on one side and an adhesive base on the other, this type is usually used on inclined and vertical surfaces.
Classification according to the composition and properties of the starting material:
- The insulation is based on ordinary polyethylene and has a porous closed structure. Its main disadvantages: low resistance to deformation and tendency to shrinkage.
- Thermal insulator based on cross-linked polyethylene. It is resistant to mechanical loads, has good strength, and regains its shape.
Izolon under plywood on the floor. isolon
evgeny
Report to moderators
This method (under plywood) of laying isolon is quite acceptable when installing floor coverings. In addition to plywood sheets, on top of this heat-; soundproofing material can be laid parquet, laminate or linoleum.
KuPer
Participant
KuPer
Report to moderators
In principle, it is possible, but it will be of little use. The main advantages of isolon are low density and high porosity, which is why it is considered a good insulation material. It works great on walls, but under a load of plywood? A simple, crumpled sandwich made of plastic and foil. The styling effect is almost zero.
1
Kiril
Participant
Kiril
Report to moderators
I completely agree with evgeny. There is isolon, the density of which is designed specifically for floor insulation. But I would advise you not to take anything you come across, but one made of sewn polyethylene and with a self-adhesive bottom base.
Root
Forum member
Root
Report to moderators
Isolon is fine, but I repeat about plywood - do not lay layered or fibrous materials on the floor. Plywood and fiberboard behave unpredictably, you will curse everything from taking furniture out of the house, tearing down and redoing floors. And this happened more than once or twice with plywood on the floor.
evgeny
Newbie
evgeny
Report to moderators
Root: January 27, 2016 at 11:52 pm
on (expand)
Isolon is fine, but I repeat about plywood - do not lay layered or fibrous materials on the floor. Plywood and fiberboard behave unpredictably, you will curse everything from taking furniture out of the house, tearing down and redoing floors. And this happened more than once or twice with plywood on the floor.
Agree. If you have already placed Isolon on top of a wooden floor, then you can safely put flooring on top of it (linoleum, laminate, parquet). An extra layer in such a “pie” (plywood) can only do harm.
Artemus
Participant
Artemus
Report to moderators
evgeny: January 28, 2016 at 10:13
on (expand)
Agree. If you have already placed Isolon on top of a wooden floor, then you can safely put flooring on top of it (linoleum, laminate, parquet). An extra layer in such a “pie” (plywood) can only do harm.
Plywood will not harm, it will be easier to lay parquet or laminate on it later, plus the plywood layer in the cake will provide greater sound insulation. The downside is that the height of the room may decrease slightly depending on the thickness of the plywood sheet.
Root
Forum member
Root
Report to moderators
Laminate flooring will make a knocking noise against the plywood when you walk on it. The plywood will bend, the laminate will bend at least a little, and the whole thing will rattle underfoot. It is advisable to lay the laminate on a soft (but not thick) substrate.
The procedure for installing thermal insulation
You are offered instructions for arranging thermal insulation, including isolon and additional insulation in the form of mineral wool (can be replaced with polystyrene foam/expanded polystyrene or other insulation of your choice).
If you wish, you can not arrange the second layer of the structure. For example, in the case of installing thermal insulation in an apartment in combination with a heated floor heating system, or while simultaneously using insulation as a substrate for laminate, you can limit yourself to using only isolon. The relevant instructions remain the same. For the rest, be guided by the features of the location and operation of the premises being equipped and your personal preferences.
Floors with heating pipes and ducts, the so-called “warm” floors, have become widespread in the construction of residential buildings. Foil-coated ISOLON is used as reflective insulation in the construction of such floors. Possible material options ISOLON 500, ISOLON 300 3-5 mm foil
First stage. Dismantling the coating
If you plan to insulate a floor that has already been in use, you will have to perform a number of preparatory measures, the first of which is the dismantling of the existing floor covering. We get rid of it and take the garbage out of the room.
The old floor should be removed
Second phase. Preparing the foundation
After getting rid of the old finishing, examine the condition of the underlying structure. Get rid of peeling and cracked screed down to the very base. If the finishing was laid on top of a wooden structure, replace the damaged elements with new ones or, if there is significant damage, install a new structure after first getting rid of the old one.
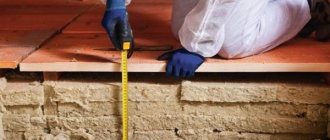
If necessary, strengthen the base, focusing on the characteristics of a particular situation. For example, if the floor of a balcony is being insulated, examine the condition of the parapet, make sure that the joints of the structural elements are intact, etc. Blow out any cracks found with foam. To eliminate individual defects in the concrete floor, use appropriate building mixtures, for example, cement-sand mortar. If significant differences in surface height are detected, it makes sense to pour a new screed with a thickness of about 30-40 mm.
floor screed
Floor leveling screed
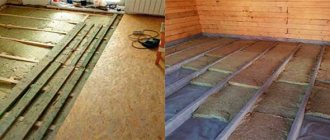
In the case of insulation of a wooden structure, isolon, as a rule, is laid on top of the subfloor, presented in the form of a flooring made of material chosen by the owner (plywood, boards, etc.). This provision may vary, depending on the specifics of your specific situation. For example, it may be necessary to insulate the floor with isolon along the joists.
Laying isolon
Laying isolon on the subfloor
In this case, the following is done:
- beams are fixed on top of the subfloor in increments of up to 1 m;
- Boards or plywood panels are fixed between the joists. Wooden blocks are traditionally used for fastening;
- Isolon is laid on top of the boards/plywood and secured with tape.
Third stage. We arrange waterproofing
The necessary hydro- and vapor barrier of the floating floor is provided by a layer of IZOLON material. For hydro- and vapor barrier of a floating floor, the material ISOLON 500, ISOLON 300 4-8 mm is suitable
Cover the base with a suitable primer. Let the coating dry for the time recommended by the manufacturer of the selected primer. After this, we cover the surface with a simple plastic film or a special waterproofing membrane.
When laying waterproofing, we place the edges of the film at approximately 10-15 cm of the height of the walls and secure them with a stapler, nails or other suitable method. Pieces of film are laid with a 10-15 cm overlap. The joints are fixed with adhesive tape.
If desired, you can give preference to coating waterproofing. The work comes down to applying two layers of bitumen mastic, each 1-1.5 mm thick, onto a previously dust-free base. Before applying a new layer, wait a period of time as recommended by the manufacturer of the waterproofing compound.
waterproofing
Fourth stage. Laying the first thermal insulation layer
The necessary thermal insulation of the floor is provided by a layer of ISOLON. Material used: ISOLON 500, ISOLON 300 4-10 mm
If necessary, we adjust the rolled/sheet insulation material to size and lay the cut on top of the waterproofing layer. We fill the entire surface with pieces of isolon, making sure that there are no gaps at the joints, because because of them, the thermal insulation properties of the structure will deteriorate. We glue the joints directly with foil tape.
Foil tape
If laying a second layer of insulation is not provided, cover the isolon with waterproofing material and proceed with arranging the final finish in accordance with the chosen technology. When installing two-layer insulation, follow the steps described below.
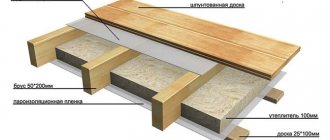
Fifth stage. Installing logs
Laying lags
We cut the wooden beam pre-treated with antiseptic impregnation into the required number of elements along the length (for small rooms such as a balcony, it can be along the width) of the base and install it on top of the insulation. We place the outermost logs directly next to the walls. We place intermediate ones in 0.5-0.6 meter increments. We check the evenness of the installation of the logs using a level. After making sure that there are no differences, we fix the elements using dowels and self-tapping screws. There must be at least 4 fastenings for each lag. We screw in the outer fasteners, departing from the ends of the beam about 70 mm.
Sixth stage. Laying the second thermal insulation layer
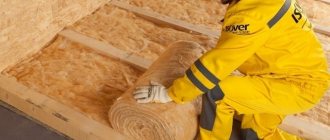
Insulation is laid between the joists
We place the selected thermal insulation material in the space between the joists. The insulation must first be adjusted to the size of the formed cells and laid as tightly as possible, without gaps. If there are cracks, we get rid of them in a suitable way, for example, by blowing them out with foam.
Example of laying mineral wool
We lay a layer of waterproofing material on top of the mineral wool insulation. To fix the film to the joists, we use any suitable method. For example, protective material can be secured using a stapler.
Vapor barrier Izospan
If you decide to replace mineral wool with polystyrene foam or expanded polystyrene, you will not have to install an additional layer of waterproofing material.
expanded polystyrene
Seventh stage. Finishing the job
Finally, all we have to do is lay the finishing flooring on top of the joists. For its arrangement, boards with a thickness of 3 cm or sheet plywood are traditionally used. We lay the elements perpendicular to the joists and fix them with nails or self-tapping screws.
Finally, all we have to do is lay the finishing flooring on top of the joists.
Now we only need to arrange the selected finishing material - it will lie on a flat and insulated area without any problems.
| Type of coverage | Service life, years | Decorativeness | Ease of maintenance | Resistance to mechanical loads | Environmental friendliness | Maintainability |
| Parquet | 15-20 | average | average | not high | high | low |
| Linoleum | 3-7 | low | easily | not high | low | Can not be repaired |
| Tile | 5-15 | average | average | average | high | average |
| Carpet | 1-5 | low | hard | not high | low | Can not be repaired |
| Laminate | 3-7 | low | average | not high | low | Can not be repaired |
| Polymer | 10-30 | high | easily | high | high | high |
| Evaluation criterion | Laminate | Parquet | Cork materials | Solid floor board |
| Environmental Safety | Completely artificial material | Without varnish and glue, it is completely natural | Absolutely environmentally friendly and safe coating | Environmental friendliness at the highest level |
| Duration of operation | Traditionally up to 5-15 years | Up to 50 years, depending on the thickness of the base layer | At least 45-50 years old | Average – 35-40 years |
| Moisture resistance | Low | Low | Increases after waxing | Increases after impregnation with appropriate products |
| Thermal insulation indicators | Low | High | Very high | High |
| Difficulty of installation | Easy to set up | Requires professional skills | Can be installed independently, depending on the chosen installation method | Self-installation possible, basic skills required |
| Difficulty of care | The material is undemanding and easy to care for | Requires regular maintenance and careful use | Does not require special care. You can use a vacuum cleaner. The main thing is to avoid over-wetting the material. | Requires regular care |
Good luck!
Technological map for sound insulation of interfloor ceilings and floors using physically cross-linked polyethylene foam Isolon 500 as a sound insulation layer
isolon 500
What method do we use?
For a long time we used the method of attaching pipes to reinforcing mesh. There were many reasons for this: price, lack of other offers and expensive delivery to order. Now we are bringing anchor brackets and securing the pipes with a tacker. This significantly speeds up the installation process. Difficulties usually arise when pipe lines run at close distances. The tucker does not fit into the gap between the pipes and our tucker often makes false alarms. It is still unknown whether this is a feature of all tucker machines or just ours.
Penoplex is considered one of the best floor insulation materials due to its technical properties. The technology for installing it, although it has certain nuances, is not highly complex, so anyone with minimal construction skills can perform floor insulation with penoplex.
Floor insulation with penoplex
Scope of application of expanded polystyrene
H2_2
The scope of application of PPS is quite wide in both civil and private construction.
It can be used for:
- thermal insulation of the foundation and basement floors, roofs;
- facade insulation, wall insulation;
- thermal insulation of pipelines and refrigerators;
- arrangement of basement walls and floors;
- construction of partitions;
- insulating the soil around the foundation to prevent freezing;
- PPS can be used as a warm floor screed with polystyrene foam.
Parameters for choosing insulation, what we pay attention to
When purchasing floor heating from expanded polystyrene, you should take into account indicators such as: quality and variety.
Initially, the quality of polystyrene foam boards for heated floors is determined by their appearance. The following points should be taken into account:
- Color - should be bright and uniform, which indicates compliance with the technological process. Most often sold in blue or orange. The color scheme itself does not affect the characteristics of the product.
- Smell – a strong odor is unacceptable, a slight, slight specific odor may be present.
- The shape is clear geometric, and the edges are smooth and do not crumble.
- The granules are the same size without voids.
- The surface is flat, otherwise the thermal insulation qualities will be reduced.
For your information! Experts recommend especially inspecting the place of the cut or break. If the granules are intact in this area, we can talk about their poor adhesion to each other. In a high-quality slab, when broken, the granules should also be destroyed.
Laying technology: a set of basic rules
Installing the substrate is not difficult; you can do the work yourself. The main thing is to follow simple and clear rules.
The order of installation depends on the form of the lining: roll insulation, individual modules or puzzle slabs, fixed together with a locking connection
General requirements for installation of the substrate:
- Accurate calculation . It is necessary to determine in advance the amount of material taking into account the standard sizes of the lining. It is optimal if the insulation is placed with a minimum number of joints.
- Preparing the subfloor . The base must be level. You shouldn’t rely too much on the ability of dense material to mask unevenness - any product will take the shape of the base over time.
- Waterproofing . Substrates made from natural components (cork, chipboard, OSB) require preliminary installation of a water barrier. It is enough to lay thick polyethylene.
- Laying . Rolled, sheet material is rolled out without stretching; overlap onto the walls is required. The slabs are placed close to vertical surfaces, protected by 10 cm of damper tape.
- Docking . Rolled insulation sheets are overlapped and secured together with construction tape. Plates and mats are grouped end to end.
When installing a heated floor under a laminate, it is necessary to take into account the direction of the panels - they are placed mutually perpendicular to the roll backing.
How to lay
Let's start with the fact that the flooring of special film waterproofing is a mandatory installation stage, regardless of the type of mat. Along the bottom of all walls of the room it is glued with damper tape.
The next layer of mats is laid using a locking system, and if the thickness and weight are small, using the adhesive method.
Attention
With this installation, you cannot use metal fasteners, as this may damage the integrity of the thermal insulation layer and waterproofing.
The assembly joints of the foil plates are taped with tape. If necessary, mark the surface for water pipes and proceed directly to the installation of heating circuits.
The value of thermal insulation substrate
Insulating material is an intermediate layer between the subfloor and the water pipeline with the coolant. The main purpose of the substrate is to preserve and redirect heat flows upward, that is, to the living area of the room.
In addition to the task of preserving heat, the intermediate layer performs a number of equally significant functions:
- Waterproofing. In emergency situations, a waterproof substrate will retain water, protect the lower layers of the underground “pie” and prevent water from leaking to the basement floor. In addition, it will prevent the flow of moisture vapor from the screed to the finishing floor covering.
- Thermal insulation. The layer acts as a kind of barrier between elements with different temperatures. Otherwise, contact with a cold floor will contribute to condensation and a decrease in the characteristic qualities of the insulation.
- Uniform heat distribution. The substrate minimizes the likelihood of obvious temperature changes - there are no excessively warm or cold zones. This feature reduces the negative thermal impact on the final flooring, appliances and furniture.
- Sound barrier. Most underlay materials absorb noise from walking on the floor and improve the overall sound insulation of the room.
The substrate softens shock loads on the base, distributing point pressure - this helps maintain the integrity of the screed.
The insulating layer, due to the low thermal conductivity of the material, gives a heat-reflecting effect - the main flow of heat energy rushes upward. In the absence of a substrate, the efficiency of the heating circuit decreases sharply, and energy bills increase (+)
When installing a water floor, the substrate is usually laid on top of the insulation to maximize heat retention - a “thermos effect” is realized, reducing heat loss.
The lining with beads makes installation easier - you can use different options for placing the heating circuit, choosing the optimal locations for connecting the system and installing control sensors
Selecting a substrate by type of base
The physical characteristics of the decorative floor covering significantly influence the choice of linear parameters and physical qualities of the substrate. The greater the weight of the finish, the stronger and more reliable the damper should be.
Ceramic tile. The water floor under the tiles is installed using concrete technology - the contour is mounted under a monolithic screed. This method involves significant loads on the lining material.
Substrates with high load-bearing capacity, such as extruded polystyrene foam, are suitable. Both smooth mats and ridged mats can be used
Laminate. The main criterion for choosing a substrate for a warm water floor with a laminate coating is the highest possible heat saving rate, since the panels themselves do not transmit heat well.
The light weight of the laminate does not put significant pressure on the “water system”. This makes it possible to use different types of lining, including soft ones
The optimal solution is heat-reflecting insulation with a low degree of thermal conductivity.
Linoleum. Installation of roll coating is carried out on plasterboard, OSB or sheet plywood. The panels have an impressive weight, which means that the requirements for the strength of the substrate are becoming more stringent. It is recommended to give preference to polystyrene foam, cork options or a lining made of cross-linked polyethylene foam.
Read more about installing a water-heated floor under linoleum in this article.
Setup No. 1
When they opened the packages with EPS, it turned out that it was soft, and the hardness did not exceed 200 kPa. The company that supplied this material turned out to be not a manufacturer, but a reseller, and it seems that the characteristics on the site were simply made up. Fortunately, when sodrujestvo was carefully preparing to install the floor, he came across an Italian instruction; there, it was recommended to use ordinary 200 kPa foam plastic for thermal insulation, and two overlapping galvanized layers on top for strength. They did everything according to this scheme, but it all cost money and time - only cutting the galvanization took 4 days.
But our participant separately emphasizes: it is wrong to think that the building materials market in Cyprus is a complete mess; many companies work in such a way that a mosquito will not undermine your nose. The air-to-water heat pump was delivered on time, without prepayment and only by agreement on the Internet; the same goes for other materials.
SodrujestvoFORUMHOUSE Member|
By the middle of the 2nd day I had everything at the construction site. And a day later they brought steel. So downtime was avoided.
Analogs
Quite a lot of materials are produced that are used for the same purposes as polystyrene foam. However, in terms of their characteristics, they are very inferior to the latter.
Such materials include:
- Polystyrene foam is a fragile material that is not suitable for heavy loads on it.
- Cork slabs have one significant drawback - high cost.
- Mineral wool perfectly absorbs moisture, which is extremely undesirable when using it when laying warm water floors.
- Foamed polyethylene is bad because when pressure is applied to the material, it significantly decreases in thickness.
Bonding of EPS and galvanized sheets
So, all the materials have been purchased, you can start. It was not possible to find glue that would reliably attach EPS to the old tiles in Cyprus, and one of the installers suggested extrapolating his experience to Cypriot soil: using a gun and polyurethane foam. We applied ordinary (!) foam to the EPS sheet in paths every 8 cm, laid it on the floor, immediately lifted it back and laid it down completely.
SodrujestvoFORUMHOUSE Member|
I think you can also glue EPS to almost any base.
Pipe laying lines were marked on the EPS with a marker, and the grooves were milled with a hand milling machine. The width of the grooves is 18 mm, and the plates for a pipe with a diameter of 16 mm fit perfectly into them.
Laying metal-plastic pipes into grooves is much more convenient and simpler than plastic ones. The plastic doesn't hold at all and tends to jump out of the grooves.
Directly during installation, the pipe was wrapped in 0.1 mm thick foil at the bends. It wrinkles a little, but that's inevitable.
In those areas of the structure where it was inconvenient to lay the plates, only foil was placed, cut into strips of the required width. They placed it on the groove, pressed it in with their hands, and installed the pipe. The pipe was wrapped so that a strip of two layers of foil was formed on one side of the pipe.
Then galvanized sheets 1 mm thick were laid in two layers “overlapping” (thinner ones simply could not be found).
SodrujestvoFORUMHOUSE Member|
First, the sheets were cut out and adjusted to an area of 10 - 15 m2.
The sheets were glued together and glued to the galvanized sheet with polyurethane two-component glue, which is capable of gluing, it seems, just about anything. After gluing, the floor was pressed down with heavy objects to press the sheets down. In general, everything was going great, but then something happened