Quite often you can feel a sharp cold snap indoors. Most often this happens when there is a strong gusty wind outside the window. This is especially typical for the autumn period. To avoid unpleasant sensations, you should choose the right insulating material.
A sharp gusty wind can cause cold temperatures indoors. Not all building materials can hold back a strong flow of cold air. Most often, such unpleasant situations occur in the autumn or spring. To combat such an unpleasant situation, there is a windproof film. Very often such insulation is neglected, but it is not always worth doing.
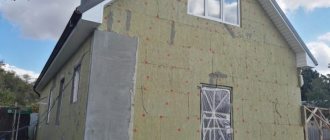
Siding used as a finishing material inside or outside a building unconditionally requires additional thermal insulation. However, whether special wind protection is needed for such material is worth finding out exactly, since its installation is associated with additional costs.
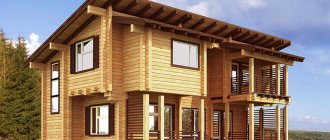
House finished with siding
As practice shows, most often siding panels are often used as exterior finishing material in the reconstruction of old buildings. Often, old buildings made of timber, wood, and brick are sheathed in this way. This method of reconstruction allows you to revive the building, giving it a modern, stylish look.
It’s worth noting right away that siding panels do not have thermal insulation properties, which is why we can say with confidence that you will have to work hard to create high-quality insulation.
The need to install wind protection under siding
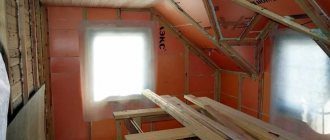
Wind protection under siding when insulating a building is extremely important
The use of a material such as windproof film under siding is very important for maintaining the quality characteristics of the heat-insulating material used for insulation. Many factors depend on maintaining the performance properties of insulation, and the building is characterized by:
- no need to implement active heating of the room;
- slower cooling and decrease in indoor temperature;
- high-quality heat retention by walls;
- increased levels of sound insulation inside a living space.
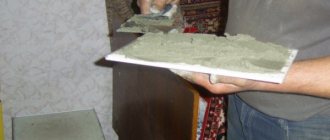
As a rule, thermal insulation materials are used for insulation in the form of mineral wool boards, including Rockwool of the Light Butts type, as well as under the Knauf-Insulation brand. The dimensions of such materials may vary. It should be remembered that the wind-hydroprotection film is installed on insulation.
The use of windproof film under siding is very important for maintaining the characteristics of the thermal insulation material used for insulation
The creation of a wind barrier film for installing insulation is a relatively new direction in the production of special insulating materials. The release of wind protection products is a consequence of the emergence of the installation of ventilated facades, which do not have sufficient stability in the presence of high wind loads.
The solution to the problem of wind loads when installing such facades was the creation of additional wind protection for wall surfaces, and the windproof version of the film became a common material for installation.
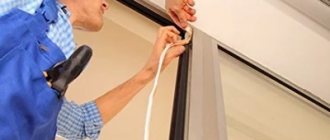
Installation of a windproof layer
When installing a windproof film, as in the case of a waterproofing layer, the film is overlapped. All joints that are formed must be glued using a special waterproofing tape. In this case, it is necessary to use just such a tape, this will protect the structure from the penetration of cold air.
When choosing a tape, do not forget that this material must have good vapor permeability. There should be no difficulty in purchasing such products, since such a building element is usually produced by the same manufacturer as the wind and waterproof film.
The film material is sewn onto the finished frame, which makes an indentation of 2 - 3 centimeters from the insulation. This gap is necessary for ventilation.
As it becomes clear, without high-quality wind protection, it is almost impossible to achieve comfortable living conditions. Its use is necessary for almost any coating of external walls. This material is used for insulation only of private houses, since its use in multi-apartment buildings is difficult. As for cladding a building with siding panels, there is no way to do without the use of windproof film.
The design of the walls of a wooden house always involves the creation of several layers, one of which serves as a vapor barrier - it prevents moisture entering the wall from the room from destroying the insulation material.
Where does moisture get into wood?
There is an opinion that moisture enters the walls of a wooden house from the outside with slanting rain, fog and snow. Precipitation actually moistens the walls. But wet weather does not last so long; the sun and especially the wind help to quickly remove excess moisture. An attentive reader will tell you: the average annual air humidity outside is 78% (data for the Moscow region), and in the house it fluctuates between 40-70% - which means there is more moisture outside and it should penetrate from outside to inside.
But actually it is not. The fact is that climatologists operate with relative humidity, this is the ratio of the proportion of water vapor to the maximum possible, taking into account the temperature. And the colder the air, the less moisture it can contain. To understand the real moisture content in the air, absolute humidity values are used in building physics. In the summer, when the temperature outside and inside the house is approximately the same, the humidity is similar. But in winter and in the off-season the picture is completely different. For example, at an outside temperature of -20 ºС and a relative humidity of 80%, the absolute value will be 0.6 g/m3, and inside the house at 20 ºС and a relative humidity of 60%, the absolute value will be 10.4 g/m3. Accordingly, the actual moisture content in the air inside the house is 17 times higher. It is not surprising that wood, like a pump, absorbs moisture from the inside and releases it to the outside through micropores and joints between logs filled with flax, moss, jute or other “breathable” inter-crown insulation.
It is important to know: most of the year, with the exception of the warm period, water vapor penetrates the wood from inside the house and tends to escape outside, the greater the quantity, the colder it is outside and the warmer it is in the house.
Selection of thermal insulation products
Various types of siding are used for cladding buildings made from a variety of materials. It is better to select insulation for a specific type.
House made of foam concrete or aerated block
Although such facade materials themselves act as insulation, their thickness is not always sufficient. In addition, the unattractive appearance requires cladding, which siding does an excellent job of.
Thermal insulation material for buildings made of foam block and aerated concrete must have high vapor permeability
Frame and panel buildings
The choice of thermal insulation material for these houses must be approached carefully; they need reliable insulation. The recommendations are as follows:
External activities with such houses imply taking into account the thermal insulation material that was used for internal processes.
It is impossible to say exactly which insulation is better; you need to proceed from the specific situation. Compliance with existing requirements and recommendations will help you make the right choice.
How does wind protection work?
Windproof film actually performs two functions. Not only does it prevent air masses from penetrating into the insulation when there is wind, but it also acts as a moisture barrier.
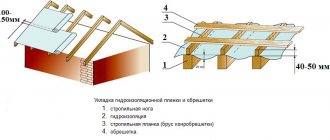
A separate type of film is used for arranging insulated roofs. Such films are often called under-roofing membranes, by the way, for some reason many builders neglect them, as it turns out in vain...
Roofing membrane
The windproof membrane consists of polymer fibers sintered in a special way. The film itself is designed in such a way that on one side it is smooth and does not allow moisture from the street to penetrate into the house, on the other it has a rough surface.
When is it required from the outside, and when from the inside?
of hydrowind protection is similar to a vapor-permeable membrane. It freely releases steam vapor from the multilayer wall, but does not allow moisture from the environment to pass inside.
It is not a complete waterproofing and is only capable of protecting against tangential or small penetrations of moisture, but will not work, for example, against capillary moisture coming through the walls from the ground.
The retail chain sells two types of hydro-wind protection - for wall protection, the least durable, with minimal waterproofing characteristics, and a super-diffusion membrane for roofs, which has the greatest strength and selective protection - on one side it allows steam to pass through, and on the other it does not allow moisture to pass through.
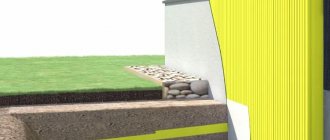
Such hydro- and windproof films are installed exclusively from the outside of the house on the outside of load-bearing walls, but not instead of a vapor barrier layer.
It is mandatory to install a ventilation gap after it to remove vapors into the atmosphere, and only then the cladding.
An exception may be for rooms with very high humidity: swimming pools, steam rooms and baths. Here the task is not to lock the vapors inside the rooms, but to the need to accumulate it and remove it from the room through the drainage system at a point, with subsequent evaporation on the street.
Wind flap
Strong gusts of wind can not only blow heat out of the house, but also damage the cladding and accelerate the wear of insulating materials. To extend the life of insulation and siding, a wind barrier is used.
A wind strip or wind board is an additional element designed to redistribute the load from the wind. It fixes the siding panels and takes on the wind. As a result, the cladding does not become loose under gusts, the joints remain intact longer, and rain or snow does not get inside.
An additional function of the wind strip is decorative. It gives the facade a more holistic, finished appearance.
It is important to use windbreaks designed for installing siding panels. You need to carefully approach the choice - quality criteria and accuracy of calculations must be observed, otherwise the use of planks will not bring results
Installation Features
When installing hydro- and vapor barrier films, there are certain rules. Compliance with them will ensure long service life of the insulation and waterproofing. The most important thing is to avoid gaps in insulating the insulation from the environment. Otherwise, moisture will enter the insulation through these holes and it will not immediately get wet, after which it will begin to lose its heat-insulating properties. It is also worth paying careful attention to the fastening of the films so that breaks do not occur during installation and further operation.
And also - control the correct application of films. After all, waterproofing membranes have a front and back side. If you mix them up when installing waterproofing, the film will not work correctly.
View: cost of siding and additional materials
Wind protection for the walls of a wooden house
Houses with wooden walls suffer from moisture more than others. The tree is constantly in motion under the influence of temperature. The most destructive periods are weather changes. Therefore, owners of wooden buildings cover them with an additional layer of cladding.
But he is not a panacea either. Wooden walls that are not properly sheathed can rot faster than you expect. Reasons: lack of ventilation, more comfortable conditions for wood-destroying organisms (bacteria, mold, insects), constant dampness can eat the walls two to three times faster than operation without cladding. Therefore, in this case, the use of wind protection is mandatory.
It is recommended not to save money and install diffusion membranes. This approach will allow you not to look under the skin of a wooden house for at least 10 years.
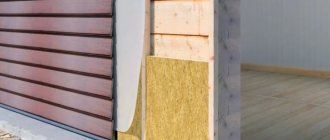
What is the design pie made of?
The wall pie in a wooden building is a “layered” system made of a number of protective materials, each of which performs its own function. The correct composition of the cake is calculated during the design of external or internal wall insulation and depends on the following factors:
The wind barrier contractor must understand the difference between a vapor barrier and a wind barrier. The first is always installed before the insulation, and the second after. If you install them the other way around, the heat insulator will quickly fail.
A standard pie for windproofing wooden walls looks like this:
The diagram is clear:
Classic membranes are best suited for siding; they reliably protect the heat insulator from external moisture and wind; they are installed, leaving a ventilation gap.
Reference! Diffusion membranes can be installed on facades, both with and without a heat-protective layer. They are made in the form of a multilayer structure and allow moisture to be removed from the insulation or walls, but at the same time it is completely impermeable to external wind influences.
For this modification of membranes, a ventilation gap is not required; it is laid closely on the insulation or wall.
A very common mistake for many novice builders is installing thermal protection without a windproof membrane, when the siding is mounted directly on the insulation. But since, according to its characteristics, it cannot protect the heat insulator from either wind or moisture, therefore, during the first year of operation, such insulation fails and the destruction of the wooden load-bearing wall begins.
Installation on a receding and level base
The wall level between the plinth and the wall is often called “zero”. It is this boundary that must be found before starting work. To do this, you can use a water level, which checks every corner of the house. They need to determine the lower point of installation of the starting profile. For example, let's take a starting profile, the width of which is 6.4 cm. From the bottom point found on the wall, measure this width and hammer a nail into the wall. Along the entire perimeter of the house at each corner, the nail is driven in at the same height and level.
Connect the hammered nails with one cord. This cord indicates the upper limit of the starting bar. To prevent the cord from interfering with the installation of the plank, you can rub it with chalk and mark a line around the entire perimeter of the house.
Next, check the entire length of the house for the presence of sheathing. It should be enough to install the starting bar. In some cases, it may be necessary to increase the sheathing, especially if the base is far from horizontal and some corners are strongly raised up.
After this work, you can proceed directly to installing the bar itself.
For installation, a distance is measured from the corner of the house, which will be the same as the width of the corner profile (75 mm) or j-profile (46 mm). In this case, you must not forget to take into account the presence of a temperature gap of up to 5 mm.
Now you step back from the corner by the width of the profile plus the temperature gap. Place the starting bar in this place and secure it. All this must be carried out according to the markings carried out. The top edge of the plank must completely coincide with the mark along the entire perimeter of the walls. The plank can be secured with nails or self-tapping screws. They are inserted into a special perforated hole. After installation, the bar should be moved from side to side, returning to its original place. Nothing should interfere with these movements. After installing the first strip, you also step back up to 10 mm for the temperature gap and install the next starting strip.
According to this principle, installation is carried out along the entire perimeter of the facade. During work, from time to time you can check the bar for horizontalness using a level.
Basic rules for waterproofing ↑
When installing a waterproofing film, certain rules must be followed:
- When laying the film, the joining of the edges should be done with an overlap of at least 150 mm, gluing the joint with tape. In this case, it is necessary to check that there are no areas not covered with waterproofing to avoid the insulation getting wet.
- The film should be attached in such a way that it cannot be damaged when installing the siding.
- The film is secured using galvanized nails with a wide head or staples using a mechanical stapler.
- A gap of about 30 mm is required between the film and the siding to allow natural ventilation. In addition, when installing some types of films, it is necessary to leave a gap between them and the insulation: this requirement must be specified in the instructions from the manufacturer.
- It is necessary to ensure the correct orientation of the film: if it is laid on the wrong side, the material will not function correctly.
Windproof film for walls: purpose, structure
Facade insulation film is used for:
- protection from atmospheric moisture when installing the so-called thermal cake;
- stopping cold (warm) outside air in order to reduce heat loss in the building;
- as a barrier - in ventilated facades it protects the insulation from snow blowing in and its accumulation under the facing material.
Water vapor barrier films for facades have the following structure:
- Waterproofing vapor-proof films consist of two layers. The inner layer is a non-woven artificial material, among the fibers of which moisture accumulates and condenses, and is removed by gravity down this layer. The outer layer is waterproofing and waterproof. It is made by spraying a thin layer of polyethylene (such films are cheaper) or acrylate (expensive branded films). They are installed with a small gap (up to 30 mm) from the insulation; there should be holes at the bottom to remove condensate.
- Vapor-permeable membranes (diffusion) – a higher class of wind protection. They consist of three layers: the outer layers do not allow moisture and air to pass through, but allow water vapor to pass through. In the center between these layers there is a vapor-conducting layer, which removes excess moisture to the outside. The outer layers are made of non-woven polyester, the inner layer is made of acrylic fabrics with a hygroscopic response mechanism. They can be installed hermetically close to the insulation material.
For high-rise buildings, reinforced films with a thicker coating can be used, which provides them with additional tensile strength. Such films can be mounted on umbrella-type mounts. The main condition is to ensure sufficient tension so that the wind protection does not “flap” under increased wind pressure in bad weather.
All films are installed taking into account the continuity condition: there should be no gaps between the wind protection strips, the joints are overlapped or sealed using construction tape. On high-rise buildings and tall structures, the film is placed vertically along the facade; on one-story and two-story facades, the roll can be rolled out horizontally, forming an overlap to ensure drainage (the lower one is launched under the top sheet).
Step by step procedure
When carrying out the technological process of installing wind protection with your own hands, the contractor must be extremely careful, following all the manufacturer’s instructions. Rolls of windproof membrane should be mounted horizontally, in the direction from bottom to top.
It is very important to strengthen it with the right side. As a rule, the external one is considered to be the one that has the manufacturer’s brand on it. In other cases, you simply need to carefully study the factory instructions.
It is very important for any type of protective membrane to maintain the overlap size: vertically/horizontally, respectively, 150/100 mm.
The film must adhere extremely tightly to the plane of the heat insulator - this is a fundamentally important condition for its high-quality operation.
Fix the film to the heat insulator frame with galvanized nails or a construction stapler. The joints are taped with specialized tape so as to prevent even the smallest gaps. At the bottom, the membrane should not contact the ground. In this place, a drain is provided to remove condensate moisture formed on the outside of the membrane.
Outside
External installation of wind protection depends on what material will be used - roll or sheet.
There is a general order in which the layers of laminated timber walls are laid out. All outer layers are placed on a wooden frame made of timber. A vapor barrier and then insulation are placed behind the load-bearing wall . Next, after the ventilation gap, there is a wind barrier in one or several protective layers, then it is secured with a counter-lattice, after which the façade finishing goes through the ventilation gap.
Features of installing rolled wind protection for a wooden house:
Important! You need to purchase windproof roll films with a reserve to ensure a technological overlap of the material of 100/150 mm.
Installation technology for sheet wind protection for a wooden house:
From the inside
Wind protection from the inside is installed only in exceptional cases, for special rooms with a high content of water vapor, for example, baths and swimming pools. The feasibility of installing internal wind protection should be confirmed by calculations for selecting the necessary layers of multi-layer wall protection.
In such cases, wind protection is performed in combination with thermal insulation on ventilated frame systems, which are fastened to the main wall material. For these purposes, a membrane is selected that has a universal action and has vapor and waterproofing protection.
The procedure for installing the membrane from the inside:
The procedure for installing siding with laying vapor barrier, insulation and waterproofing
Let's consider the stages of cladding a facade with siding using the example of a wooden house and mineral wool insulation:
- The surface of the walls is cleaned of dirt, the cracks are filled with tow or silicone sealants.
- The vapor barrier film is attached to the wall with the rough side using a stapler, the edges are taped.
- To attach the insulating material, a vertical sheathing is made of timber treated with anti-rotting compounds.
- Mineral wool slabs are laid tightly, without gaps. Such material can maintain its position without the use of fasteners. In cold regions, two thermal insulation layers are laid.
- A waterproofing film or membrane is applied to the insulation and secured with an overlap to the vertical sheathing using a construction stapler. The edges of the waterproofing are taped with tape.
- A counter-lattice is installed on top of the waterproofing, to which the siding is attached. The counter-lattice is not only a frame for the siding, but also forms a ventilation gap, allowing the insulation to “breathe”.
Some types of waterproofing materials additionally require a gap between the thermal insulation and the water barrier.
A counter-lattice is mounted on top of the fixed waterproofing under siding made of timber or metal profiles; the second option is more durable and reliable.
Work production technology
The technology for insulating a wooden house under siding is quite simple; any “handed” man can perform such work.
- The distance between the bars should not exceed 60 cm; it is better that it is equal to the width of the insulation; for mineral wool it is 50 cm.
- We recommend mounting the first level of bars vertically. The second, if the insulation is laid in two layers, is horizontal. The counter-batten to which the siding will be directly attached is vertical.
Frame for insulating a log house with mineral wool in two layers.
- It is convenient to attach the bars to uneven walls using perforated plasterboard hangers. The traditional method will be labor-intensive, but preferable from the point of view of heating engineering: adjust the distance from the wall by placing wooden pegs. Screws will hold the frame in place better than nails.
Options for framing and insulation for siding.
- If the mineral wool mats are too soft, we recommend installing one or two horizontal jumpers in each vertical section, this will reduce the subsidence of the material.
- Having sewn the frame and filling the gaps between its elements with insulation, they attach the wind protection, and on top of it - the counter batten.
The frame is filled with insulation, the next stage is wind protection
- The final work is covering the wooden house with siding.
The “correct” design of wall insulation under siding with a double layer of mineral wool.
Free air flow must be ensured in the ventilated gap. To do this, gaps are left in the outer cladding at the bottom and top of the wall (covered with a mesh to prevent mice and insects) or grates are inserted into the siding panels.
It is important to know: ventilation holes must be located in the lower and upper parts of the wall cladding.
Not everyone has the capabilities and necessary skills to perform such work. If you don’t have confidence in your abilities, it’s better to entrust the insulation of your own home and covering it with siding to experienced craftsmen.
Installation of siding panels
The siding panels have a special lock, so their installation is simple even with your own hands. They easily form an attractive seamless surface in which neither the method of fastening nor traces of screws can be seen. The panels can be easily sawed with a hacksaw. Siding has practical and valuable properties:
- It is easy for them to cover any surface: roofs, walls, gables, plinths;
- it is quite durable and strong;
- it does not rot or rust;
- he is not afraid of moisture;
- he is not afraid of the sun's rays;
- it has a large selection of textures and colors.
To lay vinyl siding with your own hands, you need to purchase the required amount of additional materials:
- J - profiles;
- external and internal corners;
- finishing, starting and finishing strips;
- near window trims and ebbs for lining window and door openings;
- chamfers, soffits, flexible profiles for cladding gables and arched windows.
Covering a wooden house with siding on the outside with your own hands should begin with installing the starting strip and outer corners. Vertical surfaces are faced from the bottom up. The panels are assembled correctly if the panel clicks loudly when the lock is locked. Don't forget about temperature compensation gaps. Siding panels are highly flexible, so they can be slightly bent for ease of installation. Minor difficulties arise when covering the last panel under the eaves with your own hands. Almost always it is narrower in width (trimming is required) and you need to insert the top edge into the finishing strip while simultaneously snapping the lock.
Methods for laying waterproofing material
There are two ways to install vapor-waterproofing films on the façade:
- Rolling out the roll horizontally from the base of the house while simultaneously securing it with staplers. The next layer of film is laid overlapping.
- If the height of the building is small, it is easier to attach the film vertically. Both methods guarantee protection of thermal insulation from moisture when all joints are sealed with specialized double-sided tape.
Wind protection for siding – panels
During restoration work, it is safe to say that wind protection under the siding is necessary. Its presence will help protect the quality properties of the thermal insulation layer.
If the insulating layer fully performs its functions, then the following indicators are immediately visible:
- while maintaining the quality properties of the insulation, there is no need to constantly heat the premises in the building;
- the atmosphere inside the room cools down more slowly, which makes it much easier to maintain a certain temperature inside the room;
- if you have a high-quality insulating layer, you will protect the walls from possible freezing at low temperatures;
- among other things, remarkable sound insulation properties are revealed.
Mineral wool is most often used as insulation for external walls. This insulation has remarkable properties, but its use requires high-quality waterproofing. Since open penetration of moisture has a detrimental effect on the properties of any insulation.
Wind protection scheme for siding panels
Very often, the waterproofing film includes a windproof layer, which eliminates the need to purchase additional material. However, not every waterproofing material has these properties.
Windproof film has a limited history of use. We can say that this is a new material that was specially developed for new facade materials with high ventilation rates. It’s worth saying right away that in this case, you cannot do without special wind protection, otherwise, with strong gusts of cold wind, the temperature in the room will quickly drop.
Types of windproof film
Currently, there is a great abundance of insulating materials. This nuance does not bypass wind protection, which is available on the modern market in several types, namely:
- Diffuse membranes. Using this material, not only waterproofing is performed, but also reliable protection of the insulation from wind loads. In this case, the material consists of several layers. For better results, it is recommended to use three or four-layer films. It is also worth noting that this material is also used to provide vapor barrier for siding. Diffuse membranes are considered the most popular insulation material today.
- Windproof film. Many companies are engaged in the production of such products. This material is designed to withstand strong wind currents, providing a reliable barrier to cold air. Such a film is characterized by resistance to heavy loads, which is why films with increased density are used as wind protection.
Wind bar
When cladding external walls using siding panels, it is important to pay attention to wind strips. This element allows you to contain loads from sudden gusts of wind. When using these elements, the facade siding wears out significantly less
This material allows you to significantly redistribute the load
When using these elements, the facade siding wears out significantly less. This material allows you to significantly redistribute the load.
The use of a wind strip will not only significantly extend the service life of the cladding, but will also give a completed look to the façade of the building. It is worth noting that, as in many other cases, the installation of such elements is carried out with precise calculations and in strict sequence. Otherwise, the use of wind bars will not give the desired result.
Instead of PS
Now you know whether you need a vapor barrier under your siding and how to install it. All that remains is to do the job correctly. Contact the certified Alta-Profile team so that the vapor barrier is installed in compliance with the technology. Ready? Your home is now warm and comfortable at any time of the year!
Good afternoon I'm going to install vinyl siding on a wooden facade (the building is old - clapboard). Part of the wall area is planned to be insulated, and part will be done without insulation. The siding will be mounted on a galvanized profile with screws. Actually question 3. Question No. 1: What screws should I use to install siding? Profile 60X27.
Question No. 2: Is it necessary to sheathe the façade of a building with glassine (or vapor barrier) under the siding? I read the following comment from the Internet: “However, in the case of reconstruction of an old facade, it is strictly not recommended to install a vapor barrier, since the walls must breathe. Vapor barrier prevents the penetration of air and the vapor contained in it from the room, and water from the insulation inside. The insulation does not interfere with this: its vapor permeability should be higher, so it is recommended to use insulation based on mineral fiber, preferably basalt.”
Question No. 3: How to fix the insulation, install wind protection and make windproofing in areas with insulation? The insulation is basalt wool – ROCKWOOL. In theory it’s clear (from the wall side) - insulation, wind insulation, air gap, siding. How to attach wind insulation to a metal profile and then create an air gap?
Windproof membranes for walls entered construction technology with the development of ventilated facades. This material today is presented in several main forms: as a vapor barrier or waterproofing, or a material with combined properties (the material removes excess moisture in the form of steam from the insulation from the inside, and does not allow moisture to enter from the outside). Most materials in this category are represented by films and membranes; vapor barrier boards are less common.
What insulation materials are suitable for this?
Let's take a closer look at each of the suitable thermal insulation materials. Let's start with the cheapest, that is, glass wool.
Option one. Glass wool
A budget variety of mineral wool, so to speak. The material is quite dangerous, since when working with it, glass dust is released, which is extremely harmful to the respiratory system. When choosing this insulation, be guided by the fact that it will cost several times cheaper than its analogues (more on prices a little later).
Here are the main characteristics of glass wool:
- thermal conductivity index – from 0.029 to 0.041 W/m*K;
- the use of phenol-formaldehyde resin during the joining of fibers, due to which, in fact, toxic substances are released;
- the specific gravity indicator fluctuates between 11 and 25 kilograms per cubic meter;
- high danger to the human body (possible severe irritation of mucous membranes and skin);
- the vapor permeability indicator reaches 0.6 mg/m*h*Pa;
- the material is made from sand, limestone, broken glass, soda and borax;
- glass wool is a non-flammable material;
- high resistance to aggressive chemical environments;
- operating temperature – from minus 60 to plus 250 degrees;
- the fibers of the material do not absorb liquid at all;
- moisture absorption (if glass wool is briefly immersed in water) is approximately 0.8 kilograms per square meter.
From all that has been said above, we can conclude that glass wool would be an ideal insulation material if not for a number of harmful factors; more specifically, he:
- does not burn;
- resistant to high temperatures;
- moisture resistant;
- almost does not allow heat to pass through;
- not afraid of bacteria and fungi.
But health still comes first. That is why in a number of countries glass wool was banned from being used in civil construction. In short, in our case this material is not suitable at all.
Option two. Mineral wool
A common material, including as insulation for siding. It has all the advantages of the previous option, but it does not have its disadvantages. In addition, it is worth noting the long service life of mineral wool, reaching 70 years.
Over the years of operation, this insulation for the walls of a house outside under siding has shown itself only from the best side. You can easily install it yourself, but in the process you must strictly follow all the rules provided for by the installation technology.
In short, if you plan to use mineral wool to insulate walls under siding, you must take care to protect the material from getting wet. This can be achieved with the help of special membranes - moisture, wind and vapor protection (more on this a little later). The heat insulator in this case will be wrapped in a waterproof film. Manufacturers claim that such protection functions like a valve, since it only allows steam to pass out. Steam will not penetrate into the material from inside. What about the “breathing” of the walls, many will ask? The fact is that such “breathing” does not involve the movement of air through the walls; a ventilation system is used to ensure air exchange - even old log houses “breathed” only thanks to the stove draft, and not due to air penetration through the walls.
In short, mineral wool is a good option for thermal insulation of the outside walls of a house under siding. Go ahead.
Option three. Styrofoam
This material is characterized by a fairly low thermal conductivity (no more than 0.043 W/m*K), and therefore is rightfully considered one of the most effective modern thermal insulators. It is used in many areas, including for insulating the outside walls of a house under siding.
And it’s not surprising, because polystyrene foam has many advantages. So, it is quite easy to install, and it does not need waterproofing. It is also easy to work with polystyrene foam - it weighs little, is easy to cut, and does not emit any harmful dust.
Extruded foam plastic has a minimal thermal conductivity, but it:
- very durable;
- resistant to bacteria, fungi;
- not afraid of high humidity.
Its surface after installation will be protected by siding, and therefore the negative impact of the environment will be minimized. Therefore, extruded foam plastic is one of the best options for insulating the outside walls of a house under siding, especially since its modern varieties are safe both from a fire point of view and from an environmental point of view.
The issue of vapor permeability
The building wall in SNiP is described as a multi-layer enclosing structure. Interior decoration - wallpaper, for example, plaster, the wall - monolithic, with voids, double, and exterior decoration - this is the simplest version of its construction. If thermal insulation is assumed, the design becomes much more complex.
Obviously, the ratio of different materials in such a “pie” cannot be random and is subject to a certain pattern. It sounds like this: the ability of a material to remove steam should increase from layer to layer from the inside out.
Why is this necessary? In a residential building, a constant source of steam formation is not only a gas stove or water in a sink, but also people, animals and plants. Steam released through breathing or during washing and cooking is removed using a ventilation system or simply through an open window, but also through the walls of the building. If this does not happen, moisture accumulates in the room, and condensation falls on surfaces - walls, furniture, clothing.
- This case is best illustrated by a bathroom in a multi-story building, where there is almost never good ventilation. After taking a bath or even a shower, the entire room from the ceiling to the handles on the washing machine becomes wet. Why? The bathroom is finished with tiles or tiles; this material is completely vapor permeable, and therefore moisture is not removed at all. The dew point is condensation, located inside the living space on the walls.
- Option two is thermal insulation inside. A solution that builders try their best to avoid. Compared to a brick wall, the vapor permeability of insulation is much higher, therefore, in the design - finishing / insulation / wall, the most vapor-permeable element is mineral wool or polystyrene foam. Condensation falls in the thermal insulation area and quickly destroys the material, which makes waterproofing necessary.
- If insulation is carried out from the outside, then the “pie” looks like this: wall/insulation/cladding, and, again, the dew point falls on the thermal insulation layer, since the cladding absorbs moisture much less. To prevent this from happening, the insulation is protected with hydro- and vapor barrier. Then the dew point ends up in the air gap between the wall and the insulation, for which purpose a substantial ventilation gap is left here during installation.
Installation of siding without insulation
- But if the walls of the building themselves have high thermal insulation characteristics - a brick wall of sufficient thickness, for example, then there is no need to additionally insulate them, but they do need to be protected from wind and rain. Do you need waterproofing and wind protection for siding without insulation?
The design looks much simpler: wall/cladding. However, the vapor permeability of the wall is higher than that of both metal and vinyl finishes, that is, the rule for increasing vapor permeability occurs and the dew point ends up in the area between the wall and the finish.
To avoid moisture accumulation, a ventilation gap is left between the finish and the wall. Therefore, installation of finishing without thermal insulation is quite possible, but without sheathing - not. If there is an air layer, then condensation accumulates on the inner surface of the finish, which is insensitive to water; if not, then directly on the wall, which leads to its destruction.
- Is waterproofing required here? It is not needed, since during sheathing its task is to protect the insulating layer, which in this case is not used.
- Do you need a vapor barrier for siding without insulation? Vapor barrier or wind protection is a vapor-permeable membrane that allows steam to pass in both directions, but water only in one direction, away from the heat-insulating layer. Again, if it is not there, then there is nothing to protect. Siding technology without insulation
Installation without heat and vapor barrier is much simpler.
- The surface of the facade is cleaned. Old finishing, if any, must be removed. If you plan to cover a wooden house with siding without insulation, then before work you should caulk the cracks between the beams or logs - this procedure will significantly reduce heat loss.
- A sheathing is fixed to the surface - made of a galvanized metal profile or a wooden beam treated with an antiseptic. The thickness of the timber should not be less than 50 mm, despite installation without thermal insulation.
- The pitch between the frame elements, as well as the direction - vertical or horizontal, are determined by the type of siding - lamellas, panels, and installation method.
- The material is fixed to the sheathing using the usual method: first, the starting strip is fixed, then the corner elements and near-windows, and the connecting profiles are fixed, if necessary.
- Then the panel is inserted into the groove of the starting strip and fixed to the sheathing. The fastening is not rigid; a film under the siding without insulation is not needed.
The photo shows one of the working moments.
Additional siding elements
From different manufacturers, additional elements may have different names and slightly different profile shapes, but the functions performed will be identical:
- The initial or starter strip of siding is used to secure the first panel. The installation features of this plinth accessory will be discussed below.
- Internal and external corners are used to secure panels at the corners of the building.
- A joint strip or H-profile is used to connect siding panels.
- The ends of the roof are sheathed with wind boards.
- The finishing strip is installed under the cornice and completes the installation of panels and additional elements. Also used when installing wind and window accessories.
- Soffit is used when finishing cornices.
- For neat lining of door and window openings, as well as when finishing the pediment, a J-profile is installed.
- The near-window strip is used for finishing slopes of both windows and doors.
- The ebb is designed to protect the bottom of the window opening.
- The drain plate serves to protect windows and the basement of the building from water flows.
Vapor barrier
A vapor barrier is installed between the wall and the insulation - this protects the insulation from the inside.
This film does not allow moisture or steam to pass through. Its task is to prevent steam from entering the insulation from inside the house. How much steam is released from inside the premises? For example, one person releases up to 1.5 liters of water in the form of steam per day. Without a vapor barrier, more or less of this moisture (depending on the ventilation in the room) will be absorbed into the walls and insulation.
We offer vapor barrier films:
- Yutafol N96
– three-layer vapor barrier with reinforcing mesh; - Izospan B, C
– two-layer vapor barrier with a rough reverse side – accelerates the evaporation of moisture; - Izospan D
is a woven vapor barrier of increased strength.
Wood moisture and harmful fungi
We all know how quickly wood that is constantly in a damp state is affected by mold fungi. The loss of strength of the material occurs in a matter of months, and in a year or two a log, in the thickness of which favorable conditions have been created for the life of fungi, can turn into dust. The main condition for mold growth is a sufficient amount of moisture. Accordingly, in order to preserve a wooden house for many years, its walls and other structures must be protected from waterlogging. The absolute humidity (the ratio of the mass of water to the weight of absolutely dry wood) of a freshly cut coniferous forest reaches 90%, of a log house before installation - 25-35%, of a wooden house, which has stood for a year under normal conditions - 10-20%, depending on the season. At the same time, fungal infection of wood begins to develop at a moisture level of 22%, which is only slightly higher than the natural state of the log house. By the way, these same conditions are suitable for wood-boring beetles to settle in logs.
It is important to know: under no circumstances should wood be allowed to become over-moistened - the main cause of its destruction.
Over-watering wood causes it to rot.