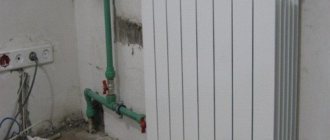
Pay maximum attention to this element of the heating system
Installing a chimney in a wooden house with your own hands - conventional and coaxial
We will now try to establish the differences between these chimneys, find out how they are installed, and in addition, we will give you the opportunity to watch the video in this article.
Various chimneys
Important! When calculating how to install a chimney through a wooden ceiling, it is important to remember that at 200 ⁰C the charring of wood begins, and a temperature of 300 ⁰C allows you to maintain stable combustion of wood in the stove firebox. This suggests that the main efforts should be directed at reducing the temperature at the junction of the pipe.
Installation specifications
Can use ceramics
- In order to ensure the correct installation of a chimney in a wooden house, you do not have to “create a bicycle” - there is practical experience, which is currently reflected in the form of regulations in various government documents. You can obtain the basic installation manual from SNiP 41-01-2003 (heating, ventilation and air conditioning) - it contains basic information that will be taken into account by fire safety representatives during inspection.
- But the constant temperature in the chimney can also depend on the distance of one or another section of it from the firebox, which is influenced by the design of the heater itself and the design of the chimney system. According to SNiP 41-01-2003, you need to maintain certain distances from stoves and pipes to flammable objects - in this case, it is wood (walls, partitions, rafters, etc.). Thus, brick and concrete stoves or pipes should be located at a distance of 130 mm, and metal and ceramics - 250 mm from lumber structures.
| Type of equipment | Heating temperature |
| Fireplace or Russian stove (wood) | 350-650⁰C |
| Stove in the bathhouse (wood) | 400-700⁰C |
| Gas generator boilers (wood) | 160-250⁰C |
| Solid fuel boiler (pellets) | 120-250⁰C |
| Solid fuel boiler (sawdust) | 220-240⁰C |
| A gas boiler | 120-200⁰C |
| Liquid fuel boiler | 150-250⁰C |
| Solid fuel boiler (coal) | 500-700⁰C |
Heating table for chimney pipes with different heaters
Attention! The same standards apply to fusible insulation materials such as polystyrene foam, expanded polystyrene, and so on. When installing pipes, try to remove the insulation to the specified distance.
Brick pipes
Exit section in a multi-storey wooden house: 1 – channel for smoke; 2 – floor beam; 3 – cutting into one and a half bricks; 4 – asbestos sheet in 2 layers; 5 – cutting into one brick with insulation; 6 – casing
The construction market is constantly offering more and more new materials from which pipes for chimneys are made, but, nevertheless, brick always remains the main material for arranging the channel itself or its insulation.
When passing a chimney through a wooden ceiling with your own hands, it is important to observe some nuances of the masonry - it is laid on lime or cement-lime mortar up to the roof.
But for the part that rises above the roof, you already need to use a cement-sand mortar - there the temperature of the passage drops sharply. The seam on the brickwork should not be wider than 10 mm, otherwise the structure will lose rigidity and stability, but there is simply no point in strengthening or simply lining the chimney with plaster - it will still crack from temperature changes and collapse.
It is recommended to build such structures from solid single red brick, the weight of which is on average 3.45 kg, therefore, the entire masonry will be very heavy. This indicates that a solid foundation is needed - it should be not only under the stove, but also under the walls of the house, since, starting from the sunbed, the entire mass of the smoke channel rests on the ceiling, which, in turn, rests on the walls.
Brickwork as insulation
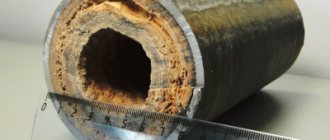
As a rule, when building brickwork, everyone tries to make its front side as smooth as possible, but the uneven surface inside the pipe contributes to the very rapid settling and accumulation of soot on the walls, and this already carries the risk of fire.
In addition, the brick or mortar sticking out from the inside is destroyed under the influence of acidic condensation, and the pieces that fall inside block the passage, thereby reducing the cross-section of the channel, and the draft becomes worse.
Note. If your brickwork is made as a sleeve, the chimney itself consists of an asbestos-cement or metal pipe, then you can fill the free space with sand-cement mortar or fine-grained concrete (this is called a sleeve - this increases not only the price of the structure, but also its quality). This way you will not only enhance thermal insulation, but also prevent premature destruction of asbestos cement.
Ceiling and wall
Installation of thermal insulation in the ceiling
As you understand, the distance from the chimney to wooden structures according to SNiP 41-01-2003 is given in open space, but passage through the ceiling is carried out according to different standards, since in such cases various insulating materials are used that reduce the heat transfer of the chimney.
For example, if, when passing a metal or asbestos-cement pipe through a wooden floor, two layers of asbestos sheet are used, then the distance of one brick should be maintained, that is, 250 mm, but if such a heat extinguisher does not exist, then this distance will increase to 380 mm. (See also the article Insulation of wooden floors: features.)
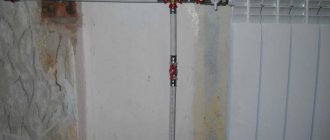
In the photo, brickwork and galvanized sheet are used as thermal insulation.
The requirements for the distance between the chimney and the wall remain exactly the same as for floors, that is, if there is two-layer asbestos insulation, then it must be at least 250 mm, and if there is none, then it increases to 380 mm.
But sometimes such requirements can be waived a little, for example, the distance can be made a few centimeters smaller at the boiler in the steam room, since it operates periodically, however, so that the lining does not burn, it is sheathed with galvanized sheeting, as shown in the top photo.
Height requirements
When installing a chimney directly through a ridge, its height to the cap must be at least 200 mm. In cases where the pipe is located to the side, on a slope, it should be at least 500 mm higher than the ridge. This will ensure normal traction.
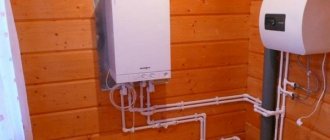
Coaxial chimney
When a coaxial chimney is installed in a wooden house, there are completely different requirements that do not require maintaining a distance from flammable objects, since the pipe simply does not heat up. It's all about the design of this device - gases from combustion products are vented outside through an internal pipe, and through the sleeve (outer pipe) air from the street enters the boiler, supplying the oxygen necessary for combustion. (See also the article Attic flooring on wooden beams: features.)
In cases where a gas boiler has forced circulation, the “coaxial” (output) is installed only in a horizontal position. With natural circulation, pipes can be installed vertically or inclined.
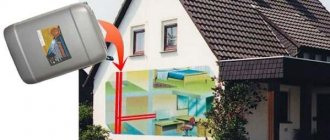
What is the advantage of output through the wall
Vertical chimneys are partly located inside the bathhouse, the other part is in the attic, and a relatively small area is led outside through the roof. This significantly complicates maintenance and general monitoring of the condition of the pipe - you have to climb into the attic or onto the roof, which requires some preparation and poses a certain danger.
Expert opinion
Makarov Evgeniy Vasilievich
Professional stove maker and turnkey bathhouse builder
Chimneys brought outside through the wall are much more convenient. They are in plain sight and within easy reach. Any problems with them can be detected in the early stages, which allows you to respond to them in a timely manner and restore the original functionality of the channel. There is no passage through the attic where flammable objects may be located.
Another important advantage is the presence of a special pocket for collecting condensate. It is located at the bottom of the knee and allows you to easily drain accumulated fluid. Vertical pipes do not have this option.
In addition, the installation of such a chimney is practically safe and can be done with your own hands. Waterproofing and insulating the passage through the wall is not a serious problem.
There are ready-made units for passage through the wall (or through the ceiling; they can also be installed on vertical planes). With their help, arranging the pipe outlet through the outer wall occurs without any special difficulties or labor costs.
The pipe is secured to the wall using clamps or special brackets. If the pipe is long, you can strengthen it with guy wires - this is done in regions with high wind loads.
The big advantage of the side placement of the chimney is that all the necessary parts and components are available for sale - you do not need to make any parts yourself, you can purchase all ready-made accessories and carry out installation without delays or problems.
Technical prerequisites for selection
If you plan to install a chimney in a wooden house, then before you start installation, you need to find out what is the temperature of the exhaust gases in the heating device in your house? Table 1 shows the flue gas temperature depending on the type of heating device and the fuel used.
People have been living in wooden houses for thousands of years and using stoves, hearths and fireplaces, and have developed considerable experience during this time. This experience is collected in regulations on construction, installation and fire safety. A chimney is being installed in a wooden house in accordance with regulatory documents adopted by government agencies.
There is a guideline document SNiP 41-01-2003 “Heating, ventilation and air conditioning”. It is this document that governs state regulatory authorities.
SNiP states that it is prohibited to place flammable elements closer than 130 mm in the clear distance from concrete and brick pipes or ceramic pipes in thermal insulation. For ceramic chimney pipes without thermal insulation, this distance should be even greater - 250 mm.
Wood is a flammable material; most modern insulation materials are also flammable, and polymer vapor and waterproofing films are even more so. Therefore, we must ensure that these materials do not touch our chimney.
Questions and answers
Let's look at a few questions that most often arise among inexperienced users:
Is it possible to build a brick chimney outside the bathhouse?
Yes, you can. however, such work will cost a significant amount of labor and materials - a separate foundation will be needed (you can connect it with your own foundation of the furnace), the pipe should be much wider at the base and gradually taper towards the top. Such work is too expensive, therefore, the assembly of brick external chimneys is not used in the construction of baths.
Is it necessary to install metal protection on the wall if a standard passage unit is used?
In this case, you can do without protection if the design of the passage unit has a protective plane. However, if it is not there, you will have to proceed according to the usual method, installing all types of protection and insulation.
Is it possible to reduce the diameter of the chimney?
The size of the chimney is indicated in the stove passport. If it is not there, use the diameter of the outlet as a guide. This size should not be reduced - high resistance will arise and traction will decrease. You can increase it, but not by too much.
Does the gate (damper) have to be factory-made, or can a home-made design be used?
You can use a homemade damper. There are no fundamental contraindications here. However, it is necessary to ensure its tightness so that flue gases do not penetrate into the bathhouse and create a danger of poisoning for users.
Is it necessary to observe the minimum chimney height if the bathhouse is low?
The height of the chimney is determined by the requirements for draft intensity. The size of the bath is not important here. If it is high, then the pipe is made longer, but the height cannot be reduced below the standard minimum.
Brick chimney
Despite the mass of new materials for making chimneys, brick still remains quite popular and in demand.
Let us remind you that:
- The pipe should be laid with a bandage, inside the house using lime or cement-lime mortar, and cement mortar is used above the roof.
- According to the “Rules for Pipe and Stove Works”, chimneys must be made of solid red brick, the seam no thicker than 10 mm. It is prohibited to plaster the inner surface of the pipe.
- Serious weight requires a foundation.
- Brickwork is destroyed by acid condensate, brick fragments can collapse inward and narrow the cross-section of the channel.
- Due to the roughness of the brick, soot accumulates inside the chimney pipe.
To reduce the negative aspects, the installation of a brick chimney is carried out as follows: an asbestos-cement pipe is inserted into the smoke channel and the space between it and the brick is filled with concrete. This event is called gilzovka.
The figure below shows the passage of a chimney through a wooden ceiling. On the left is a passage device using 2 layers of asbestos, then the distance from the pipe to the wooden floor beam is 1 brick, that is, 250 mm. And on the right is shown an option without asbestos, in which case the distance from the chimney to the wooden floor beam should be no less than 1.5 bricks, that is, 380 mm.
Rice. 1. Cutting the chimney passage in the interfloor ceiling: 1 chimney; 2 wooden beam; 3 cutting with a thickness of one and a half bricks; 4 double layer of asbestos; 5 cutting the width of a brick with asbestos insulation.
Connection to a wooden wall.
- The wooden wall must be insulated from the chimney; the distance from the “smoke” to the tree must be at least 25 cm. If there is no asbestos insulation, then this distance should be no less than 38 cm. This retreat can be closed with quarter-brick walls on the sides.
- In new log houses, it is customary to install a plank board attached to the wall on a sliding fit to compensate for the inevitable settlement of the log house. And the side closing wall should be adjacent to the quarter in this shield
- Holes are made in the side walls for air circulation. Up and down.
- Wooden setback floors are covered with one row of bricks, tiles or other fireproof materials.
A very important question: how to remove the chimney through the roof? A correctly organized chimney passage through the roof is shown in Fig. 2.
- When planning to bring the pipe through the ceiling, you should make sure that the distance between the outer surface of the brick pipe and the wooden rafters is regulated at least 130 mm.
- This space is filled with stone (basalt) wool, made without an organic binder.
- If the roofing was installed from flammable materials, such as roofing felt, the distance should be doubled to 260 mm.
- In the place where it is planned to remove the chimney, the roof is covered with fireproof materials, for example slate, or better yet roofing steel, at a distance of at least 500 mm from the pipe and the pipes are carefully adjusted to fit the otter.
Rice. 2. passage through the roof
The figure below shows a general diagram of the height of the pipe above the pitched roof.
The height of the chimney above the roof is taken as follows:
- not less than 500 mm when located near the ridge of a pitched roof or in the case of a flat roof;
- not less than 500 mm above the ridge of the roof when the distance of the pipe axis is less than 1500 mm from the parapet or ridge;
- not lower than the ridge of the roof when the chimney axis exits from 1500 to 3000 mm from the ridge;
- not lower than an imaginary line drawn down from the ridge at an angle of 10° to the horizontal, when the chimney axis exits more than 3000 mm from the ridge.
Elevation of the chimney above the roof.
Installation procedure
Installation of a chimney with outlet through the wall is a step-by-step procedure of installing it on the wall and connecting the pipeline to the outlet of the stove.
Procedure:
- Make markings and determine the location of the hole in the outer wall. After its manufacture, a protective screen made of metal with a gasket made of non-flammable material is immediately installed on the wall;
- A pipe segment equipped with a damper (gate) is connected to the furnace outlet. This is a mandatory element that allows you to maintain heat in the bathhouse after the firewood burns out. Installation is carried out on threaded connections (flange mounting) using a special heat-resistant sealant. To attach the segment, you can use an adapter that ensures that the mounting diameters of the furnace and the pipeline match;
- The chimney is carried out to the point of passage through the wall. To rotate the pipe, use 45° bends (2 pieces) or one 90° bend (which is somewhat worse);
- If there is no ready-made assembly for passage through the wall, a box made of non-combustible materials (asbestos cement, sheet steel) is installed in the opening and filled with a heat insulator. The best option is stone mineral wool;
- When the pipe is brought outside, the lower element of the sandwich pipe with a special glass for collecting condensate is attached to it;
- After this, the pipe is extended in vertical segments until the design height is reached. A spark arrestor must be installed on the upper cut;
- The vertical section of the pipe is secured using metal clamps. Their installation step is no more than 1 m.
After this, the installation can be considered complete. Now you need to check the correct assembly and tightness of the channel. To do this, you need to light the stove and carefully inspect all areas where the segments are connected. If there are no complaints, proceed to normal operation of the chimney.
Ceramic chimneys
In recent years, a chimney in a wooden house is often made of ceramics (see Ceramic pipes for chimneys):
- This is actually a modular system, installation is carried out from prefabricated elements of complete factory readiness.
- Inner tube made of heat-resistant, durable and acid-resistant ceramic.
- Due to the smoothness of the inner surface of ceramic pipes, soot does not accumulate on them and there is no turbulence in the draft flow.
- Due to the significant weight of the chimney system, installation of a foundation is required.
Scheme of a ceramic chimney.
Preparing the oven
Before you work on the chimney, the stove should already be in its intended place. But first, it should be heated in the yard for the first time. is necessary to do this , because during the first fire the industrial heat-resistant paint usually sets and partially burns out. It “smoke” a little when fired and smells. This is normal, this is how it should be.
By the way, new stones in the yard - sometimes they give off a stench that stings the throat and eyes. It is better to experience this in the fresh air, and not in the steam room.
Assemble the stove according to the instructions, install it on a flat and solid base, place some piece of at least a ventilation pipe on the chimney pipe ( at least 2 meters long) and heat it thoroughly once. At the same time, find out if there are any design defects, if it smokes, in general, get to know each other.
On a note! Heat for the first time with normal wood, not garbage, and most importantly, wait for natural cooling after the wood has completely burned out. In this case, the paint polymerizes correctly.
Metal chimneys
Chimneys made from sandwich pipes (see Sandwich pipe for chimney) have gained well-deserved popularity:
- Convenient and quick installation.
- Lightweight structures do not require a separate foundation and do not require a foundation.
- Filling with mineral (basalt) wool of the required thickness provides the necessary thermal insulation.
- The smoothness of the inner walls does not allow soot to accumulate and does not disrupt the draft air flow.
- The pipe has a complex structure; an acid-resistant grade of stainless steel is used for the internal channel, this guarantees the durability and safety of the smoke removal system.
Scheme of a sandwich pipe.
When choosing a chimney, you should not forget about the flue gas temperatures shown in Table 1.
Therefore, the thickness of the internal stainless wall of the pipe should be:
- from 0.5 mm for gas, diesel and pellet boilers;
- from 0.8 to 1.0 mm for stoves, sauna stoves and fireplaces;
- from 1.0 mm for coal boilers.
The thickness of the thermal insulation layer should be up to 100 mm in the case of stoves, fireplaces and coal boilers, and in the case of automated boilers the layer thickness should be up to 50 mm.
Overlap
I repeat once again that an undoubted convenience is the availability of ready-made elements for all occasions. If one supplier does not have it, then we can easily find another supplier who can supply all the necessary kit.
- In the case of interfloor slabs, we take ready-made factory-made cutting.
- This cutting is called attic or interfloor.
- The inner diameter must match the outer diameter of the sandwich pipe.
- We cut out a square hole between the beams, corresponding to the size of the square part of the cutting; you can make a reserve to wrap the metal with another 1-2 layers of non-flammable basalt cloth.
- We pass the chimney through the round hole.
- Filling the space with basalt wool
Mounted cutting. The space between the pipe and the metal wall is also filled with mineral wool.
Roof
The problem of how to install a chimney through the roof is solved in much the same way as in the case of overlapping. We take ready-made elements, in particular ready-made roof trim, some call it roof trim. They come in different sizes and with different slope angles.
- Installing a roof passage unit is still much more difficult than installing a floor passage unit.
- The distance from the pipe to the tree must be at least 250 mm on each side. The hole and chimney are covered from above with a special element - a roof.
- This roof is inserted from above under slate or tiles, and from below is placed on top of the tiles.
- On top of the roof, a kopinik is put on the chimney pipe and clamped with a clamp. This provides protection from precipitation.
- The space between the chimney and the rafters is filled with non-flammable mineral (basalt) wool and covered from below with a metal reflector.
Passage through the roof.
Passage through the wall
Often, sandwich-style pipes are led outside the house and run along the outer wall. This has its positive aspects in that there is no need to carry out labor-intensive passages through the floors and roof. And the fire hazard is reduced. In this case, a horizontal passage is added through a vertical wall (see How to route a chimney through a wall).
From the point of view of thermal insulation, this node for passing through the wall is no different from the node for passing through the interfloor ceiling. The installation is complicated only by the fact that the log wall can shrink. And here there should be a sliding fit of the cutting.
Advantages and disadvantages
The advantages of chimneys with side placement include:
- the absence of a passage through the roof makes it possible to increase the tightness of the roof and avoid the danger of ignition of flammable elements;
- the chimney outlet area is freely accessible, which significantly improves control and maintenance conditions;
- the presence of a special compartment for collecting and removing condensate;
- compactness. The chimney does not take up much space indoors, and outside it is made in the form of a vertical pipeline with one elbow (usually) and fasteners;
- There are different models of sandwich pipes and wall passage units on sale. The user only needs to select the appropriate options;
- ease of installation, the ability to perform the procedure yourself.
Flaws:
- the cost of chimneys for side placement is 10-15% higher than that of vertical structures;
- more intense condensation formation;
- high wind load requires the use of reliable fastenings;
- the draft in such pipes is somewhat worse than in straight models.
The thrust in such a pipe decreases due to the presence of turns. This disadvantage can be compensated for by choosing a larger pipe diameter. When drawing up a project, it is necessary to take this point into account and set a suitable diameter in advance and eliminate the presence of unnecessary turns. If this cannot be achieved, the location of the stove in the room should be changed.
The disadvantages of chimneys with outlets through the wall are quite serious, but bathhouse owners consider them understandable and acceptable. The demand for such structures is constantly increasing, which increases their popularity and makes side chimneys a common type of structure.
What materials can be used for fire protection when installing polyurethane foam?
Both brick, ceramic, and metal parts of interfloor cutting units are heated to temperatures that create a risk of wood fire. To reliably isolate the flammable elements of the ceiling pie, you need to make a gasket made of protective materials.
Slab fireproof material based on cement with the addition of limestone, mica and cellulose. Withstands constant heating up to 150 °C. When exposed to higher temperatures, the organic filler of mineralite burns out and it becomes brittle. This general name refers to a fibrous insulation consisting of molten threads of various inorganic natures. This can be either minerals (basalt, dolomite, etc.), or blast furnace waste, slag. Slag wool does not lose its properties up to temperatures of 300°C; in a hotter environment, sintering of the fibers occurs - binders and water-repellent additives are not as resistant to fire as the mineral component. As a result, thermal conductivity increases sharply. Rigid mineral board of the PZh-175 brand is positioned as a fire-resistant material. It is capable of maintaining insulating properties up to 1000°C. It is produced in thicknesses from 2 to 10 mm. This is a material that perfectly protects against fire; it not only does not burn, but also does not smolder. Harmfulness may be considered a limitation on its use - asbestos vapors are undesirable in a bathhouse. All asbestos gaskets on the steam room side must be covered with metal. A highly effective and absolutely environmentally friendly heat insulator, which belongs to the group of non-combustible materials. Its thickness is 5 mm, the thermal conductivity coefficient increases slightly with increasing temperature, and it operates reliably at temperatures up to 900°C.
Types of pipeline sleeves (material)
- Metal sleeve
- Fireproof (clay, ceramic) sleeve
- Polymer sleeve
Steel sleeve is the most reliable option
- Steel is the most durable and expensive material that is suitable for almost any floor. They are used on large-scale construction sites, as they can withstand pressures of up to 120 tons per 1 square meter. They are also very popular in the construction of reinforced concrete structures - they can be concreted not only at the construction site, but also in the production workshop. The edges of such a part must be sanded so as not to damage the polypropylene pipes inside.
- Fireproof - distinguish between clay and ceramic. Used as an insulating material for chimneys. The main disadvantage is fragility, which means be careful when installing (you can not only break your purchase, but also get a cut injury).
- Polymer - used in interior floors for pipelines and cables. The main distinguishing feature of the material remains wear resistance and cold resistance.
Basic Rules
When wiring a chimney through the ceiling and roof structure, it is necessary to take into account fire safety rules and regulations, in accordance with SNiP 2.04.05–91. The pipe in a private house and bathhouse must be equipped with a special passage unit.
The rules have the following main provisions:
- The distance between rafters made of flammable material and a pipe made of brick or concrete is set at a level of 13 centimeters or more.
- The distance between an uninsulated ceramic pipe and combustible rafters must be at least 25 cm. If there is thermal insulation, this figure is reduced to 13 cm.
These rules are mandatory when installing beams, the pitch of which is usually 60 cm. To obtain the required distance between the chimney structure and the ceiling with such a pitch, the use of exclusively insulated pipes will be required. An excellent option in this case is a special sandwich pipe, the design of which includes several layers, including insulation. Typically, furnace outlet pipes have a cross-section of 115-120 cm. If the thickness of the insulating layer of the sandwich pipe is 10 cm, the total diameter reaches 315-320 mm, and the distance reaches 130 mm.
In bathhouses, pipes are usually used, where the thickness of the insulating layer usually reaches 10 cm. In some cases, this figure can be reduced to 5 cm, although experts do not recommend this. The most common type of sandwich pipes are products with a thickness of insulation layer of 35-50 mm: options with 100 mm thermal insulation are usually available at specialized points of sale focused on bathhouse equipment. For chimney pipes without insulation, the minimum distance to combustible material is set at 250 mm.
Why comply with them?
Many people do not pay attention to how the passage is made through the interfloor material and the roof. It doesn’t burn out, doesn’t spark – and that’s fine. But, under certain circumstances, failure to comply with certain standards can easily lead to a fire. Also, inconsistency of installation parameters will cause problems when passing a fire inspection.
Problems may also arise when the heating boiler starts working. An incorrectly installed and assembled smoke outlet will be ineffective. “Draft overturning” occurs, which leads to the appearance of smoke in the room.
There is also a certain ratio of draft force to stove power, which allows you to heat the house with maximum efficiency. If the draft is weak, combustion in the stove will be poor, with a lot of smoke, and too strong draft leads to rapid combustion of fuel and a decrease in the efficiency of the stove.