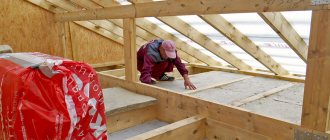
Hi all! Agree that a house made of wood is a warmer structure than its brick and concrete counterparts. But thermal insulation is needed here too. Therefore, today we are discussing the insulation of a wooden house from the inside with mineral wool.
This is a fairly popular insulator. In general, insulation of a log house from the inside can be done using different materials. But until now, mineral wool remains the optimal and most acceptable solution. Yes, if there are flax and hemp insulation, although this is a completely different conversation.
Mineral wool has certain advantages over its competitors. Therefore, the answer to the question of whether it is possible to insulate a wooden house from the inside with mineral wool has an obvious answer. Yes, this can be done. And often it is necessary. It’s just important to do the work correctly.
What you need to know about mineral wool?
Mineral wool for wall insulation can be of three types, it all depends on what source material was used to make the wool.
Based on glass fiber (glass wool)
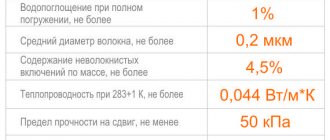
The raw material for the manufacture of glass wool is glass, but not more than eighty percent. The composition also includes sand, borax, soda and limestone. Fiber thickness is from 5 to 15 microns, length is 15 – 50 mm. Withstands temperature loads from – 60 to +450° C.
Advantages and disadvantages:
- Has increased elasticity. The material can be folded in several layers without it deteriorating;
- Vibration resistance;
- Excellent moisture resistance. This material is practically waterproof;
- The purity of the material and the absence of toxic components, hence minimal harm to the human body;
- Fire resistance. The material is absolutely non-flammable;
- Not susceptible to mold or mildew. Mineral water does not rot;
- Absolutely inedible for rodents (rats, mice);
- Enhanced safety precautions are required when handling the material;
- Some types contain formaldehyde.
Based on slag (slag wool)
The raw material for the production of slag wool is metallurgical slag, which is processed into glassy fibers. It has a fiber thickness from 4 to 12 microns, and a length of 16 mm. Among all types of mineral wool, this type can withstand the lowest temperature - 300° C.
Advantages and disadvantages:
- Has high chemical resistance;
- Simplicity and ease of handling during installation. Cotton wool is produced in rolls;
- Environmentally friendly. The material contains a minimum amount of components harmful to the human body;
- Not resistant to high temperatures. At temperatures above 300° C, the fibers begin to melt and the material loses its performance qualities;
- Hygroscopicity and residual acidity;
- Fiber fragility. The fibers crack and dust from them appears in the air.
Based on stone fiber (stone wool)
The raw material from which this material is produced is rock, namely: gabbro-basalt, metamorphic rocks, marls. The thickness of the fibers almost corresponds to the size of the slag wool fibers.
Stone wool products can withstand very high temperatures, provided the material is not deformed. Wool fibers can withstand temperatures up to 1000° C. Unlike glass and slag wool, stone wool's fibers are not sharp, which makes it easier to handle.
Advantages and disadvantages:
- Has low thermal conductivity. Keeps the house warm;
- Has a very long service life. Shelf life up to forty years;
- The material is not afraid of exposure to mold;
- Has high noise insulation properties;
- Resistant to vibrations;
- Eco-friendly material;
- Has high fire safety;
- Convenient for installation;
- High price;
- There may be heat leakage through the seams. To avoid this, it is necessary to connect the wool slabs together as tightly as possible;
- Does not withstand heavy mechanical loads.
Manufacturers
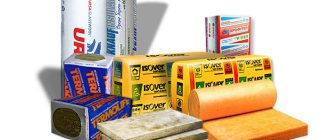
It is better to buy cotton wool from trusted manufacturers. Among them are both well-known brands and mineral wool brands that are unfamiliar to the mass consumer.
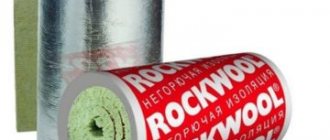
Rockwool. (Denmark) produces insulation from basalt and gabbro fibers at production facilities located in several countries, including Russia. Features of insulating mats are:
- low thermal conductivity;
- good absorption of air noise;
- resistance to open flame (flammability class NG);
- long service life;
- environmental cleanliness.
Paroc. A manufacturer of basalt wool from Finland () offers consumers mats for residential construction and acoustic insulation of recording studios.
The insulation is characterized by a low thermal conductivity coefficient, fire resistance, and durability. It is almost impossible to find counterfeit products on sale - the company very carefully monitors the market for counterfeits. Unfortunately, for the average consumer the price of insulation is too high.
Isover. The leader in sales of mineral wool in Europe is a transnational company registered in France, which has its production facilities in Russia. The product has the best balance between price and quality.
TechnoNIKOL. The brand of thermal and waterproofing materials "TechnoNIKOL" belongs to Russian business, but is produced in many European countries (Lithuania, Belarus, Czech Republic, England). Among the huge product line, mineral wool insulation occupies a significant place. Modern equipment and careful quality control allowed the company to enter the TOP 5 largest suppliers of mineral wool to the construction market of Europe and the CIS countries.
IZOVOL. produces basalt insulation in Russia. The product has an affordable price and good quality. The line of insulation products includes mats produced separately for facades, roofs, floors, and foundations.
All quality characteristics meet the requirements of EU and Russian standards. A slight shedding of fibers during the installation process blurs the impression of quality. The manufacturer knows about the problem, but cannot fix it yet.
In addition to the listed brands, it is worth paying attention to the products of the brands “KNAUF” and “URSA”. It is very often bought for insulation of timber houses. From the middle price sector, experts note the insulation "Beltep" (Belarus). It has excellent rigidity, good vapor permeability, easy installation, and an affordable price.
Pros and cons of internal insulation
It’s sad, but often insulating walls with mineral wool from the inside has more disadvantages than advantages.
Advantages of internal insulation:
- Convenience of the process. Work on the internal insulation of a house can be carried out at any time of the year. There is no need to build scaffolding to create height; a stool will do;
- The facade of the building remains the same, that is, its appearance can be preserved;
- Good sound insulation properties;
- The price for work and material is twenty percent cheaper than the price for external insulation.
Disadvantages of internal insulation:
- The size of the room is reduced due to the applied insulation. You need to be prepared for the wall to increase and the room to decrease by ten centimeters (at least) on each side;
- Fungus and rotting of walls due to poor condensation of walls. The wall gradually accumulates moisture, which does not evaporate, and fungus and mold collect on the walls, and the house smells damp. Let me tell you that this is a very unpleasant situation;
- If the heating system in the house is turned off, it will quickly cool down. This happens because the insulation has low inertia;
- If there are sockets on the wall, then they must be transferred to the insulated layer, which means additional work and time.
Installing mineral wool
To install insulation on any surface, a working frame or additional partitions are required. The simplest and most effective partition for mineral wool is best made from plasterboard sheets. Builders and ordinary people, depending on their preferences, lay mineral wool in one of two existing ways. In the first case, it is placed behind the drywall, in the second, the insulation is placed in the partition. We will now look at how this is done specifically in each case.
First way
Special fastening brackets are installed on the wall for the profiles to which the drywall will be attached. They are placed vertically with a distance of approximately 50-60 centimeters from each other and screwed to the surface. Almost four to five fastening brackets will be installed on the same line, which is quite enough for both the CD profile installed under the frame assembly and the fastening of mineral wool sheets. We bend the screwed brackets in the shape of the letter “P”. Ultimately, there will be peculiar horns on the entire surface, ready to accept mineral wool. We unravel the roll or take out layers of mineral wool from the bale (depending on the form of the material) and measure out the required fragment depending on the need. At the same time, we give some tolerance. For example, for a wall 2.6 meters high, you should add a margin of ten centimeters - after all, this is not a rigid material, wool can be deformed, so if there is no margin, it may happen that some part of the space will not be covered with insulation.
We place the prepared strip of cotton wool on the mounting brackets protruding from the insulated surface. Considering the properties of cotton wool, it can easily be pierced by a staple and will hang securely in a vertical position. Similarly, we adjust and install the material in a horizontal position. The next strip is installed like an accordion. By installing mineral wool in the recommended way, you will continuously and tightly cover the entire planned surface with insulation.
After completing the installation of thermal insulation material in the inner surface, it should be remembered that we still have to install profiles for installing plasterboard sheets, and mineral wool, despite the fact that it is already on the wall, continues to be a source of danger for humans - it continues to be present in its composition a certain concentration of carcinogen and formaldehyde. So you should not relax and all further work must be carried out with extreme caution and in compliance with the above safety measures.
So, we stopped at the stage of installing profiles for covering the installed mineral wool with plasterboard sheets. The LED profile is installed using the usual method (described above), however, we again protect our hands with gloves from the effects of material particles. If we use mineral wool without foil, then first we install a waterproofing barrier on top of the insulation and profiles (there is a large selection of waterproofing materials on the construction market). Thanks to this, the room will receive additional protection from the side effects of mineral fibers. To completely complete the wall insulation using this option, all that remains is to cut out the necessary fragments from the plasterboard sheets and attach them to the profile.
Second way
We make a working frame on the wall surface for attaching drywall. In the usual, previously described way, we mount metal profiles. Now you can fill the frame space with mineral wool. But since we have already used the mounting brackets, the insulation strips should be laid in a different way. In this case, it is assumed that the distance between the profiles does not exceed 40 centimeters, and the width of the mineral wool strip is in the range of 50-120 centimeters. Thus, you can use the often used “accordion” method - the insulation should be passed under the profiles one strip after another. With a small distance from the profile to the wall, the wool can be layered to the desired size. No gaps should be made; the entire surface should be tightly covered with insulation! Even minimal holes in a constructed, albeit very warm, blanket can significantly reduce the thermal insulation of a room.
When carrying out work on stretching strips of mineral wool under the profiles, care should be taken not to spoil the insulation with fastening brackets placed on the surface.
Having completed the installation of mineral wool, some people are in no hurry to cover the insulation with plasterboard, but on top of the mineral wool, for the purpose of additional protection from carcinogens and formaldehydes, they apply a layer of dense cellophane film and only after that they cover the structure with plasterboard.
Precautions when working with material
I’ll tell you about precautions when working with mineral wool insulation. Since this material is cheaper than others, it is used very often. Expanded polystyrene is also often used for insulation. Often, mineral insulation for walls is more dangerous.
- Personal protection. First of all, before work, it is necessary to protect the respiratory tract and body as much as possible from the possibility of dust from fibers getting on it. The fibers cause irritation and itching. If dust is inhaled or gets on exposed areas of the body, rinse thoroughly with water. For work you need to use protective overalls, a respirator, a mask, gloves;
- All cutting and grinding work must be carried out in a well-ventilated area;
- Storing and consuming food and various drinks in a room where construction work is being carried out is strictly prohibited;
- Upon completion of work, you must immediately take a shower (preferably cold). Change into clean clothes. If after all the procedures the itching does not disappear completely, do not be upset, this short-term feeling will pass in a few hours.
Which basalt wool is better to choose?
The effectiveness of wall insulation with basalt depends on the correctly selected insulation and compliance with insulation technology. Among the criteria by which it is necessary to choose insulation: the thickness and density of the mats, as well as the manufacturer.
Thickness. The thickness of stone wool for wall insulation depends on the climatic zone in which the house (the apartment is located) is built and on the type of walls: concrete, brick, wood or frame.
For central Russia, an indoor insulating layer of basalt 50 mm thick copes with its function perfectly. For a facade, a thickness of 100 mm is needed, for a frame house - 150-200 mm.
If you wish, you can use an online calculator to more accurately calculate the thickness of the insulation.
Density. The thermal conductivity of the material (the lowest for insulation with a density of 60-80 kg/m3) and the rigidity of the slabs depend on the density indicator. The rigidity indicator is very important when insulating a frame house, where a lot of pressure is applied to the bottom row and when finishing work is carried out directly on the insulation (decorative plaster).
The density of basalt wool for wall insulation should be within:
- 50-75 kg/m3 for frame houses;
- 80-130 kg/m3 for walls with a gap for ventilation;
- 130-160 kg/m3 with the “wet” method of insulation;
- 150-175 kg/m3 for a concrete facade.
It is better to buy basalt fiber wool from reputable manufacturers on the market. At the same time, it is not necessary to strive to purchase mats with the brand “PAROC” or “Rockwool”. They have high quality, but the price is also very high.
Other manufacturers' quality fully complies with European and Russian standards, and the cost is an order of magnitude lower. Therefore, why overpay for a trademark if there are products from TechnoNikol, Isover, URSA, and Beltep (Belarus).
Installation
Insulation of walls from the inside with mineral wool - has several installation options. I will tell you about two main methods. Both options are practical and simple, the main thing is to follow the instructions.
Technology one - laying mineral wool between structural elements
For this type of installation, you need to use mineral wool made in the form of slabs - this will make installation easier. The first step is to lay a waterproofing layer on the entire surface of the insulated wall in order to at least somehow protect the wall from moisture.
The second stage is the creation of fastenings for cotton wool in the form of gratings from a metal profile. Insulation must be placed in these gratings.
To prevent gaps from appearing between each grid, it is necessary to compact the insulation as tightly as possible. Cut out the insulation with a margin of a few centimeters along each edge. For better thermal insulation, mineral water should be laid in several layers.
The third stage is the installation of a vapor barrier layer (vapor barrier). To do this, you can use the most ordinary film, preferably without damage. The last step is covering the wall. Here, each owner decides in his own way what he will sheathe with. In my opinion, it is appropriate to use drywall here.
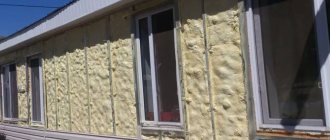
Technology two - attaching mineral wool directly to the surface
I advise you to resort to this type of installation, as it will significantly save time. This method of installing insulation is simpler, but no less practical. It is provided here to mount insulation boards using glue or mastic on the surface.
The first step is to prepare the surface. Clear it of all protruding parts, clean it well and prime it. Only after this can glue be applied to it to attach the mineral wool. To prevent the cotton wool from becoming deformed in the future, or even worse, coming off, it additionally needs to be attached with dowels (fungi).
After laying the insulating layer, a reinforcing layer - a grid - is laid on it. Its function is to strengthen not only the entire structure, but also to further protect the material from damage. The last stage of work is applying primer and plaster to the protective grille.
Technology of thermal insulation of walls with plasterboard from the inside
The technology of insulating the walls of a room with plasterboard from the inside does not require special training of workers or expensive equipment. General construction skills and a universal tool are enough.
Tools and materials
During the work you will need:
- guides (metal profiles or wooden bars);
- gypsum boards;
- insulation in slabs or rolls;
- double sided tape;
- vapor barrier membrane;
- screws, dowels and other fasteners;
- anti-mold agents;
- putty;
- drill;
- screwdriver;
- hand tool.
The floor in the room must be cleared of debris and foreign objects.
Preparatory work
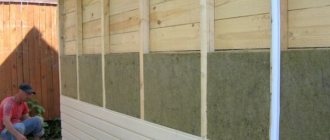
First, leveling is carried out, as well as cleaning the walls from dirt and dust. It is important to completely remove old plaster and paint, if any. For wooden houses, the surface of the walls is additionally treated with construction antiseptics in several layers. This is necessary in order to prevent the destruction of the surface of the wood, its rotting and to extend the service life of the entire building. For brick buildings, walls are treated with antifungal compounds.
Electrical wiring that is already installed in the room must be unfastened so that insulation is not placed on top of it. The platbands, window slopes and other fastening elements from the walls are being dismantled so that the heat insulation layer is not damaged. The walls must be completely dry before installation. After completion of the preparatory work, the main ones are carried out, such as:
- caulking (sealing) cracks;
- creating a vapor barrier;
- installation of sheathing;
- laying mineral wool with calculation of the ventilation system;
- creation of external vapor barrier;
- exterior finishing work.
Sealing cracks
Any house has a tendency to shrink and sag. Often cracks, cracks and other gaps form inside the walls, which interfere with the thermal insulation process. To eliminate this, all these errors should be eliminated by caulking them. The most suitable material for this is jute. It is an inexpensive, environmentally friendly, rot-resistant material. Caulking must be done evenly over all walls.
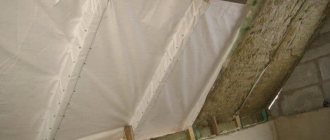
Vapor barrier
As already noted, the disadvantages of mineral wool include excessive wetting. To prevent this from happening, it is necessary to provide a vapor barrier. So, a special film is laid with the smooth side facing the insulation and the rough side facing the wall. A construction stapler is used for fastening. The joints are sealed with construction tape.
Lathing
To install mineral wool, it is necessary to provide a frame. To assemble it, you can use a wooden beam measuring 50x50 mm or a profile for attaching drywall. The frame is fastened with self-tapping screws or using dowels and nails. It is important to avoid distortions; for this you should use a level.
The sheathing is installed in a vertical position if roll insulation is used. For horizontal placement, insulation in mats is used.
Laying the material
It is worth noting that the mineral wool that comes in rolls is laid vertically, and the tile insulation is placed between the sheathing bars themselves. The material is fastened using anchor nails. There should be no gaps or cracks on the surface of the material. The structure should be dense and uniform.
After installing the insulation on the frame, a vapor barrier film is laid on top with the rough side facing the mineral wool. This is necessary to protect the room from basalt dust and other hazardous substances that may enter the air.
Finishing
To attach drywall or other finishing material, you need to install another frame. But its sheathing must be perpendicular to the first. That is, if the first one was horizontal, then this frame should be vertical.
Some good tips
- To avoid mistakes, you must follow the instructions exactly;
- For high-quality installation of the material, the slab must have a width of more than one meter;
- In order for mineral wool for wall insulation to last longer, it is necessary to create a high-quality vapor barrier;
- The material should lie tightly and evenly on the surface. When filling the grate with insulation, it is important to avoid gaps;
- Insulating walls with mineral wool slabs is much easier than using mineral wool in rolls;
- The wall on which the insulation is applied must not have cracks or defects.
Well, I would like to hope that this article will help the reader understand and understand what mineral wool is, what properties it has, and how to use it correctly to save heat in the house. Let insulating walls with mineral wool seem like an easy job with a positive result for everyone!
Vapor barrier in different rooms
There are different levels of moisture evaporation in the bathroom, bedroom or kitchen. Therefore, you should consider how to install the vapor barrier material on the frame.
Step-by-step process of waterproofing a bathroom
In the bathroom
Watch the video: waterproofing in the bathroom.
When working in the bathroom, the sequence of actions is as follows:
- First, the frame of the selected type is installed.
- Then a heat-insulating layer of material is mounted into the frame (if provided).
- After this comes the moment of fixing the vapor barrier layer into the frame structure.
- Depending on the selected material (vapor barrier film or membrane film), the sheets are secured either with a profile or immediately fixed with a sheet of plasterboard. When installing vapor barrier material on the surface, you should be extremely careful. It is necessary to check that there are no cracks or gaps between the sheets.
The installation of vapor barrier material in other rooms is carried out in the same way.
It is preferable to opt for waterproofing the bathroom using mastic.
Necessary places for waterproofing in the bathroom
In wooden houses
There are some differences in the process when installing a vapor barrier layer in a wooden house. Plasterboard coverings are popular in wooden houses. The main thing is to adhere to the process technology in order to do everything correctly.
Vapor barrier in a wooden house under a wooden frame
The wooden facade of the house is prone to corrosion and fungi. Therefore, it is best to install a vapor barrier coating on both sides of the insulation so that moisture and dampness coming from the wood do not reach the surface of the plasterboard sheets. To do this, you can first fix the vapor barrier sheets on both sides before installing the insulation into the frame. This will remove excess moisture from the surface of the drywall and wood.
Vapor barrier in a wooden house under a metal frame
It is not difficult to install vapor barrier material under plasterboard floors. The main thing is to weigh the important nuances and decide what materials you need to buy and which installation option is most relevant.
The main thing is to decide what goals are set, and you also need to pay attention to the cost of the material. A narrow selection of vapor barrier materials prevents you from getting lost in a multitude of ideas
Watch the video: attaching a vapor barrier in the attic under a metal profile and to aerated concrete walls.
Installation of insulation
- Installation of insulation begins with clearing the wall of all protruding hanging elements. It is necessary to remove all brackets, window slopes, window sills, etc.
- Inspection of the wall, assessment of surface quality. If there are cracks or other defects, they should be filled with putty; the cracks are first expanded with a spatula, since they may be much larger inside than outside.
- We mark the wall for installing direct drywall hangers. The usual profile pitch is 60 cm, the axes of the guides are outlined. Each axis contains 4-5 suspensions.
- Hangers for plasterboard guides are installed.
- Insulation is being installed. The material is laid in dense rows in one layer, or several, so that the joints overlap with solid sheets of the upper rows. There should be no gaps or cracks. The petals of the suspensions pass through the joints of the insulation.
- All detected cracks are filled with polyurethane foam. The wall plane must be completely covered with insulation. Window slopes are also covered with mineral wool up to the line of contact with the frame.
- Guides for plasterboard partitions are installed on top of the mineral wool sheet. To do this, the outermost strips are installed plumb, control cords are pulled between them, making it easier to adjust the plane, after which the remaining guides are installed.
Attention! For the installation of more rigid slab mineral wool, the installation of guides is carried out first. The insulation boards are tightly fixed in the spaces between the planks.
Video “Insulation of walls from the inside with stone mineral wool”
Sources
- https://expert-dacha.pro/stroitelstvo/steny/uteplenie-st/minvata-plyus-gipsokarton.html
- https://teplodom1.ru/penoplast/86-uteplenie-iznutri-minvatoy-oshibki-s-sereznymi-posledstviyami.html
- https://x-teplo.ru/uteplenie/steny/iznutri-minvatoj-plyus-gipsokarton.html
- https://StroyGuru.com/remont-kvartiry/steny/tehnologiya-utepleniya-sten-bazaltovoj-vatoj/
- https://mr-build.ru/newteplo/uteplenie-sten-iznutri-minvatoj-plus-gipsokarton.html
- https://pro-instrymenti.ru/strojka/kak-uteplit-dom-mineralnoj-vatoj/
- https://SovetPoRemonty.ru/steny/uteplenie-sten-iznutri-minvatoj.html
- https://ProUteplenie.com/steny/iznutri-minvatoy
- https://odnushka.ru/steny/uteplitel/minvata
- https://iv-proect.ru/steny/uteplenie-sten-iznutri-minvatoj-plyus-gipsokarton.html
- https://rusolymp.ru/raznoe/yteplenie-sten-iznytri-minvatoi-tehnologiia-i-poleznye-sovety
Conclusion
If the stone wool installation technology is followed, multi-layer and single-layer insulation is equally effective. If the seams come apart, several layers will not save the situation. But whether it makes sense to create additional difficulties for yourself is a controversial choice. Manufacturers propose switching to simplified, therefore economical, single-layer insulation.
In one of the previous materials you can learn more about the characteristics of stone wool. An example of single-layer installation is in the article about insulating a wooden house. The video talks about choosing stone wool and installation rules.
Content
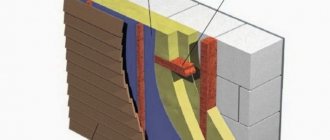
Insulating walls from the outside is certainly much more effective than from the inside. In order to find out why this is so, you need to consider such a concept as “dew point”.
The “dew point” is the ambient temperature at which water vapor in the air condenses.
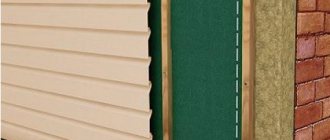
In a wall insulated from the outside, the “dew point” is most often located either in the thickness of the insulation or between the insulating material and the wall, and, therefore, the inner surface of the wall always remains dry. If the thermal insulation material is laid from the inside, then with a sharp drop in temperature, the “dew point” may be between the wall and the insulation, which will inevitably lead to the appearance of condensation. The surface of the insulation will remain dry, but fungus will begin to grow underneath it. The result is dampness and a musty smell in the apartment.
In multi-storey buildings, to insulate the walls outside, you will have to hire a team of industrial climbers, and this is quite expensive.
Oddly enough, another obstacle to warm and dry walls can be a housing company. In some cities, partial insulation of facades (walls of one apartment) is prohibited.
Insulation from the inside with mineral wool - mistakes with serious consequences
Insulation from the inside with mineral wool is similar to sabotage in order to cause maximum damage to the structure and people.
Standards require that experts recommend thermal insulation only on the outside of the building. But insulation from the inside is an extreme necessary measure, and it must be carried out according to certain rules. Can this be done using mineral wool with special measures to protect structures?
Let's decide in order - how to properly insulate, how mineral wool should be used, what common mistakes and opinions exist in this regard.
Lack of insulation from the inside - freezing
When insulated from the inside, not only with mineral wool, but also with any heat insulator, the wall is protected from heat, so its temperature decreases.
Moreover, with a sufficiently large amount of insulation, the wall can freeze through. Freezing a structure is always bad, because for any material there is a finite number of freezing cycles before its destruction. It’s even worse if the wall freezes while wet. In this case it will be so.
Humidification, dew formation
The dew point - the temperature at which dew falls from the air - will be located directly on the wall.
More precisely, condensation may begin to fall in the insulation, but the cold surface of the wall will also condense water on itself. And there will be a lot of water, it will also flow onto the wall from the insulation, especially if you use mineral wool.
A wet wall will grow excellent “greasy” mold and large colonies of putrefactive microorganisms. All this will be located indoors, spreading from the wet collapsing wall along the ceiling, floors... Residents will need means of rescue.
Finally, when insulating from the inside, the heat insulation and finishing will take up part of the usable space. The usable area of the room will decrease by about a square meter. It's a lot.
The above disadvantages can be circumvented and leveled out (except for eating up the usable area). But only if mineral wool is not used for internal insulation.
Mineral wool is moisturized and accumulates water
Mineral wool is not suitable for insulation from the inside, even in forced situations, due to its properties. This insulation perfectly allows water vapor to pass through itself and can accumulate water inside, becoming simply wet.
It is clear that when insulating from the inside, the insulation will become wet due to the dew point in it and the lack of ventilation. The consequences are known.
The material consists of tiny fibers of basalt or other minerals. It is also made from blast furnace slag and silicates (glass wool), these samples are cheaper. To bind the fibers together, phenol-formaldehyde resins are used, the same as in the production of chipboard.
Mineral wool owes its good thermal insulation to the air trapped between many interwoven fibers. If the air is replaced by water, at least partially, then the required thermal insulation qualities will disappear.
Even a slight increase in humidity (by 2%) of this insulation leads to a significant decrease (up to 8%) of its thermal insulation properties.
Mineral wool is harmful indoors
Some of the fibers are microscopic in size and are carcinogenic (cause cancer of the respiratory system). Resins evaporate, and when heated - significantly, they are harmful substances to health. In principle, it is not prohibited to use mineral wool indoors.
But it must be reliably isolated from the living space; it is advisable that the fumes from it do not get inside the house, but are discharged outside. Dispersing mineral wool fibers around the house (apartment) is not permissible. Some experts, due to potential health hazards, generally recommend using mineral wool only outdoors.
Work with mineral wool should be carried out only with personal protective equipment.
Why do they want to insulate from the inside?
Why is the desire to insulate from the inside great?
- It seems that this is easier and cheaper to do than from the outside (although in the end it is much more profitable to insulate from the outside).
- Many people want to use mineral wool - at first glance it is not expensive and it is not difficult to do without wet processes (in fact, it is often easier and cheaper to insulate with other insulation materials).
- In addition, you can also read on the Internet how to insulate the inside with mineral wool (the information is often incorrect).